
Thanks to Astro-Jen, I’ve rediscovered my Barbie dolls and how much I like crafting for them. I’ve also added a few new dolls to my collection, including the 1993 Reproduction that I’ve been using as a model, and two Silkstone lingerie Barbies. They’re glamorous girls.
The increase in Barbie “stuff” – clothes and dolls – had me looking for better Barbie storage. I really like the Silkstone Signature Carrying Case, but it’s discontinued now and the NIB ones I found on eBay were at least $300US plus shipping to Canada. (Here it is on the Mattel site.) I needed a more economical solution, which meant it was time to get creative.
I had bought two boxes at Michaels to store my girls, but the dolls were just stacked inside. They’re decorative storage boxes made by Ashland and I’m quite sure I bought them when they were BOGO because I have two exactly the same. They have a handle on each side, a clasp on the lid and are really pretty. They’re the larger ones, roughly 11 by 14 inches and 6 inches deep. I turned one on its side and Eureka! It’s a carrying case!

First, I removed the handle from the left side, which made the other one a carrying handle and gave the box a vertical instead of horizontal orientation. I then cut the existing ribbon that kept the box from opening more than 90 degrees and began to build interior partitions. There’s room for 3 dolls on the inside of the lid, and I borrowed the idea from that Mattel case of having ribbons to hold them in place. That meant I needed a liner.
Several years ago, I took a bookmaking course, which was fascinating, and I still have some of the supplies. I used the Binder’s Board for this project. This is really really thick acid-free cardboard. I bought a package like this at Curry’s back in the day. It’s been waiting for this project, evidently. I cut one piece to the width of the lid interior and a little more than the height of the dolls (12″) with a flap the depth of the lid. I scored that line and folded it, then cut two squares to go above the “shelf” and hold it in place. Then I cut three pairs of slits (2 cm apart) for the ribbons.


This shelf ultimately was a fail, because it was too deep. I hadn’t accommodated the thickness of everything together and ended up cutting it out, which made a mess of my panel. I also didn’t realize at the time that Silkstone Barbie was 1 cm taller, so the ribbon was too low for her. (That’s why she looks a bit drunk.) The ribbons could have been a bit longer, too.

I took it apart and redid the back panel to fit the entire back, and just hold the three dolls. I ran out of the paper, so used a different one instead. You can see the finished liner on the right. (She still looks a bit drunk, but has no excuse in terms of the ribbon.)
The ribbons were pushed through the slits before I glued that backing in place – I was going to knot them but it was a snug fit. I put a dab of extra glue on them in the back just to make sure they didn’t move.
For the other side of the wardrobe, I created a box the width of the box interior. Again, I scored and folded it – I needed the sides to install the clothing rod. The clothing rods are bamboo skewers, coloured black with a Sharpie marker, and fed through bamboo beads that act as escutcheons. The side panel is notched out, then another side panel sandwiches the end of the rod on each side. I positioned the “closet” so that there was just over 2″ at the bottom and – like the other side, created braces for the shelf at the top. After taking the “before” picture, I decided to split the closet to make it more stable, and add a second clothing rod on the right side.
Here it is wallpapered and with drawers:


In the left image, you can see one of the challenges of using these paper boxes – this one isn’t square. (Paper isn’t the most dimensionally-stable material.) It’s narrower at the back of the closet than closer to the opening. So, fitting the board for the back of the closet to the box meant that the shelves bent outward. In the end, I taped it square before covering it, and lived with the small gap that developed around the perimeter. The pattern on the paper disguises a lot! I also didn’t need braces at the top to keep the shelf in place – it was very snugly tucked in there.
I made my first drawer out of the kind of cardboard that is on the back of writing pads, folding it as shown below. Because I decided to use brads for the knobs, I cut an additional panel for the back of each drawer front so the ends of the brads wouldn’t snag anything. Here’s my first attempt at a drawer and the component materials. (That’s the drawer at the top right.)

I thought this drawer was too flimsy, so I made two new ones out of the Binder’s Board. I couldn’t fold those, because of the width of the material, so I cut the six sides and taped it all together, then covered each drawer with decorative paper. They’re lined, too.
The blue floral print is decorative paper from the Rifle Paper Company, which I bought online at The Paper Place. (Because of the postage cost, this is my big expenditure on this project. All the other supplies came out of my stash.) For surfaces that I expected to see a lot of wear, I covered the paper with clear Contact vinyl with a matte finish – it’s pretty much invisible but will make the surface more durable. I used it behind the dolls and on the drawers. I used a bookbinder’s glue because I had it – it’s acid-free – but white glue would work, too. If I hadn’t messed up one drawer and the back panel on the front, I would have had enough paper to do it all the same. As it was, I chose to add a second print from my bookmaking stash rather than order more paper.
The finished inside looks like this:
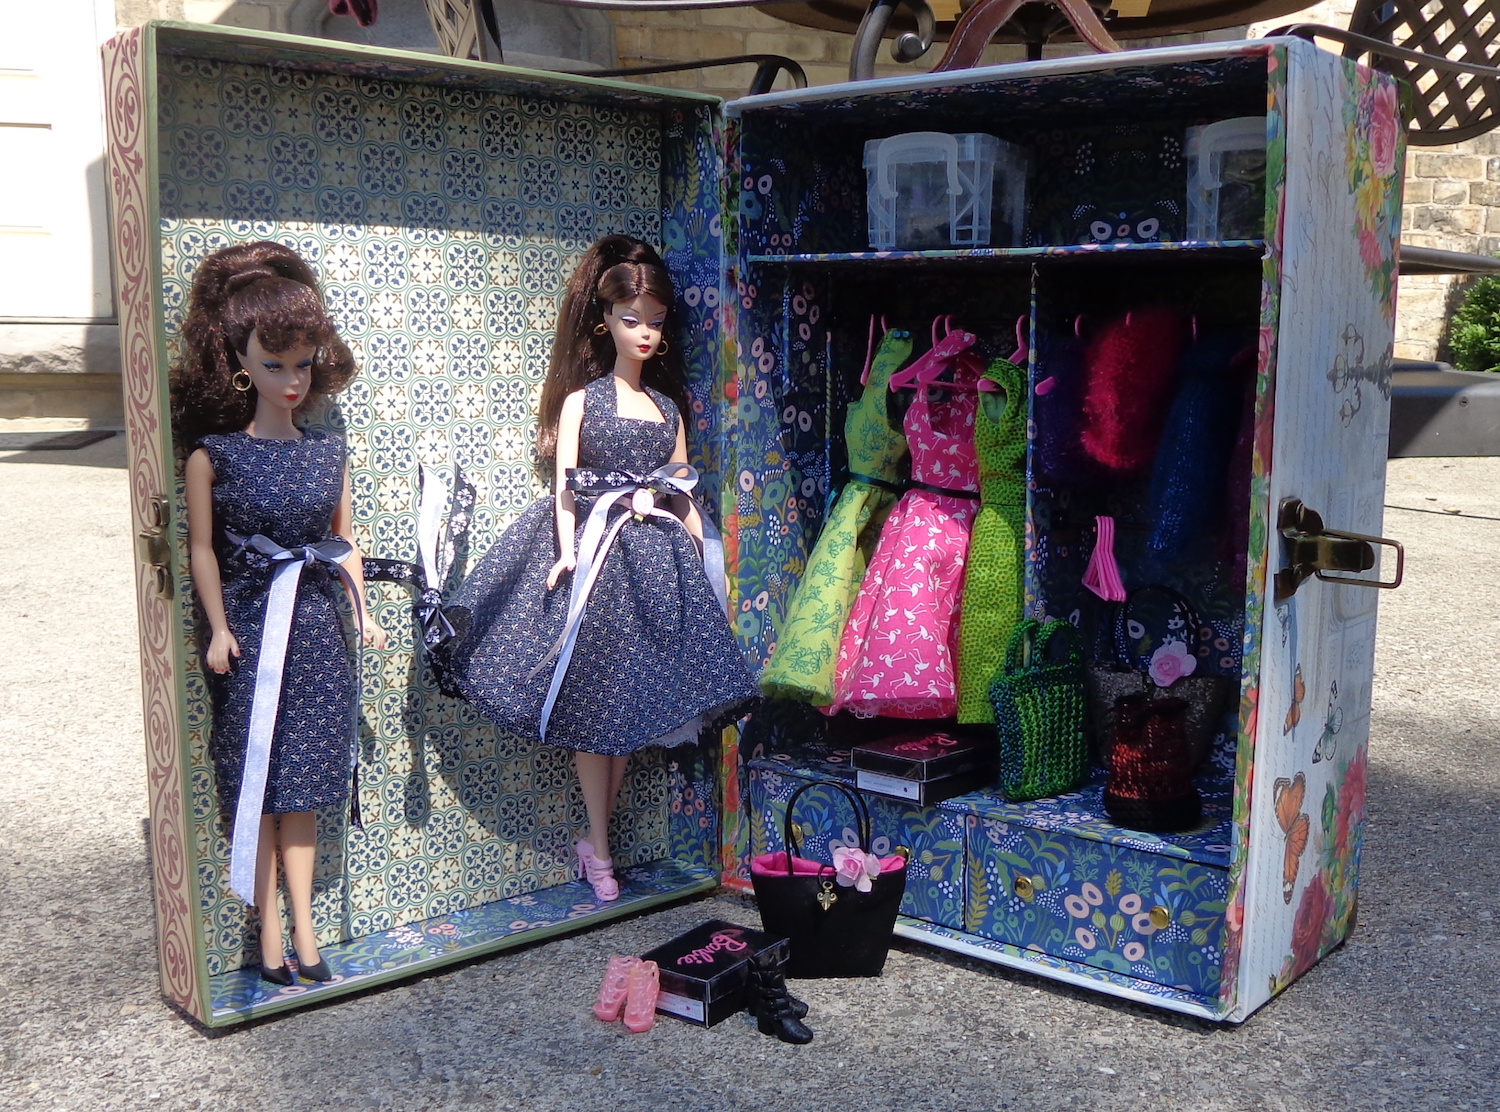
The shoe boxes are from a PDF download that I bought on Etsy – you print them out on card stock, then fold them and glue the flaps. I applied a clear gloss Avery label on the lids of the black ones, too. This is the PDF I bought.
I put felt pads on the bottom of the box for feet, as well. In this shot, you can see the two metal rivets from the second handle. I couldn’t get them out, but they’re shorter than the felt pads so all is good. I put felt pads on the lid, too, so the wardrobe isn’t tippity when it’s open.

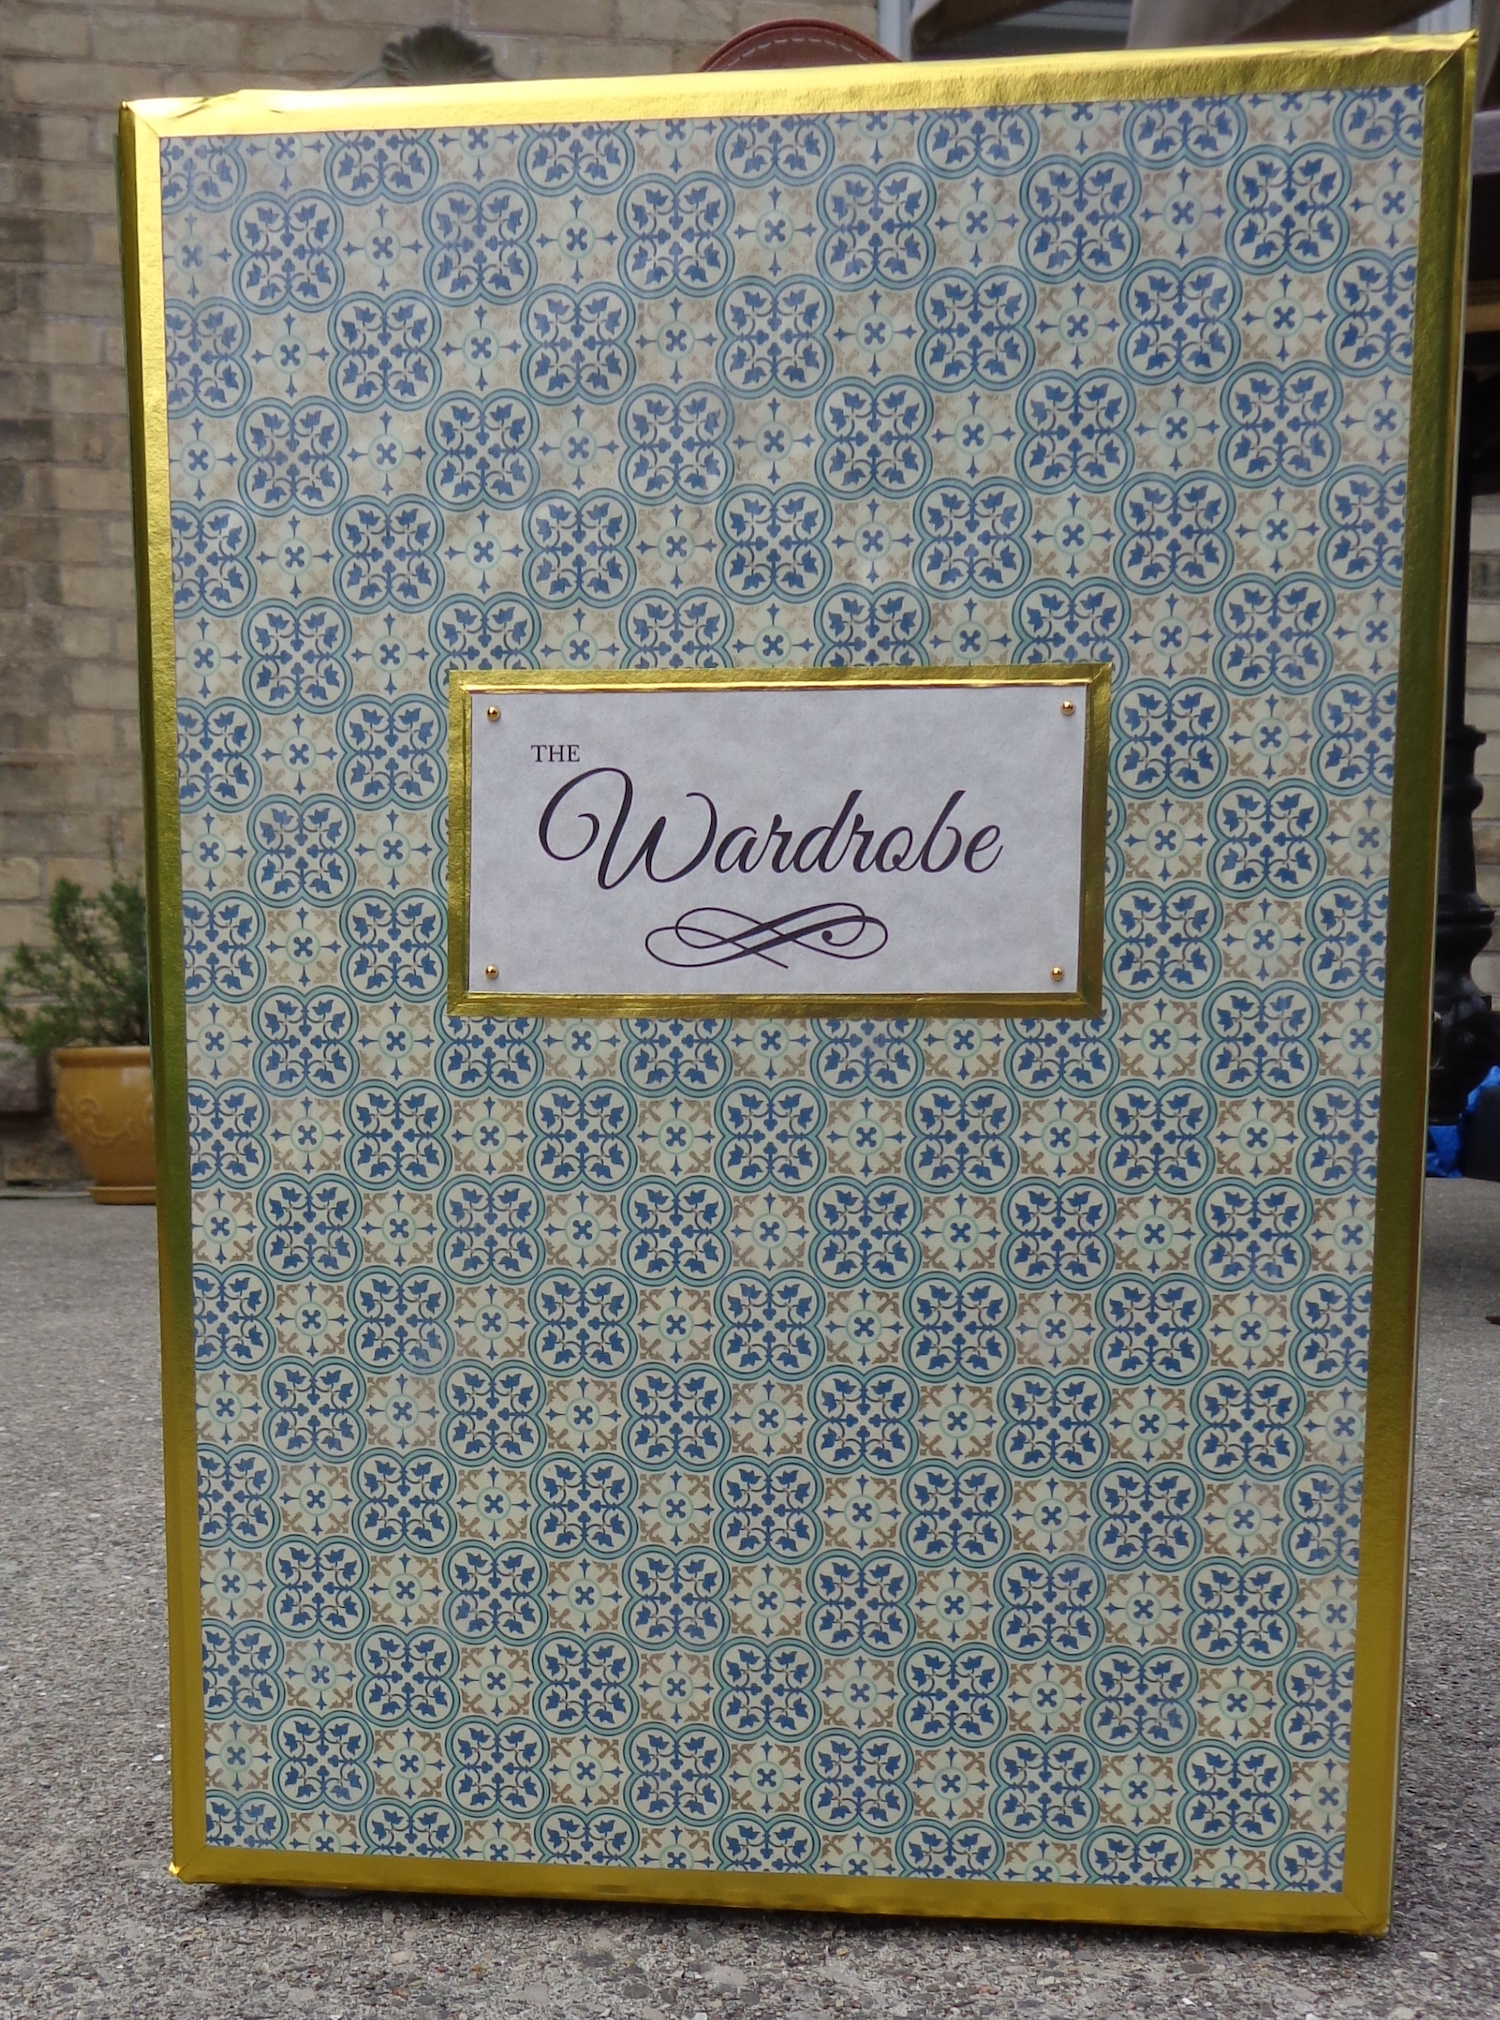
The front of the box had an Eiffel Tower which ends up sideways with this orientation, so I covered it over with decorative paper, also covered with Contact vinyl with a matte finish. I added some gold tape on the edges all around. I made a label on Canva, a free online graphics utility, printed it out on parchment paper and edged it in gold, too. The sides of the box still have sideways images, but I can’t repaper them without removing the corners and clasp, which I don’t want to do. I’m going to live with that.
Here’s the front, with my label – and some teeny tiny stickers from the dollar store that look like rivets. (Ha.)
This wasn’t a very expensive project, but it did take some time. You could, of course, make one for a doll of different size, changing your choice of box and the size of the inserts, and design a different interior to accommodate your collection. If I did another one, I’d look for a patterned Contact vinyl and save the step of putting the film on the paper. I’m thinking of making one for my EverAfter doll out of a decorative box that looks like a book. Since it has a flat lid, I’d make a section for the doll then a wardrobe beside her.
What do you think?

Pingback: 2021 in Review | Alive & Knitting
Pingback: Modern Day Goddess Dresses | Alive & Knitting
Pingback: Tights for the Monster High Dolls – and a New DIY Wardrobe | Alive & Knitting
Pingback: April Showers Modern TrenchCoat for 16″ Dolls – and a Wardrobe | Alive & Knitting