Swoon Blanche Barrel Bag

Swoon Patterns Blanche Barrel Bag

I seem to be making a lot of bags lately, but this one will finish me for a while. My favourite thing about it is that it’s done!

The pattern is the Blanche Barrel Bag from Swoon Patterns. I bought a paper pattern from Emmeline Bags because I was buying some hardware from them anyway. It’s also available as a PDF. (The first link is to the designer’s website.)

The pattern includes the bag in two sizes. I made the larger one. My plan is to make the smaller one as well, but not just yet.

My main challenge with this bag was self-inflicted. I chose vinyl for the handles, base and accent, and this did not bring joy to my sewing machine. I should have borrowed access to my friend’s industrial machine for sewing those thick bits.

Still, it came out pretty well:

Swoon's Blanche Barrel Bag, sewn by Deborah Cooke

You can’t be surprised that I got all matchy-matchy with the birds.

I made a couple of modifications. Originally, I had made piping with the light caramel vinyl and sewn it around the ends. I wasn’t happy with the appearance of it – as with the Weekender overnight bag, I had a hard time sewing up flush to the piping in some areas. This time, I just took out the piping. It means the piping on the top of the end pockets is kind of a solitary feature, but (luckily) the colour matches the fabric I chose for the lining. It ends up looking like a plan. 🙂

Swoon's Blanche Barrel Bag, sewn by Deborah Cooke

I also added one of those Ikea thin cutting boards into the base of the bag, and some bag feet. And I added an open pocket into the other side of the bag lining – this was partly to use up a piece of fabric that was cut the wrong way. The pattern seems to assume that your fabric doesn’t have a directional print. Mine did – both the birds on the outside and the lining inside, which has little flower buds – and I cut the pocket lining in the wrong direction. I cut it again, then (ha) ended up putting it in upside down. I have drunk birds inside the zipped pocket in my lining. (My guess is that few people will know or notice.) So, my pattern has a bunch of notes on it for future reference since I do like directional prints.

Swoon's Blanche Barrel Bag, sewn by Deborah Cooke

Finally, I sewed the lining to the inside of the zipper by hand, instead of by machine. This is the same modification I made with the Weekender bag, as I just couldn’t fit all that under the arm of my sewing machine.

The other thing I did on the vinyl was colour the cut edges with a Sharpie marker. Vinyl often has a white backing, so when you cut it, the edges look bright. A matching Sharpie marker squares that away. I should have done that on the edge of the contrast piece on the base of each side of the bag before sewing it to the main fabric. I’m thinking that if I do it now, I’d likely get the Sharpie on the bird fabric, which wouldn’t be cool.

Once upon a time, I had a purse that was this shape and loved it to pieces. This one is a bit big for a purse – it’s looking like a knitting bag to me right now – so I will make the smaller version, but my sewing machine and I need a little break first.

The girls are also certain they need some new clothes. 🙂

New Socks for the Mister

Socks by Beehive

The mister’s new socks were done in time for him to put his best foot forward for the new year!

The pattern is an old one, from a Beehive book called Socks by Beehive #113. They must have printed a lot of copies of this booklet as they’re pretty easy to find in thrift stores and antique markets. This pattern is Knotty Pines. (Those are both Ravelry links.)

I really like this pattern and have made it several times, long before Ravelry existed (so those socks aren’t listed on my project pages there.) The yarn is vintage Patons Kroy in a heathery blue.

Patons Knotty Pines socks, knit in Patons Kroy by Deborah Cooke

The legs are shorter than stipulated in the pattern because I was going to make these for myself. They ended up being too wide in the foot for me (I should have seen that coming, with 76 stitches around) so they became socks for the mister instead. He really likes them.

Now that I have my needles back, I could cast on a pair for myself. First, though, I’m going to finish those pretty socks.

I hope you all have a happy new year – with lots of cozy socks! – and wish you and yours all the best for 2026.

McCalls 6260

McCalls 6260

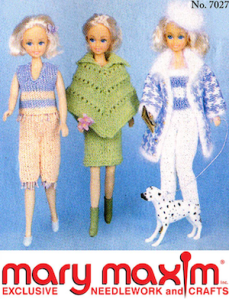
This is a vintage pattern for dolls which is out of print. I found a PDF version on Etsy. Like most such PDFs, the sizing of the pages was a bit off – I ended up printing mine at 104% in order to have the measuring tape scale come out the correct size.

Thank goodness it had the scale! If you ever download a pattern that doesn’t have a scale, you can print the pattern pages at different sizes until the seam allowance comes out to 1/4″ – if that’s what the pattern uses. Most of them do.

I like the vintage look of some of the pieces. The kimono reminds me of a bathrobe my grandmother made for my dolls when I was a kid – she (very cleverly) used a baby wale corduroy for that robe, then pre-made narrow bias tape which she applied with a decorative zig zag. (Yes, I still have it.)

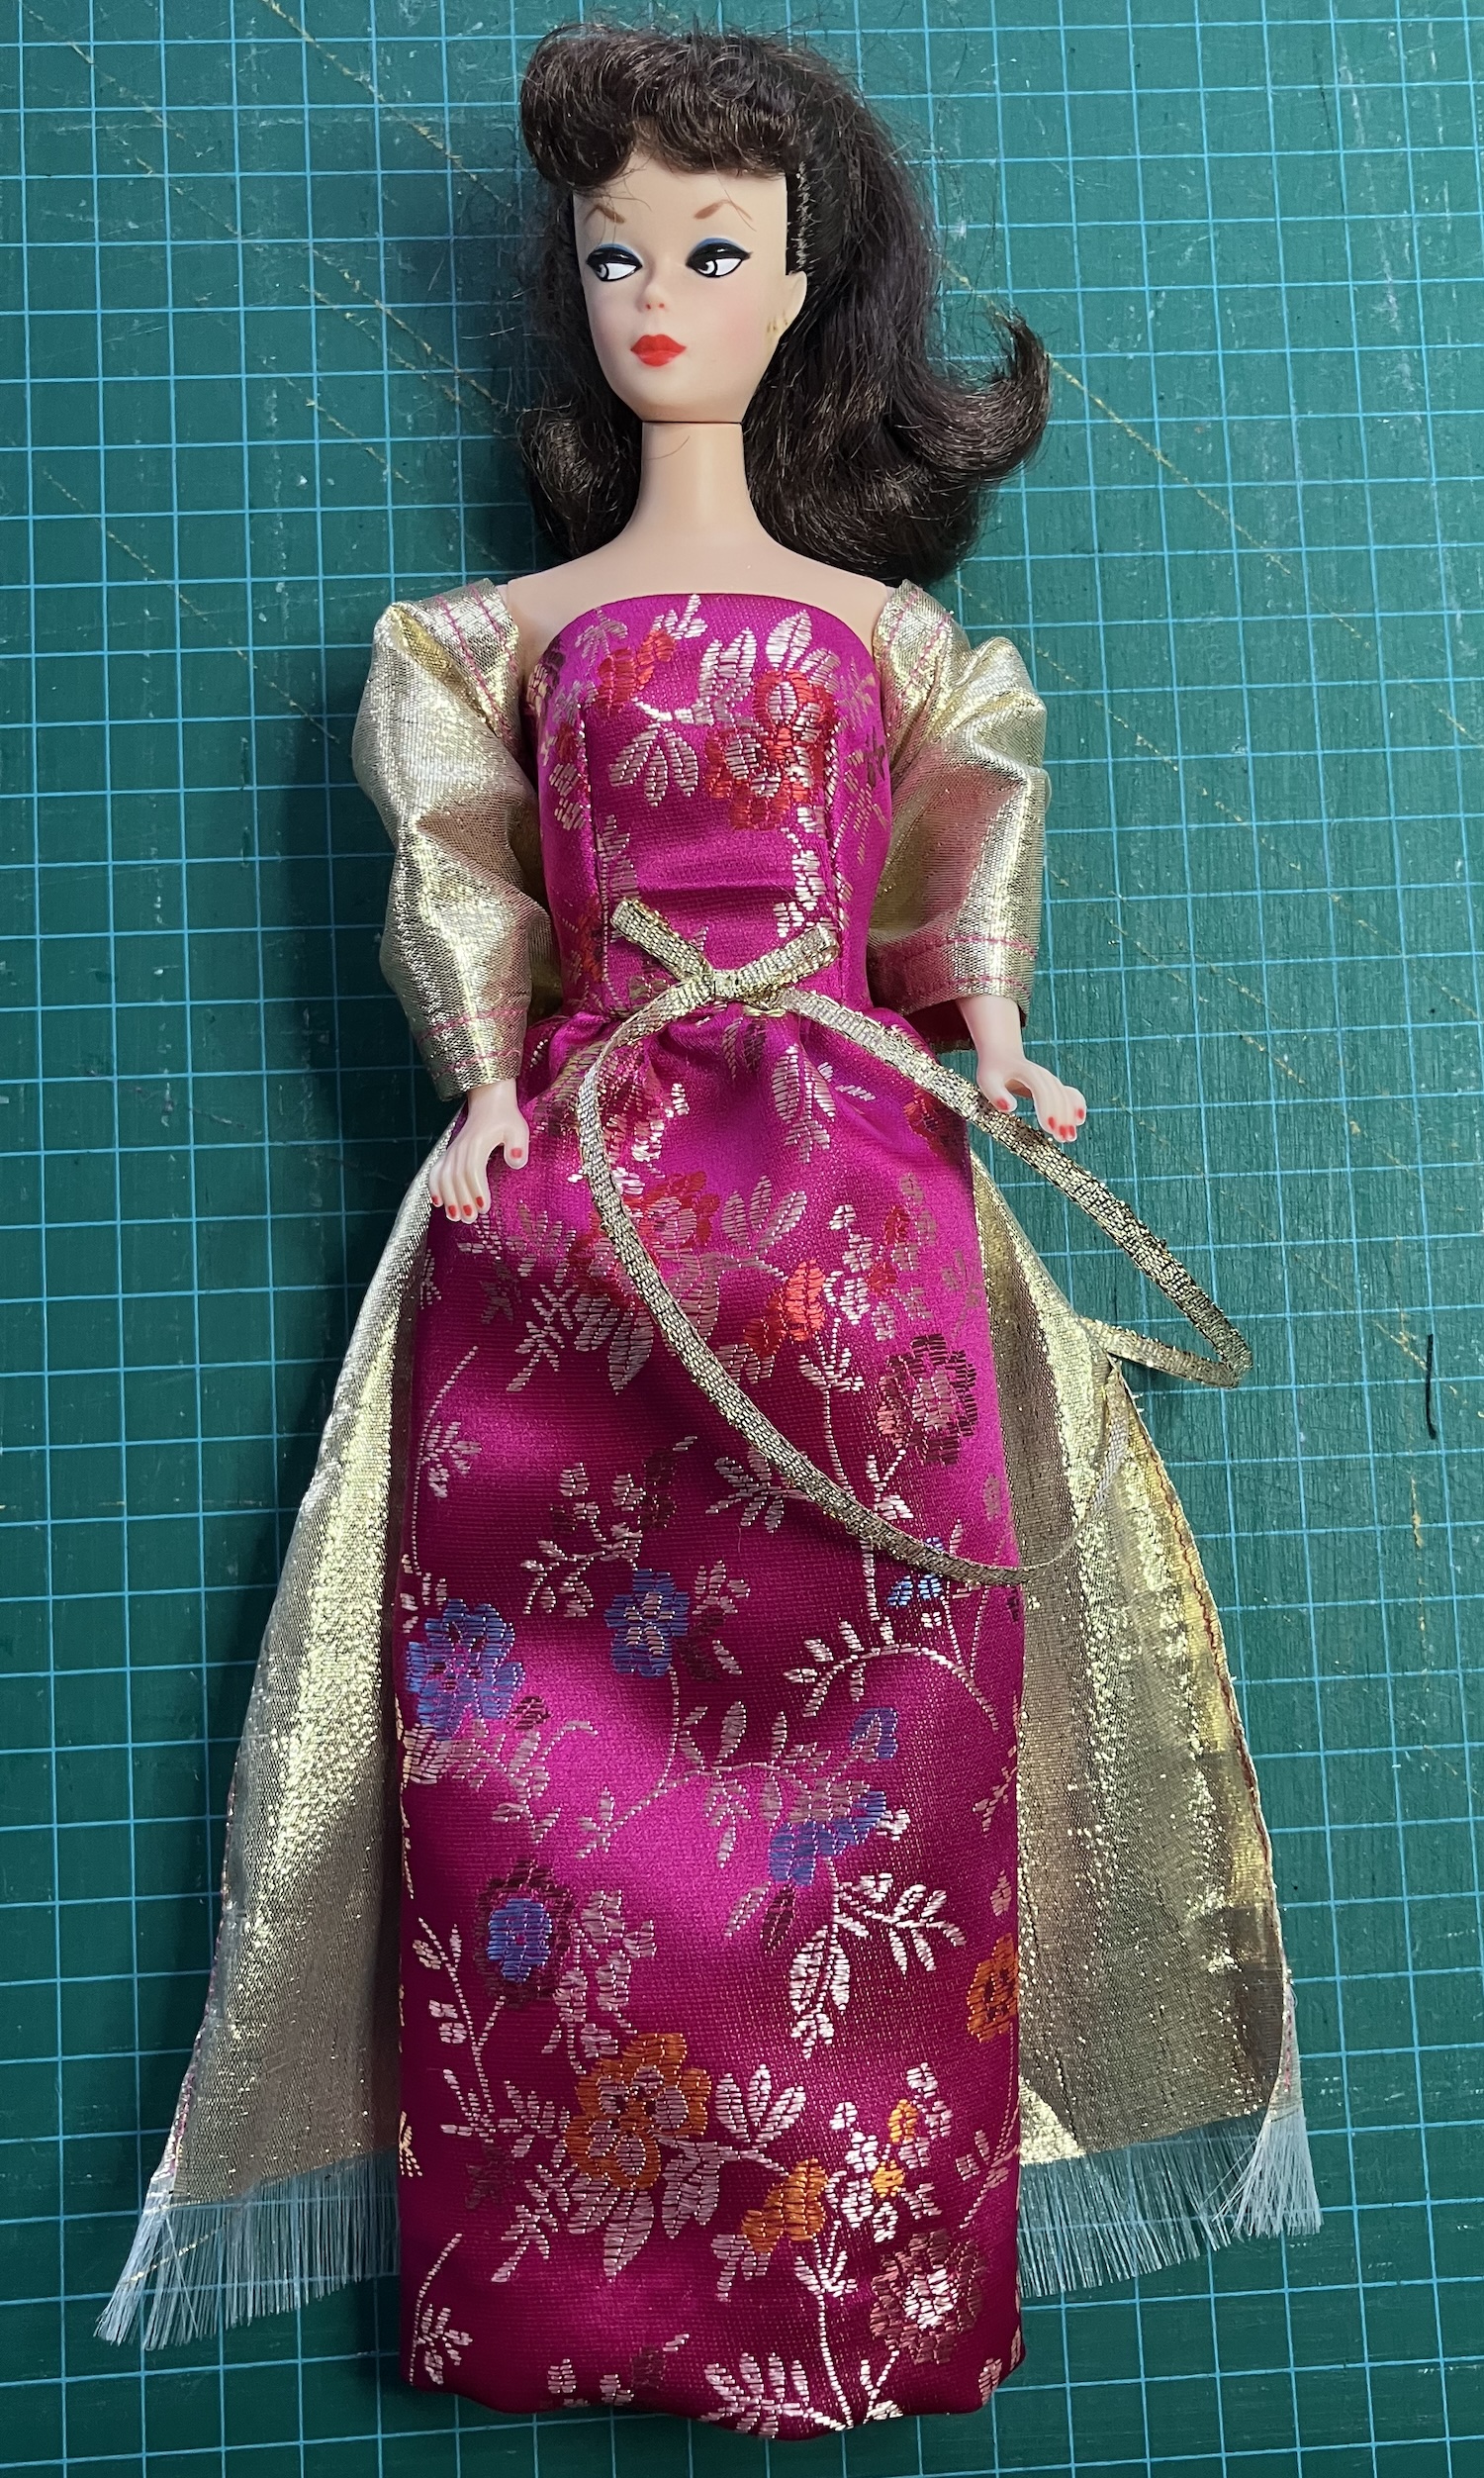
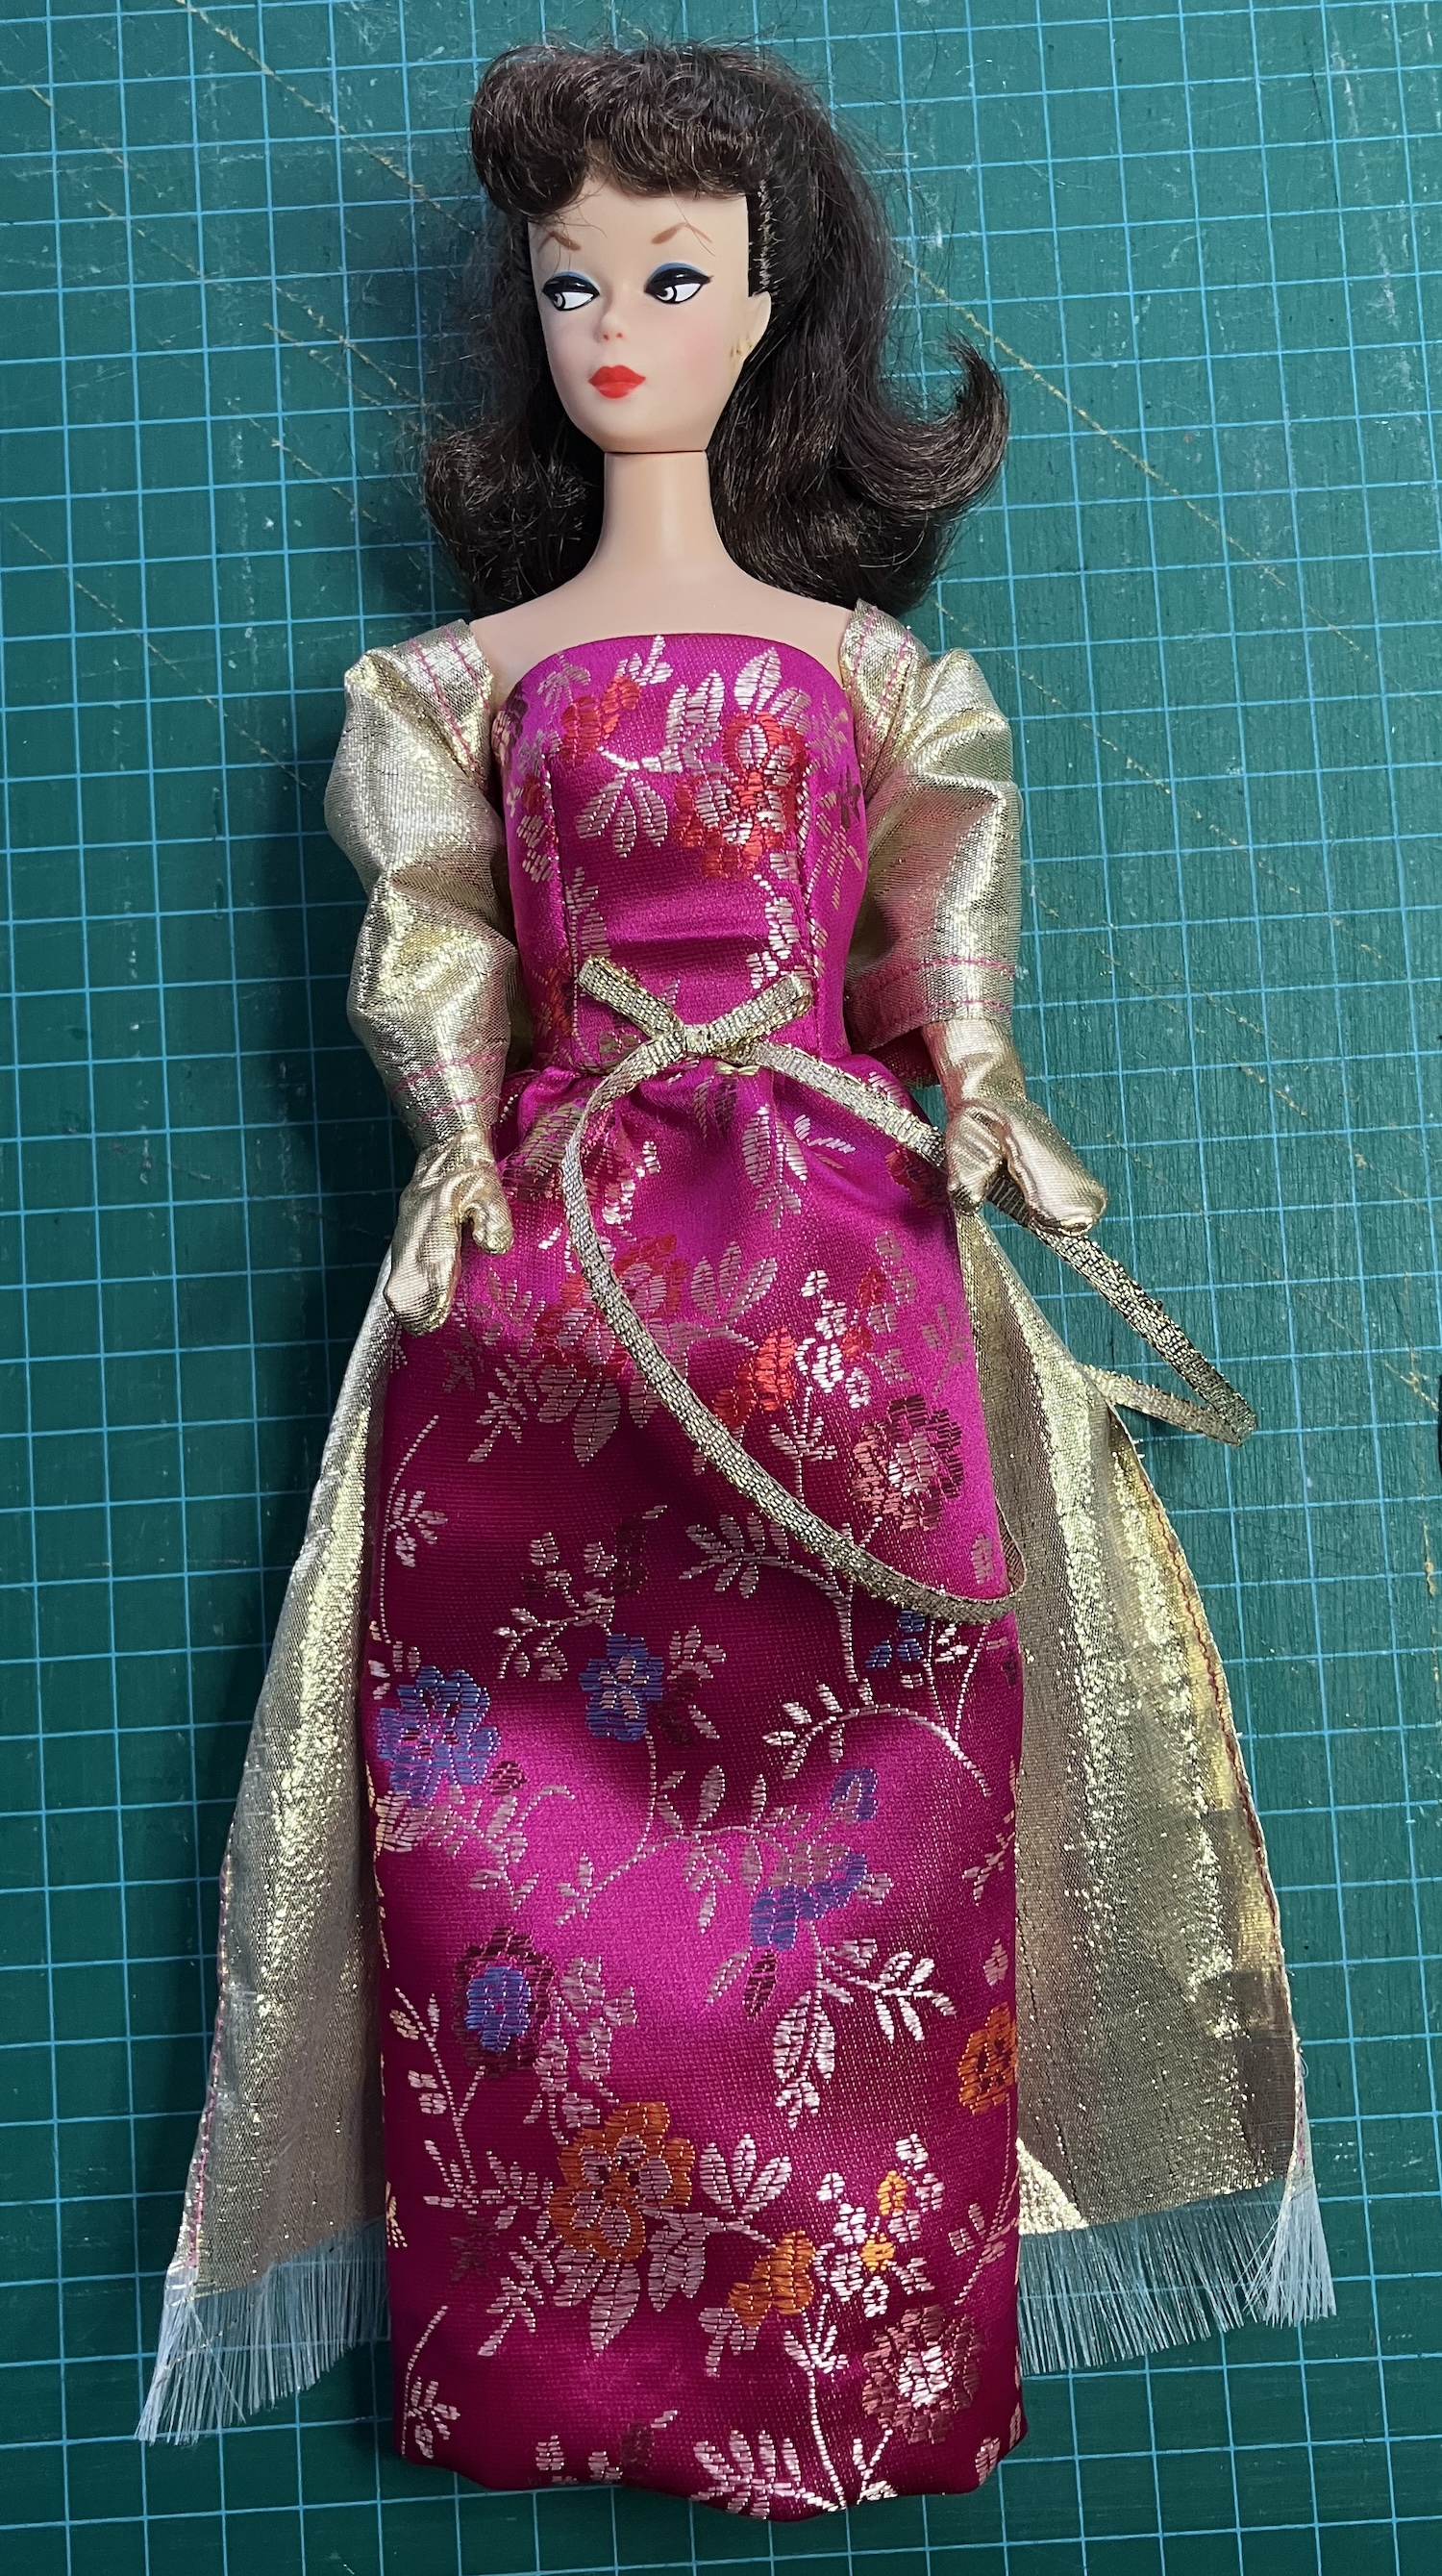
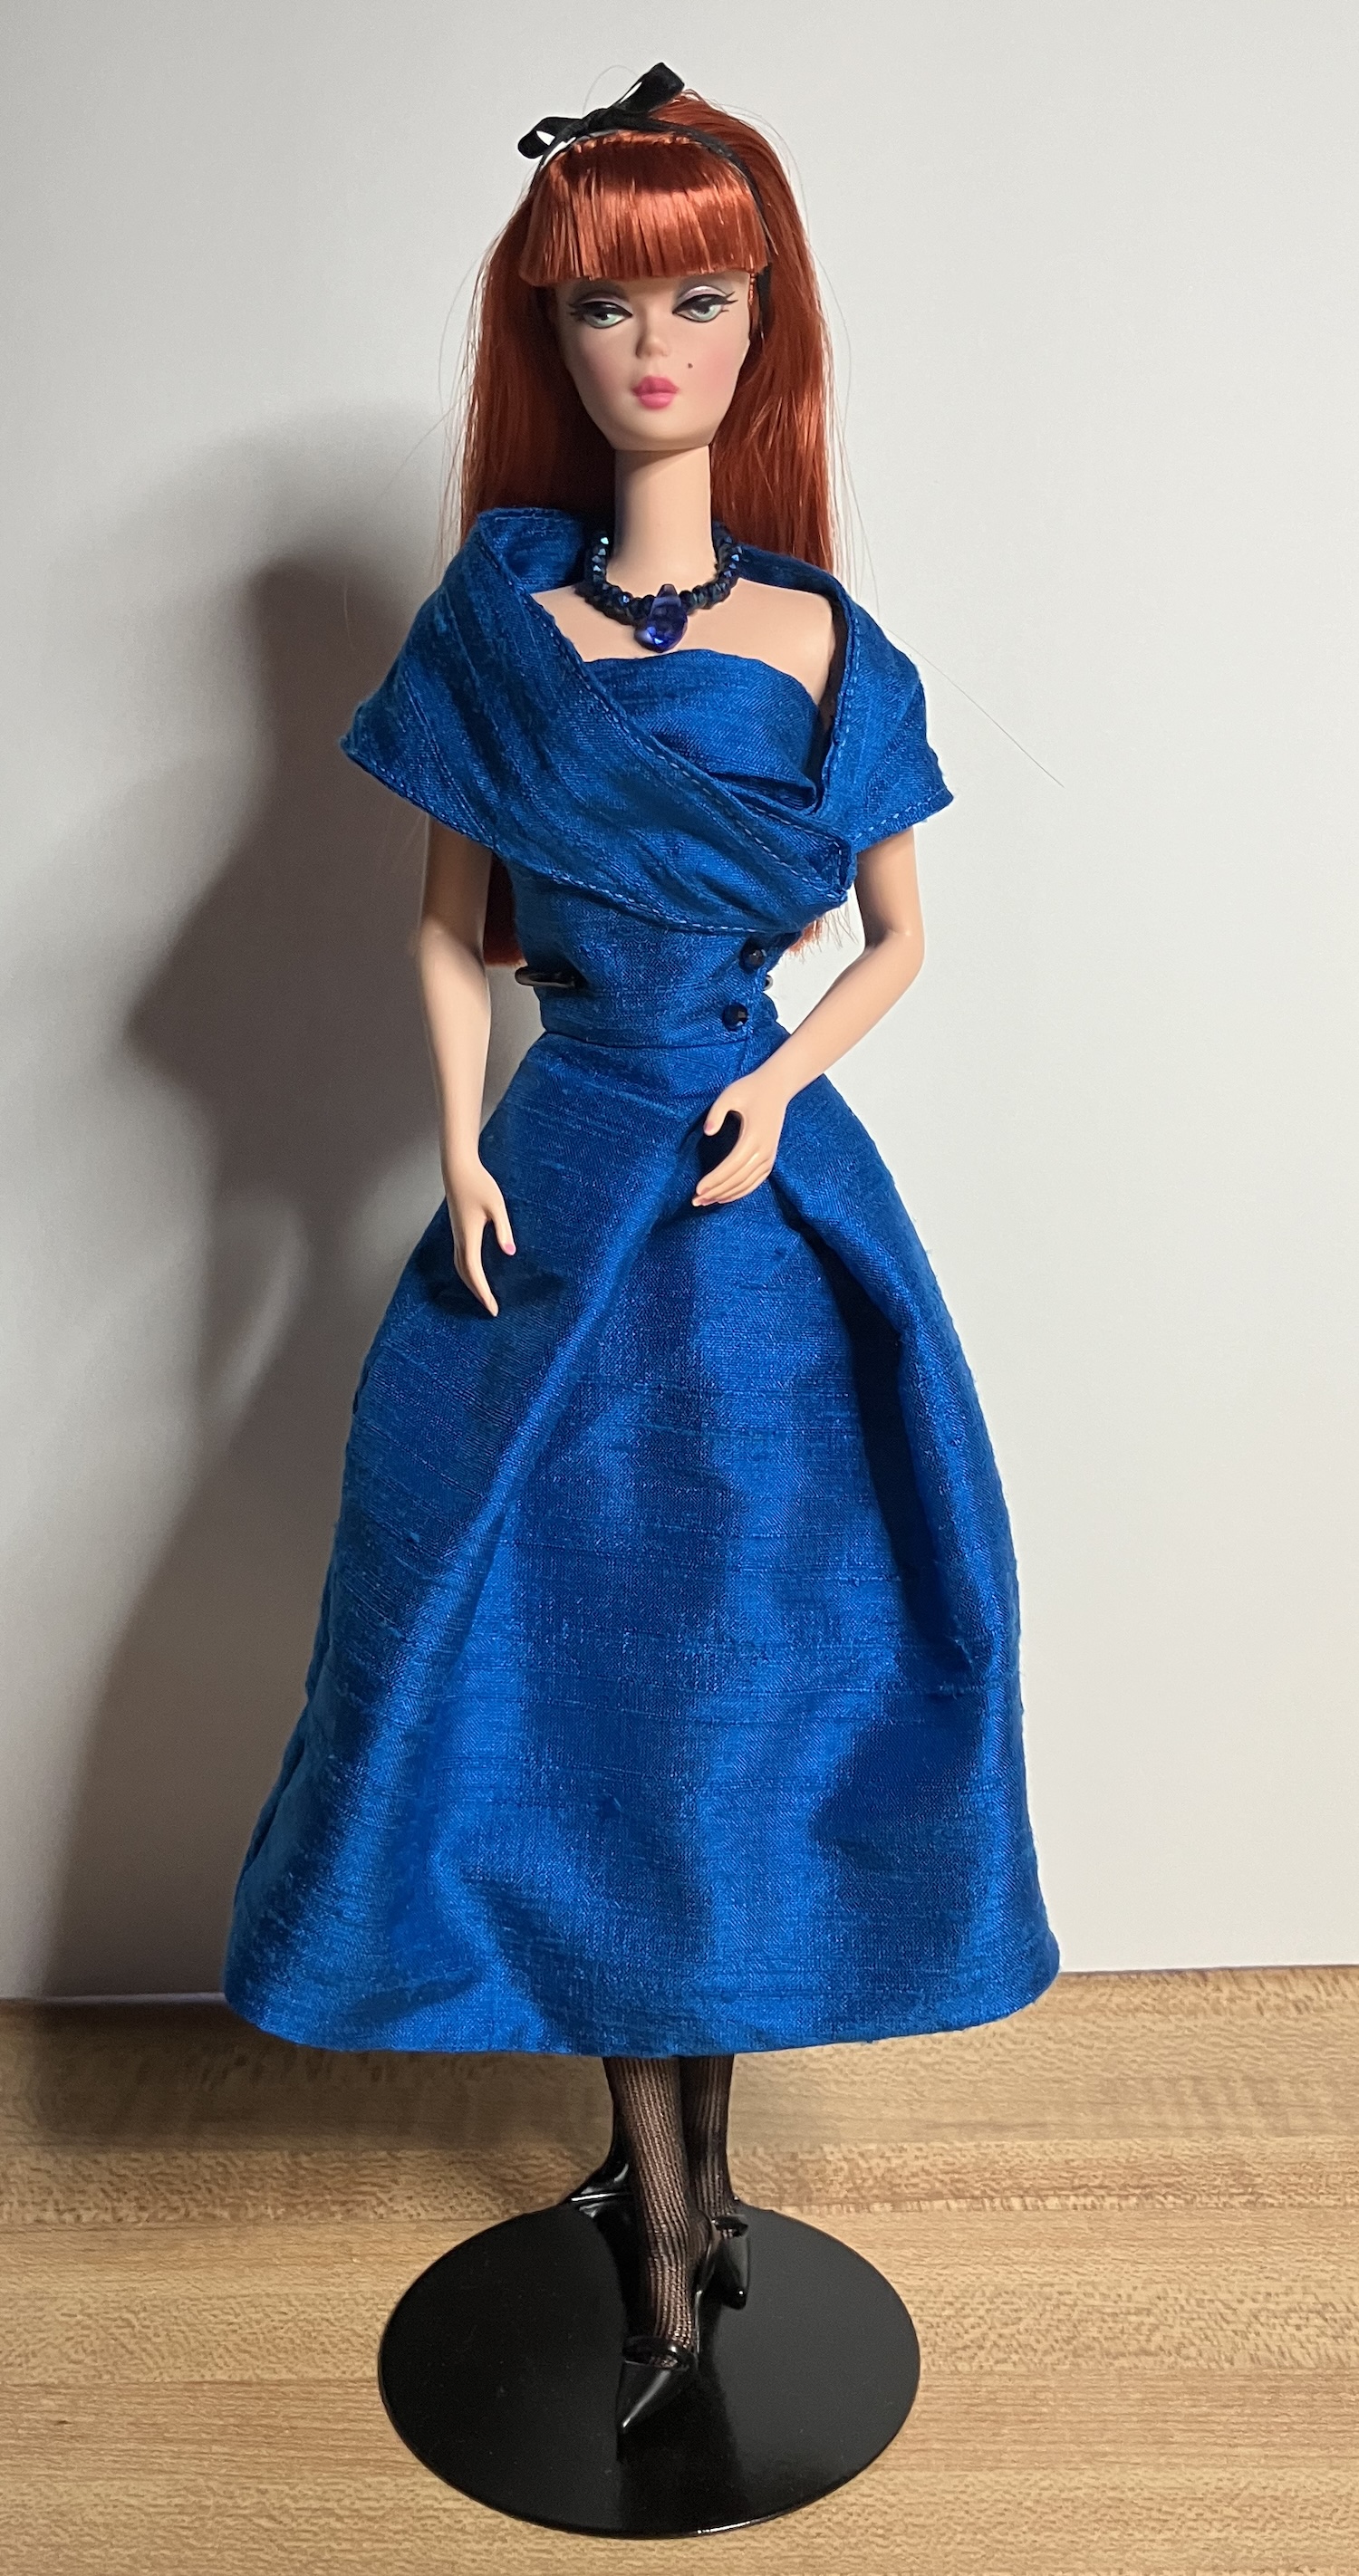
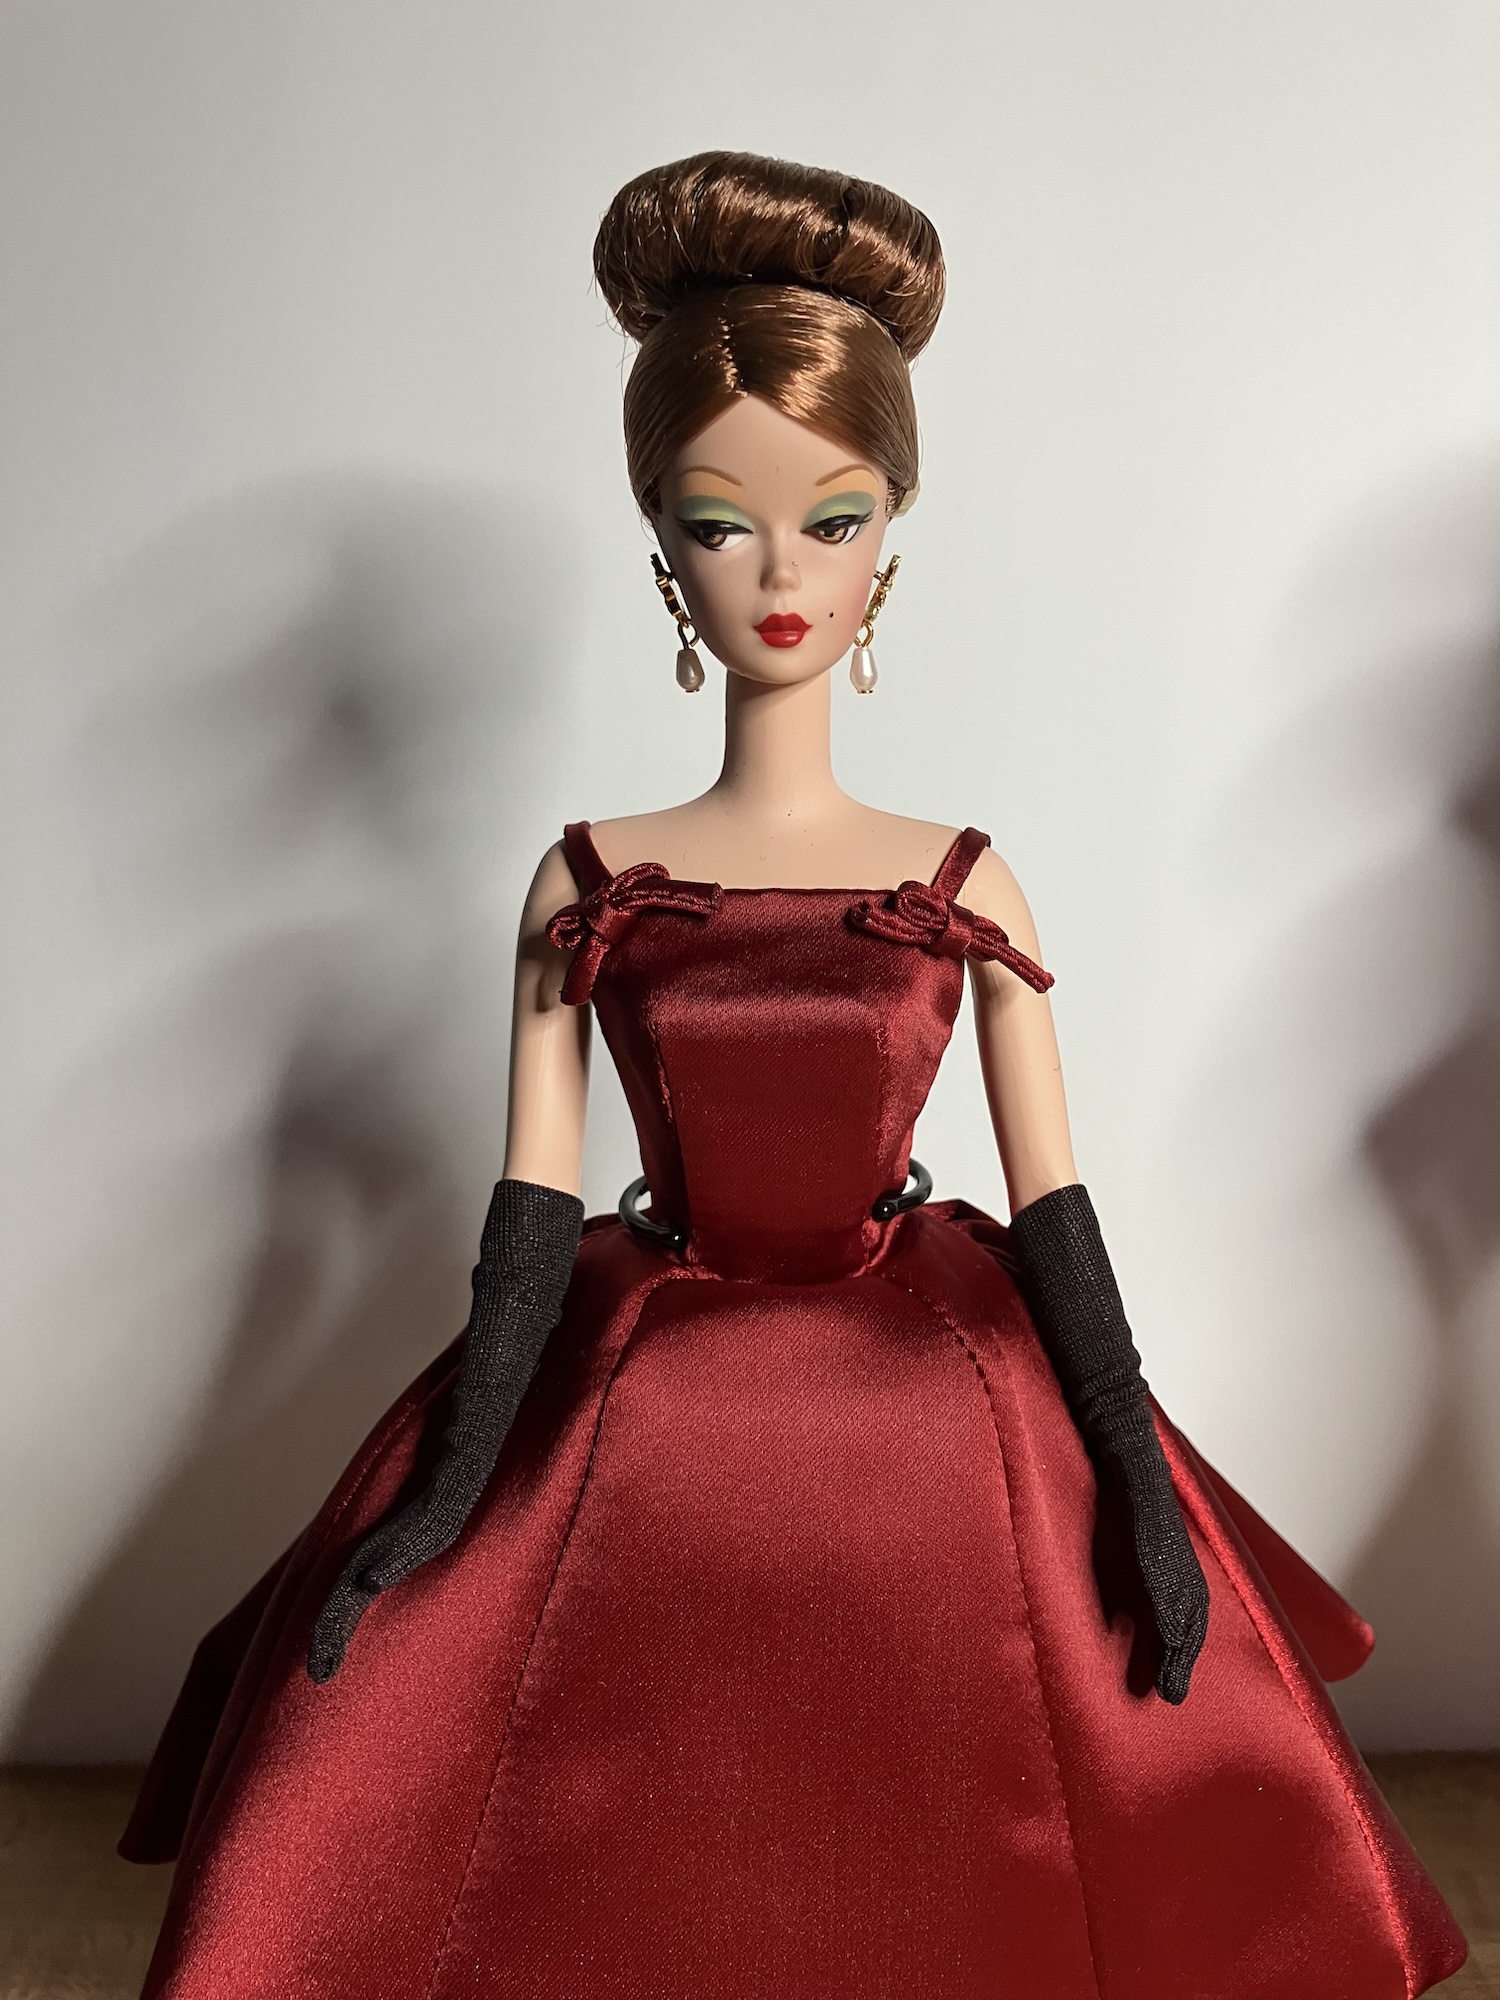
I made the ballgown first, which is view B. This one fits pretty well, though the bodice could be a little more snug. I used Chinese brocade, which is quite thick, and that could be a contributing issue. I lined the bodice, as instructed, but not the skirt, also as instructed. When I make it again, I’ll line the skirt too. That brocade sheds like mad, even though I finished the edges.

Of course, I made B a pair of gold opera gloves to go with the dress.

McCalls 6260 gown made by Deborah Cooke
McCalls 6260 gown with stole made by Deborah Cooke
McCalls 6260 gown with stole and gloves made by Deborah Cooke
McCalls 6260 gown with stole made by Deborah Cooke

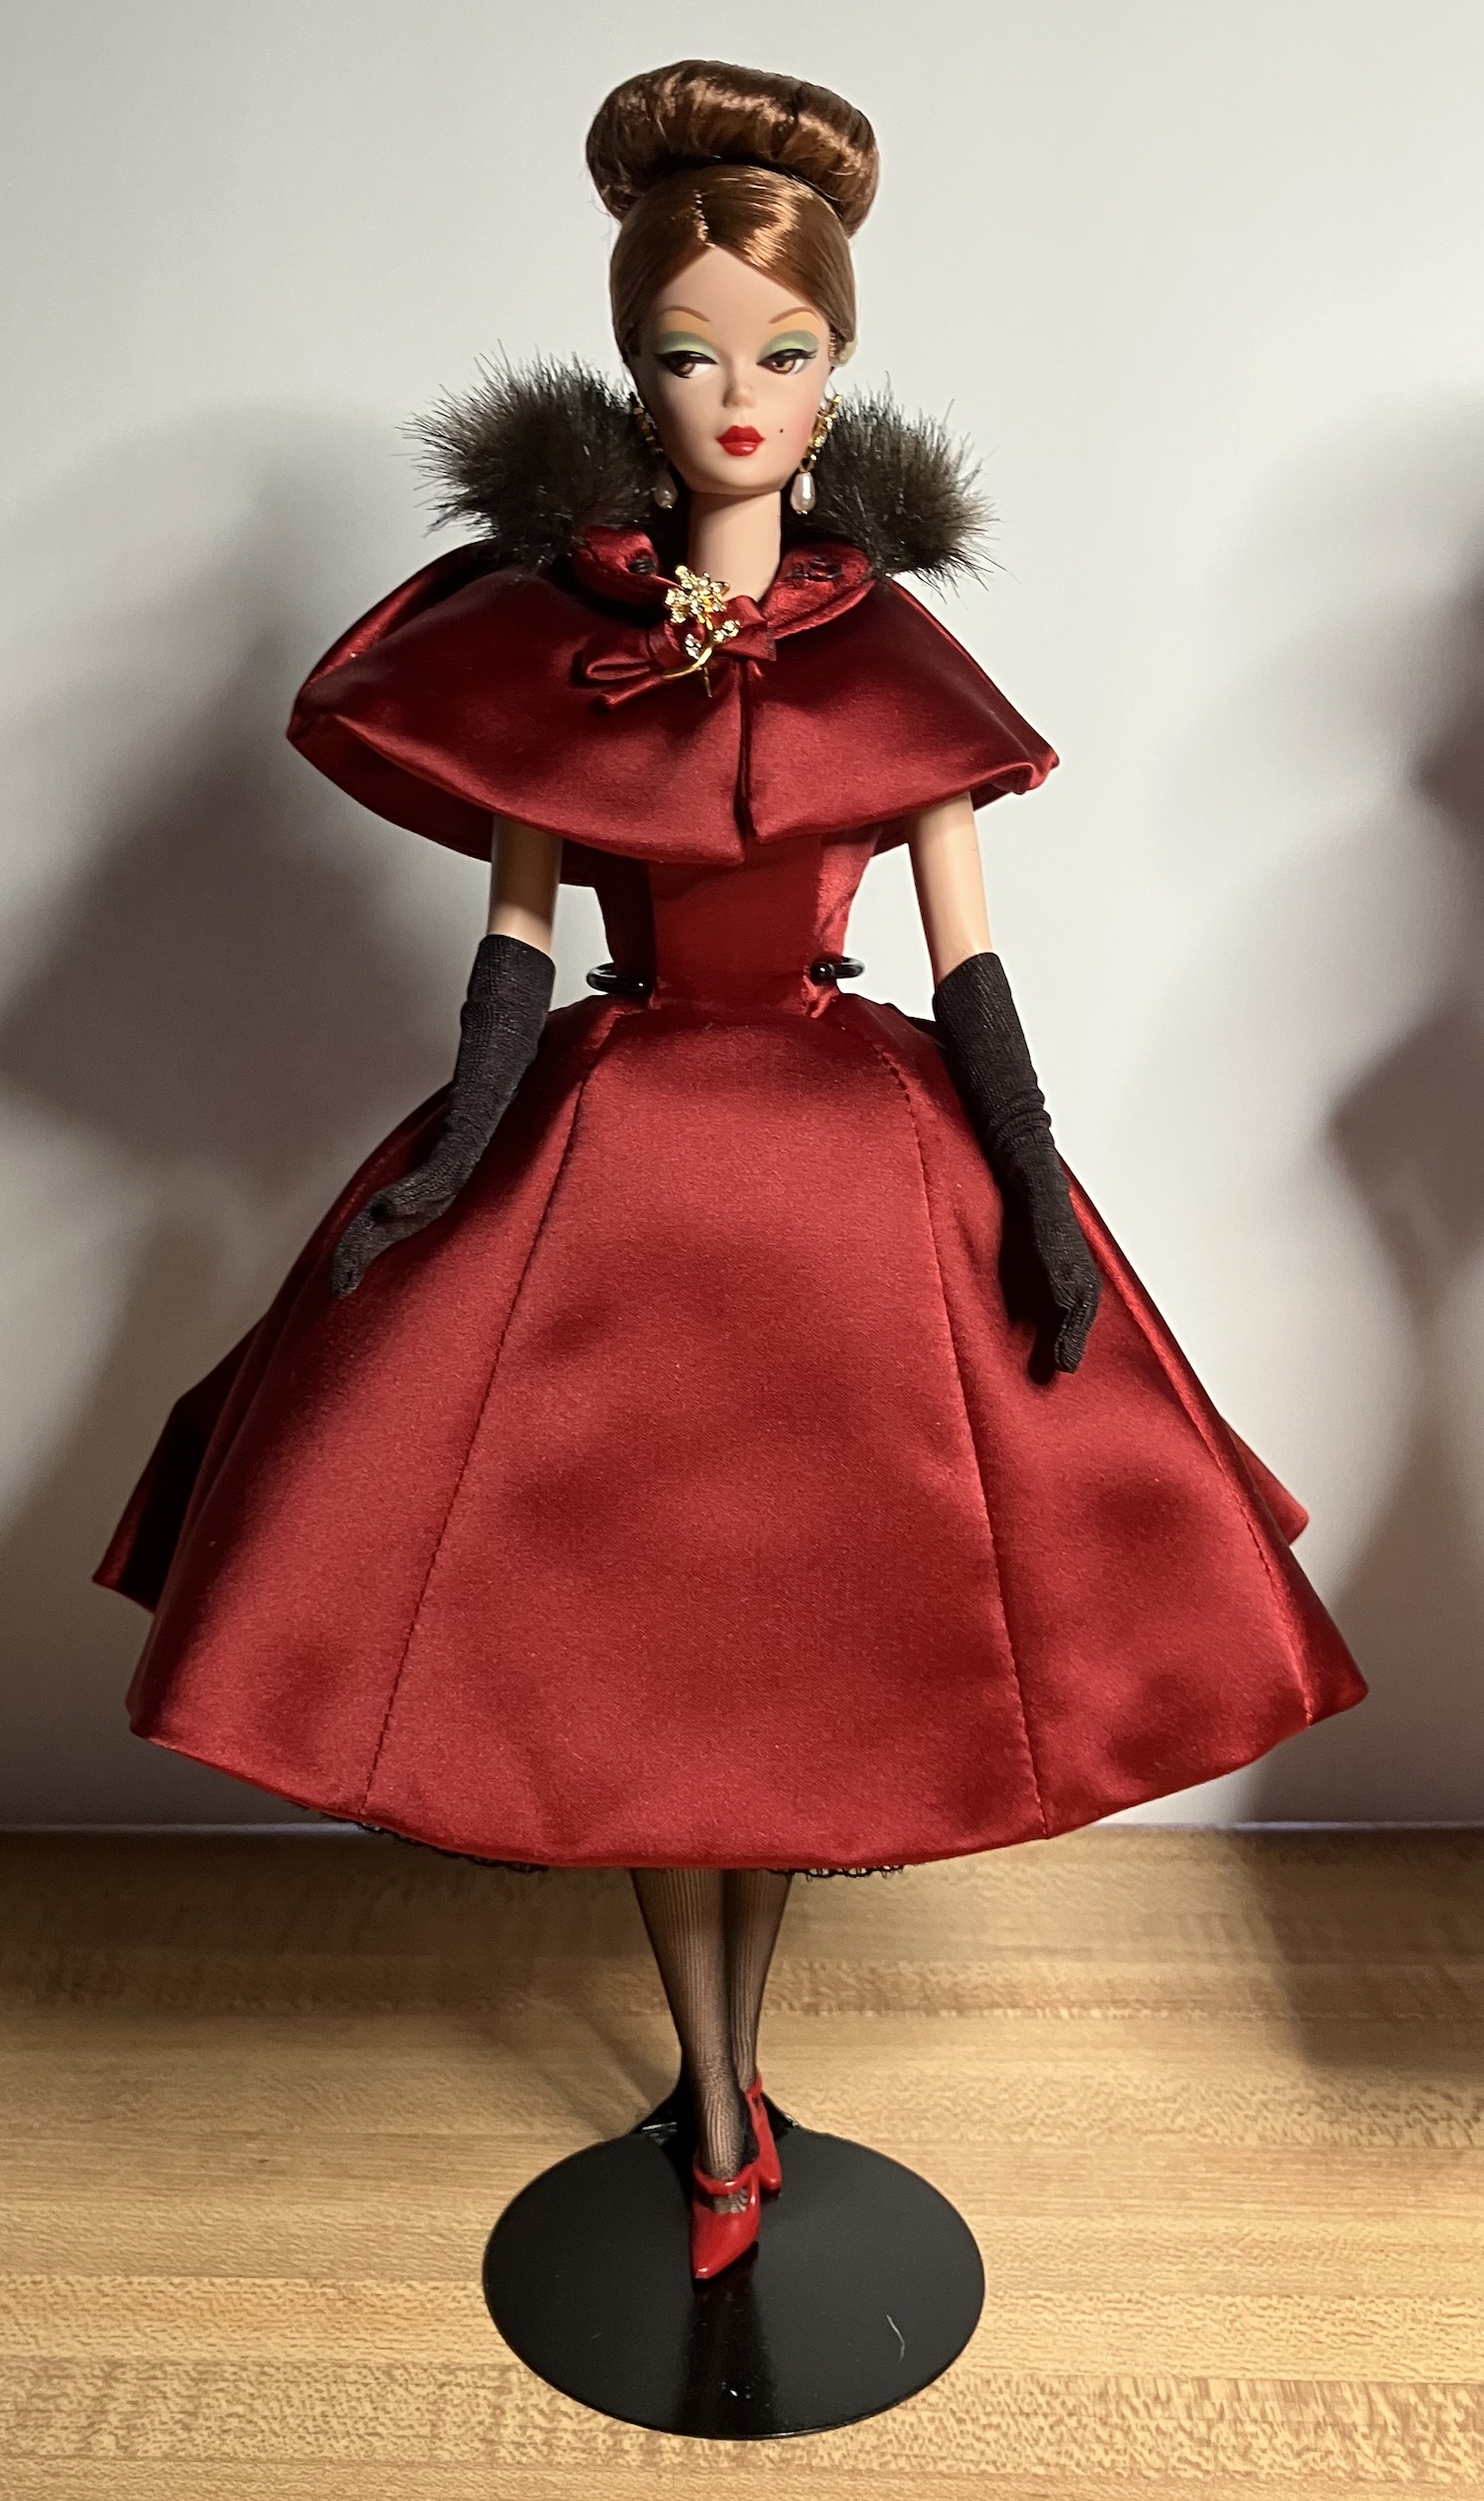
The stole is interesting. I thought it was like the big bow on the back of that other ballgown, but it isn’t. For this one, the doll’s arms go through the loops of the bow – ha! I looked back at the historic images I found for that bow dress and sure enough, the Balenciaga from 1950 has a stole with similar design. I had found this pic before but hadn’t noticed her arms going through the loops of the stole. You can see that the top loop, for her arms, is lined with another fabric, while the other loops and train are plain tulle. B is always so very stylish, isn’t she?

Balenciaga evening gown, 1950

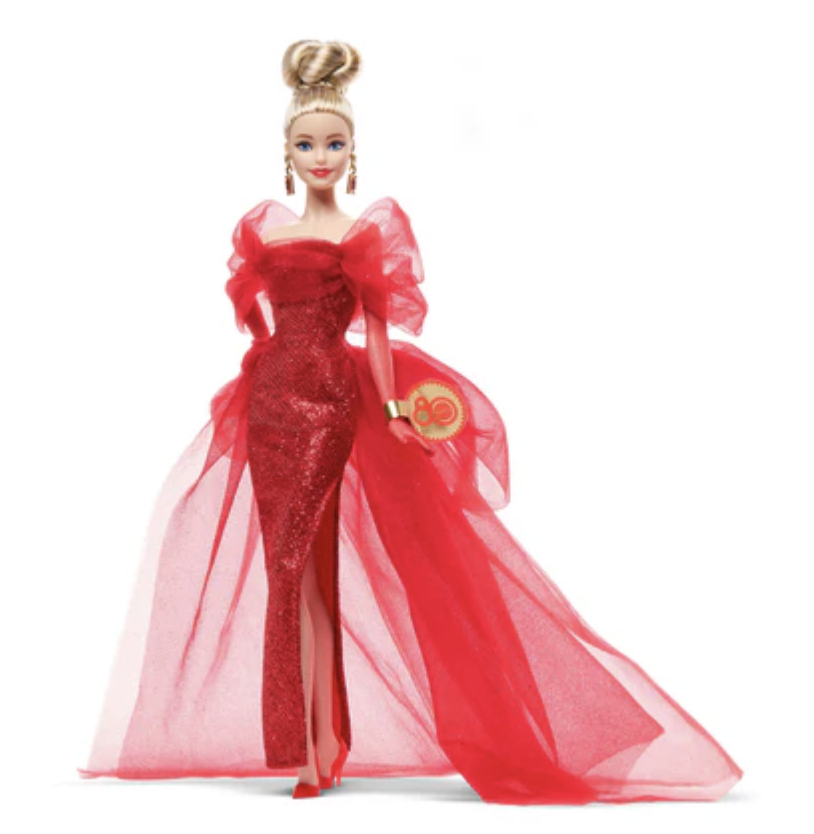
Interestingly enough, the 80th anniversary Barbie has a gown and stole that looks to be inspired by the same Balenciaga design.

80th anniversary Barbie

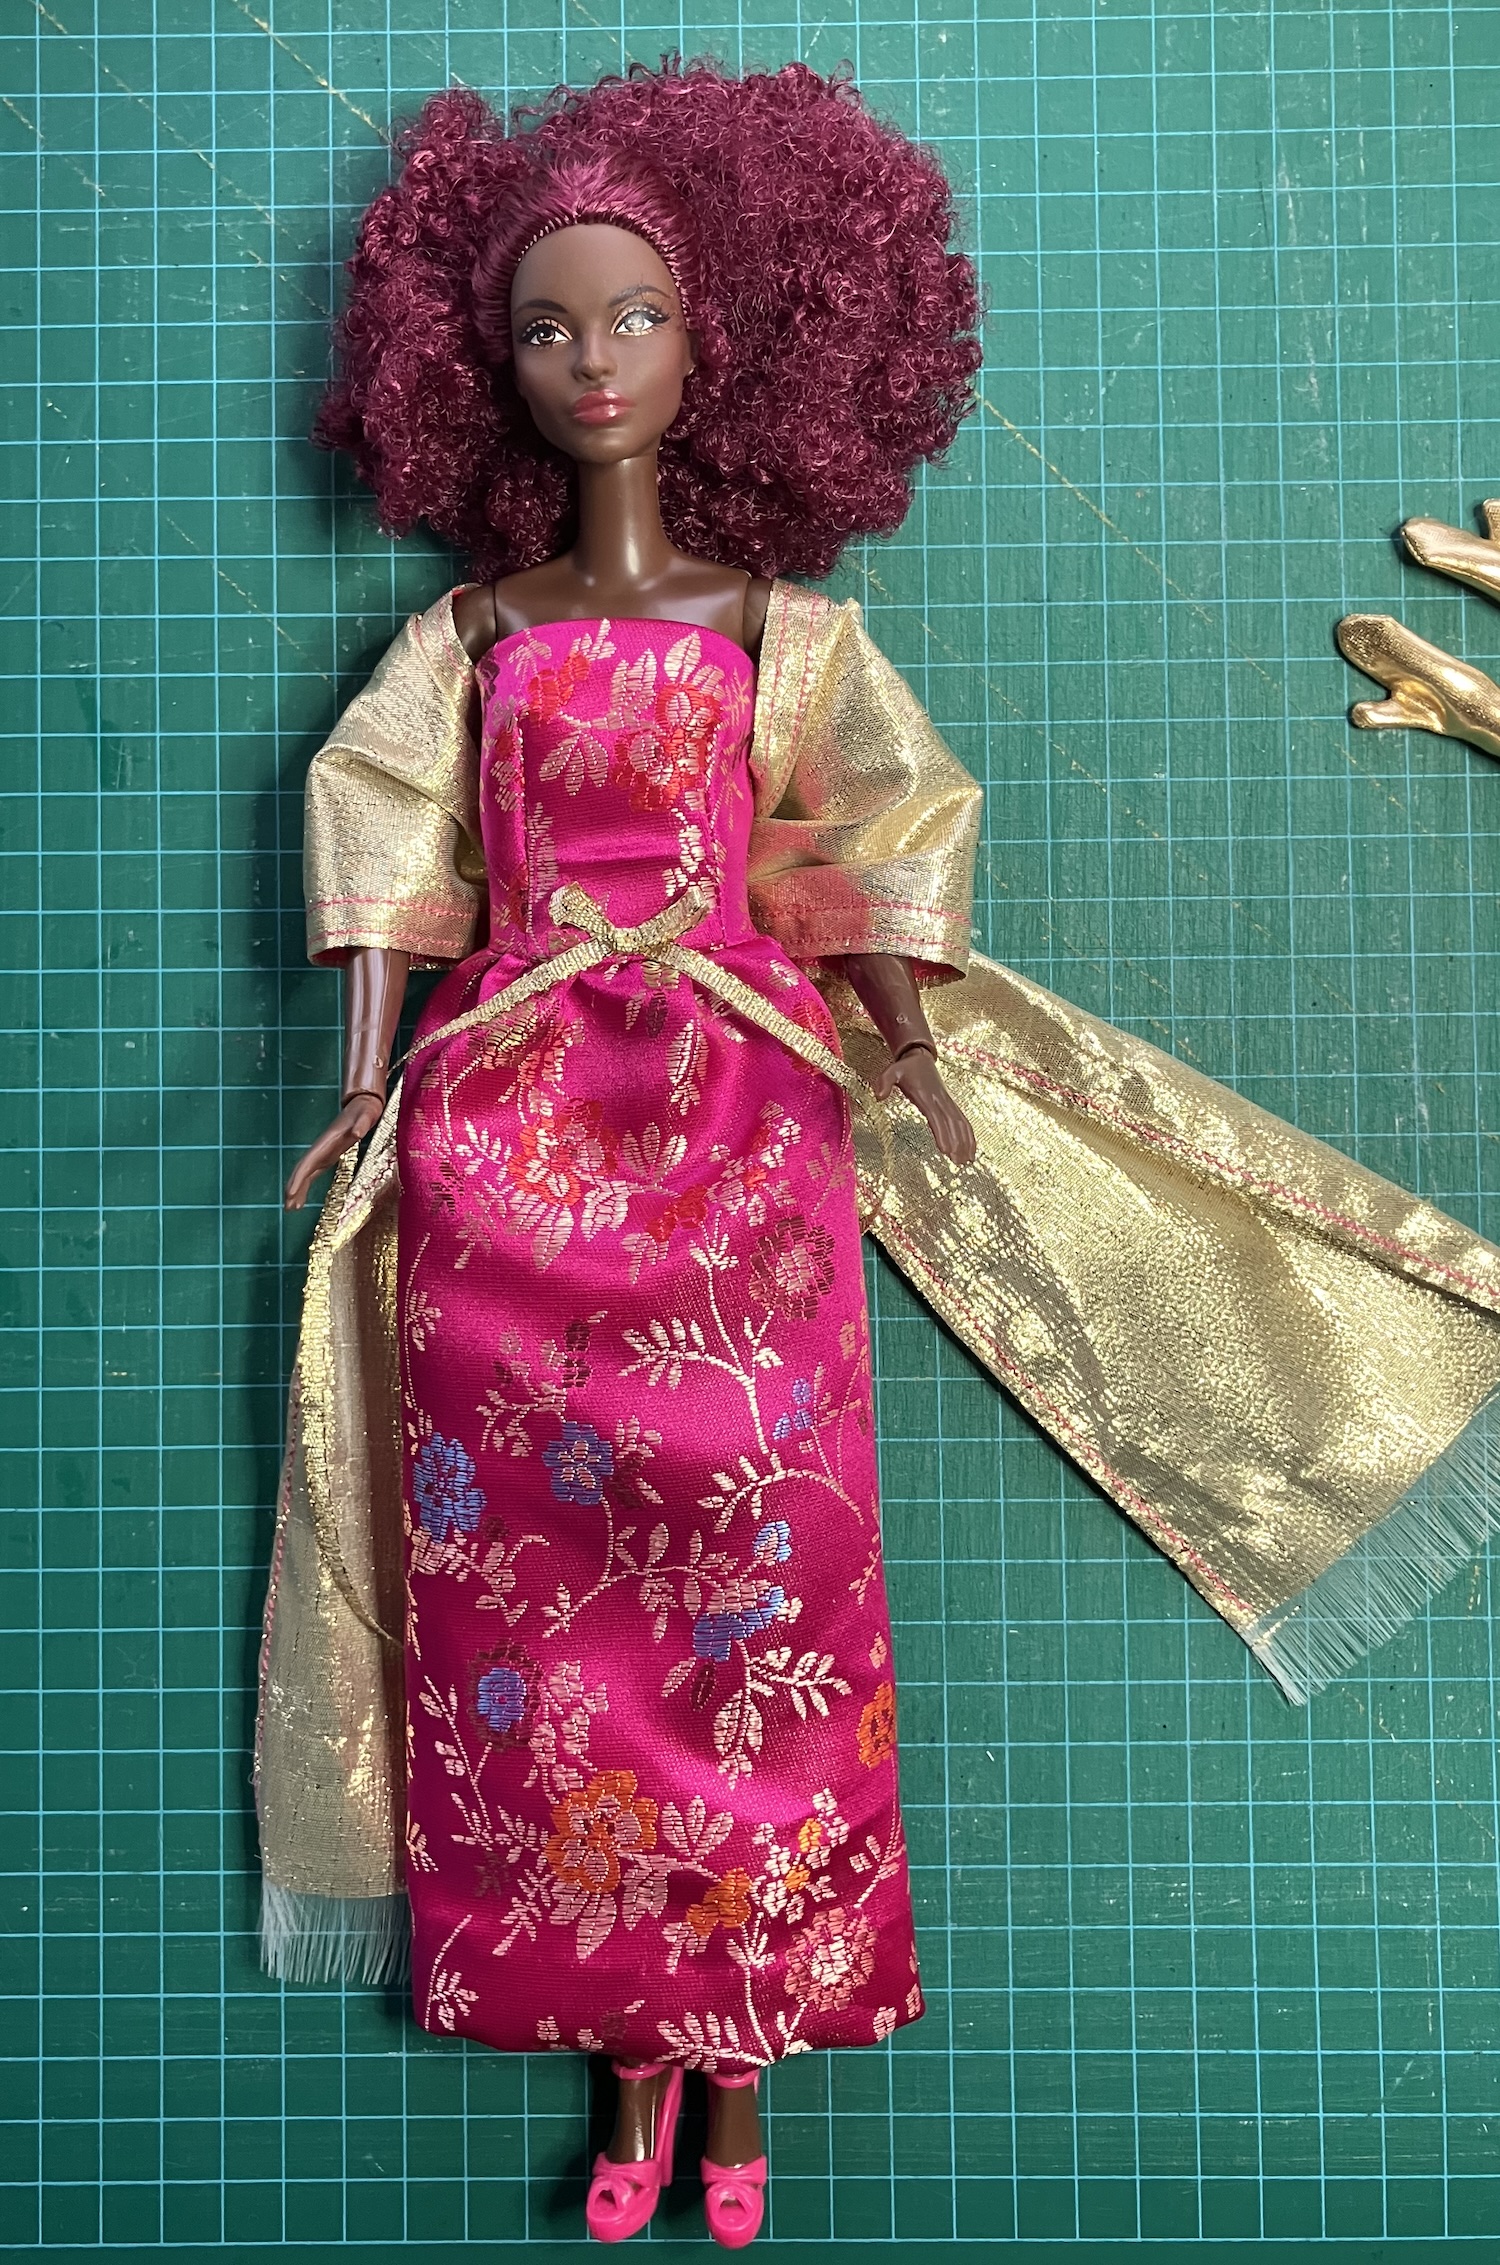
The skirt on this gown could be a teensy bit shorter for vintage B (which might be my fault) and I’m thinking I’ll add a back slit next time around. The colour made me think of this tall B.

McCalls 6260 gown with stole made by Deborah Cooke, modelled by a tall Barbie

It is a fabulous shade for her. She’s thinner than vintage B, so the bodice is a bit loose on her, but the fabric is perfect. (The dress could be maybe 1/4″ longer for her.) I’m thinking she needs a frock coat of this pink brocade, maybe with a pair of black silk cigarette pants and some great boots.

In this image, you can see the topstitching on the part of the stole that goes around the doll’s arms. It’s faced with ribbon and I decided to use a contrasting one. So, the ribbon is bright pink and so is the stitching. It gives the sheer fabric a bit more structure, too.

I also made the coat from this pattern. It’s a swing coat, which I cut from a cotton flannel that looks (in scale) like wool coating. I cut the collar of a thin (very soft) fur and the undercollar of rayon Bemberg lining.

McCalls 6260 coat made by Deborah Cooke

I lined the pockets (which is not suggested by the pattern) with the same rayon Bemberg as well as the coat itself. I like the result, but similar to other swing coat patterns I’ve made for B that are cut this way, there’s really a lot of fabric in the bodice for size of the doll. I’d like to modify this design to make a more flattering swing coat for her – and I have the perfect leopard print fur for that.

It’s hard to see on the pattern image but there’s a matching fur hat for this coat. It’s a band of fur, lined with ribbon, with a bit of elastic at the ends. This is a clever idea, but the one I made was far too small for B. The instructions specify that the fur strip should be cut to 3.25 inches long, which makes it 2.75″ once the edges are turned under. B’s head is over 5″ around, so my elastic wasn’t nearly stretchy enough. I tried another with a strip of fur that was 5.5″ by 1″ and that worked out reasonably well. I think it could be a little bit smaller. In future I’ll start with the circumference of the doll’s head then maybe take it down by half an inch. The elastic stretches but the fur doesn’t. I can’t show it to you because this whole ensemble has been shipped off to a friend. 🙂

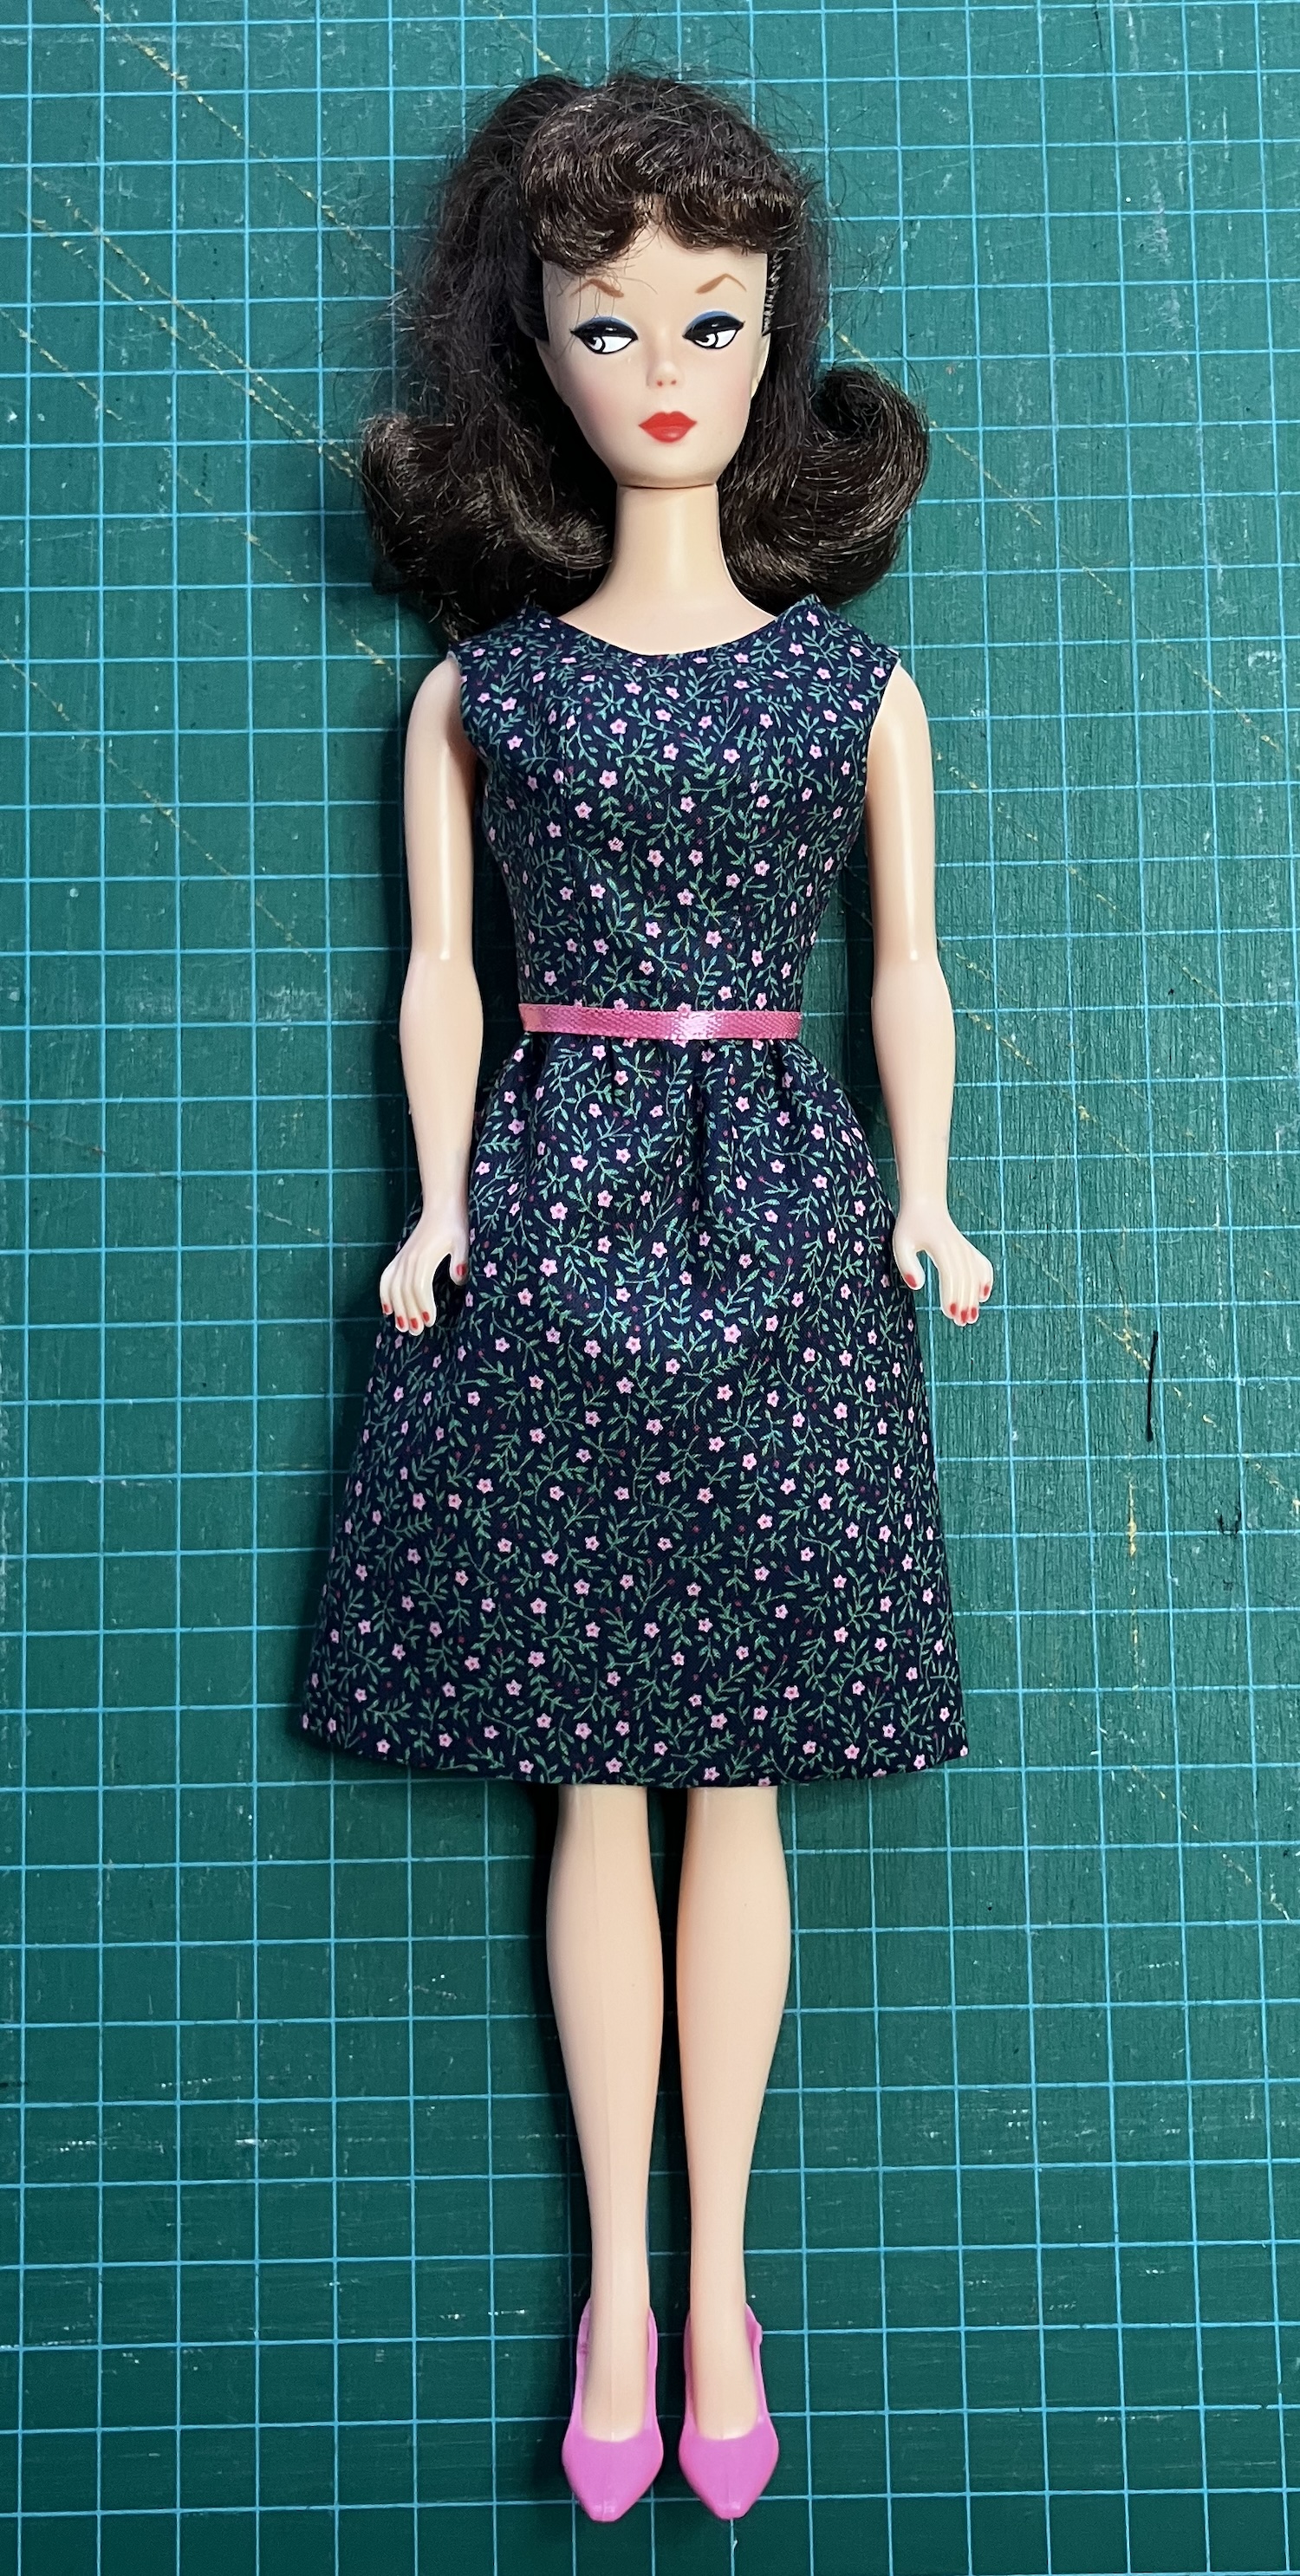
Finally, I made dress A in cotton. This pattern is a real gem. The bodice fits B really well.

McCalls 6260 dress made by Deborah Cooke

I lined the bodice – as instructed – but didn’t follow the assembly directions. The pattern says to join the bodice and lining, and turn, then to sew the darts with the two pieces of fabric held together. Since the seam allowance on the dart is trimmed afterward, this would leave raw edges on the inside of the garment. The side seams are also to be sewn with both fabrics held together, which would give more raw edges on the inside. Instead, I did the darts on each piece separately so the raw edges could be trapped between them.

McCalls 6260 dress made by Deborah Cooke

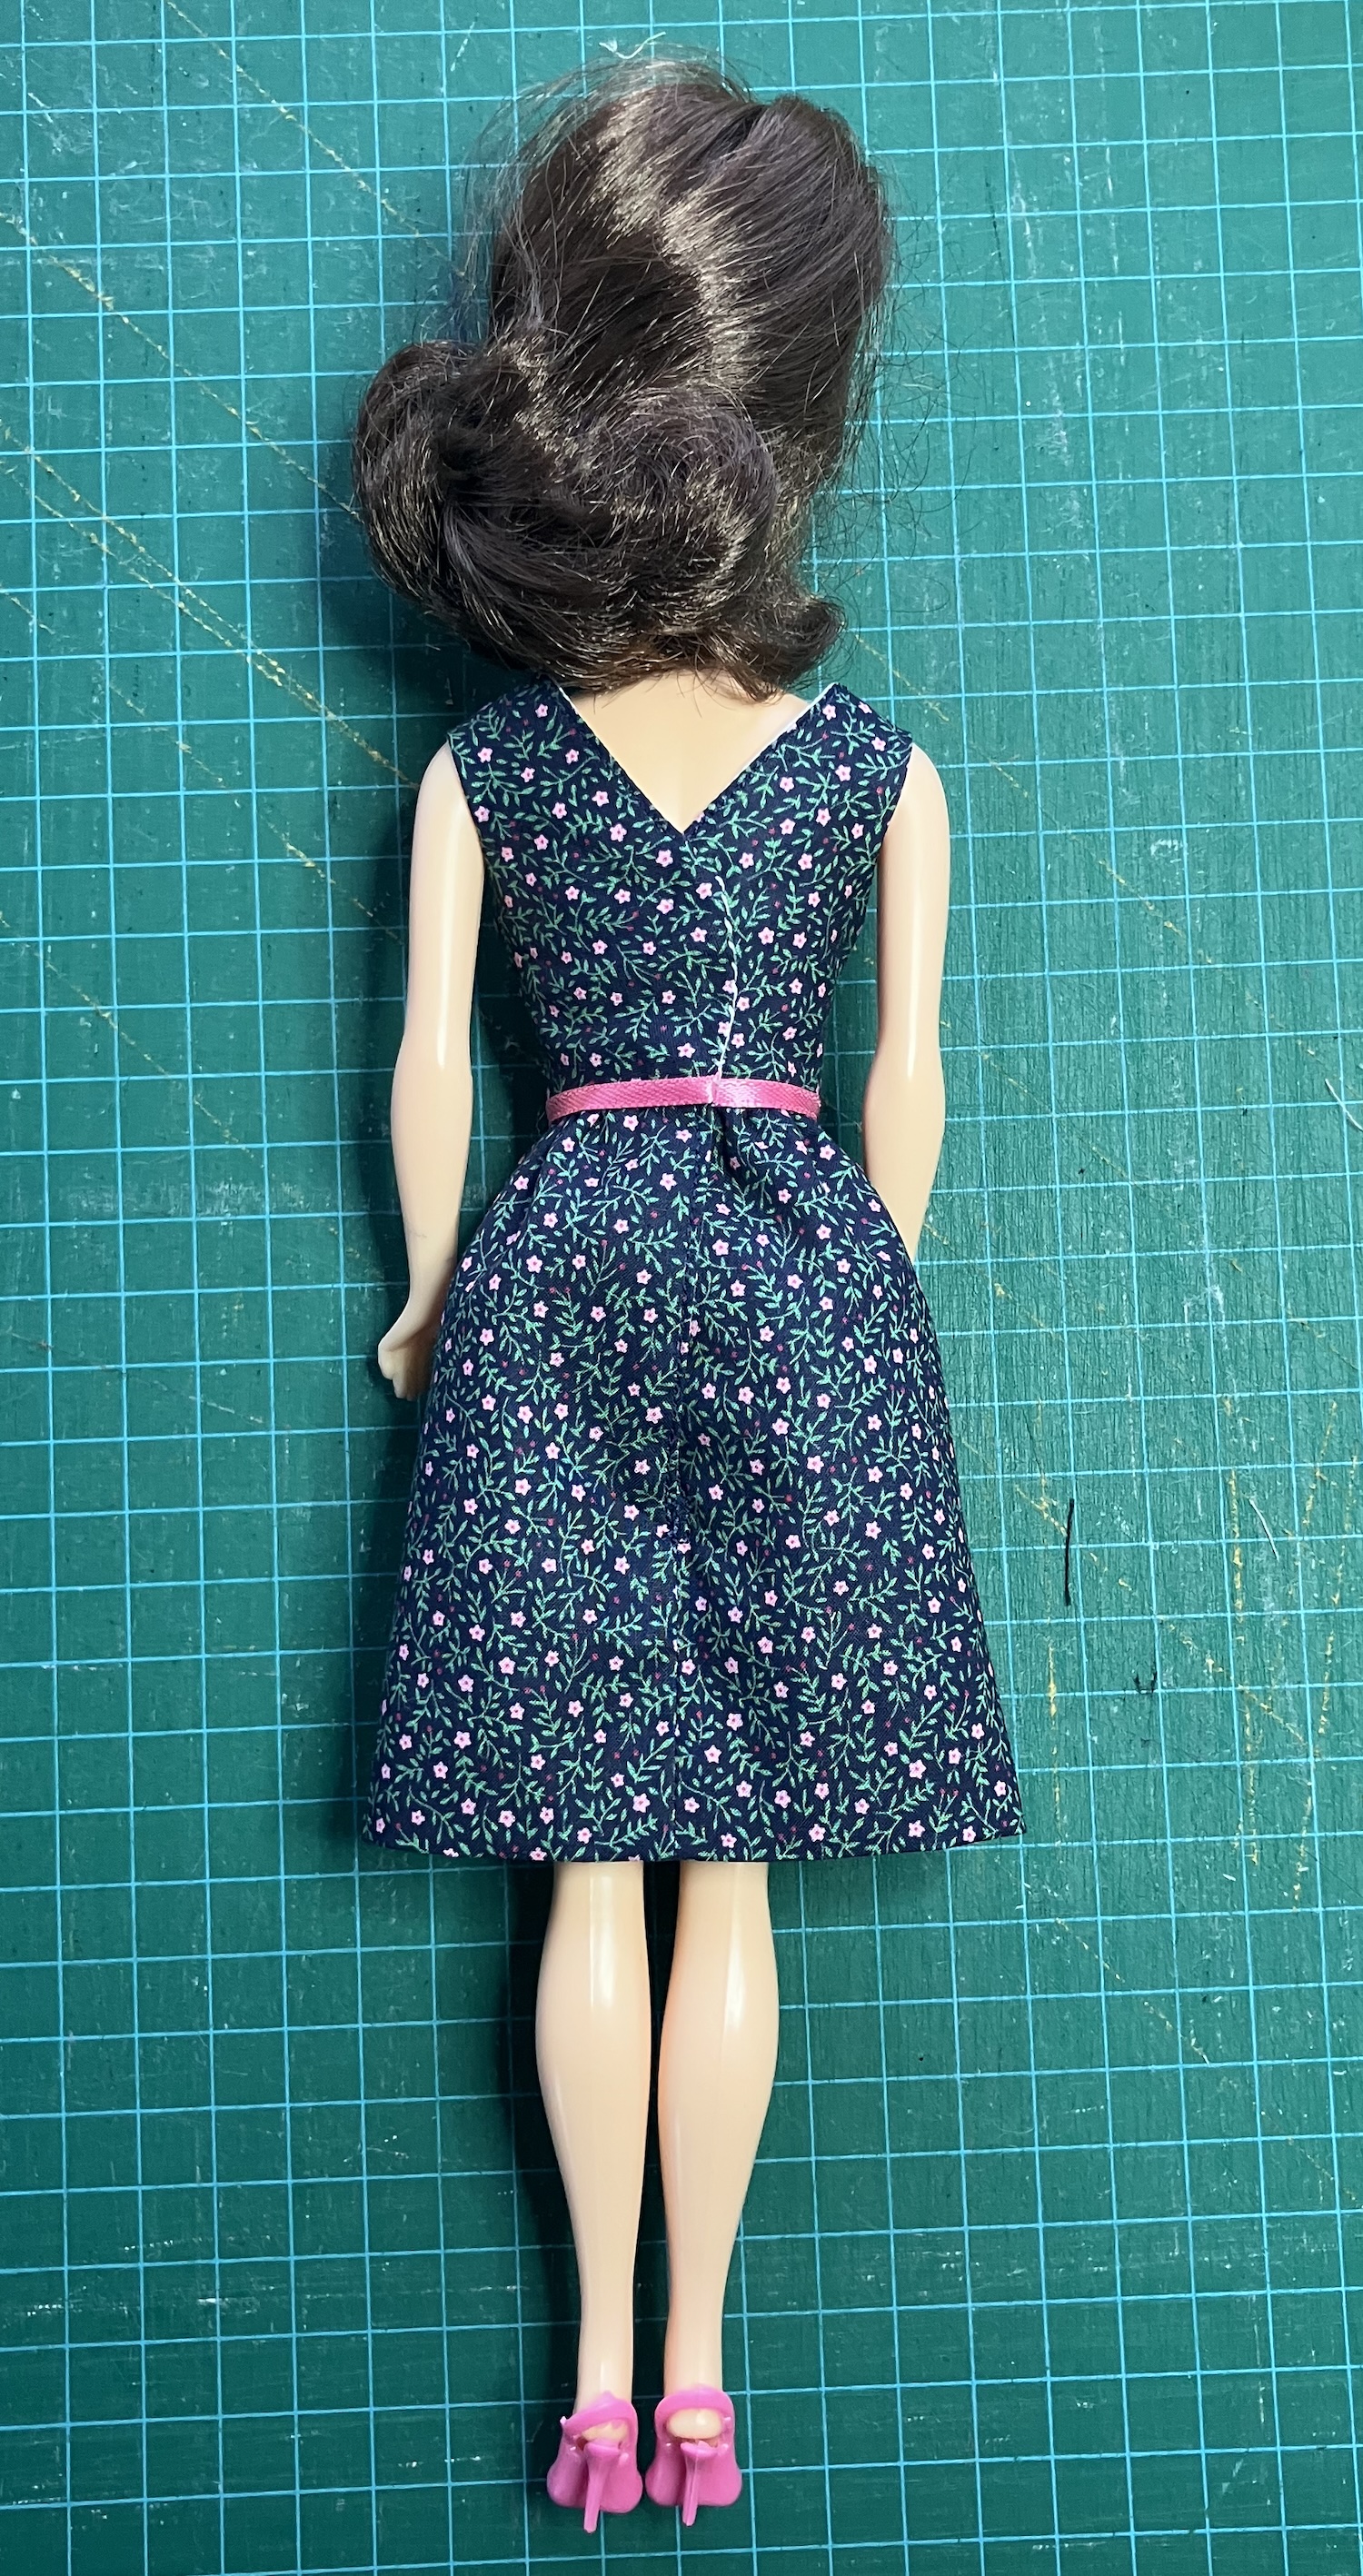
The skirt wasn’t supposed to be lined, but I lined it anyway. (Are you surprised?) I then followed my usual dress construction sequence. I sewed the hems of the skirt and skirt lining together, pressed the seam, and understitched the hem. I then sewed the center back from the lining below the opening around to the main fabric below the opening. I turned and pressed the skirt and top stitched the edges of that back slit. The skirt went into the bodice in the main fabric, then I enclosed all the seam allowances under the bodice lining, sewing the side seams in the bodice by hand. In the picture, you can see that I understitched the neckline as well. I added a ribbon belt, too.

This one had quite a deep hem in the original design, so I could modify the skirt and lining pieces to make the lining longer.

McCalls 7550

I really like this little dress, and of course, the skirt could be easily changed to be straighter, fuller, longer or some combination thereof. What’s unusual about it is how easily the bodice can be turned, once the lining is sewn to the neck edge and the sleeve edges. Because there isn’t a shoulder seam in either the bodice or the bodice lining, it’s easier to turn the garment. It reminds me of the sleeveless dress bodice McCalls 7550, one of the first patterns I used to sew for B, but turning that bodice was much more challenging – possibly because the neck was smaller. I’ll have to take a look and compare the two.

I had cut a piece of lace for the overskirt as shown in this dress pattern, but decided that it looked too much like an apron, and a permanent one at that. I left it off. I do have a dress that my grandmother made for my dolls which uses lace and taffeta together – they’re treated as one fabric, with the lace giving more interest to the taffeta, instead of the lace being a separate skirt. I may try that with this pattern.

I had originally planned to make view E as well, the jacket and trousers, but the pants are actually cut of a knit. You need the stretch to pull them over her hips. I didn’t have a knit thin enough to be in scale for the girls, but I’ll keep looking.

See how it is? I finish trying out one pattern and end up with a whole list of potential modifications and projects!

The Orange Purse Completed

Elegant Edibles purses from Knitpicks

I mentioned these two fruity purses to you a few weeks ago, as they’d risen to the surface of my projects needing to be finished. They were from a kit from Knitpicks called The Elegant Edibles kit. (That’s a Ravelry link – the pattern is no longer available.)

I knit the orange and the kiwi, but never finished them and put them aside. That’s changing now. 🙂

The orange was like this:

Orange purse from Elegant Edibles Knitpicks kit, knit by Deborah Cooke

Usually, when I put a project aside, there’s a reason. I had no idea how to line the orange, given its unusual shape, plus I thought it was too floppy to make a good purse. Similarly, I liked the handle of felted leaves, but it felt too soft to be functional.

One review, I decided to interface the lining. For the shape of the lining pieces, I flattened the bag and traced around the crescent shape, then around the arc of the “rind”. I added 1/4″ seam allowance on the edges and cut the lining. I then added some interfacing to the “rind” edge to give the purse some body. I trimmed a piece of curtain header (buckram) to the shape and stitched it to the lining fabric so it wouldn’t shift around, then assembled the lining.

You can still see those stitches. There was no chance of matching a print with so many colours, so I went with white for contrast.

Orange purse from Elegant Edibles Knitpicks kit, knit by Deborah Cooke - lining and reinforcement of base

Here’s how the lining looks with the purse on its side.

Orange purse from Elegant Edibles Knitpicks kit, knit by Deborah Cooke - lining completed

Of course, I added an interior pocket. Just for fun, I used a contrast batik. The open edge of the pocket is parallel to the zipper.

And here’s the bag turned right side out:

Orange purse from Elegant Edibles Knitpicks kit, knit by Deborah Cooke - bag with zipper

Finally, here it is all finished up.

Orange purse from Elegant Edibles Knitpicks kit, knit by Deborah Cooke - completed purse

I like the felted leaves a lot, but they’re a bit soft for a handle. Twining them around the fabric handle makes for a more sturdy solution. I’ll see how it works out but might stitch that felted wool handle right onto the batik. Overall, I’m pleased with the result. 🙂

Next up, the kiwi purse.

Vintage Knitting Patterns for Dolls from Mary Maxim

Last week, I discovered these older knitting patterns for 11.5″ fashion dolls available as PDFs from Mary Maxim. They were also on sale at the time, so I snapped them up. They include quite a number of garments each.

Mary Maxim's Fashion Doll Wardrobe

The first one is called Fashion Doll Wardrobe – you can find it on the Mary Maxim site right here.

It includes a (blue/white) houndstooth coat with pants, top and hat; a (green) poncho and dress; and a (peache/blue) capri set with top and short pants.

Apparently, the top and capris both have a beaded fringe at the hem, although it’s tough to see in the picture. The whole thing looks like an old photocopy. 🙂

Mary Maxim's Fashion Doll Wardrobe

The second one is also called Fashion Doll Wardrobe – the pattern samples are all knit in red and white.

It includes a “skating outfit” with sweater, skirt and headband; an “aran outfit” with sweater and skirt; a “casual outfit” with sweater and pants (I think that’s the top middle one); an “office outfit” of dress and short jacket; and an “evening outfit” of a long skirt and sleeveless top.

Again, the PDF pattern looks like a photocopy, but there’s a chart for the top sweater. It has a contrast star on the back.

Mary Maxim Teen Doll Pattern

The third pattern has a black and white product image, which is very fuzzy. This one is called Teen Doll Pattern.

From left, the pattern includes a coat and boots, worn with a straight skirt; a skating dress with panties; a long dress with an eyelet pattern on the skirt; a jacket, pants and tank top; and finally, a crocheted long dress.

Mary Maxim Teenage Doll pattern book

Finally, there’s a very vintage pattern, Teen Age Doll Pattern Book. The description says it includes 8 outfits. Ravelry lists the original publication date of this book as 1950 but that can’t be right. The doll on the right is Midge, who was introduced in 1963.

There is the 3-piece suit for B shown on the cover, and the 3-piece outfit for K shown on the cover. There are two dresses for B: one “off-shoulder” and one v-neck. Both have a hat and purse. There’s a v-neck sweater and hat for both B and K – these look like polo shirts to me. There’s a Bermuda shorts set for both B and K, including shorts, sweater, knee socks and hat. There’s a sweater, skirt and hat for B with Rudolph on the sweater front. (That’s what it says. I don’t see it, but maybe it will be more clear in real life.) There’s a coat, hat and purse for B with fur trim which is very pretty. Then there are “ski outfits” for both B and K, with sweater, pants, mittens, socks and hat – knit in a variegated yarn, they look a bit like pjs. 🙂 I count more than 8 outfits in total, so there’s a lot of knitting in this little book.

All of the knits call for either fingering weight yarn on 2.75mm needles, or DK/sport yarn on 3mm needles. Sounds big to me, but I’ll check it out.

Mary Maxim Teenage Doll pattern book

Ravelry shows a book (Mary Maxim, Teen Age Dolls, Vol 2: Mary Maxim Exclusive Knitted Sportswear for 9″ to 11½” Teen Age Dolls, Vol 2) which has classic Mary Maxim sweaters for Barbie, Ken and Skipper. Those would be fun to knit.

I found a print copy of this one on Etsy and have ordered it. I figured I’d print it out since the sweaters are charted, so a print copy made sense. I’ll tell you more about that one once I dig in.

Cute Embroidery Kits from Kiriki

Kiriki Press doll kits

These kits were featured in the current issue of Threads Magazine, as a gift suggestion for sewists. I took the suggestion and bought myself two of them. They are incredibly cute.

The kits are for stuffed and embroidered dolls – many of them are animals – from a company called Kiriki Press in Toronto. You can see the range of options on their website – and a few of them in this image at right from their site.

The doll kits are presented by level, which is determined by the amount of embroidery on each one.

Kiriki Press Starter Kit for Raccoon

I bought the raccoon in the starter kit, partly to avoid having to hunt down an embroidery hoop of the right size. (You can choose any design in the starter kit or just on its own, as the sheep below. You can also add a hoop to any order, which I didn’t notice earlier.)

The starter kit includes the hoop, as well as a pair of stork scissors and the instruction book of stitches. It also includes the same items as in the individual doll kit – the embroidery floss, screen-printed fabric, stuffing and pattern.

Kiriki Press Kit for Sheep

I bought the sheep in the doll kit, so I have two critters to make. Both of these are level 3 kits, with most of the surface covered with embroidery.

It was tough to decide. I loved the wolf and the otter also, and the hedgehog is adorable. Hmm. I also loved the keeper bears, but they were sold out. It looks as if they’re back in stock, so maybe I’ll treat myself once these two are finished up.

I thought they’d make nice projects for a snowy evening and am looking forward to starting the raccoon.

Hankie Chic Caracas Dress for 12″ dolls

Caracas pattern for 12" dolls by Hankie Chic

I made some holiday dresses for the girls, using this pattern by Sylvia Bittner at Hankie Chic. The pattern is called Caracas, and you can buy the downloadable PDF from her online store right here.

This dress has an interesting wrap around the shoulders. It’s attached to a bodice flap overlapping the front body of the dress. The skirt has a big pleat in the front, then there are three bead buttons at the side of the bodice.

I found this pattern an easy make, so long as I didn’t think about it too much. I referred to the pictures of the final dress for that front pleat, because I would have sewn it down wrong otherwise. Similarly, I wrapped that shoulder bit a couple of times before I was convinced that I had it right. It folds back on itself (kind of) which confused me at first.

Here’s the first one I made, modelled by Continental Holilday Silkstone B.

Caracas pattern for 12" dolls by Hankie Chic made in red silk by Deborah Cooke

The three little “buttons” are gold beads, although they’re hard to see from this angle. I also bought the girls some Kaiser stands, which are pretty awesome. They almost disappear and are much more stable than the stands that come with the dolls.

I really like the base bodice design on this dress – it has a center front vertical seam from the waist to the bust, then a crosswise dart on the bust – and may use it in other garments. It fits quite well.

Caracas pattern for 12" dolls by Hankie Chic made in red silk by Deborah Cooke - bodice detail

I did change the order of assembly, in my usual way. I really like to sew the skirt and the lining together at the hem while they’re still flat, then understitch the lining. I did that with the skirt, then the same with the bodice. My handsewn seams end up being the waist seam in the lining, then the back edges to finish up.

I am lucky to have a number of friends who sew and who give me scraps of their wonderful fabrics. The red dress is made from a silk taffeta given to me by Laura.

Caracas pattern for 12" dolls by Hankie Chic made in blue silk by Deborah Cooke
Caracas pattern for 12" dolls by Hankie Chic made in pink silk by Deborah Cooke

The blue and the pink are from silk remnants given to me by Helen. The girls like them all. 🙂

These models are Lingerie #6 in the blue and Lingerie #2 in the pink.

After the first doll was dressed, I realized that she reminded me of Ravishing in Rouge from 2001. I had a look and found one at the right price, so she’s joined the other girls here. She really is lovely.

2001 Ravishing in Rouge Silkstone Barbie

I’ve still planned to make another Caracas, with the wrap in a contrasting fabric. For the moment, though, the girls have some party dresses for the festive season ahead.

Finishing the Jumping Jax Flash Quilt

Jumping Jax Flash quilt designed by Judy Niemeyer

One more quilt has made its way to the shop with the long arm quilting machine and come home to be finished. This is Jumping Jax Flash, a Judy Neidemeyer design that I pieced at least twenty years ago.

Here’s the pattern envelope at right – the pattern is discontinued. This link will take you to the Quiltworx page for this design. There are still some paper copies of the pattern around – I found one at Etsy and one in a US quilt store when I was looking for an image. If you want to make one, you can find the pattern!

Obviously, I made mine bigger, with 25 blocks instead of 12. I’m not sure whether I bought more paper piecing templates, or whether I traced them out myself. It’s been a loooooooong time since this one was pieced!

Here’s what it looked like when it went to the shop. Lots and lots of paper piecing for this one.

Jumping Jack Flash quilt by Judy Neidemeyer pieced by Deborah Cooke

I’m so chuffed that this one is finally finished. Here it is now – yes, another kitchen shot because the snow just keeps on coming.

Jumping Jax Flash quilt designed by Judy Niemeyer and made by Deborah Cooke

As you can see, I inverted the colours for five squares, giving them black stars instead of black backgrounds. Four have green backgrounds and the central one has a peach background. I wanted it to be a focal point, that looked illuminated compared to the others. I’m not sure that was successful, but it is what it is at this point. I am glad that I broke up the rhythm of the colours a bit.

Jumping Jax Flash quilt designed by Judy Niemeyer and made by Deborah Cooke

I don’t have the highest level of restraint with colours and fabric selection, and this quilt proves it. There’s a lot of range in my definition of peach/orange and even more in my definition of turquoise. The blacks are pretty consistent (esp for me.) The smaller stars are all half-yellow, although the intensity of the yellow varies greatly, and the second colour in each one, which started out as a bright, ended up becoming just about anything not-solid-yellow.

Jumping Jax Flash quilt designed by Judy Niemeyer and made by Deborah Cooke

The other day, I told you how I’d already sewn on the prairie points and wasn’t sure how the binding would work out. In the end, I sewed on the binding just the way I always would, but instead of enclosing the seam allowance, I pressed the binding flat on the back. It’s more of a facing than a binding, though it’s doing the same thing. That peach French shirting (that I used for the bias binding) has a woven windowpane design and I did use it on the top, so it brings it all together. I might even have enough of it left for a short-sleeved shirt.

The machine quilting is in a meander pattern. Though it looks like white thread here, it’s actually a peachy pink that coordinates quite well. I decided against adding more quilting, as the binding is sewn down almost halfway through that unquilted border.

I’m SO excited to have this one finally finished!

And now, of course, I’m thinking about what’s next. I have unfinished projects calling my name but am still tempted by this Judy Niemeyer pattern. It’s called Crimson Poppy and that link will take you to the pattern page at Quiltworx.

Crimson Poppy quilt design by Judy Niemeyer Quiltworx

Hmm. Not just paper piecing but curvy bits. I may have to hunt down a workshop for this one, as I’m not sure how you (I) would even begin to choose fabrics for it.

The Moonglow Quilt is Done!

Last week, I picked up two more finished quilts at the longarm quilting place. They both needed their edges bound, of course. For both quilts, I chose a meander quilting pattern and it proved to be the perfect choice. 🙂 It’s always so exciting to get a quilt back and have it almost finished. I end up trimming the edges right away.

For this one, I had the fabric for the bias tape already. I had it cut up and sewn onto the front of the quilt by the next morning. I’ve been handstitching it to the back ever since. It’s motivating to have a quilt almost done!

I meant to show you this Friday, but it was raining when I finished the binding on Tuesday. My plan was to take it outside then photograph it on the driveway, but no joy. Rain, rain, rain, and then Friday, the snow started. So, we get kitchen pix instead.

Here’s my finished Moonglow quilt.

Moonglow quilt made by Deborah Cooke

My first thought was that the binding could be black, but I thought that was a bit of a predictable choice. Instead, I chose this purple print and kept it very narrow. The backing is a black print with purple.

Moonglow quilt made by Deborah Cooke

I really like how this one came out.

There are a number of posts about piecing this one, which was a kit from Jinny Beyer. I began to piece it in April 2020, apparently.

Moonglow Quilt I

Moonglow Blocks

More Moonglow Blocks

Finishing the Moonglow Quilt Top

The other quilt that’s home to have its edges bound is my Jumping Jax Flash quilt, which has an edge that needs a bit of thought. Because I put prairie points on the outer edge, I asked them to leave the coral border unquilted. So, I’ll need to figure out a binding, then maybe add a bit more quilting myself to finish it up. As my friend, Terri, said, it will have more of a facing than a binding.

Here it is unquilted to show you what I mean.

Jumping Jax Flash quilt pieced by Deborah Cooke

It also has a bit of a ripple around the outer edge, as I added this coral border before I realized that strips cut crosswise will stretch a bit when sewn. Hmm. This one needs a plan – but first, I need to check in the attic to see if I have any of those fabrics still in my stash!

It has so many fabrics that it wouldn’t really matter if I used a new one for the border, but it would be more satisfying to use one that’s already in the quilt. There’s a coral French shirting that I think it in the stash – I just used a bit of it in the points, because I was planning to make myself a shirt with the rest, so I’m thinking there’s 1.5m or so stashed away.

Radiant New York Beauties

Radiant New York Beauties by Valori Wells

The other book I found on my shelf this week was Valori Wells’ Radiant New York Beauties.

Here’s an Amazon.ca buy link.

Here’s a buy link at C&T publishing.

And here is Valori Wells website.

I like her use of stripes and plaids, and also her playful freeform quilting. It’s a joyous little book. 🙂

Carnival Beauty is the quilt on the cover, although that only shows part of it. Here’s a picture from inside the book that I took:

Carnival Beauty by Valori Wells

I like that there’s a kind of a gradient in her quilt top, with the bottom being darker than the top, although I didn’t manage to accomplish that myself.

I was very excited to realize how much I’ve finished on my quilt top. Here’s my progress so far:

Deborah Cooke's Radiant New York Beauty quilt top

You can see that I need three more little suns to finish the top in this layout. Looking at this photo, I have a feeling that I was going to move that top yellow sun up half a row so it didn’t line up with the pink one so well (they’re not sewn together yet) then add more little suns around it. (That would also explain why there are two more blue background squares cut.)

Clearly, I prefer my suns being whole. 🙂 I added rick-rack around a few of them (to make them more radiant) and that’s fun, too. In the project stash, there is also some trim with mini pom-poms, so that might end up in the finished top. (Maybe around the border. Hmm.) I really like it so far and am pleased with the fussy-cutting and piecing.

This one also requires me to dig back into the stash and search for fabrics to finish up this top. Sounds like a trip to the attic is on the agenda for this weekend! This top is an exciting find as it’s almost done, and the size means I’ll be able to quilt it myself. I’m also excited that many Kaffe Fassett yarn-dyed stripes are available again, so I’ll be able to add some of them into those little suns that need making.

Tomorrow, we’ll have a look at a finished quilt. 🙂