A Knitted Purse

Here’s another project that’s been waiting on me for a while and was finished up this week. I wanted to post it yesterday, but the handsewing at the end took a bit longer than anticipated.

One Stick Two Stick Sushi Wallet instructions

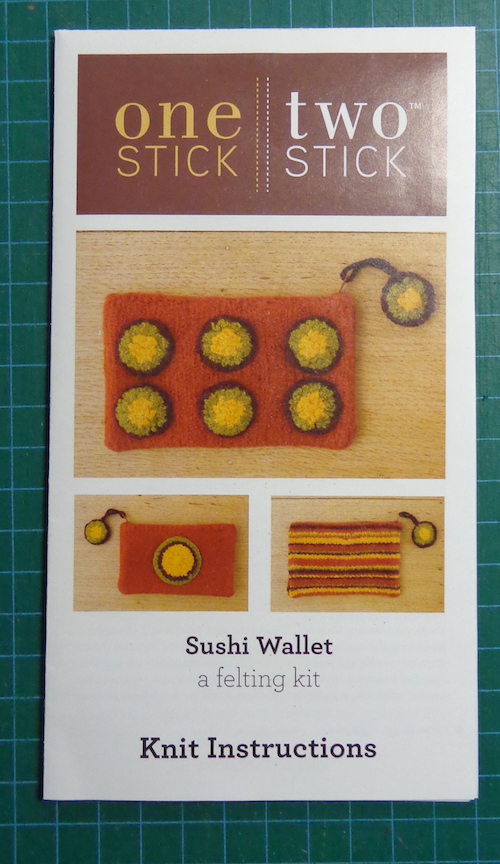
It started with a kit called Sushi Wallet. Here’s a Ravelry link for the pattern. The kit was from One Stick Two Stick and was packaged in a cute way, like a tray of sushi with six little balls of wool. I’ve chucked the packaging from mine, but here’s one that sold on Etsy. The kit includes the yarn, the pattern and a matching zipper.

On the right is the instruction folder, which shows the sushi wallet you’re supposed to make at the top. The second wallet is a variation, with just one sushi on the side and stripes on the back.

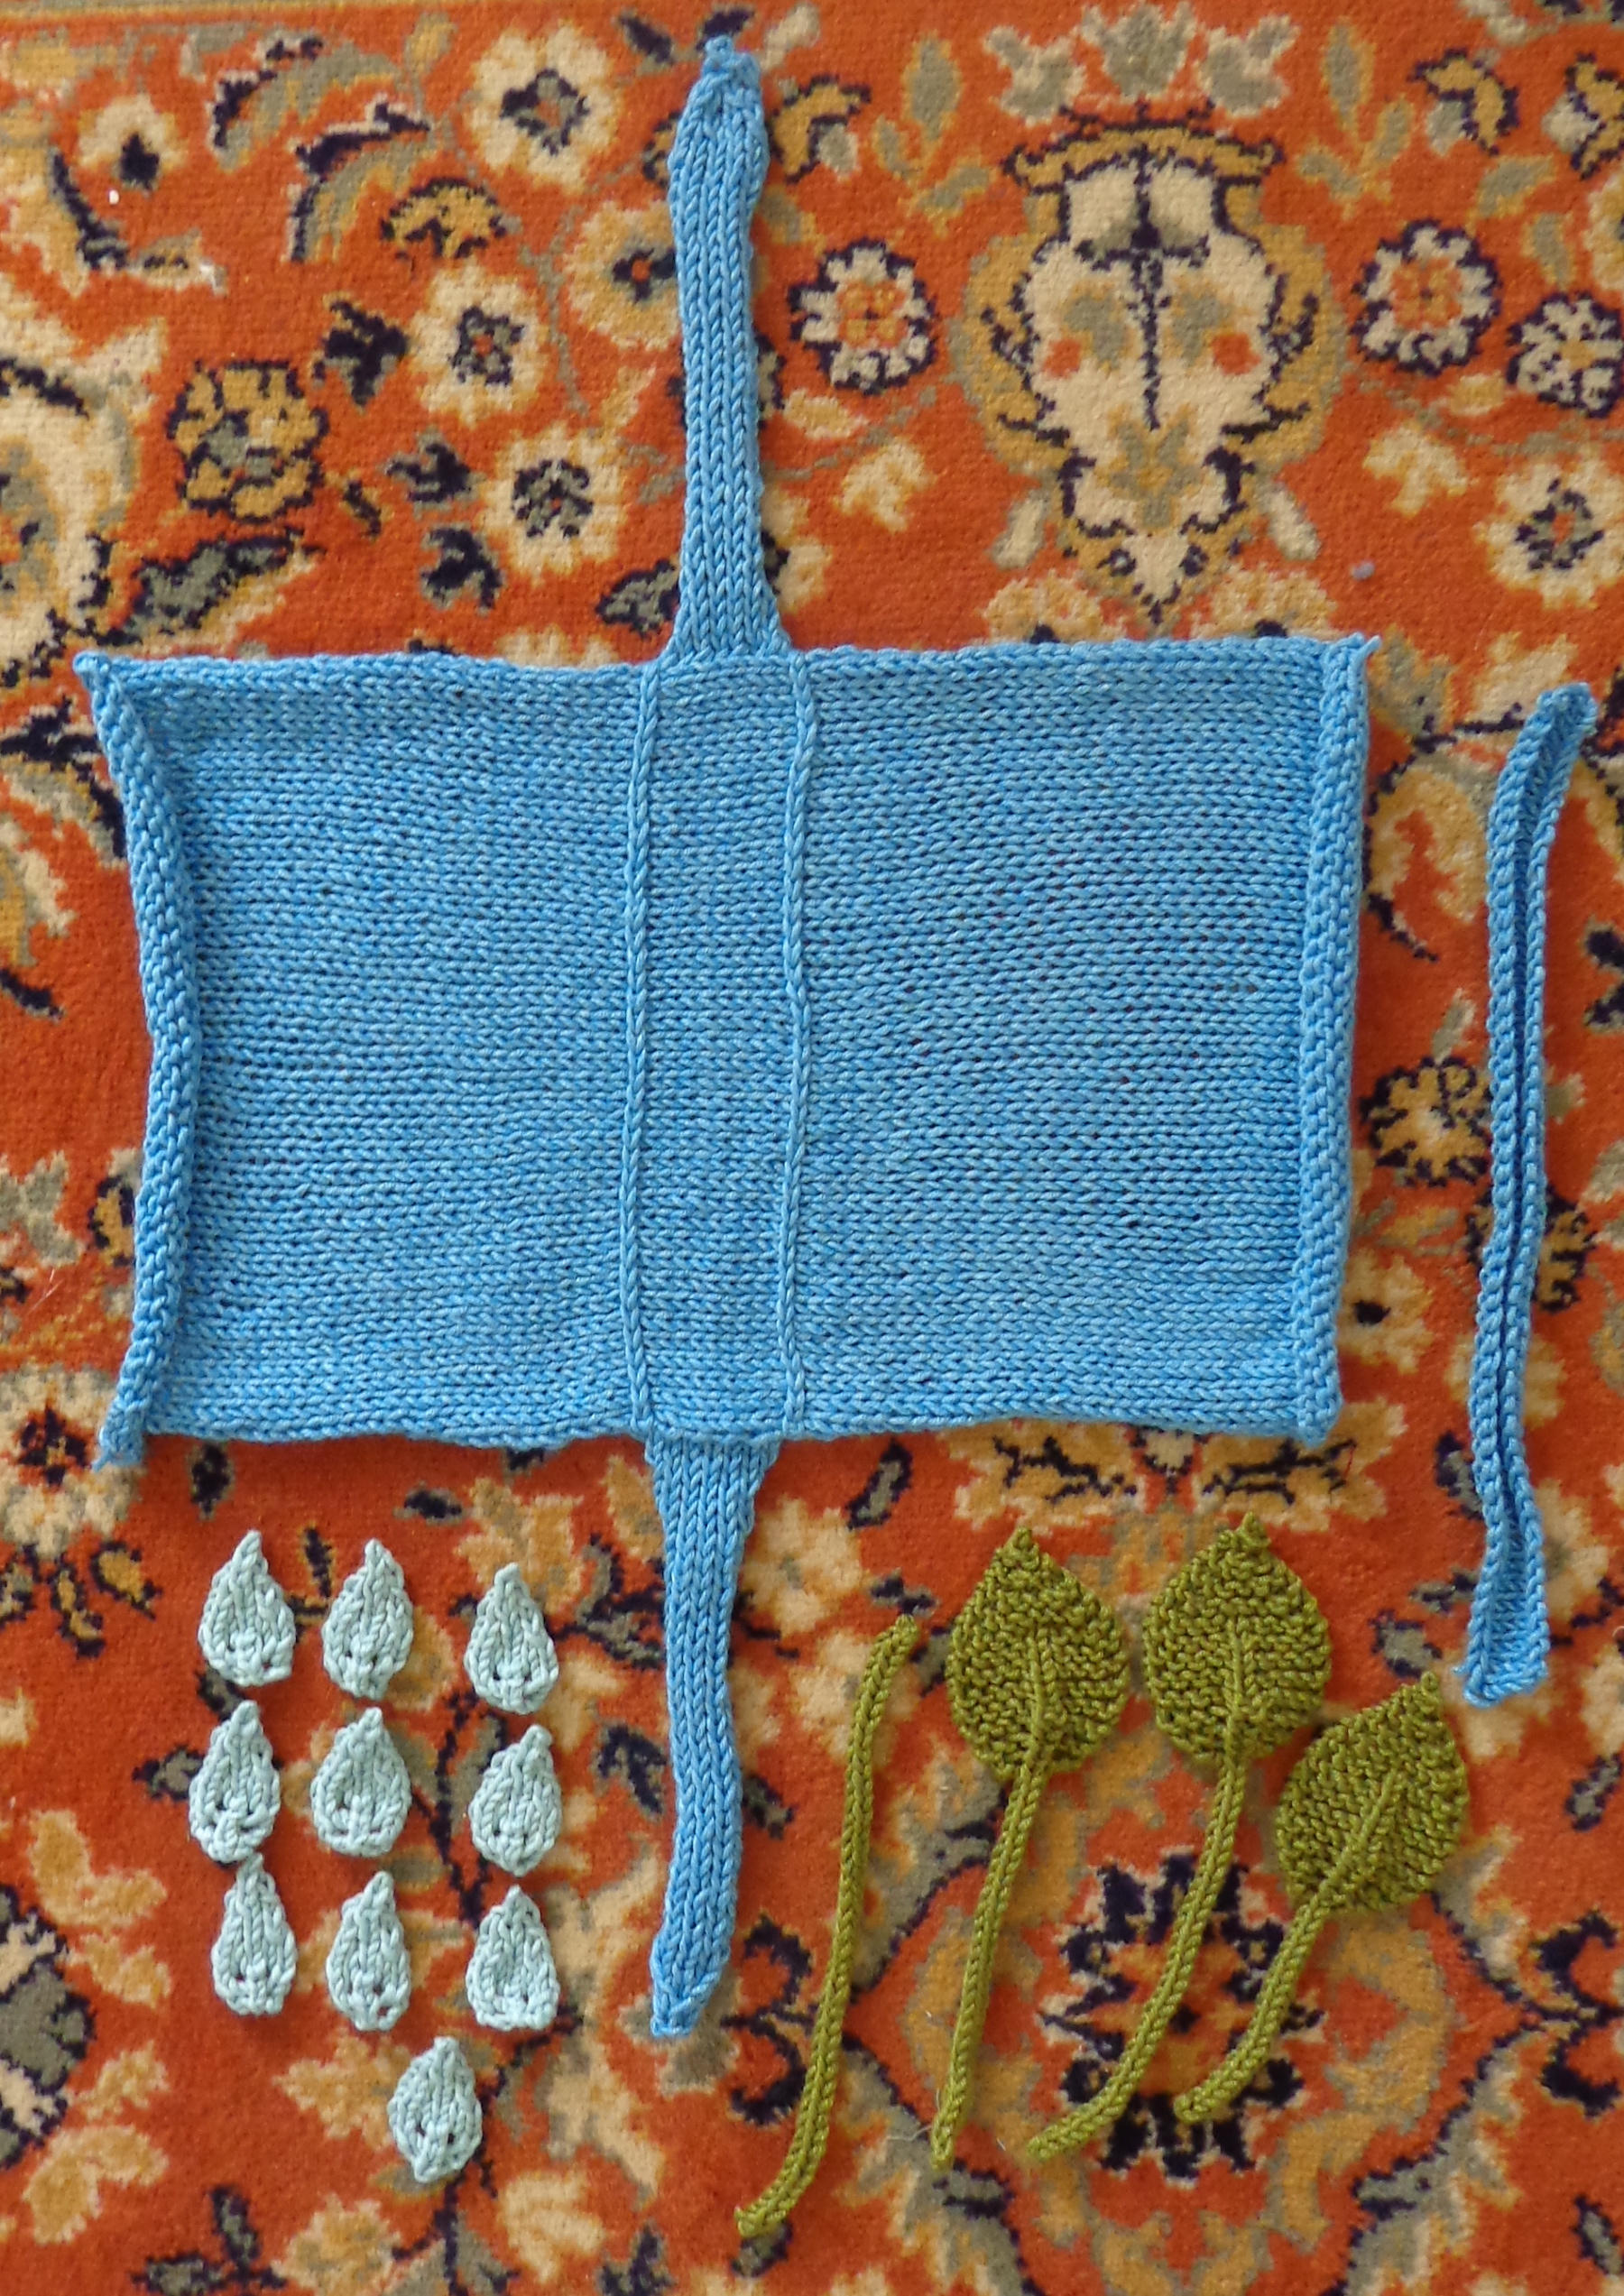
I found the kit for a buck in the discount section at Len’s Mills and they were all in the blue-green colourway called Caribbean Seas, possibly because it doesn’t make sense for sushi to be those colours (even though the combination was pretty). The yarn is a bamboo wool mix and there were four colours included: 64g of the medium blue, 18g of the light blue, 13g of the dark green and 11g of the light green. I weighed them all because I planned to do something different than follow the instructions. There was enough yarn to make two wallets, but I didn’t want two wallets.

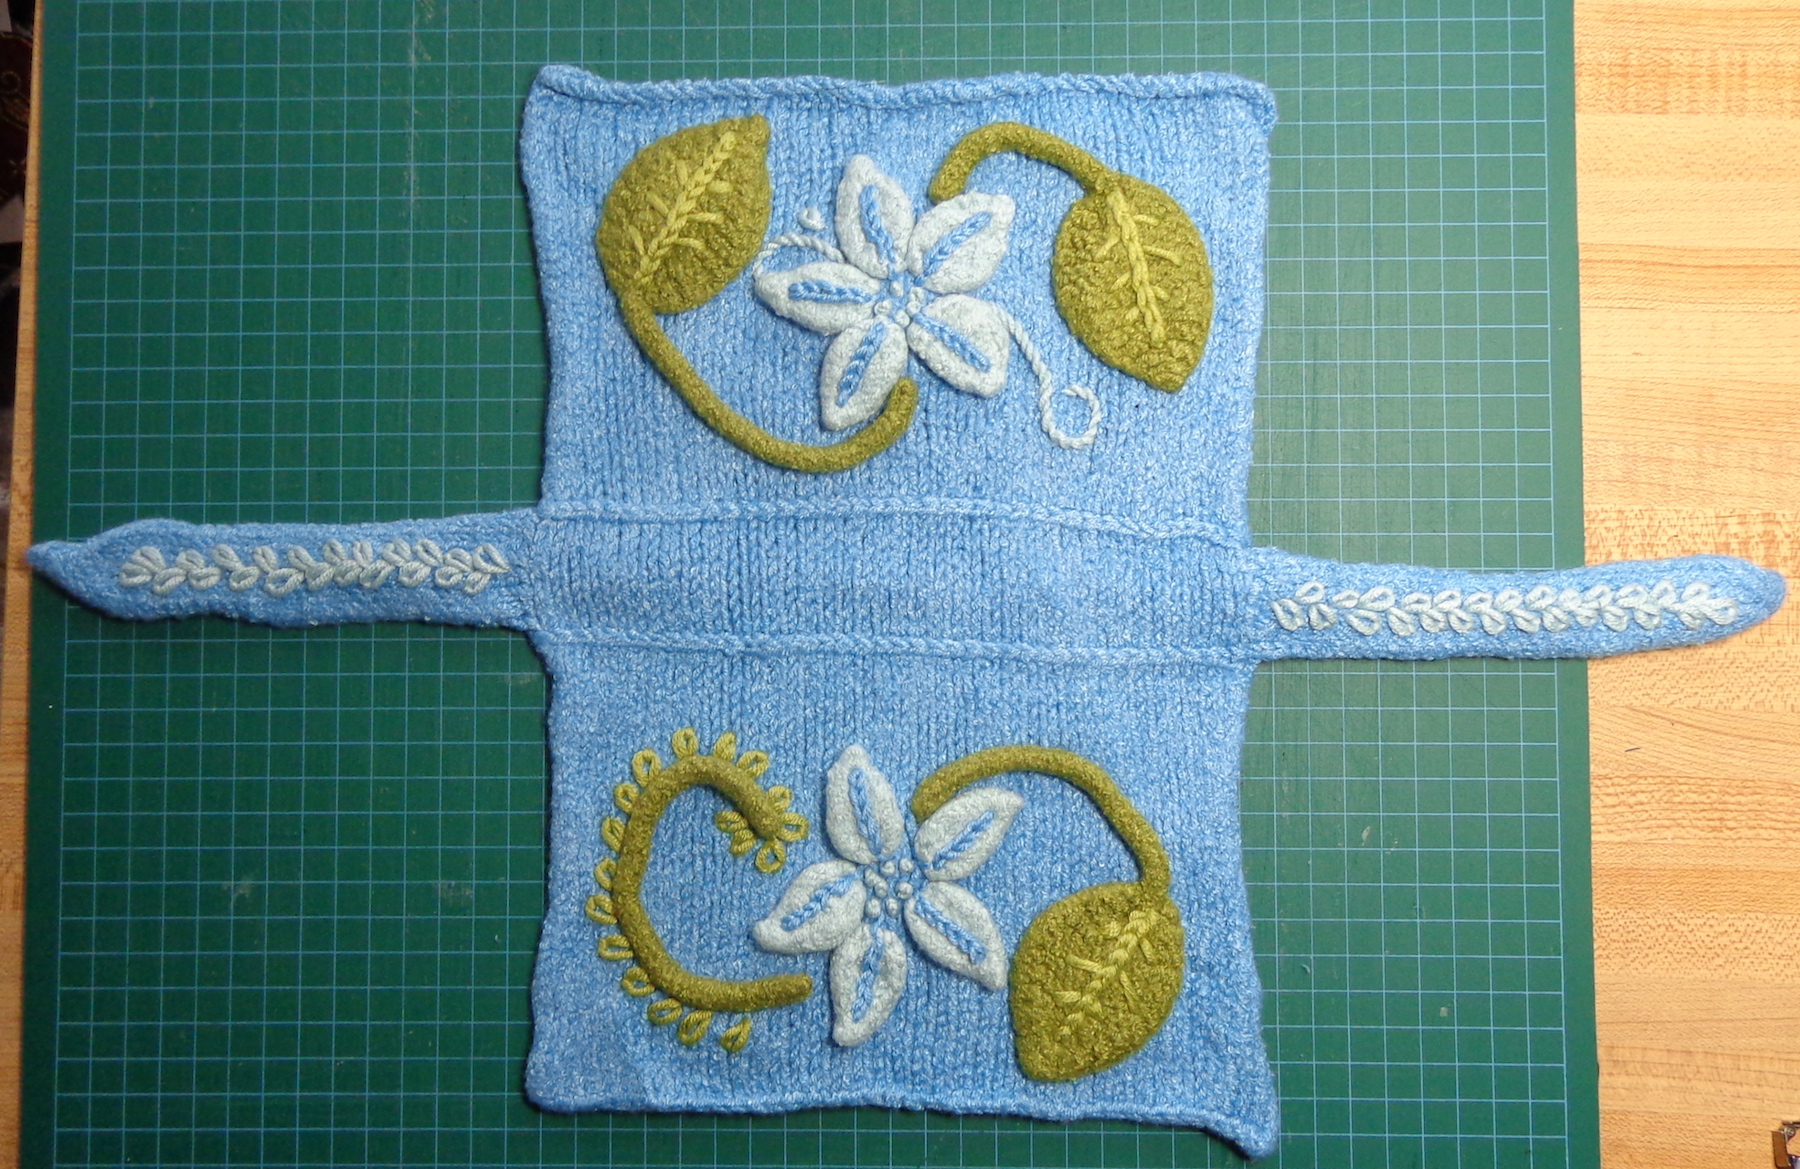
I made a bigger purse instead, by casting on more stitches and knitting more rows. I also added a wedge at each side and a base so it wouldn’t be flat. (The original design is flat, a rectangle folded in half.) I also knit a strip to be a handle. Then I knit petals and leaves from the other colours. Here are all the pieces.

Purse pieces knit by Deborah Cooke for modified sushi wallet

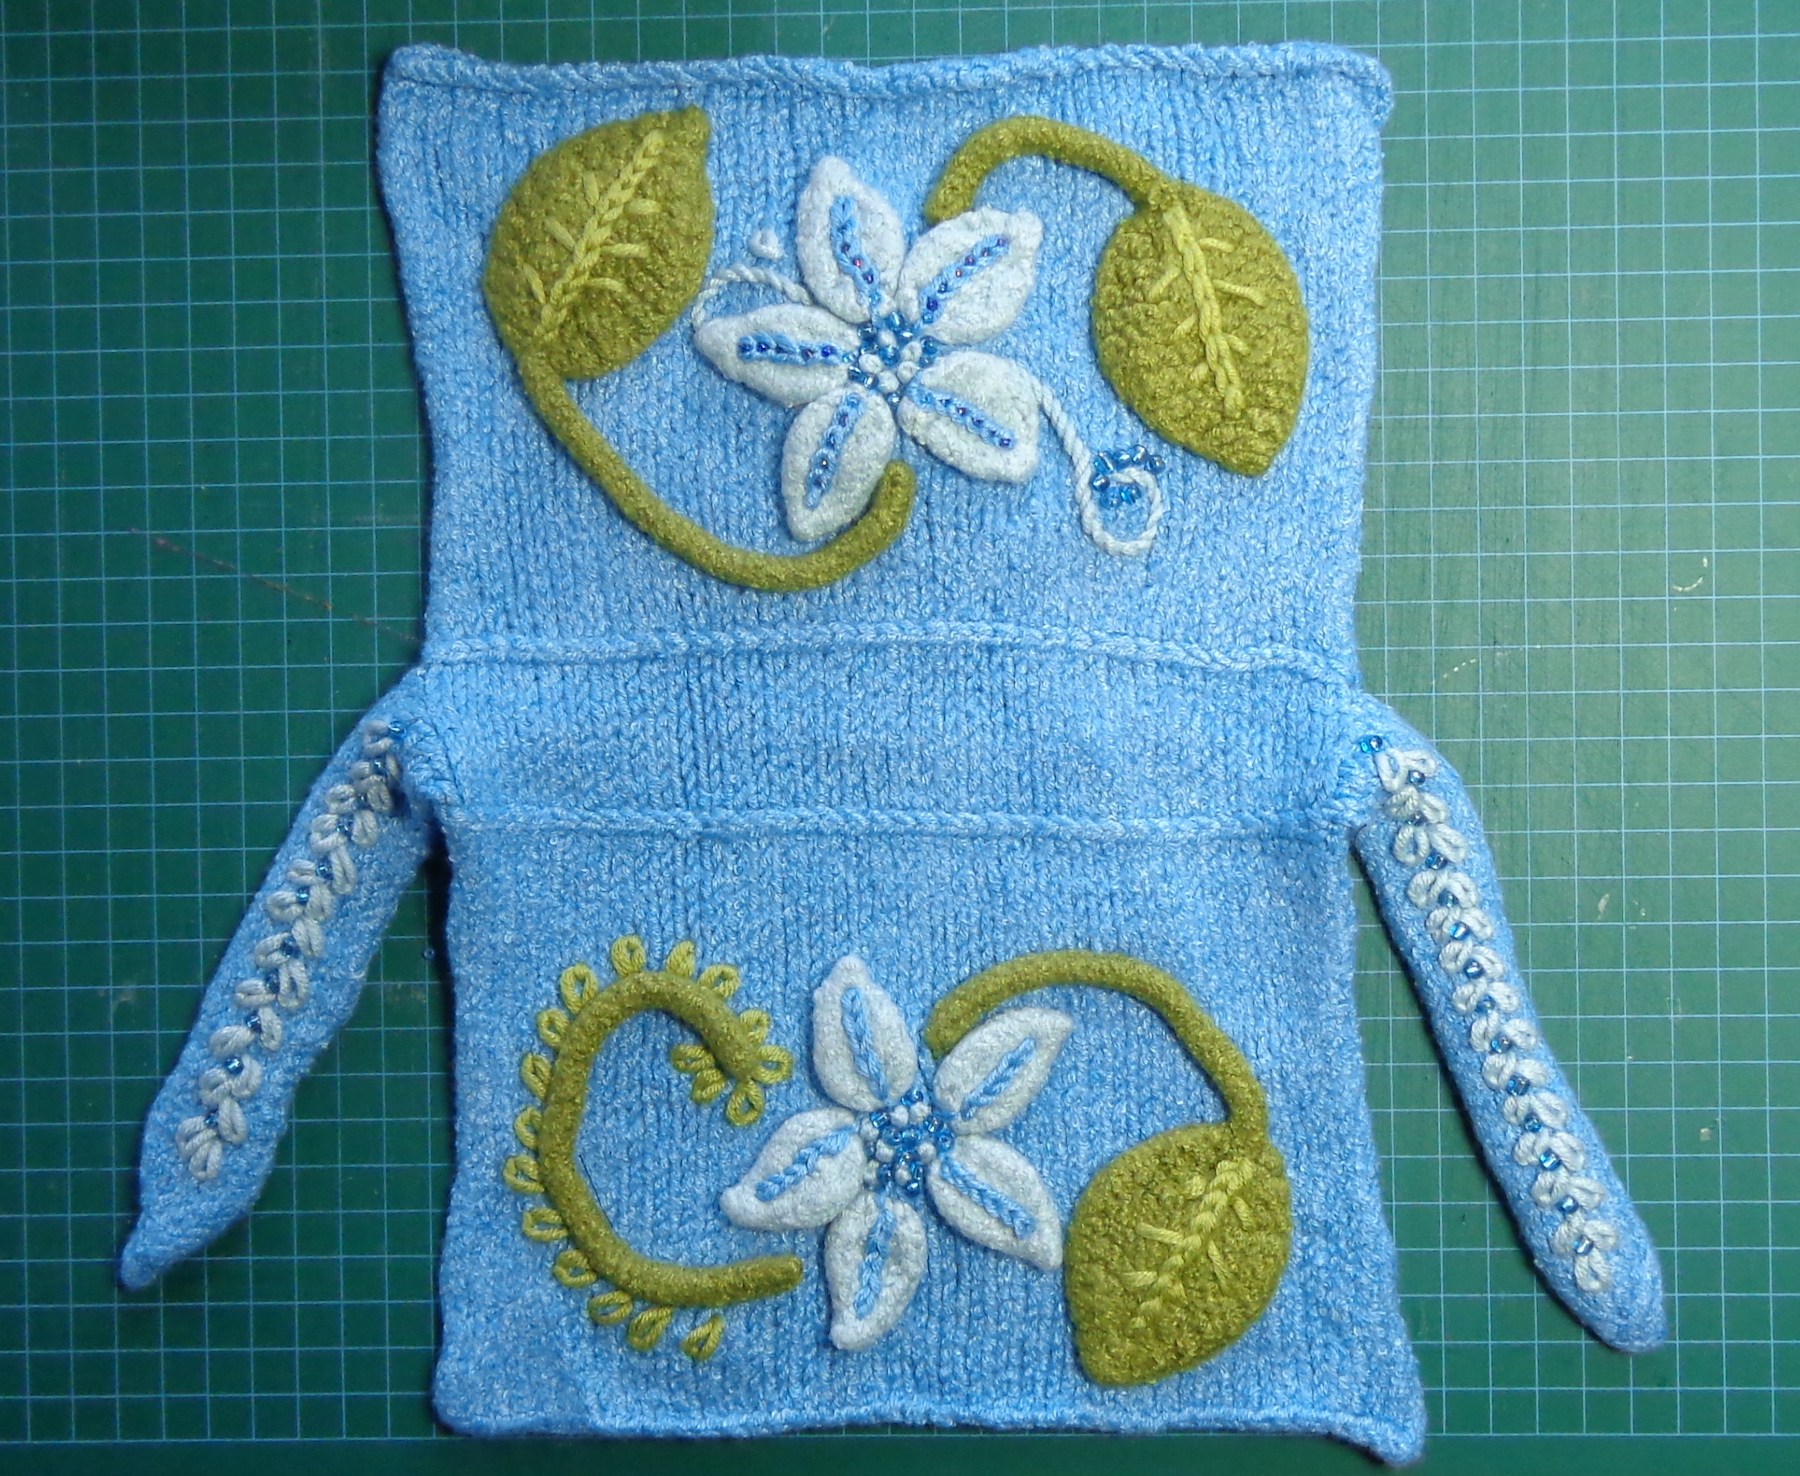
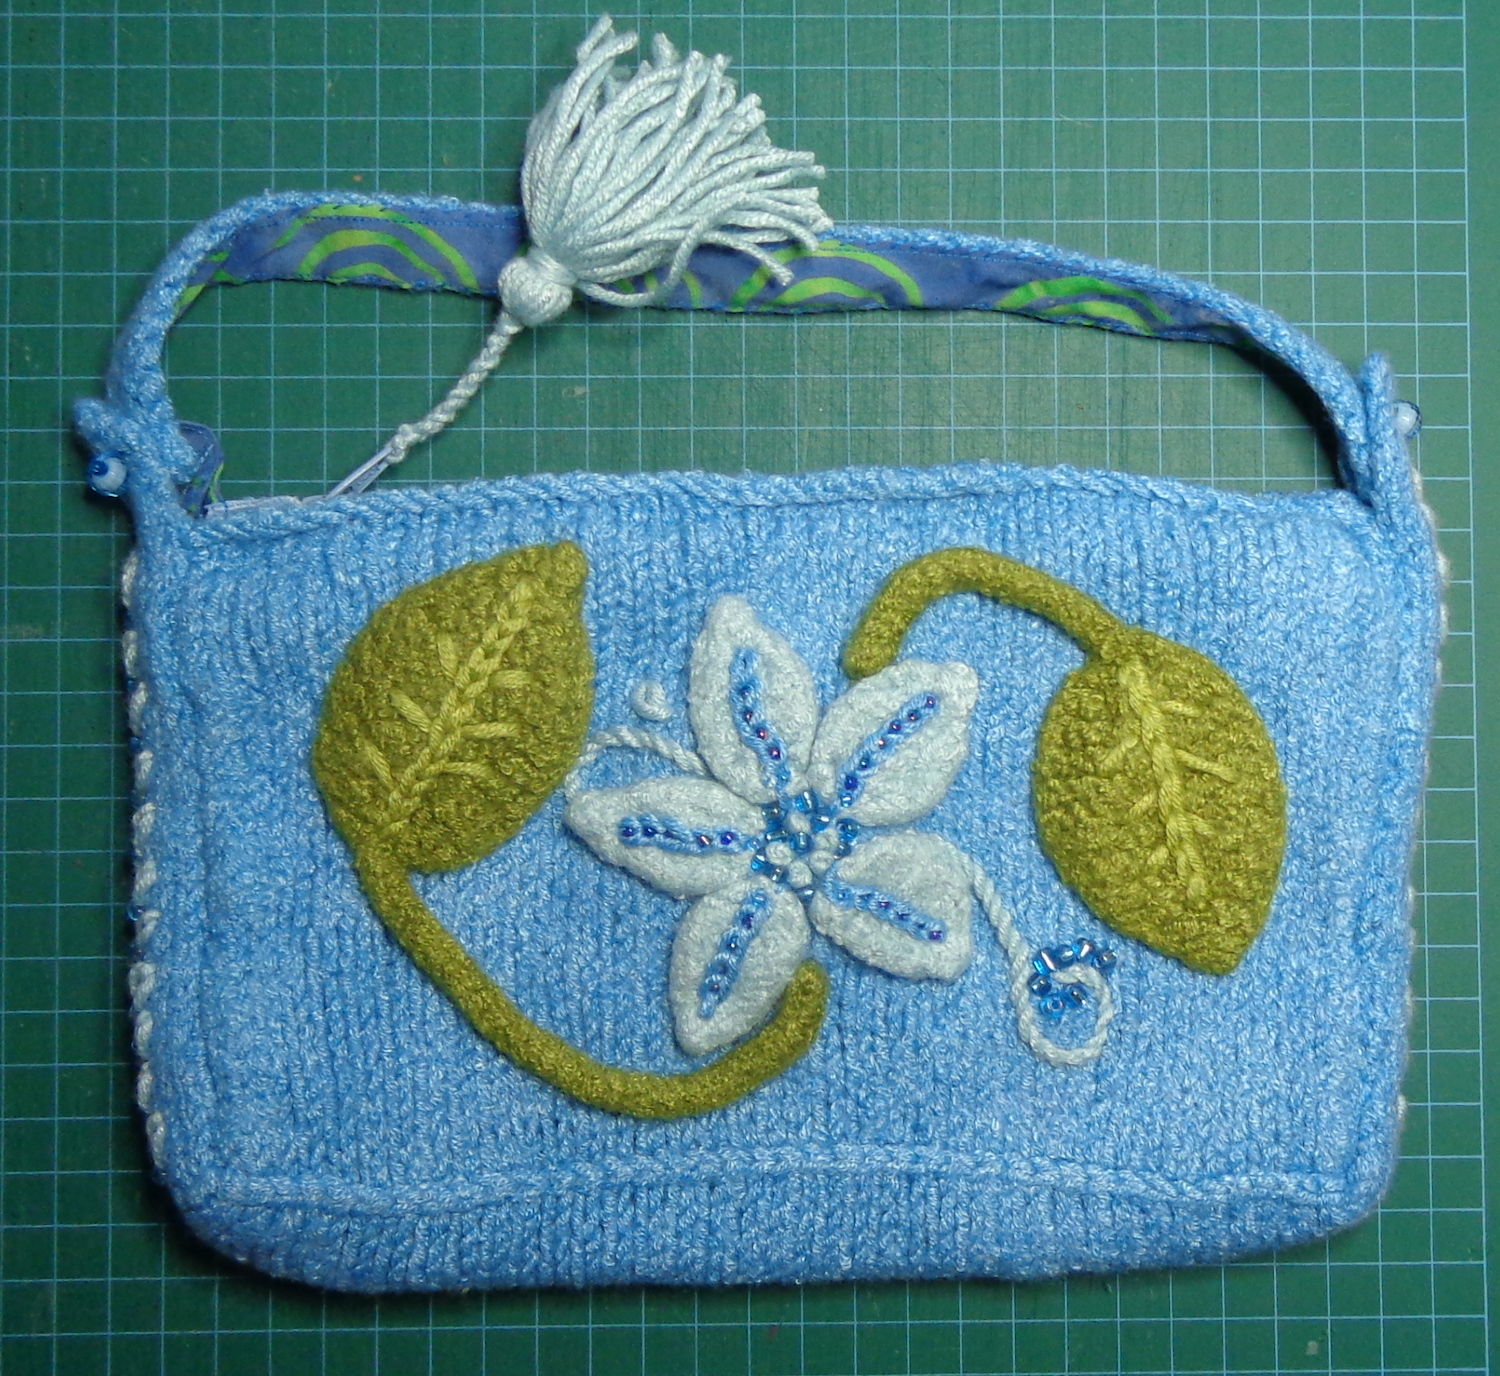
I felted everything in the washing machine. I put the pieces in laundry bags to make sure none of them were lost in the washing machine – this set from Ikea is really useful. Once that was done, I sewed everything in place. I added some embroidery and ended up with this:

Felted Purse with embroidery by Deborah Cooke

I still didn’t love it, so I added some beads:

Felted Purse with beads by Deborah Cooke

I lined the bag with a cute scrap of batik cotton in matchy colours – just using the purse as a pattern and adding a small seam allowance. I also added a little pocket inside, because I always add little pockets inside purses. They’re so useful. You can see it on the right – it’s the perfect size for a hotel room key, credit card, or folded $20 bill.

batik lining for felted purse by Deborah Cooke

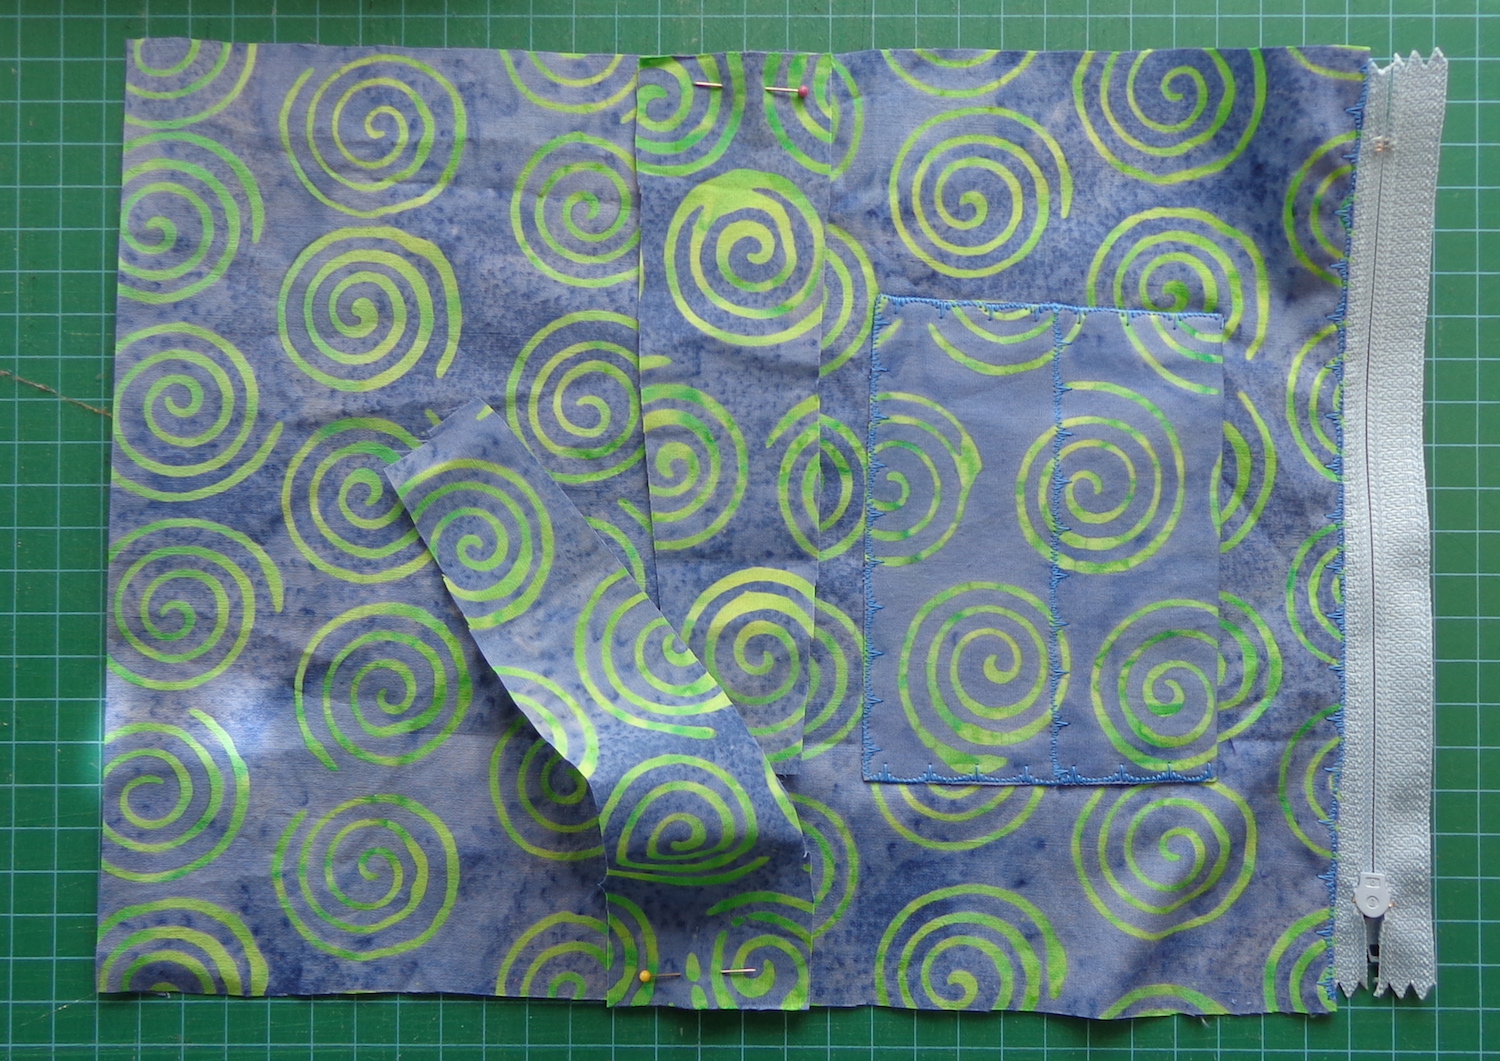
Here’s the assembled lining, ready to go into the purse:

assembled batik lining for felted purse by Deborah Cooke

I hadn’t planned on those two tabs at the top, but they came in handy when attaching the handles.

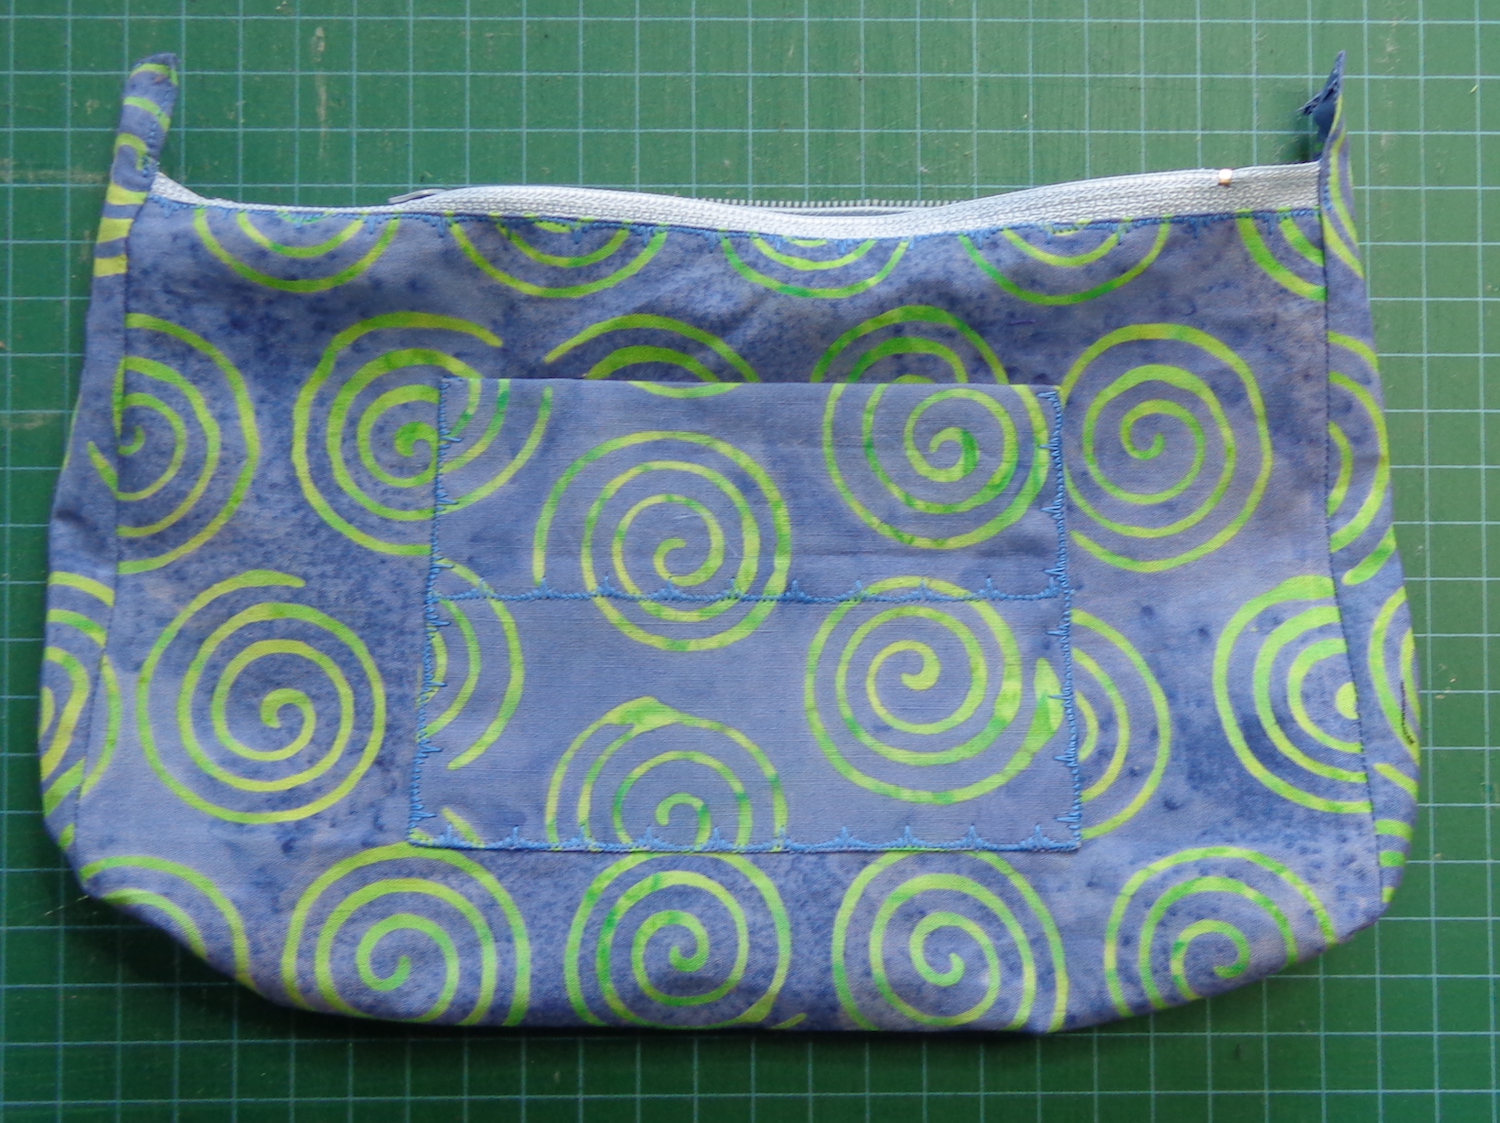
With the zipper inserted and the handle added, the finished purse looks like this:

Felted Purse by Deborah Cooke, finished - side A

And the flip side:

Felted Purse by Deborah Cooke, finished - side B

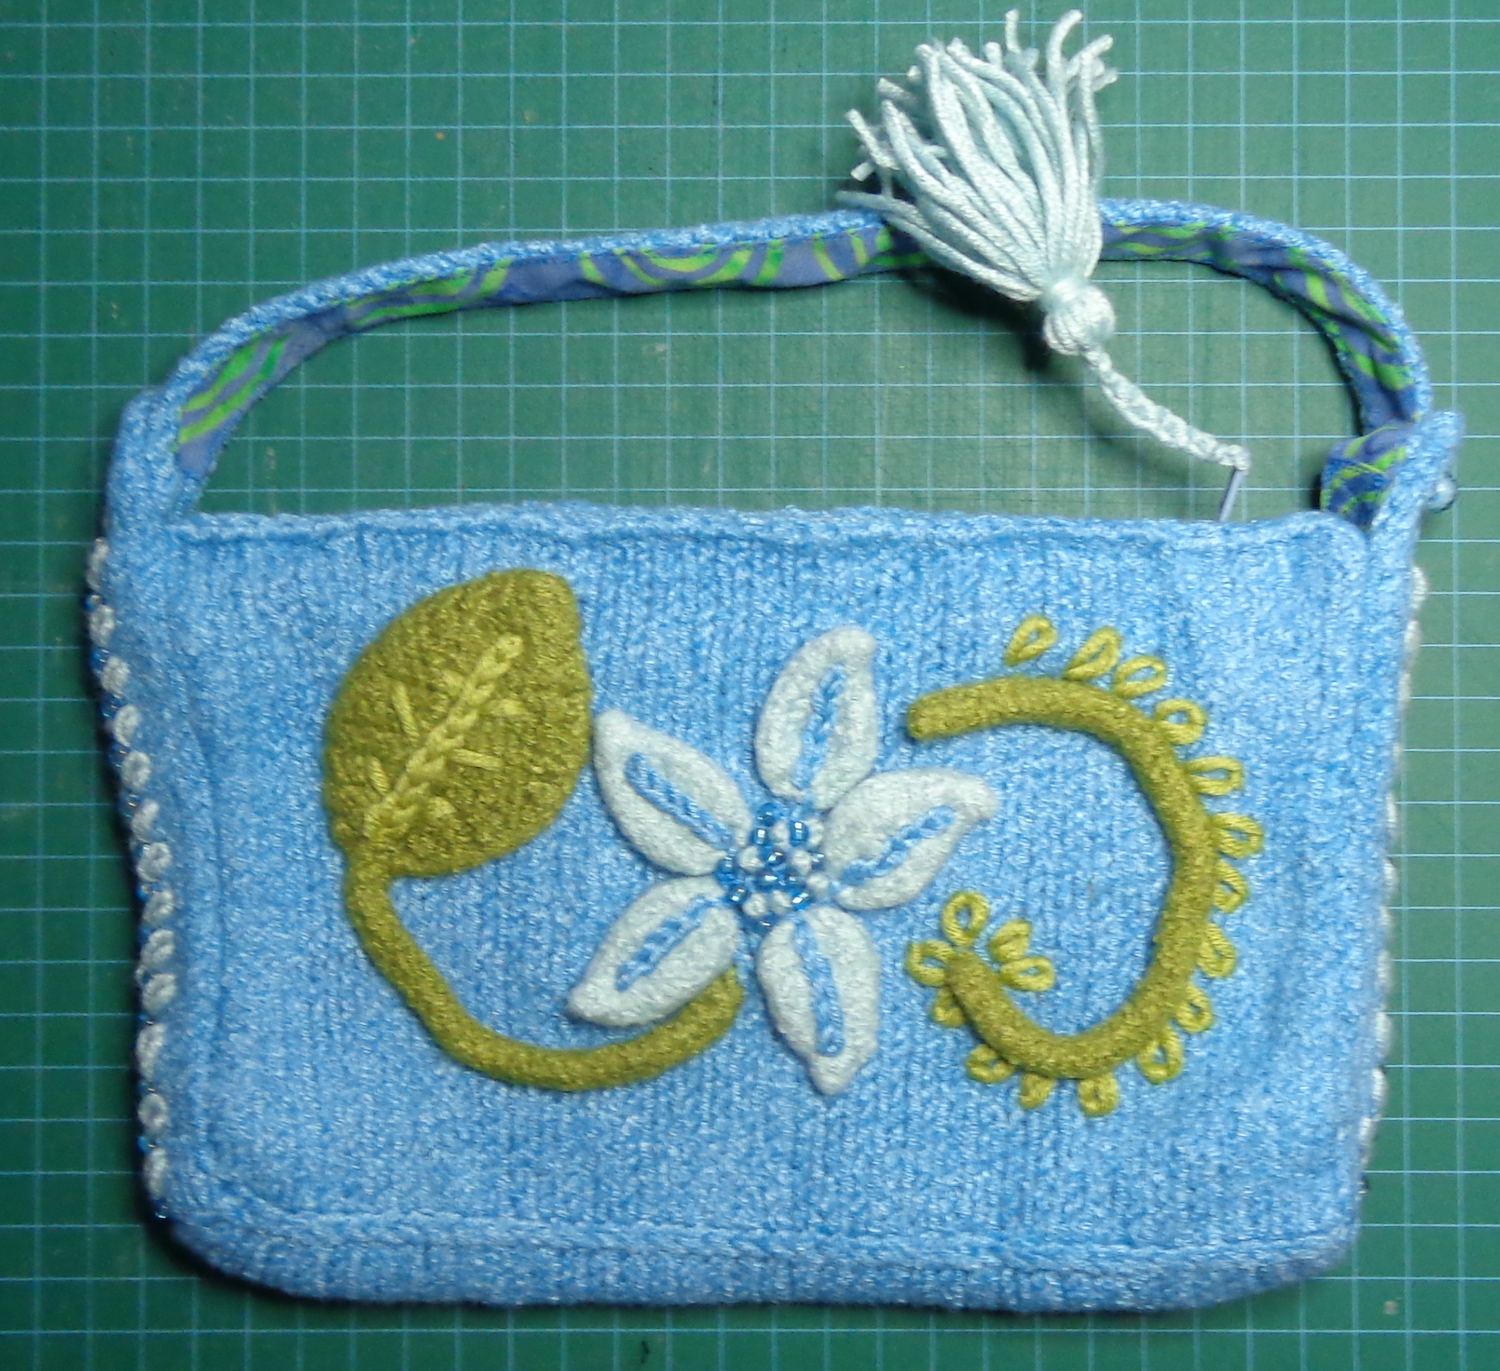
Overall, I’m pretty happy with this. The shape is a little bit wonky, but that tends to happen with felted knits. I certainly like it better than I would have liked a blue sushi wallet. 🙂

And this reminds me that somewhere in my stash of unfinished projects, I have the Elegant Edibles kit from Knitpicks, which is now discontinued. I think I knit the kiwi purse and I know I knit the orange one, and they must both waiting to be lined. I was going to knit the bunch of grapes, but I have a feeling that yarn joined the stash instead. I’ll have to have a look.

Finishing the Moonglow Quilt

I last posted about my Moonglow quilt in November 2020, so this project has been in limbo for a while. I started to post about this quilt in April 2020, and had been working on the piecing for about a year before that, so we’re at five years on this project.

It’s also been two years since I did any machine quilting myself. My goal this spring was to get some things done that have been languishing in my sewing room and this quilt top certainly made the list.

Moonglow Quilt by Jinny Beyer

Here’s that official image of the quilt again, just to remind you. 🙂

When I pulled the Moonglow out this time, I had five blocks left to piece – the four corners and the middle block, which are the most complicated ones. After that, there’s the assembly with the sashing and the final quilting. This one is going to a long arm quilter to be finished up – my plan in March was to keep at it until it was ready to go to the quilter. I did pretty well with that goal!

The idea behind the quilt is that it should take a year to piece. There’s a block assigned to each month, then in month twelve, you piece the intermittent blocks and assemble the quilt. Of course, I didn’t follow the sequence – I did the courthouse steps blocks that go in between the stars when I was tired of paper piecing, so they were done already.

There are two different designs for the corner blocks and you make two of each. I’d already cut out the pieces for the pair that are top right and bottom left, so finished them up first. These are month nine’s project.

Moonglow quilt kit by Jinny Beyer pieced by Deborah Cooke

It’s a dingy day today, so I had to take the pix inside, which means they’re a bit underexposed.

Then, top left and bottom right:

Moonglow quilt kit by Jinny Beyer pieced by Deborah Cooke

And finally, the central medallion – I need to hand-sew the central octagon, so it’s pinned in place here.

Moonglow quilt kit by Jinny Beyer pieced by Deborah Cooke

Next up, the assembly. I’m not going to repiece any of the blocks (I had thought I might, and there’s enough fabric leftover for that) but I am going to restitch one of those central octagons to make a neater job. I’m also going to change the borders on the star blocks so that the seam allowances all press outward. I did that on the central medallion and it makes for a flatter finish. Then I’ll put it all together and take it to the long-arm quilting place.

I’ve never had a quilt quilted at the long-arm place, so I’ll take the dragon quilt to be finished first. This one will make the trip second.

I am pleased with this top and am sure I’ll like the final quilt. It’s a beautiful design and the colour selection is magical. I wish there had been more explanation of why each hue was chosen for each place – I assembled the quilt, but I still don’t understand what makes it work so well.

I did learn in the piecing of this one to step back when I was getting tired instead of pressing on. That’s probably why I wasn’t enjoying it so much at first – I was product-oriented instead of process-oriented. When I slowed down and just sewed for as long as I found it satisfying, the process was much more enjoyable. So, there’s a lesson learned.

I’m also done with kits. Both this one and the dragon quilt top were kits including both the fabric and the pattern. While I like them, I don’t feel the same sense of satisfaction as with the quilts I’ve either designed myself, or the quilt patterns for which I’ve chosen my own fabrics. It certainly could be argued that the designers do a better job of selecting the perfect fabric for each section, but I prefer when my quilts are unique – even if they’re less than optimal!

This one, for example, was also paper pieced, and there are sections that I’d make another colour if I did it again, but I like it better than either of these kits. It’s one of a kind. 🙂

Jumping Jax Flash quilt pieced by Deborah Cooke

The pattern is Jumping Jax Flash by Judy Niemeyer. I pieced it probably twenty years ago. (Maybe thirty. Ha!) It’ll be heading to the long-arm quilter too, but it’ll be third and last to head there.

My Finished Escher Quilt

A long time ago, I showed you the Escher quilt that I’d sewn from a kit. Here’s the pieced top again from that original post. There’s snow on the driveway!

Escher quilt from kit pieced by Deborah Cooke

This one became my first big quilt that I machine-quilted. I’ve already completed two smaller test quilts – this one and this one. The first lap quilt used up the scraps from this quilt. This one is about 62″ by 64″, still not a full-size quilt but big enough that I had to wrestle it through the machine.

If I’d been quilting this by hand, I would have made circles or curves to contrast with the piecing. With free motion quilting, I would have made those all-over squiggles. But at this point, I’m making lines with my walking foot, so I had to come up with a different plan.

I used a cotton Gutermann quilting thread in variegated yellow, which looked nice against both the backing and the front.

The back is a quilting cotton that I’d originally bought to make a shirt for Mr. Math. He didn’t love the print, though—the birds are bigger than expected from the pix online—so it’s been in my stash, waiting for opportunity. There wasn’t quite enough of it for the entire back, especially after I matched the print, so I did a little patch of leftover blocks from the quilt top.

back of Escher Quilt made by Deborah Cooke

For the quilting design, I marked the middle of the quilt, with the plan of quilting on either side of the diagonal lines – the quilting is about 1/4″ outside of the seam on either side of the seam. I started at the top left corner—where the stripey Y is—stitched on one side of the seam, pivoted at the middle point, then quilted up to the opposite top corner. Once I’d quilted both sides of the seam, I dropped down to the next diagonal line. There’s a floral Y there. I did this three times, then flipped the quilt and did the same from the other edge. That left two triangles on either side of the middle unquilted. I followed the same idea, pivoting one column outside of the middle column until the top had all the diagonal lines quilted.

This turned out to be a really good idea and a plan I’ll follow in future. The fabric adhesive I used (Odile 505) isn’t permanent and washes out. I wondered whether it would lose its grip over the course of quilting this quilt, with all the turning and wrestling with the fabric, and it did. So, it was good to have those main lines already quilted by the time I got to the final sections.

I could have just used the walking foot to make more parallel lines but wanted some curves. I like those sinuous curves that look like water flowing. I decided to treat each black triangle like a rock in a stream—I sewed one line down the middle of each space, going around the “rocks”. I added two more quilting lines in each gap, one on either side of that wavy line and undulating between it and the straight line.

I was stumped on the binding for a day or two. I didn’t have any of the component fabrics left over, and (incredibly) anything I pulled from my stash didn’t work. The pinks were too yellow or too blue, the oranges too bright, etc. Finally, I found a piece of Kaffe Fassett Roman Glass in black and red. That colourway isn’t in the quilt top, but that design is. It’s perfect. Here’s a detail shot of one corner:

Detail of Escher Quilt made by Deborah Cooke

This is a small quilt comparatively, but bigger than either of my test quilts. It felt like I did a lot of wrestling to get this one done! The weight was a bit of an issue, which means I need a bigger work surface next time. Also, my walking foot didn’t walk as well as previously, maybe also because of the weight. I’ll make some changes to my set-up before tackling another one of this size. My curved lines are smoother, despite all that, and my stitch length is more consistent. I only had one teensy tuck in the top and none in the backing, which is a triumph.

Here it is:

Escher Quilt made by Deborah Cooke

I’m really glad it’s done. 🙂

I’m also trying to remember where I put the pattern. The kit came with the fabric and was quite a mix. The result is chaotic and fun, but I’m curious how it would look with a more limited palette, and one in which I love every fabric. I think I’ll quilt that one (if and when I do it) with parallel lines.

What do you think of this one?

Finished Shawl

I finished my shawl, knit from the Rowan subscribers’ kit! I told you about this in December when I cast it on. Here it is on the blocking needles:

Lace Scarf by Sarah Hatton knit in Rowan Pure Wool 4ply by Deborah Cooke

It’s BIG! It blocked out to 18″ by 83″, with ten repeats. I used up all but 10g of the wool.

Here’s a detail image on the blocking needles:

Lace Scarf by Sarah Hatton knit in Rowan Pure Wool 4ply by Deborah Cooke

The colour of the yarn is a greyed blue, quite pretty. It looks more grey here and more blue in the first post. In reality, it’s in between.

The shawl is supposed to be knit in a circle, with the ends grafted together, but I knew I’d wrestle with wearing that. Instead, I knit 6 rows of garter stitch at the beginning and at the end. I also increased the selvedge stitches from two stitches to three. I would have liked to have done another repeat of the first motif at the end – this second picture actually shows the cast-off end – to make it more symmetrical but there wasn’t enough yarn. I could have added a repeat of the second motif at the beginning if I’d thought of it then, but we’re going to go with asymmetry at this point.

My Ravelry project page is here.

I found this a nice knit, although it got to be quite a pile in my lap by the end. The lace stitches were easy although I didn’t quite memorize them, and the wool showed them off well.

Lace Scarf by Sarah Hatton knit in Rowan Pure Wool 4ply by Deborah Cooke

It’s interesting that the shadow in the snow makes the picture look blurred. The colour is more true in this shot. I’m hoping this will be the last chance for a while to toss a project in the snow for pictures.

On to the next project waiting to be finished!

Three More Moonglow Blocks

Moonglow Quilt by Jinny Beyer

I haven’t been working on my Moonglow quilt for a while, so a few weeks ago, I pulled it out again. I’ve always loved this quilt design and thought that when I bought the kit, I’d be obsessed with it until it was all pieced. Not so. It’s been a very fits-and-starts project. I tried to figure out why. (The picture at right is of someone else’s completed quilt.)

I first posted about it in April of this year, although I’ve had the kit for at least a year. Here’s that first post, with the alternating blocks and the first three stars done. In my May post, with the next two stars, I admitted to not loving the process, even though I’d switched to paper piecing.

I figured out that I’m not having fun because I’m disappointed in my results. My blocks aren’t completely flat (they ripple) and the points don’t match as neatly as I’d like. There are a bunch of reasons for this, even though I’m a fairly accurate seamstress. You can paper-piece some parts of each block, but never yet has it been possible to piece the entire block on paper.

Moonglow Block, designed by Jinny Beyer

Many of the blocks have set-in corners, like this one. So, the corner quadrants are paper-pieced, but then have to be set into the central star.

Many (many) seams are on the bias of the fabric, so they stretch.

There are many slightly angled seams, and it’s tricky to pivot at the right point. Under the sewing machine foot, it’s hard to see the point.

So, I used some techniques from dressmaking to minimize the effect of these things. When I have paper piecing, for example, I’m leaving the paper on each piece until it’s sewn in on every side. That helps to stabilize the seams on the bias. I’m also pinning the beginning and the end of each of those seams, then using more pins in the middle, to make sure it doesn’t shift while being sewn.

When setting in a corner, I sew the seam that comes to the corner only as far as the seam allowance and backtack it. That means I can move the seam allowances more readily when insetting the other piece. I’m also sewing out from the point, doing the inset in two seams (instead of sewing in to the corner, pivoting, then sewing out). Lots and lots of pins on these insets, too.

Moonglow template, from quilt designed by Jinny Beyer

When there’s a slightly angled seam, I poke a pin through the paper at the pivot point, leaving a hole. That’s visible when I’m sewing so I know exactly where to pivot. I’m also clipping the paper at those points, which makes it easier to re-align the seams (when the needle is down in the turning point) to continue sewing.

(You can also see in this image how much fabric is wasted in the trims. I’ve been saving these pieces as they’re big enough to cut the corner squares in the sashing.)

And of course, pressing, pressing, pressing. I was pressing a lot before but now I’m doing it even more.

I’ve done three more stars and am much happier with the results. I also enjoyed sewing them more. They’re still not perfect, but they’re better. These three blocks allowed me to complete the second column and the fourth column of the quilt. Here they are:

block for Moonglow quilt, designed by Jinny Beyer and pieced by Deborah Cooke

They all look much better once pieced into the quilt. I have five more blocks to make – the four corners and the middle star. There are two blocks designed for the corners and you make each one twice. The centre star is kind of the big finish, the most complicated block of all.

All my borders are cut and the alternating squares pieced, and many of the fabrics won’t be used again. There’s a lot of fabric left over, which means I’ll be able to redo any of the blocks that really irk me. (And there will still be a lot of fabric left! The cuts in this kit are really generous.) I’m getting close!

In the meantime, I’ve been seduced by another beauty: look at this!

Crimson Poppy quilt design by Judy Niemeyer Quiltworx

This is called Crimson Poppy and was designed by Judy Niemeyer (the designer of Jumping Jax Flash, which I’ve made) and sold at Quiltworx. Here’s a link to buy the pattern for the central medallion – it ends with the red polkadot square. The central block is on point in this version. You can also buy a kit for this larger version, with the four corner extensions and all the fabric required at Quiltster, right here.

On this page, there are a number of colour options and corner additions displayed, also as kits including fabric. You can also (be still my heart) join Quiltster and change out the fabrics online, customizing your own version, then buy your own kit from them. Hello, timesink – but what fun!

In the Beginning Dragon Quilt – 4

I’ve been showing you my progress on the In the Beginning Dragon quilt kit – here’s my first post and my second – and today, it’s border time. The kit comes with a dragon border print, which has four rows of the border printed lengthwise. After pre-washing, the repeat lengthwise is just under 24″, with dragon circles alternating with dragon profiles in flames. Widthwise, the repeat is 9 7/8″. The instructions say to cut borders 9.5″ wide, but I wanted the maximum ability to play with positioning at the corners. Cutting four lengthwise strips 9 7/8″ wide will leave 3/4″ of black, at one selvedge or the other. Hmm.

Here’s the orange quilt illustration from the kit:In the Beginning Dragon quilt pattern in orange
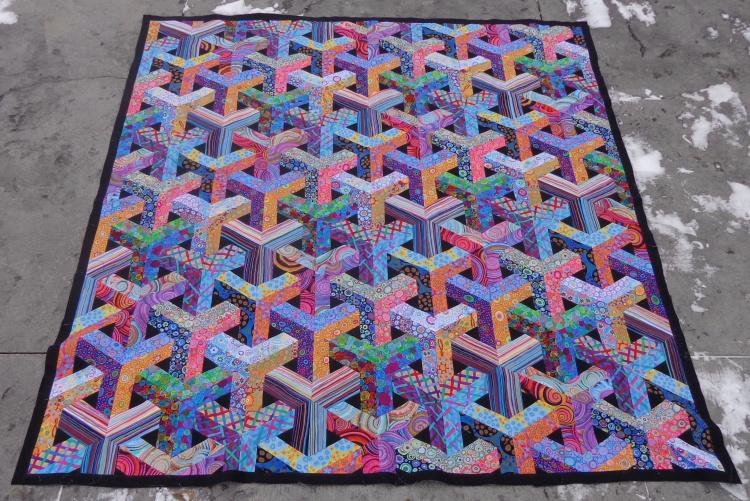
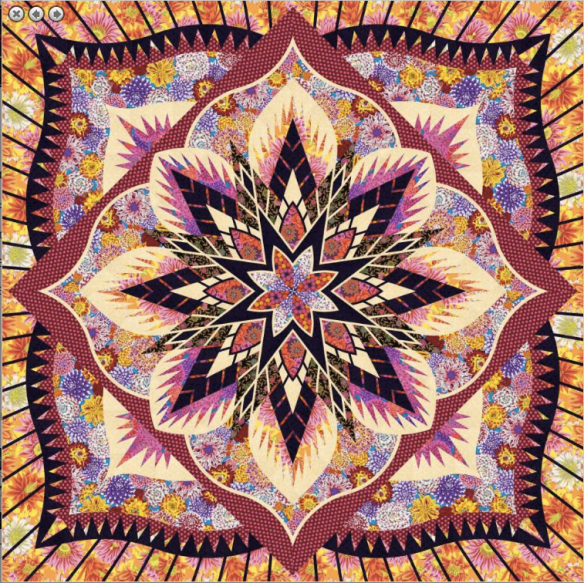
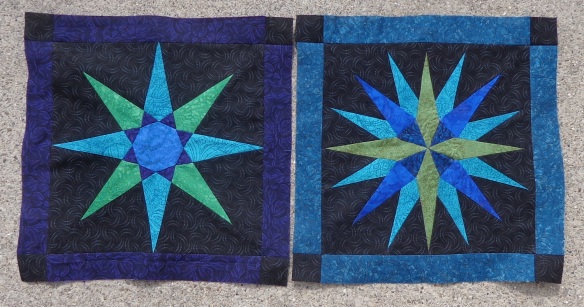
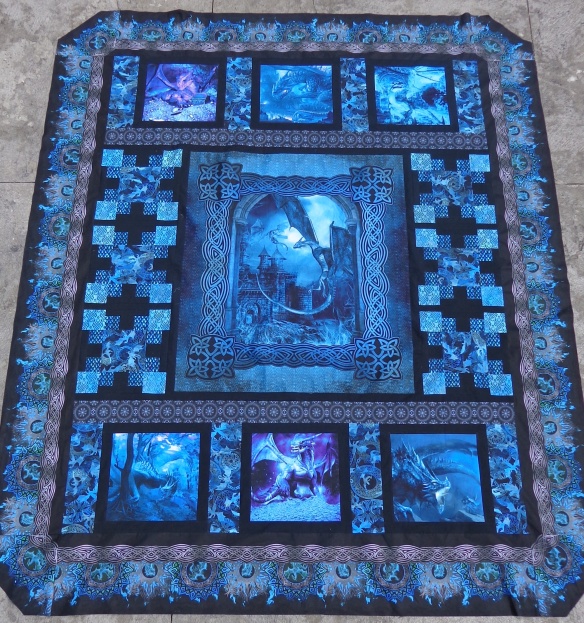
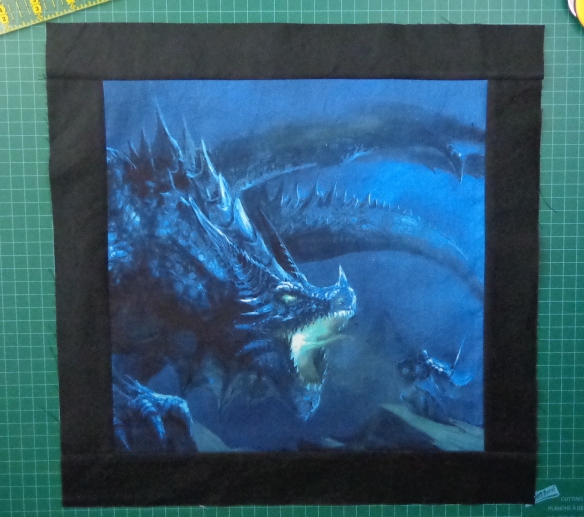
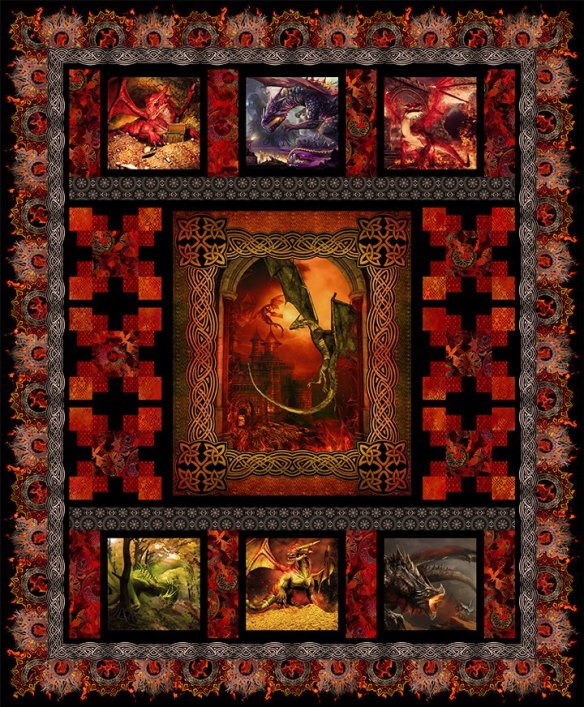
The instructions say to center a dragon circle on the width of the quilt and a dragon in flames on the lengthwise edges. The quilter who made this orange quilt did that, which is why we’re looking at this image this week. (The one who made the blue quilt didn’t.) The corners are mitered, and you can see that with this positioning, you get mirrored corners which is all good, but they each have a slice of dragon circle in them. I don’t love that, so I wanted to explore alternatives.
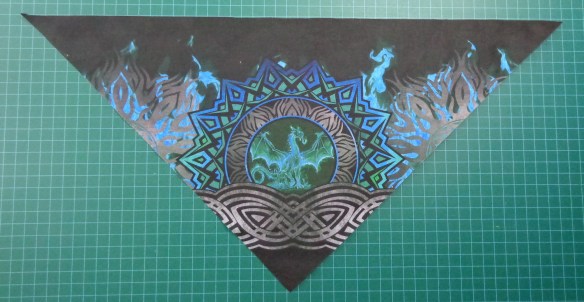
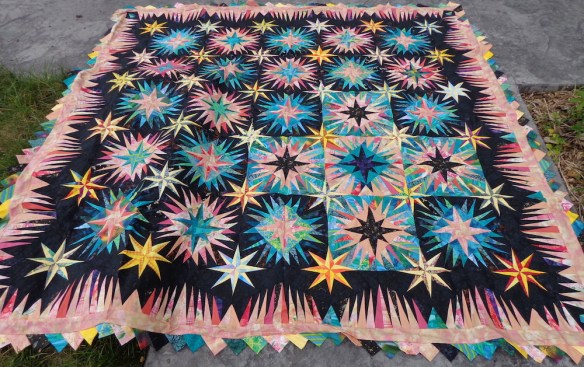
That extra 3/4″ of black in the border fabric can be either on the outer edge of the border or the inner edge, depending which selvedge you choose to start cutting. It looked to me like this quilter cut pretty close to that Celtic braid, moving the extra black to the outer edge. I cut the other way around, trimming the white from the selvedge closest to the braid, then cutting my 9 7/8″ strips from there.

I tried many options: dragon circle centered on both the length and width, dragon in flames centered on both the length and width, dragon circle centered on the length and dragon flame on the width, then vice versa. I moved the Celtic braid closer to the edge of the quilt, too. None of the results make my little matchy-matchy heart go pit-a-pat.

Then I had an idea: fussy cutting. Here is a bias cut corner, a square with its sides the same width as the border, with a dragon circle centered in it. It’s cropped at the top because that’s diamonds cut out of rectangles.

It’s less than ideal that it’s on the bias, but look at the corner I got with it:Dragon Quilt Corner pieced by Deborah Cooke

Oooooo! I like that! No mitering either. There are always compromises in matching up a detailed border like this one, but this compromise pleases me. The circle around the dragon is almost whole, and the inside of the Celtic braid lines up. This also means that my quilt is slightly octagonal, but I like that, too. I could have patched the corner with some of the leftover solid black fabric, but it’s darker than the background on the border print. I thought it would show.

I cut two each of the borders shown above. I laid out the side borders to have the dragon in flames centered on the long edge and centered a circled dragon on the shorter edges. I couldn’t quite alternate circled dragons around the perimeter as there are six on the long edges and five on the short ones, but I alternated which dragon was in the corner. In two corners, I have the dragon with the spread wings between one the same on the left, and the dragon that’s more in profile on the right. On the other two corners, the profiled dragon is between two dragons with spread wings.

Voilà! Here’s my finished quilt top:In the Beginning Dragon Quilt Kit pieced by Deborah Cooke

It’s huge! Mr. Math used a ladder to take the picture and the edges are still cropped.

Initially, I was disappointed that I hadn’t ordered fabric for the back of the dragon and circles print, but I found a textured black print in the discount bin at Fabricland. It was $5/m and 54″ wide, so that was an economical solution. I’ll put a strip of the emblems along the seams—there’s some left from cutting those six dragon panels apart, as it was between them—and a dragon in flames where the strips meet, just for fun. It definitely needs to be bound with a color. I’m going to find out about the long arm machine quilting done at a local shop and maybe have this one quilted that way.

And the bonus? The leftover fabric makes really cool masks.

In the Beginning Dragon Quilt – 3

In the Beginning Dragon Quilt in blueMore dragon quilt!

Last week, I was piecing the six blocks with the scales in this design—the ones that are stacked on either side of the central panel—and getting the scales oriented the right way. As mentioned then, I took apart my second pieced strip—the one with two strips of scale fabric with a strip of black sandwiched in the middle—and sliced it into squares. I then sewed the squares together with the scales the right way to make the units for the top and bottom of each of these blocks.

Here’s one of my finished blocks:In the Beginning Dragon quilt pieced by Deborah Cooke

All the scales are aligned!

The print called Flames is the one in the corners of this block. The instructions say to cut two 3.5″ widthwise strips out of the fabric, then cut each one into 12 squares. Because I pre-washed my fabric, I only got 11 out of the width, but there was plenty of fabric left to cut the remaining two. This print is also a one-way design: it doesn’t matter which way you think is “up” but it looks better to have the blocks all oriented the same way IMO. I sewed a couple “upside down”, so my stitch ripper got another workout, just because I wasn’t paying attention. After these blocks were done, I pieced them into vertical rectangles by adding a bit of black sashing.

Next, I pieced the dragon squares into horizontal rectangles with those rectangles of the dragon print. (I did play around with the placement of these, then ended up using the same arrangement as the illustration.) When I had the two horizontal panels on the floor, I realized what a nice quilt you could make with just these blocks. Look:In the Beginning Dragon quilt panels pieced by Deborah Cooke
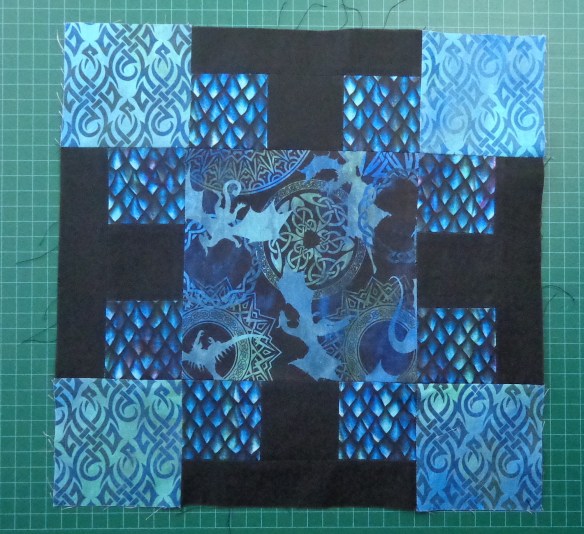
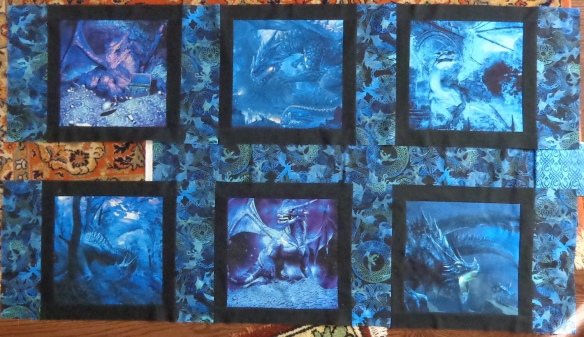
I put some of the leftover fabric between the rows—it ran out at the left, because these bands are 58″ or so wide—and put a little bit of the flames at the right. I like it better with the background all the same colour, but even one panel of these six-dragon-panels would make a fun quilt.

Next I cut the two rows of Emblems that go between the dragon blocks and the central section. I wanted to have the round medallions centered in both horizontal strips. I cut for the image not the grain. There’s extra fabric included for matching, but the design was printed slightly off-grain (as grid patterns often are). This is where the shrinkage from pre-washing almost got me. I needed more than three widthwise strips to get enough repeats, and managed to get another half width. Phew! It was just enough.

Here’s the top at this point:In the Beginning Dragon quilt panels pieced by Deborah Cooke

The sun was bright, so it’s a bit washed-out—and even with a step ladder, we didn’t get the whole thing!

I’m pleased to see that the joins in the Emblems bands are invisible. I matched the pattern between the circles as I thought it would be less obvious. You can see the print through the back of the fabric, though, so it was pretty easy to match.

Finally, the borders. The border print runs lengthwise on the fabric and there are four repeats across the width. The kit includes plenty, but I wanted prettier corners than shown in the illustrated quilts. This is going to be tough. The border print has a 23.75″ repeat after washing, which doesn’t divide neatly into anything. You already know I have matchy-matchy disease and this border print is going to make me work for it.

In the Beginning Dragon Quilt – 2

In the Beginning Dragon Quilt in blueI told you a while ago about ordering this quilt kit and (yay!) it finally arrived. Despite all the other things in progress on my worktable, I immediately dove in because, well, dragons.

I was worried that the fabric might feel too much like ink, but it’s quite nice. It’s very smooth and seems a bit lighter than other quilting cotton. The instructions say not to pre-wash the fabric, as it might shrink and the panels might be too small to cut to size. The issue for me is that the fabric wouldn’t be able to be washed ever if I did that. I like to pre-wash so the worst case scenario has already happened before I sew, so into the washing machine it went.

It shrank, of course, as it’s 100% cotton. I like the feel of the fabric much better – it’s a bit thicker now and not as smooth. The unexpected thing was that it shrank in the width and not so much in the length. I measured those six square dragon panels before washing. They have a 1/4″ black border around each image and were 12 1/8″ square at the inside of the black border. After washing, they were 11 1/8″ wide and 11 3/4″ tall. The instructions are to cut them 12.5″ square with .25″ going in the seam allowance, so, exactly as warned, I couldn’t cut them to size.

I’d expected this and had two contingency plans.

The second contingency plan was the tougher one: that I’d make the entire quilt slightly smaller overall and have to recalculate everything. (Gah.) Fortunately, the first contingency plan worked. I checked the black fabric and there’s a lot in the kit, mostly because they included some for the quilt binding. They instruct you to cut the binding on grain, though, which I won’t do – I always cut binding on the bias – so those 9 X 2.5″ crosswise strips of black are now extra fabric. (Actually, that’s 22.5″ by 43″ or so, maybe more if the kit is generous, so it might be enough to cut binding on the bias. We’ll see.)

Each of the six dragons are bordered in black: the instructions call for 1.5″ strips of black for those borders, and the squares end up being 14.5″ square. Once they’re sewn in, they’ll have a 1″ black border. I cut my shrunk dragon panels so that the black border was the seam allowance on the width and made them square. Then I cut my black strips 2″ wide. After sewing on the black borders, I trimmed them up to be 14.5″ square. A teeny bit of the dragon image in the height was lost – less than .25″ – and the black borders are a little bit wider than specified – mine will be about 1 3/8″ wide once the blocks are sewn in – but my finished measurements are all good. (It doesn’t look square in this image because I had the camera at an angle. 🙂 It IS square!)Dragon quilt block sewn by Deborah Cooke

There is a lot of extra fabric around the image in the central panel. Mine just has a little more background than the one in the picture. I’m good with that.

Detail of In the Beginning Dragon Quilt
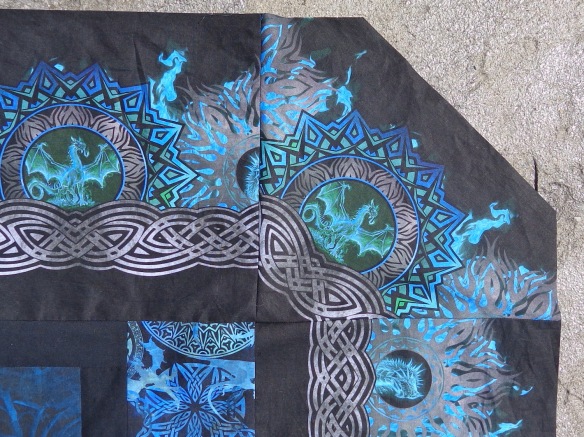
When I started to piece the other blocks, things got interesting. The scale print is a one-way design: the scales are shaded at one end and not at the other. It seems to me that I’d want them all to be in the same direction. To my relief, the person who made the sample quilt thought the same thing, because they are aligned that way. At right is a close-up of the side panel from the image on the kit: you can see that the scales are all aligned. I apologize that it’s not really crisp but I wanted it big enough that you could see the scales.

If you follow the instructions, this isn’t the result you’ll get. That’s because of the one-way design. Let’s look at that. There’s a little unit of three squares created by cutting crosswise strips of black and the scale fabric. You sew them together, then cut the blocks from them, like this:Dragon quilt sewn by Deborah Cooke

You join them to an outside rectangle of black then put them around the central square in the block. But look what happens when you change their orientation by placing them around the square:Dragon quilt sewn by Deborah Cooke

The implication of the one-way design strikes! Cutting the strips as instructed will only create the units to be placed vertically, if you care about the scales being oriented the same way. I do, so I’ll take apart the other pieced strip (there are two), cut the strips into squares, and piece them individually with the scales aligned the way I want them for the horizontal blocks.

It also means that I need to divide my units into groups, to make sure the black rectangle is sewn on the outside edge. I’ve split this first group of twelve with vertical scales into two groups: I’ll put the black rectangle on the left side of six of them, and on the right side of the other six. Dragon quilt sewn by Deborah Cooke
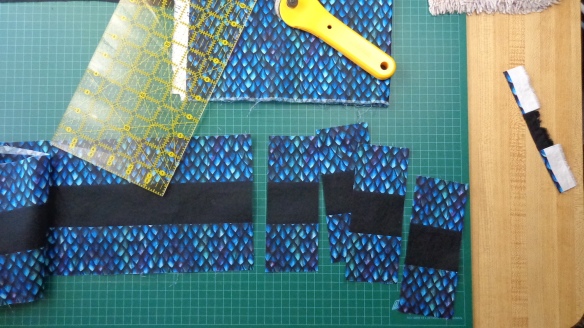
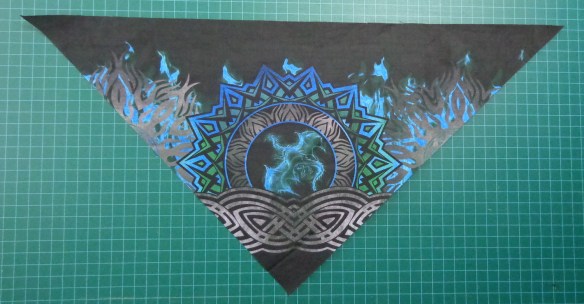
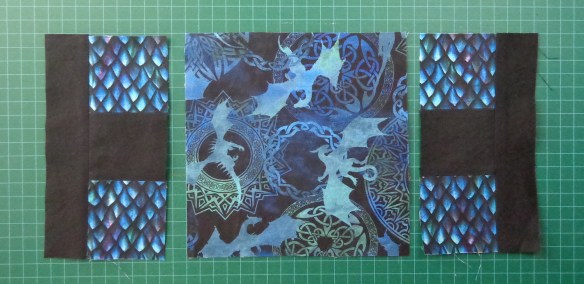
Similarly, when I piece the units for the horizontal scales, I’ll put the black rectangle on the top of six of them and on the bottom of the other six. That got a bit more complicated, didn’t it?

This also means (hmm…) that I won’t be able to rotate the blocks when I arrange them for the quilt. Their orientation will be set, because of the scales. Prints often repeat across the width of the fabric as well as down the length, so I laid out the six central blocks to check:Dragon quilt sewn by Deborah Cooke
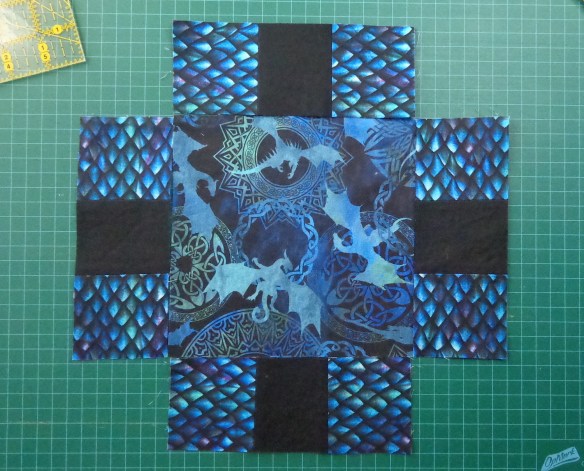
I’m thinking I might notice the similarities, particularly between the two on the left and also on the two in the middle. Those light-coloured dragons draw my eye! I rotated the blocks before sewing on the pieces with the scales:Dragon quilt sewn by Deborah Cooke
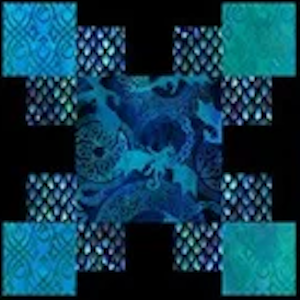
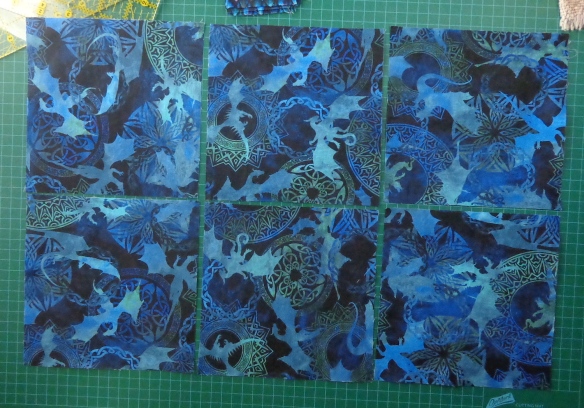
The similarities are less obvious this way. Now, I’m ready to piece those six blocks!

What about the quilt in the picture provided with the kit? Either the person who pieced it didn’t follow the instructions and did as I did, or it might be a computer-generated image. That’s interesting, and it means I’ll be keeping my eyes open for other tweaks as I work.

This quilt is a lot of fun! I can’t seem to leave it alone, so I’ll show you more next week.

In the Beginning Dragon Quilt Kit

I was looking for some dragon fabric to make masks a few weeks ago and discovered this quilt kit and pattern. I found the individual fabrics first, several of which are fabulous. Here’s the quilt kit using all of them. It comes in orange or blue:
In the Beginning Dragon quilt pattern in orange In the Beginning Dragon Quilt in blue
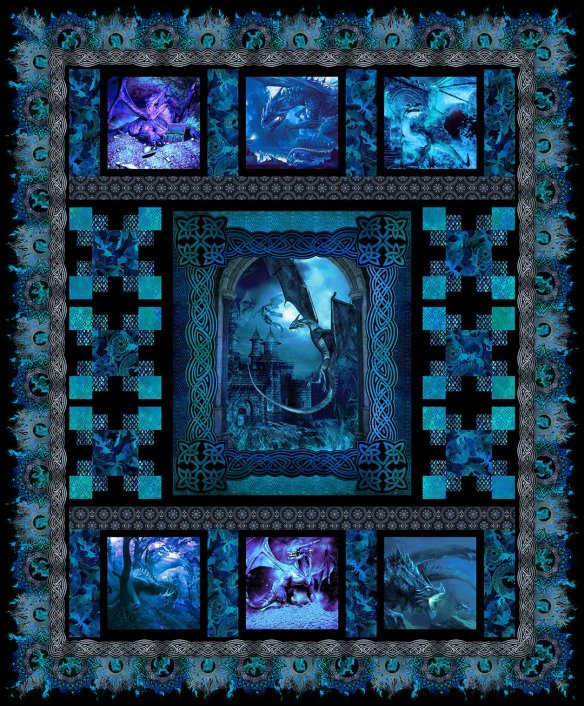
Here’s the page about it on the website of the designer and manufacturer, In the Beginning.

The collection includes a large central panel, then a panel with six smaller dragons, a border fabric, and four all-over prints (scales, circles, a Celtic knot and a wonderful mix of circles and dragons). You can see the individual fabrics in blue on the designers’ site, right here. The quilt requires all of the fabrics in the collection. I think it might include some solid black, too.

I spent a lot of time looking at this on various sites, trying to decide whether I love it or not. The short answer is that I love the coordinating fabrics but am not so wild about the panels – but then, the panels are kind of the point. The palette reminds me of the original covers for the first two of my Dragonfire novels, Kiss of Fire and Kiss of Fury, which is also part of the appeal. The finished quilt is a big piece – 72″ by 92″.

In the end, I surrendered to temptation. 🙂 Even though the dragons show up better on the orange version, I ordered the blue one. I’m curious to see how the fabric feels on the panels, whether it’s stiff with ink or not. Is there metallic ink on the panels and borders? I’m not entirely sure. It would be lovely to see it in person before deciding, but I didn’t find a local stockist, even if stores were open. It should be comparatively quick to piece – it looks as if all the blocks are squares – but we’ll see. (I’ve already noticed that I prefer how the borders are pieced and the corners mitred on the orange sample, so there’s something to watch.)

I’ll tell you more when the kit arrives, whenever that might be.

More Moonglow Quilt Blocks

I showed you a bit of this quilt already, which I’m making from a kit. (Here’s my earlier post on the Moonglow Quilt.) I’ve been making slow progress on this quilt top. I switched to paper piecing for these two blocks and am happier with the results. Here are blocks #4 and #5:Moonglow blocks 4 and 5 sewn by Deborah Cooke

The strange thing is that I’m not really enjoying the process of creating this quilt. I’ve admired it for years and wanted to make it since first glimpse. I’ve done paper piecing with Judy Niemeyer’s quilts, like this one, Jumpin’ Jack Flash (which still needs to be quilted):

Jumpin' Jack Flash quilt by Judy Niemeyer pieced by Deborah CookeMoonglow Quilt by Jinny BeyerBut I’m not feeling the love with the Moonglow. It feels like a chore, which is disappointing. I think it’s because the blocks are hard to sew together. I paper-pieced the star of #4, for example, but the octagon in the middle had to be appliqued in by hand.

For #5, only the four outer quadrants could be paper pieced and it wasn’t a lot of fun getting that green star in the middle so that the center laid flat. I did the middle three times and finally stitched it by hand. It’s still not perfect but I’m done with it. #6 is a star with a star in the middle – it’s the second one from the top in the fourth column – so we’ll see how that goes.

Instead of savoring every moment, I’m kind of glad to have only 7 blocks left to piece. :-/ Next are the two in the second column, then the four corner blocks (there are actually two designs and you make two of each), and finally the middle block. My mood will probably change when I start assembling the top together, since I’m likely to get excited about the result when I see it coming together. I’ve cut the outer borders but haven’t sewn them yet, and haven’t decided how to quilt this one.

In the meantime, onward….