McCalls 8532 Instant Wardrobe

McCalls 8532 Barbie Instant Wardrobe

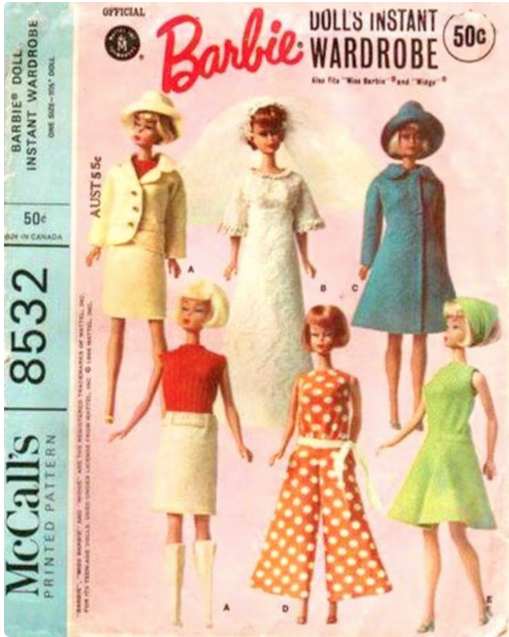
This is an older sewing pattern for dolls that I found on Etsy as a digital download. Once upon a time, my grandmother made pantsuits with palazzo pants for my dolls and I wondered whether this might have been the pattern she used.

After downloading it, though, I realized there was a very neat feature about the designs – the suit and the coat are made of felt, so there are no edges to finish. In scale, it’s as if they’re made of boiled wool. Hmm.

One thing that is good about this download is that there’s a tape measure on each page of the PDF. This should make it easier to ensure that the pattern pieces are printed to scale. More about that in a minute.

Here’s my first attempt at the suit. The jacket is great as is (and very clever, too) but the skirt is meh, IMO. It’s just a tube with a paperbag waist and the same kind of belt-and-slits finish as the jacket. The result is quite bulky around her waist. I’m not showing you the paperbag waist because, well, meh. We can do better. 🙂

McCalls 8532 for Barbie sewn by Deborah Cooke

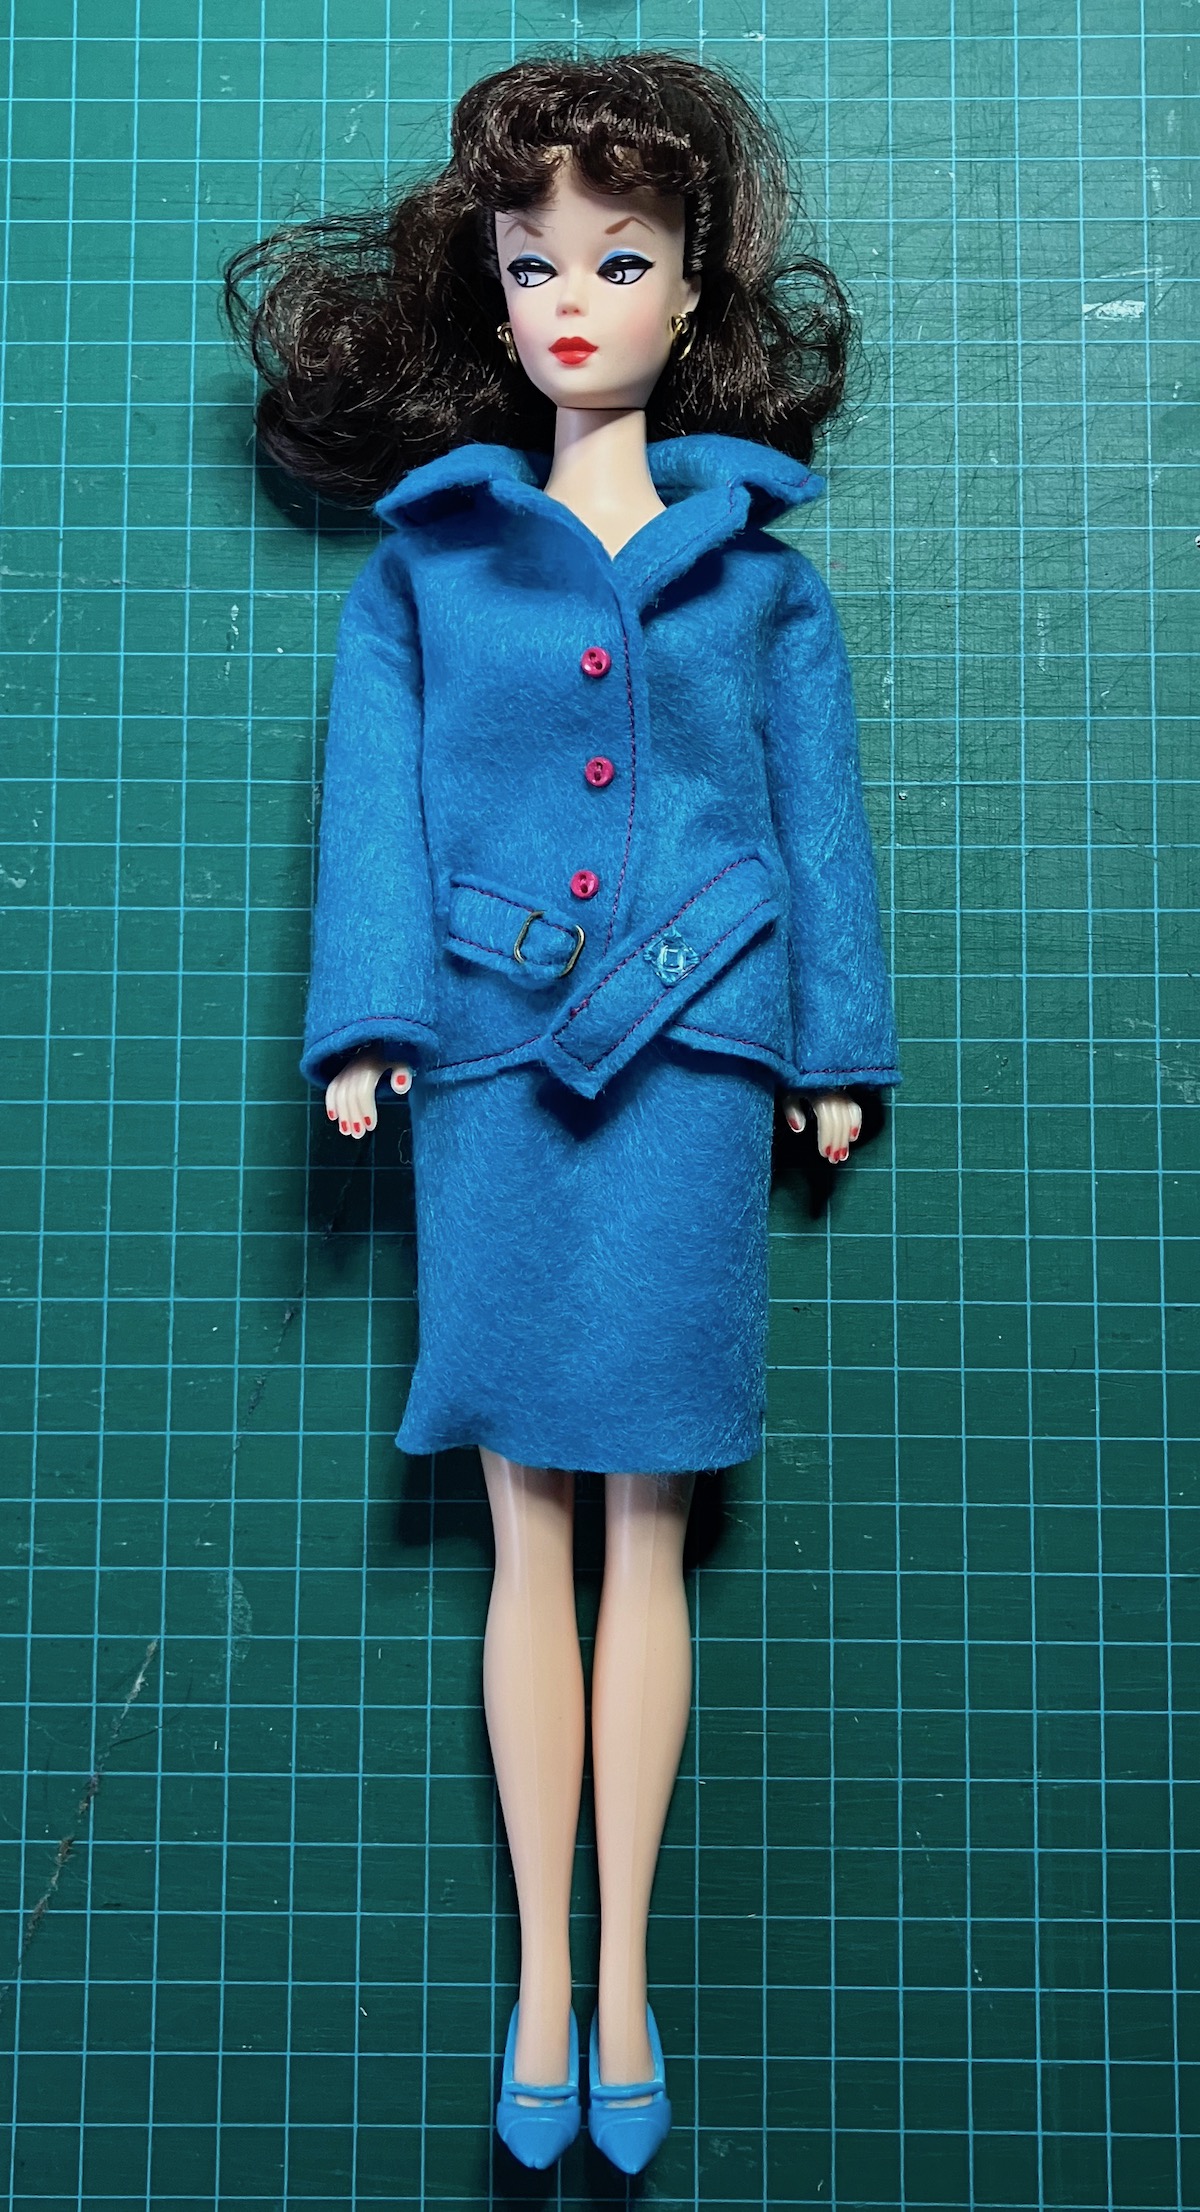
I’m a little concerned about how well the felt belt will wear. (There’s another one on the skirt.) With a lot of play, I could see it just shredding apart. I may make a fake leather belt next time.

The hat was enormous, probably to go over those early 60’s bubble cuts, so I cut it way down for the version on the right.

McCalls 8532 for Barbie sewn by Deborah Cooke

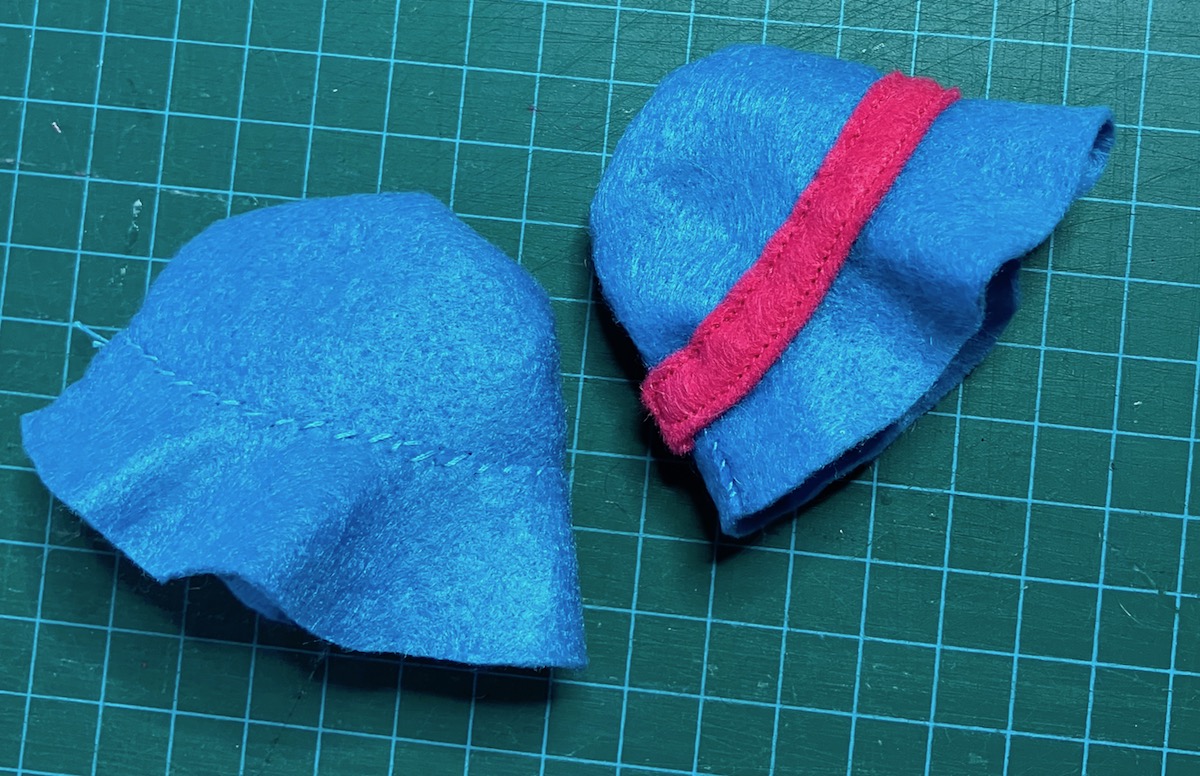
It’s still a bucket hat, so not the most flattering option possible. I like the felt, though, and it’s got me thinking about tweaking it to a more vintage style.

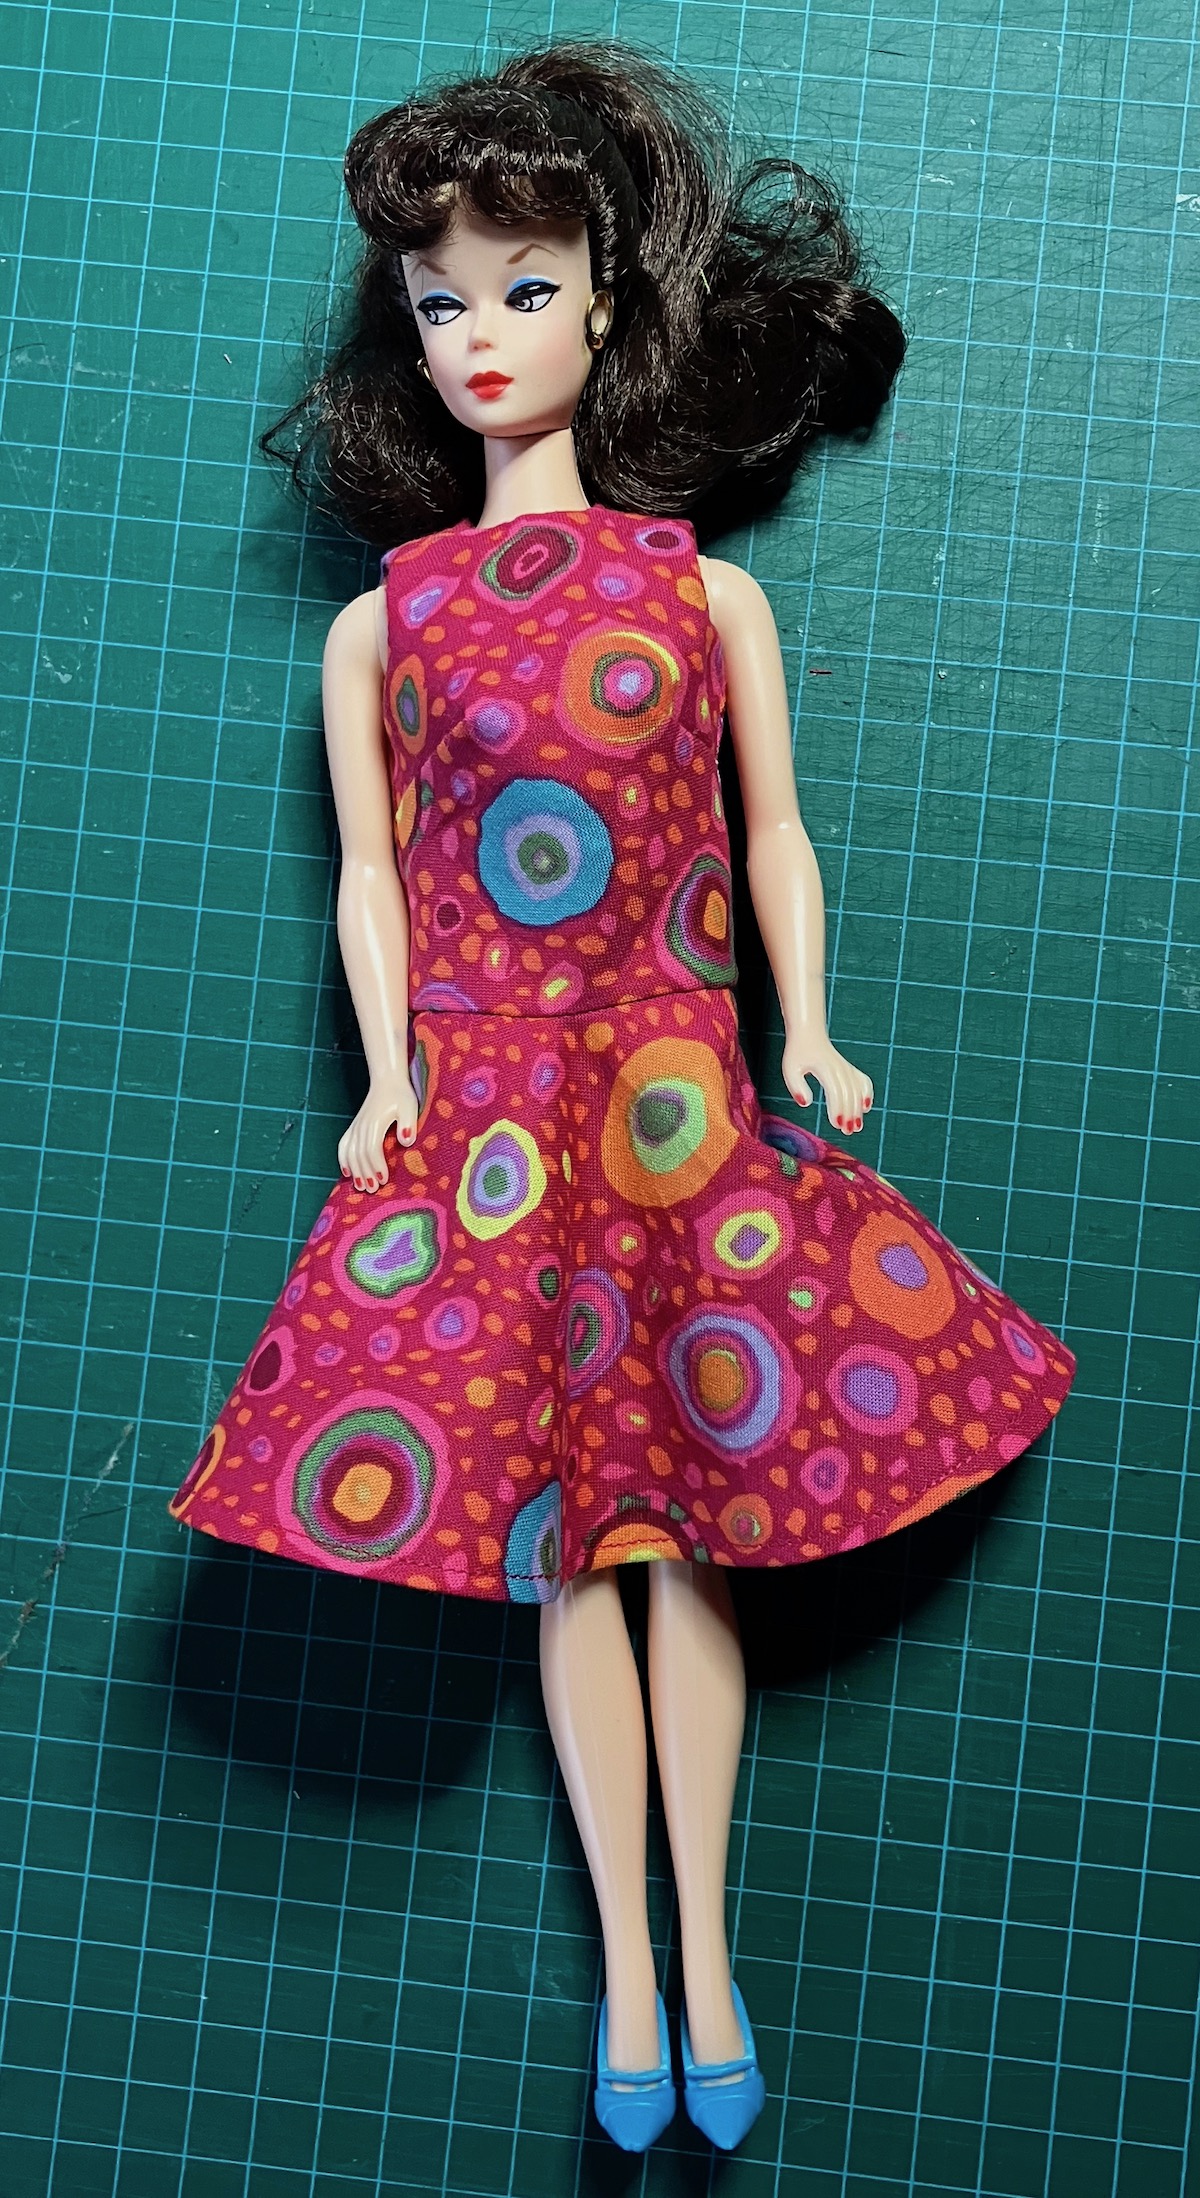
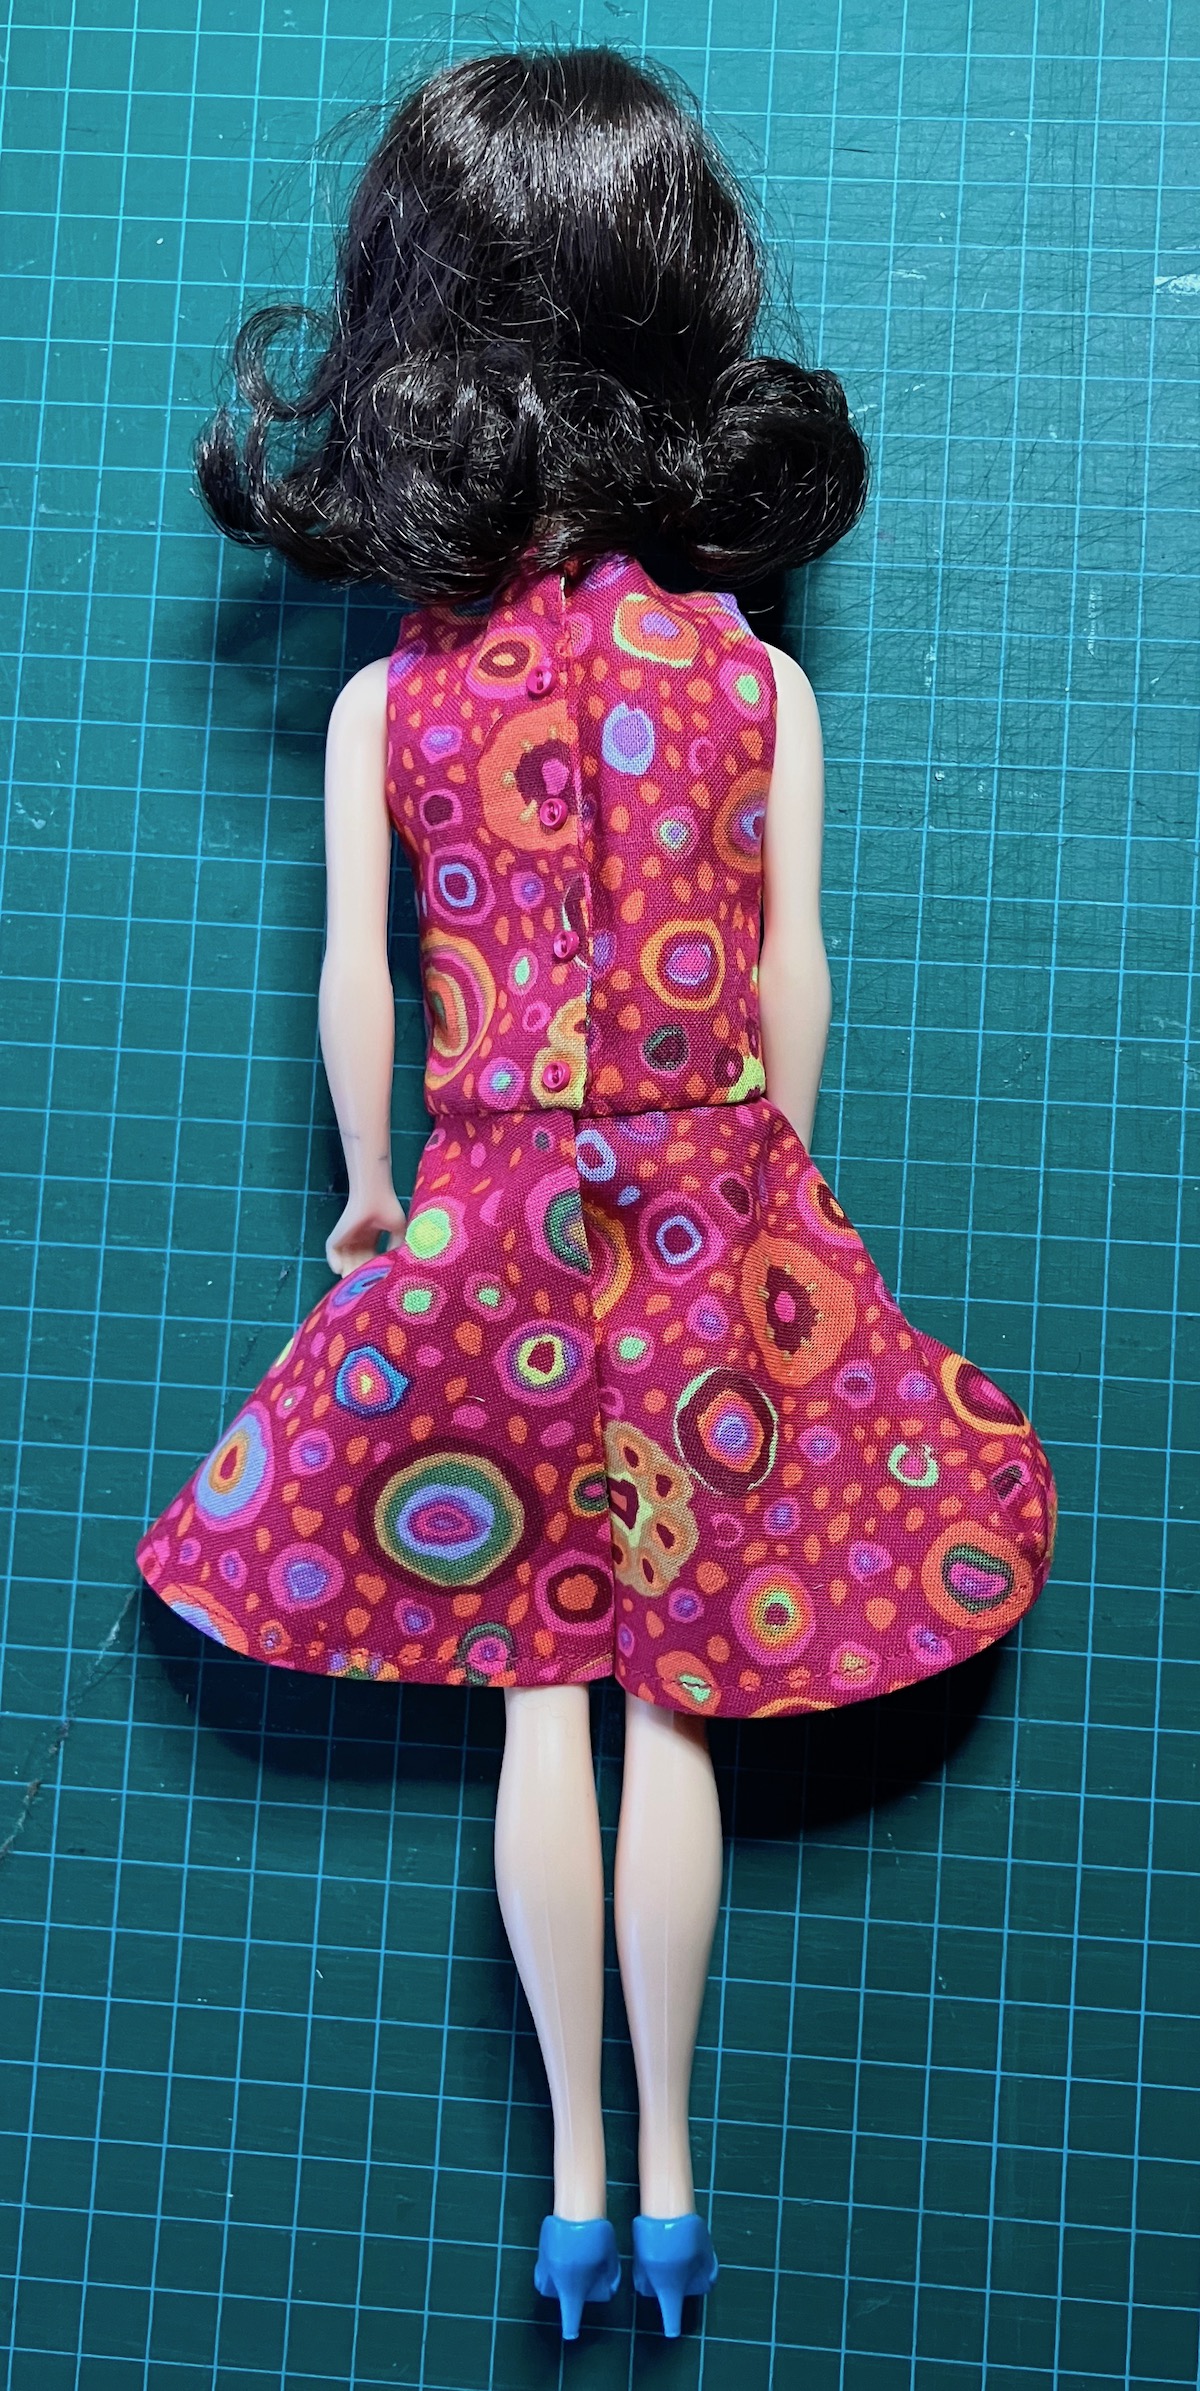
The dress had a lined skirt but an unlined bodice. I chose to do it the other way around since lining the bodice makes it easier to finish the neck and sleeve edges in this scale. I also modified the back to have an overlap in my usual way. I like it in this Kaffe Fasset cotton print.

McCalls 8532 for Barbie sewn by Deborah Cooke

There’s a triangular kerchief to match the dress that irked me a bit. I made two and hemmed hemmed them in two different ways – one with the edges turned under twice, as per the pattern, and one with fusible interfacing on the edges, then turned under once and zigzagged – but I don’t like either particularly. Maybe it needs a snap – there’s not much fabric to tie it in place. Hmm.

The knit top that is supposed to be sewn into the skirt came out so big that it fit Tyler instead of Barbie. Again, the construction is interesting so I’ll modify it a bit to make a t-shirt pattern for both Tyler and Barbie. I printed the pattern page so that the included tape measure is exactly right, but this makes me wonder whether the tape measure image was added later than the scan of the pattern piece – and is actually wrong. Hmm.

I still have to sew up the pantsuit, which I cut of a woven rayon jungle print, just for fun.

This pattern also made me aware of a lack in my doll accessories – I don’t have any white go-go boots for B. I have tall white boots for her, but am now on the hunt for those mid-calf ones. They’d look great with that dress.

Like most doll patterns, this one needs a few tweaks to bring me joy, but there are details I like about it as it is. I really like the felt for a jacket that resembles boiled wool, so I cut out another one. Inspired by a Simplicity pattern for women, I all add darts to the waist of the jacket to give it some shaping. I’m also going to modify the paperbag waist on the skirt – there’s too much bulk with it under the jacket as is. I’ll show you that and the pantsuit when they’re done. I’ll probably make the coat, too, and another hat. It really is an instant wardrobe!

Barbie Dresses from Hankie Couture

Hankie Couture by Marsha Breenberg

Hankie Couture is a book featuring dresses (and other outfits) made for Barbie (and other 11.5″ dolls) from vintage handkerchiefs. I’ve had this book for a few years now and finally found some hankies at the thrift store so I could experiment.

The image and the link above both go to the Amazon product page for the book. I have the paperback and (wow) it’s from 2011. I don’t think I’ve had it quite that long. Evidently there’s a new edition from 2019, too.

This book is very pretty, with LOTS of inspiration in the many many images of dolls styled with dresses etc. made from hankies. The disappointing thing is that it doesn’t have a ton of patterns, certainly not for all the outfits shown in the images. There are three bodices – a strapless bodice, a round-neck sleeveless bodice and a square-neck bodice with straps. All of these are attached to rectangular skirts. There’s a circle hat and a purse. All of these are pretty standard Barbie patterns – I have similar templates already in my stash. The one difference is that the strapless bodice pattern is way too big for Barbie. I used my repro vintage B as a model and usually modern patterns are too snug for her – she has the biggest bust of all Barbies – but I took half an inch out of the circumference of this pattern.

What did I make? Well, first I made the round neck dress from a hankie with a navy polka dot border.

Ha. This is fun. I photographed the outfits flat, the way Mattel used to sell outfits for B, then on the doll, too. Of course, I didn’t make the shoes but chose matchy ones from B’s shoe stash.

Hankie Couture inspired dress etc for Barbie, made by Deborah Cooke

This hankie was a bit worn, so I used it first in case the dress didn’t come out well. I lined it with navy broadcloth, which makes it look a bit dull. It has a belt made of a narrow strip of the polka dots which is sewn on and has an in-scale buckle at the center front. I made a circle hat and a purse to go with it – the purse is lined and has ribbon handles – and think it came out pretty well.

Hankie Couture inspired dress etc for Barbie, made by Deborah Cooke

Then I made a strapless dress from a turquoise hankie with big purple tulips on it. The hankie had a circular design, so I cut it following the curve and made a half-circle skirt. The pattern almost matched at the center back seam! Unfortunately, the hem on the hankie was too close for me to keep the entire white scalloped border – later I realized I could have unpicked the original hem to get more seam allowance. Oh well. – but I sewed the hem with a scalloped hemming stitch which I like.

Hankie Couture inspired dress etc for Barbie, made by Deborah Cooke

This was the bodice that was too big – I was sewing on the snaps after doing all the finishing when I realized as much (grrr) so picked it all back and fixed it, adding a petticoat to the skirt at the same time since I had the waist taken apart. The petticoat is the striped part of hankie that I used to line the bodice with a bit of lace sewn on the hem. I still think the bodice is too long for her in the front, but will use another pattern in future.

Hankie Couture inspired dress etc for Barbie, made by Deborah Cooke

I wanted to add a little bolero jacket but couldn’t find a pattern. There were two corners with a floral motif from the hankie after cutting the circular skirt, so I trimmed them into a curve and sewed them together for a shawl collar. I made up the rest of the jacket pattern and it came out reasonably well, considering that I’ve never done that before. I’ll tweak it before I make another. It needs a little more ease through the shoulders. There was nothing left for a purse, since the hankie had some stains, but she looks happy enough.

She also reminded me that she could wear this dress with her Kidsilk Haze shrug, which is all true.

Hankie Couture inspired dress etc for Barbie, made by Deborah Cooke

Next, I tried the third and final bodice pattern. It’s identical to one I have from another pattern for B, so I knew it would fit. This time, B got a hat, a clutch purse and a bigger tote bag.

Hankie Couture inspired dress etc for Barbie, made by Deborah Cooke

I put lace on the hem of the skirt and the edge of the tote bag, and used that yellow polka dot cotton as contrast. This one came out particularly well, IMO, but the hankie was really pretty. Bonus that I had red flowers in my stash that perfectly matched the ones on the hankie!

Hankie Couture inspired dress etc for Barbie, made by Deborah Cooke

I folded up a tissue to put in the tote bag, to give it a bit of ballast against the top-heavy flowers. Mr. Math peeked inside then said “ah! she’s been to the fabric store!” which made me laugh.

Here are the two hats, which I made slightly differently. The hat with an open top is kind of an established style for B, not just because some have a ponytail like mine. It’s hard to make a closed hat fit B’s head and not look ginormous, because usually B has a lot of hair.

Hankie Couture inspired pair of hats for Barbie, made by Deborah Cooke

The one on the left is more like the instructions in the book – except that the author recommends a zigzag edge around the inner circle which would leave a raw edge. I turned in the edges instead (fiddle fiddle) then top-stitched around it. For the navy hat, I made a hat band of contrasting fabric, then sewed the two brims together along the seam line. I hand-sewed one edge of hat band to the flat brims of the hat, using that stitching line as a guide, then clipped the curves and put all the seam allowances insde the hat band before sewing the other edge over it all. I’m much MUCH happier with this version, although it was finicky. I also bound the outer edge of the navy one with a contrasting self-cut piece of bias – sewn to the outside, pressed very narrow, and hand sewn on the inside – and I like that too. (Even though, yes, there are a couple of red stitches showing on the outside where I made the binding wider on the inside.) In either case, there was a bunch of hand sewing to assemble the hat.

All in all, this was an interesting adventure. They’re fiddly makes, because they have to be completely lined, but I had fun. Of course, I have another one cut out on my sewing table, but then I’ll head back to sewing for the bigger dolls (or maybe even myself!)

I haven’t been watching tv at night during the past month, which means I haven’t been knitting in the evenings. This has slowed my progress a lot, but I’m casting off a sweater this week that I’ll be able to show you next week. Another one coming off the needles!

Soirée and Cape

Stylebook of Doll's Dress for Barbie by Katie Mitsubachi

This is my second make from Kate Mitsubachi’s book, Stylebook of Doll’s Dress for Barbie. It’s called Soirée & Cape.

I love how glamourous and retro the fashions are in this book, and how lovingly they’re photographed. If you want to sew vintage for Barbie, this book is definitely worth a look.

Here’s the image of the dress from the photoshoot part of the book:

Soirée and Cape from Stylebook of Doll's Dress for Barbie by Katie Mitsubachi

And here are the pattern instructions, just so you can see the mix. The instructions are all written in Japanese, but there are a lot of illustrations – if you know how to sew, it’s pretty easy to work out what to do.

Soirée and Cape from Stylebook of Doll's Dress for Barbie by Katie Mitsubachi

That said, I’m finding that with each pattern, I have to make one to see where there need to be modifications. (This is actually true of all Barbie patterns so far. Every one of them seems to need a tweak. Part of that is the variation between different body sculpts, but the other part is construction choices.) This pattern shows a similar choice as that of other dress patterns for the girl – the bodice is lined, but the bodice and lining are sewn together at first, then treated as one piece after that. That leaves the raw edges of the big dart exposed on the inside of the bodice, and the seam allowance from the waist exposed, too. I don’t really see the point of lining the bodice if you’re not going to tuck all those seam allowances inside. (The point is that it’s easier to do it that way but the result still doesn’t give me joy.)

Soiree and cape designed by Kate Mitsubachi and sewn by Deborah Cooke

The first version of this dress I made in red crepe back satin. (Possibly a bad choice as that stuff is slippery!) It took me ages to figure out that pleat across the front, but now it seems so obvious. I then pleated the bodice lining, in reverse. I sewed the darts in the skirt at the waist, then pressed the pleats for that cluster of pleats. This was pretty easy – I laid the fabric on top of the pattern piece and folded it, one pleat at a time, then pressed the crease for that pleat before moving to the next one. This made it much simpler to gather those pleats together – because they radiate, they’re not all on the grainline. I sewed the bodice to the skirt waist, then sewed the bodice facing to the bodice. I hand-stitched the waist on the bodice facing, then added the “buttons” on the outside.

The tricky bit in my version is that the skirt waist extends beyond the CB of the bodice which leaves raw edge bits at the waist beyond the bodice. I finished the edge on those tabs, along with the CB edges of the skirt, then pressed the waist edge down. After sewing the CB seam, I top-stitched those waist edges and along the back opening of the skirt. I don’t love the back. 😦

Soiree and cape designed by Kate Mitsubachi and sewn by Deborah Cooke

I decided to hem the dress with self-bias, so cut 1″ wide bias from the fabric. I trimmed 1/4″ off the hem so the dress would finish to the same length as intended, then bound that edge. A pair of snaps on the back and it was done.

I’m only going to show you the front because the back still vexes me.

This is polyester crepe back satin, and those are seed beads on the bodice. I made the capelet of cotton velveteen lined with rayon Bemberg and used a small fancy button as a clasp. The gloves are made of that super-thin shiny knit from Fabricland that I mentioned previously—wow, does my sewing machine hate this stuff!—and she has another clasp purse from that McCalls pattern. It turns out I don’t love my hem solution. Mr. Math thinks the gloves make her look like she’s handling hazardous materials. I think the outfit looks Christmas-y.

Soiree and cape designed by Kate Mitsubachi and sewn by Deborah Cooke - with "fur" cape knit by Deborah Cooke

The back remains vexing because 1/ those edges; 2/ the facing is bulky with the darts which means 3/ the fit is snug on vintage B—so skinnier Silkstone B wins this one. Here she is again with a “fur” cape that I knit for her:

Our model is Best in Black Silkstone B, (that’s an Amazon link since Mattel has taken the unavailable dolls off their site) who was divested of her crunchy black dress upon arrival. I took out the ponytail and just combed the hair over. I like her hair better loose although it is a bit wild.

The floor and wall are for my shop diorama but aren’t installed yet. I just propped them up on my sewing table to set the scene.

I had a think about the back of the ballgown and decided to try an alternate version with a simpler bodice facing. After pleating the bodice, I traced it on a piece of paper to make a pattern piece for the bodice lining. It’s a curve cut on the bias with no darts, and I cut it from Bemberg lining. I sewed the top seam of the bodice, attaching the lining, pressed the seam allowances toward the lining, then understitched that edge. It worked beautifully to make a nice edge at the top of the bodice. I sewed on two of the beads on the front to hold the pleat before sewing the bodice to the skirt, and also pressed up the waist edge of the lining. I also finished the CB seam allowances on the skirt.

Soiree and cape designed by Kate Mitsubachi and sewn by Deborah Cooke - with "fur" cape knit by Deborah Cooke

After sewing the bodice to the skirt, I sewed the center back seams on the bodice. When piecing, I matched the cluster of pleats with the bottom of that front dart—that meant that one edge was even with the back of the bodice and the other extended 3/8″. The flush one was turned in 1/4″ and pressed, then top-stitched. I fused some knit interfacing to to the other edge to stabilize it at the waist, turned it in 1/8″ and top stitched across the extension at the waist, then down the CB seam. When I sewed the CB seam of the skirt, there was overlap in the skirt, instead of the dreaded butt opening – and all the edges are finished.

This makes me happy.

Soiree and cape designed by Kate Mitsubachi and sewn by Deborah Cooke

In fact, this version of the bodice gave me buckets of joy. It was simpler to constuct and the back is much neater. It also fits better – making this one a bit of a nipple-flasher for Silkstone B (if she had nipples, that is.)

This version is cut of black “Chinese brocade”, which is a very heavy polyester damask. Often these are multi-coloured but this one is just black. Our model is Dusk to Dawn Silkstone, a recent addition to my girls, and that’s another Amazon link. Her cape is knitted from a faux-fur yarn, closed with a hook-and-eye that has a sparkly.

Because of the thickness of the brocade, I knew I’d never manage a turned hem that was only 1/4″ wide in total. Instead, I fused knit interfacing to the wrong side to stabilize the edge, turned the hem 1/4″ and machine stitched it in place. Because it wanted to flip, even after pressing, I trimmed the seam allowance close to the stitching line.

I’m quite pleased with these and might manage to complete a few more in time for New Year’s Eve. Another completed mission in my Kate & Me challenge!

Next week, we’ll talk about stoles and capes, and making gloves.

Stylebook Double Breasted Suit

Stylebook of Doll's Dress for Barbie by Katie Mitsubachi
Double Breasted Suit for Barbie from Kate Mitsubachi's book Dress Style

Time for an update on my sewing for Barbie. You might remember that I was planning to make the Soirée ballgown from this Japanese pattern book, Stylebook of Dolls Dress by Kate Mitsubachi, but I got distracted by the Double Breasted Suit instead. That started a little adventure that led me down a rabbit hole.

First, the suit pattern. Here’s the image from the book at right. It’s very cute.

The patterns in this book are written in Japanese, but there are illustrations for the assembly. You can see in the pattern layout below that the dark grey fabric is the main fabric – that’s the skirt, placed on the fold, the jacket cut twice, the sleeve cut twice, and the bias panel to line the skirt which only needs to be cut once – the stripe is the lining and the light grey fabric is the white used for the hat.

Double Breasted Suit for Barbie from Kate Mitsubachi's book Dress Style

For this one, they’d forgotten to include the collar on the layout for the main fabric, but that was easily remedied.

I was less happy that the jacket is supposed to be unlined. I made one version as instructed, but didn’t finish it. I then cut another suit with a lining.

It was a bit tricky to line the skirt, given the construction order. In the end, I changed it. I cut a skirt lining the same as the main fabric piece, sewed the hem, the center back seam (which I made narrower, to allow more overlap for the snap) and then the pleats. I lined the top of the skirt with the bias piece, then hand-sewed that piece over the lower part of the skirt.

For the jacket, I needed a lining pattern piece. I traced the main jacket pattern and laid the back neck facing over it, tracing it. I then folded back the pattern on the front foldline and traced the self-facing of the fronts. Then I had to mark the seam line, and add a seam allowance on the other side before cutting the lining pieces. I also decided to cut the back collar facing in the main fabric, just as you would do with a bigger jacket, instead of in lining as instructed.

This also changed the construction order. I sewed the darts in both lining and jacket, then the center back seam in the fabric. I sewed only part of the CB seam in the lining, so I’d have a way to turn the jacket. I inset the sleeves in both lining and jacket (I basted these by hand first), then sewed the sleeve hems. Finally, I sewed all around the outsides and turned the jacket. When it was pressed and seamed, I added snaps to the jacket front and skirt back. The pattern suggests seed beads as mock buttons, but I had teensy Barbie buttons in black, so I sewed ten of them up the front.

So, here we are with the finished suit:

Double Breasted suit for Barbie designed by Kate Mitsubachi and made by Deborah Cooke

It’s important to press as you go with Barbie’s clothes as the garment keeps getting smaller and it becomes harder to get to the seam allowances. I made myself a little helper, not unlike a pressing ham, but rolling some cotton flannel into a tight tube, a little more than an inch across. I can get that into the waistband of any garment to press it. Sleeves require a skinnier tube, so I rolled more flannel around a dowel. These two funny little rolls are now part of my Barbie dressmaking toolkit.

What leads me astray with Barbie outfits are the accessories, because Barbie doesn’t just throw something on. She pulls it all together. It took me a while to finish the hat for this outfit, not because it was hard but because it was tiny and had to be handsewn. My pillbox hat doesn’t have quite as crisp of an edge, so I’ll have to figure out how to fix that next time. It’s possible I tugged the thread a bit and gathered it slightly.

I became a big fan of Avery mailing labels while making this outfit. They’re a really useful way to temporarily mark the finished size of any element – you cut a template out of the mailing label and stick it on the fabric. I did that with the crown of the hat, which allowed me to sew the band in place with more accuracy.

For the accent on this hat, after much deliberation, I went with a contrast bow like the one suggested in the pattern. There’s more inspiration on this website, though. (Actually, the whole site is pretty amazing as a fashion reference.)

Can this suit be worn without a string of pearls? I thought not. I used the tiniest jelly elastic I could find (it was at Fabricland and is .5mm wide) along with some seed “pearls” from the bridal department at Len’s Mills. I played around with different lengths and also pendants. This one has a black bead rose. I’d love to have a string of pearls that was shorter, but there are limits to how much the jelly will stretch to go over her head. (And clasps are another rabbit hole. I did find this teeny one.) The jelly has a square knot at the back, which has been reinforced with a dab of glue. There will be more on necklaces in next week’s post. They’re like potato chips – it’s hard to have just one.

Of course, she needs a purse. There’s a clutch bag on the McCalls 7550 pattern which reminds me of the classic dimpled gold clutch from days of yore. (I still have one.) It’s really easy to make and just requires a bead as a clasp. I made this one out of a red faux-leather which is very thin. I ordered a piece of it from I Sew For Doll and am using it sparingly. The clasp is a black bead in this case.

Finally, she needed gloves – which are actually mittens even though we always call them gloves. (Why do we do that??) I’m getting better at making these, although they’re still not perfect. Again, the mailing labels help. I traced the finished glove dimensions on a label, and cut it out as a template. I then hemmed a square of the fabric for the gloves so the wrist edge was finished, folded it, stuck the label on the fold and sewed around it. I trimmed it to the glove shape after sewing, not before. They’re tricky to turn as they’re so small, but a little crochet hook helps. These are made from a stretch knit with a shiny coating that looks like patent leather. It’s a very thin fabric. I got it at Fabricland in several colours, including metallics, specifically for gloves. Next time, I’ll try a second row of stitching parallel to the first. It might keep her from poking her finger out between the thumb and fingers of the mitten.

Barbie is modelling this suit on the construction site for my new diorama of a shop. I’ll talk more about that process another day.

Double Breasted suit for Barbie designed by Kate Mitsubachi and made by Deborah Cooke

What do you think of outfit #1 in my Kate & Me challenge? (The problem with sewing for Barbie and having multiple dolls is that now they all want a new suit.)

Barbie Measurements Over Time

Last time, we started to talk about Barbie’s evolving dimensions. If you’re going to sew for Barbie, and you’re going to make something fitted, you need to know which Barbie will be wearing the finished garment.

Barbie body styles, photographed by Deborah Cooke

Fortunately for we Barbie dressmakers, each doll has the date of her body mold stamped on her bum. It’s interesting that this can get so mixy-mixy with face sculpts – the middle doll, for example, is a thrift store find who has a Bob Mackie face sculpt. (I’ve yet to fix her hair.) Mattel started making the Bob Mackie faces in the 1990s but she has a 1966 TNT body, by the date on her bum. The Black Label Basic Barbie from 2009 on the far right has a 2003 Model Muse body. The one in between has a 1999 Bellybutton body, but is a much later doll. (Notice also how the hand poses and sculpts change over time. There are lots of variations in this.)

Like good dressmakers everywhere, I got out my measuring tape and made a chart. I don’t have all the dolls to measure, but here are the five above. The measurements are in centimeters:

MeasurementVintageSilkstoneTNTBellybuttonModel Muse
Intro Date19582000196619992003
Bust14131412.512
Waist87897.5
Hip12121213.511
Back Waist66666
Inseam13141313.513.5
Height29.530.529.53030

It’s easy to see why a dress or suit drafted for Bellybutton wouldn’t fit vintage, especially in the bust.

The other thing that changes over time is Barbie’s foot size. I’ve bought mixed bundles of new shoes on eBay and there are always some in the package that don’t fit vintage Barbie. There are fairy boots in the mix, for example, with teeny tiny feet. There are also styles that look like they should fit but don’t, like this one:

Barbie Shoes comparison

I’ve left this image big so you can see. The turquoise shoe on the left is from one of those packages of mixed shoes. The one on the right is a Silkstone Barbie shoe. Not only is the quality of the casting and finishing better, but the dimensions are different: the turquoise one is narrower at the ankle. Vintage, Silkstone, TNT, Bellybutton and Model Muse can wear the shoe on the right. Of the five, only Bellybutton can wear the one on the left. She doesn’t have as high of an arch so her foot is narrower below the ankle.

Here’s another Silkstone shoe compared with a budget version:

Barbie Shoes comparison slingback

The black shoe on the right is a Silkstone shoe. The pink one on the left is from a pack of mixed shoes. Again, you can see that the quality of the mold and finishing is better on the black shoe, but also the heel is higher. For Silkstone, these shoes have left and right as well, with a buckle molded into the slingback strap – you can see it on the back side – while the budget version doesn’t have that detail. These shoes both fit all five dolls, but I always think they look like the toes are too long. Of course, I’ve had shoes with elongated toes like that myself, so it’s a style thing.

So, what’s a dressmaker to do? My first plan is to buy only patterns that are modelled on the kind of doll who will wear the finished garment. More about some of those patterns for vintage Barbie next time.

1/6 Scale Market Bags

After trying the purses for Barbie from that McCalls pattern, I was inspired to try some market bags. I watched a couple of YouTube videos which were for 1/12 scale minis then fiddled around on my own. Here are the first results:

1?6 scale market bags designed and created by Deborah Cooke

These bags are about 2″ high, 3.5″ with the handles. They’re lined and the handles are leather cording. They have little charm fleur-de-lis clasps and elastic loops to keep them closed as well as beads for feet. The one at the far left has a jewelry charm for a clasp instead. The one on the far right was the first one, and it’s a bit narrower than it should be. I widened my template for the others.

The brown fabric is a silk linen blend suiting that I bought in Paris in the 1980’s. I made myself a suit from it – long gone! – and these are remnants. The black fabric is quilting cotton. The bags are lined with French shirting fabric (that bit of red stripe), Liberty Tana Lawn (the other two brown bags) or silk/cotton voile. The roses on the bags are paper roses (are you singing along with Marie Osmond?) and the bouquet is a cluster of ribbon roses that I wrapped in tissue, like they just came from the florist.

The box is a desk organizer from the dollar store with a nicer paper glued in for backing. It’s 6 x 9″ and is the foundation of a display case for the store diorama that I’m creating for Barbie and her friends. Yup, another rabbit hole has opened wide…

McCalls 7550

McCalls 7550

McCalls 7550 is a mini-wardrobe of vintage styles for 11.5″ fashion dolls like Barbie. It’s a current pattern, and I’ve linked it to the Simply Delightful website for Vogue, Butterick and McCalls patterns. You can buy it in hard copy or as a digital download, either there or from a local fabric store. I have a hard copy.

I liked the vintage look of these garments for Barbie and made the sundress shown in blue and white on the pattern envelope. It’s a halter back dress with a full circle skirt and is Dress E.

Here are the pattern line drawings:

McCalls 7550

I made this first in a green quilting cotton but wasn’t as happy with the result as would have been ideal. Piecing that bodice is fiddly and it’s a challenge to get those seams to lie flat on the front. My corners didn’t turn as nice crisp points even though I trimmed the seam allowances. And the bodice is tight on my vintage Barbie. I think there are three reasons for this: first, the doll photographed is a newer and less curvy model; and secondly, the fabric is probably thicker than would be best, and thirdly, I didn’t follow the directions closely for the back.

Here’s Babs showing off that version:

McCalls 7550 view E sewn by Deborah Cooke

The front looks good, but see at right how the back gaps open. (And yes, I sewed on little contrasting buttons.)

McCalls 7550 view E sewn by Deborah Cooke

Even on this version, I did make some changes. First, I sewed lace on the hem on the tulle underskirt. Secondly, the bodice is lined, but after piecing it, you’re instructed to sew around the raw edges of the center back and waistline – when you join the skirt, there will be a raw edge inside the garment. I couldn’t see the point of having a lining if that was the case, so I tucked the raw edges in between the bodice and the facing. I had done the same for the center back, but then didn’t have enough fabric for a good overlap for the snaps – that contributed to it being tight. Finally, I added a ribbon around the waist, sewing it into the center back seam on each side, then tying it at the front and tacking it down there so the bow can’t come undone.

I made the dress a second time, and read the directions for the back more closely this time. This version is better. This is another quilting cotton but it’s not as thick as the green print.

McCalls 7550 view E sewn by Deborah Cooke

I forgot to tuck the ribbon ends into the center back seam (duh) so had to sew them by hand. This time, I only used one layer of tulle instead of two, but I put lace on the edge again. This one also got a ribbon rose and (again) contrasting buttons. 🙂 I made the same changes with putting raw edges inside the bodice and facing, but only used a 1/8″ seam allowance at the center back instead of 1/4″. This fit vintage Barbie much better and the opening below lies more smoothly. I think it should be finished more, though, so there’s a version three.

McCalls 7550 purses sewn by Deborah Cooke

I also tried both purses from this pattern in a shiny fake leather. I love the clutch – which is upside down in the picture! – and it was both quick and easy. The other purse is a bit floppy, plus I thought the strap was short and thick. The flap curls on that one, too, so maybe the fake leather needs to be doubled over or interfaced. Maybe the bag needs to be lined. Modifications are required!

For version three of the sundress, I applied fusible knit interfacing to the center back seam allowance for the skirt. This will ensure the edges can’t fray after the garment is done.

And here’s version three with the new purse!

McCalls 7550 view E sewn by Deborah Cooke

My model is a Silkstone Barbie, new to me. She’s Lingerie #2 from 2000 and I bought her NIB on eBay. Her hair needs to be redone since the elastics have disintegrated over time and her lingerie is a bit yellowed. I’ll give it a handwash to see if that will clean it up. I hadn’t seen a Silkstone Barbie before and there are cool things about her – a little more detail in the sculpt and the material makes her heavier. Her knees don’t bend, though.

I was so busy trying to get her to hold her new purse that I didn’t realize she was doing a drunk-lean on the steps.

This quilting cotton is probably the thickest of them all and that made the flamingo dress a bit challenging. I’m tempted to try one in Liberty Tana Lawn just to see how much easier it would be in a thinner cotton, but I need a break from this dress.

Fiddly fiddly sewing for Barbie! I like the challenge, though, and I’ll show you some market bags that I created in 1/6 scale next.