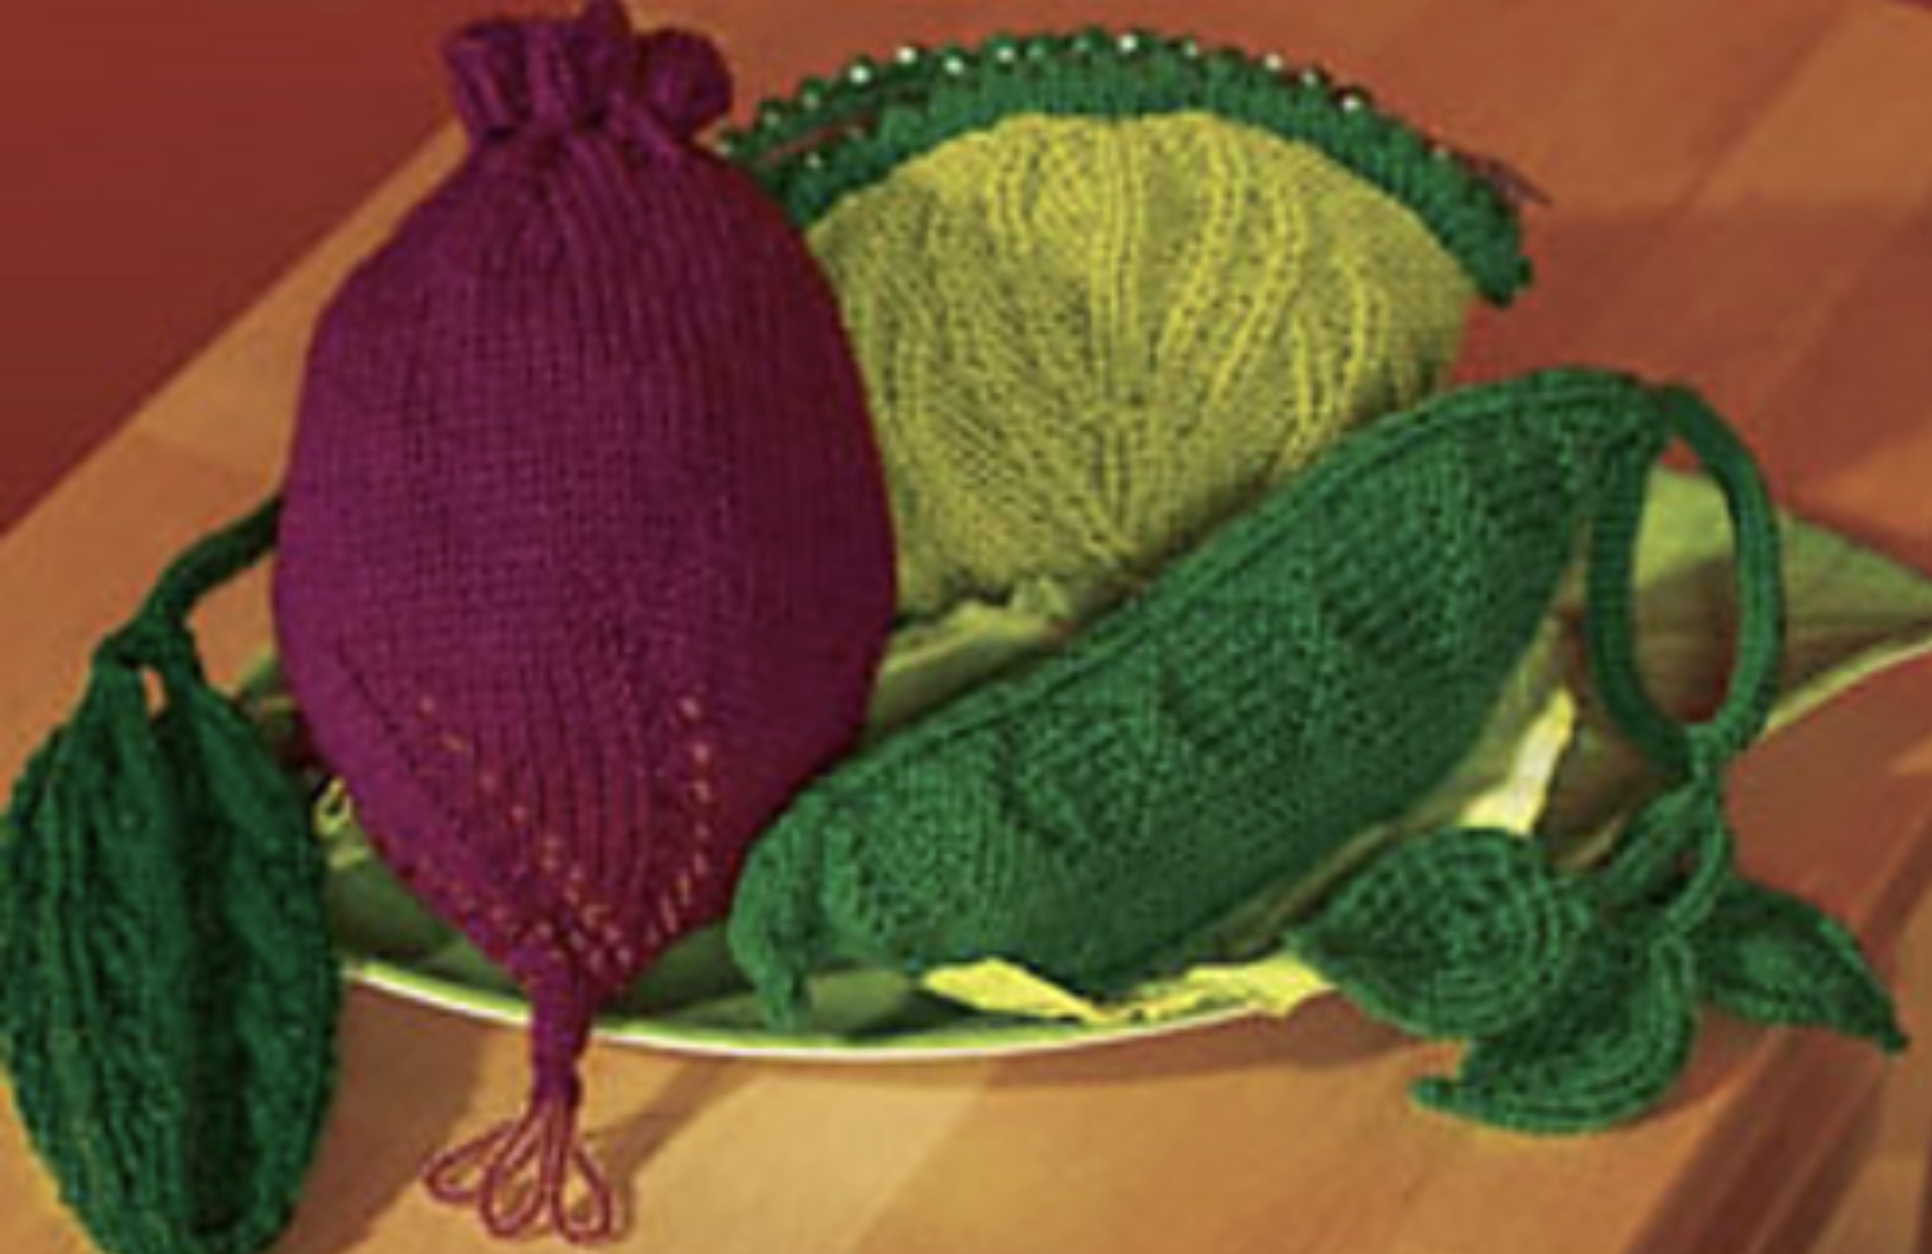
I mentioned these two fruity purses to you a few weeks ago, as they’d risen to the surface of my projects needing to be finished. They were from a kit from Knitpicks called The Elegant Edibles kit. (That’s a Ravelry link – the pattern is no longer available.)
I knit the orange and the kiwi, but never finished them and put them aside. That’s changing now. 🙂
The orange was like this:
Usually, when I put a project aside, there’s a reason. I had no idea how to line the orange, given its unusual shape, plus I thought it was too floppy to make a good purse. Similarly, I liked the handle of felted leaves, but it felt too soft to be functional.
One review, I decided to interface the lining. For the shape of the lining pieces, I flattened the bag and traced around the crescent shape, then around the arc of the “rind”. I added 1/4″ seam allowance on the edges and cut the lining. I then added some interfacing to the “rind” edge to give the purse some body. I trimmed a piece of curtain header (buckram) to the shape and stitched it to the lining fabric so it wouldn’t shift around, then assembled the lining.
You can still see those stitches. There was no chance of matching a print with so many colours, so I went with white for contrast.
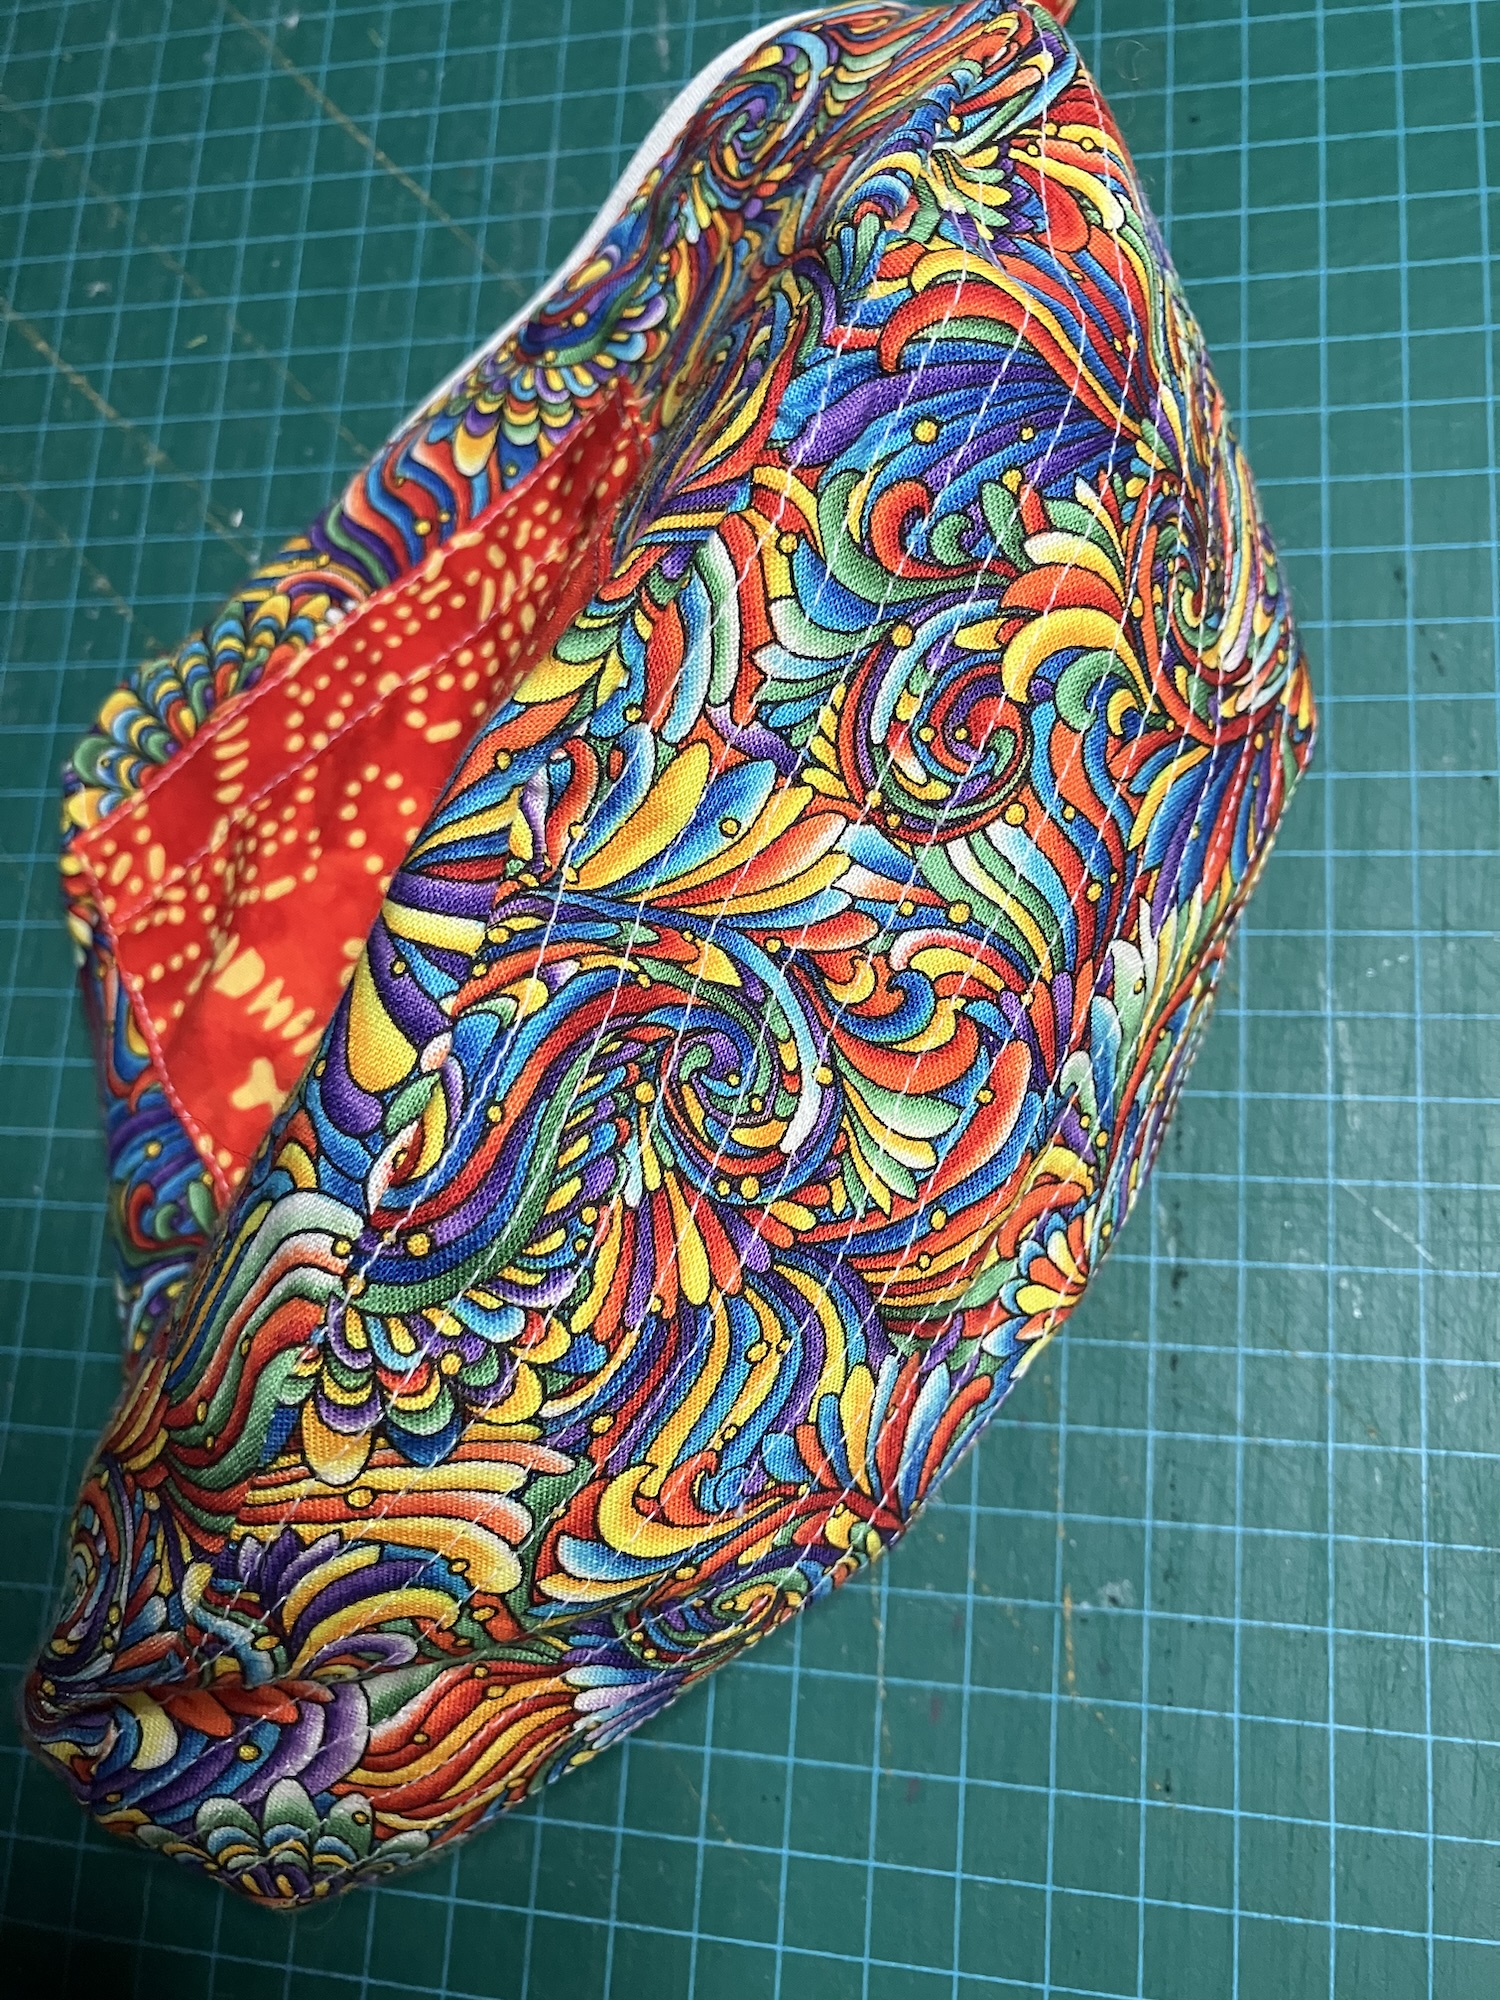
Here’s how the lining looks with the purse on its side.
Of course, I added an interior pocket. Just for fun, I used a contrast batik. The open edge of the pocket is parallel to the zipper.
And here’s the bag turned right side out:
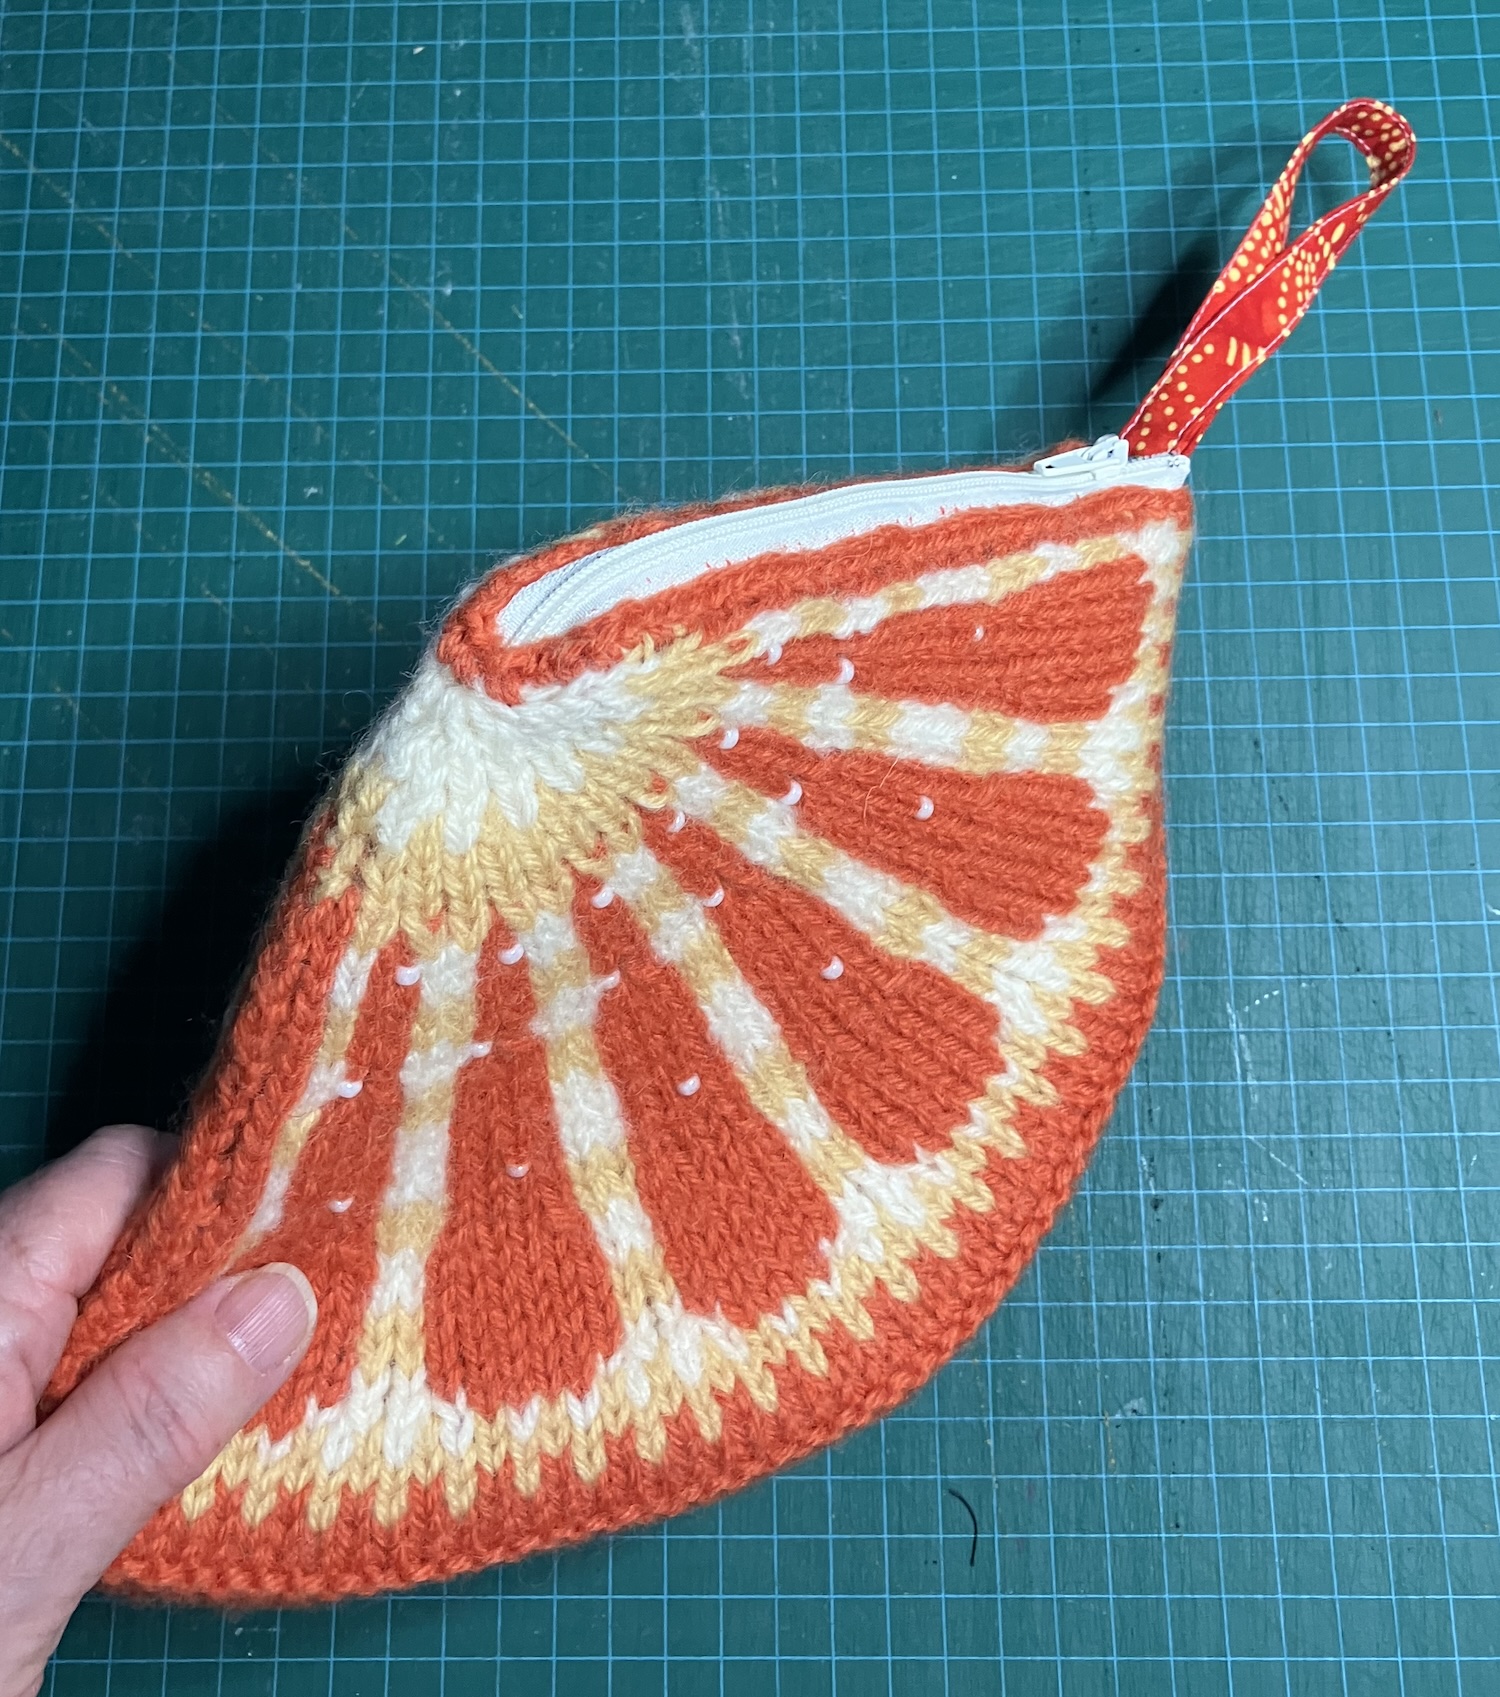
Finally, here it is all finished up.
I like the felted leaves a lot, but they’re a bit soft for a handle. Twining them around the fabric handle makes for a more sturdy solution. I’ll see how it works out but might stitch that felted wool handle right onto the batik. Overall, I’m pleased with the result. 🙂
These kits were featured in the current issue of Threads Magazine, as a gift suggestion for sewists. I took the suggestion and bought myself two of them. They are incredibly cute.
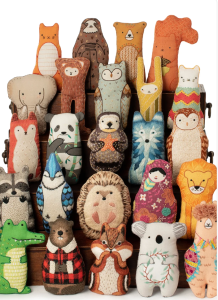
The kits are for stuffed and embroidered dolls – many of them are animals – from a company called Kiriki Press in Toronto. You can see the range of options on their website – and a few of them in this image at right from their site.
The doll kits are presented by level, which is determined by the amount of embroidery on each one.
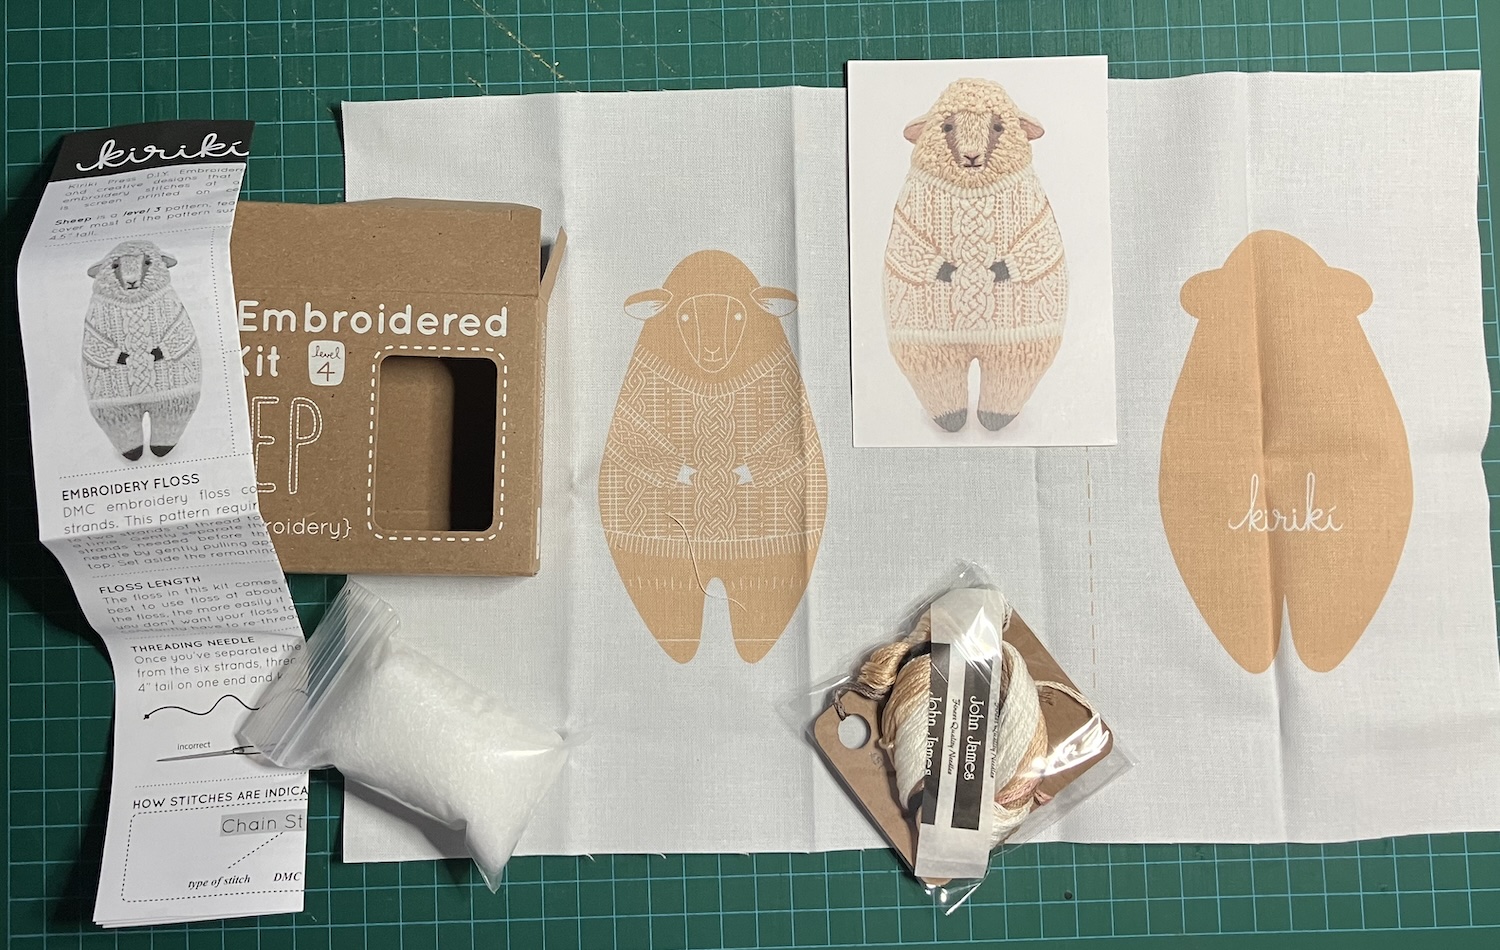
I bought the raccoon in the starter kit, partly to avoid having to hunt down an embroidery hoop of the right size. (You can choose any design in the starter kit or just on its own, as the sheep below. You can also add a hoop to any order, which I didn’t notice earlier.)
The starter kit includes the hoop, as well as a pair of stork scissors and the instruction book of stitches. It also includes the same items as in the individual doll kit – the embroidery floss, screen-printed fabric, stuffing and pattern.
I bought the sheep in the doll kit, so I have two critters to make. Both of these are level 3 kits, with most of the surface covered with embroidery.
It was tough to decide. I loved the wolf and the otter also, and the hedgehog is adorable. Hmm. I also loved the keeper bears, but they were sold out. It looks as if they’re back in stock, so maybe I’ll treat myself once these two are finished up.
I thought they’d make nice projects for a snowy evening and am looking forward to starting the raccoon.
Last week, I picked up two more finished quilts at the longarm quilting place. They both needed their edges bound, of course. For both quilts, I chose a meander quilting pattern and it proved to be the perfect choice. 🙂 It’s always so exciting to get a quilt back and have it almost finished. I end up trimming the edges right away.
For this one, I had the fabric for the bias tape already. I had it cut up and sewn onto the front of the quilt by the next morning. I’ve been handstitching it to the back ever since. It’s motivating to have a quilt almost done!
I meant to show you this Friday, but it was raining when I finished the binding on Tuesday. My plan was to take it outside then photograph it on the driveway, but no joy. Rain, rain, rain, and then Friday, the snow started. So, we get kitchen pix instead.
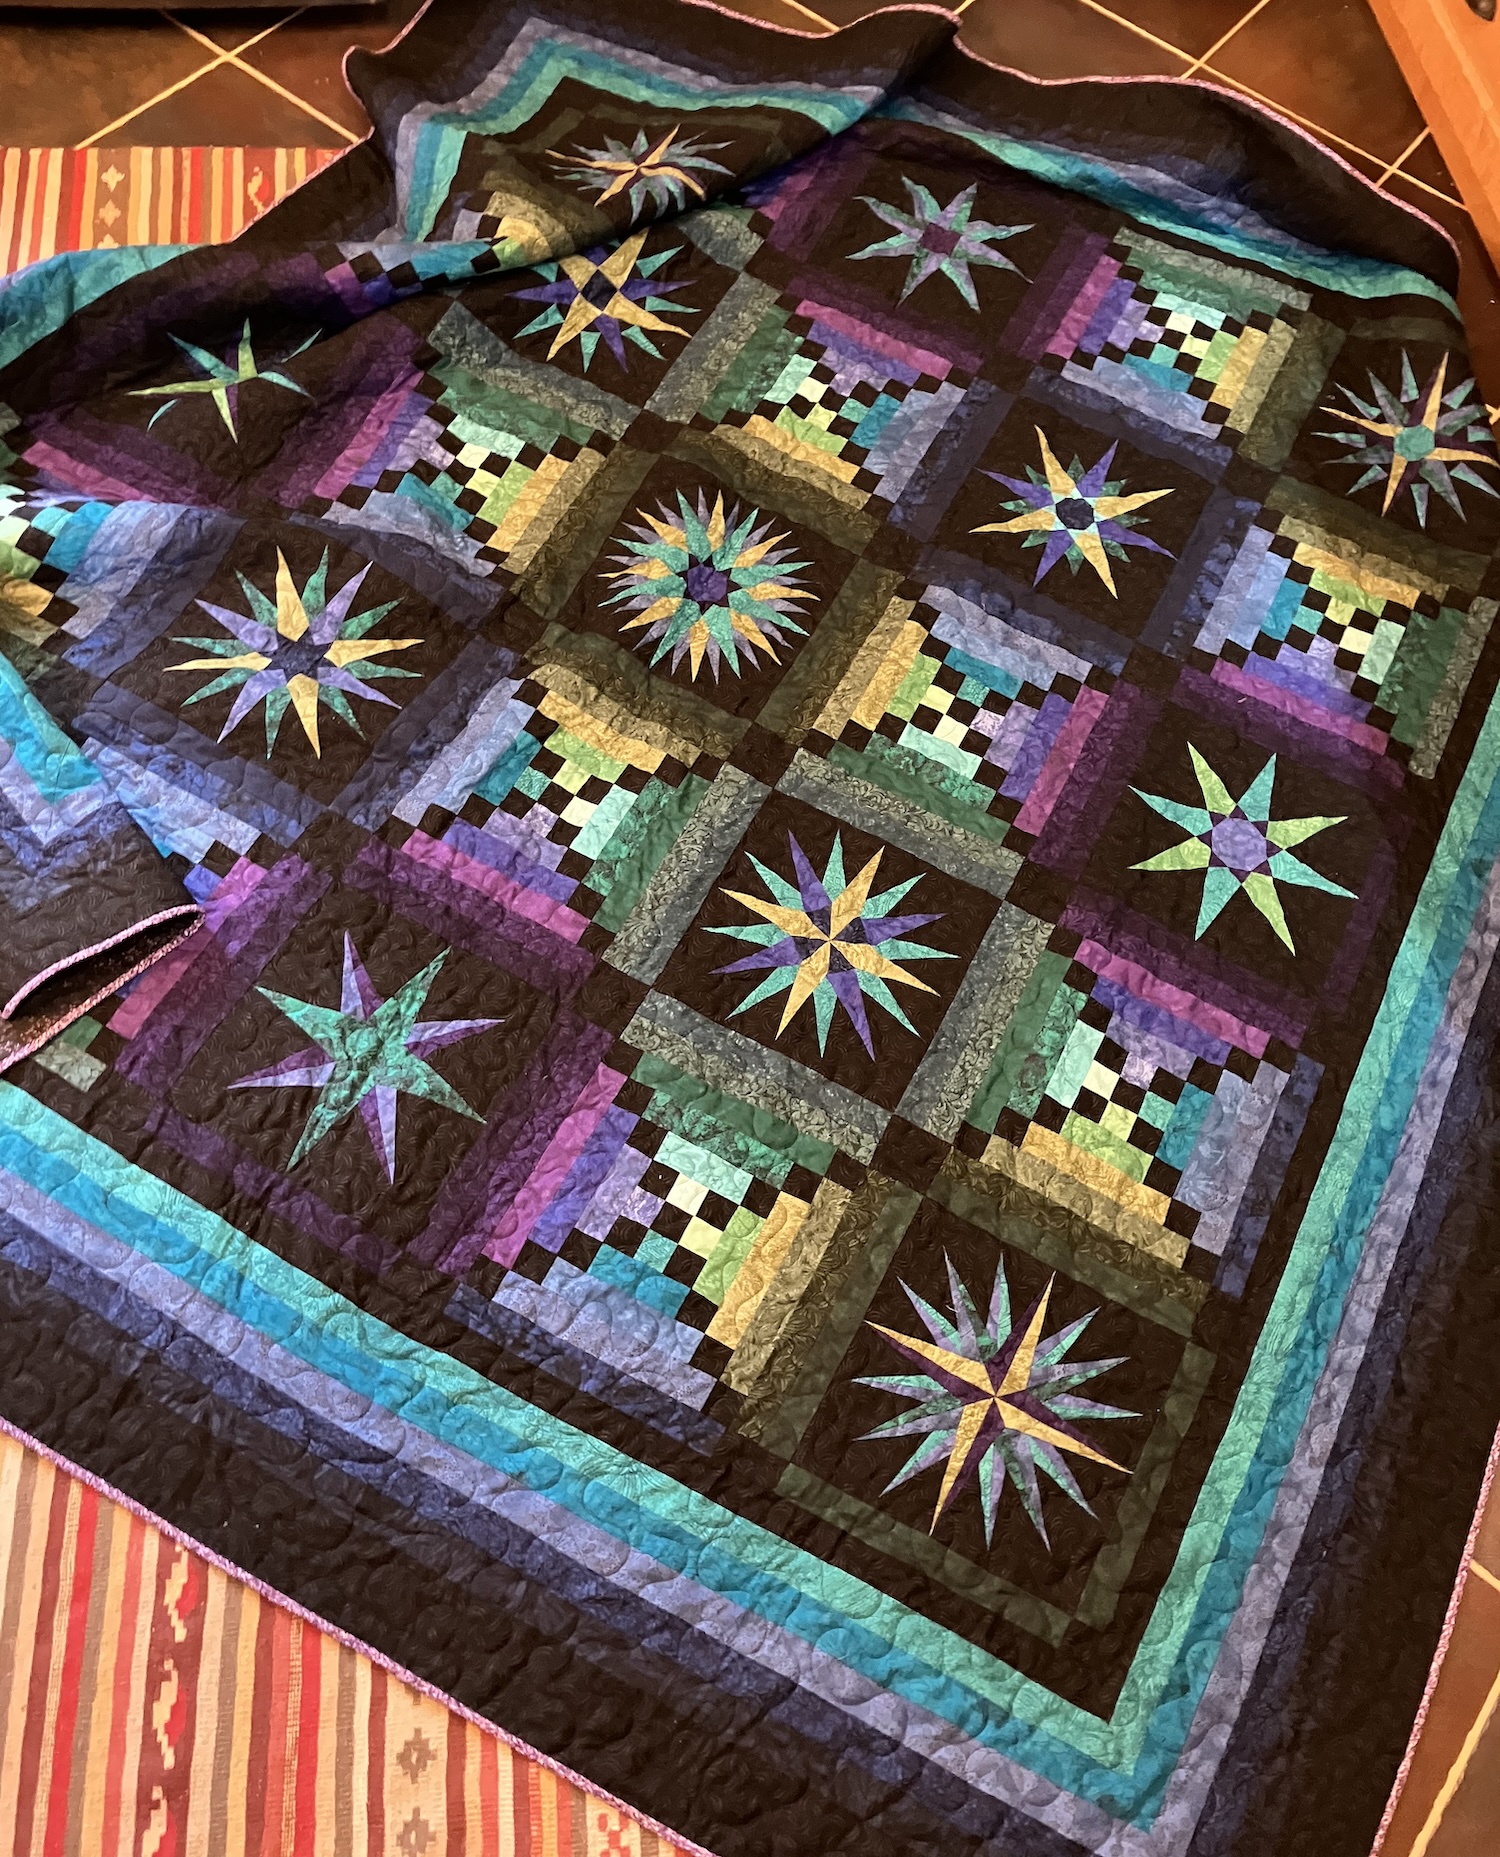
Here’s my finished Moonglow quilt.
My first thought was that the binding could be black, but I thought that was a bit of a predictable choice. Instead, I chose this purple print and kept it very narrow. The backing is a black print with purple.
I really like how this one came out.
There are a number of posts about piecing this one, which was a kit from Jinny Beyer. I began to piece it in April 2020, apparently.
The other quilt that’s home to have its edges bound is my Jumping Jax Flash quilt, which has an edge that needs a bit of thought. Because I put prairie points on the outer edge, I asked them to leave the coral border unquilted. So, I’ll need to figure out a binding, then maybe add a bit more quilting myself to finish it up. As my friend, Terri, said, it will have more of a facing than a binding.
Here it is unquilted to show you what I mean.
It also has a bit of a ripple around the outer edge, as I added this coral border before I realized that strips cut crosswise will stretch a bit when sewn. Hmm. This one needs a plan – but first, I need to check in the attic to see if I have any of those fabrics still in my stash!
It has so many fabrics that it wouldn’t really matter if I used a new one for the border, but it would be more satisfying to use one that’s already in the quilt. There’s a coral French shirting that I think it in the stash – I just used a bit of it in the points, because I was planning to make myself a shirt with the rest, so I’m thinking there’s 1.5m or so stashed away.
There are more projects in this stash of UFOs. Here’s the next one in my finishing queue.
This was a kit from Knitpicks with instructions and wool for six fruity purses, called The Elegant Edibles kit. (That’s a Ravelry link – the pattern is no longer available.) I remember thinking these were so cute.
Here are the official pictures from Knitpicks:
I did not remember that it was 2008! I finished the kiwi and the orange purses by 2010, and they’ve been waiting patiently ever since to be finished up. Enough!
Here’s how I found them:
These are really cute knits and I like that there are beads for the ‘seeds’. I made some changes to the pattern, noted on my Ravelry project page here.
I suspect what happened was that I didn’t like how floppy they were and wasn’t sure what to do about it. In the KP pix, they look more like pillows than purses to me. I did felt them a bit, which gave them a little more substance. I also decided against the handles shown in the pattern and adapted the leaves from the bunch of grapes for the orange. Those leaves are felted as well.
And now to finish them up. I found some coordinating zippers (there were zippers in the kit, but who knows where those ones are now) and pinned them in. I also cut linings and interfacing for those linings – in fact, I’ve cut buckram for the outer curve on each one. The kiwi one doesn’t have a handle at all, but my Rav stash lists the bin (in the attic) where the remaining yarn is supposed to be. (It was there at some point. Is it still there? I’ll have to go up and see.) I’m thinking a long i-cord in the green would be a good choice for a handle on the kiwi bag. If the yarn is gone, I’ll do one in black.
The beet and the grapes are also cute, but I have no idea what I did with the pattern. Hmm. If I find the yarn, I’ll hunt down the pattern. I do remember that the brighter purple (for the beet) was called Fairy Tale. 🙂
Did I use up the KP yarn on this Norah Gaughran beet? Here’s my Rav project page, and yes, the purple is the KP yarn. The green is Patons Classic Wool Worsted, so the green from the kiwi purse might still be in the stash. I’ll have to go hunting…
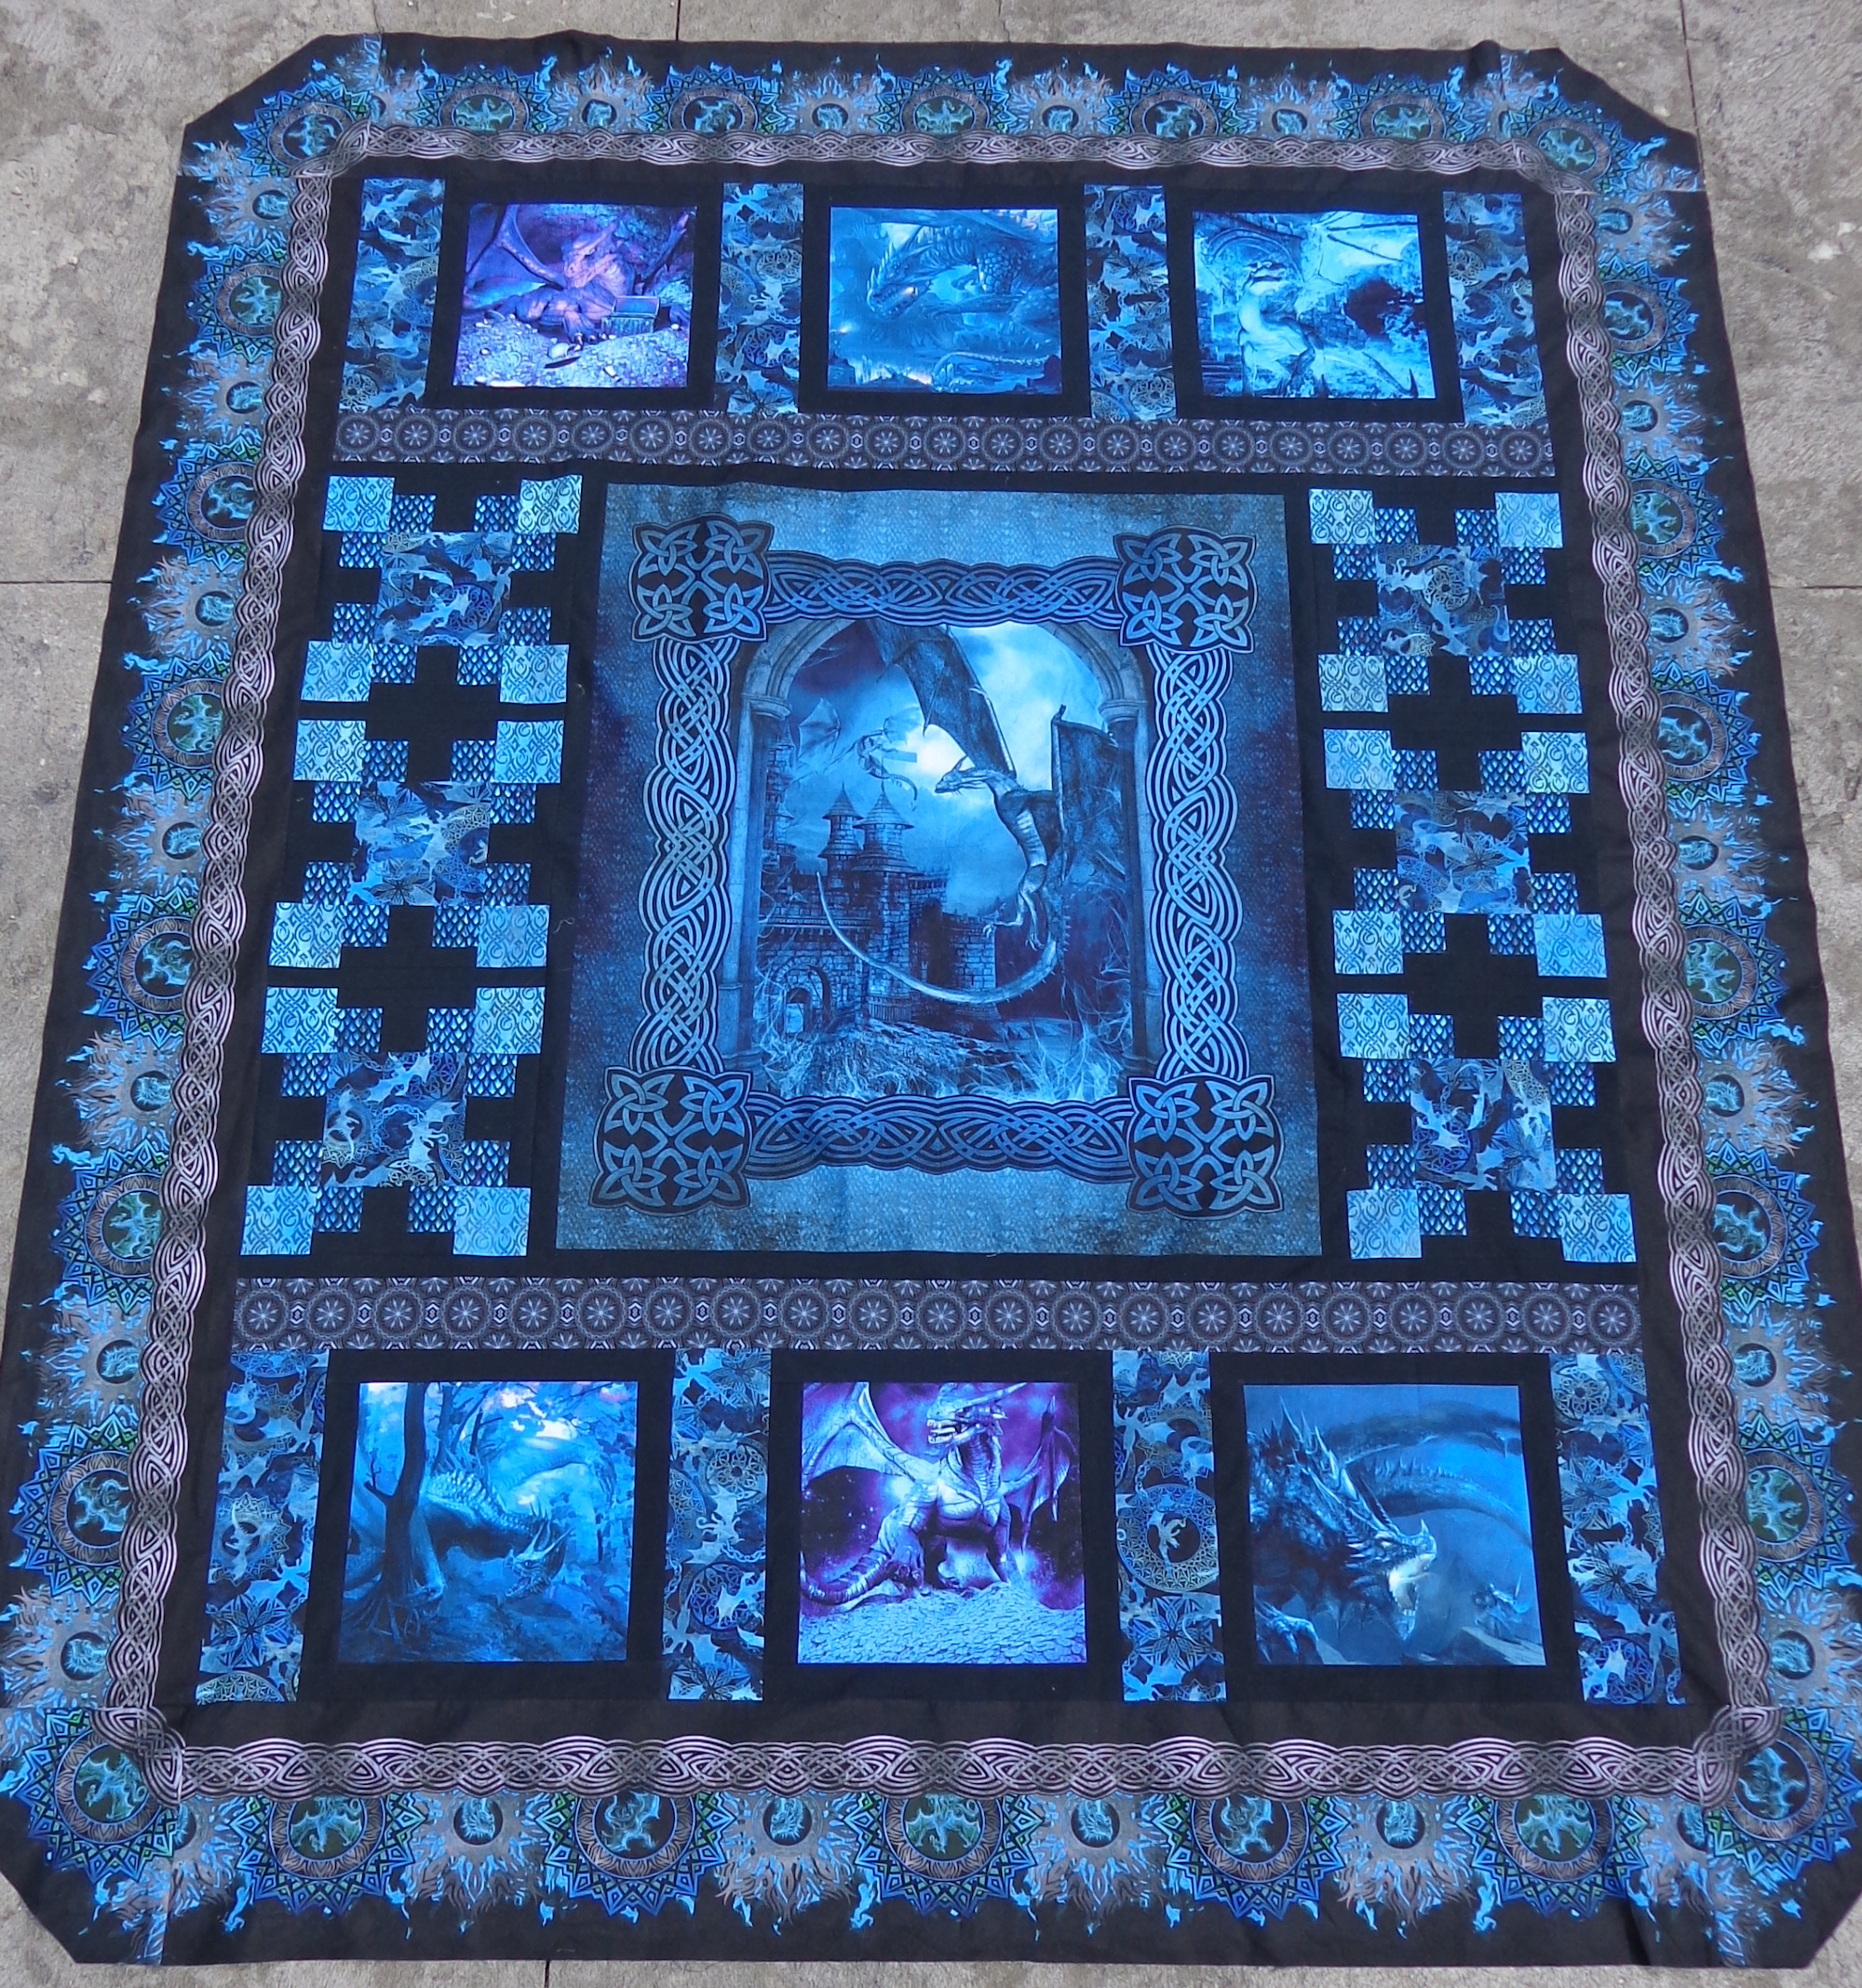
About five years ago, I had a pandemic project of assembling a quilt kit called In the Beginning. Here’s the finished quilt top from the final post about that project:
I’d decided that this would be the first quilt that I had quilted by the shop with the long arm machine and took it in there last month. I picked it up and have been sewing on the bias binding – I sewed it to one side by machine, then handstitched it on the back all the way around. This is a big quilt!
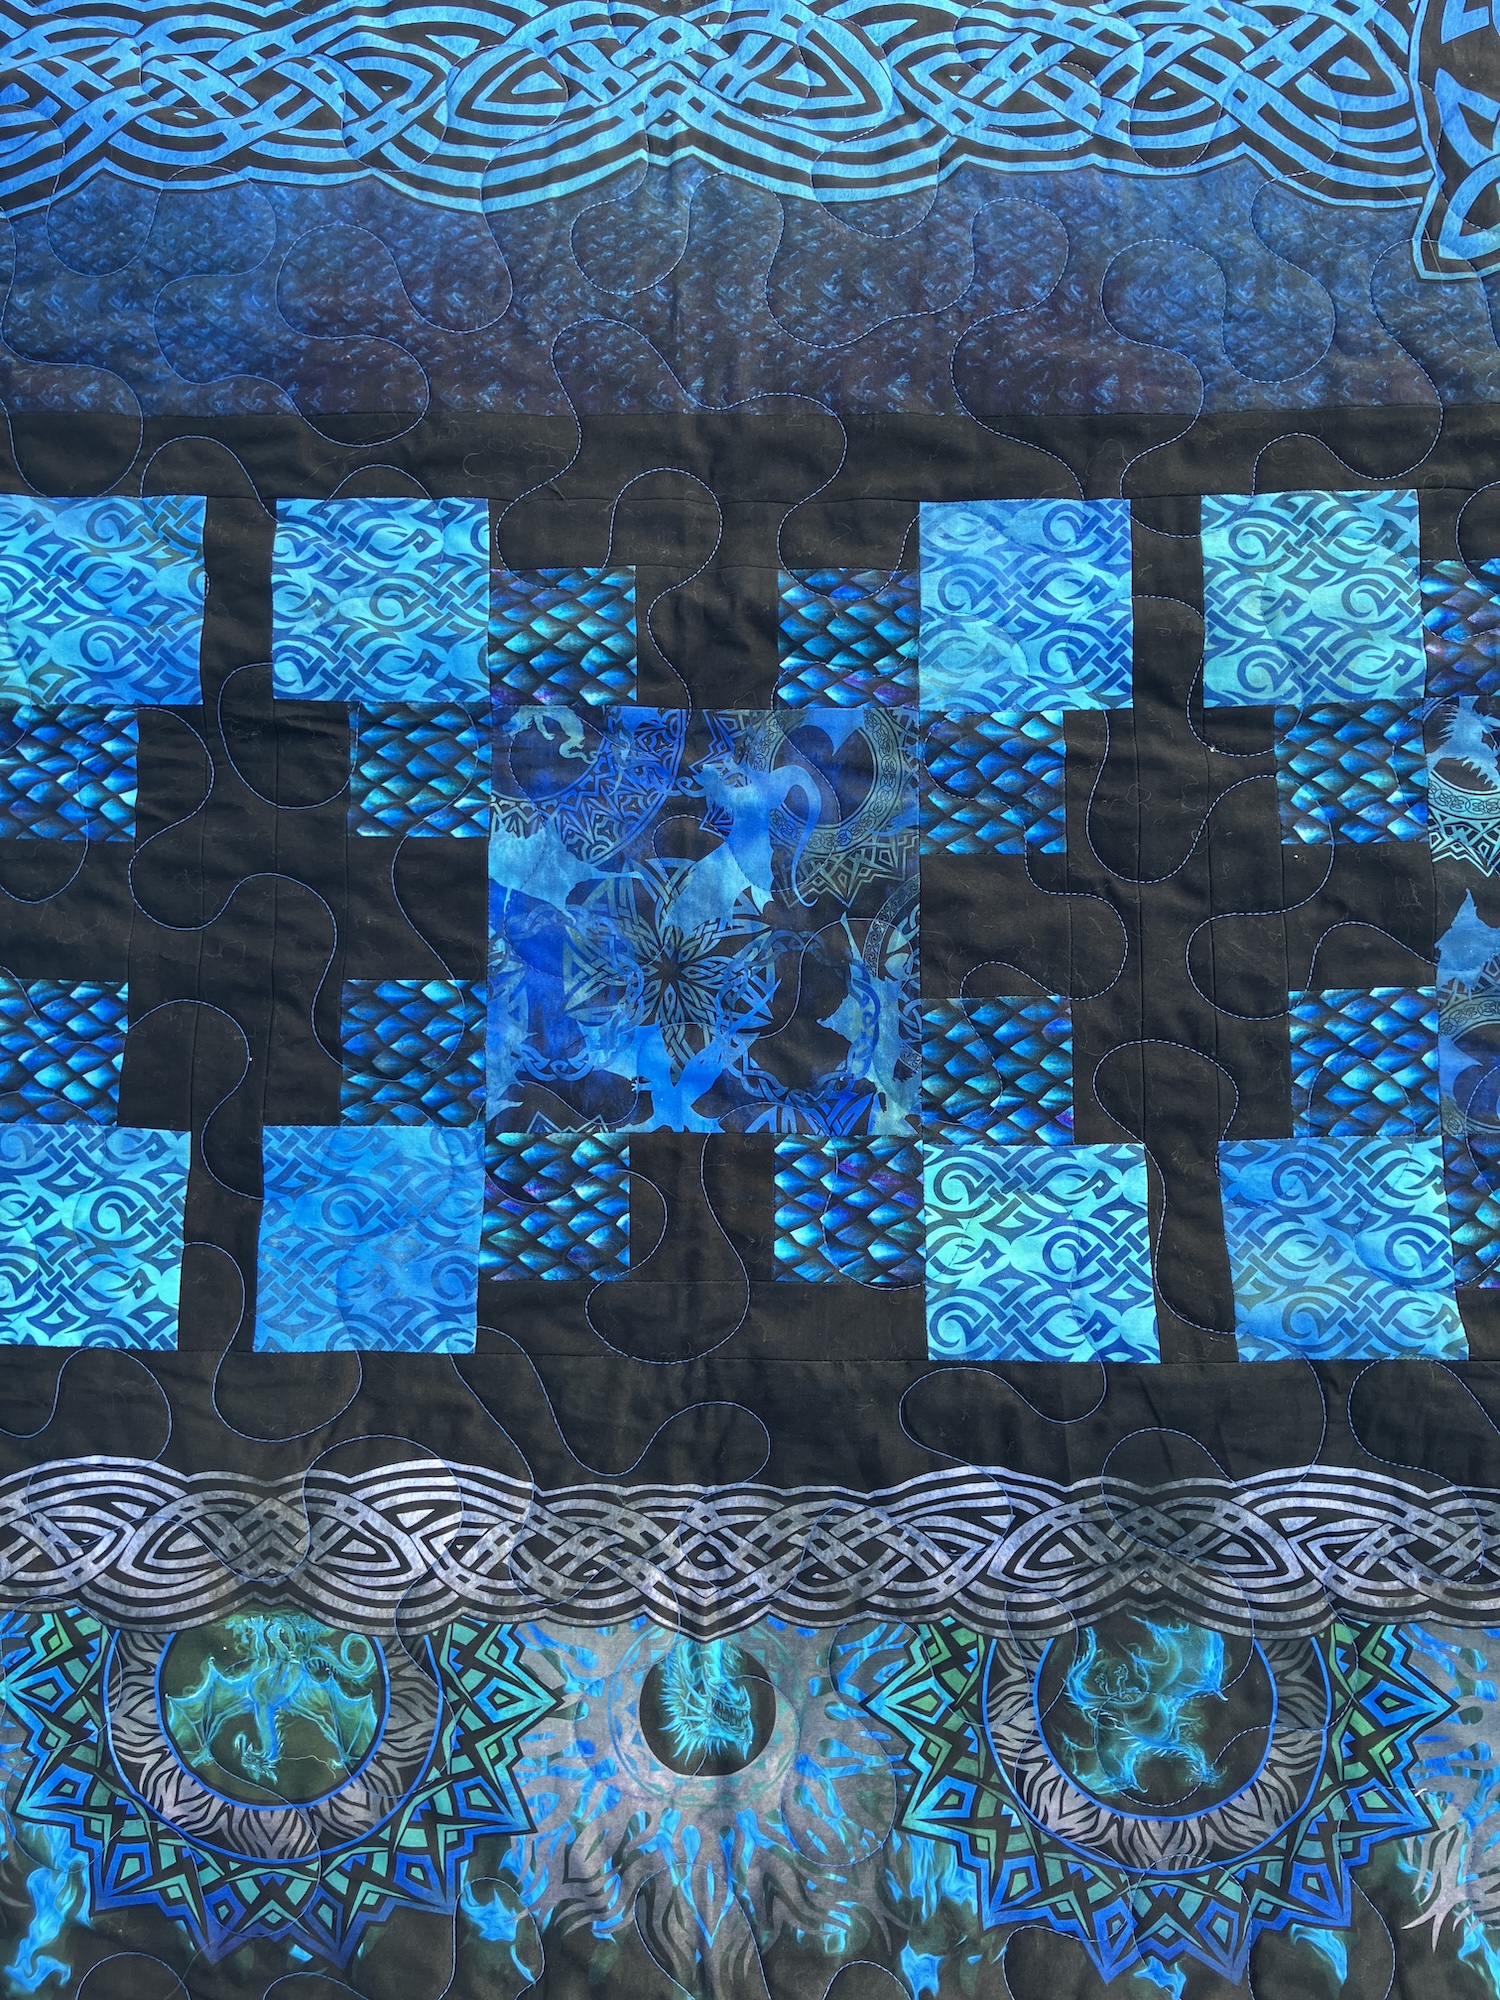
The binding is the allover print with the Celtic knots. You can see it more clearly in the detail below.
I chose a meander pattern for the quilting and they used a blue thread. It looks really great!
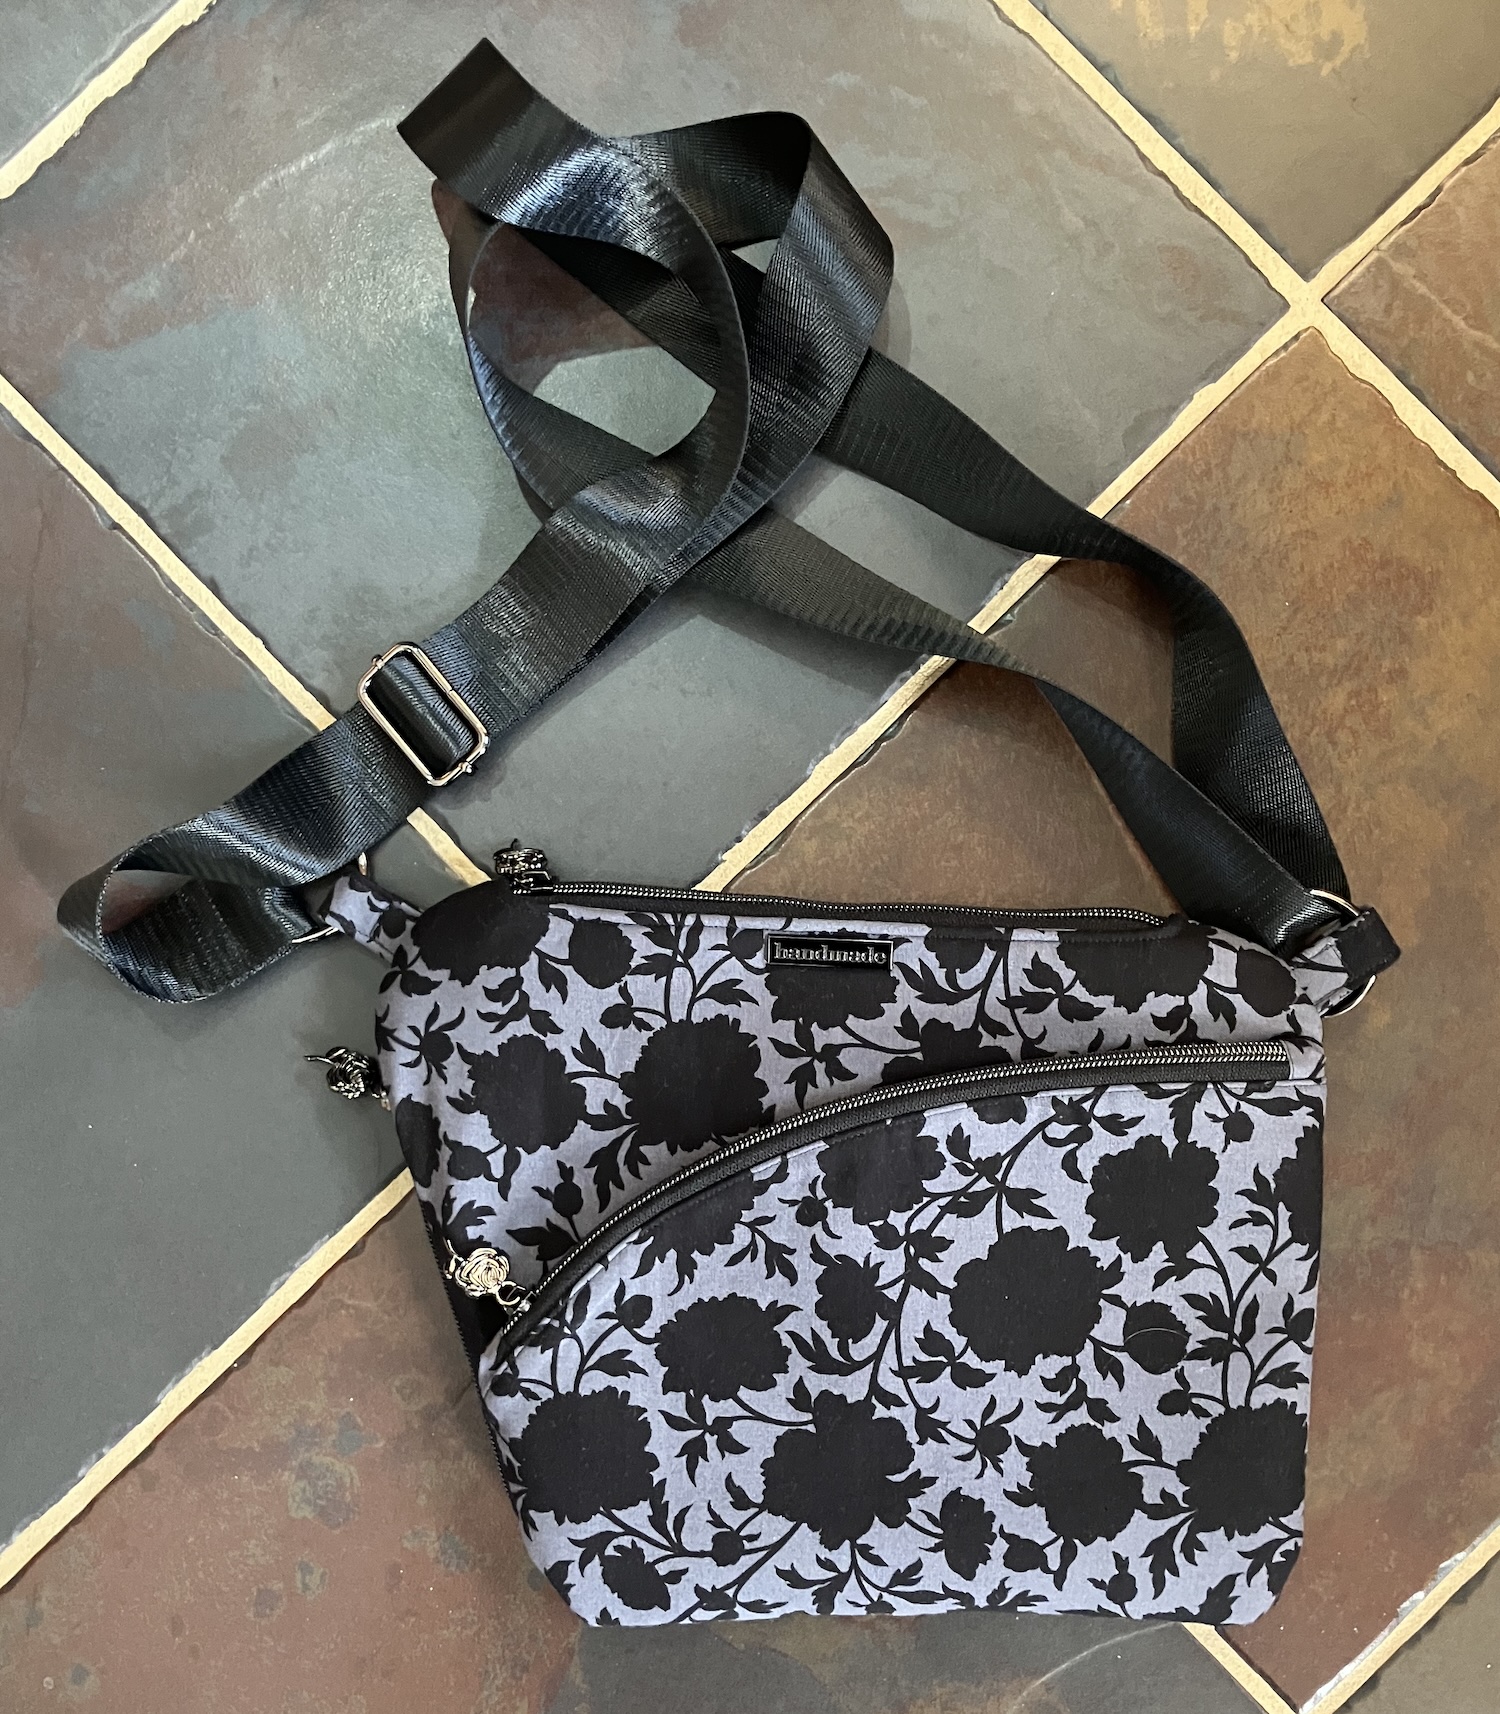
Here’s something a little different today. Last year, I attended a presentation on bag-making given by the founder of Blue Calla, and bought one of her kits. It’s the Foxtail Cross Body Sling.
I don’t see any kits on the site now, but I do recommend a kit for your first bag. It’s a good way to make sure you have all the parts, especially the hardware.
And here’s my Foxtail:
I’m really pleased with how well it came out, and it wasn’t very difficult. I really like that fabric, too. (The inside is an abstract print from the same line, with a light background, just the thing for a bag interior.) The instructions were clear, though I had to read them through a couple of times – since bagmaking is comparatively new to me, I tended to overthink it all. I should have just done what I was told and not worried about it. 🙂
The only thing I had to redo was the strap – I put it on upside down the first time, so had to unpick the stitching at the one end to redo it. That actually makes sense, since I routinely attach bra straps upside down. This is a similar technique, with a loop so that the strap length can be modified.
One thing I didn’t consider was which way I sling a crossbody bag. I always put the strap over my left shoulder, as shown in this pic of the bag from Blue Calla’s site. But this means that all the zipper tabs are at the left and the compartment along the left side is a little tough to reach.
Now, imagine the bag is slung over the right shoulder. It would tip to the right then, and all the zipper tabs would be front and center.
I think I’m going to make a second one that’s the mirror image of this one that I’ve made. That way, when I put the strap over my left shoulder, all the zipper tabs will be readily accessible. This one, I’ll wear over the right shoulder.
One thing about making bags is that it’s addictive. I had started a bag years ago and wasn’t sure I had all the right pieces so put it aside. I’ve dug that one back out to finish it up, and ordered all the parts (I hope) to make a different Blue Calla bag. They also offer a free pattern, the Clematis Wristlet, and I’m going to try that one, too. Oh, there are some kits available for that one, right here.
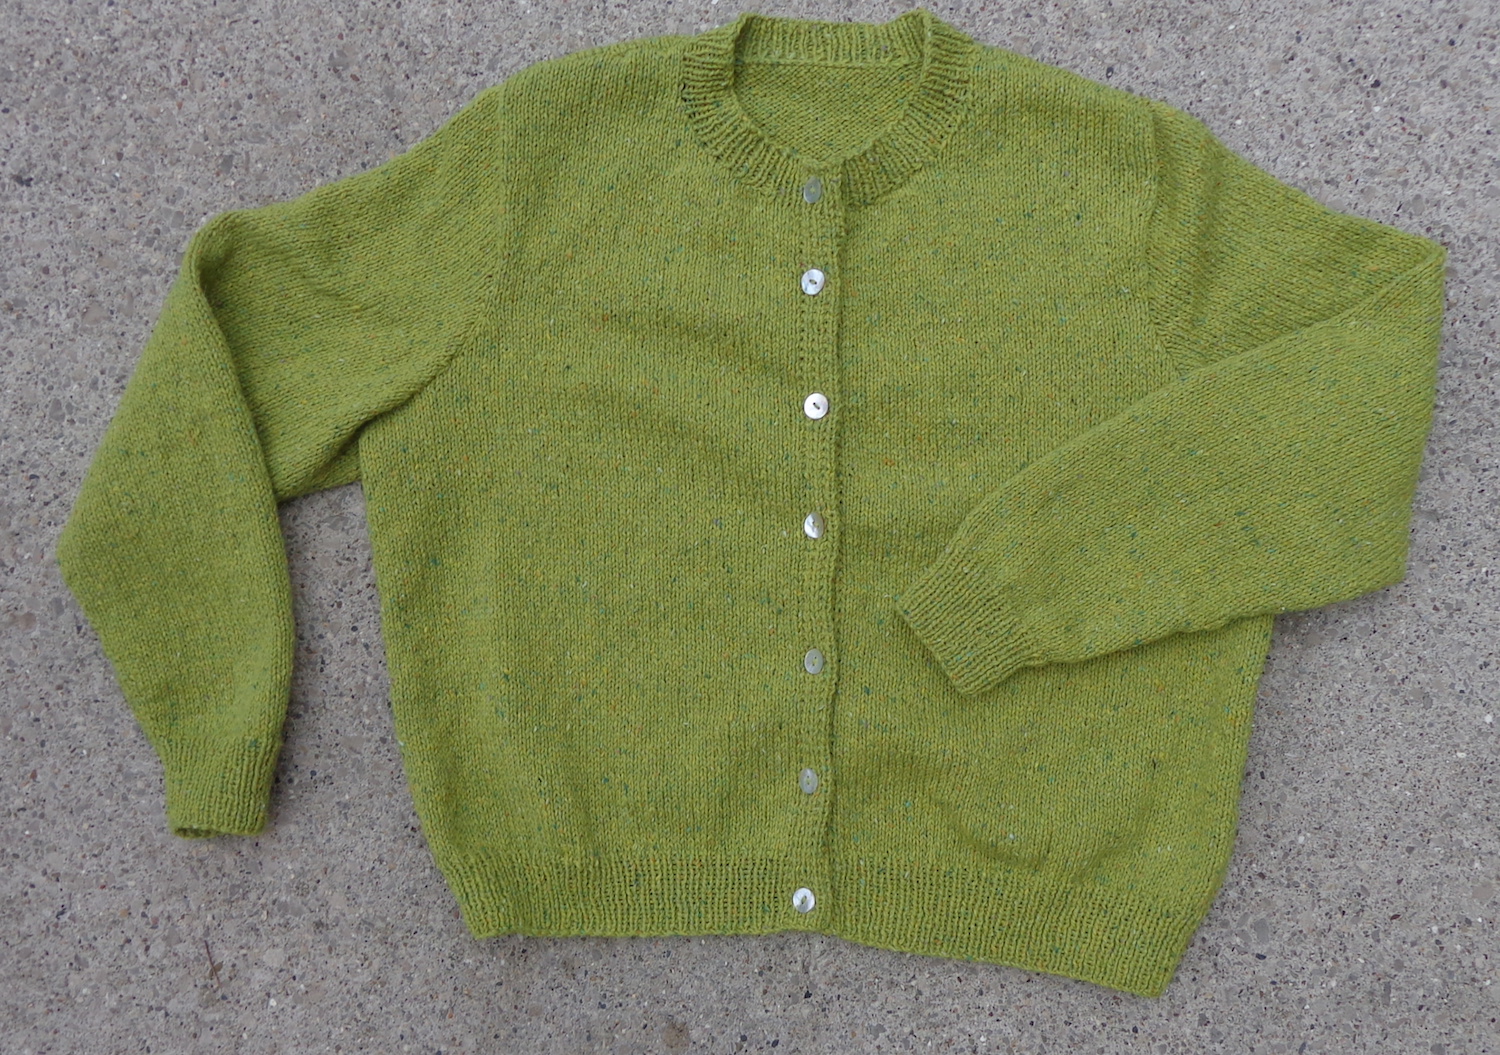
This was a kit of the Quintessential Cardigan designed by Churchmouse Yarns & Teas. The yarn is Jody Long Alba in the colourway, Moss. I knit the body two inches longer than the pattern specifies. (There’s another blog post about it here.)
I quite like the sweater and it fits well. The colour is great and I love the tweedy flicks in the yarn. It was a bit tedious seaming it up, but that’s always the way – and yes, this yarn was almost as inclined to snap as Rowan Felted Tweed. One great thing is that the sleeves fit perfectly into the armscyes. Yay!
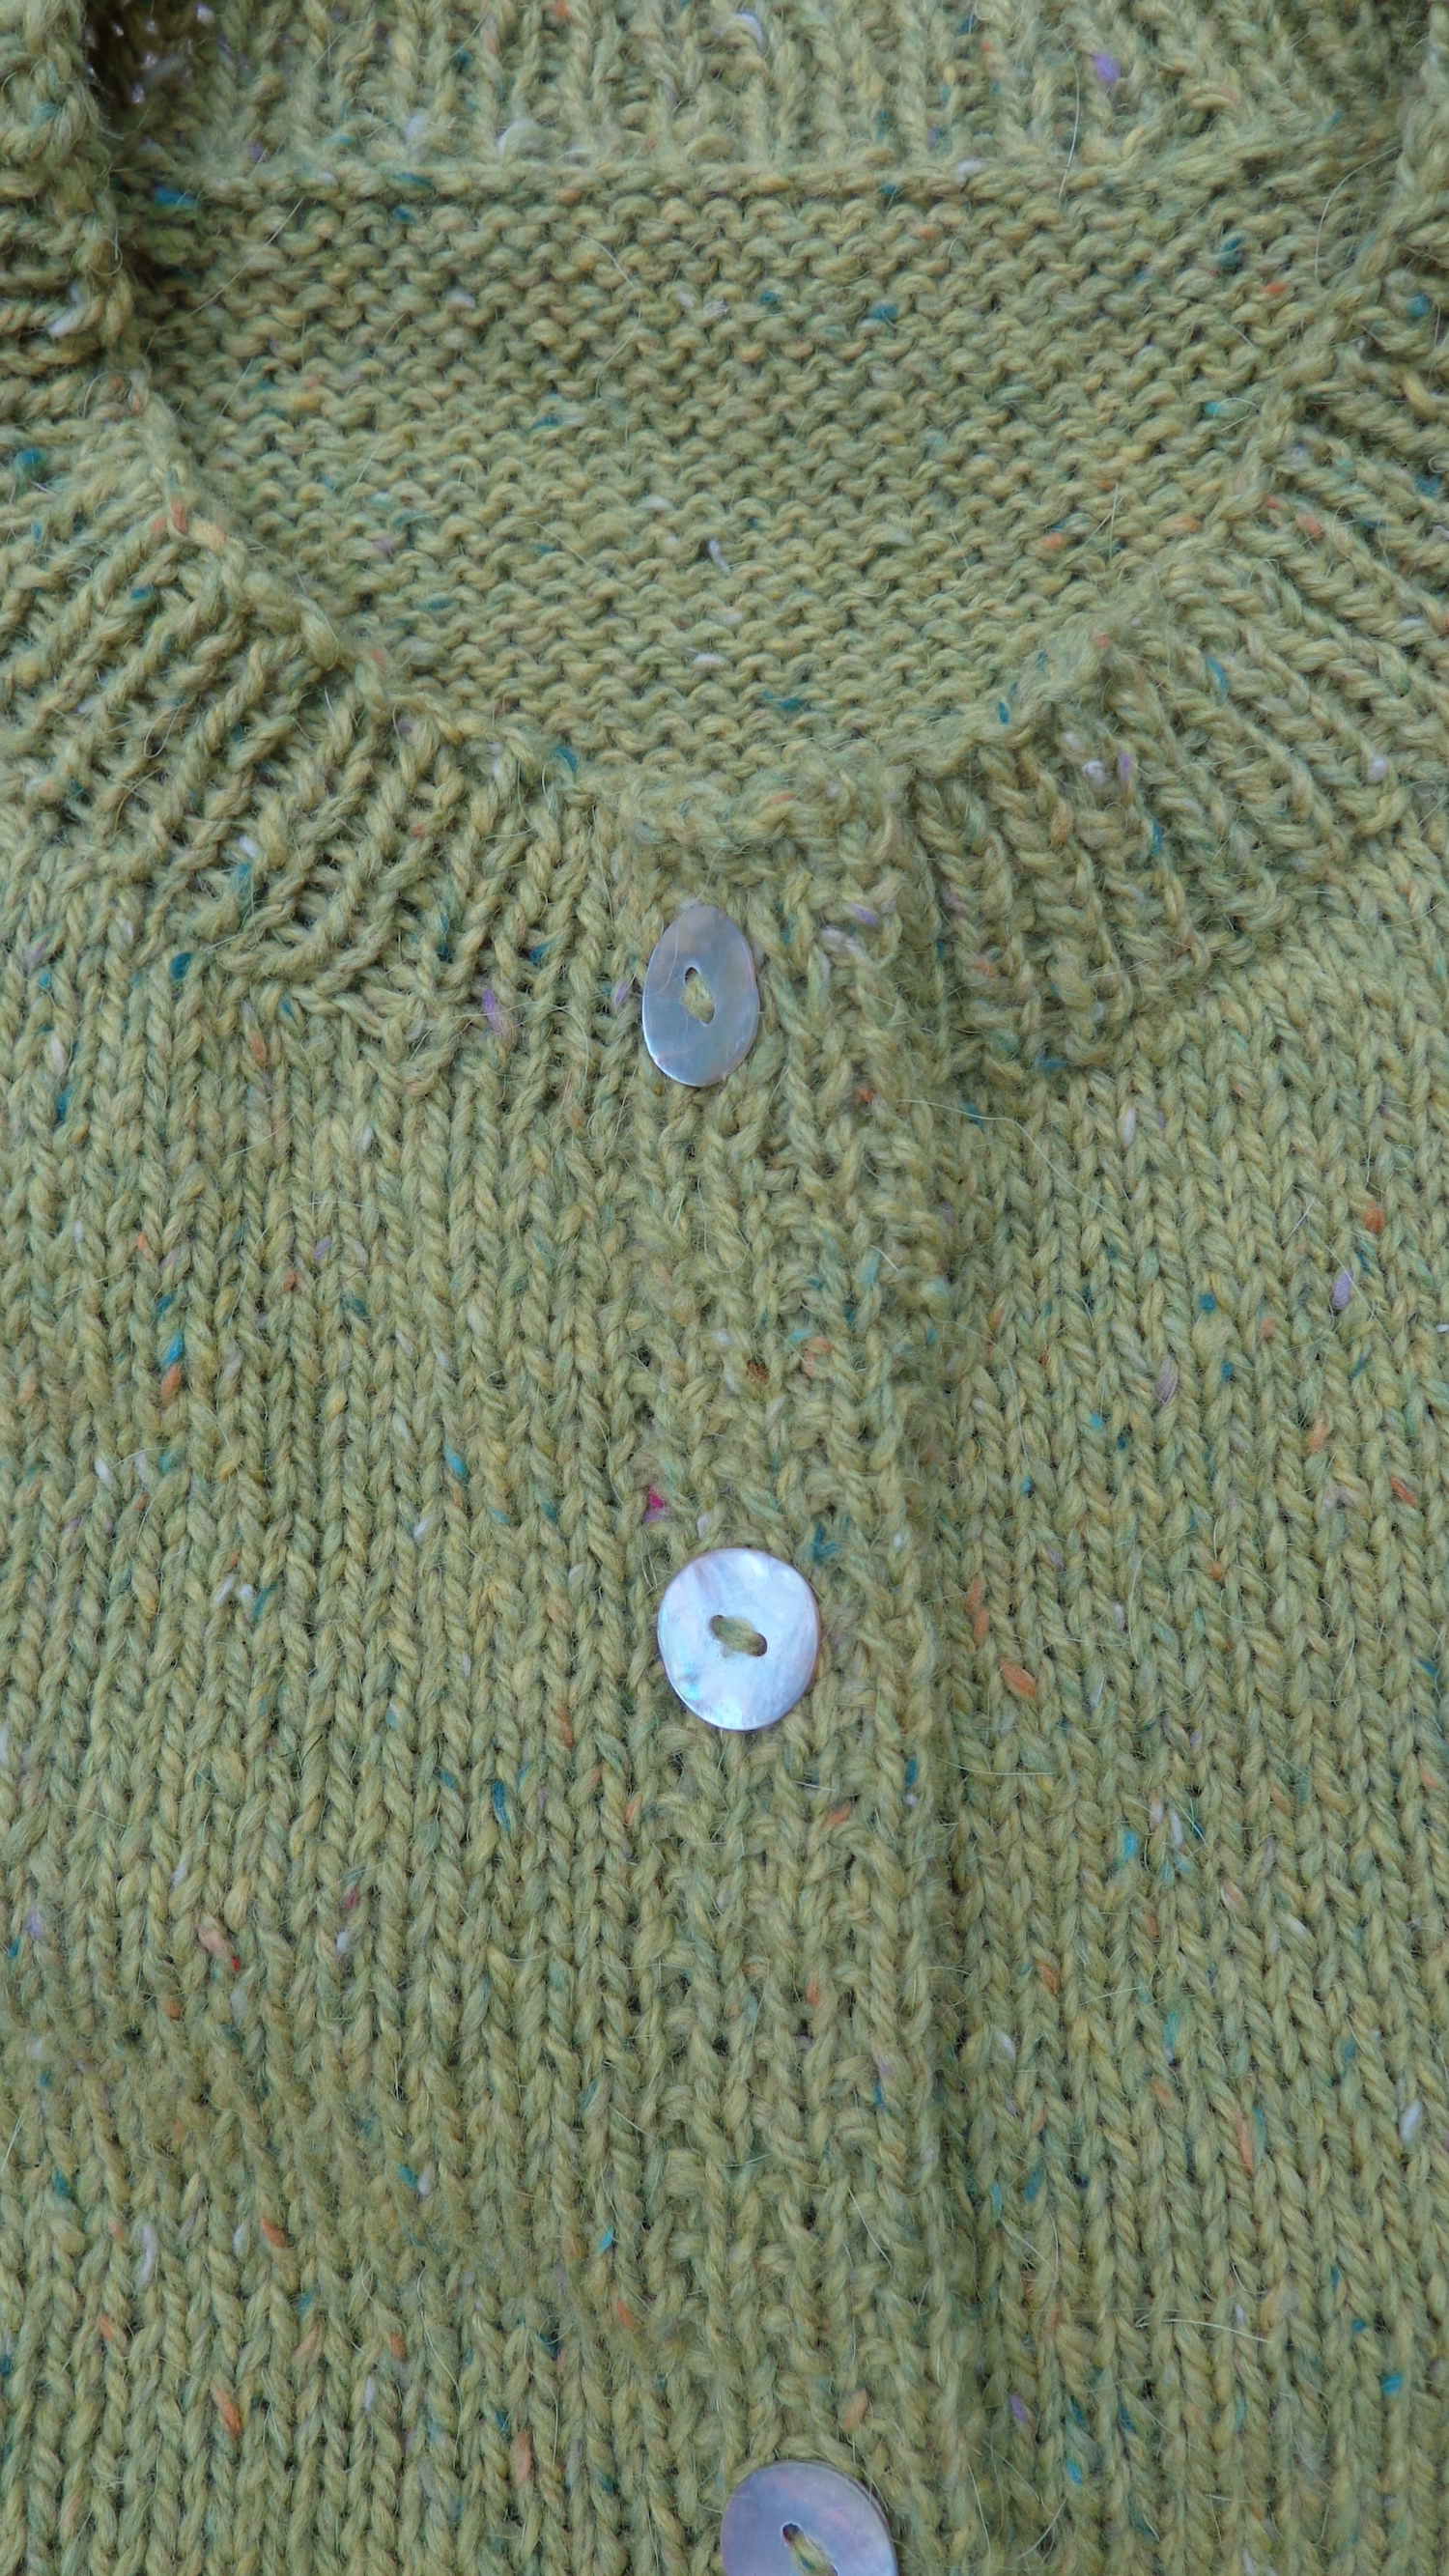
Here’s a detail shot of the front buttonhole band, which has slipped stitches on the wrong side.
The colour’s not very true in this pic – the wool really is that lovely lime shade. In this shot, though, you can see that my miscalculation, the one that made the last button before the collar band a little higher, isn’t really that bad once the buttons are sewn on.
I don’t love this slipped stitch on the band. It looks too different from all the other ribbing, although I understand that it’s intended to keep the button bands from being too long. Another way to avoid that is to pick up the stitches for the button band after the fronts are done and knit them sideways.
It took 3.4 balls of yarn or just under 1200 yards.
I do have another kit in Plum so will be making a second one, with a few changes. • Since I lengthened the sweater, the waist ribbing falls at my hip, which isn’t ideal. I’ll change that to a garter stitch hem or a moss stitch hem instead and let it be a bit swingy. • The cuffs are on the narrow side – it’s fine when they’re worn down, but I always push up my sleeves. I’ll make them a bit wider on the next one. I’ll work them in whatever stitch I decide to use instead of the waist ribbings, too. (I don’t love ribbing on my sweaters.) • Because of that slipped rib stitch on the button bands (which is over 7 stitches), the buttons aren’t centered on the band. You make the buttonhole on stitches 5 and 6. This kinda drives me nuts. 🙂 When I work the button bands in another stitch – to match the hems – I’ll put the buttonholes in the middle of the band, over stitches 3, 4, 5, which will also make them a little bit bigger. It’s snug to get these buttons through the holes, but I don’t think smaller buttons would look good.
Overall, I’m pleased. It’s a very basic sweater, but the colour keeps it from looking frumpy.
I really want to cast on the plum version immediately, but am trying to finish a project first. We’ll see how I manage with that goal!
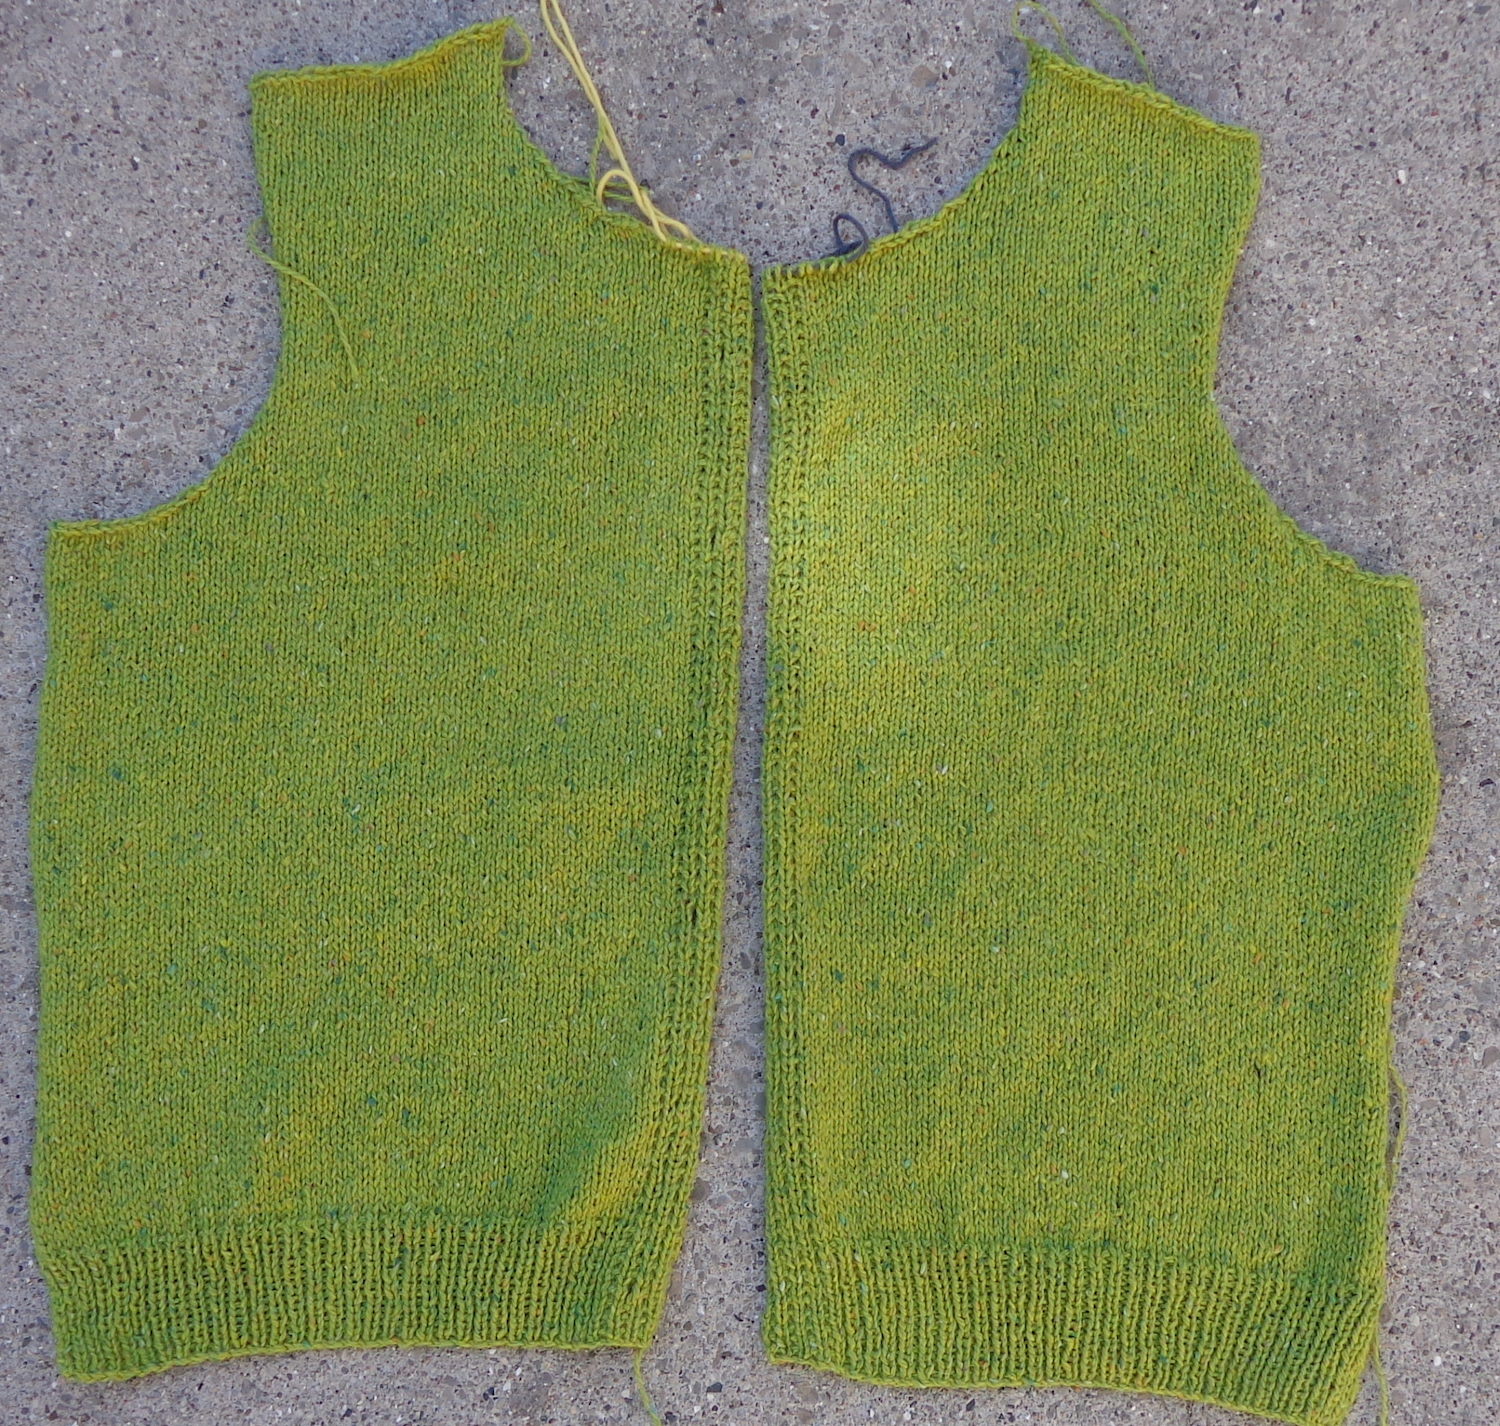
I told you about this one, a kit that I bought and cast on right away. It’s the Quintessential Cardigan designed by Churchmouse Yarns & Teas. The yarn is Jody Long Alba in the colourway, Moss. I’ve finished the fronts and the back, and made them 2.5″ longer than specified in the pattern.
I did muck up the calculations slightly. After knitting the left front, I counted the rows to space the button holes. (The pattern suggests that you place markers, then compare the right front as you knit it to the left front to choose where to make a buttonhole. I went with the strategy I know – but still messed it up. LOL) It worked out that they should be every 23 rows, but the buttonhole is made on a RS row. I decided to alternate 22 and 24 R between buttonholes, but my top bottonhole before the collar is a little higher than it should be. I should have just done 22R between each one. I’m not going to frog back to fix it. I bought the kit in another colourway – Plum – so will do the buttonholes right on that one.
This pattern has a lot of small touches that are interesting and some are new to me. They suggest, for example, some short rows immediately above the ribbing at the hem to keep the hem hanging straight. I’ve never had an issue with the hems of my cardigans, and actually, I was so busy with the buttonholes that I forgot to do it on the right front. (Not frogging back for that either.)
The front button bands are ribbed but have slipped stitches on the wrong side, again to keep the ribbing from hanging too long. It also changes the look of the ribbing, and I’m not sure I’d do that again. I might just knit the bands in seed stitch on the plum version.
So far, I haven’t found any jazzy buttons in the right size and colour, so it looks as if this one will have abalone shell buttons, which is pretty much my neutral answer to buttons.
I’m now working on the sleeves and am up to the elbow or so, knitting them both at the same time. I find that the easiest way to make sure my increases match. Progress is steady and this is good TV knitting. I should be finished soon. 🙂
Here’s another project that’s been waiting on me for a while and was finished up this week. I wanted to post it yesterday, but the handsewing at the end took a bit longer than anticipated.
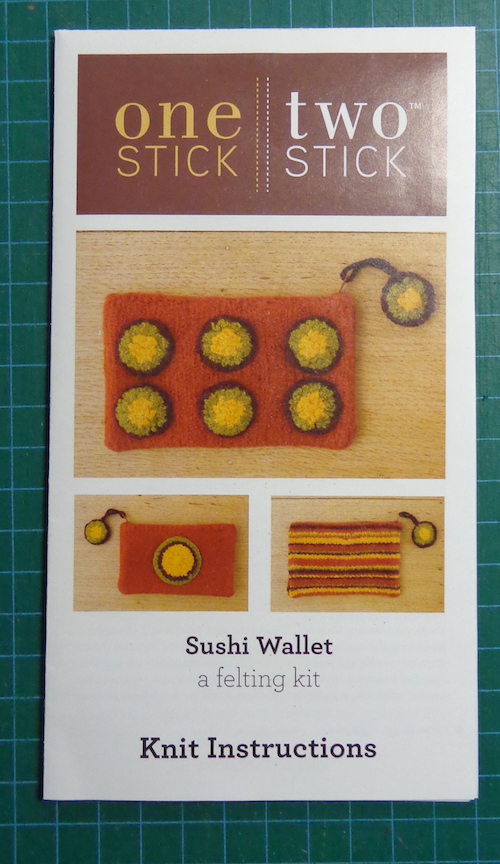
It started with a kit called Sushi Wallet. Here’s a Ravelry link for the pattern. The kit was from One Stick Two Stick and was packaged in a cute way, like a tray of sushi with six little balls of wool. I’ve chucked the packaging from mine, but here’s one that sold on Etsy. The kit includes the yarn, the pattern and a matching zipper.
On the right is the instruction folder, which shows the sushi wallet you’re supposed to make at the top. The second wallet is a variation, with just one sushi on the side and stripes on the back.
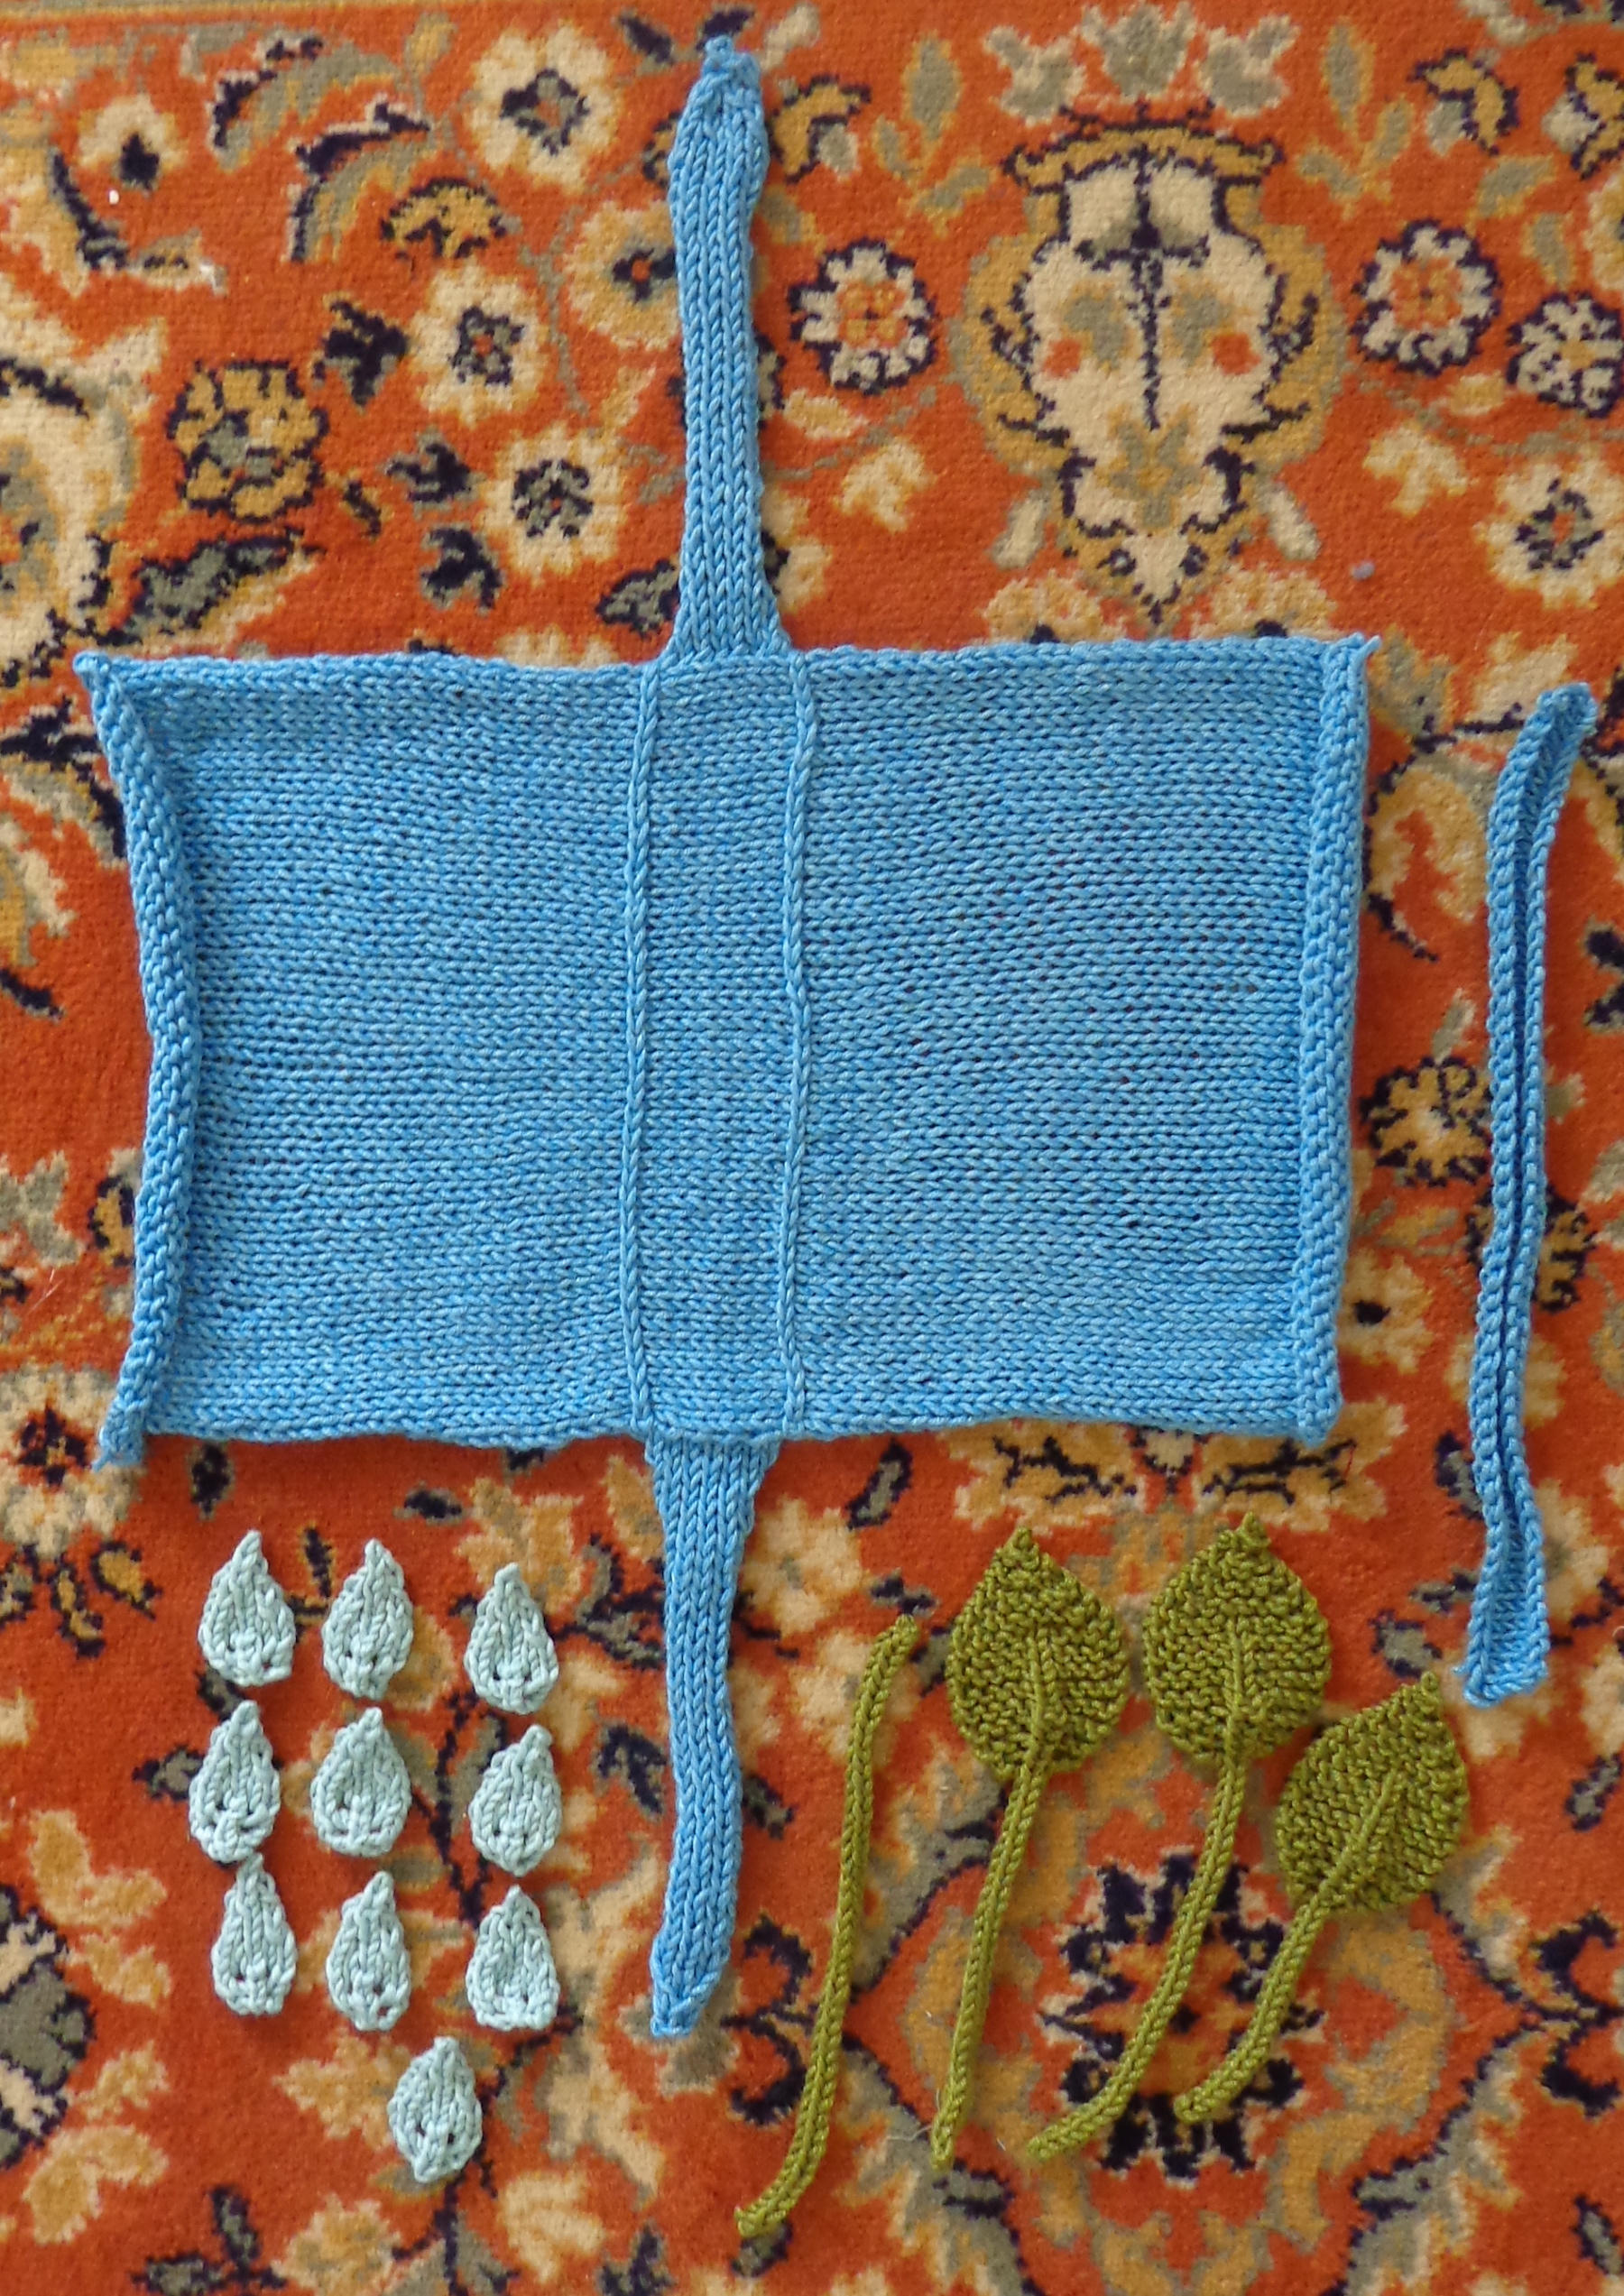
I found the kit for a buck in the discount section at Len’s Mills and they were all in the blue-green colourway called Caribbean Seas, possibly because it doesn’t make sense for sushi to be those colours (even though the combination was pretty). The yarn is a bamboo wool mix and there were four colours included: 64g of the medium blue, 18g of the light blue, 13g of the dark green and 11g of the light green. I weighed them all because I planned to do something different than follow the instructions. There was enough yarn to make two wallets, but I didn’t want two wallets.
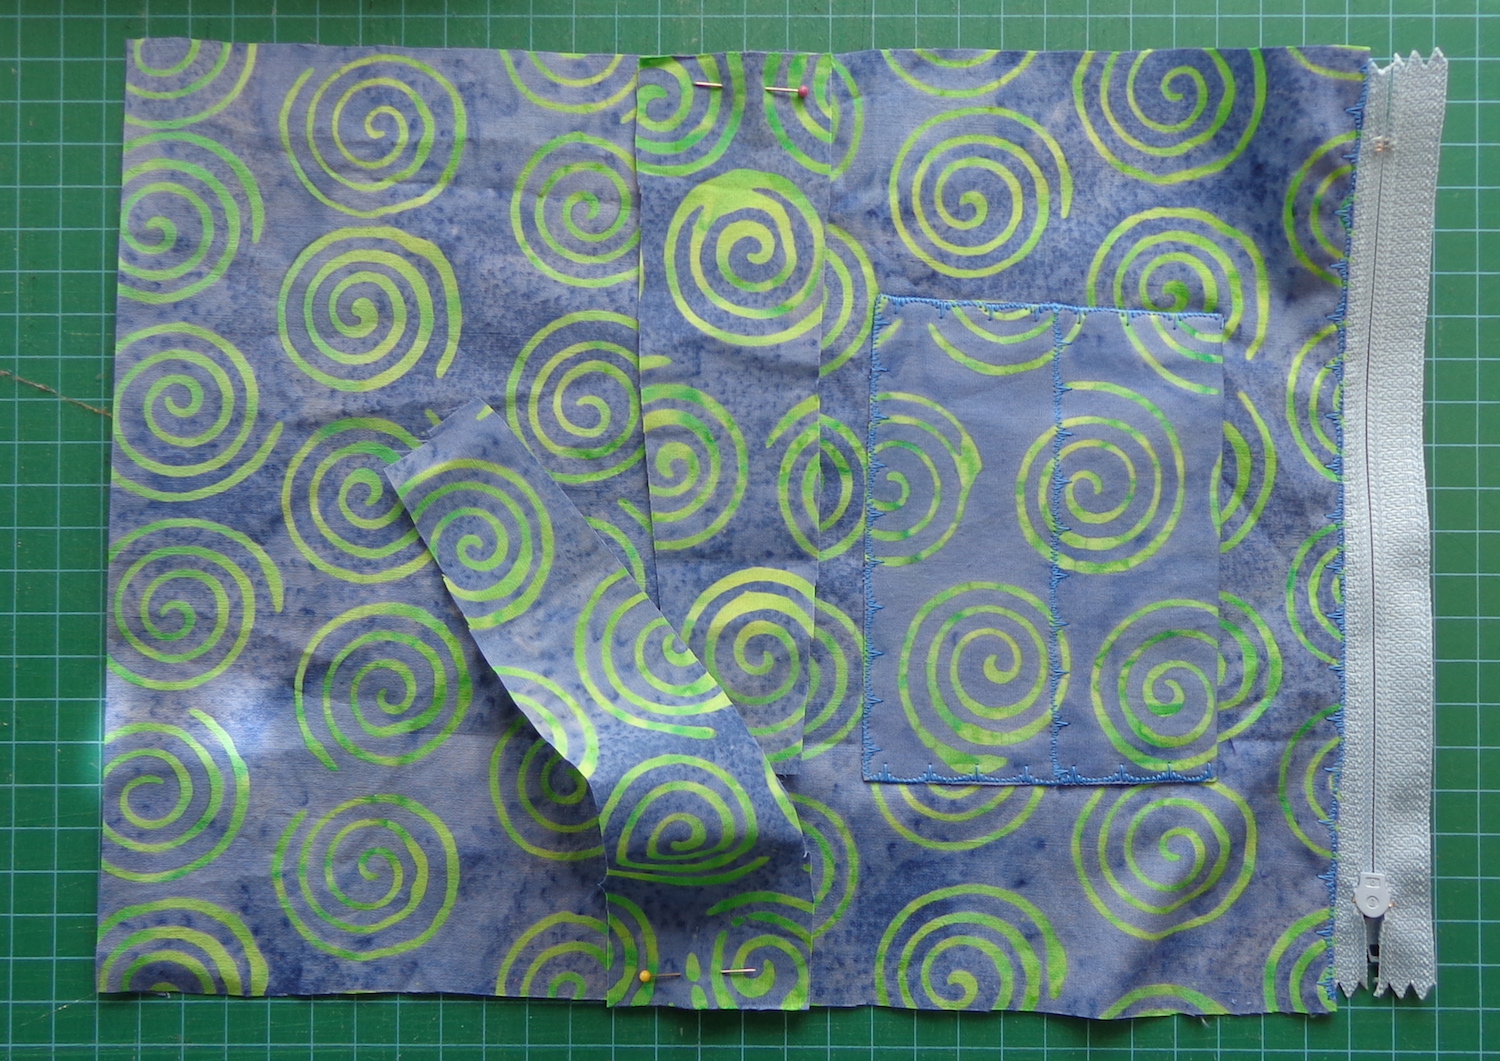
I made a bigger purse instead, by casting on more stitches and knitting more rows. I also added a wedge at each side and a base so it wouldn’t be flat. (The original design is flat, a rectangle folded in half.) I also knit a strip to be a handle. Then I knit petals and leaves from the other colours. Here are all the pieces.
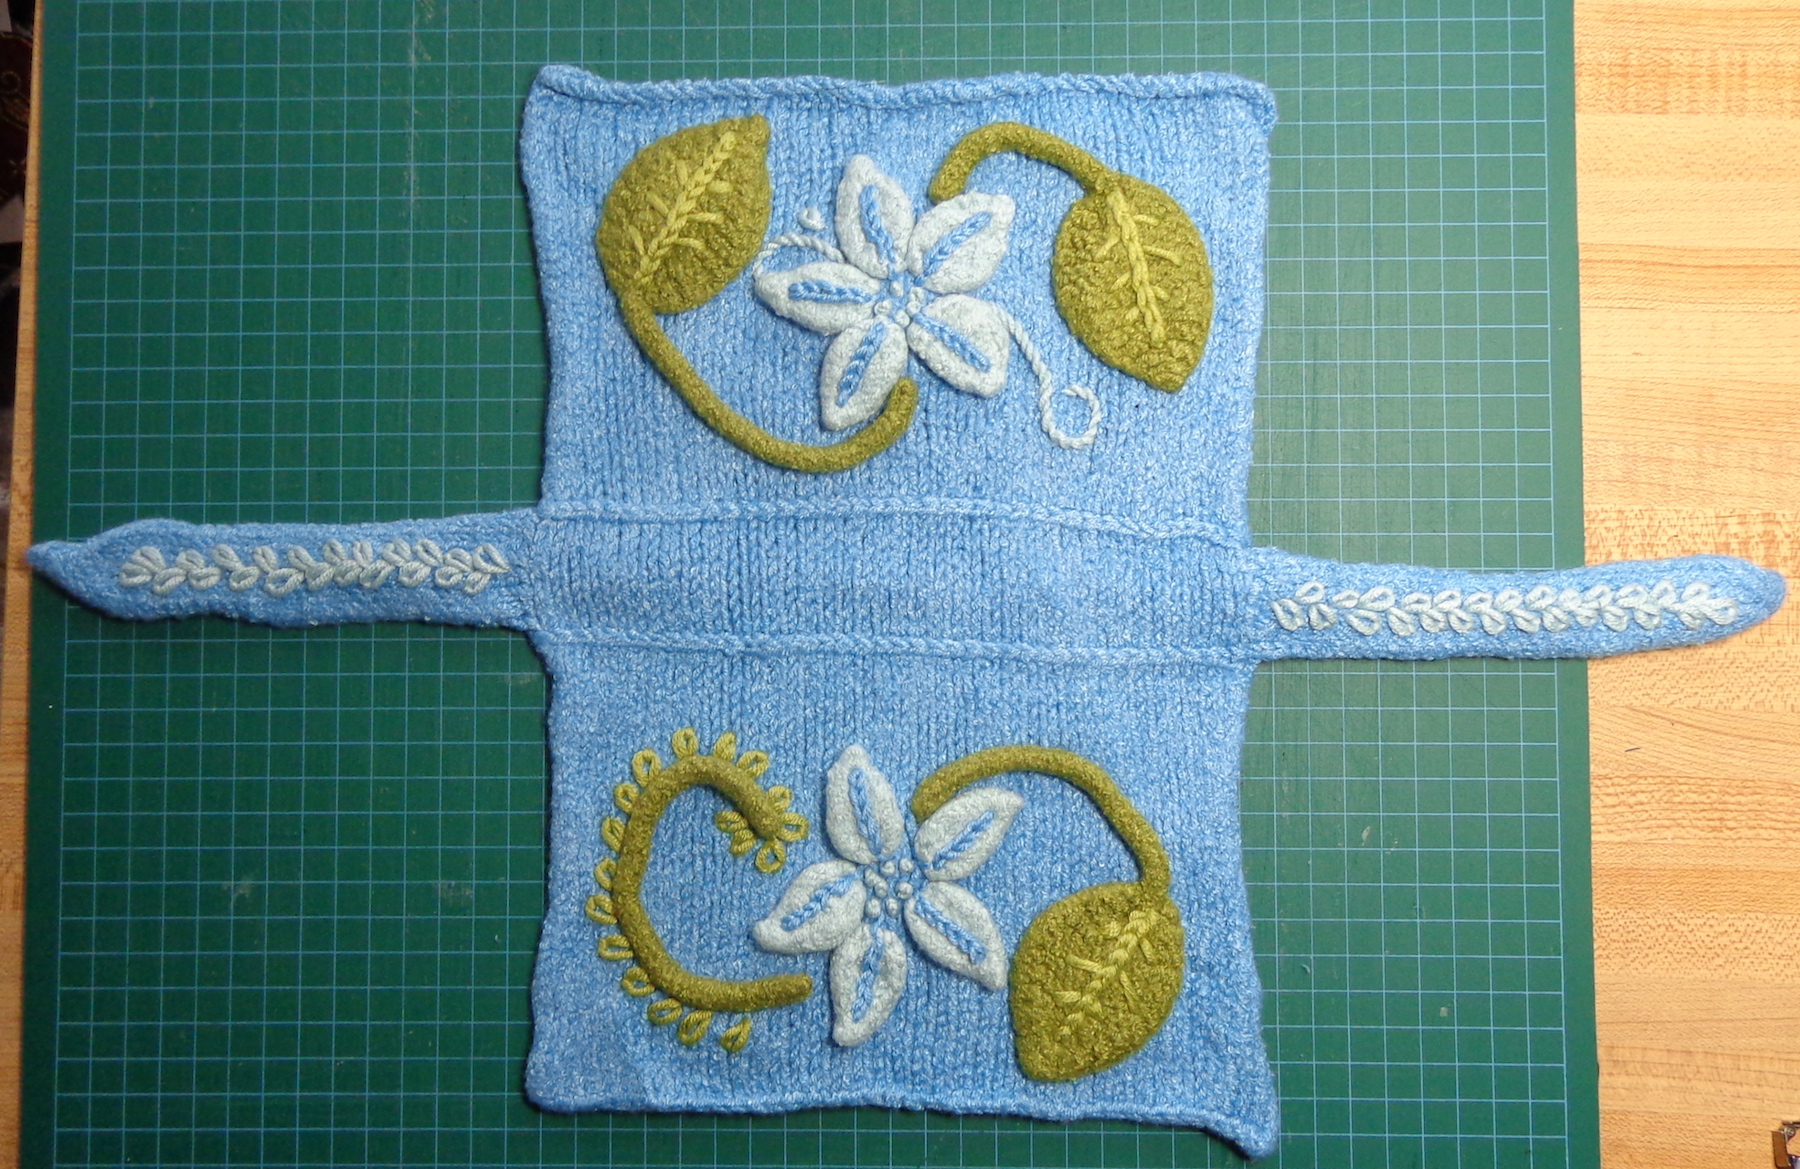
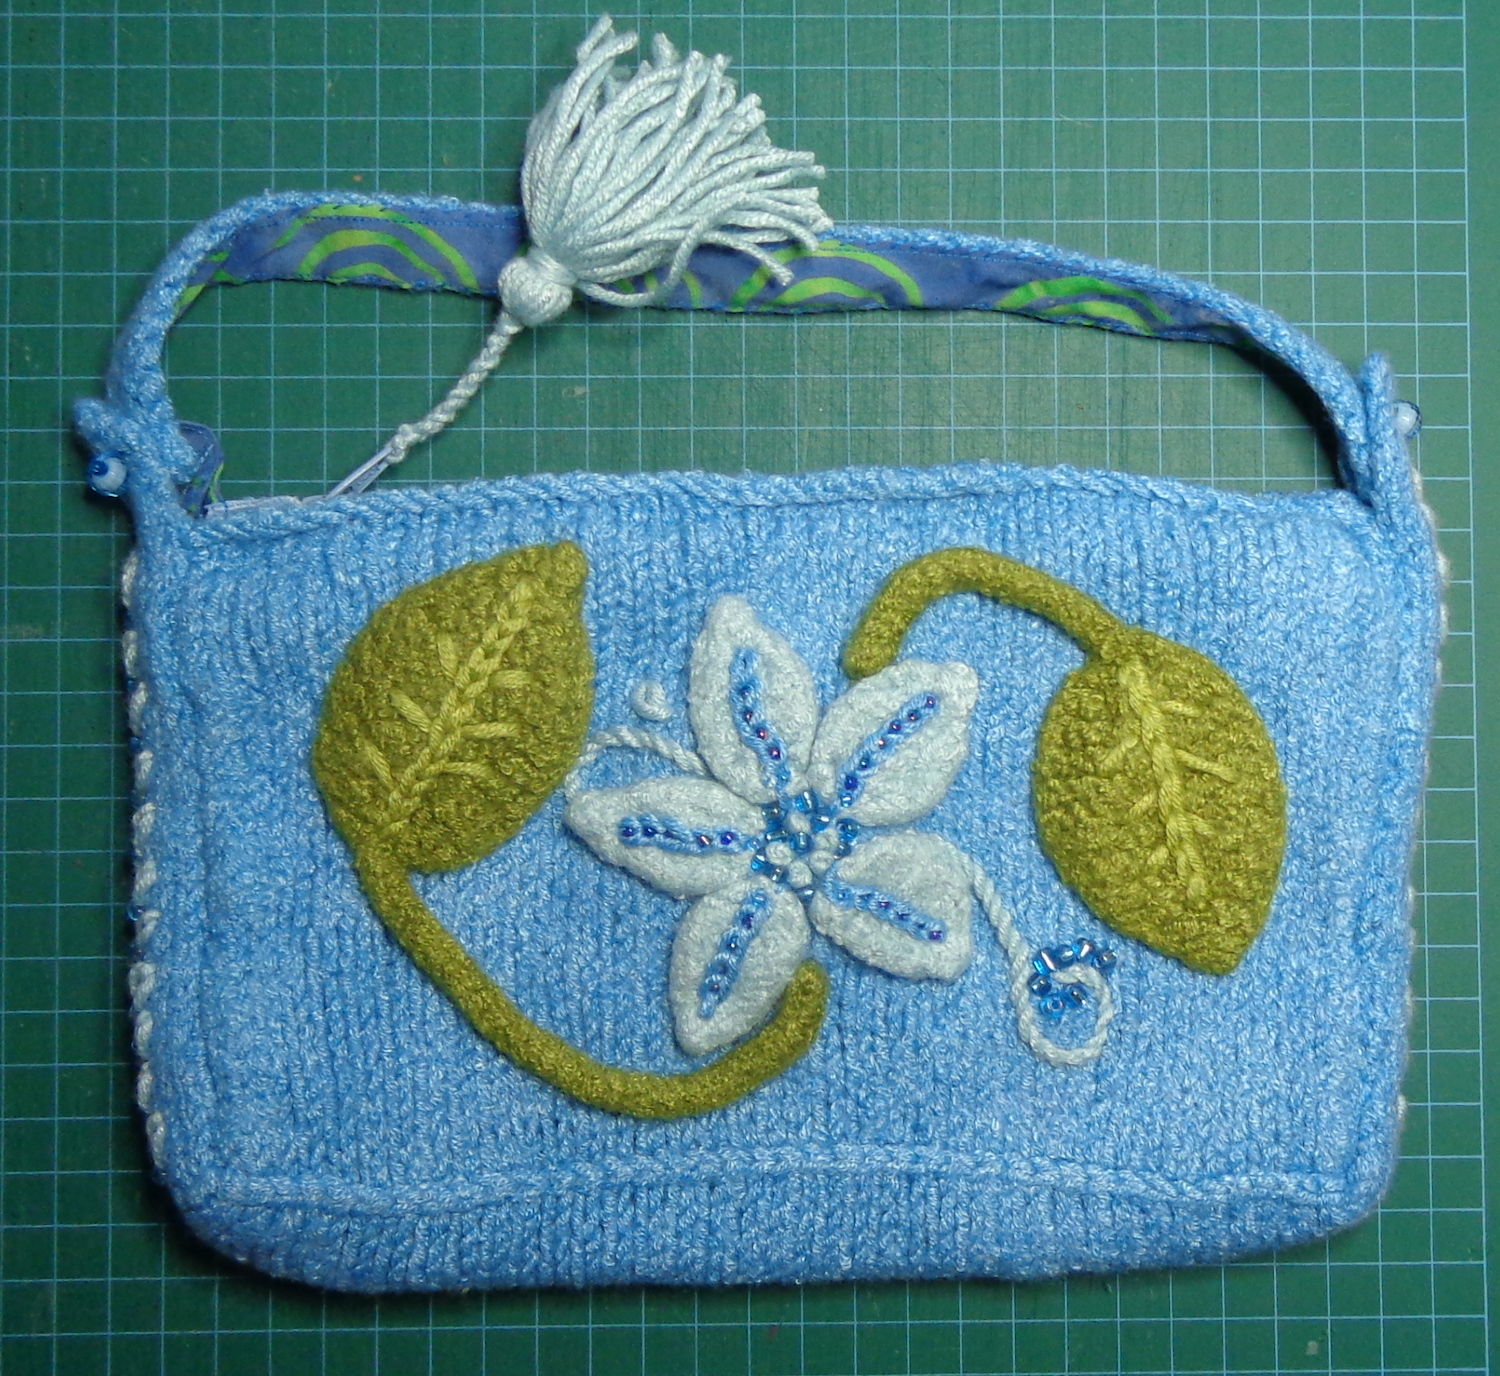
I felted everything in the washing machine. I put the pieces in laundry bags to make sure none of them were lost in the washing machine – this set from Ikea is really useful. Once that was done, I sewed everything in place. I added some embroidery and ended up with this:
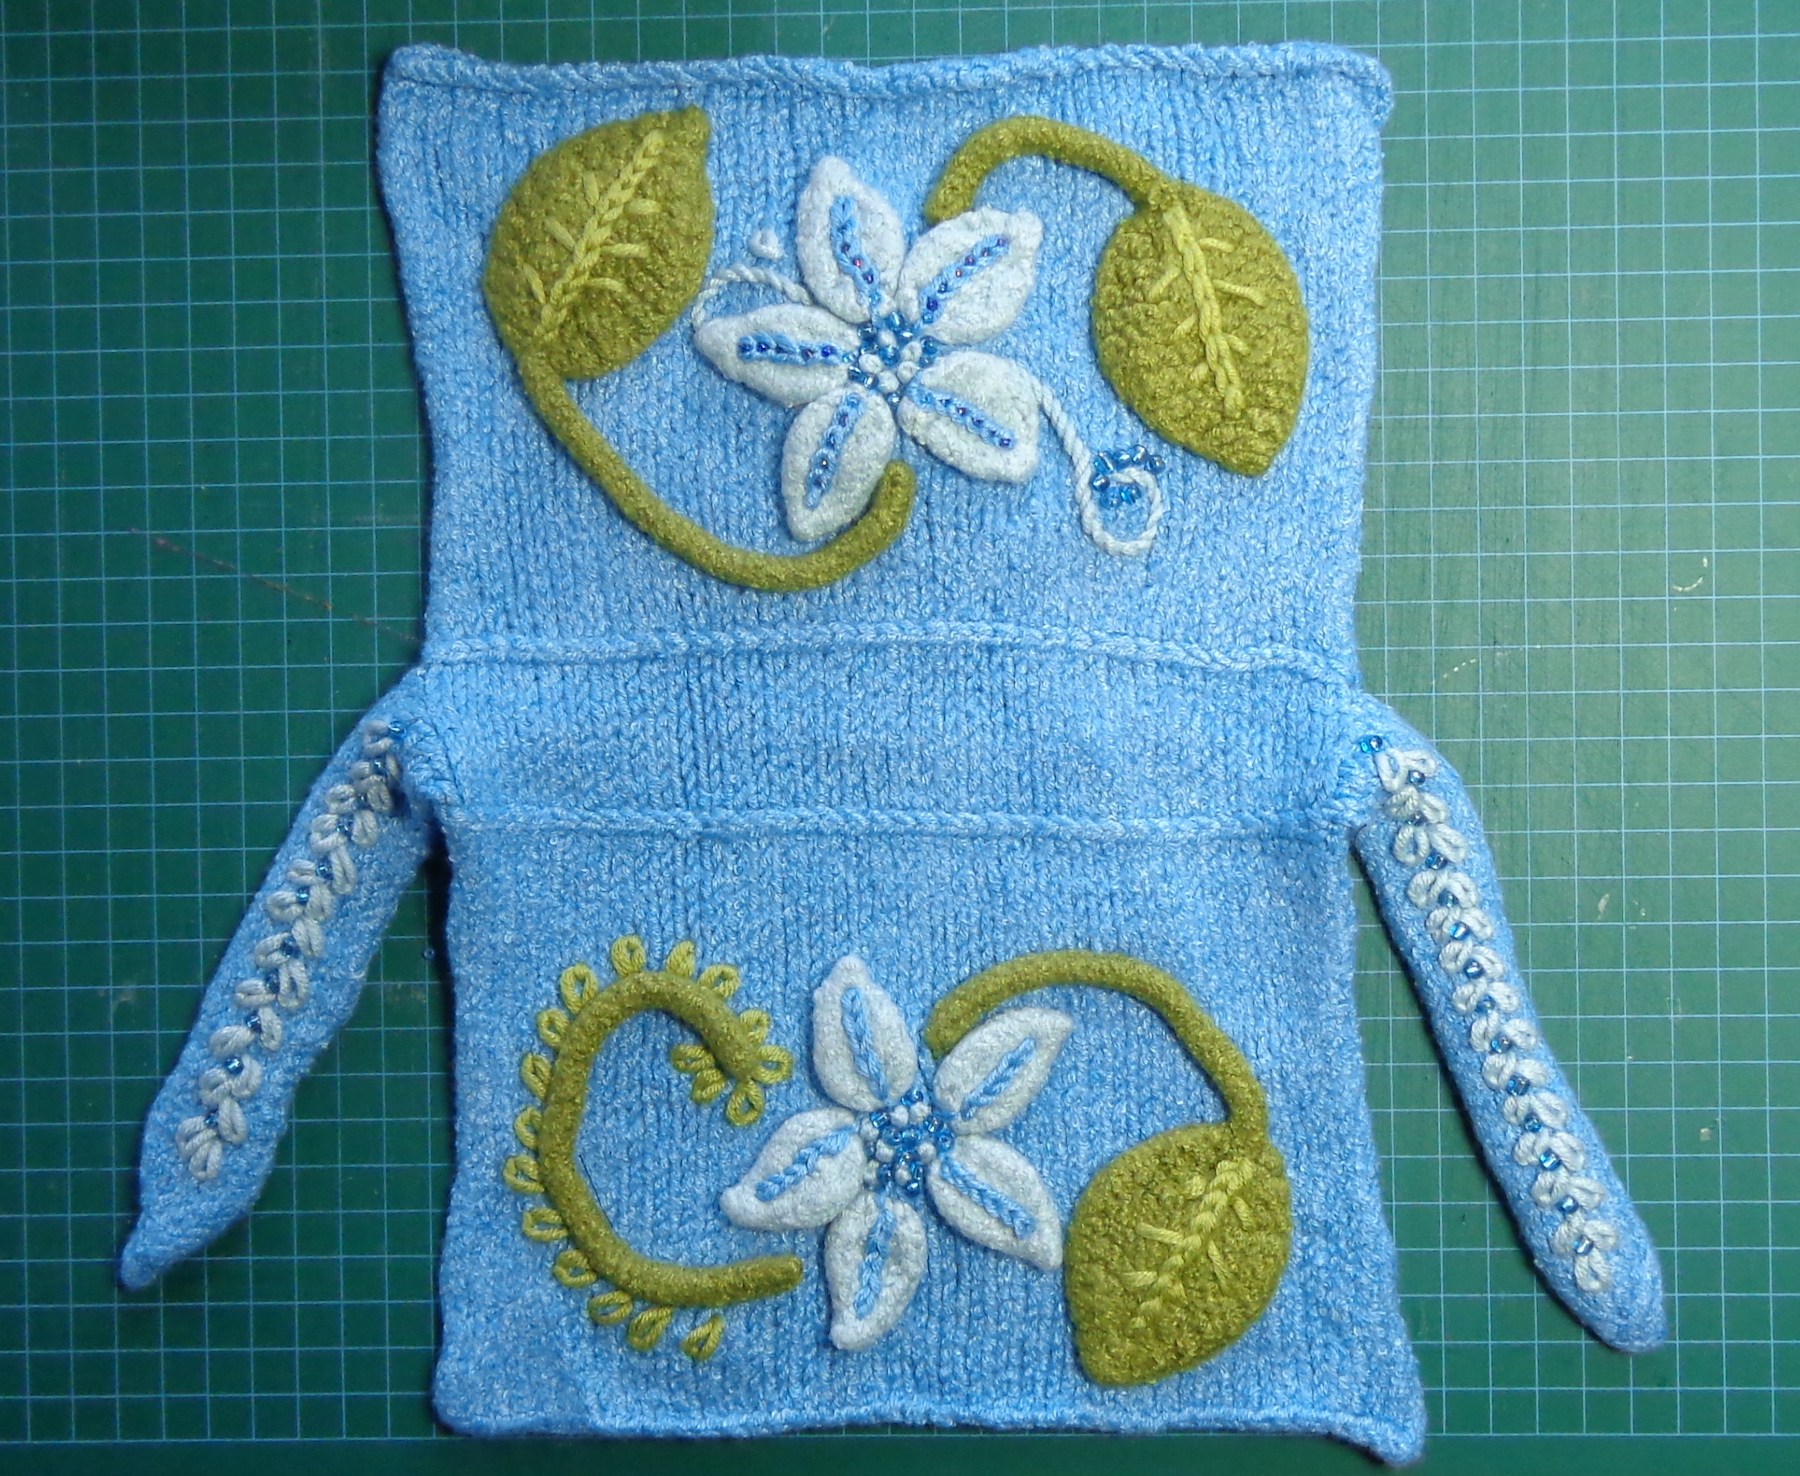
I still didn’t love it, so I added some beads:
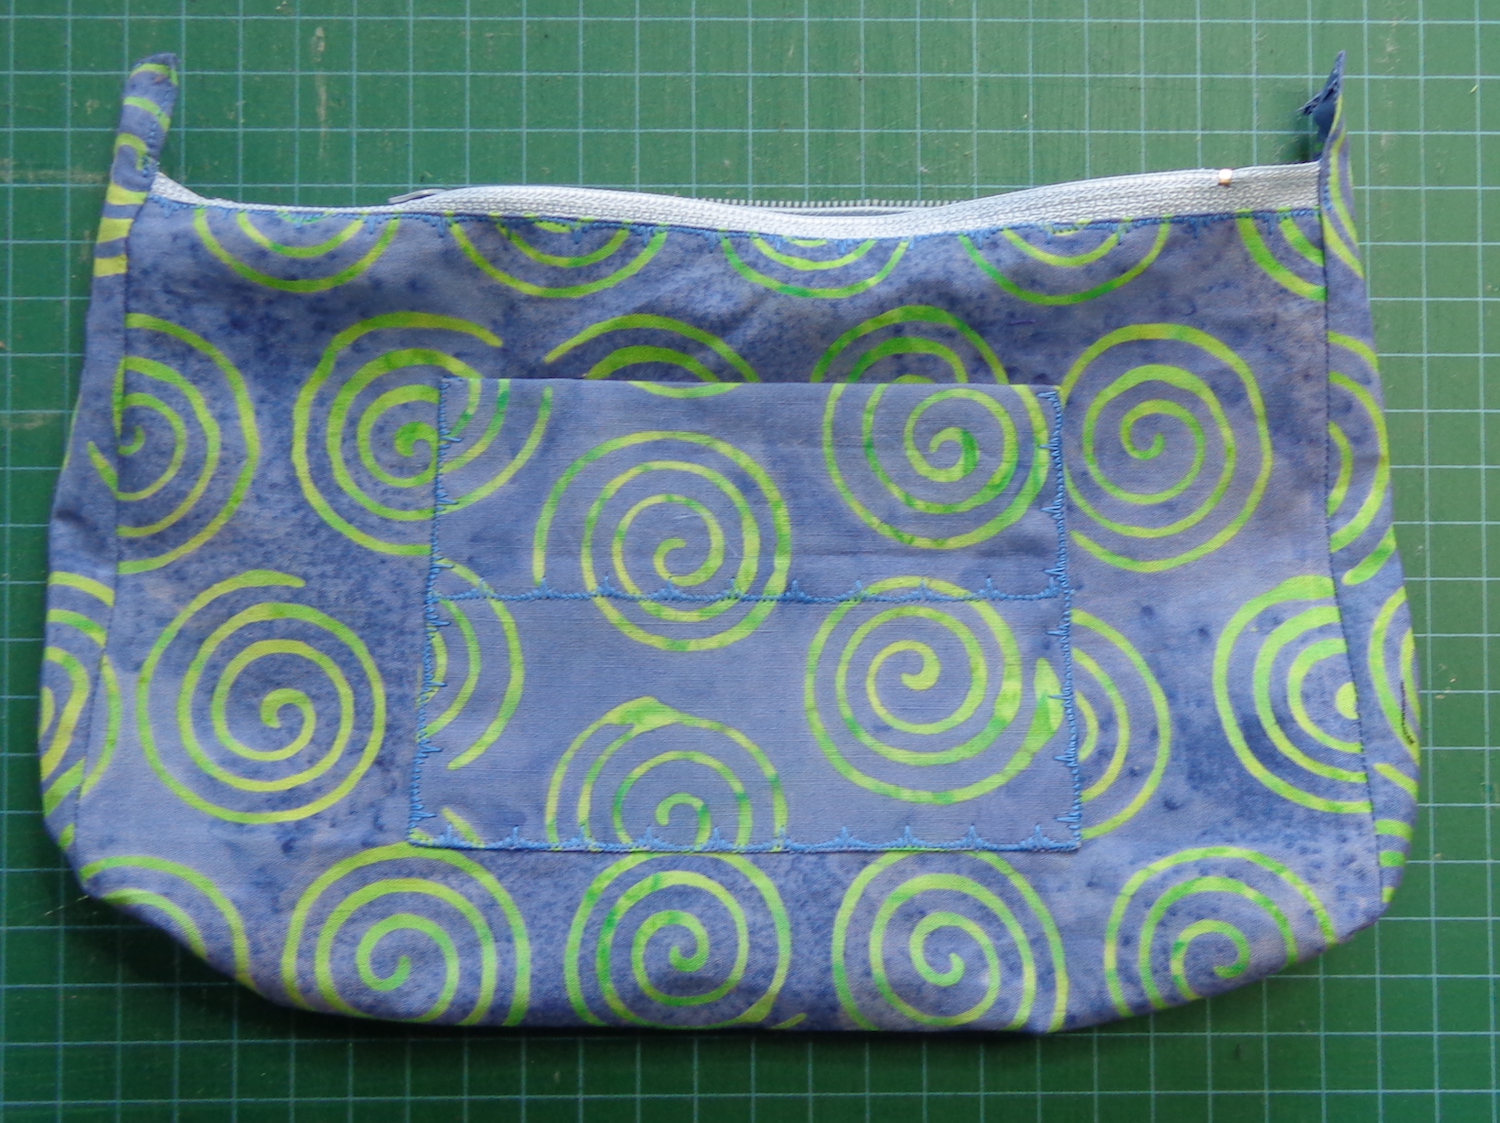
I lined the bag with a cute scrap of batik cotton in matchy colours – just using the purse as a pattern and adding a small seam allowance. I also added a little pocket inside, because I always add little pockets inside purses. They’re so useful. You can see it on the right – it’s the perfect size for a hotel room key, credit card, or folded $20 bill.
Here’s the assembled lining, ready to go into the purse:
I hadn’t planned on those two tabs at the top, but they came in handy when attaching the handles.
With the zipper inserted and the handle added, the finished purse looks like this:
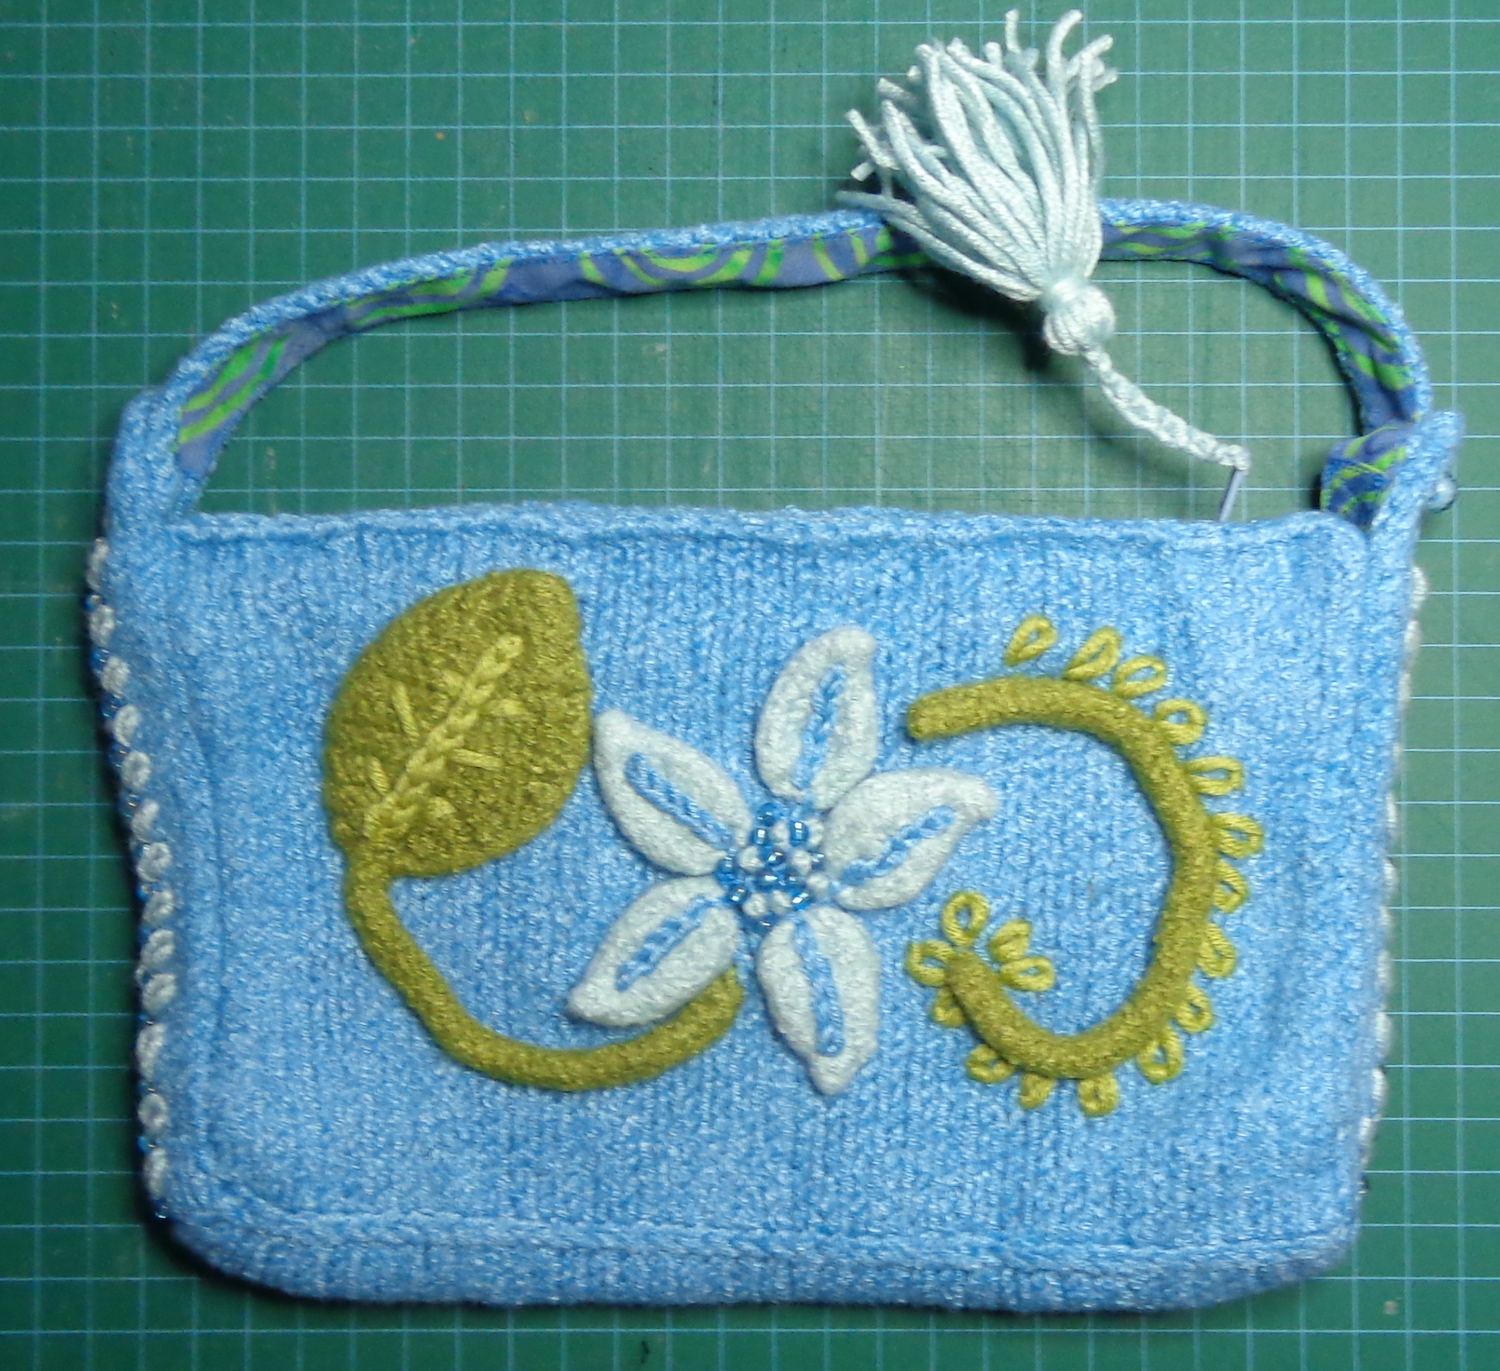
And the flip side:
Overall, I’m pretty happy with this. The shape is a little bit wonky, but that tends to happen with felted knits. I certainly like it better than I would have liked a blue sushi wallet. 🙂
And this reminds me that somewhere in my stash of unfinished projects, I have the Elegant Edibles kit from Knitpicks, which is now discontinued. I think I knit the kiwi purse and I know I knit the orange one, and they must both waiting to be lined. I was going to knit the bunch of grapes, but I have a feeling that yarn joined the stash instead. I’ll have to have a look.
It’s also been two years since I did any machine quilting myself. My goal this spring was to get some things done that have been languishing in my sewing room and this quilt top certainly made the list.
Here’s that official image of the quilt again, just to remind you. 🙂
When I pulled the Moonglow out this time, I had five blocks left to piece – the four corners and the middle block, which are the most complicated ones. After that, there’s the assembly with the sashing and the final quilting. This one is going to a long arm quilter to be finished up – my plan in March was to keep at it until it was ready to go to the quilter. I did pretty well with that goal!
The idea behind the quilt is that it should take a year to piece. There’s a block assigned to each month, then in month twelve, you piece the intermittent blocks and assemble the quilt. Of course, I didn’t follow the sequence – I did the courthouse steps blocks that go in between the stars when I was tired of paper piecing, so they were done already.
There are two different designs for the corner blocks and you make two of each. I’d already cut out the pieces for the pair that are top right and bottom left, so finished them up first. These are month nine’s project.
It’s a dingy day today, so I had to take the pix inside, which means they’re a bit underexposed.
Then, top left and bottom right:
And finally, the central medallion – I need to hand-sew the central octagon, so it’s pinned in place here.
Next up, the assembly. I’m not going to repiece any of the blocks (I had thought I might, and there’s enough fabric leftover for that) but I am going to restitch one of those central octagons to make a neater job. I’m also going to change the borders on the star blocks so that the seam allowances all press outward. I did that on the central medallion and it makes for a flatter finish. Then I’ll put it all together and take it to the long-arm quilting place.
I’ve never had a quilt quilted at the long-arm place, so I’ll take the dragon quilt to be finished first. This one will make the trip second.
I am pleased with this top and am sure I’ll like the final quilt. It’s a beautiful design and the colour selection is magical. I wish there had been more explanation of why each hue was chosen for each place – I assembled the quilt, but I still don’t understand what makes it work so well.
I did learn in the piecing of this one to step back when I was getting tired instead of pressing on. That’s probably why I wasn’t enjoying it so much at first – I was product-oriented instead of process-oriented. When I slowed down and just sewed for as long as I found it satisfying, the process was much more enjoyable. So, there’s a lesson learned.
I’m also done with kits. Both this one and the dragon quilt top were kits including both the fabric and the pattern. While I like them, I don’t feel the same sense of satisfaction as with the quilts I’ve either designed myself, or the quilt patterns for which I’ve chosen my own fabrics. It certainly could be argued that the designers do a better job of selecting the perfect fabric for each section, but I prefer when my quilts are unique – even if they’re less than optimal!
This one, for example, was also paper pieced, and there are sections that I’d make another colour if I did it again, but I like it better than either of these kits. It’s one of a kind. 🙂
The pattern is Jumping Jax Flash by Judy Niemeyer. I pieced it probably twenty years ago. (Maybe thirty. Ha!) It’ll be heading to the long-arm quilter too, but it’ll be third and last to head there.