Long Cardigan by Lutz & Patmos

This one’s more like a jacket. It’s also knit in thick wool, on 8mm needles (the pattern specifies 9 mm but I had to go down a size to get gauge) so it knit up quickly. It was perfect television knitting.

I liked this jacket right from the outset. It’s in the Fall 2010 edition of Vogue Knitting, and was the first pattern – you can see it on Rav, right HERE. Here’s mine:Long Cardigan by Lutz & Patmos knit in Patons Wool Roving by Deborah Cooke

First modification – I left off the pockets.

Second mod: The back of this sweater, which doesn’t show on the VK link, has three enormous cables down the centre back. They’re kind of neat, because they’re so thick, but my DH took one look and said “looks like dinosaur vertebrae.” That was funny, but it was also a mental image I just couldn’t shake. I decided to ditch those massive cables, and work in the same cable pattern on the back as on the front. See?Long Cardigan by Lutz & Patmos knit in Patons Wool Roving by Deborah Cooke

(Once again, the flash has messed with the colour. The first photo is more true.)

Notice the construction technique – the back of the collar is knitted in stockinette so that it naturally rolls back. Clever clever!

If you want to do this, you need to recalculate the number of stitches for the back, to be a multiple of 8 plus 1. You also probably want to round down, as those big cables (the ones you won’t be knitting) tend to pull the fabric in quite a bit.

Third mod: Just to keep things interesting, I reversed the cable on the right front so that the two sides mirror each other. On the back, then, the same mirroring happens. I like it, even though I messed up and did it the opposite way around for the front. You wouldn’t have noticed if I hadn’t told you, right? I did one sleeve with the cable twisted right and one with it twisted left, then matched them to the fronts.

My fourth modification was the sleeve length. I’m not sure why designers think that coats or heavy sweaters should have elbow length sleeves. Maybe it’s a glam downtown look with long leather gloves. To me, it looks like someone miscalculated the yarn requirements. I want my forearms to be warm when it’s cold enough for this sweater! So, I lengthened the sleeves to the wrist.

This big scary calculation was what slowed me down. I put the project aside, because I had to figure this out, then it was summer and too hot to knit it. Ultimately, I decided to cast on 12 fewer stitches than the pattern called for. I did the ribbing at the hem the same as the fronts and back, then on the second cable twist, I increased one stitch at each end of the row. I continued like this, adding two stitches per row on every 8th row, until I had the final stitch count. Then I continued to knit until the sleeves were long enough to reach to the underarms – for me, this was 18″, because the sweater doesn’t fit tightly under the arms.

My only other modification was a yarn substitution. I got lucky one day on a trip to Spinrite, and found that they had bags of six balls of Patons Wool Roving on sale for $6.99. It’s usually that price per ball. (This is Moss, which is kind of an olive colour with some gold, too.) So, the cost of making this jacket was less than fifteen dollars, which works for me in a big way. I might have been able to make one sleeve in the specified yarn for that price.

What do you think?

Chevalier Socks

Things have been a bit wild around here lately, but I have been knitting. (It is a sanity preserver!) I think a couple of things might get frogged for gauge and fit issues – phooey – but these socks are getting done.

I love them. Fortunately, so does Mr. C. who will get to wear them.

The pattern is by Mari Muinonen and is called Chevalier (This is the Ravelry link, which might not be visible to the world at large.) The pattern is free for download on Ravelry and there’s a matching Chevalier pattern for mittens. Mari’s blog is called MadebyMyself, but a lot of the content is in Finnish.You can look at the pictures, though – she’s an incredibly talented designer. (She seduced me utterly with her pattern directions for these socks. It says “Pattern of the Chevalier Socks is written both english and finnish in the same file. Try to manage.”)

The yarn is Briggs & Little Tuffy, which Mr. C. loves for his house socks, and which is spun in New Brunswick. The colourway is Greystone. It’s actually kind of green.The bonus of using such thick yarn is that the socks knit up super-fast.

Here’s the first sock. Don’t you love it?Chevalier Socks by Mari Muinonen knit in Briggs and Little Tuffy by Deborah CookeA bit of a blurry shot because I had to do it without the flash to show the cables better. Also, the colour looks more blue here than it really is.

I made some modifications. I knit 24 rows of ribbing before starting the cable stuff, while the pattern specifies 10 rows. And I fiddled with the toe so that there’s a whole diamond ending there, instead of just cropping it off and doing a regular toe. Since these won’t be worn under boots, cabling on the top of the toe isn’t going to be an issue.

What do you think?

Two Tea Cosies

Have you been knitting gifts for the holidays? I wasn’t doing so well with that this year. I’ve had years when I knit mitts, and years when I knit scarves, but this year, I’ve been a bit stumped and a bit crushed for time.

But a few weeks ago, I needed a new tea cozy myself and found this old Patons’ pattern in my pattern stash. I thought it would be a perfect quick knit and stashbuster:Tea cozies knit in Bernat Felting by Deborah CookeIt calls for a yarn called Beehive Craft Yarn, which I think is gone from this world. (I remember using it a long time ago for doll hair. It was a very thick acrylic yarn, at least three ply.) Instead, I used some Bernat Felting for these two, which I had in my stash. I had the idea that I’d felt it once it was done, but I like the look of it just as it is, and the size is perfect. I was a bit worried about the yarn being a single ply and not spun, but it worked out just fine. This is a quick and easy project – I can knit one in an evening, even when I’m worn out from battling Mages and fighting Slayers. (!)

The idea was that the green one would be a gift, but as you can see, I have two teapots and it wasn’t long before it was put to work right here. (You might also notice that the cables are done differently on the two cozies. The green one has cables the way they’re supposed to be. It doesn’t make a huge amount of difference, but the top is slightly easier to work when the cables twist the right way.)

It also wasn’t long before I was back in my stash, inspired for the holidays. I’ve made more of these tea cozies with Bernat Roving and with Patons Classic Wool Roving. The Bernat Roving is for people who might be inclined to chuck the tea cozy into the washing machine – it’s 80% acrylic. One ball does it in most cases.

Some of these tea cozies are heading to their destinations with a box of the recipient’s favourite tea or a box of shortbread – or both! Those being hand-delivered will arrive with fresh baking. (Yup, my mom will get one with her scones.) I’m quite happy with my army of tea cozies – they’re both useful and attractive. Besides, doesn’t everyone need a nice hot cup of tea?

Have you made any gifts this year? If so, what?

In the Mood for Gloves…

On the flights to and from Seattle, I knit my first glove. The pattern is called Knotty Gloves, and is a free Ravelry download right now.

I used Malabrigo Sock, because it seemed too soft to me to make good tough socks. It was so pretty that I had to buy it anyway. The colour is called Solis.

I finally finished the second one and sewed in all the ends. Here they are:Knotty Gloves by Julia Mueller knit in Malabrigo Sock by Deborah Cooke

Once again, we have the photography challenge. With the flash, the colour comes out more true (it’s teal) but the cable detail is lost. This shot was taken without the flash, so you can see the cables, but the colour isn’t even close. This colourway is all greens and teals – not blue as it appears here. You wanted to see the cables, though, right?

My Ravelry project page is here.

They came out quite nicely, nicely enough that I might try another pair in another yarn. (They look better on my hands than on the floor, but it’s tough to take a picture of your own hands.) The pattern is terrific – very clear and error-free. If you’re like me and had never knit gloves, these might be a good start. I wanted them to have long cuffs so knit an extra dozen rows of ribbing before starting the pattern. They probably would have been long enough, if I’d just followed the directions, but there you go.

This project, unfortunately, did very little to diminish my stash – it used only half the ball of Malabrigo Sock, so now I need to knit something with the other half. Hmmmm….

Cabled Denim Bag Done!

Knitters talk about F.O.s, which are Finished Objects – as opposed to U.F.O.’s, which are UnFinished Objects. Finishing a project is definitely cause for celebration, so I’ll share my most recent F.O. with all of you.

Even better, you watched it in progress. I started my denim bag here, continued here, and most recently posted about it here. I finished all that I-cord, then stalled a bit on the lining. There must have been an easier way to put the lining together than the way I did it, but I finally got it done.

And here it is!

Cable Bag knit in Rowan Denim by Deborah CookeHere’s the inside, which looks kind of like funky pyjamas:

Cable Bag knit in Rowan Denim by Deborah CookeIt shrank about an inch in each dimension, as the label warned and I think the fabric tightened up nicely. It has some sturdiness now, especially with the lining. I only had a little bit of the sixth ball leftover, so I maybe could have knit one more repeat on the strap. Pretty efficient knitting, and I’m very happy with the end result.

Cabled Denim Bag 3

My denim cabled bag is getting closer to completion:

Cable Bag knit in Rowan Denim by Deborah CookeYou can see that I finished the flap. I had increased the cables to the top of the bag, then worked a couple of repeats in the full width to come across the top of the bag, then decreased down to the point.

Then I started with applied I-cord. As much as I love the look of applied I-cord, it’s pretty boring to knit, and invariably, you need a lot of it. It’s not good TV knitting, either, because you have to keep looking to pick up that stitch. I feel as if I’ve knit a couple of kilometers of it so far! It kind of disappears, but does give the edge a better appearance – if you look at the handle, at about 7 or 8 o’clock, you can see the difference between the two edges.

I’ve done all around the other side and around the flap – the button loop is I-cord that isn’t applied – and need to continue around the bag and the one edge of the strap. The I-cord does cover up the picked up stitches nicely across the lower edge of the bag – you can compare and contrast here, between the part with the I-cord and the part I still need to do.

I also found some zingy lining fabric in the remnant bin, a Madras cotton stripe in hot pink and denim blue which might be a Kaffe Fassett fabric. As those are distributed by Rowan, it seems appropriate. I like it either way.

All I need to find now is a great button.

Rowan Denim is said to shrink quite a bit in the length when it’s blocked/washed – just the way jeans used to – so I’m curious to see what happens when I wash this. It wouldn’t break my heart if the fabric was a bit stiffer. I washed the lining already, so everything will be pre-shrunk by the time it gets joined together.

Plus the additional feet for my Weekend Getaway Satchel arrived this week, so I’ll finally be able to finish that. It looks really good – what a fun project. A lot of hours of work but none of it was too hard, and the felting was fun. If you follow this link to Interweave, it will show you all of the patterns in the Fall 2005 issue – the Weekend Getaway Satchel is about a third of the way down the page. Of course, mine is a bit different – why make it the same as everyone else’s?!

Cabled Denim Bag 2

I started that bag last week and it’s coming along really well. I finished the body of the bag and did the casting off bits I told you about. Pix next – sorry they blurred a little bit, but I needed to take them without the flash to show the cables.

Right now I’m finishing the flap. I’m going to shape it to a point, so the cabled part will be diamond-shaped – the flap should end about halfway down the front.

Cable Bag knit in Rowan Denim by Deborah CookeOn the other side, it’s easier to see the construction. The front has been cast off and the cabled handle is on waste yarn on either side. I’ll finish the handle after the flap.

Cable Bag knit in Rowan Denim by Deborah CookeYou can see that the front hem is rolling, as stockinette is inclined to do. I’m going to do some applied I-cord all the way around the opening, to stabilize this edge and also finish the flap edge.

This has been one of those lucky projects. I’ve been pretty much winging it, but the counts have come out beautifully – for example, I have four purl stitches on the each side of the cable work on the back/flap. When I had increased the cable pattern to its largest width, there were four knit stitches left on either side. Just like I’d planned it!

Plus I found a wonderful new book for cables – it’s called CONTINUOUS CABLES by Melissa Leapman. This diamond cable isn’t from the book exactly, but after reading her explanation of how cables work, I was able to make it up.

It took 3 balls of the Rowan Denim to finish the body and I’m into the fourth one now. It looks as if I’ll have enough with the 6 – I’d like to do applied I-cord on each side of the handle and around the bottom of the bag, but that might have to happen in a contrasting colour. The RD is supposed to shrink in blocking/washing, and I hope it stiffens up a bit too. Right now, it’s droopy and soft, like old jeans, and doesn’t feel as if it’ll wear that well in a purse.

Which means it also needs to be lined. Maybe this is one of those little projects that keeps getting bigger!

(P.S. – I sewed up that seam before taking the pictures.)

Cabled Denim Bag 1

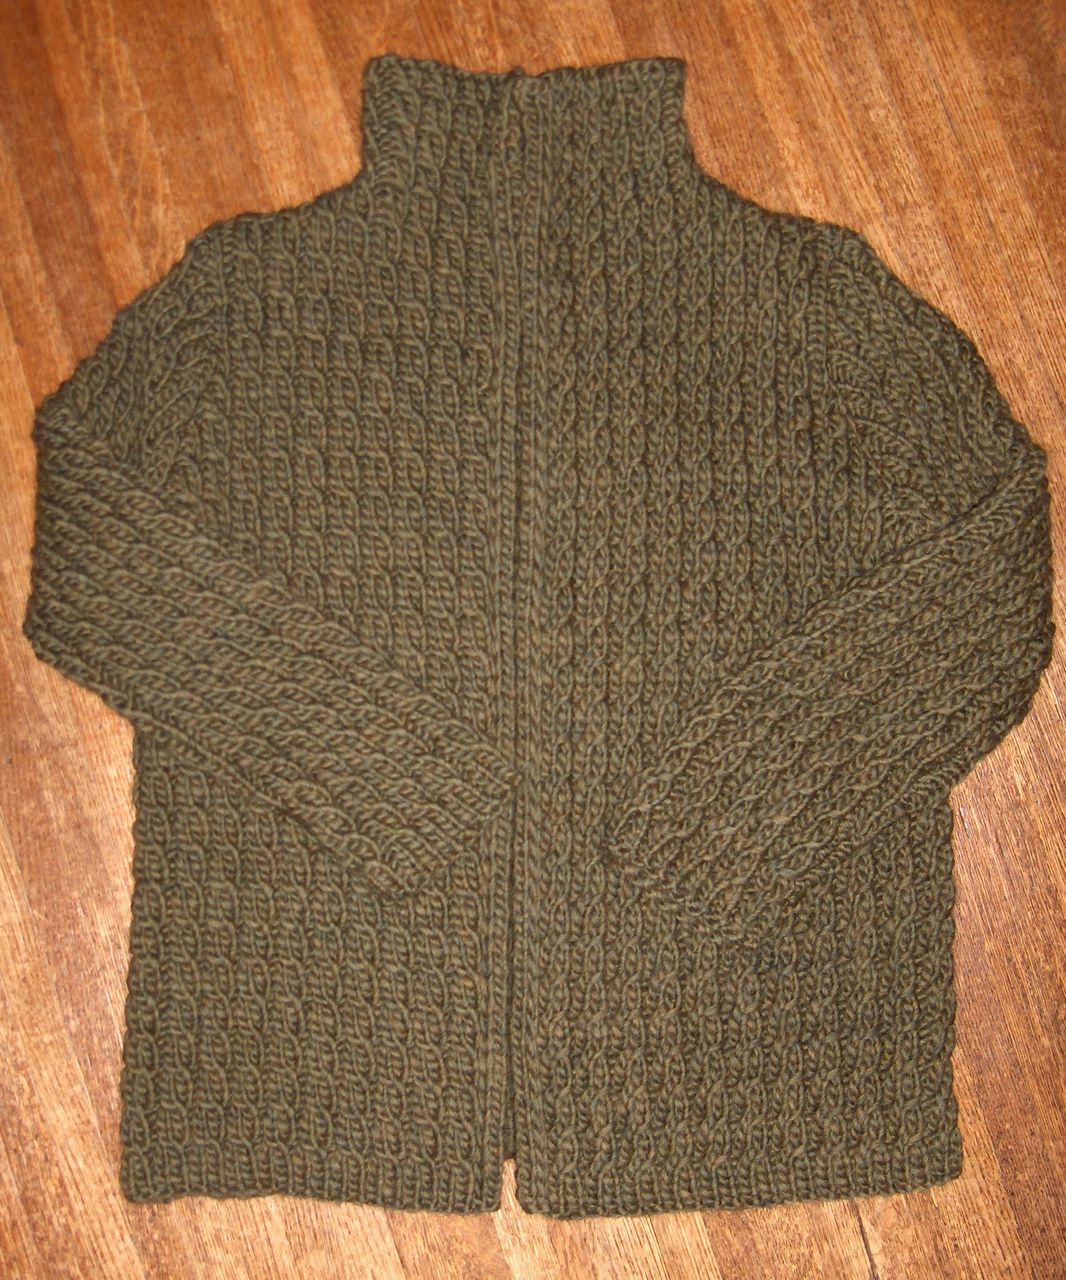
Rowan sent a kit to me with my subscription to their magazine last year. It’s a kit for a denim bag called Charlie, which includes the pattern and six balls of Rowan Denim. The Charlie bag in the kit pattern is a plain stockinette shoulder bag with a flap. Very nice, but the pattern didn’t excite me, so the package had been chucked aside. I like the yarn, though, so I cruised the ‘net and my pattern stash for ideas.

I found Tasha on Knitty, a bag pattern that uses (hey!) Rowan Denim. The cable on the bag is very neat, but I didn’t like that it had an open top. Big zipper fan, that’s me. I’m good enough at losing things that I need all the help I can get. Also I found a pattern in Rowan #35 by Martin Storey, for a bag very similar to Charlie but with cables on the flap. I liked that MS lined his bag and saw zipper potential under that flap, esp with the lining. Hmm.

The thing that all of these patterns have in common is that you knit all the pieces, wash/block them, then sew it all together. Blech. Plain stockinette is boring enough without knitting plain stockinette rectangles that have to be sewn together later. One thing I really liked about Tasha was that cable, but not that it only ran along the strap. So, I began to ponder…

What if the strap was one continuous loop, knit with that cable pattern, and made the bottom and sides of the bag as well?

What if I picked up the stitches from the base, then knit the bag in the round to the top opening? That would eliminate the seaming. Hmm.

Let the calculations begin!

I started with the bottom and made a strip of the cable pattern. The cable pattern is 14 stitches wide (5 x 2 st stockinette cables plus 4 purl stitches in between), so I cast on 24 stitches. For each right side row, I slipped the first stitch, P4, work the cable pattern, P5. For each wrong side row, I slipped the first stitch, K4, work the WS of the cable pattern, K5. (If you’re looking at the Tasha pattern, the designer has 3 stitches on either side of the cable. The first stitch is slipped on each row, but that’s not listed in the pattern directions, just the P2 or K2 at either end.) I worked for about 10 inches in length, ending with a WS row.

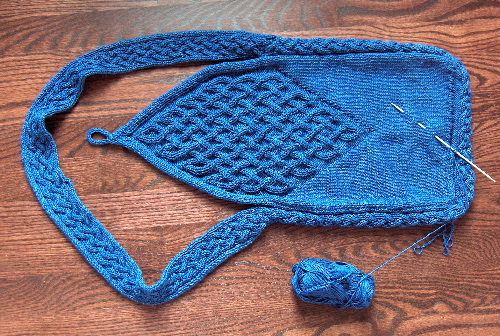
Then I switched to two circular needles. One side of the bag and one end would be on each needle. This is much easier (I learned) than working on 4 dpns – the long sides want to jump off the needle – or one circular – the curve is too tight.

Here’s what it looks like now, so you can visualize what’s going on:

Cable Bag knit in Rowan Denim by Deborah CookeYou could technically join the bag into a complete circle and work it in the round, but I left one seam open and am working it back and forth – it’s easier for me to keep track of the cable pattern that way and I don’t mind sewing one seam.

So, I worked the next row of the cable pattern across the end of the bag base, then picked up all those slipped stitch loops on the left end of the cable needle. I worked down that long side, knitting one stitch into the first loop and two into the next one – for every two loops, I picked up three stitches. This might be a bit full, and I’m thinking now that four stitches for every three loops might have worked better. We’ll see.

To make one stitch in the loop, you simply knit the loop. To make two stitches in a loop, you knit into the front of the loop, then without removing the loop from the left needle, knit into the back of the loop. Then you remove it from the left needle.

I switched to the second circular and picked up 22 stitches from my cast-on, purling above the purl and knitting above the knit stitches. (I initially cast on 24, but the other two stitches – one at each end – became the slipped stitches which were picked up for the long sides. Each end is now 22 stitches, with four reverse stockinette stitches on either side of the cable.) Then I picked up the other long side, the same way I’d picked up the first one.

When I’d gotten all the way around the bag, I turned the work and worked back on the WS. The front and back of the bag are in stockinette, so I purled all those stitches I’d made, then kept the ends in the cable pattern bordered with reverse stockinette.

At the beginning of the next row, I made one stitch at the beginning of the cable panel. This is the seam stitch – I’m knitting it on the RS and purling it on the WS. When I sew that seam, it will disappear into the back of the bag. There are some holes along the bottom where I picked up all those stitches, but I’m going to border the bag with I-cord so the holes will be covered up.

The picture is the bottom of the bag. The opening, which will be the seam, is at the top left corner. The stitches on the left side and across the bottom are on one circular needle. The stitches on the right side and across the top are on the second circular needle.

I have a feeling that the cable pattern stitch on the side of the strap that came from the picking up the cast-on is upside down or backwards or something. I’m just knitting to make it look right and not following the directions anymore, so if you try this, keep an eye out on that side.

Back and forth I’ll go, until the bag looks deep enough – probably about ten or twelve inches, guesstimating from the other pattern instructions. Then I’ll cast off one long side and divide the straps from the other long side. The remaining long side will become the flap and the straps will continue to make that big loop. I think I’ll knit the strap on one side and graft the strap at the top of the bag on the opposite side. And I suspect that the flap will need a cable, maybe one that starts on the back side. I’ll have to have a peek at some cable designs.

For the moment, I’m happily keeping track of that braided cable – you can see at the top right that I crossed one the wrong way. I picked that back and fixed it. Then, after I’d worked about two inches from the base, I was able to put it all on one circular needle and just work back and forth.