This is another one from the vaults, as they say. It began because I went to a spinners’ festival once upon a time at the Arboretum in Ann Arbor, Michigan. It must have been in the late 1980’s. I bought four yarns that day, just because they were beautiful, including two in bluey-greens. Then I didn’t know what to do with any of it.
The two blue-green yarns coordinated. One was a thick-and-thin mohair blend – I’ve since learned that I always like thick-and-thin yarns in the skein and never know what to do with them – and the other was a smooth silk blend, maybe aran weight. I had envisioned the two yarns together, even though their textures were really different, but couldn’t find a pattern. I also didn’t have that much of either of them.
When I found a commercial yarn that came in two shades that coordinated beautifully, this was the result:
The two handspun yarns are used for the top and the sleeves. I alternated them in 4-row stripes of moss stitch. Even the blue and green commercial yarns had blended colours, so they worked really well with the handspun ones.
The cream contrast is another commercial yarn with a long variegation. It feels as if it’s part cotton, maybe part acrylic, but the label is long gone. I loved the gradation in it.
I have a vague recollection that the intarsia pattern was from a book, but I don’t know which one now.
This sweater is a cropped length because that’s how much yarn I had. It’s incredibly warm so I never wore it much. In fact, I haven’t worn it even once in over 30 years, so something needs to be done. The yarn is too beautiful to sit in the cedar box.
I tried this sweater on again and rediscovered another issue. The top is very thick and bulky, and it’s wide in the shoulders. It’s not a flattering fit. Also the contrast line above the intarsia used to be below my bustline. Now it isn’t. Ha. So, that’s not a good look either. I decided to unravel it and save the intarsia part as a cowl.
Wow. Did I ever do a good job of seaming up this sweater! It was a challenge, but I’ve taken apart the body and have what will be the cowl back on my needles. (I’m guessing what size they were.) The plan is to knit a ribbed backing and join it to the cast-on hem, so only the part between the contrast ridges will be on the right side. I’ll show it to you when it’s completed.
I dove into the stash in search of more of the blue and green commercial yarn. No luck but I did find more of the creamy one *and* the label. (Ha.)
What about the thick-and-thin mohair and the silk blend? Stay tuned for its new incarnation. I have a plan…
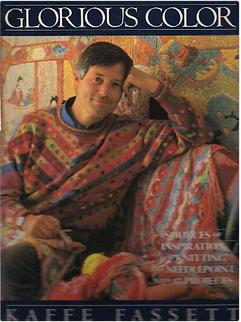
My chat this week in the comments on Audrey with rontuaru (about Alice Starmore and Kaffe Fassett patterns and knitting in days of yore) got me to thinking about The Beast again. I knit this Kaffe Fassett design – which is really called The Chinese Rose Coat – around 1990. It’s in the book Glorious Color, sort of. (That’s a Ravelry link. This is the 1988 edition, which is the one that I have. The book was reprinted in 1990 with a different cover.) What’s actually in Glorious Color are instructions for The Chinese Rose Jacket, then there’s a note that you could make it into a coat by using the chart for the jacket and the pattern for the Jug Coat.
These sweaters are all big squares, which is great for intarsia designs but not so great for a flattering fit. (If you look on Ravelry, you’ll see that the Jug Coat is one-size-fits-all and finishes out at 44″ across the bust, so there have been other changes in pattern design in forty years, too.) The coat is a big T – you cast on at the bottom back hemline and knit up, adding stitches for the sleeves (to make that T), then continue up to the top of the shoulders. Then you split the work in the middle, continuing down the fronts, decreasing to end the sleeves at the underarm and casting off at the front hem. You sew the side seams, pick up stitches at the hem to add ribbing, then add ribbing to the cuffs too. I remember what a huge pile I had in my lap at the end.
Here’s the spread from the book with the coat on the left and the jacket on the right.
Kaffe’s suggestion was that you should mix many yarns together for the coat, even twisting two lighter weight yarns together to get a thicker yarn. I did that. Mine is a big mixy-mixy of colours and textures, which is a lot of fun. There are even fringe yarns and sparkly yarns in there. I don’t remember what the fiber mix is, but it’s certainly not all wool or even natural fibres. I bought odd balls of yarn in yarn shops all over the place for this coat.
Here’s my coat:
I’m not tall enough to even get all of it in one picture!
I didn’t use one black yarn for the background but mixed a bunch of them, including a fur one and some grey ones. The one thing that bugs me is that the chenille yarn I used for the collar and cuffs seems to be aging badly – each time I pull out The Beast, there are more loose loopy bits there. I guess there’s some content with elastic that’s losing its boing (?)
I also wasn’t really good about checking gauge in those days. Most things I knit then were too big or too small. This coat was and is ginormous. It’s a bit shorter now because I took the ribbing and one repeat off the hem as soon as it was sewn together. I’m just not tall enough for how big it was. This also eliminated the ribbing at the hem, which isn’t a bad thing if you want to walk in the coat. I added facings down the front, knit my ribbed collar and cuffs in black chenille and ultimately added bias tap inside the collar (at the base of the ribbing) and from collar to cuff where the shoulder seam could have been to keep the monster from always getting bigger. Part of this is a gauge issue. Some of it is just weight. The original design was supposed to be worn open, more like a cape than a coat, but I added buttons and loops on the front. I also added pockets in the side seams, which are awesome.
It is a sweater to wear on a perfect fall day with just the right temperature and no wind. As a result, it mostly gets action when the mister is very sick, which doesn’t happen very often. He’s the one who called it The Beast and he’s convinced that it’s the warmest possible blanket when he’s not feeling well.
There was one fun incident with this sweater. It used to be possible to fly from Toronto to New York City for the day – there were a lot of flights and it’s not that far, so you could catch the 7AM flight, be in the city by 9:30, meet someone for coffee, someone else for lunch, someone else for a coffee and maybe even a fourth person for a drink, then head back to the airport to catch the 6PM or 7PM flight home. At LaGuardia, the Air Canada people always put you on the next possible flight, if you were interested. I used to go down to meet with my editors. In 1998, I was going to hire an agent and had narrowed it to two possibilities but wanted to meet them both to decide. I flew down for the day. I also had appointments with both of my editors that day, so it was busy. It was in the fall, a gorgeous sunny day, and I wore The Beast. I was so excited when two women stopped me on the street to talk about it because they recognized it as a Kaffe Fassett pattern. Obviously they were knitters, and we had a lovely chat on 7th Ave. (or maybe 5th) in the sunshine. Their enthusiasm made my day.
I also made the Chinese Rose Jacket for my SIL in the mid-90s. I was a lot more careful with gauge and much more disciplined with my yarn choices. I used one yarn for each colourway and the same black tweed for the whole jacket. I remember that it came out really well but I don’t have any pictures of it. (Maybe I’ve embellished the memory. LOL!) Next time I’m at her place, I’ll try to remember to take a pic of it.
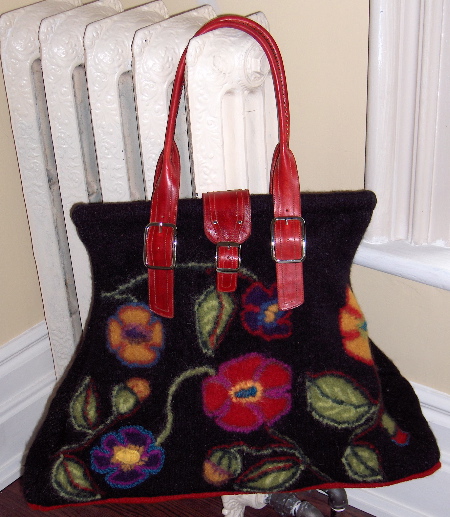
Make no mistake – it’s huge. The base is 24 x 8 and it’s so tall that I have to put it on my shoulder. Part of the height issue is my fault – I couldn’t bear to cut away all the excess knitting to make the felted pieces the same size as the schematic, so mine is a few inches taller than recommended. I never thought about the extra height from the handles (or my lack of height) but the end result is that I can’t just carry it in my hand without it dragging. Oh well. I like shoulder bags.
I changed the handles as well, using leather handles from Grayson E. instead of the felted handles suggested in the pattern. I don’t find that felted handles stand up to stress that well – plus didn’t like the idea of knitting that enormous length of red strap shown in the pattern. These handles are beautiful but expensive – I could only justify them by using odd balls and mill ends for the wool. It’s mostly Patons Classic Merino, which is now called Patons Classic Wool – you can see that one teal blue, the one that outlines the flower at the bottom left, was NOT wool and didn’t felt, but I like how frilly it looks.
The pattern is easy to follow and the knitting isn’t complicated. Most of the detail is embroidered on to the intarsia. I had thought to pattern the back as well, but by the time I finished the front, I was ready to knit a plain back as the pattern specified. The finishing, though, was a bear. I lined the bag – because I hate unlined bags – and sewing that lining in, after the base was installed, the handles were sewn on and the hex frame was sewn in, was an acrobatic feat. Fortunately, blood doesn’t show in black tweed because I stabbed myself with the needle a number of times!
I really love this bag, but I won’t be in a hurry to make another. In fact, I think I’m worn out with felted bags for a while.