Sam’s Study Hack in Progress

A while back, I told you about the Rolife miniature room kits I’d ordered. I’ve made good progress on one of them, along with a bunch of changes, and thought I’d share an update with you today.

Here’s the manufacturer’s picture of Sam’s Study. (That link will take you to the Rolife website, but you can buy these kits at many places, including Amazon and Walmart.)

Harper's Library 1:24 scale miniature room kit
Rolife Sam’s Study

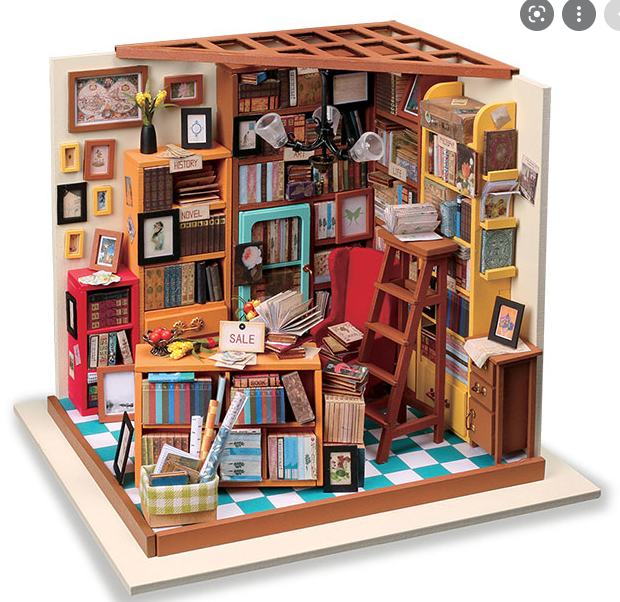
This is one jam-packed little room! It also has a lot of orange, which didn’t thrill me.

Here’s my study, which is still in progress. You can already see that I’ve made changes.

Sam's Study Hack in Progress by Deborah Cooke

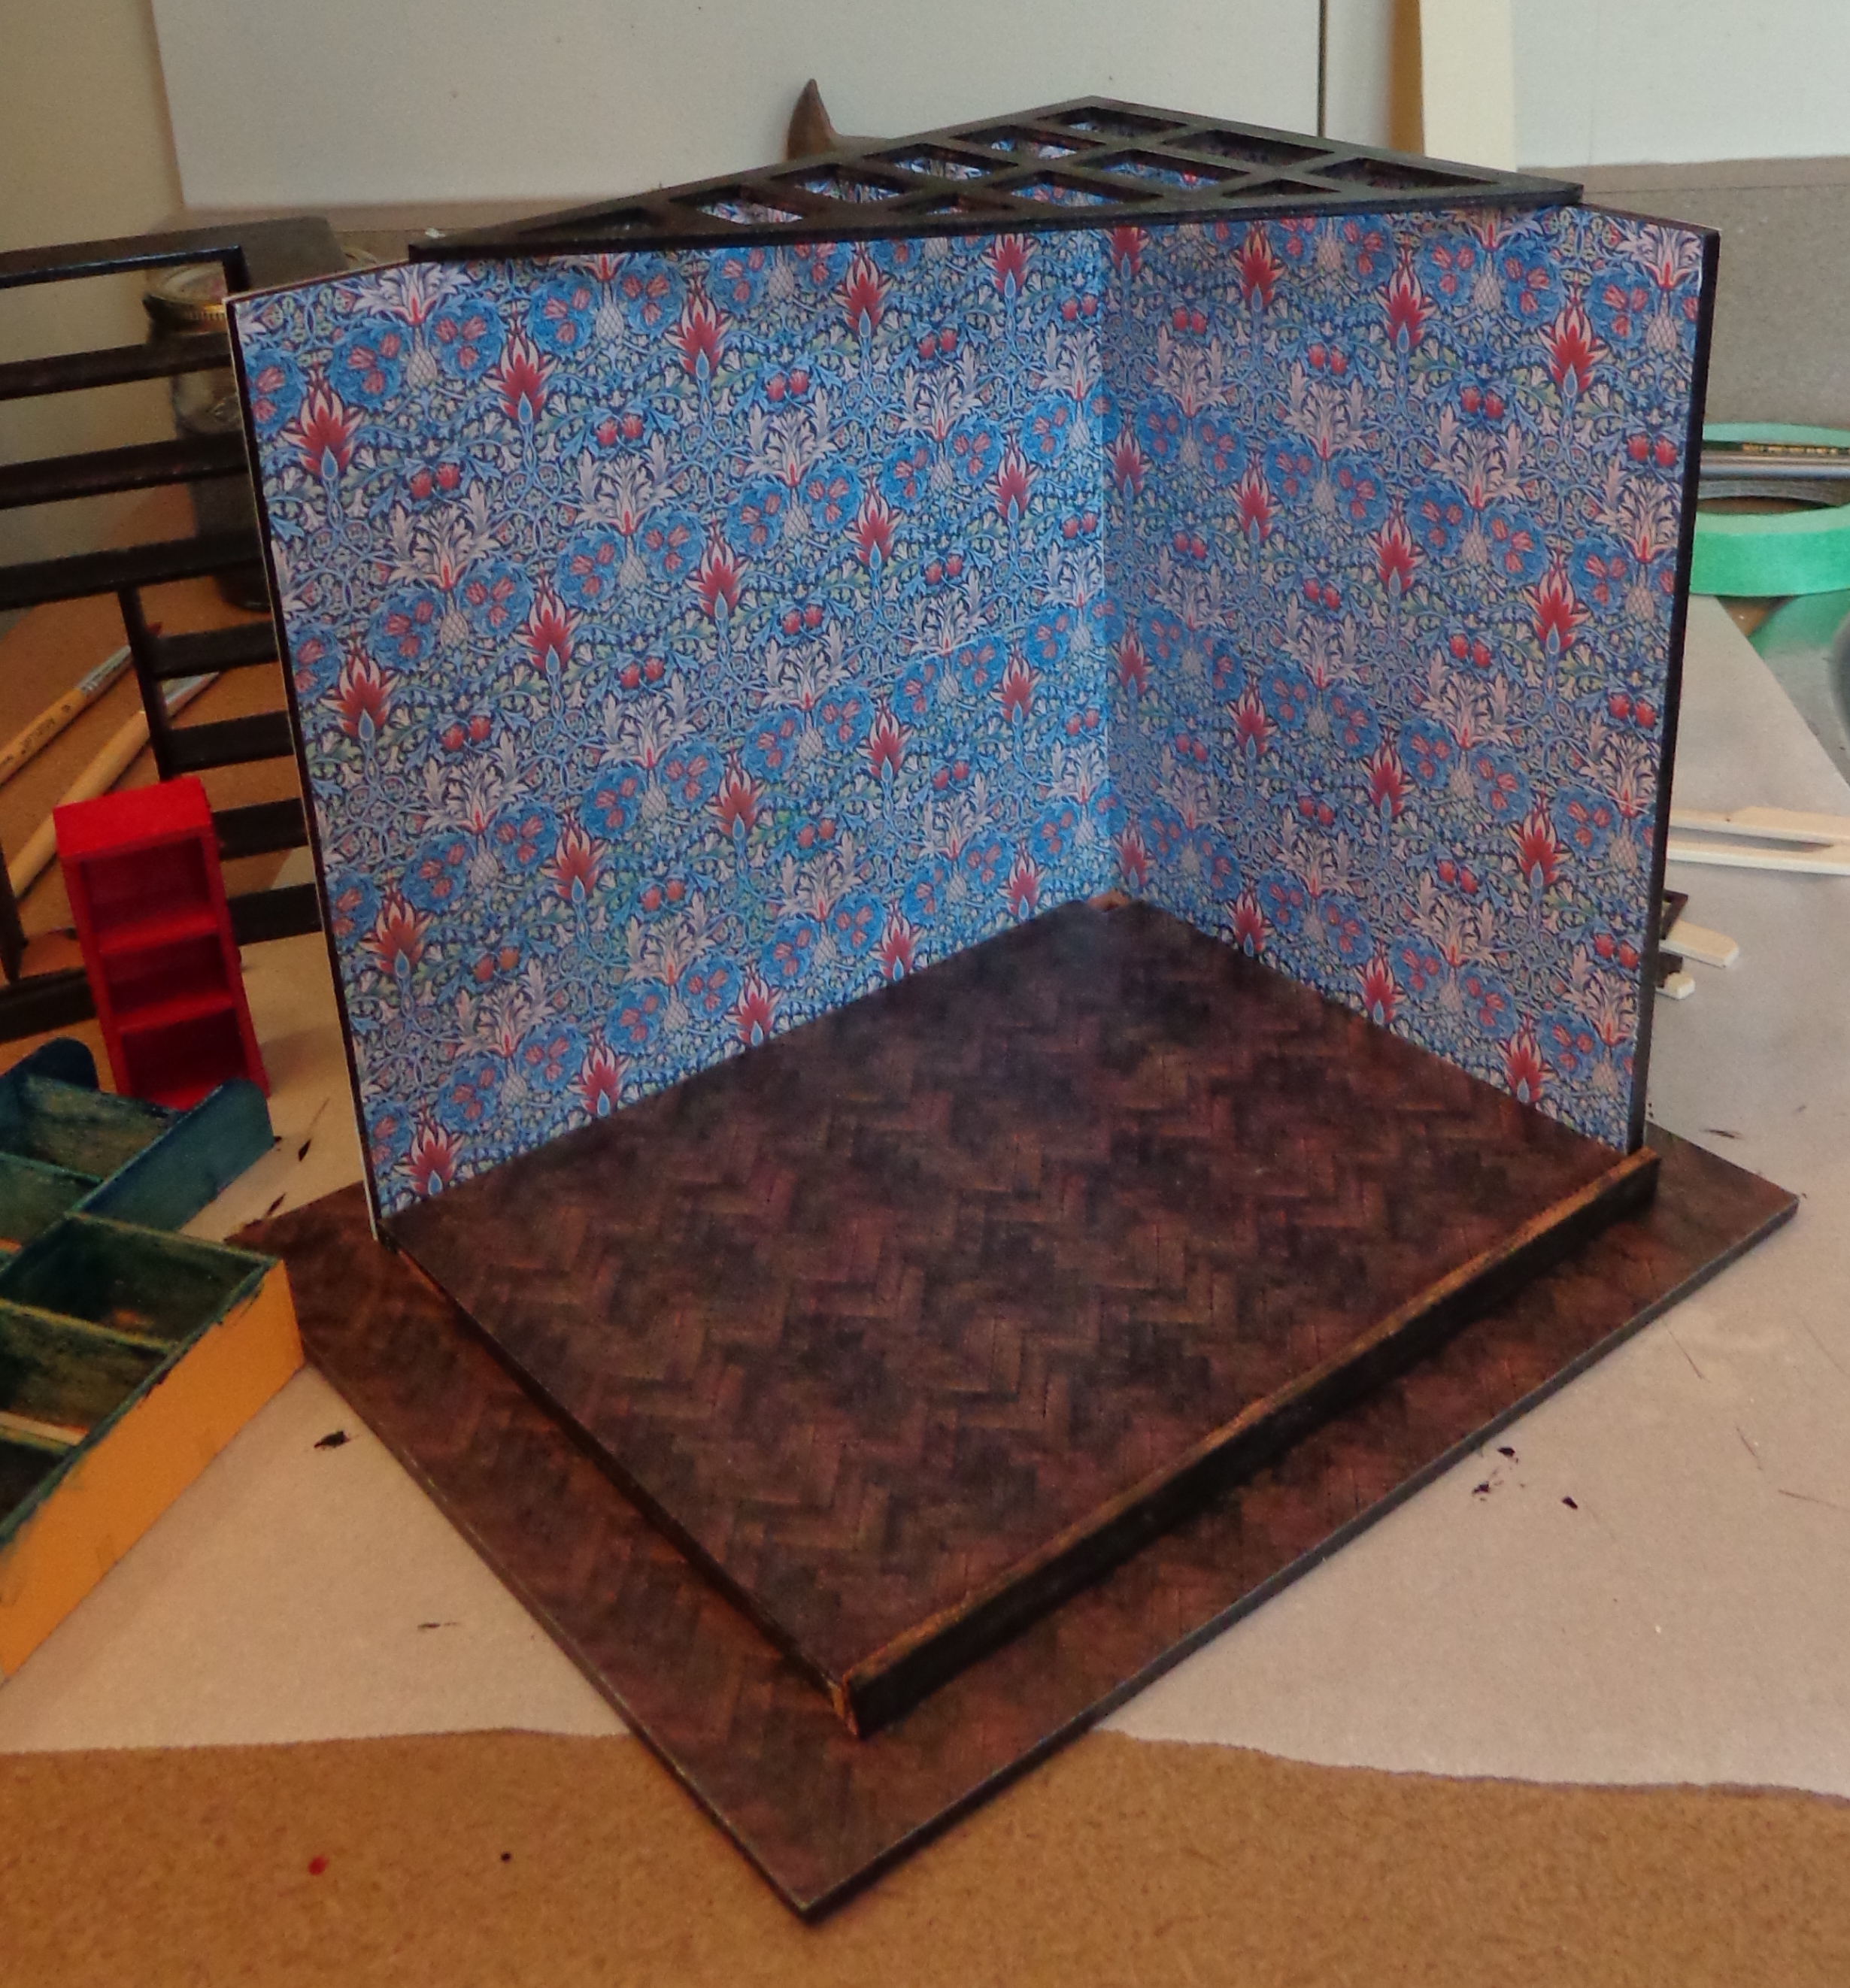
The printed floor included in my kit has dark green squares instead of turquoise ones. Either way, it had to go. I bought a downloadable printable PDF on Etsy for hardwood floors, printed out the one I liked and laminated it with matte transparent contact paper. I then cut it to fit the raised floor and the surround, and glued it in place. It’s much darker than the brown stain on the included wood pieces, so I painted the two that edge the floor black. (In this picture, they need a second coat.) I also painted the ceiling lattice pieces black.

I “papered” the walls of my study with a William Morris wallpaper design, also a downloadable and printable PDF from Etsy. I changed the size of it to make it look right, printing it at 25%, then matched the pattern on the walls. I also papered around the outside of the box, as if there’s a hall and foyer beyond it. I’m moving some of the pictures out there.

I tried a few kinds of glue and had the best success with Aleene’s Original Tacky Glue. It’s a white glue that dries clear. It’s great for the paper and the wood pieces. For metal and beads, I used E-6000 which also dries clear (but smells a lot worse).

There are a couple of frustrating things about these kits, although overall I’m enjoying them. The scale is a little bit arbitrary (I talked about that last time) and seems to fluctuate between 1:12 and 1:24 scale, depending on the item in question. That’s probably part of what makes the room look so crowded. Also, the included materials tend to warp so it’s hard to get crisp square corners. Everything is a bit tippity, but maybe that’s part of the charm.

All of the book and picture elements are pre-printed on a very thin paper. This works really well for folding pages of a book interior, but is a lot less effective for a suitcase or a book box. (Many of the volumes on the shelves aren’t individual books – they’re five-sided boxes, printed with spines and pages, that you assemble and fit into the shelf in a block.) After I mucked up the suitcase (mine has been around the world a few times and is a bit battered as a result) I made a change to the book boxes: I glued them to a sheet of bristol board to give them more structural integrity then cut them out and built them. This worked really well.

Sam's Studay Hack 2 by Deborah Cooke

That’s a book box at the front left, and my study with the chandelier installed. It looks really cool when it’s turned on, but the LED lights are really bright – they fake out the camera. I”ll have to get around that to show you the finished room. I hung the map so it’ll be centered over that left bookcase, which will be centered between the other bookcase end and the corner. The little red bookcase is going in the hall.

The chandelier was the toughest part IMO. I was a bit concerned the electrical work, but it was just holding all those pieces together that was complicated. I checked the lights constantly and they worked until the chandelier was installed. Now the one on the bottom doesn’t light up, but I’m not taking it apart. My chandelier also hangs a bit low, but that’s where it’s staying. 🙂 You can see that I need to use a marker on the floor line, too, something that isn’t evident IRL but the camera picks up.

Here’s what it looks like around the back:

Sam's Study hack by Deborah Cooke

This is my foyer and hall “wallpaper”. It’s an Italian paper that I bought when I took a bookmaking class. It came from 32 Degrees North, but they no longer have this one in stock. (They have a lot of other beauties – that link will take you to their Italian Papers page.)

Now I have bookcases to finish painting and book boxes to build. I’ll show you the miniature again when the room is done.

Miniature Room Kits

Earlier this month, I discovered these room kits to create scale models. I thought this study were so cute that I ordered one – and then, you know, another (but we’ll get to that).

Harper's Library 1:24 scale miniature room kit
Miniature Bookstore or Sam’s Study or Harper’s Library

These are scratch-build kits, which means you get a box of materials and have to build everything yourself. I thought I might learn some tips and tricks for building my 1:6 scale dioramas. This first kit comes with an LED light – that chandelier lights up when it’s done. It’s a bookstore but I’ll make mine a study by leaving off the SALE sign and the genre signs.

I bought the kit from Minihooo – that’s a link to their website, which has prices in US dollars. My order had free shipping and was dispatched from China. But then, I was at a hobby store with the mister the following week here in Ontario and they had the kits on display – except they were from Robotime or Rolife. The kits looked the same, just the company name changed.

I came home and did some searching online, and discovered the kits are stocked by Mary Maxim here in Canada, with prices in CA$. I bought Jason’s Kitchen from them.

Jason's Kitchen 1:24 miniature kit
Jason’s Kitchen

My first one is called Miniature Bookstore at Minihooo, but online you can find it labelled as Sam’s Study or Harper’s Library. (Yes, the Rolife kit has – or has had – two different names.) There are a lot of people building these kits and documenting the process on YouTube – I feel as if I’ve discovered another dimension of the universe, one that I never realized was there.

While searching all of this, I saw this apartment model and wanted that kit, too. (It was the pool that sealed the deal.)

Miniature Luxury Apartment 1:24 scale dollhouse model kit

I first saw it in MInihooo for $105US (It’s now $135US there. On Black Friday, it was $79.This is a moving target!) but had a look around at other options. There were six different listings on Amazon.ca for the same kit, ranging from $64 to $98 CA, some with free shipping and others not. The company names were all different, including Rolife, Robotime, Wadile and CuteBee. I bought the one from Cute-Eyfud which is fulfilled by Amazon. It appears that they are identical kits, but some may have only Chinese instructions. (There’s one on Amazon.ca with a lot of negative reviews about the Chinese instructions.) If you’re tempted by these kits, be sure the one you choose specifies that it has English instructions. There’s a similar variety of kits on Walmart.ca, at least half a dozen for each style, all listed as being from different manufacturers and supplied by different vendors. The kit is often (but not always) called Time Apartment.

I suspect they’re different distributors for the same kits and that the kits are assembled by the same company. The price variations could be because of the marketing – Minihooo, for example, has a pretty website and sells directly from it; Cutebee seems to have only a storefront on AliExpress. There appear to be slight variations in terms of what comes with the kit, especially glue and paint. There are differences about included dust covers, too – I’ll guess that these kits came with dust covers once but no longer do, so some people get them and some don’t, depending on when that particular kit was made. It might also be that the kits have variations in the additional stuff when ordered in Asia rather than elsewhere.

Amazon being Amazon, the kit I ordered last was the one that I received first. Of course, it came overnight even though I don’t have Prime. The other two came the same day, two weeks later.

The box for Time Apartment is like a little briefcase, with a cute carrying handle. The brand on the box is Cute Room. All the other text is in Chinese.

The other two both say they’re Rolife kits and that they’re made by Robotime. My bookstore is called Sam’s Study.

Let’s look at what’s inside.

The only kit that had paint and glue included was the kitchen that came from Mary Maxim. The study says it has paint included but it’s not there. The apartment says you need to get your own glue. I suspect this is due to how they were shipped – if coming by air, the kits couldn’t include any liquid. The kit from Mary Maxim must have come by boat. The Time Apartment kit also has that mothball smell I associated with dollar stores and Chinatown. It has a music box, too, which is a bit of a surprise. They all have lights and wiring with the box for the batteries but no batteries included, which is fair enough.

Inside, there’s an inventory of parts in each kit.

comparing kit checklists

The Time Apartment has a list with measurements and diagrams, but they’re not in scale to each other. I needed to use a ruler when checking the parts. The Rolife kits have printed sheets with each part displayed to size in colour. That made it easy to check them – you just slide the piece along until you find the match. The Rolife kits didn’t inventory all the beads and bits, though, while the Time Apartment did. Out of the three kits, I’m missing one little piece of wood for the ladder in the library, but I can easily make a replacement.

They all have little sayings on the boxes which maybe didn’t translate very well. Under the carrying handle for the Time Apartment is printed “Love Handmade & Enjoyed Life”. The sleeve for Jason’s Kitchen says “Eating in such a nice kitchen alone, you may not feel lonely.” And the sleeve for Sam’s Study says “Pick up a book and taste a sense of isolation. I seem to touch my soul at this very moment.” Hmm.

How small is 1:24? Well, the scale means that 1 inch in the model is 24″ in real life. That means that Mr. Math, who is 6 feet tall, would be 3″ tall in this scale. It’s pretty teeny. And one of the first things I noticed was that these kits aren’t in the same scale, even though they’re all listed as being 1:24. Only the Time Apartment is in that scale. I think the Rolife kits are 1:12. (Mr. Math would be 6″ tall in this scale.)

Look at the books:

book miniatures compared

You make the books the same way, by folding the pages like an accordian and pasting them into the covers. Of course, books can be different sizes, from paperbacks to coffee table books, but the Time Apartment books are 3/8″ high. (And the back covers are the mirror image of the front covers!)

Time Apartment Parts 2

That means they’re 9″ high in scale. The Rolife books are 3/4″ to 7/8″ high – in 1:24, they’d be 18 to 20″ high, which is big even for a coffee table book. In 1:12, they’d be 9 to 10″ high, which makes more sense.

The kitchen counters don’t provide a clear comparison – the Time Apartment seems to have a long counter and a small sink (that’s the marble paper covering on it), while the Rolife kitchen (orange) has a small counter and a big sink. But look at the cutting boards, and the cooking utensils. And those laser-cut clothespins!

miniature kitchens compared

And finally, the armchair – this is just the template, but I’ve put it beside the Time Apartment’s half-flight of stairs and kitchen table parts. That would be one big armchair in 1:24! Assembled with the legs on it, it would be as tall as one floor of the apartment.

armchair compared

Of course, the scale matters less between models than that everything within the model is in the same scale. If you wanted to add something, you’d need to keep the scale in mind. Also, because the items in the Rolife kits are a little bigger, the models will be easier to assemble – and there will be a teensy bit more wiggle room for fitting and matching. A smaller scale is pretty merciless, as I’m learning.

I’d started on the Time Apartment while waiting for the other two kits, since I’m making it pretty much as instructed. I’m using carpenter’s glue for the wood and white glue for the paper. I have some E-6000 for the metal, plastic and beads. I also have an X-acto knife and am going through a lot of toothpicks with the glue. I’m making good progress and will show you when it’s done.

It’ll take a bit of time, which is good as I have to think about the Rolife kits. There’s a lot of orange wood in those kits, which means I’ll probably be painting many of the pieces before assembling them. These are fantasy rooms, after all, and I have no fantasies that include orange furniture.