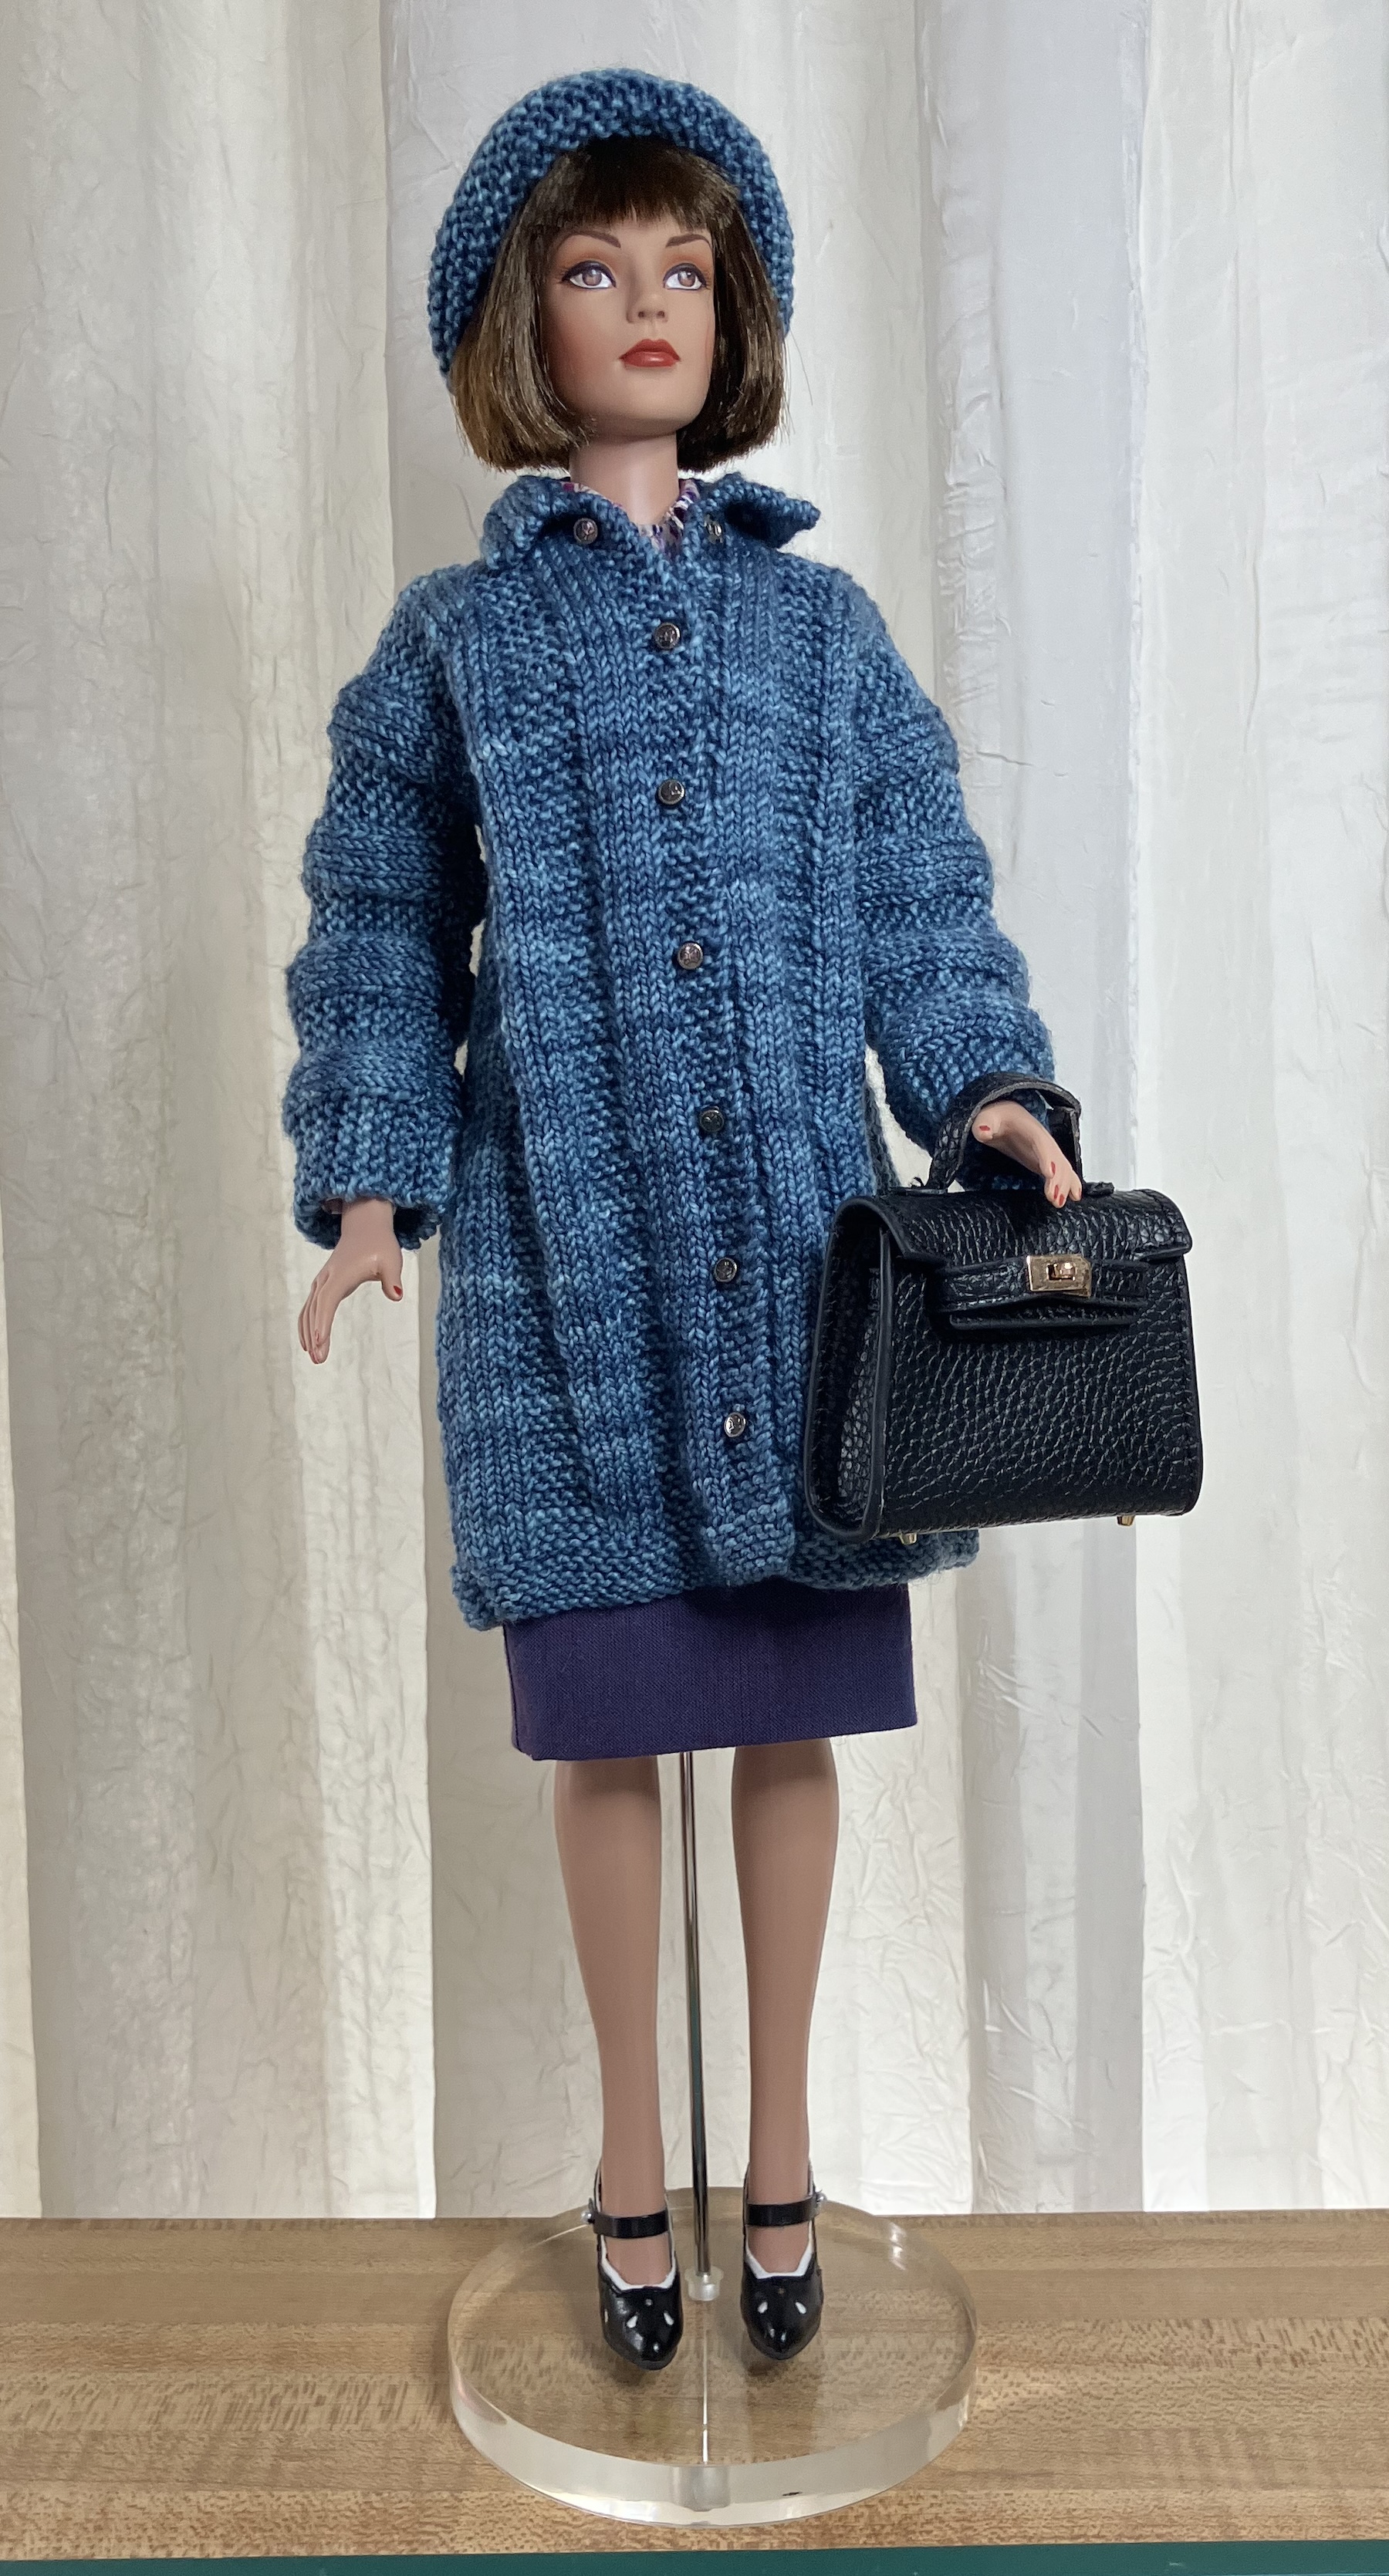
You might remember the knitted coat and hat I made for Barbie, using patterns from Sticka till Barbie. The pattern was #101 Yellow Coat along with the coordinating hat. That post is right here.
I decided to resize the pattern for my 16″ girls, and I think it came out pretty well. I used Koigu KPM and it took almost the entire 50g skein for the coat. Fortunately, I had another skein to make a matching hat.
This is Mosaic Modern Sydney Chase doing the honours today. I wish I had an umbrella to add to this combo. It has a bit of a retro look, and not just because of the shoes. (They are from a shoe pack, which included the pink slingbacks that Tyler is wearing in the picture below this one.)
The Koigu KPM has a kettle-dyed look, which worked out really well for this one. I was afraid a variegated or space-dyed yarn might pool – also Sydney says she can wear it with more things.
If I knit a second one, I might add pockets to the front. I thought of that this time, but wasn’t entirely certain what row they should be on. I’ll mark this one, just at her hand, then count the rows up from the front to know for next time.
I would make them like the pockets in this cardigan – it’s hard to see the line of cast off stitches in each front but have a look. The pocket hangs inside, like a welt pocket without much of a welt. I can just slide the tip of my finger into it.
I also made Sydney a blouse and skirt to wear with this knitted coat. She looks like a librarian to me in this combo, thus the glasses and book.
This is the blouse from McCalls 3701 (the same pattern used for the pink one above) which is actually a bodysuit. It’s made of Liberty Tana Lawn. Quite a clever little design, even if the collar is fussy fussy.
The skirt is drawn from the basic skirt sloper in Rosemarie Ionker’s Fashion Doll Clothing. It’s made of Kaffe Fassett shot cotton and lined with Bemberg rayon.
And two more girls are on their way to me, NRFB and from an estate sale. I’ll show them to you when they arrive. 🙂
It appears that when I’m stressed, I buy dolls. Who would have guessed that my comfort-indulgence would have no calories at all?
Here are the two newest girls who have joined the party.
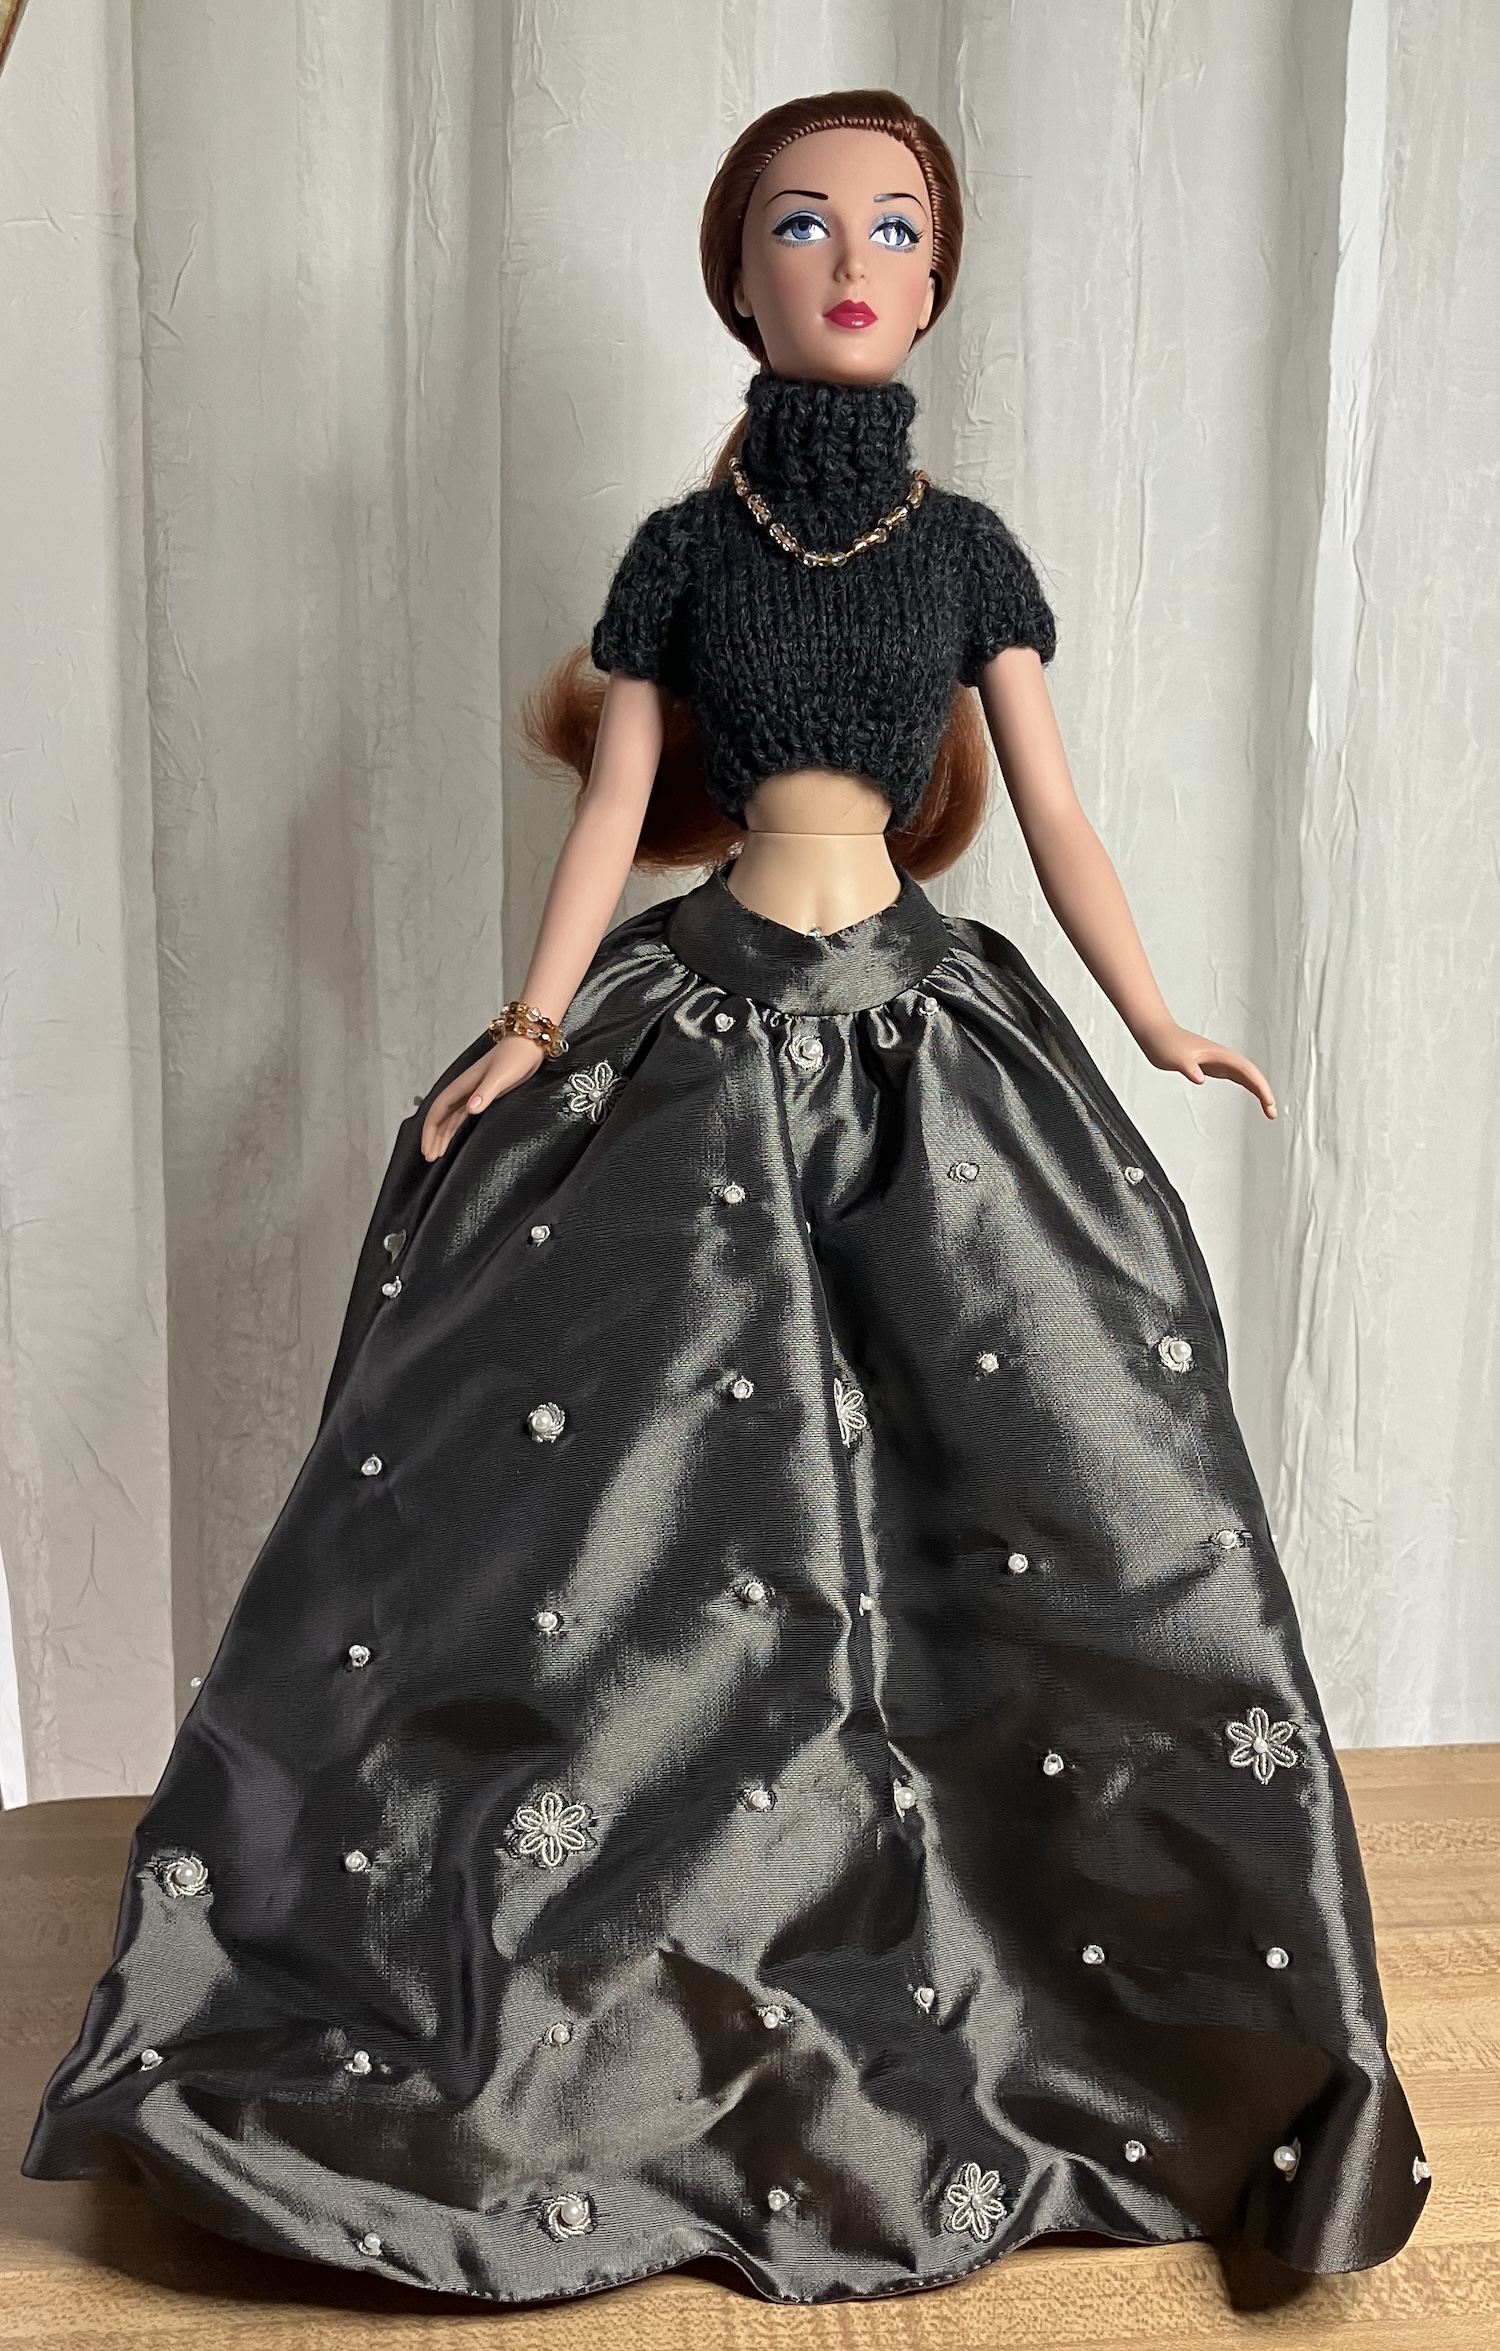
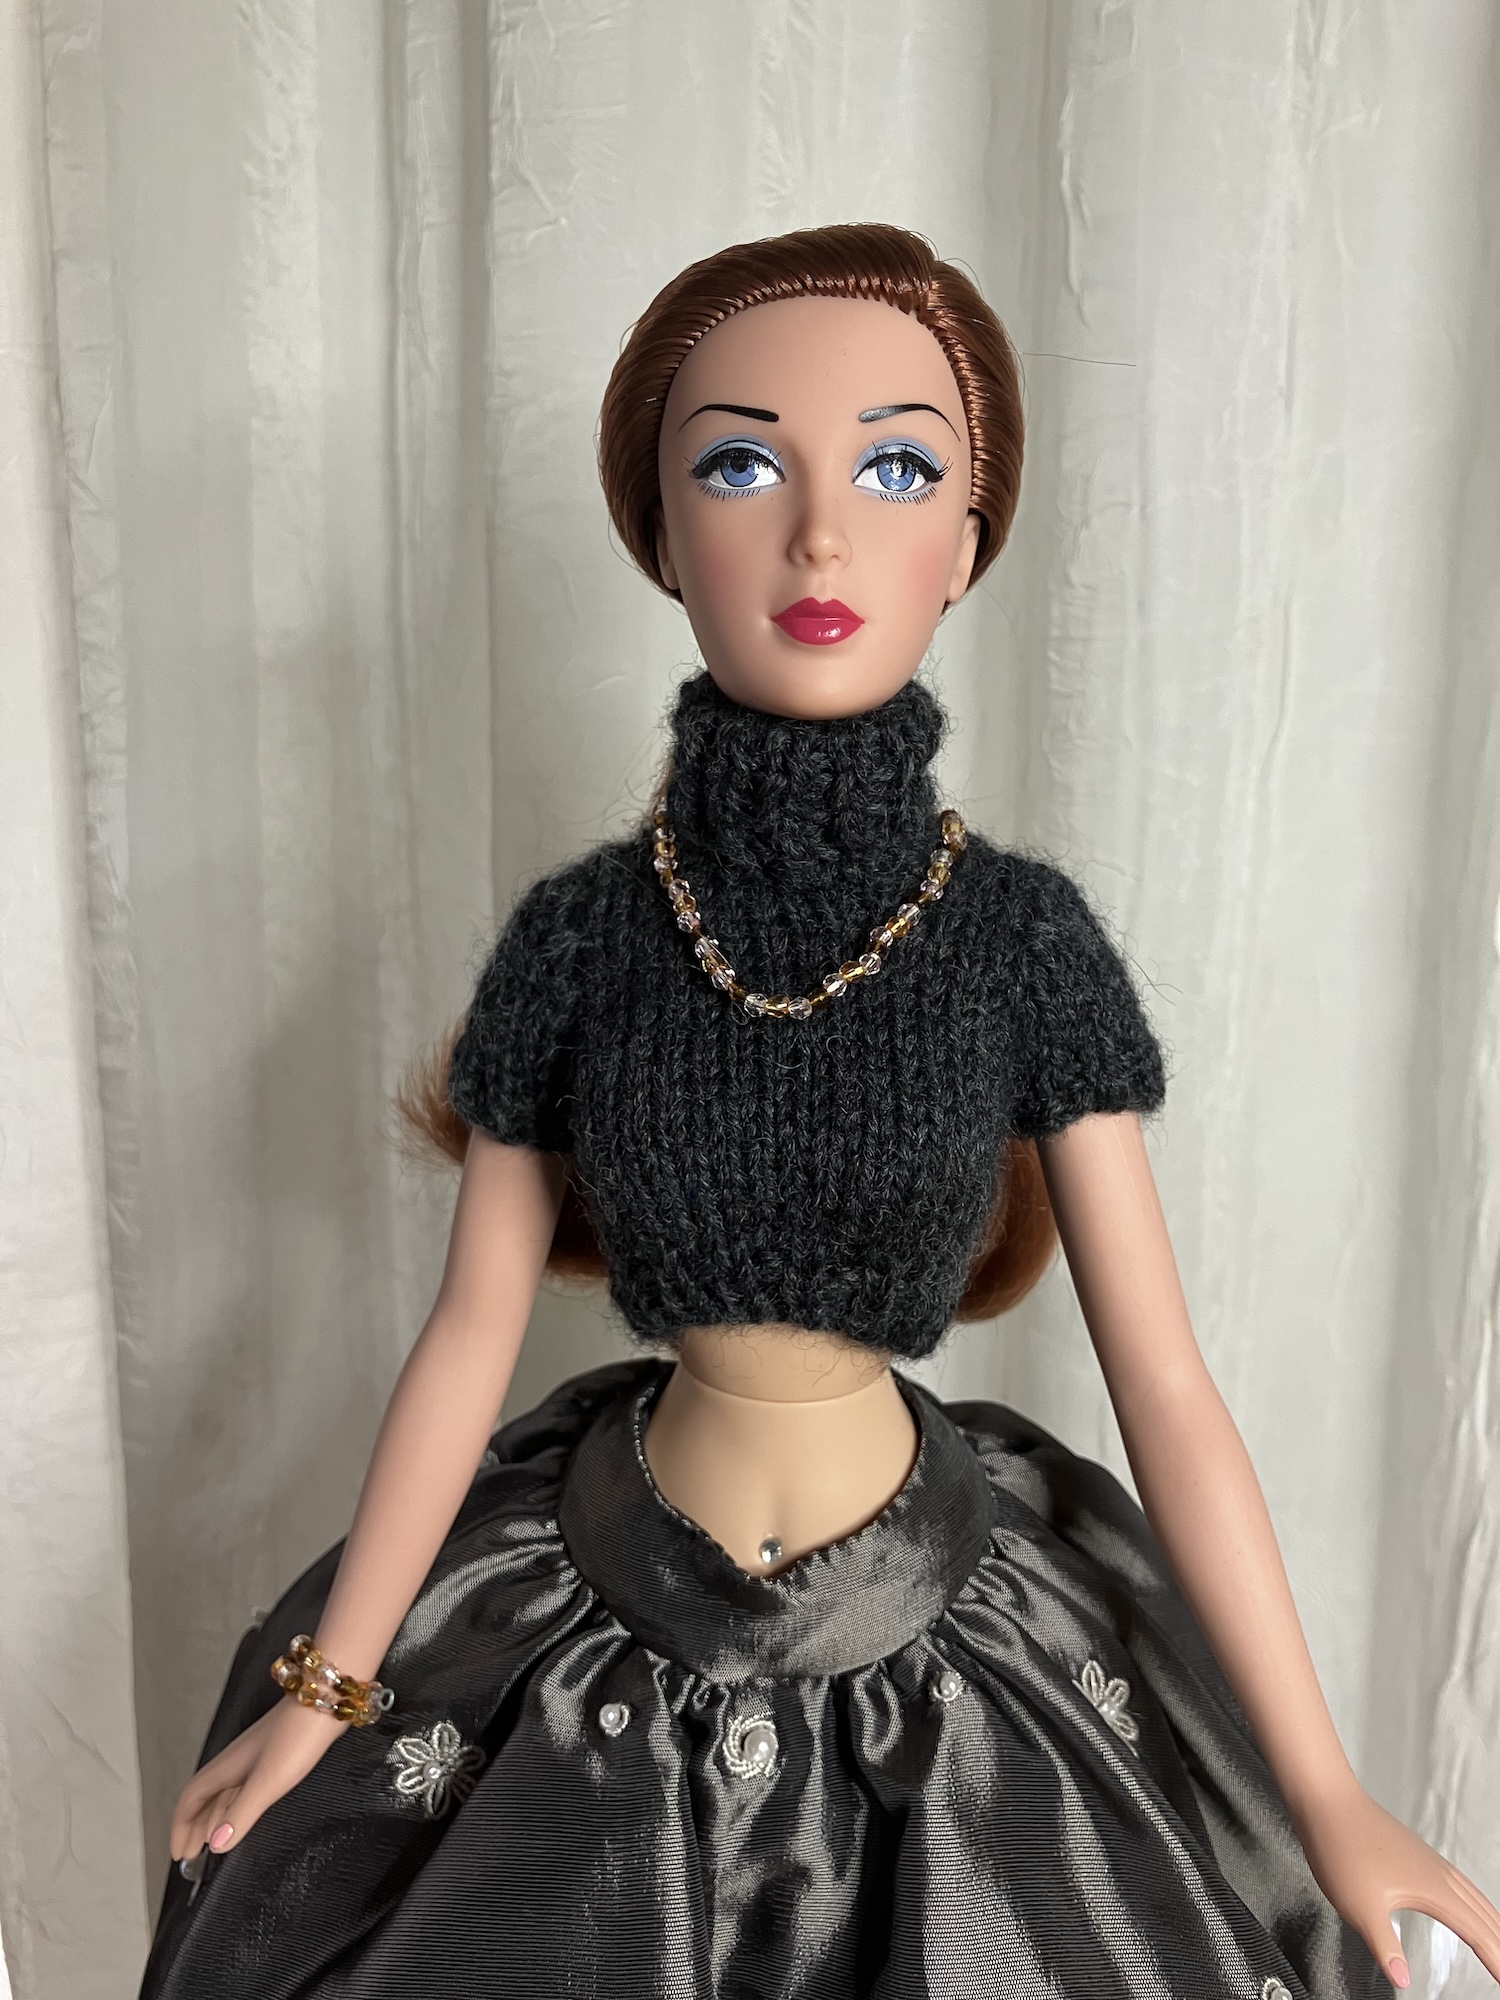
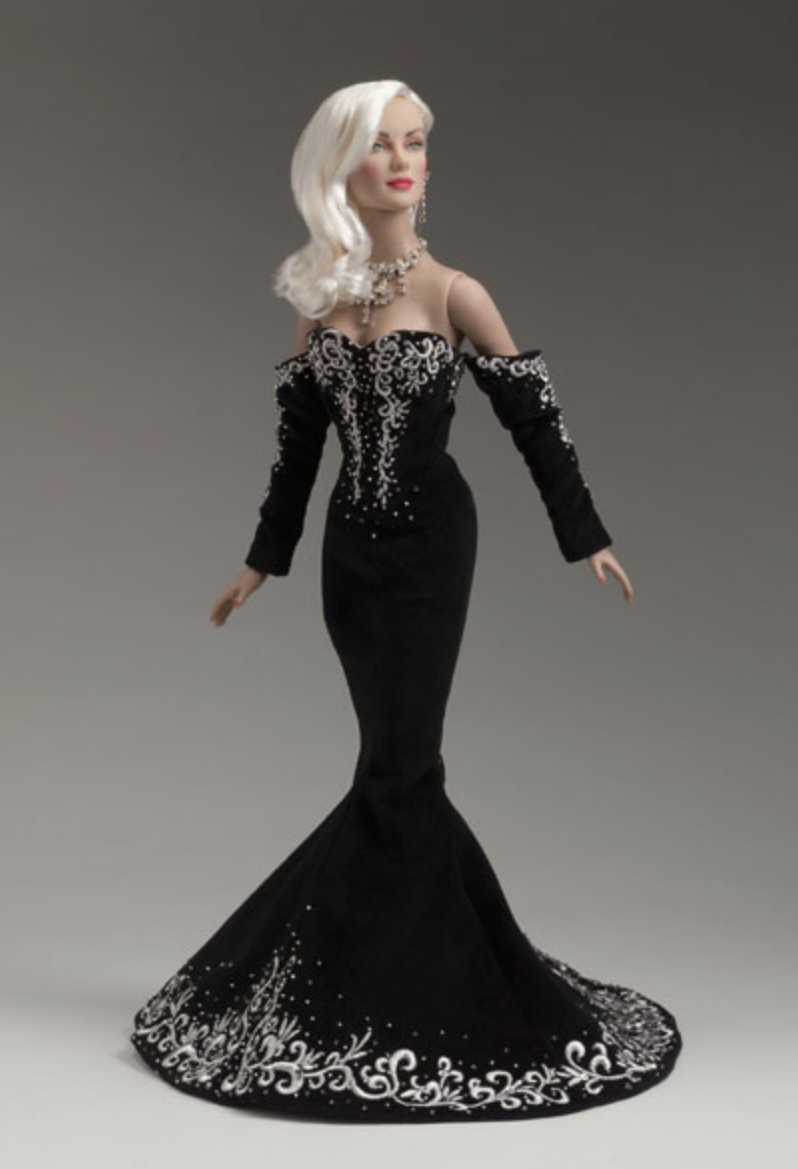
First up is Alexandra Fairchild Ford, a doll from 2000. On the left is a pic of this doll still in the box. On the right, mine is unboxed and in all her splendor.
Alexandra Fairchild Ford 2000 Museum Gala
This is from the first year of Alexandra Fairchild Ford dolls. She has no articulation in arms or legs, but I think she’s pretty. Since this one had been in the box all these years, her taffeta skirt was a bit creased – it’s longer than the doll is tall, so it covers the stand. It also has to get jammed into the box a bit when she’s packed up. The humid weather we’ve had lately has helped the taffeta to relax.
The AFF dolls have particularly nice clothes, IMO. This taffeta skirt has beads and a bit of embroidery on it, as well as having a tulle underskirt to make it stand out. It’s worth an attempt to copy. The knitted sweater opens at the back, and I’ll be taking it off the doll to figure out how to replicate it. The jewellery was packed separately – a necklace and a wire bracelet – so I put them on. She also has a purse with a beaded handle but since her wrists don’t bend, she doesn’t hold onto it well.
The AFF dolls also have eyelashes, which is kind of neat, and this one has a bellybutton stud. You can see her eyelashes a little better in the right picture.
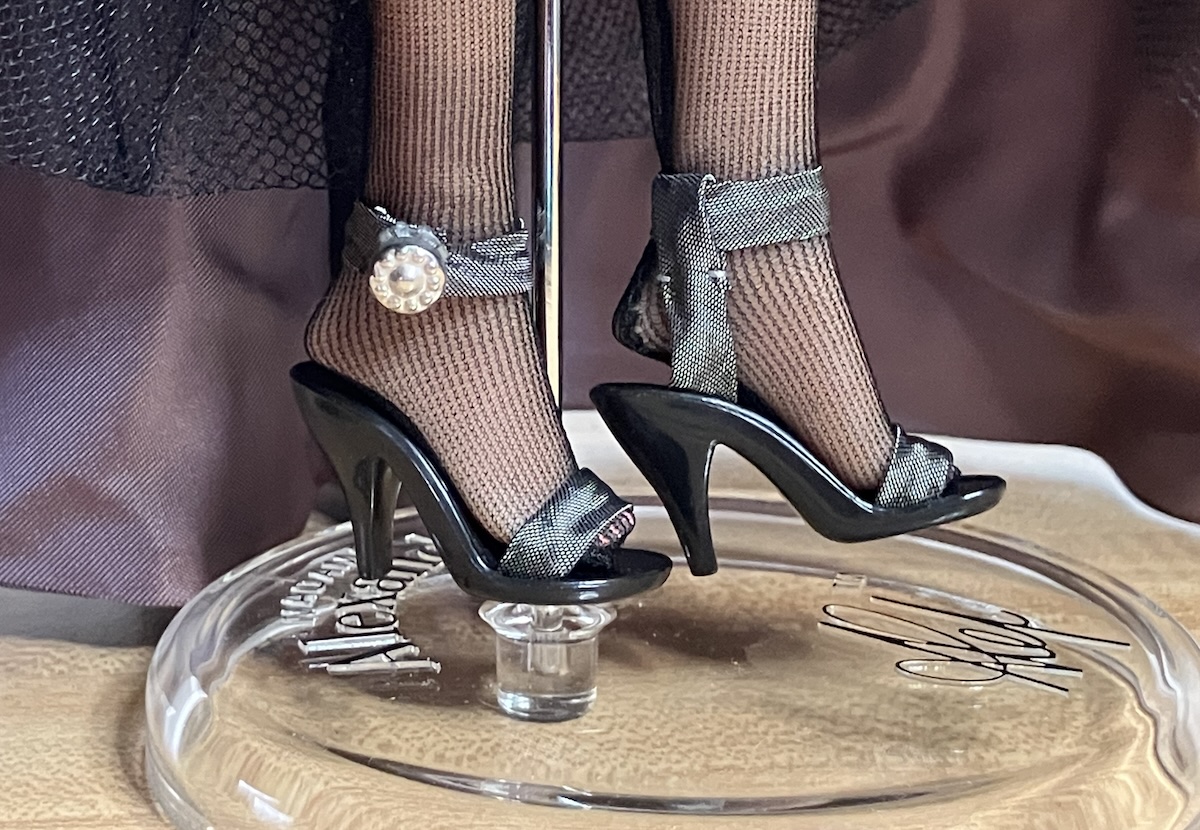
She also has thigh-high black stockings with a back seam, and a pair of shoes. I’ve seen a lot of people trying to make shoes for their 16″ dolls on social media lately, and these have a design that could be copied if you had the shoe bases. It’s a bias tube pressed flat (although you might be able to use a 1/4″ ribbon) and there’s a metal snap on the strap under the shiny bead.
The trick, of course, is finding the shoe forms.
Another interesting detail in that shot. You can see that the skirt is lined in a contrasting taffeta. It’s shot taffeta, with the mauve in one direction and a pewter similar to the outer skirt in the other direction. All the little details. 🙂
2004 Daphne Black & White Ball
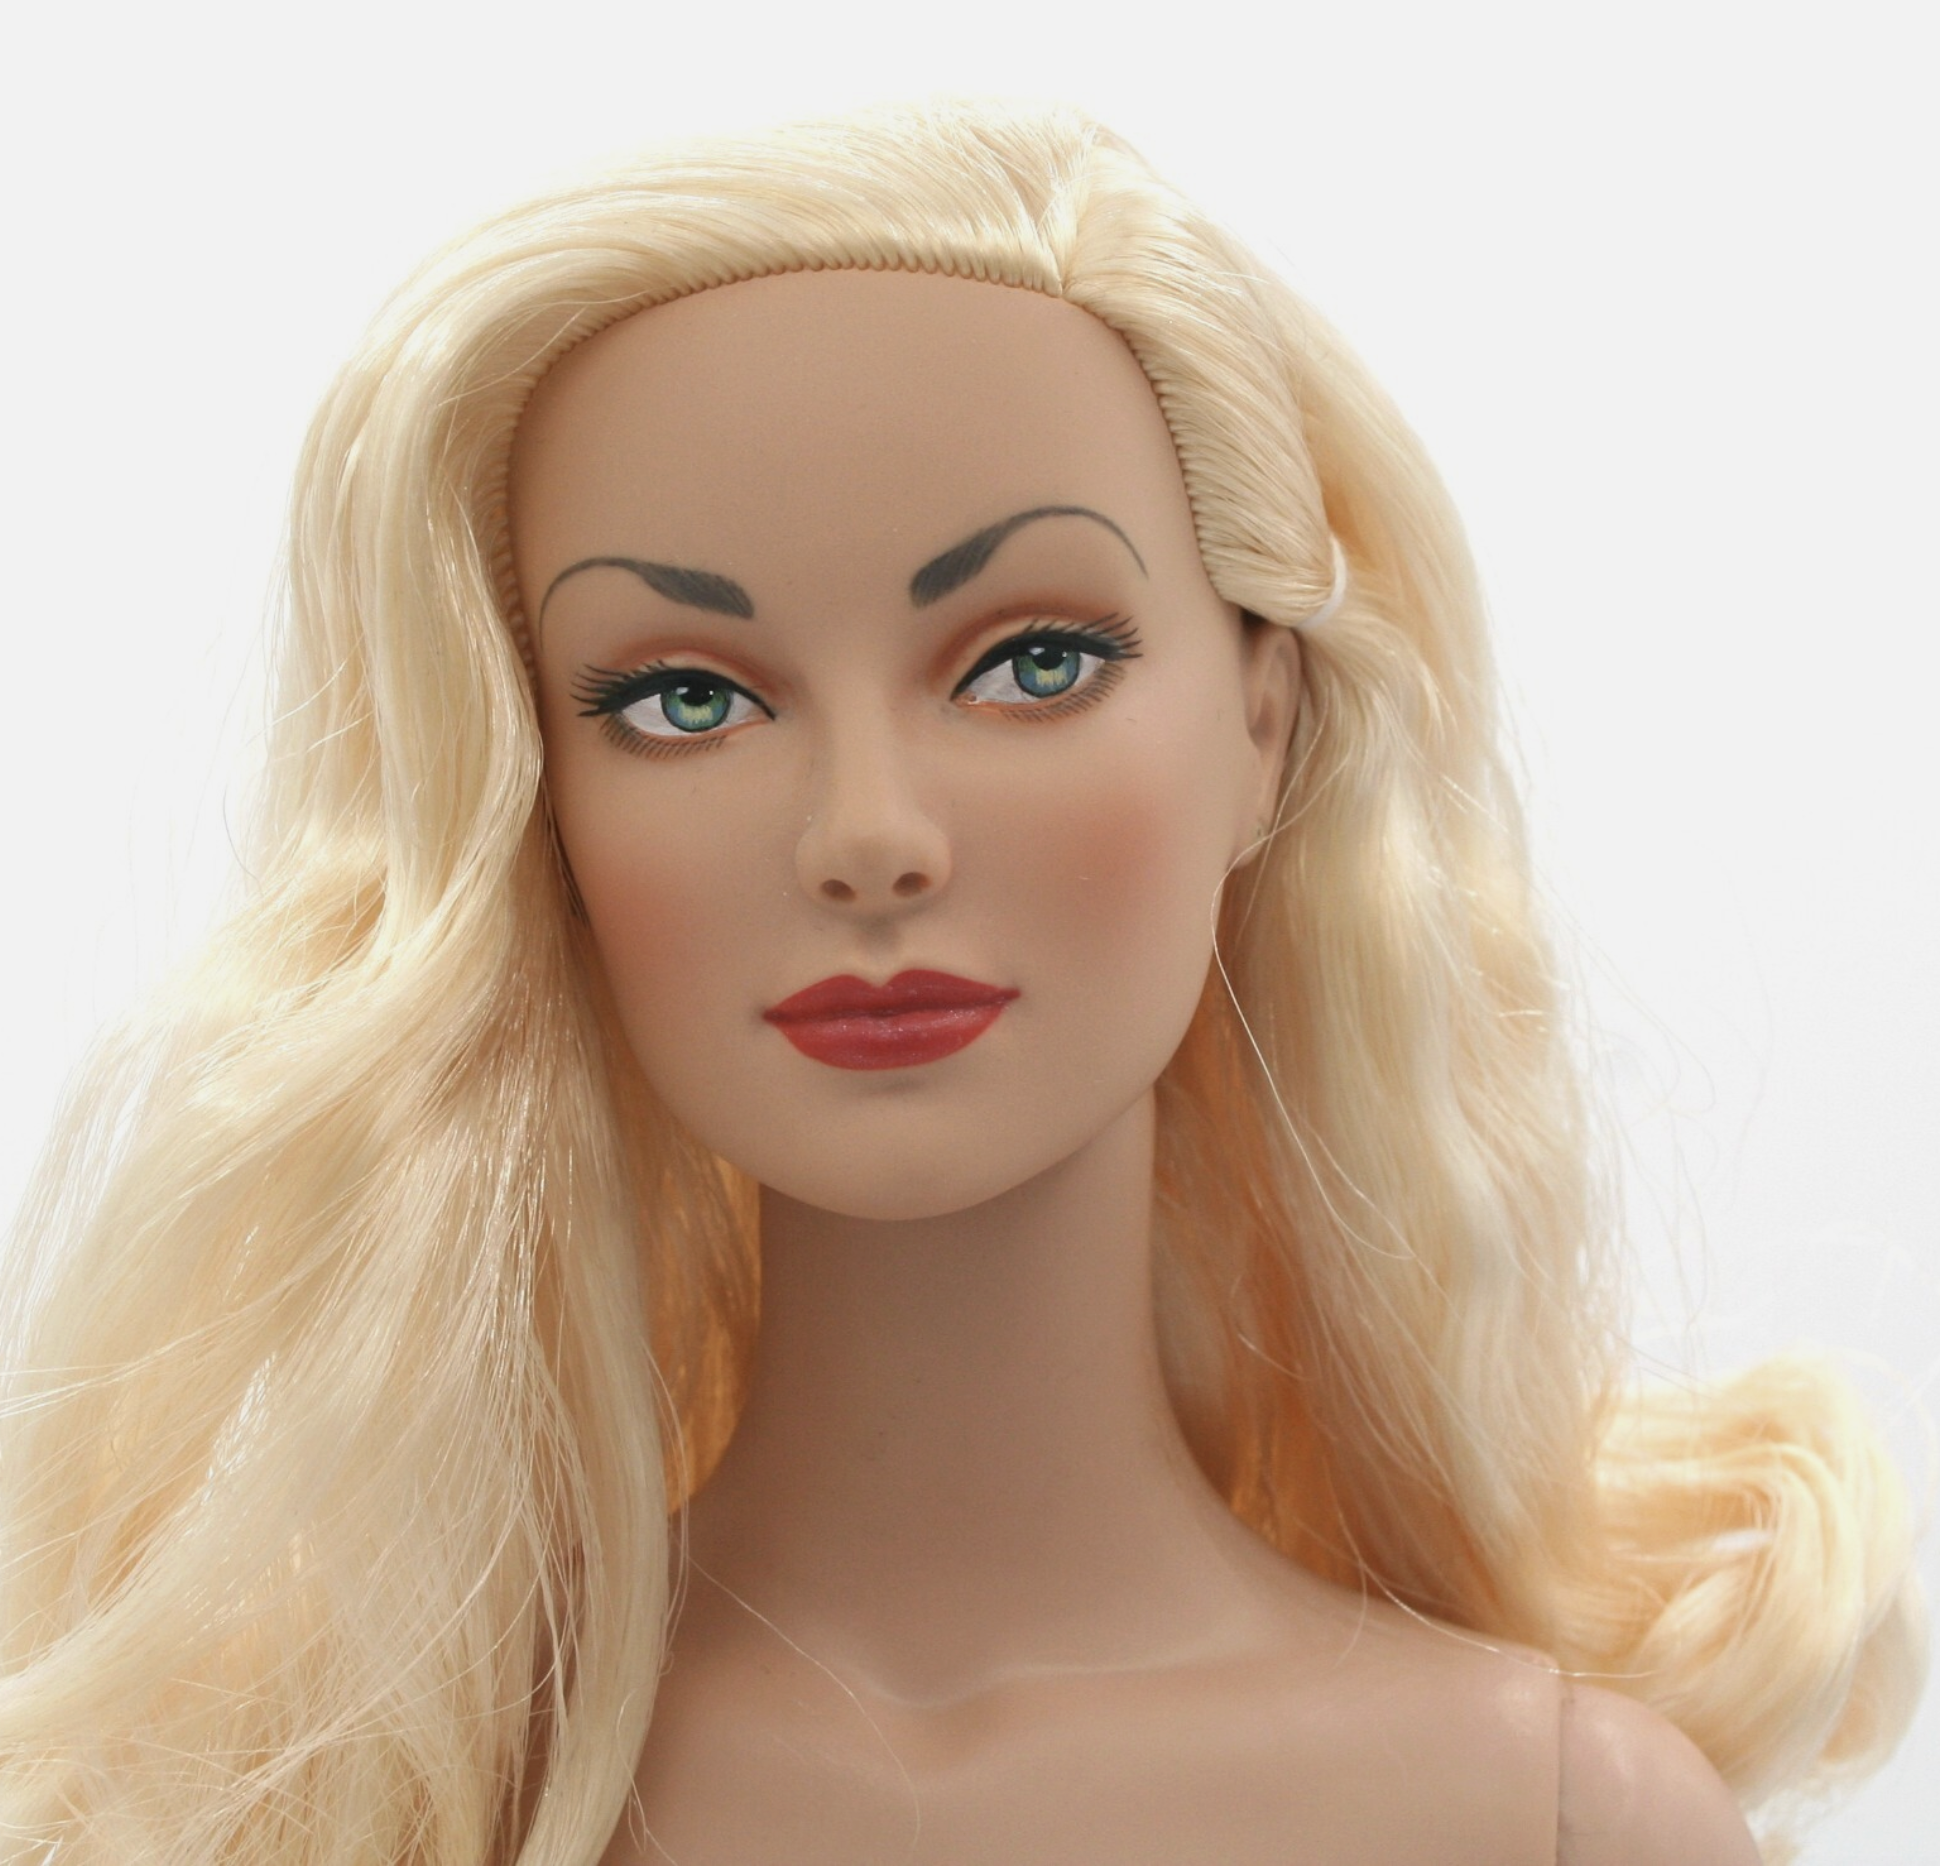
Next up, a Tonner doll. This is the first nude doll I’ve purchased. Here’s her official photo, although I don’t have any of her clothes or accessories. She’s Daphne Dimples Black & White Ball from 2004.
I’ve always thought she had a beautiful face sculpt, but she’s hard to find in the wild and often pricey.
So, this time, I bought a nude doll. I’ve been wanting a girl with long blonde hair – my two blonde Tylers have updos – and I like the vintage look of her make-up. This character is a rival reporter to Brenda Starr and a lot of her outfits are wonderfully retro. You can see them on the Dreamcastle site right here – mine is the first Daphne.
Here’s her picture from the listing:
She is taking the US tour typical of packages shipped under ebay’s international shipping program, but I’m hoping she turns up soon. I immediately thought that she needed a cheongsam, maybe because she does reminds me a bit of Kate Capshaw in Indiana Jones and the Temple of Doom. When I work out the cheongsam (and she arrives) I’ll show you both. (Let’s hope she doesn’t start singing Anything Goes in Mandarin.)
Another post about the girls this week. I’m knitting for myself, too, but it takes a lot longer to finish up a project. Right now, I’m knitting the sleeves for a cardigan in black Kidsilk Haze, using the Hebrides pattern. I’ve knit it twice before, and it’s a gem. These little jewel-necked cardis aren’t terribly exciting, but I do get a lot of wear out of them. I’ve wanted a black one for a while, though this may be the last time for black Kidsilk Haze to jump onto my needles. I have the fronts and backs done, and will pick up the buttonbands in daylight on those 2.75mm needles.
I also finished the Storm at Sea quilt, which feels like a huge accomplishment. It’s been a finished top and unfinished quilt for so long. I’m working on the hand quilting for the Pineapple Star – just two corners to go, then I can bind it. It’s time to get all these unfinished tops done.
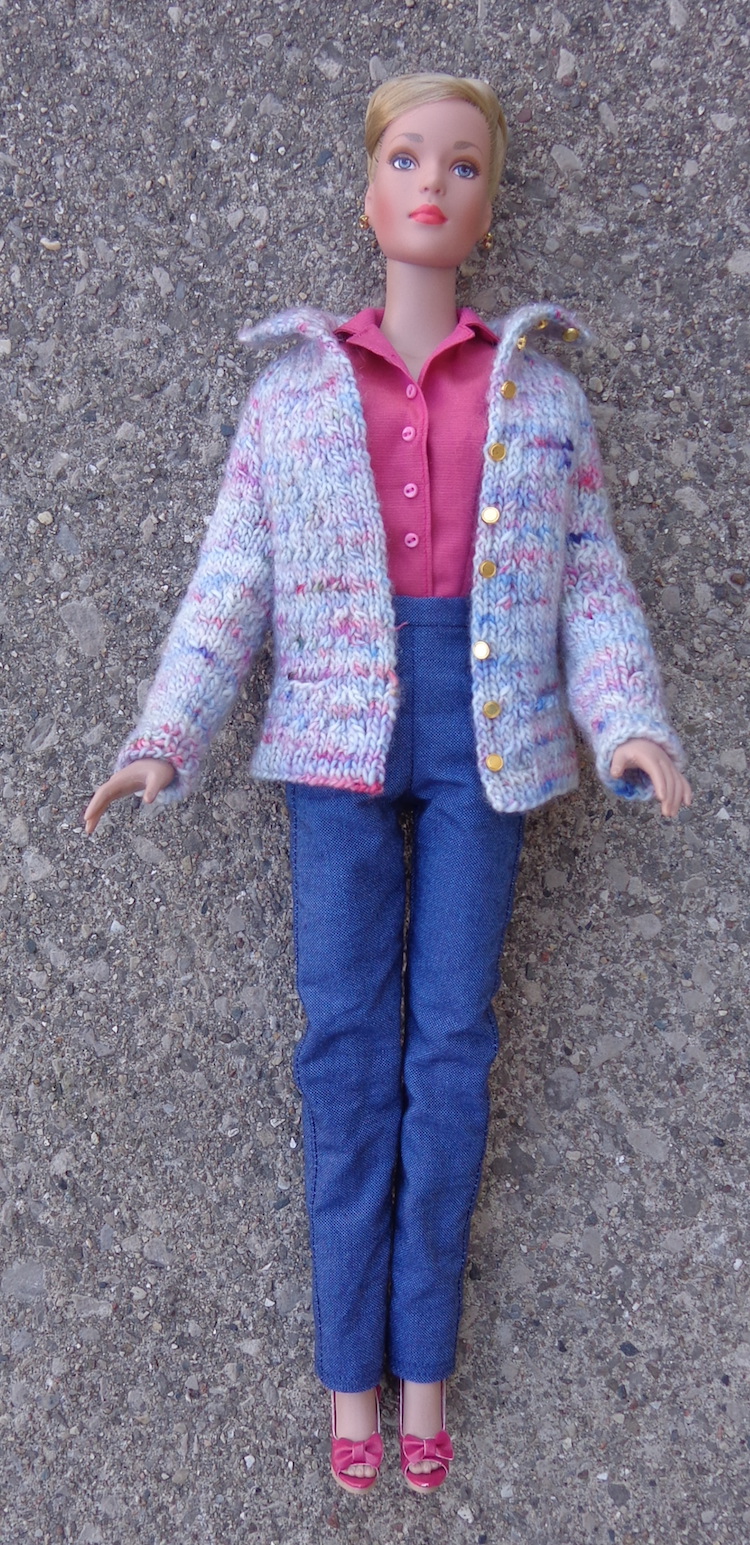
In the meantime, I finished a little top-down cabled cardigan for the girls and that’s what we’ll look at today. Here’s Tyler modelling it, along with the top from McCalls 3701 and pants from Tyler Wentworth 3522.
I didn’t have a pattern for this, just cast on with sock yarn and made it up as I went. I kept notes so I can do it again. I also kept the cables simple on this one – it’s a two-stitch cable with a purl stitch in between each one – so I could keep track of the counts better. Now that I’ve figured them out, the plan is to make another with more elaborate cables. Those are working buttons with buttonholes, though the small holes are tricky to find.
My favorite detail is the pockets in the fronts. You can just see the one on the left side (the doll’s right). I put the stitches on a holder where the pocket should go, then cast on the same number in the next row. That gave me a slit. I continued to the hem and finished the body of the sweater, then went back to those held stitches. I knit down to make a square, then sewed its edges to the inside of the sweater. Pockets!
You can see the cables better on the back of the sweater, as well as the single stitch on the raglan lines. I worked purl-knit-purl on each raglan line, and increased before and after it. As soon as I had two stitches for a new cable, I started one. The cables are turned in opposite directions on the left and right, then the center back cable is four stitches on each side of the central purl stitch.
The wool is some leftover sock yarn and I worked on 2mm needles. The only change I’ll make when I knit it again is to add a few rows to the collar – it wants to curl up – and I’ll play with the cable patterns, too.
These are the patterns for the sewn garments.
McCalls 3701 for 16″ dolls
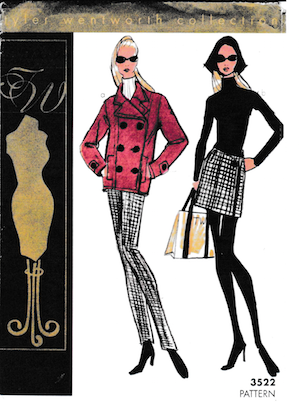
Tyler Wentworth 3522
The pink shirt is made of French shirting cotton, which is really lovely and fine. The weft is a slightly different colour, so it changes in the light. (Yes, I made a shirt for myself of this fabric once upon a time.) It’s actually a bodysuit but made of woven instead of knit. It was a little tricky to turn those collar points but a nice little project. Those buttons don’t work – there are snaps behind them to close the fronts.
The pants from 3522 are the ones I’ve made multiple times in pleather for the girls. This pair look a bit like jeans thanks to the fabric choice, but I’ll need to add pockets to the back of the next pair to complete that illusion. They are quick basic pants to sew.
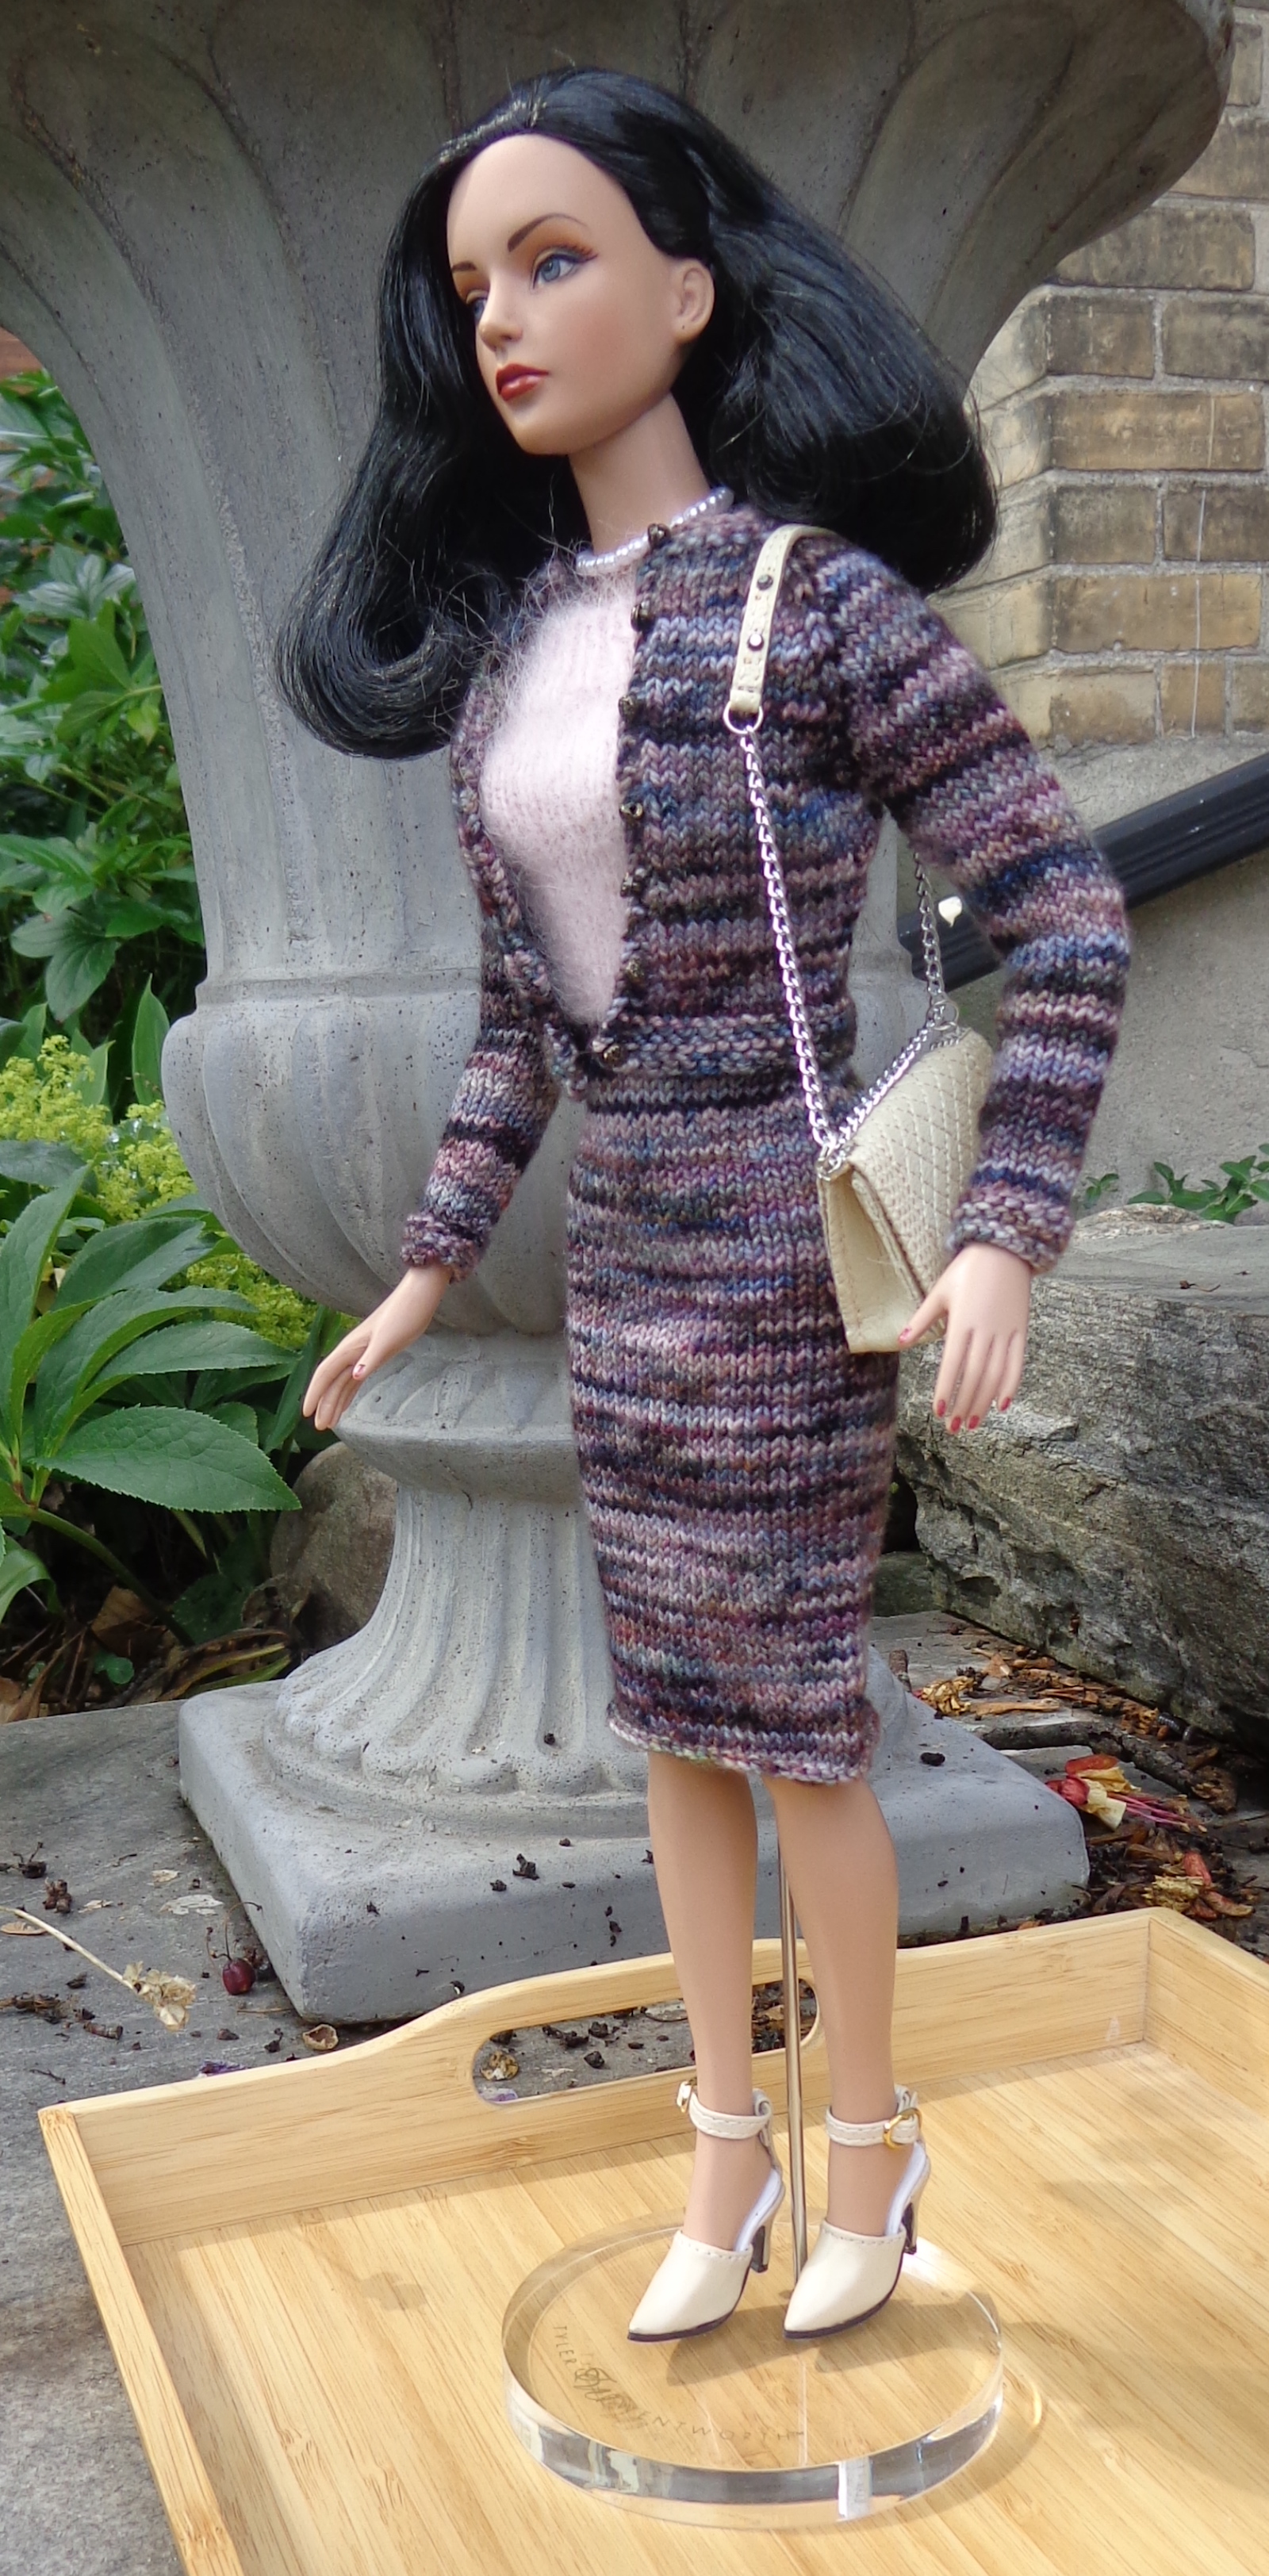
Last summer, I showed you a top-down cardigan I’d designed and knit for the girls in many sizes, from Monster High to Barbie and finally to Tyler.
I’ve also showed you this Tyler-size version. It’s knit of Koigu KPPPM in colourway 513P – KPPPM is 175m for 50g. I knit this one a little longer and also did some back neck shaping to make the front of the collar sit better. It’s modelled by RTW Rouge Sydney Chase, with a matching dress.
For the dress, I used the free pattern T-Shirt Dress for Tonner Dolls by Samira Jessica (that’s a Ravelry link) but divided the color. It’s a top-down knit with cap sleeves that are created when you cast off for the arms. I started with Sugar Bush Drizzle, held double, in Pink Puddle. At the waist, I changed to the Koigu KPPPM. I didn’t rib the skirt (as the pattern instructs) but just knit it in stockinette, then purled one row and cast off purlwise. I thought that might keep it from curling at the hem, but the hem still wants to roll up, even after blocking. I also added a little kickpleat at the center back. 🙂
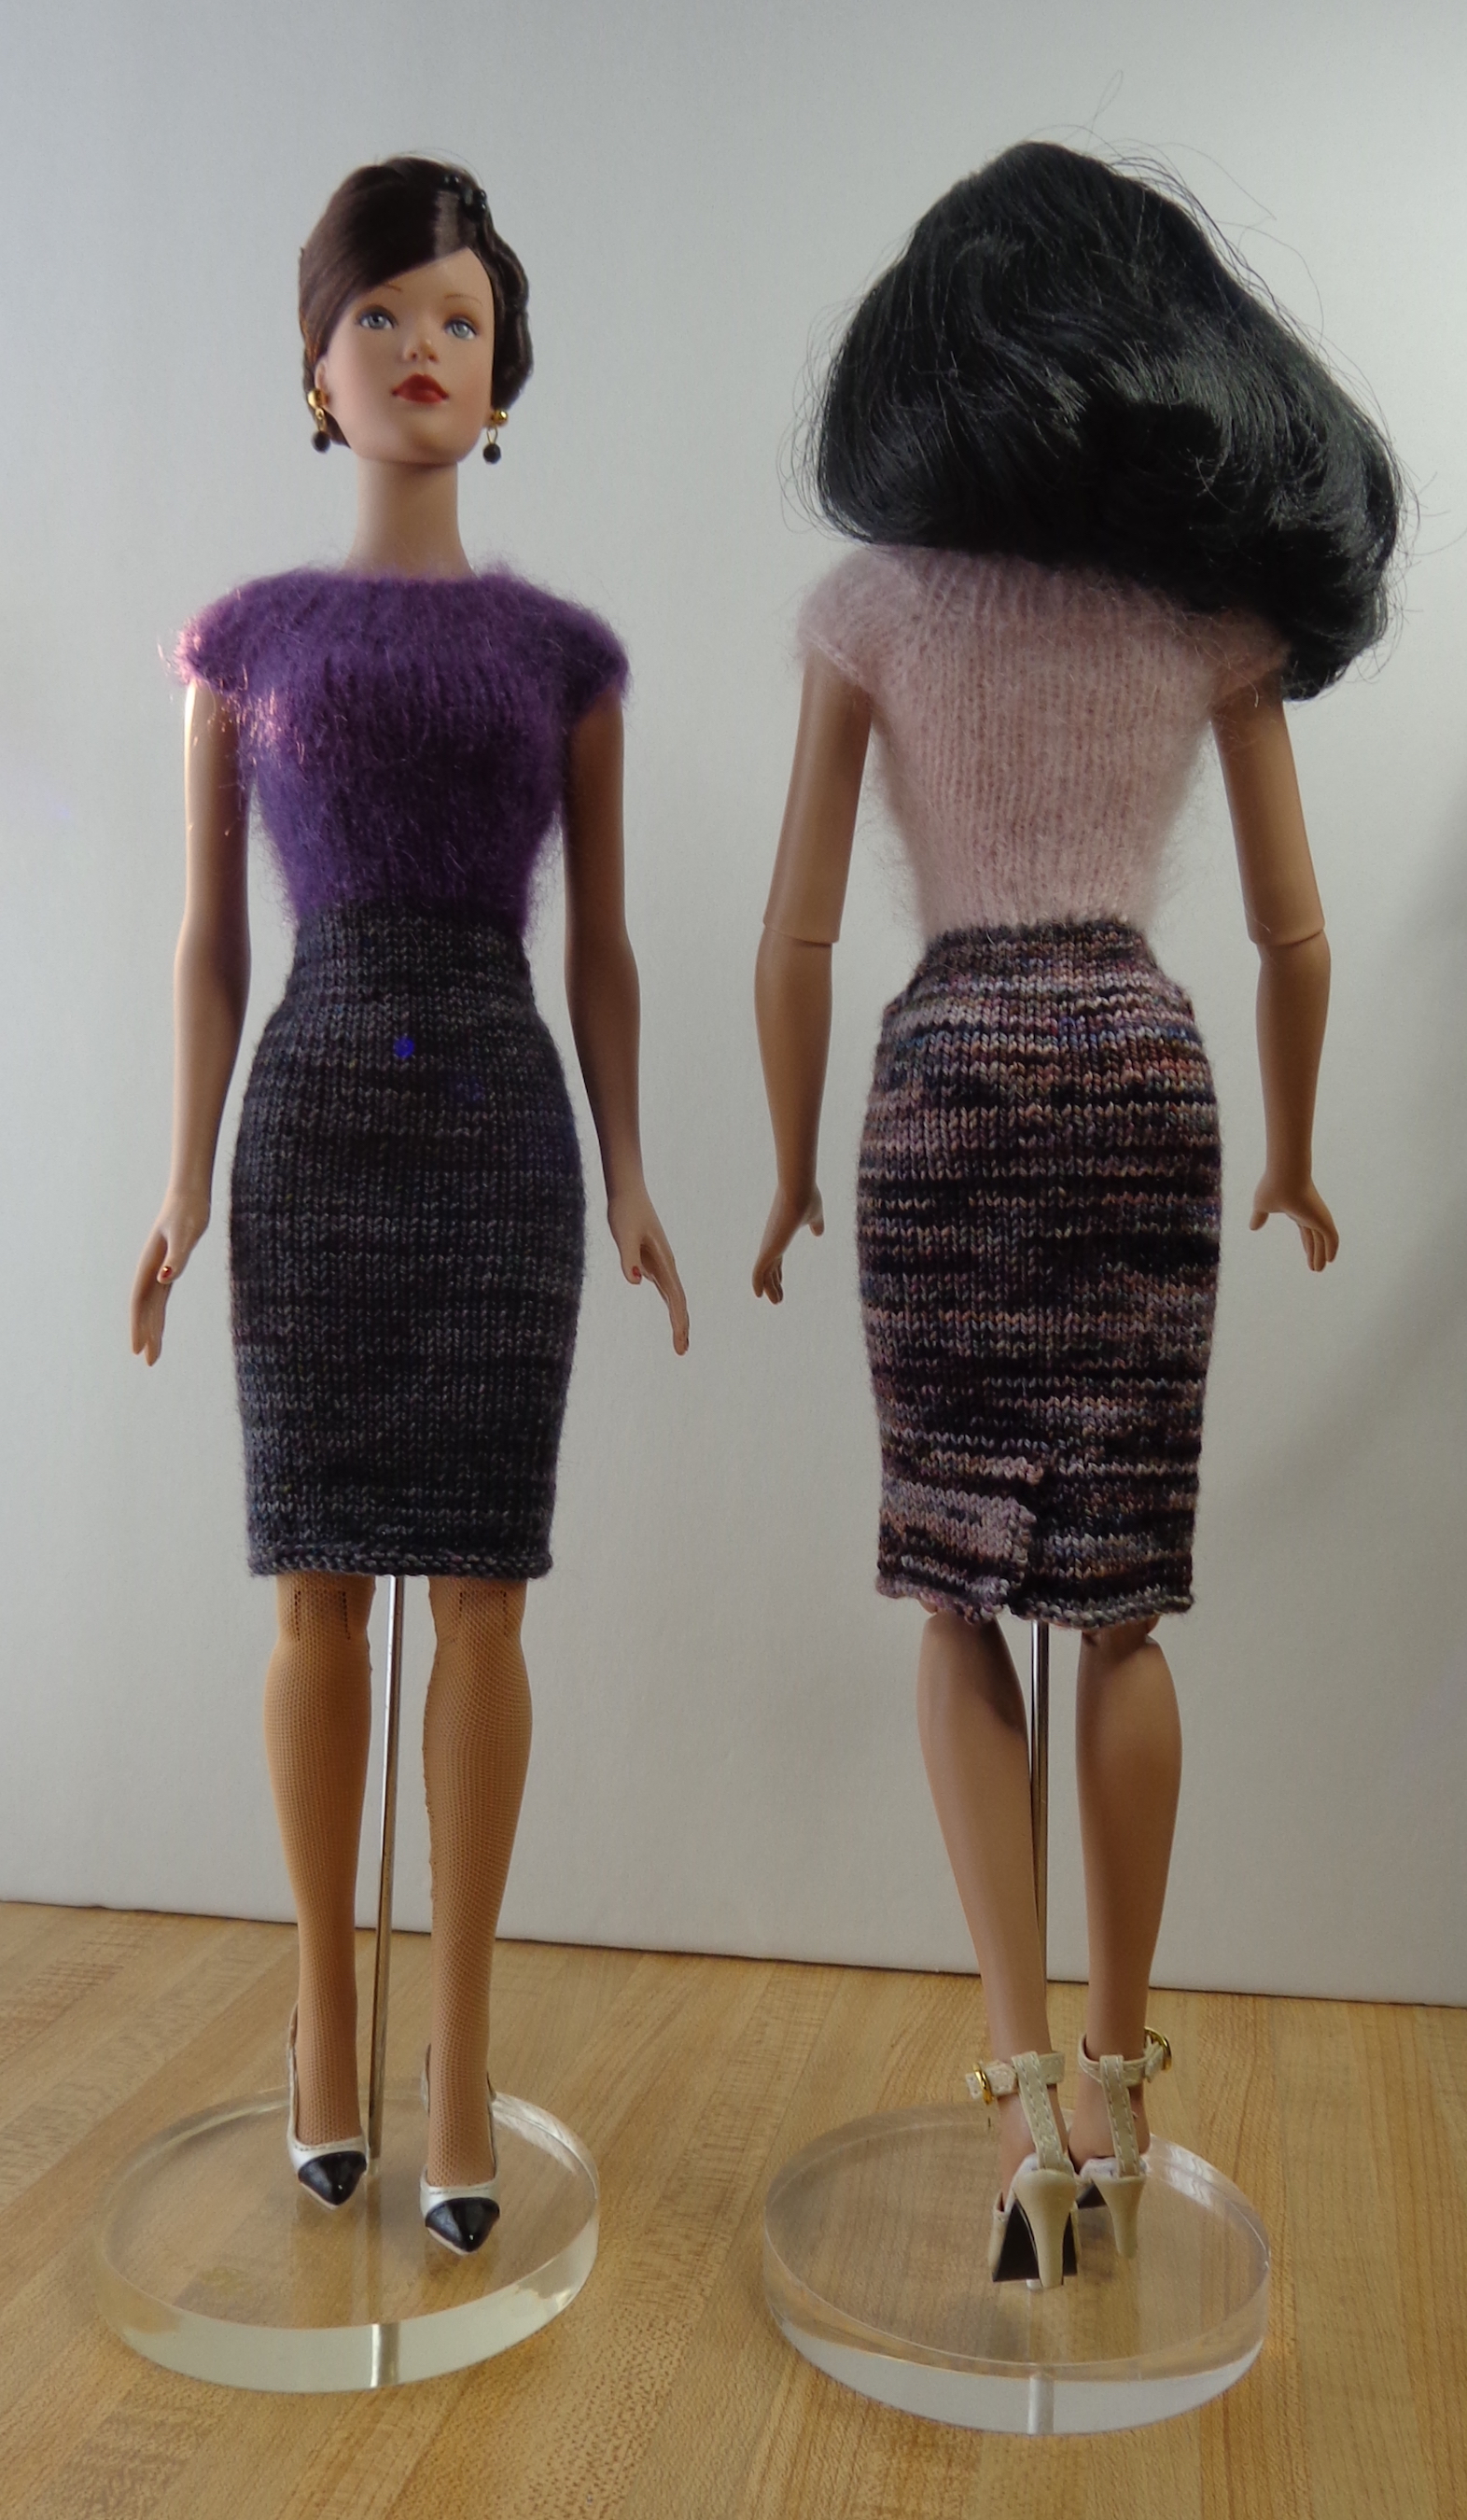
I quite like this little dress, so I made a variation of it for Tyler in a different colourway. Here are the two of them together – Sydney is still wearing the first one – the light isn’t as good in my office this time of year as it was on the steps in the summer, but you can see the little kick-pleat on Sydney’s dress. Tyler has one, too. (Don’t you love Tyler’s shoes? They’re sling=backs, too. I want a pair myself.)
The top of Tyler’s dress is Sugar Bush Drizzle held double – the colourway is Monsoon Mauve – and the skirt is a fingering weight yarn leftover from a sweater knit for me, The Loving Path Fibre Arts High Twist Sock. It came with a dyed-to-match Kidsilk Haze type yarn, The Loving Path Fibre Arts Aura Lace. I held the two together to knit a Felix for myself. (Those are Ravelry links., the last one going to my project page.) The colourway is Bewitched, a glorious mix of greys and blacks with flicks of purple and green. No photograph can do it justice.
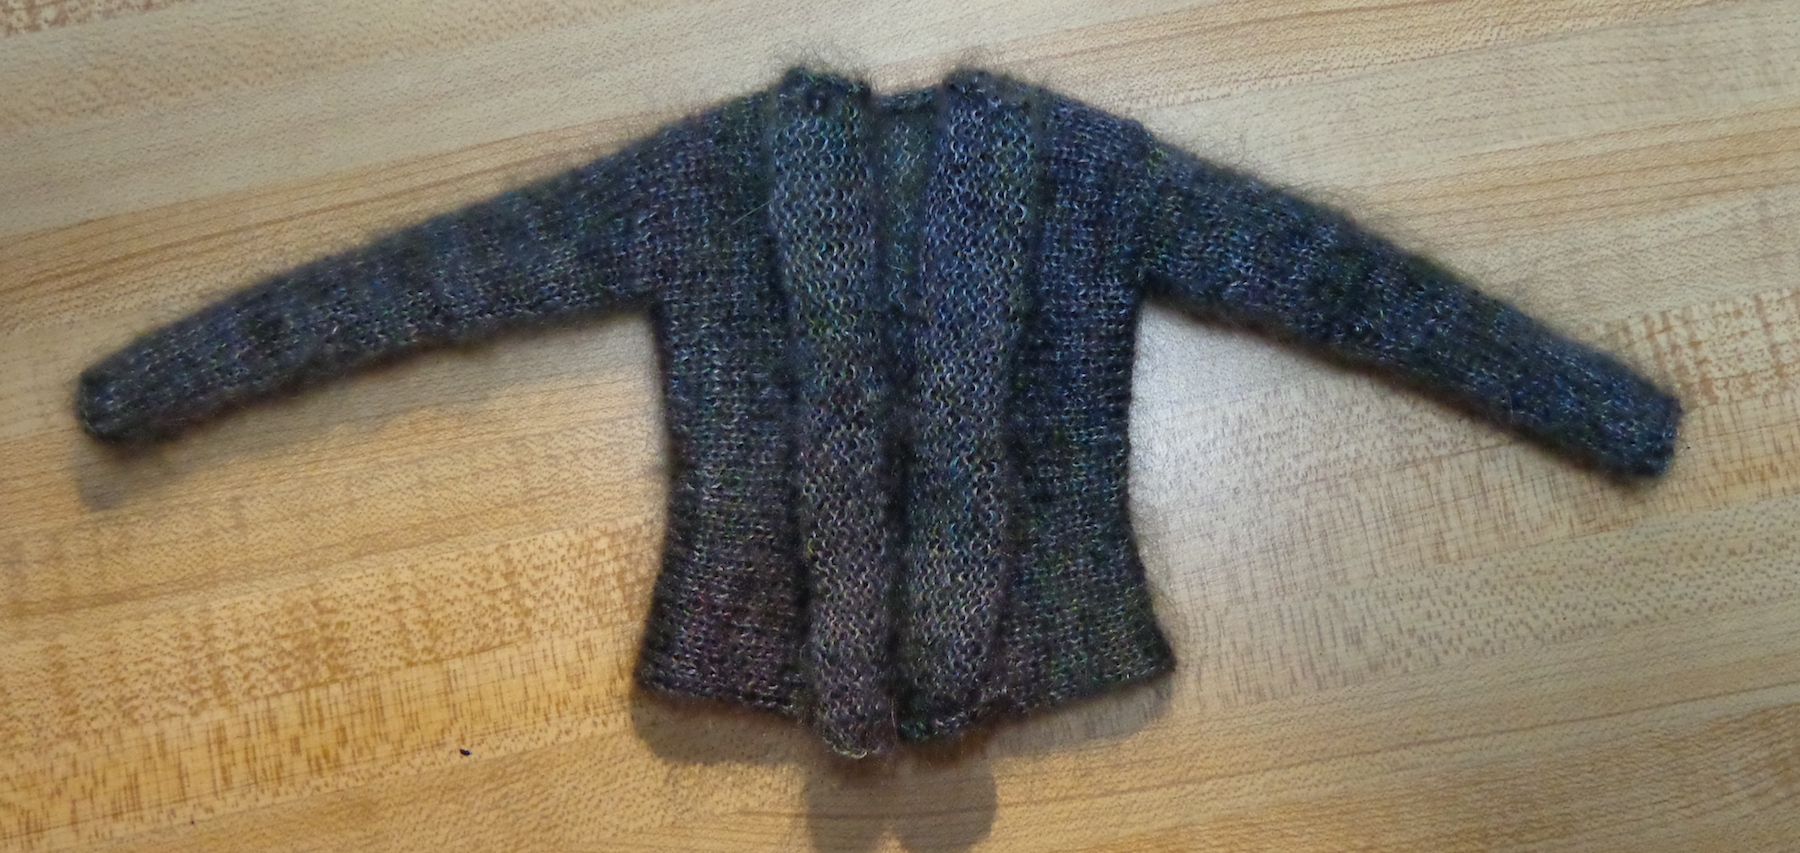
I wasn’t so fussed about the way the top-down cardigan looked on Sydney. It makes her shoulders look quite broad, which wasn’t the feminine look I was after. So, for this one, I knit a side-to-side cardigan in the Aura Lace to coordinate with Tyler’s new dress.
Here’s the sweater laid flat.
It has been blocked but those fronts want to roll. This was a bit of a surprise as I’d thought they might drape – sweaters knit like this in human size have cascading fronts. But on these needles, the fabric ends up too stiff to cascade, thus it rolls.
I knit the sweater from front to front – casting on at the front edge, knitting to the side seam, putting the sleeve stitches on a holder, knitting across the back, putting the other sleeve stitches on a holder, knitting to the front edge and casting off. I then sewed the shoulder seams, picked up the stitches for one sleeve in the round and knit down to the cuff, then repeated for the other sleeve. The only seams were the teeny ones at the shoulder.
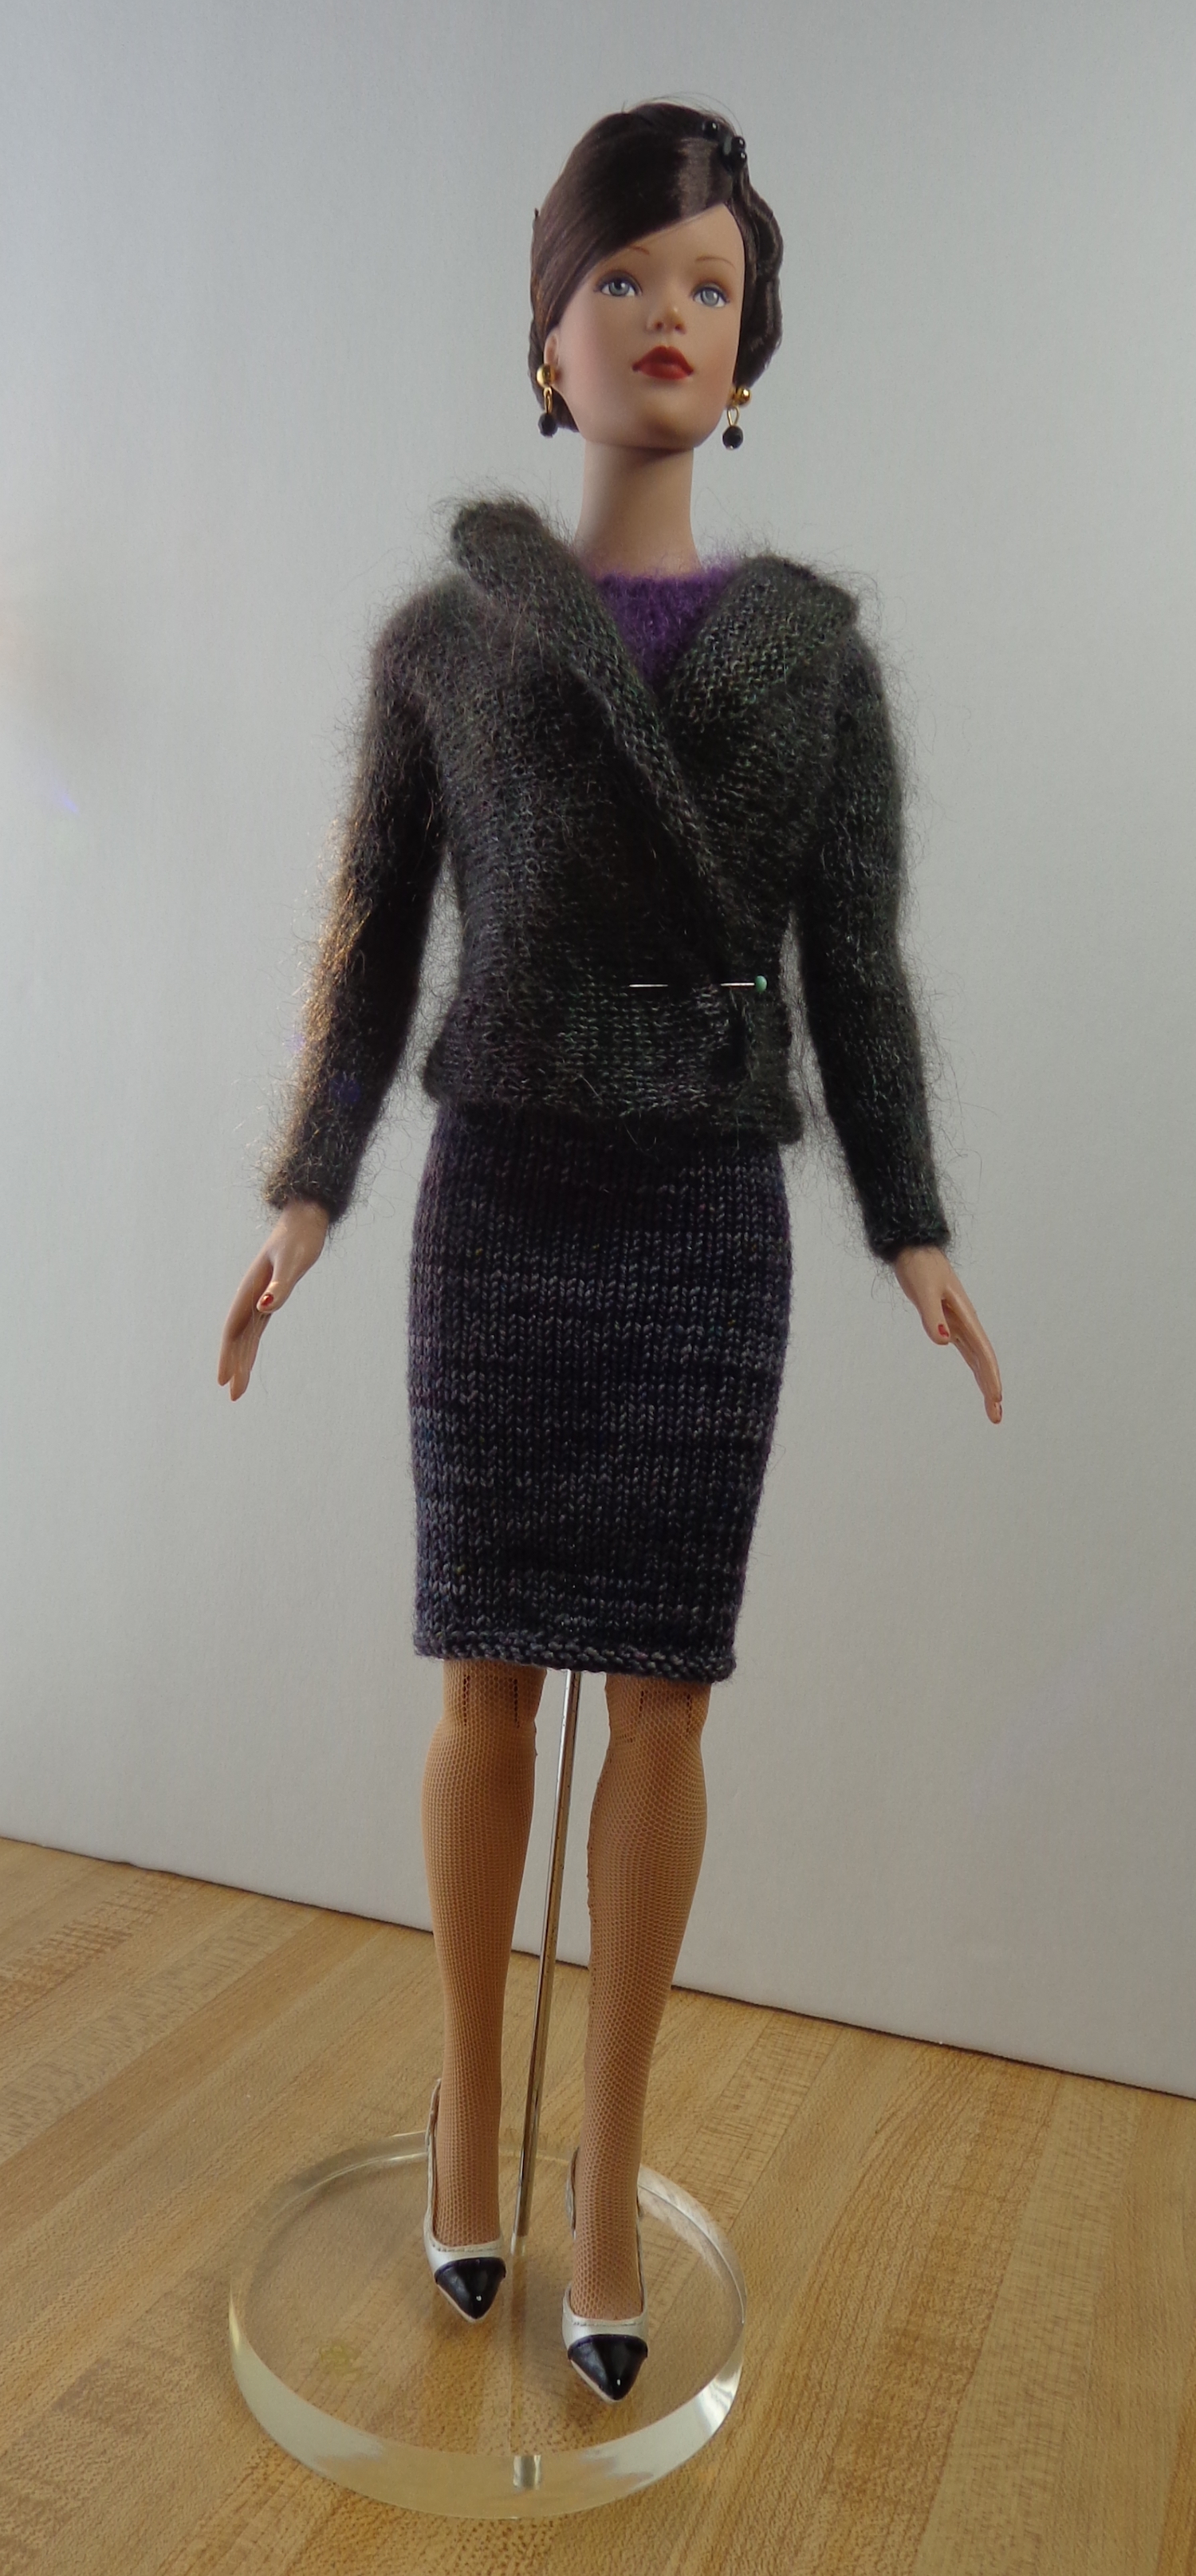
Here’s the sweater on Tyler – I had to cover her hands to get it on, btw:
I put a pin in it because I’m still thinking about the fastening, since it won’t cascade. It wants to be a double-breasted sweater jacket. With a pin at the waist, the fronts curl back like lapels. I put a clear snap at one side and three little black beads on the outside. The other side will stay tucked under when it’s closed. It’s a little more formal look than I expected, but this Tyler seems to like it.
I’m going to knit another version, but from cuff to cuff and without the extended fronts. I may pick up a collar afterward, and am thinking of adding a cable, too.
I have a sweater for myself to show you next week. 🙂
Happy new year! I’ve been really busy so far this year and have fallen behind on my weekly posting. There were also a lot of projects not-quite-done, but I’ll try to get back on track now.
First up, some sewing for Tyler.
I stumbled across these in my search for sewing patterns for Tyler Wentworth. They were published in 1999, so they would have originally been printed patterns. They’re pretty tough to find in that format now.
This is a picture from the archive at Dreamcastle Dolls, a fantastic resource for identifying and dating Tonner Dolls, accessories etc. These patterns are shown as available accessories from 1999 and these are the three that you can find as digital downloads on Etsy.
From the listing at Dreamcastle, it looks as if there were two more patterns at least in the planning. I’ve never seen these elsewhere, so it’s possible they were never actually published. (??) Too bad – that blazer and raincoat at the far right look just about perfect to me!
Today, we’ll talk about TW 3522, the Weekend Wardrobe. This pattern includes a peacoat, pants, a turtleneck, skirt, tights, socks and a tote bag. In that way, it reminds me of those Vogue Wardrobe patterns, which I like a lot, the ones that give you enough pieces to make a little capsule wardrobe.
As usual, I printed it out at 100% and sewed a muslin of the coat and the trousers. They fit, so I was off to the races.
I made a few changes right away. This pattern has a 3/8″ seam allowance – usually doll patterns have 1/4″ seam allowances, so that left a lot of extra fabric, especially around the curves. Also, the cutting line is drawn thick, so if you cut on the outside of it, the seam allowance gets close to 1/2″. After a battle royale to get the sleeves inserted in the coat without tucks on the muslin, I decided to trim all seam allowances to 1/4″ on my pattern pieces.
There are a lot of nice touches in these patterns. The trousers have a faux slash pocket at the front. The jacket has welts for faux pockets (the doll can’t put her hand in the pocket like the drawn model…although that could be changed. Hmm.) and there are bands on the sleeve cuffs. (I think they’re drawn backward in the illustration and did mine the other way, so the tab goes over the sleeve.)
Here’s Tyler in the whole ensemble.
I cut the good version of the pants from a very thin pleather in mauve. This came from I Sew For Doll and is the thinnest fake leather I’ve ever found – there are thickness variations between colours and the black is the thinnest of all. Each piece is 30 x 45cm – I used just over half to cut these pants for Tyler. There’s enough left to make pants for Silkstone B and maybe a bit after that. This is #12 purple.
Pleather doesn’t fray since it’s a woven base with the leather surface fused to it, so there’s no need to finish the seam allowances. I used a slightly longer stitch length than I would have otherwise, as the pleather surface tends to drag on both the presser foot and the feed dog plate of the machine – if it drags too much, the fused surface separates from the woven base. (Ask me how I know.) I tried a lighter embroidery foot but it made no difference.
I top-stitched the outside leg seam to keep the seam allowances to one side and to give the pants the look of jeans. The pants have a back opening, which looks fine when the doll is standing, but gapes open when she sits—as I so often do, I added a tab to one trouser back for a little extra discretion. These went together really well and I’m pleased with them. The waistband looks loose, but the pleather doesn’t stretch so the doll can be posed better this way.
The turtleneck is sewn of knit fabric and the entire back opens, closing with snaps. While I understand the practicality of this, it’s not my favorite solution. The one shown here is the third attempt – the other two are in the trash. My concern was finishing the seam allowances as jersey will fray and run. I tried to serge the first version, which is what I would do for a human-sized top like this, but the curves were too tight. I’m just not that accurate on the serger, so that was a fail. I did, though, learn that having the back entirely open meant that the top gaped open below the waist – it’s a knit fabric, after all, so it pulled open over the hips. On subsequent versions, I sewed a partial back seam, from the hem almost to the waist.
Here’s Tyler doing some push-ups so you can see the back modification to the top.
For my second attempt, I used the overlock stitch on my machine, but wasn’t any happier with that result. It was just too bulky. Number three was the winner – I remembered that I fuse knit interfacing to the hems on my t-shirts to stabilize the seam allowance, so I cut fusible knit interfacing into 1/4″ wide strips. I fused it to the seam allowances all around the pieces of the top – not the sleeve cap or armscye, since they need to be stretched to fit – then assembled the top using straight stitches. I stitched a second row 1/8″ inside the sleeve seam, then trimmed it. All the other seam allowances could be trimmed down to 1/8″ because they were fused. This worked brilliantly, and I used clear snaps to close the back of the top.
I extended the top for a dress cut of a different knit fabric, which Sydney is wearing here. I made Sydney a little belt, too. The center back seam on the dress is sewn from hem to the widest point of the hips, but I’m thinking it could have been sewn almost to the waist. Because the fabric stretches, that would still have worked.
The one detail I don’t love is the thickness of the turtleneck, especially where it overlaps to fasten in the back, but I don’t see a way around that. There’s a lot of layered fabric in a small area with the seam allowances. I trimmed them right down, but it’s still bulky.
I cut the peacoat of a fabric that looks like chalk-stripe wool in scale. (It’s probably polyester.) The collar is cut on the bias, so I seamed it at the center back to make it symmetrical at the front, as one would do with a human-size coat. That gave the collar a bit more bulk at the center-back, so I cut the undercollar of lining instead of the main fabric. This coat is lined with Bemberg rayon, which I think is perfect for the girls.
I also added a half-belt at the back to draw in the coat a bit. This makes an interesting problem since doll buttons are usually sold in packs of ten – I had to use only six on the front of the coat instead of the eight specified, because there are two on the cuff and I added two to the belt.
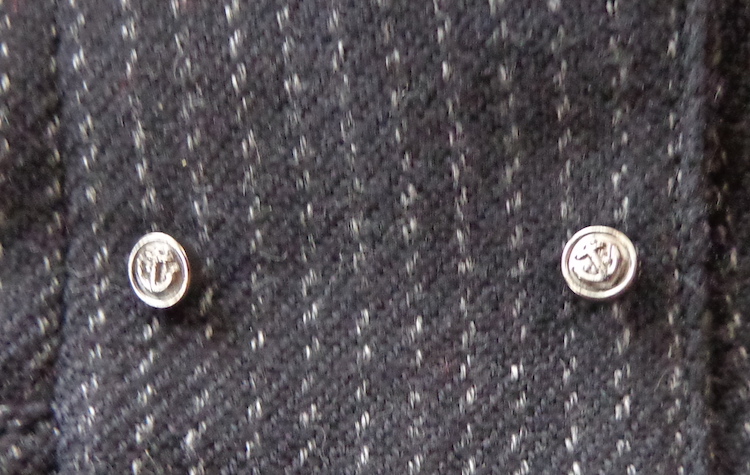
The buttons are adorable, IMO. They’re 6mm buttons with little anchors ordered from I Sew for Doll.
The tote bag is like a big LL Bean tote. I cut this one of grey pleather and lined it with a coordinating cotton print. (The pattern doesn’t include a lining, but it’s simple to add.) I even thought about adding a zipper since I dislike open totes when travelling, but gave up that idea (for the moment). The handles are satin ribbon, which snags a bit, and there are four beads on the bottom for feet. I added a charm, just for fun.
Finally, I knit a coordinating scarf in Kidsilk Haze Stripe, and Tyler’s ready for her weekend away. I still need to make the skirt.
I really like this pattern and am sewing some different colour combinations for the other girls. Weekend trips are more fun with friends!