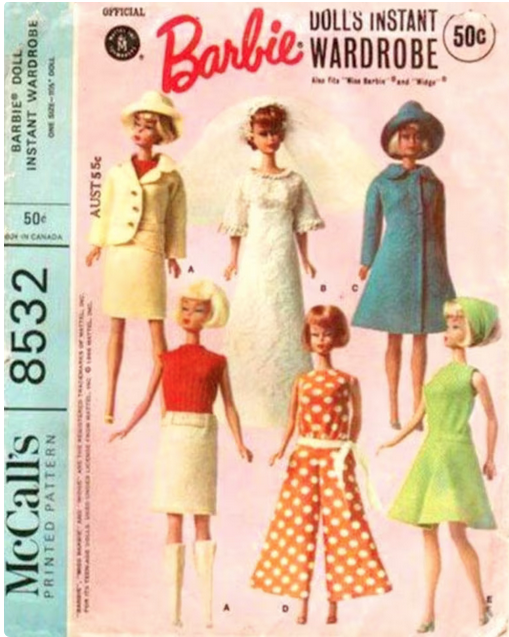
This is an older sewing pattern for dolls that I found on Etsy as a digital download. Once upon a time, my grandmother made pantsuits with palazzo pants for my dolls and I wondered whether this might have been the pattern she used.
After downloading it, though, I realized there was a very neat feature about the designs – the suit and the coat are made of felt, so there are no edges to finish. In scale, it’s as if they’re made of boiled wool. Hmm.
One thing that is good about this download is that there’s a tape measure on each page of the PDF. This should make it easier to ensure that the pattern pieces are printed to scale. More about that in a minute.
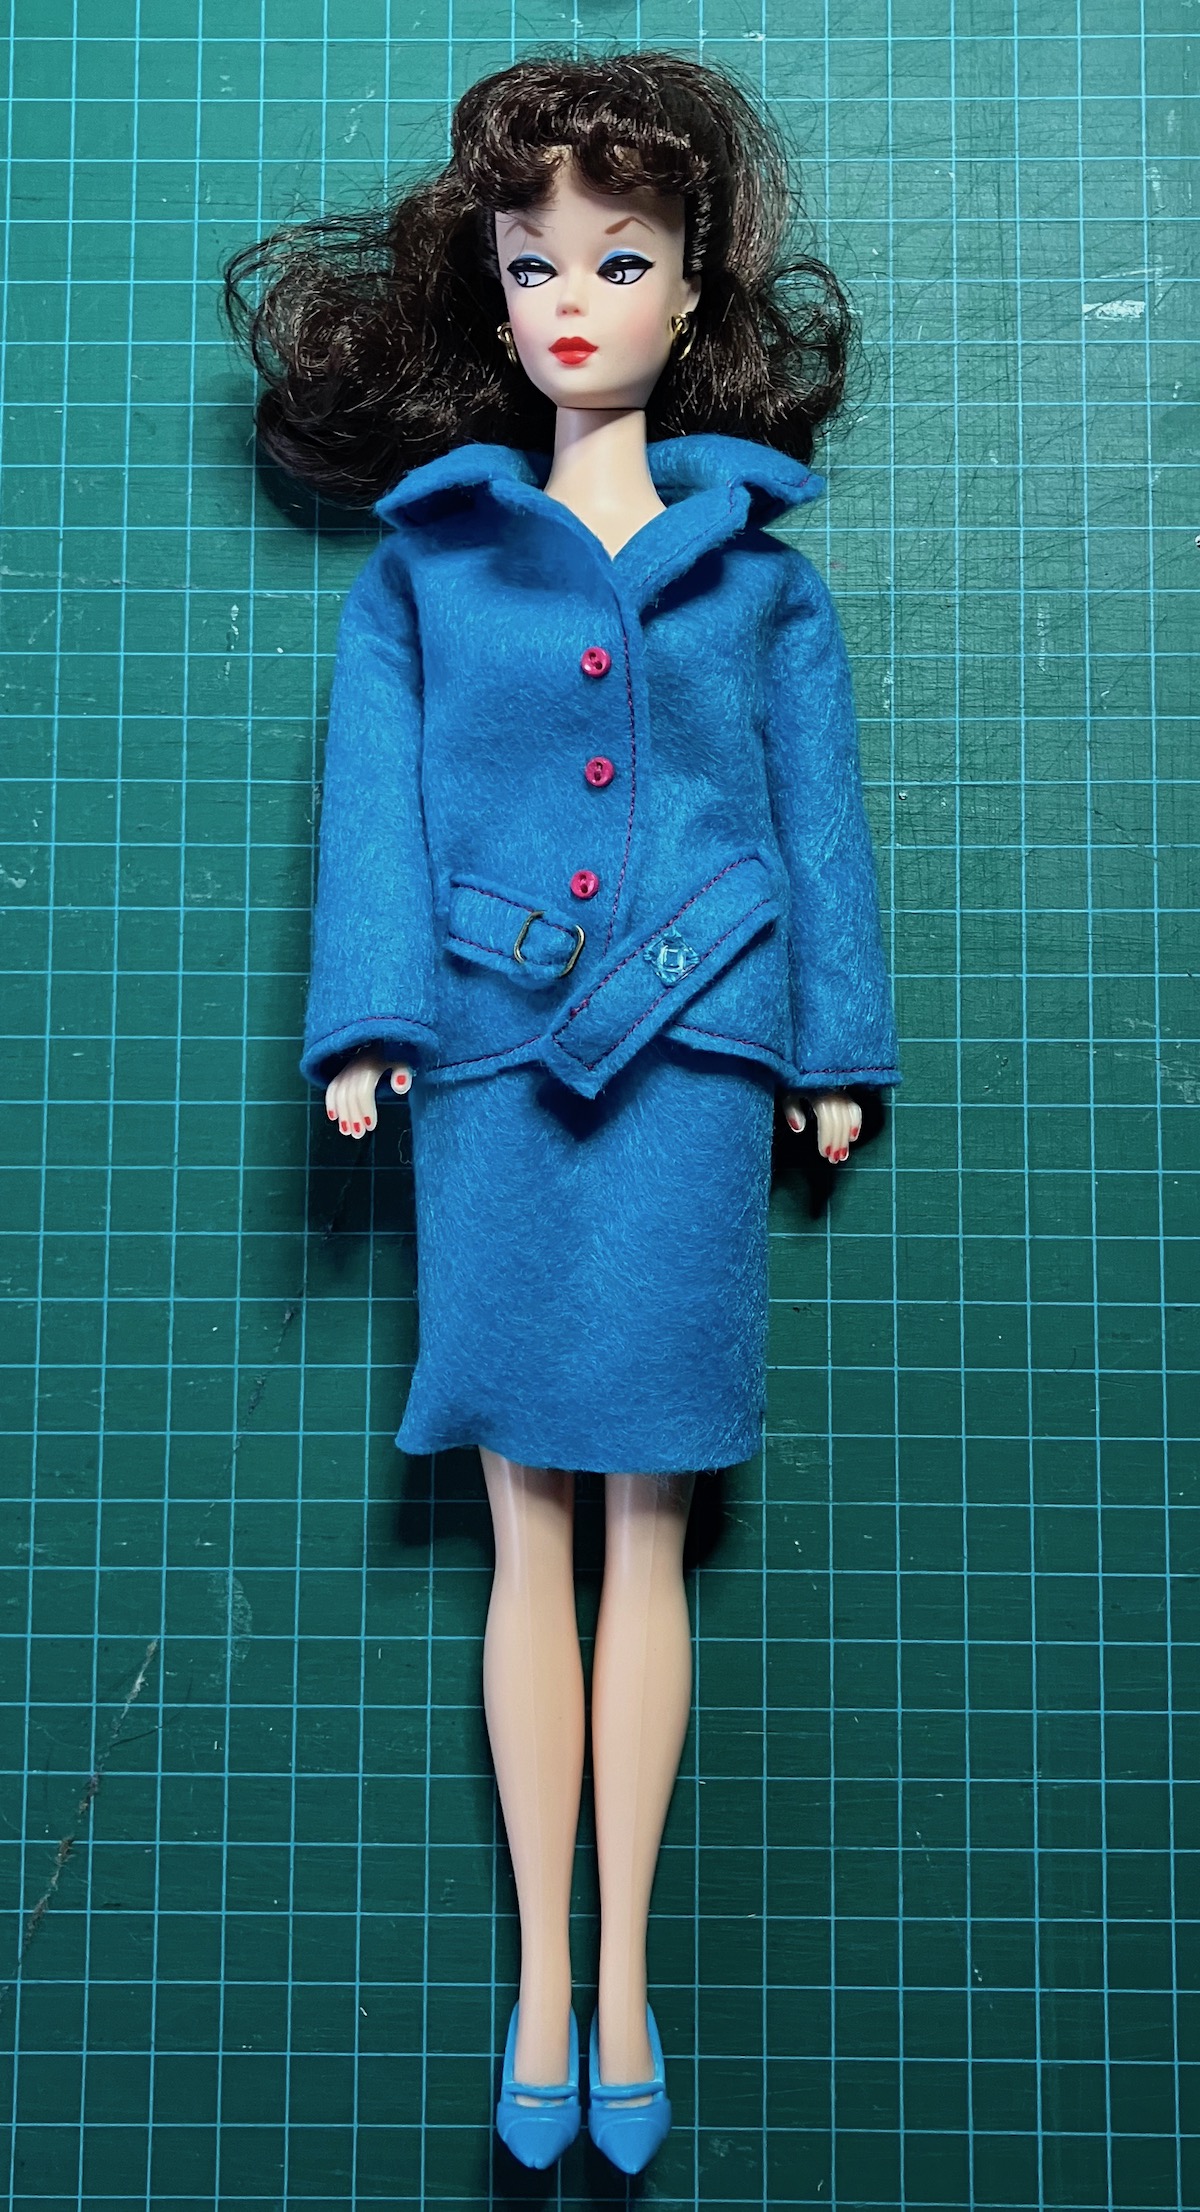
Here’s my first attempt at the suit. The jacket is great as is (and very clever, too) but the skirt is meh, IMO. It’s just a tube with a paperbag waist and the same kind of belt-and-slits finish as the jacket. The result is quite bulky around her waist. I’m not showing you the paperbag waist because, well, meh. We can do better. 🙂
I’m a little concerned about how well the felt belt will wear. (There’s another one on the skirt.) With a lot of play, I could see it just shredding apart. I may make a fake leather belt next time.
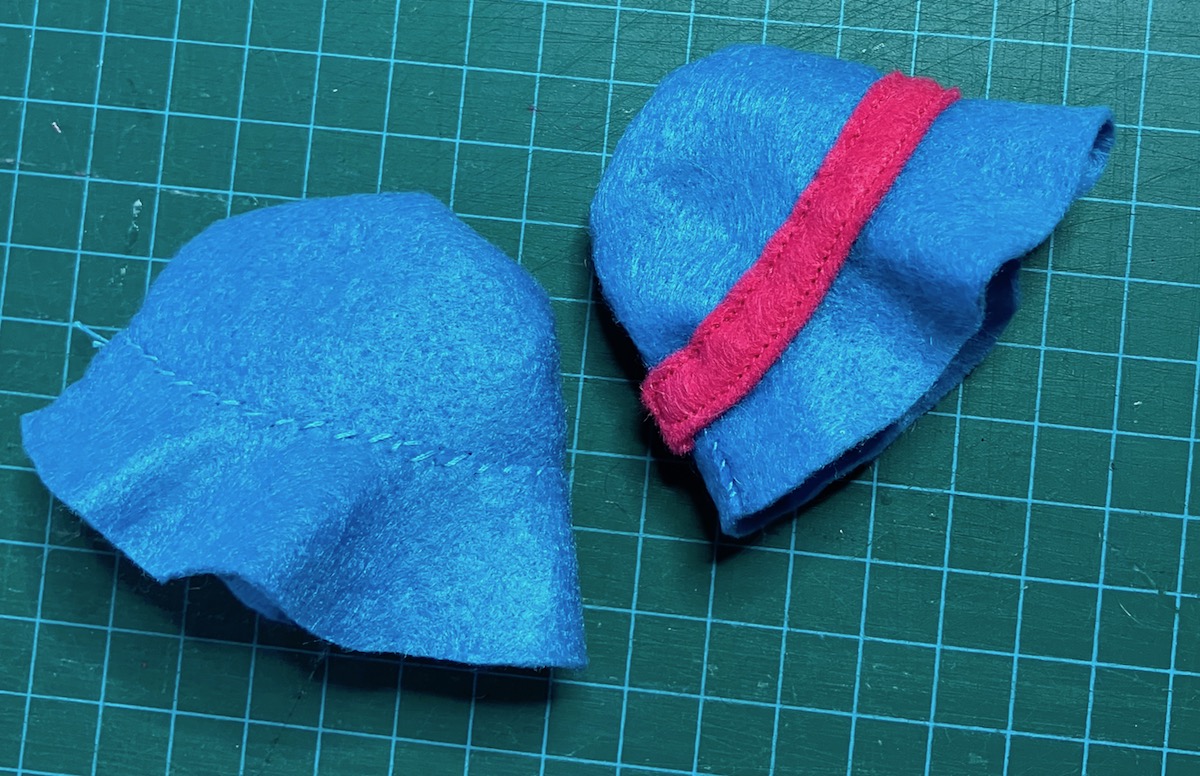
The hat was enormous, probably to go over those early 60’s bubble cuts, so I cut it way down for the version on the right.
It’s still a bucket hat, so not the most flattering option possible. I like the felt, though, and it’s got me thinking about tweaking it to a more vintage style.
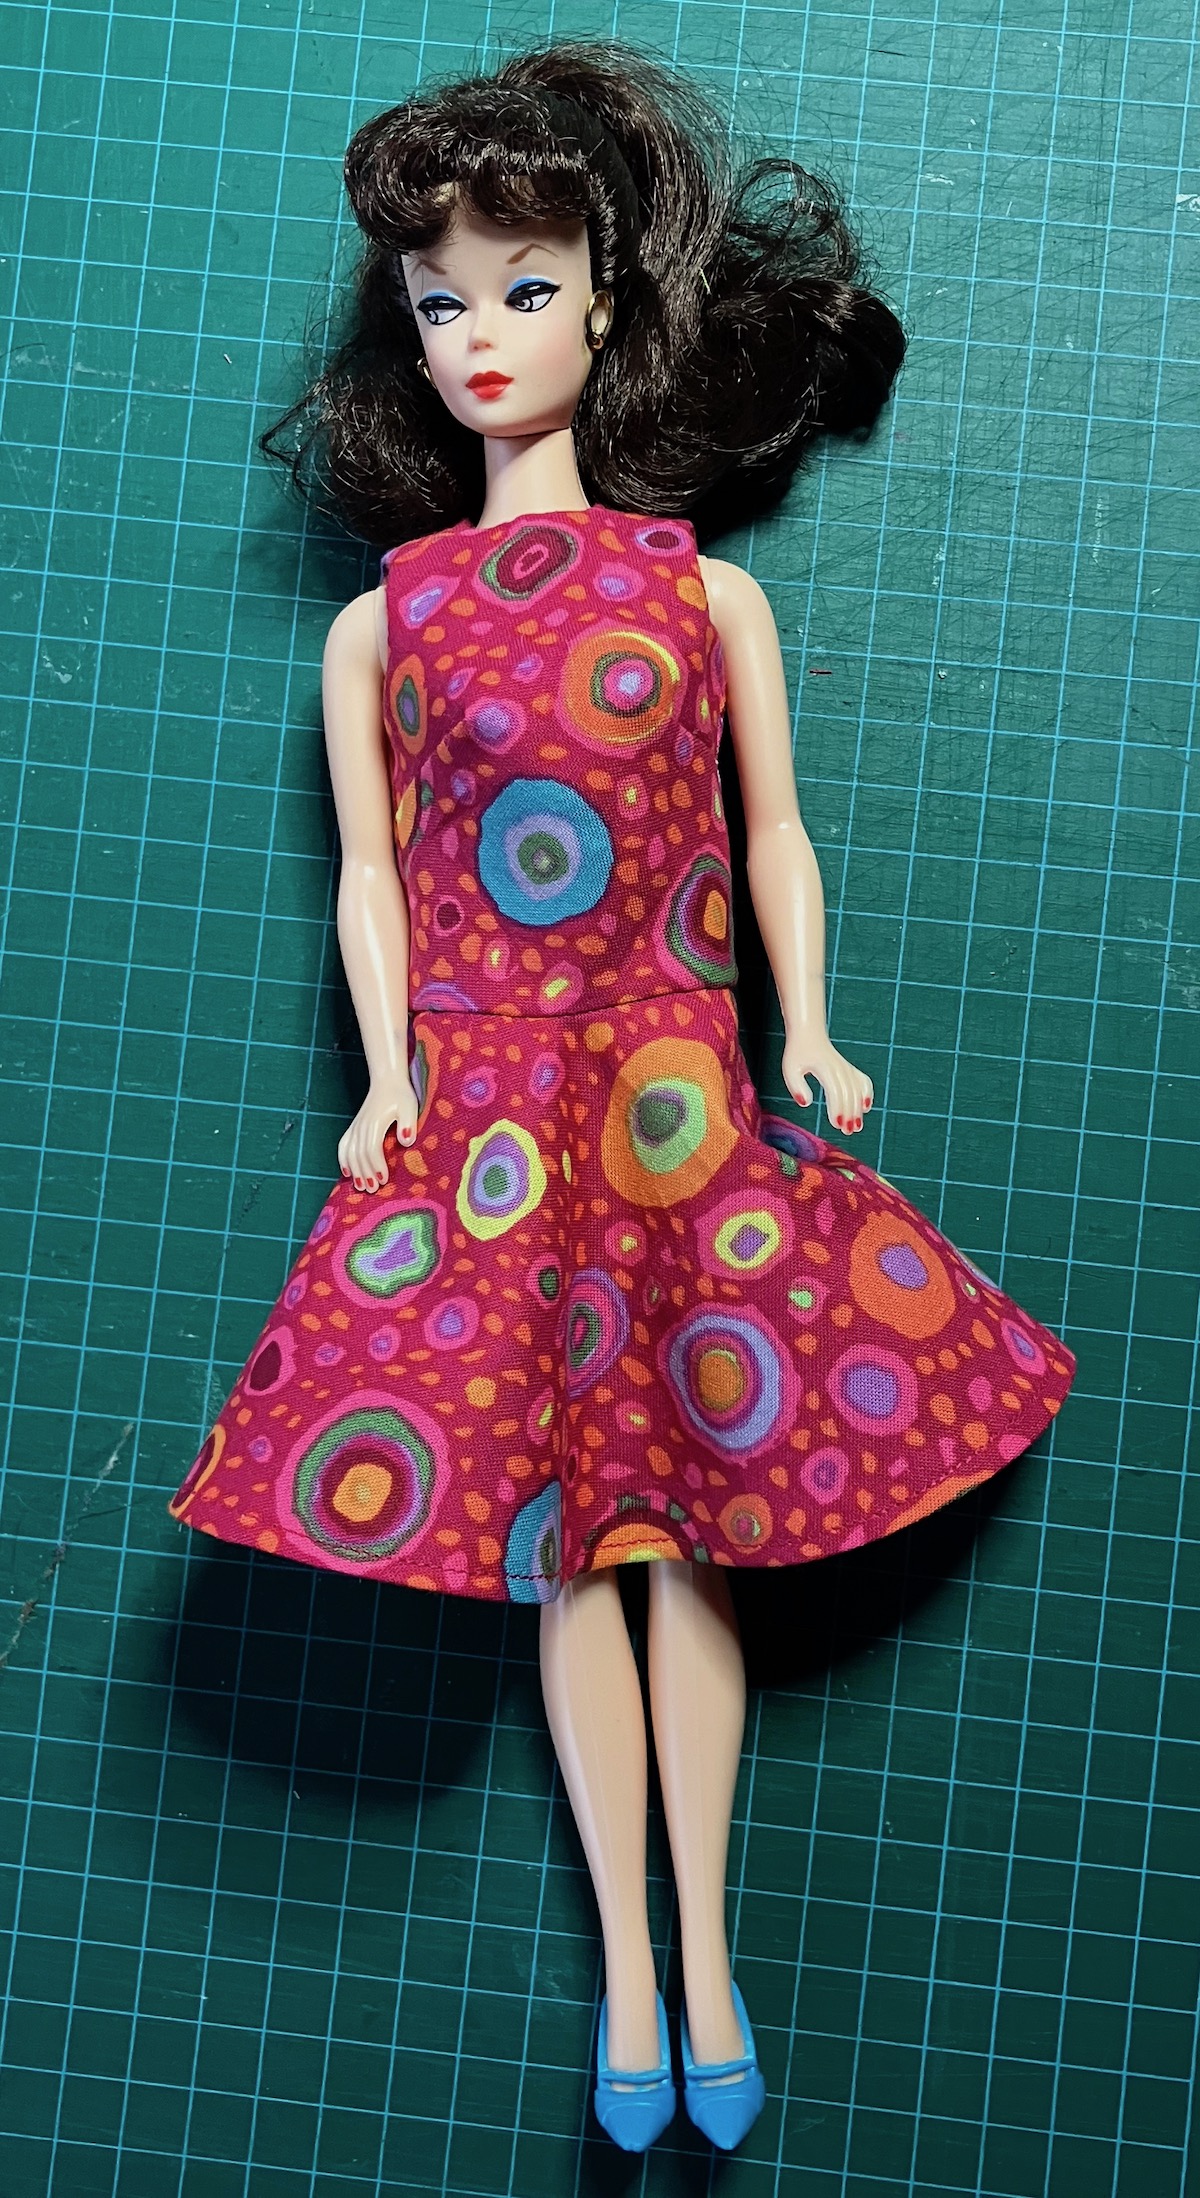
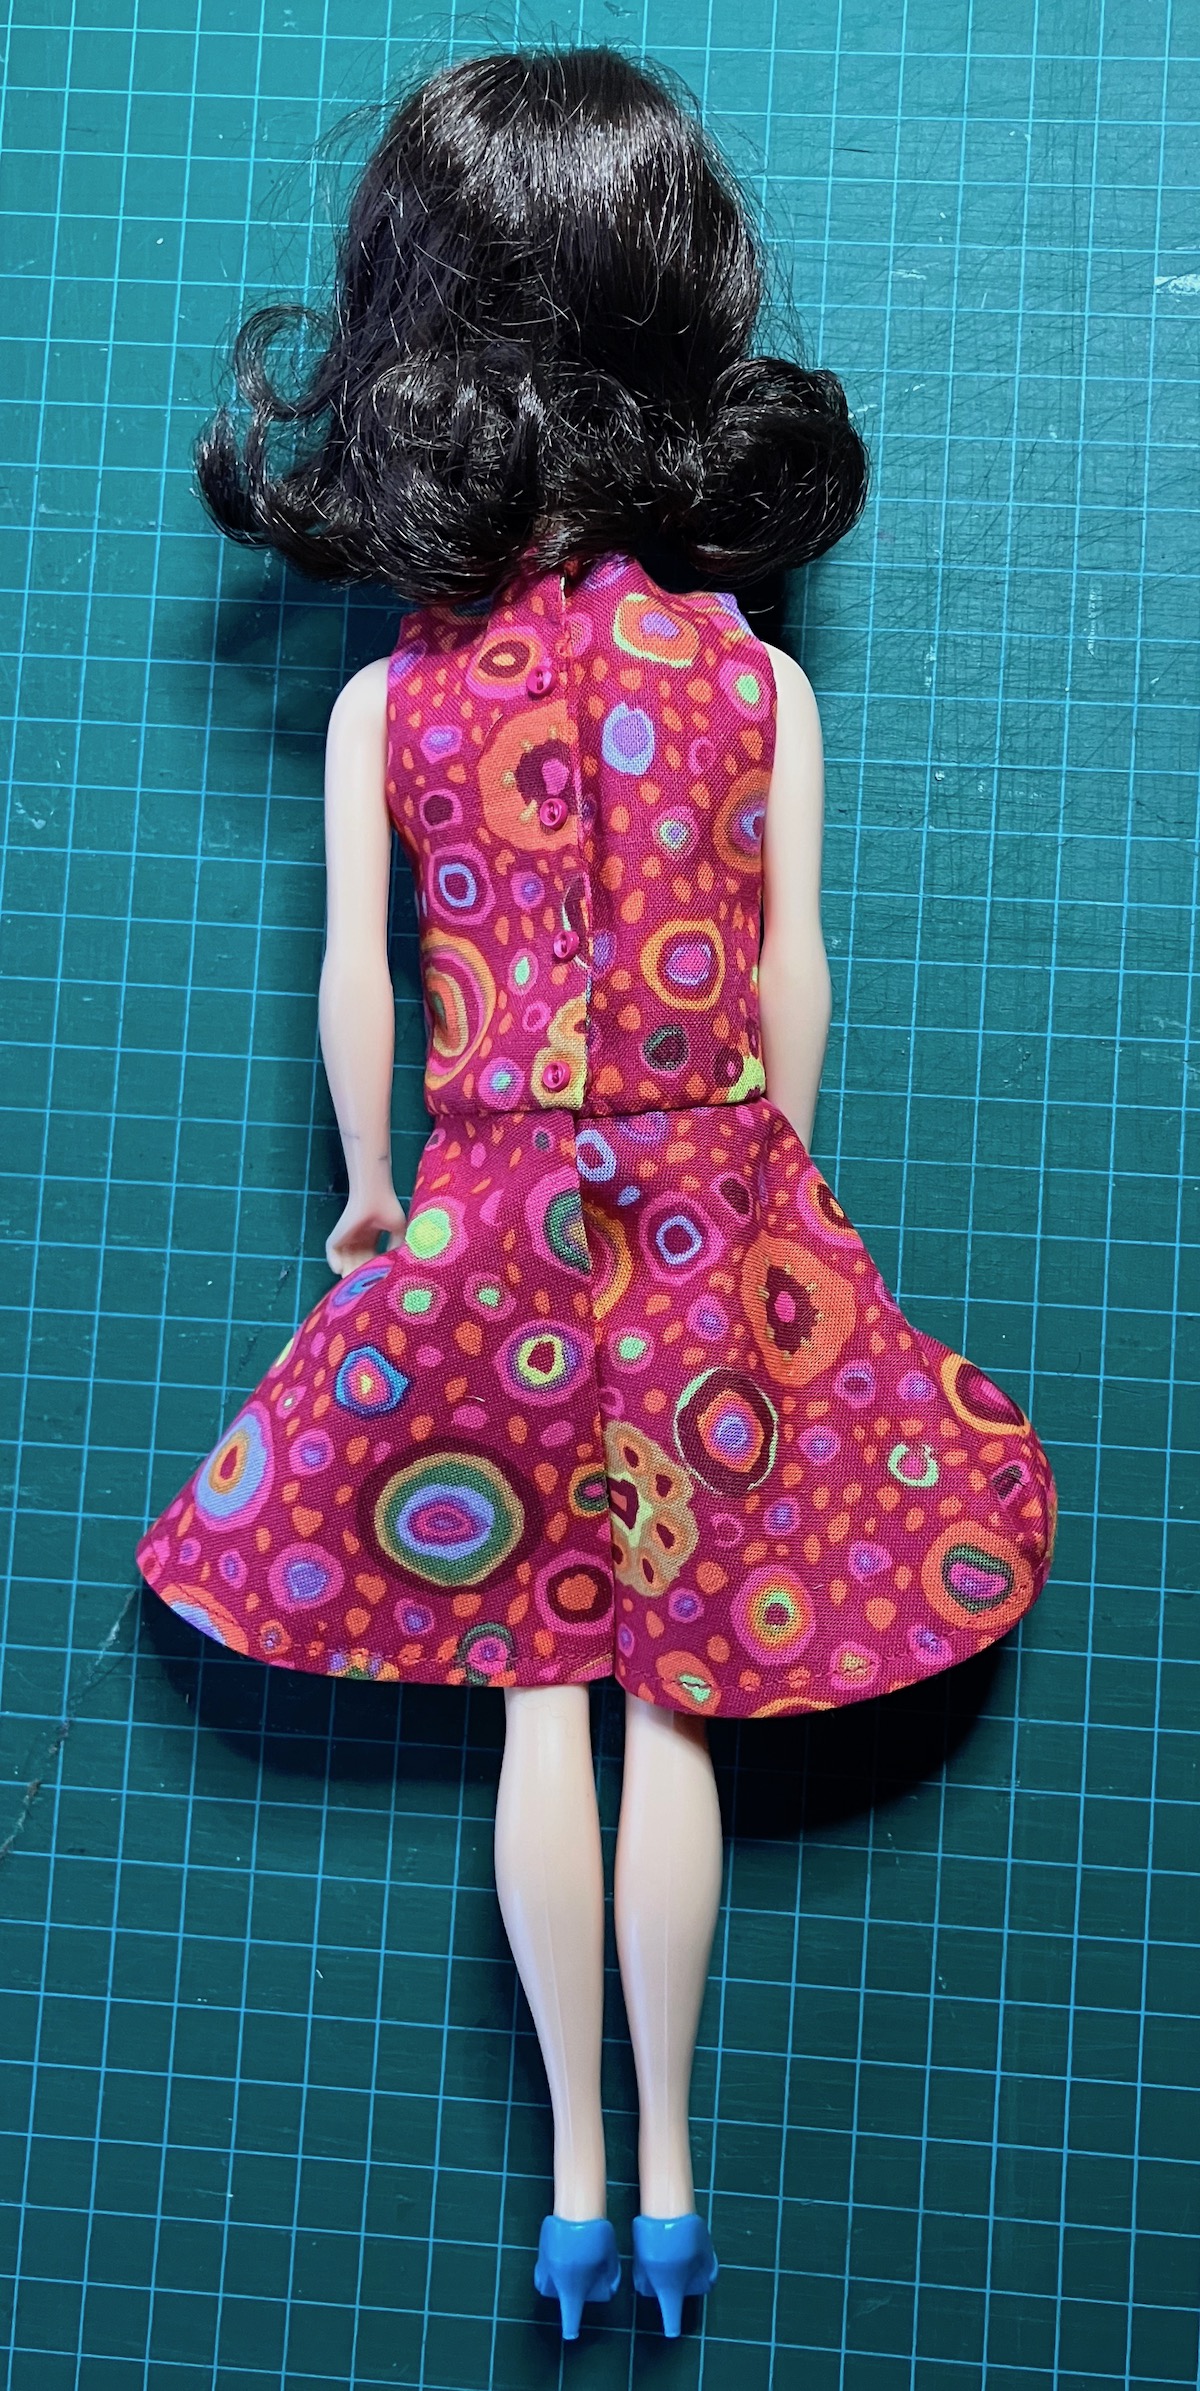
The dress had a lined skirt but an unlined bodice. I chose to do it the other way around since lining the bodice makes it easier to finish the neck and sleeve edges in this scale. I also modified the back to have an overlap in my usual way. I like it in this Kaffe Fasset cotton print.
There’s a triangular kerchief to match the dress that irked me a bit. I made two and hemmed hemmed them in two different ways – one with the edges turned under twice, as per the pattern, and one with fusible interfacing on the edges, then turned under once and zigzagged – but I don’t like either particularly. Maybe it needs a snap – there’s not much fabric to tie it in place. Hmm.
The knit top that is supposed to be sewn into the skirt came out so big that it fit Tyler instead of Barbie. Again, the construction is interesting so I’ll modify it a bit to make a t-shirt pattern for both Tyler and Barbie. I printed the pattern page so that the included tape measure is exactly right, but this makes me wonder whether the tape measure image was added later than the scan of the pattern piece – and is actually wrong. Hmm.
I still have to sew up the pantsuit, which I cut of a woven rayon jungle print, just for fun.
This pattern also made me aware of a lack in my doll accessories – I don’t have any white go-go boots for B. I have tall white boots for her, but am now on the hunt for those mid-calf ones. They’d look great with that dress.
Like most doll patterns, this one needs a few tweaks to bring me joy, but there are details I like about it as it is. I really like the felt for a jacket that resembles boiled wool, so I cut out another one. Inspired by a Simplicity pattern for women, I all add darts to the waist of the jacket to give it some shaping. I’m also going to modify the paperbag waist on the skirt – there’s too much bulk with it under the jacket as is. I’ll show you that and the pantsuit when they’re done. I’ll probably make the coat, too, and another hat. It really is an instant wardrobe!
I’ve also been sewing Paris couture fashion for the girls. Today, we’ll talk about the first dress.
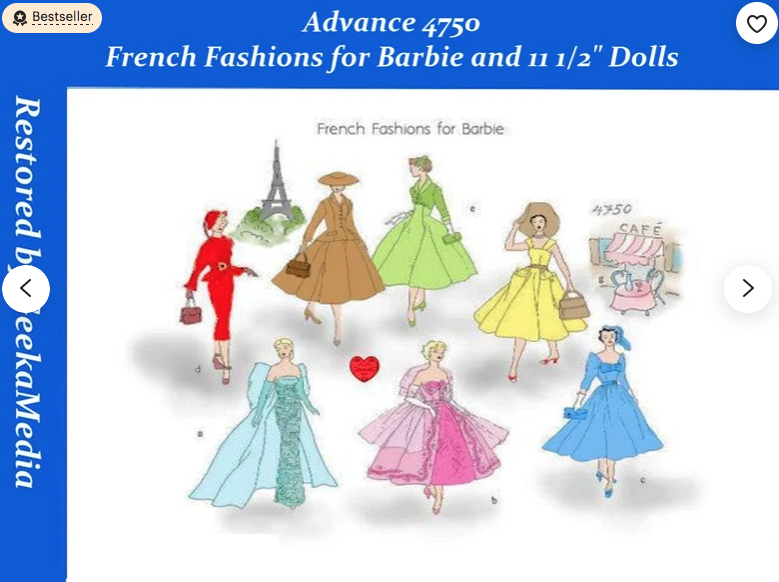
This is the downloadable pattern I bought on Etsy a few years ago. That vendor is gone, but this vendor has it. It might be the same scan. (?) Mine was the best pdf I’ve bought for the girls – the pattern is clear, and when I printed View A at 100% and sewed a muslin, it fit the girls well.
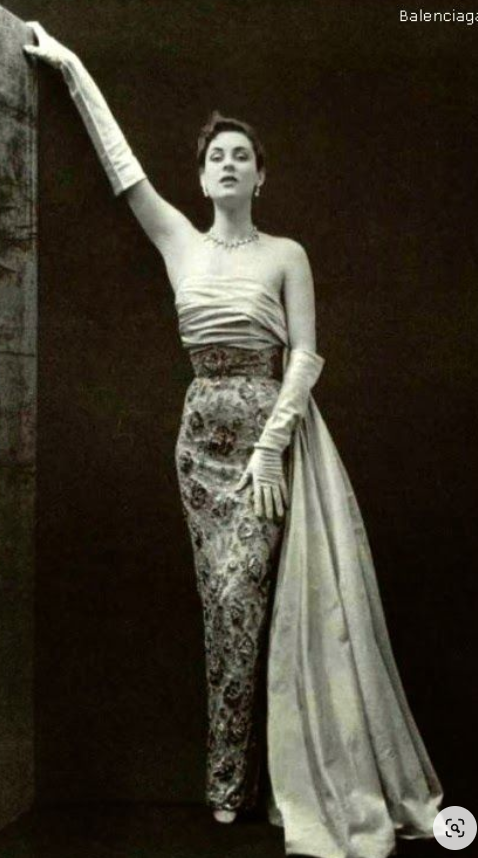
What’s really fun is that the instructions attribute the designs. View A, which is that turquoise one at the bottom left, is a “Balenciaga lace sheath. Original – cream colored lace over gold mousseline evening gown with fuschia silk sash, train and bow.” I had a look and found these two contenders for inspiration from Balenciaga’s collection in 1950:
The left one has the big bow but not the wrapped bodice, while the right one has the wrapped bodice but not the big bow. Neither appear to be cream lace over gold, so there must be a closer match out there. Aren’t they lovely, though?
Another interesting detail is that the evening gown on McCalls 3845 for Tyler Wentworth dolls appears to be inspired by the same Balenciaga dress. it’s hard to see but it has a wrapped bodice, as well as the bow and train.
This is the pattern, though, that is challenging to print at the right size though. (Remember the suit?) I’ll take on this one next, now that I’ve got the 11.5″ size right. (This also explains why the bodice on the Tyler dress was so low. The shorter dress is made without the chiffon wrap across the bust, and in the dress for Barbie, the fabric is cut low but the chiffon adds some modesty.)
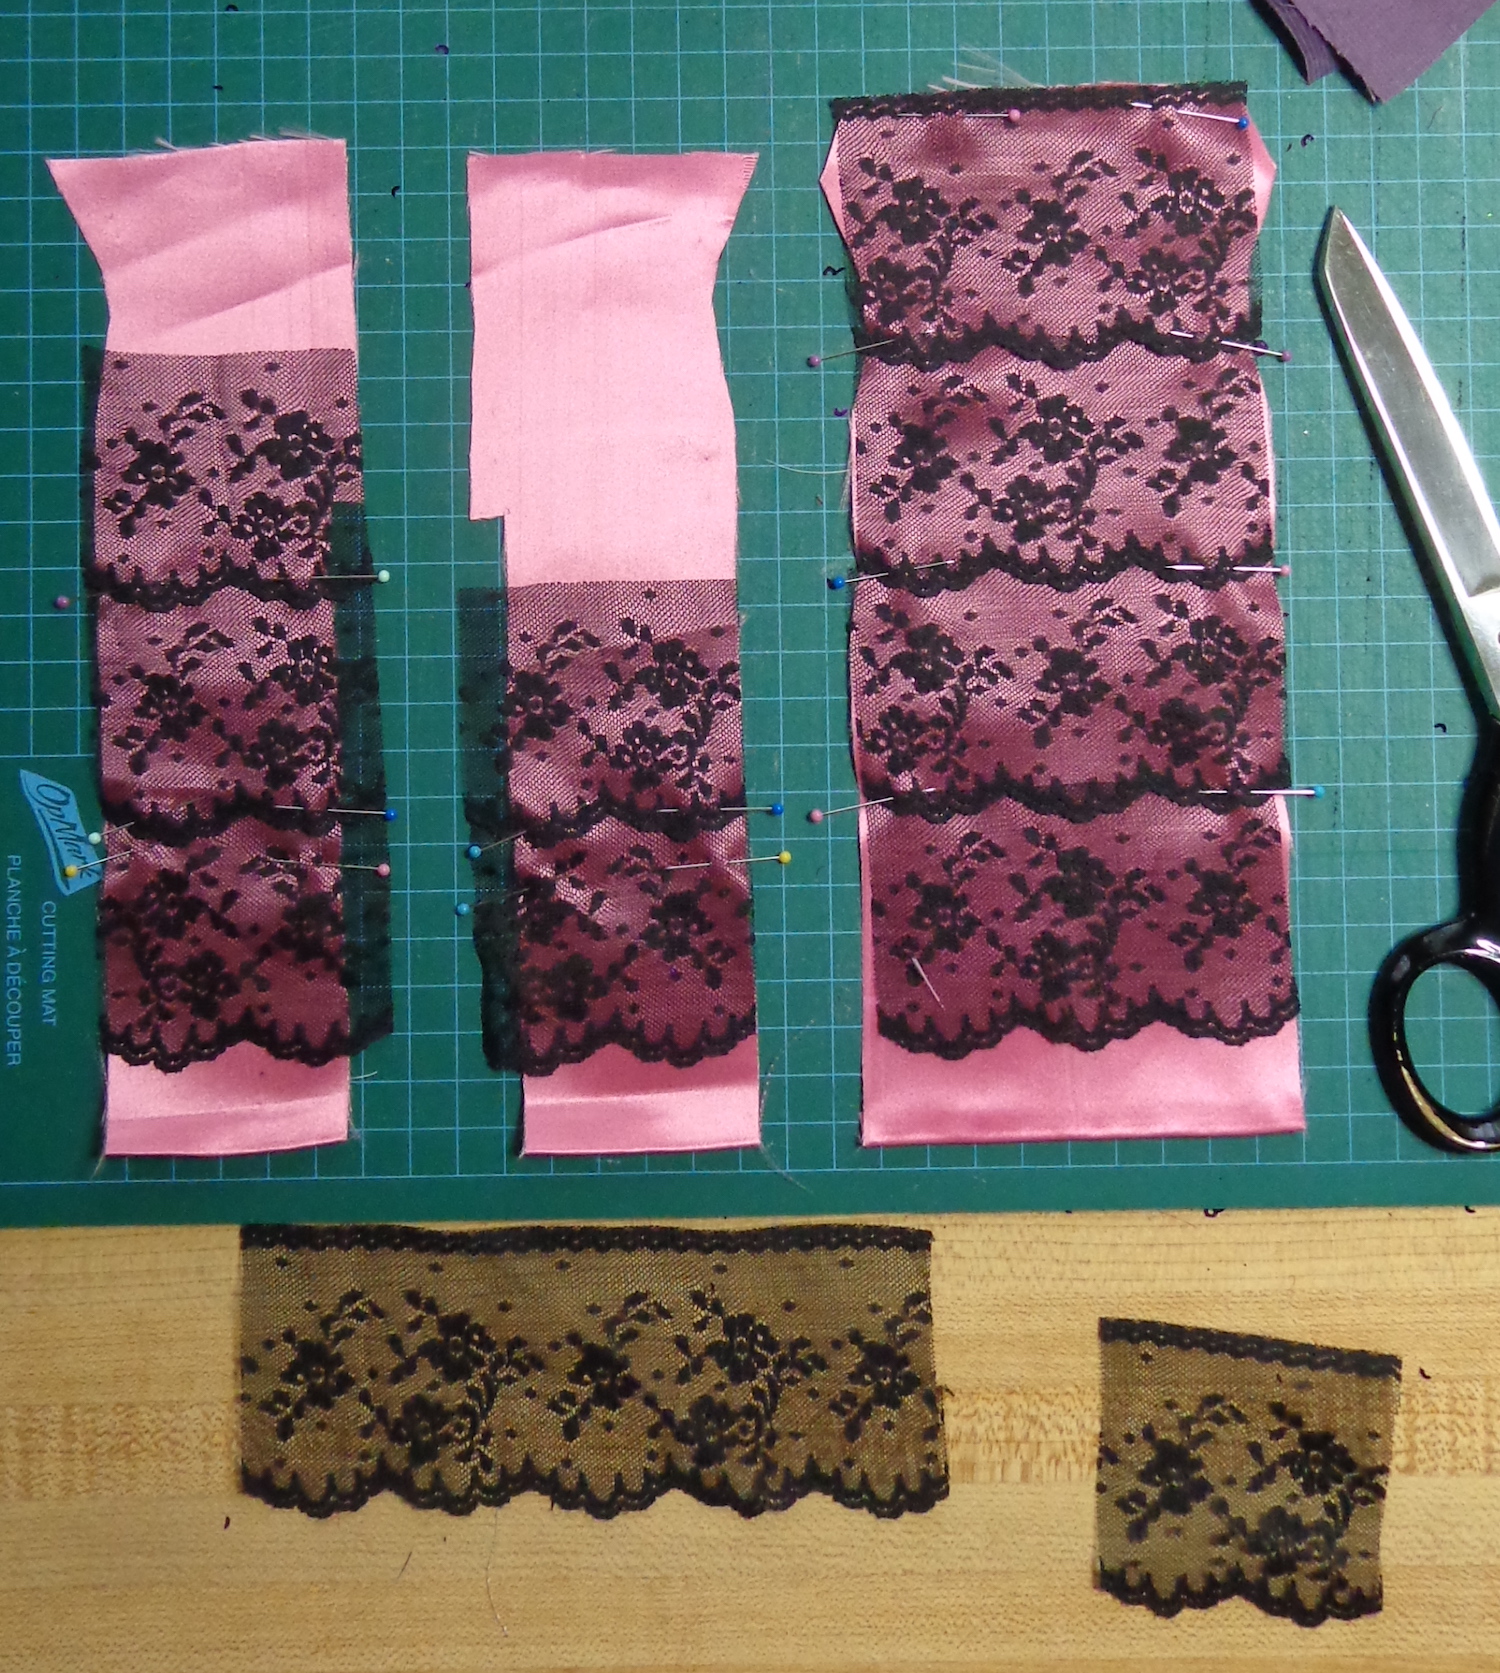
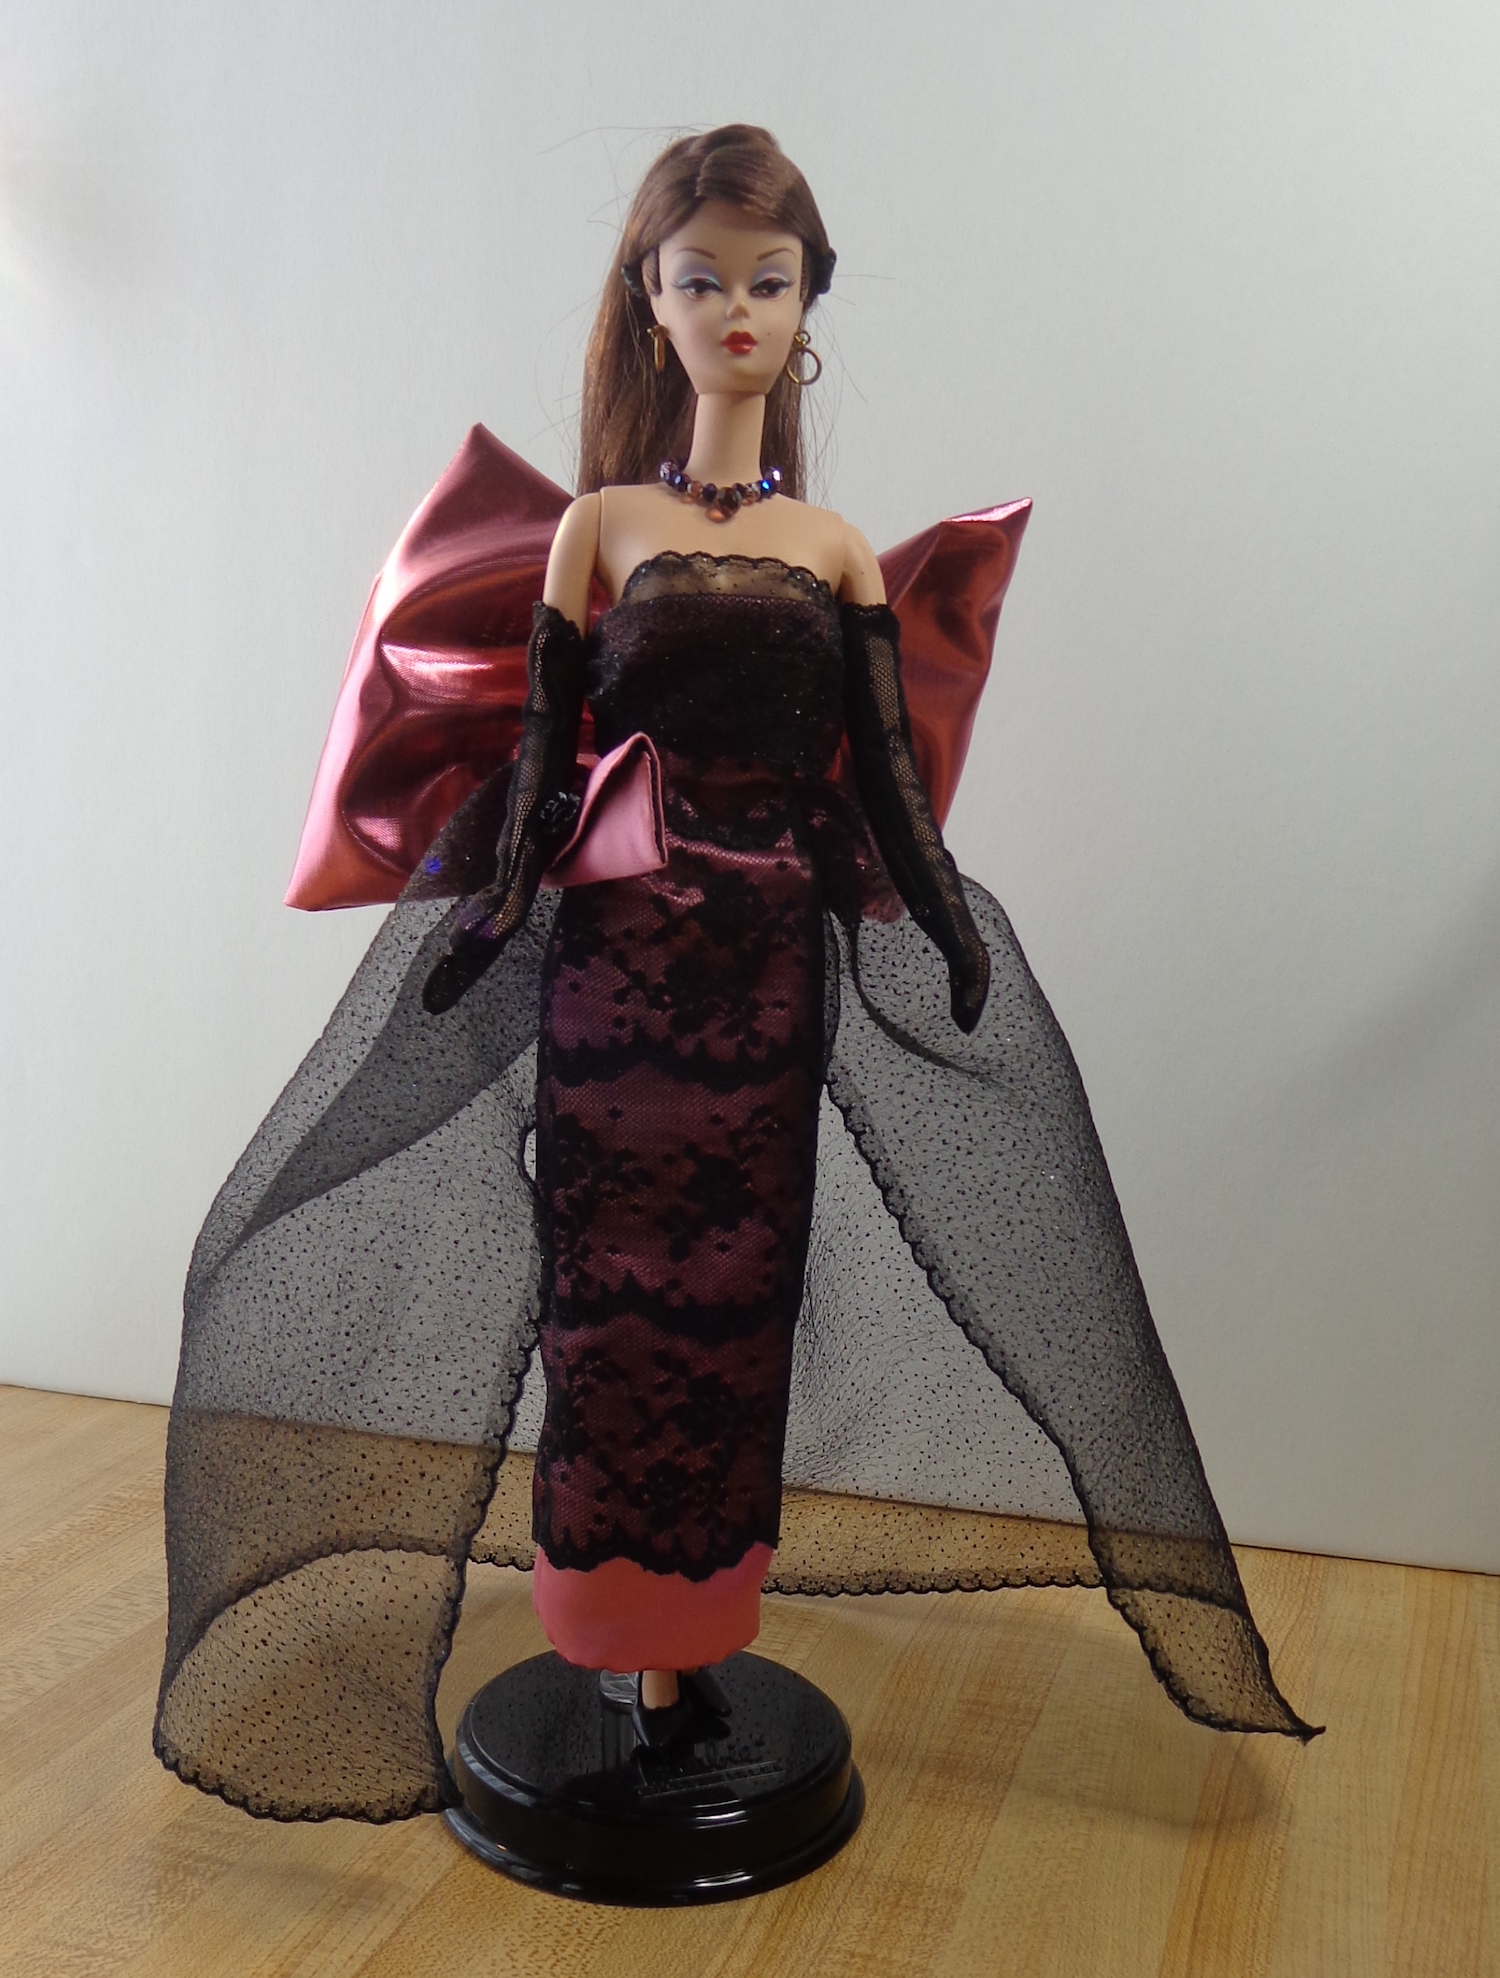
I decided to try the lace overlay technique on the first one I made after the muslin test. The instructions specify that you should stitch down rows of narrow lace to create the lace layer. I had this piece of black that was about 2″ wide with a pattern that seemed to be in scale. I trimmed off the top edge to avoid having a heavy dark line and sewed down the scalloped edge onto a heavy pink satin. Black and pink is the classic Barbie palette. 🙂
The finished dress has a wow factor, for sure. The netting is a black one with sparkles (yes, I have sparkles everywhere now) and I narrow hemmed it with a scallop stitch. The bow is a very shiny pink and black metallic fabric. The dress is lined in black Bemberg.
The difficulty I had with this one came from the weight of that satin, which was really thick. It also shed, but overall, I’m pleased with the resulting dress.
I have two more versions of this cut out for B, then will try the variation for Tyler.
I apologize for the silence here on the blog. My last post was at the end of January. I had my busiest month ever in February and barely had time to turn around.
We’re having what has to be a false spring here. The chipmunks are awake, the grackles have returned and the snow is gone. The hellebores are lifting their buds from the soil and the daffodils are a few inches high. Even knowing that the snow will probably be back one last time, the sunshine and milder weather is wonderful.
In the midst of all my writing and publishing jobs, I did acquire a new doll. 🙂 Of course, she has a different body sculpt from all the other girls, so I’m doing some sewing for her now.
She is Amazing Grace #3, a Robert Tonner doll sold through the Virtual Doll Convention, and the first Tonner doll I’ve bought new. She’s 16.5″ tall with the RTB-101 body sculpt. (They still have Amazing Grace #1, the blonde, in stock. The redhead and brunette are sold out.)
2024 Amazing Grace #3
This doll has a lot more articulation and flexibility than the Tyler Wentworth dolls, even the BW body sculpt (my fave). I have mixed feelings about her proportions. I wanted to adore her as soon as I saw her in real life. I like her, but I don’t love her yet. Maybe that will come in time. (Maybe I should have ordered the redhead….) Her hands and feet seem big to me, but there you go. At any rate, she has clothes in the works, though I’m not sure she’ll have sisters.
I have a few projects to share with you, but need to take some pictures first. We’ll start again tomorrow, with a shawl that’s in progress. I’m also finishing up a sweater for myself, which is reminding me of a sweater I knit years ago. And of course, there are new things for the girls.
I’ll be back tomorrow with knitting pix. I hope February treated you well!
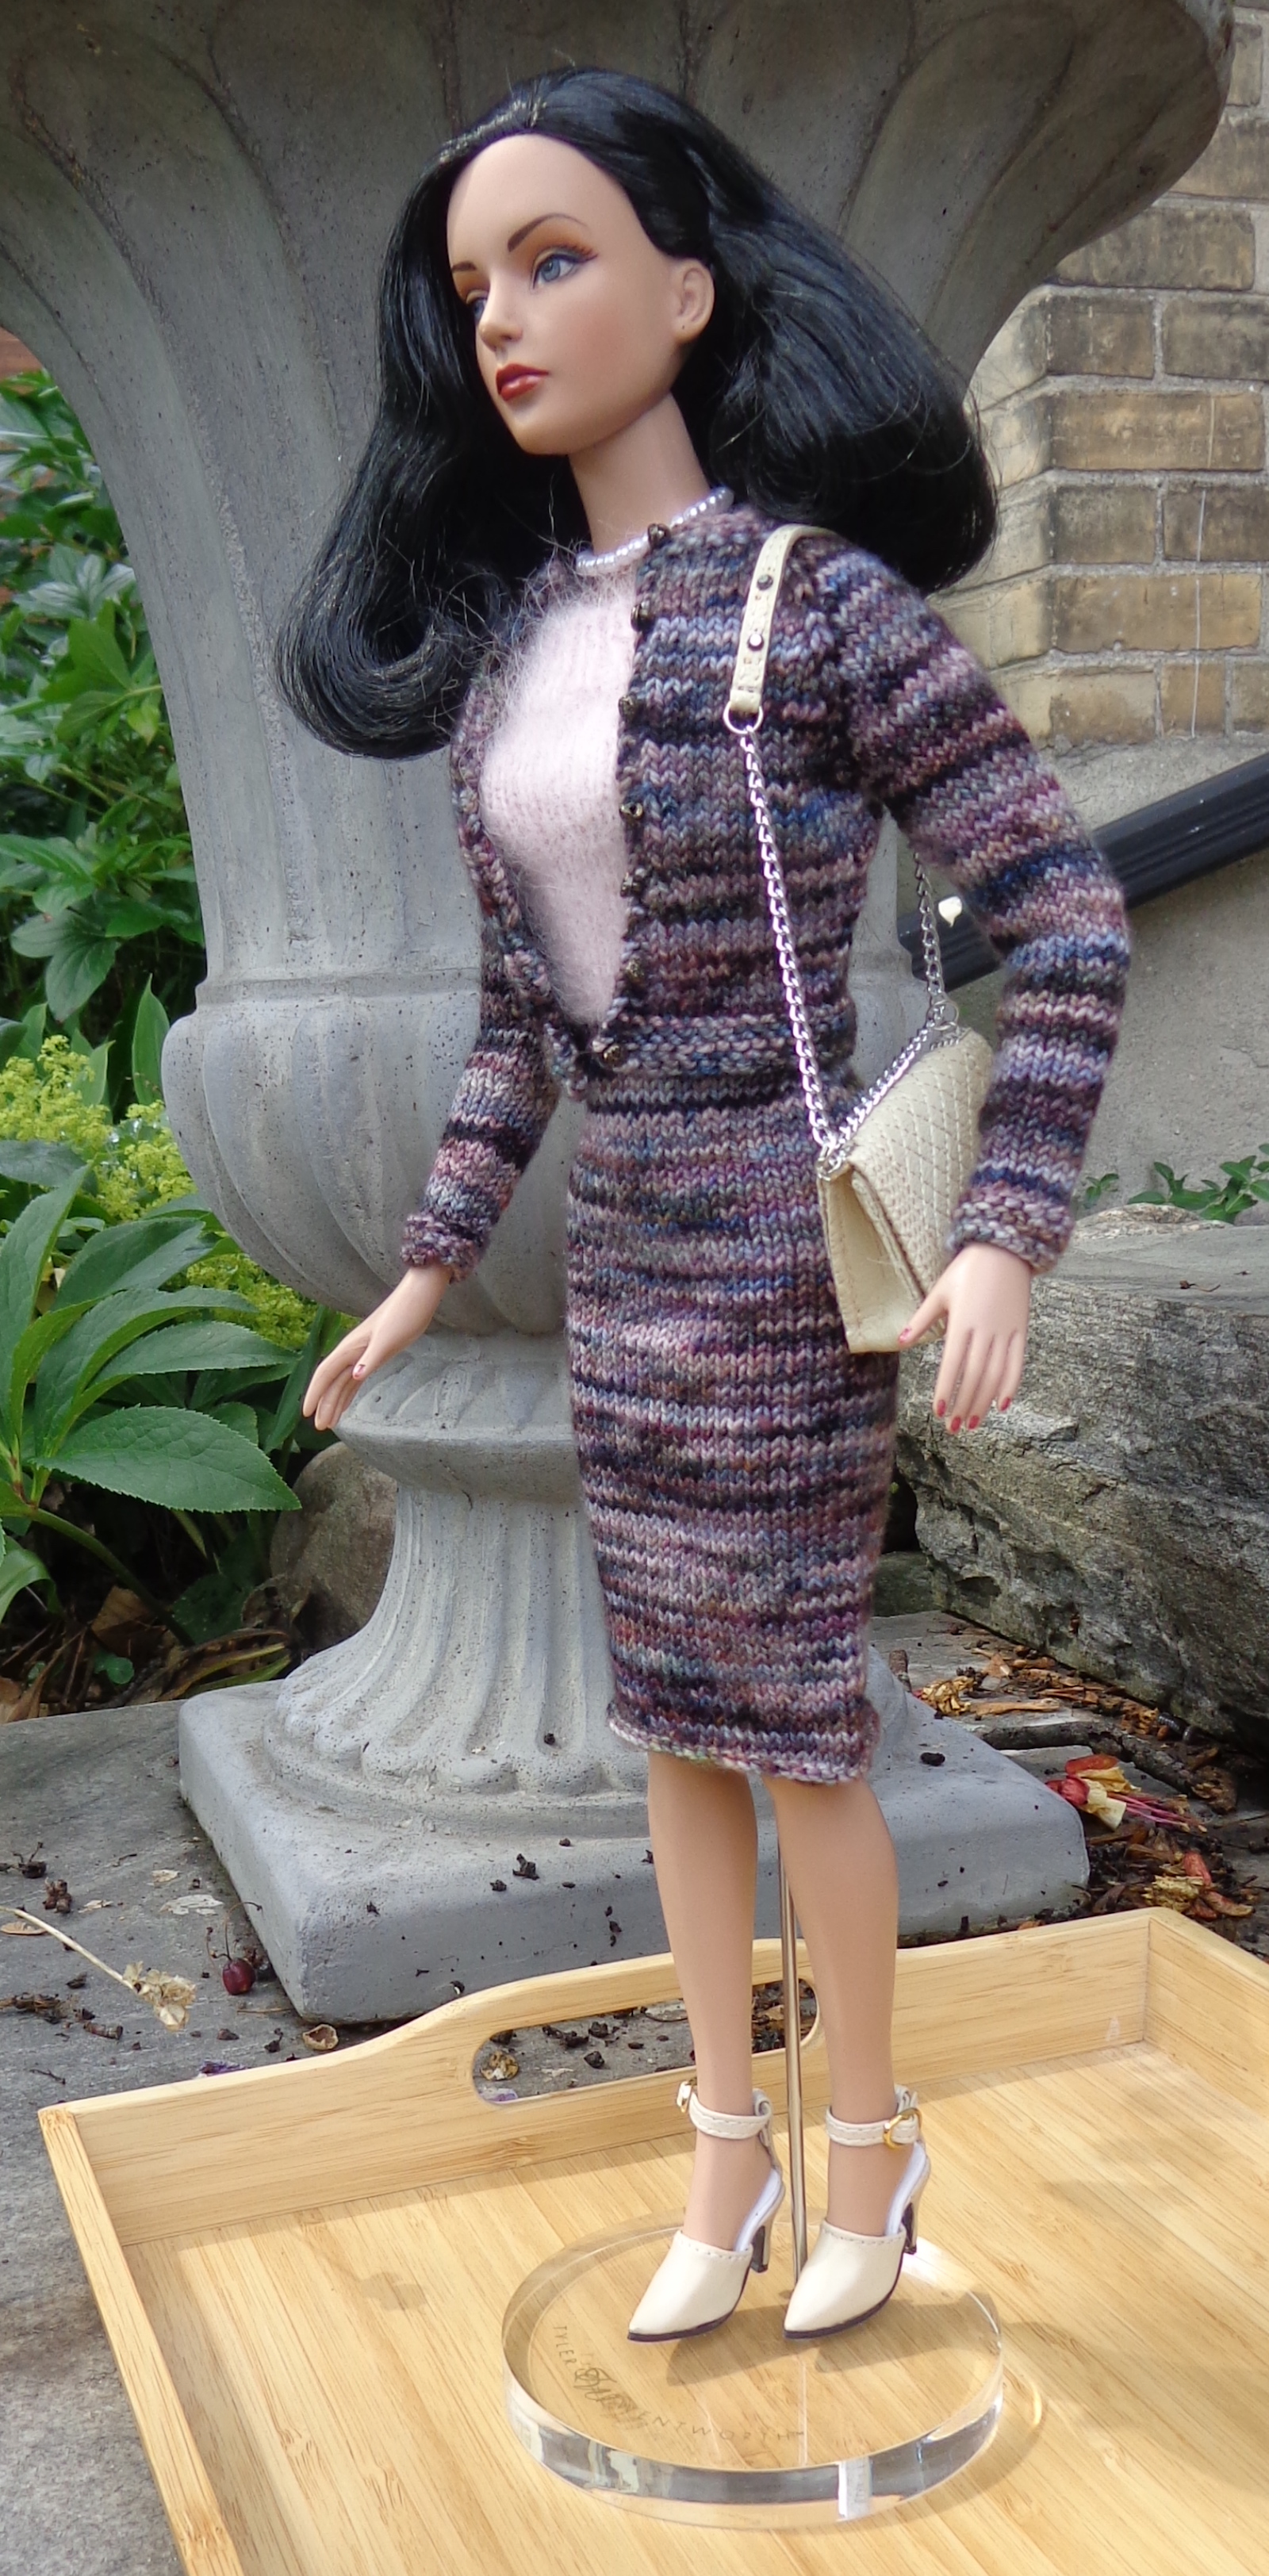
Last summer, I showed you a top-down cardigan I’d designed and knit for the girls in many sizes, from Monster High to Barbie and finally to Tyler.
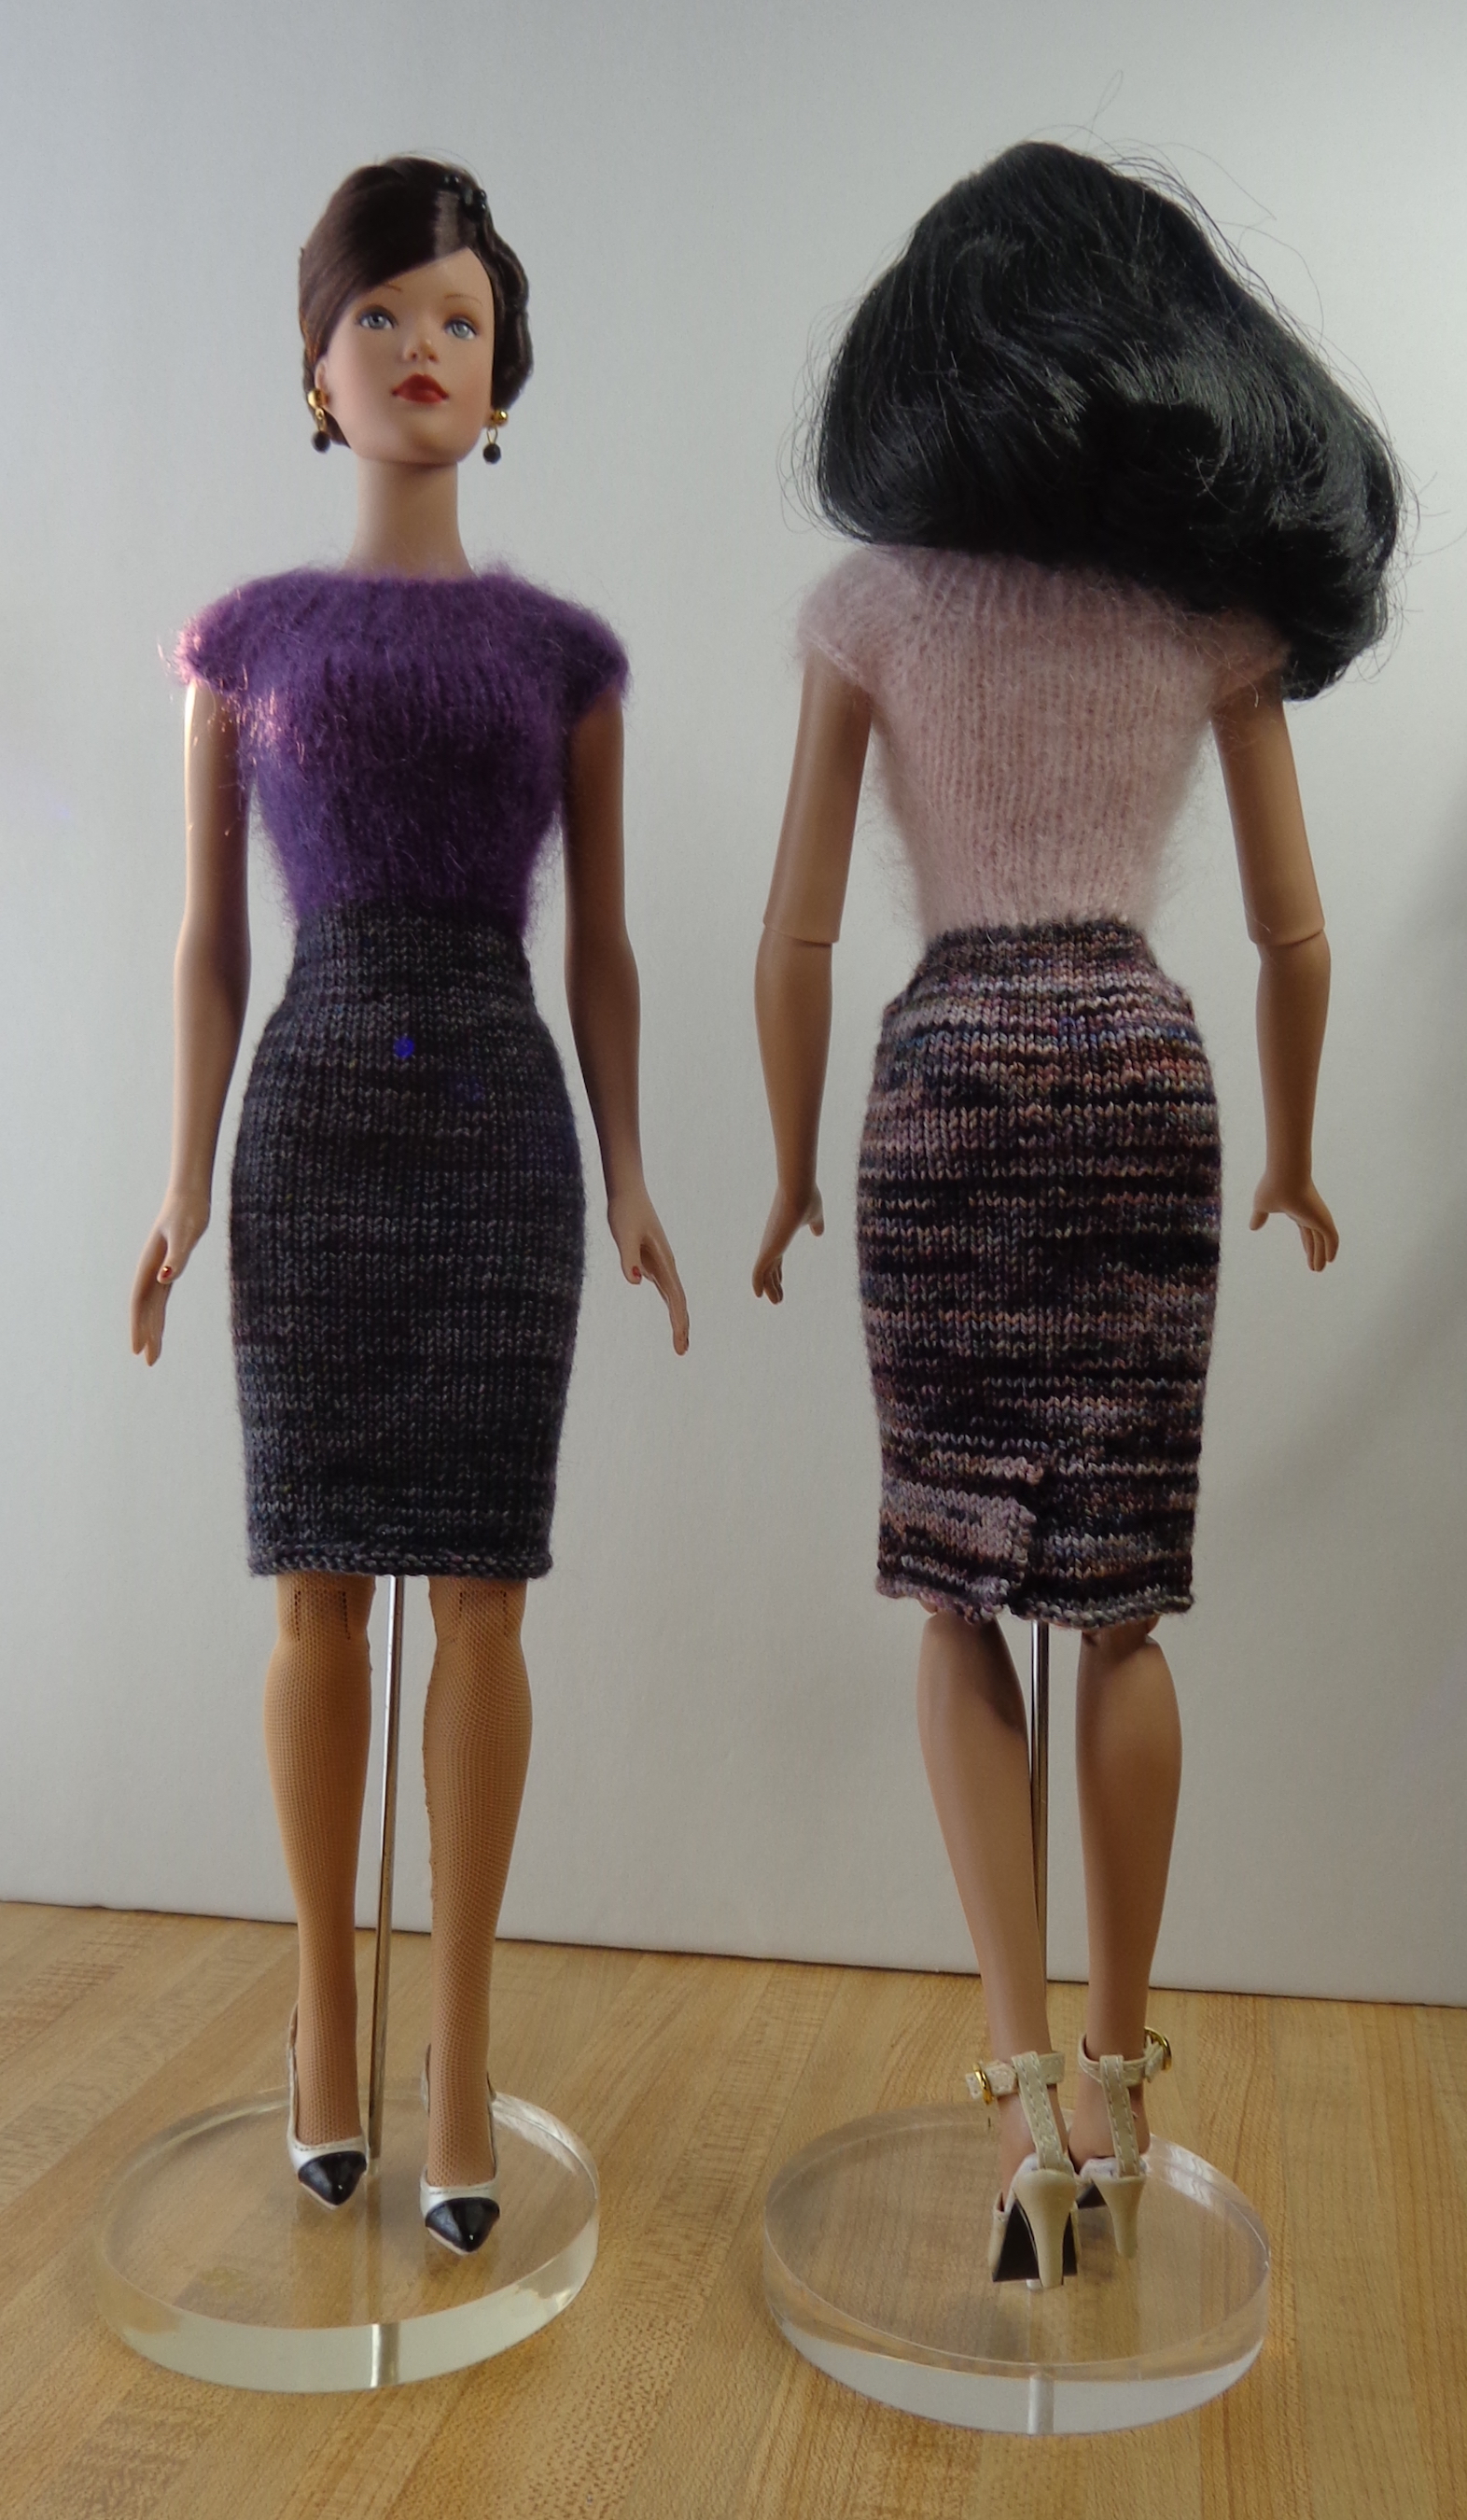
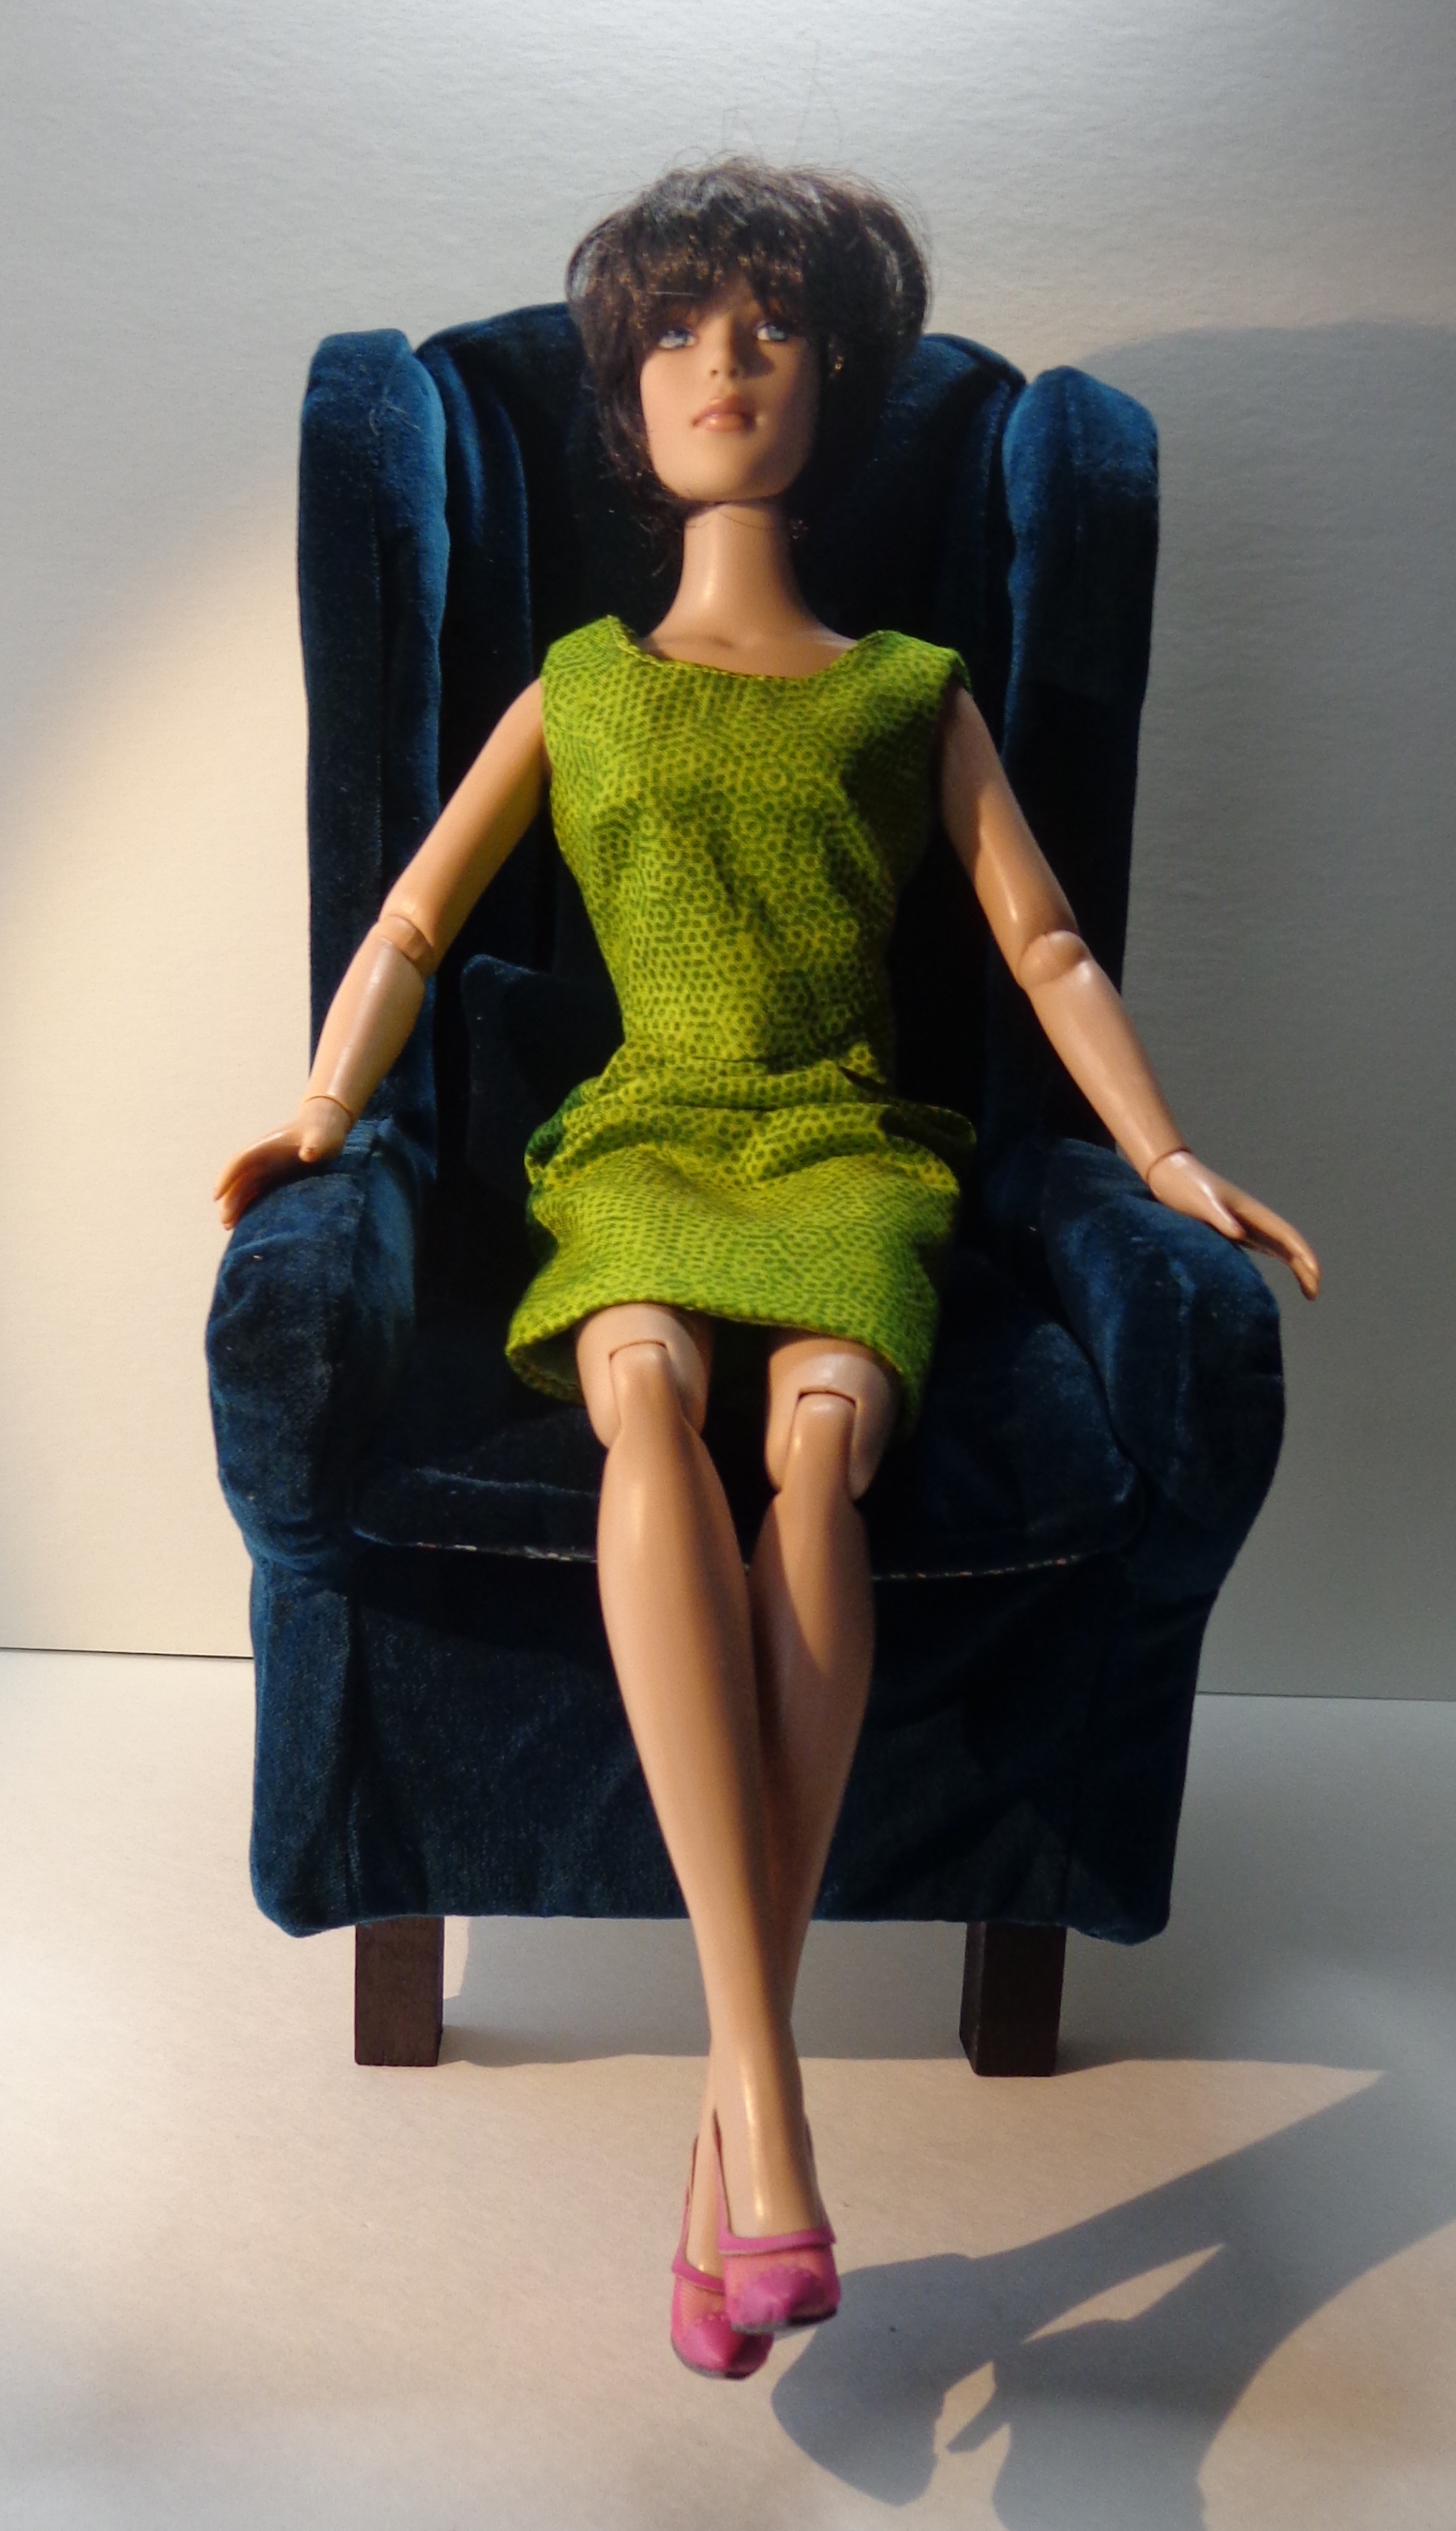
I’ve also showed you this Tyler-size version. It’s knit of Koigu KPPPM in colourway 513P – KPPPM is 175m for 50g. I knit this one a little longer and also did some back neck shaping to make the front of the collar sit better. It’s modelled by RTW Rouge Sydney Chase, with a matching dress.
For the dress, I used the free pattern T-Shirt Dress for Tonner Dolls by Samira Jessica (that’s a Ravelry link) but divided the color. It’s a top-down knit with cap sleeves that are created when you cast off for the arms. I started with Sugar Bush Drizzle, held double, in Pink Puddle. At the waist, I changed to the Koigu KPPPM. I didn’t rib the skirt (as the pattern instructs) but just knit it in stockinette, then purled one row and cast off purlwise. I thought that might keep it from curling at the hem, but the hem still wants to roll up, even after blocking. I also added a little kickpleat at the center back. 🙂
I quite like this little dress, so I made a variation of it for Tyler in a different colourway. Here are the two of them together – Sydney is still wearing the first one – the light isn’t as good in my office this time of year as it was on the steps in the summer, but you can see the little kick-pleat on Sydney’s dress. Tyler has one, too. (Don’t you love Tyler’s shoes? They’re sling=backs, too. I want a pair myself.)
The top of Tyler’s dress is Sugar Bush Drizzle held double – the colourway is Monsoon Mauve – and the skirt is a fingering weight yarn leftover from a sweater knit for me, The Loving Path Fibre Arts High Twist Sock. It came with a dyed-to-match Kidsilk Haze type yarn, The Loving Path Fibre Arts Aura Lace. I held the two together to knit a Felix for myself. (Those are Ravelry links., the last one going to my project page.) The colourway is Bewitched, a glorious mix of greys and blacks with flicks of purple and green. No photograph can do it justice.
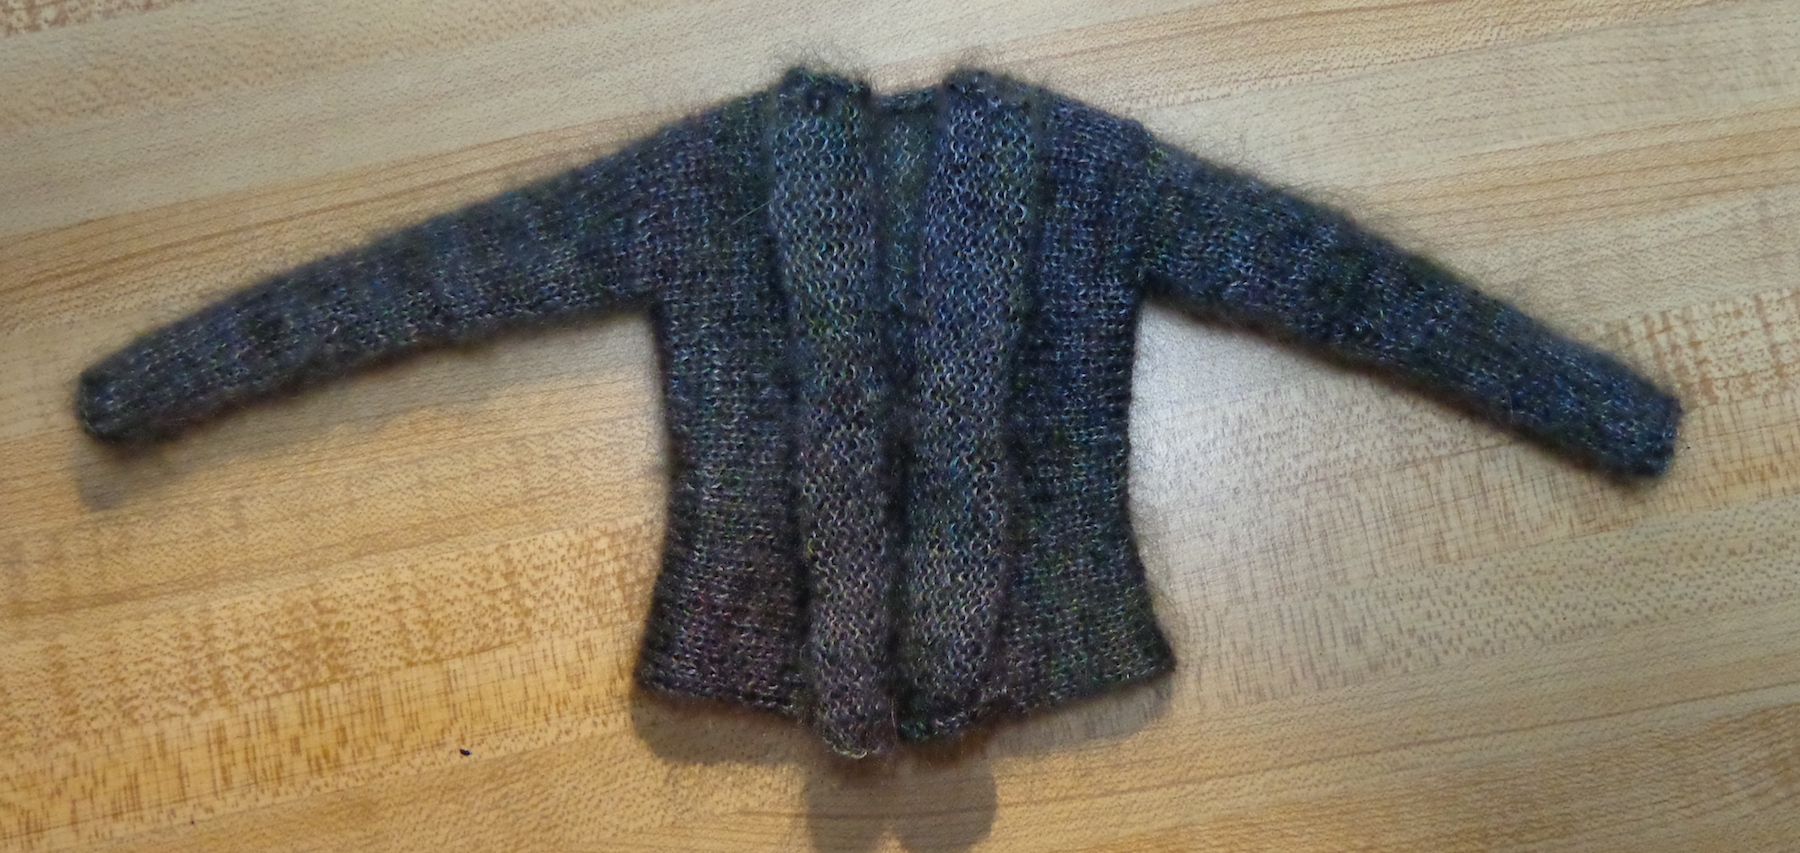
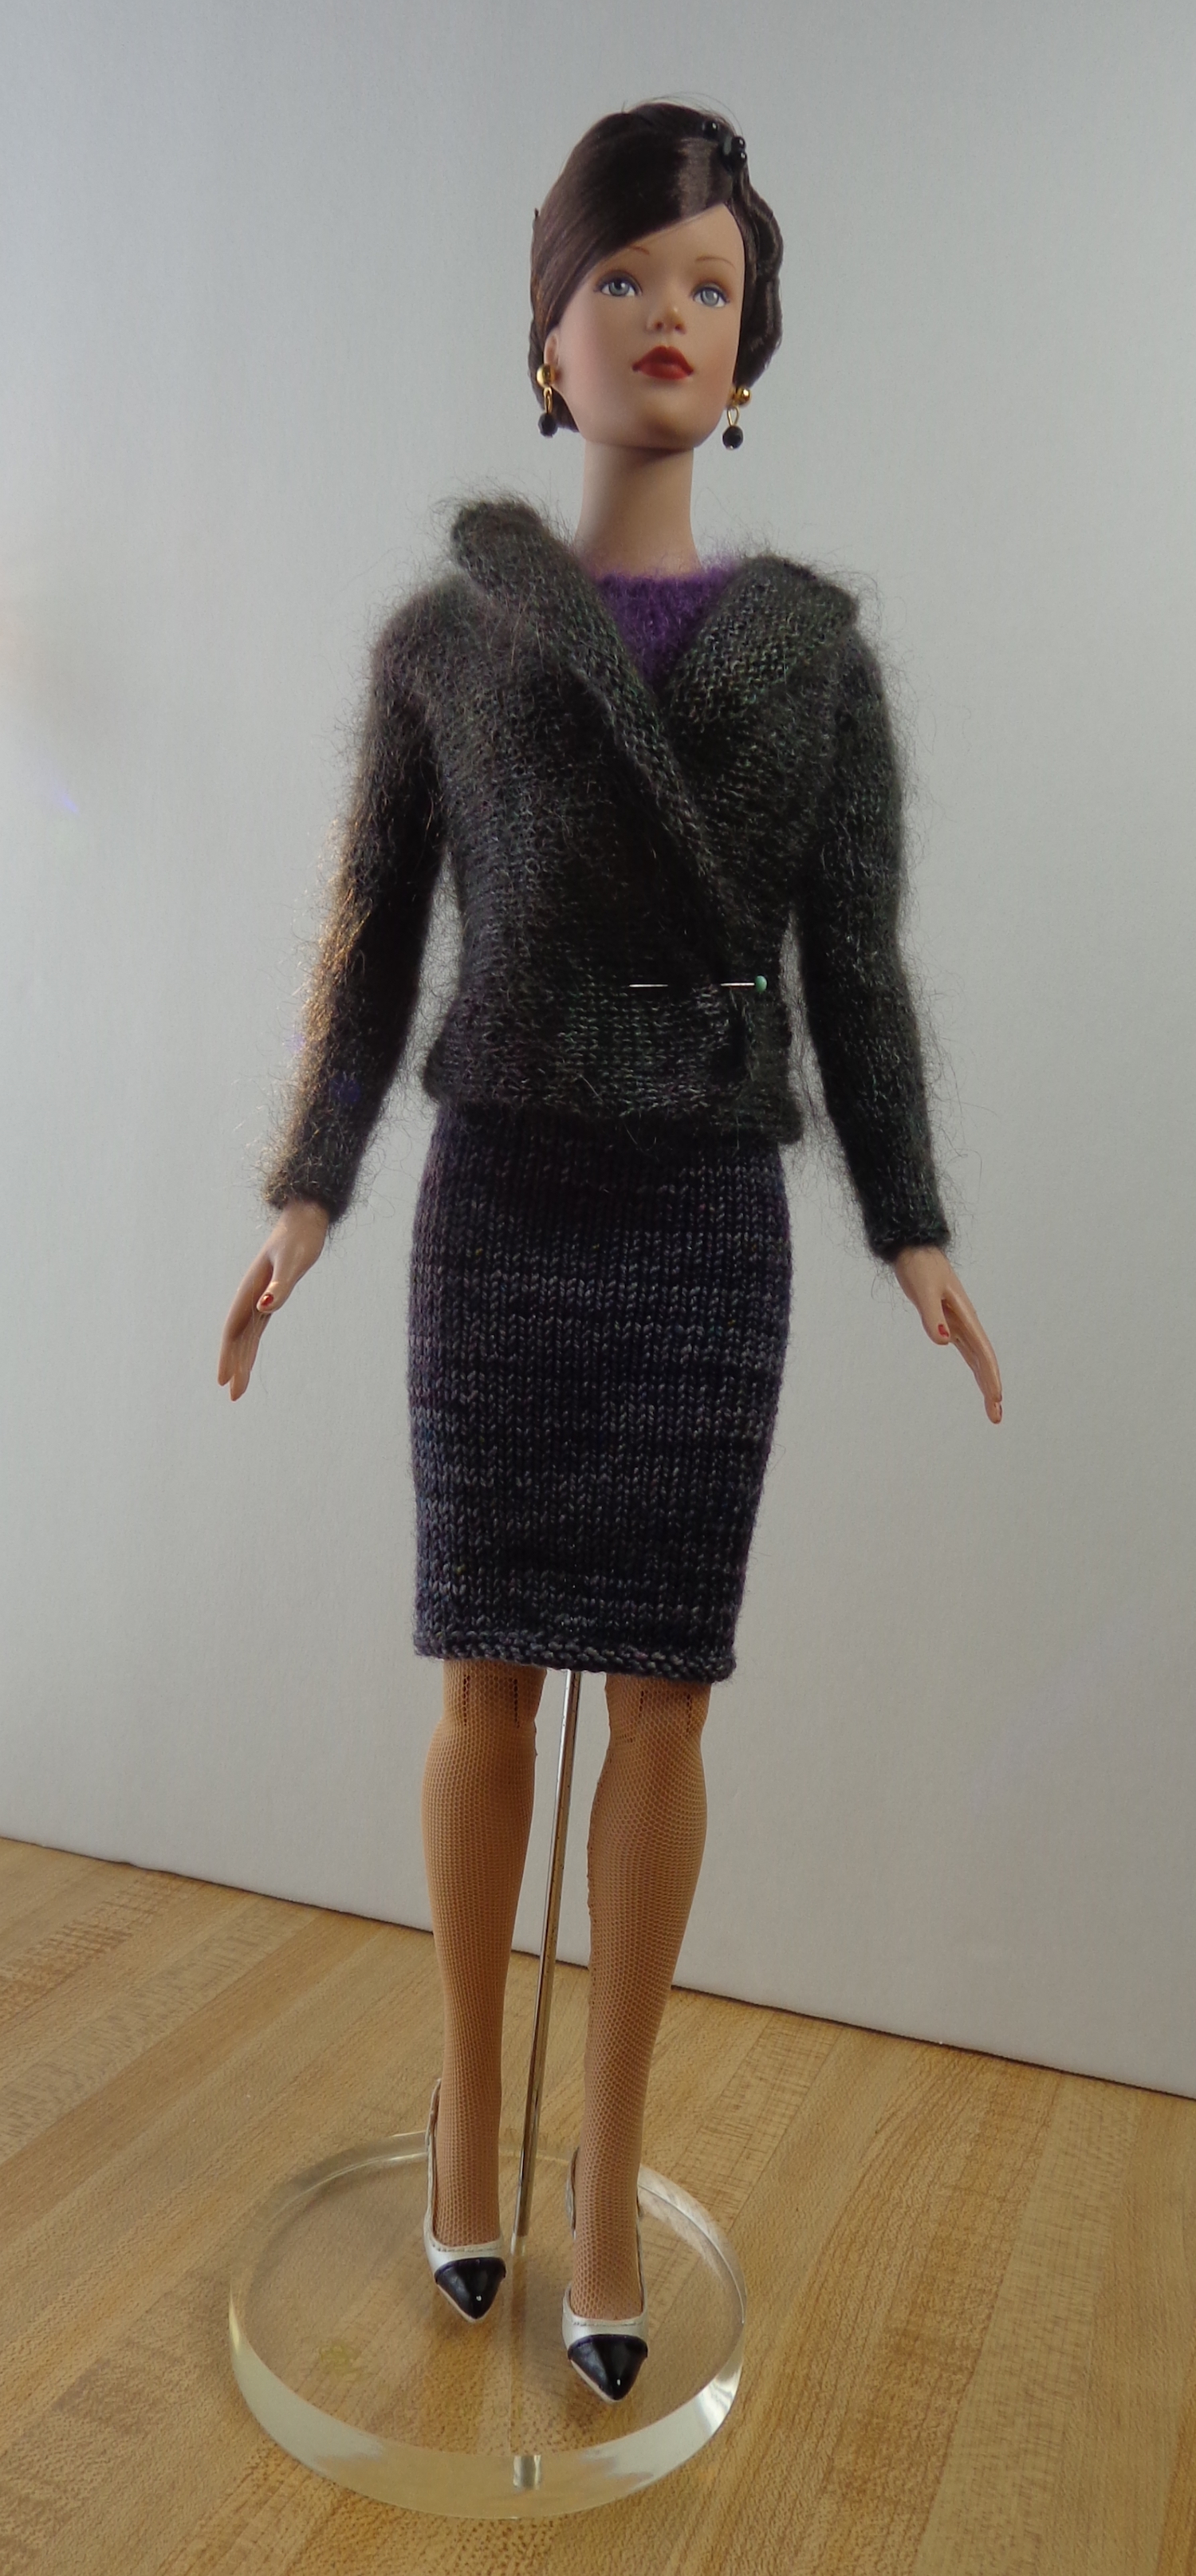
I wasn’t so fussed about the way the top-down cardigan looked on Sydney. It makes her shoulders look quite broad, which wasn’t the feminine look I was after. So, for this one, I knit a side-to-side cardigan in the Aura Lace to coordinate with Tyler’s new dress.
Here’s the sweater laid flat.
It has been blocked but those fronts want to roll. This was a bit of a surprise as I’d thought they might drape – sweaters knit like this in human size have cascading fronts. But on these needles, the fabric ends up too stiff to cascade, thus it rolls.
I knit the sweater from front to front – casting on at the front edge, knitting to the side seam, putting the sleeve stitches on a holder, knitting across the back, putting the other sleeve stitches on a holder, knitting to the front edge and casting off. I then sewed the shoulder seams, picked up the stitches for one sleeve in the round and knit down to the cuff, then repeated for the other sleeve. The only seams were the teeny ones at the shoulder.
Here’s the sweater on Tyler – I had to cover her hands to get it on, btw:
I put a pin in it because I’m still thinking about the fastening, since it won’t cascade. It wants to be a double-breasted sweater jacket. With a pin at the waist, the fronts curl back like lapels. I put a clear snap at one side and three little black beads on the outside. The other side will stay tucked under when it’s closed. It’s a little more formal look than I expected, but this Tyler seems to like it.
I’m going to knit another version, but from cuff to cuff and without the extended fronts. I may pick up a collar afterward, and am thinking of adding a cable, too.
I have a sweater for myself to show you next week. 🙂
Happy new year! I’ve been really busy so far this year and have fallen behind on my weekly posting. There were also a lot of projects not-quite-done, but I’ll try to get back on track now.
First up, some sewing for Tyler.
I stumbled across these in my search for sewing patterns for Tyler Wentworth. They were published in 1999, so they would have originally been printed patterns. They’re pretty tough to find in that format now.
This is a picture from the archive at Dreamcastle Dolls, a fantastic resource for identifying and dating Tonner Dolls, accessories etc. These patterns are shown as available accessories from 1999 and these are the three that you can find as digital downloads on Etsy.
From the listing at Dreamcastle, it looks as if there were two more patterns at least in the planning. I’ve never seen these elsewhere, so it’s possible they were never actually published. (??) Too bad – that blazer and raincoat at the far right look just about perfect to me!
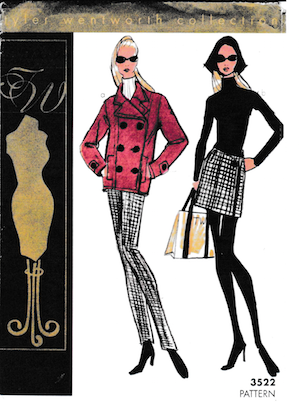
Today, we’ll talk about TW 3522, the Weekend Wardrobe. This pattern includes a peacoat, pants, a turtleneck, skirt, tights, socks and a tote bag. In that way, it reminds me of those Vogue Wardrobe patterns, which I like a lot, the ones that give you enough pieces to make a little capsule wardrobe.
As usual, I printed it out at 100% and sewed a muslin of the coat and the trousers. They fit, so I was off to the races.
I made a few changes right away. This pattern has a 3/8″ seam allowance – usually doll patterns have 1/4″ seam allowances, so that left a lot of extra fabric, especially around the curves. Also, the cutting line is drawn thick, so if you cut on the outside of it, the seam allowance gets close to 1/2″. After a battle royale to get the sleeves inserted in the coat without tucks on the muslin, I decided to trim all seam allowances to 1/4″ on my pattern pieces.
There are a lot of nice touches in these patterns. The trousers have a faux slash pocket at the front. The jacket has welts for faux pockets (the doll can’t put her hand in the pocket like the drawn model…although that could be changed. Hmm.) and there are bands on the sleeve cuffs. (I think they’re drawn backward in the illustration and did mine the other way, so the tab goes over the sleeve.)
Here’s Tyler in the whole ensemble.
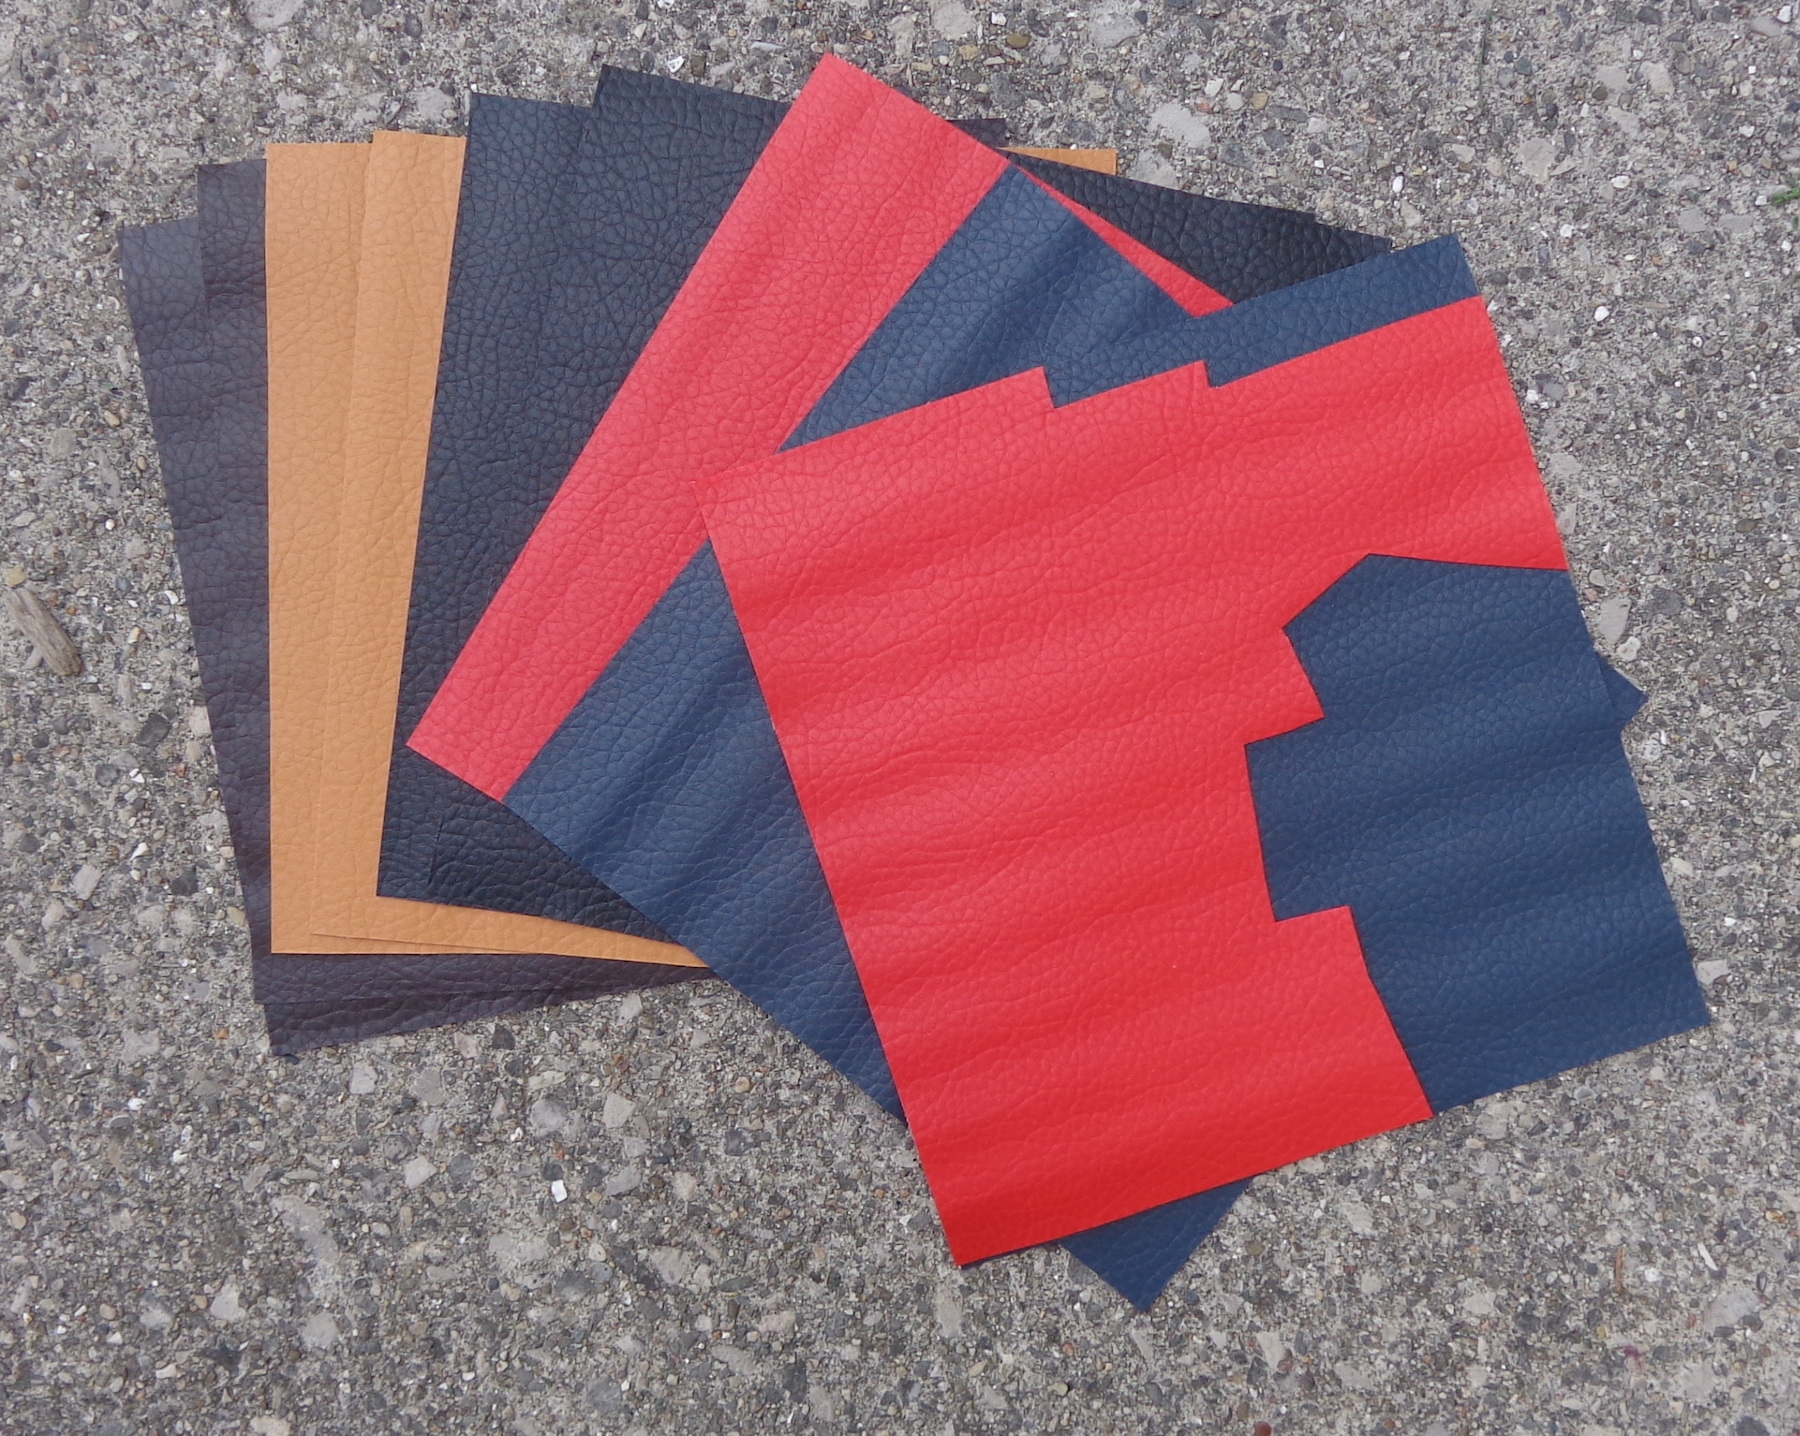
I cut the good version of the pants from a very thin pleather in mauve. This came from I Sew For Doll and is the thinnest fake leather I’ve ever found – there are thickness variations between colours and the black is the thinnest of all. Each piece is 30 x 45cm – I used just over half to cut these pants for Tyler. There’s enough left to make pants for Silkstone B and maybe a bit after that. This is #12 purple.
Pleather doesn’t fray since it’s a woven base with the leather surface fused to it, so there’s no need to finish the seam allowances. I used a slightly longer stitch length than I would have otherwise, as the pleather surface tends to drag on both the presser foot and the feed dog plate of the machine – if it drags too much, the fused surface separates from the woven base. (Ask me how I know.) I tried a lighter embroidery foot but it made no difference.
I top-stitched the outside leg seam to keep the seam allowances to one side and to give the pants the look of jeans. The pants have a back opening, which looks fine when the doll is standing, but gapes open when she sits—as I so often do, I added a tab to one trouser back for a little extra discretion. These went together really well and I’m pleased with them. The waistband looks loose, but the pleather doesn’t stretch so the doll can be posed better this way.
The turtleneck is sewn of knit fabric and the entire back opens, closing with snaps. While I understand the practicality of this, it’s not my favorite solution. The one shown here is the third attempt – the other two are in the trash. My concern was finishing the seam allowances as jersey will fray and run. I tried to serge the first version, which is what I would do for a human-sized top like this, but the curves were too tight. I’m just not that accurate on the serger, so that was a fail. I did, though, learn that having the back entirely open meant that the top gaped open below the waist – it’s a knit fabric, after all, so it pulled open over the hips. On subsequent versions, I sewed a partial back seam, from the hem almost to the waist.
Here’s Tyler doing some push-ups so you can see the back modification to the top.
For my second attempt, I used the overlock stitch on my machine, but wasn’t any happier with that result. It was just too bulky. Number three was the winner – I remembered that I fuse knit interfacing to the hems on my t-shirts to stabilize the seam allowance, so I cut fusible knit interfacing into 1/4″ wide strips. I fused it to the seam allowances all around the pieces of the top – not the sleeve cap or armscye, since they need to be stretched to fit – then assembled the top using straight stitches. I stitched a second row 1/8″ inside the sleeve seam, then trimmed it. All the other seam allowances could be trimmed down to 1/8″ because they were fused. This worked brilliantly, and I used clear snaps to close the back of the top.
I extended the top for a dress cut of a different knit fabric, which Sydney is wearing here. I made Sydney a little belt, too. The center back seam on the dress is sewn from hem to the widest point of the hips, but I’m thinking it could have been sewn almost to the waist. Because the fabric stretches, that would still have worked.
The one detail I don’t love is the thickness of the turtleneck, especially where it overlaps to fasten in the back, but I don’t see a way around that. There’s a lot of layered fabric in a small area with the seam allowances. I trimmed them right down, but it’s still bulky.
I cut the peacoat of a fabric that looks like chalk-stripe wool in scale. (It’s probably polyester.) The collar is cut on the bias, so I seamed it at the center back to make it symmetrical at the front, as one would do with a human-size coat. That gave the collar a bit more bulk at the center-back, so I cut the undercollar of lining instead of the main fabric. This coat is lined with Bemberg rayon, which I think is perfect for the girls.
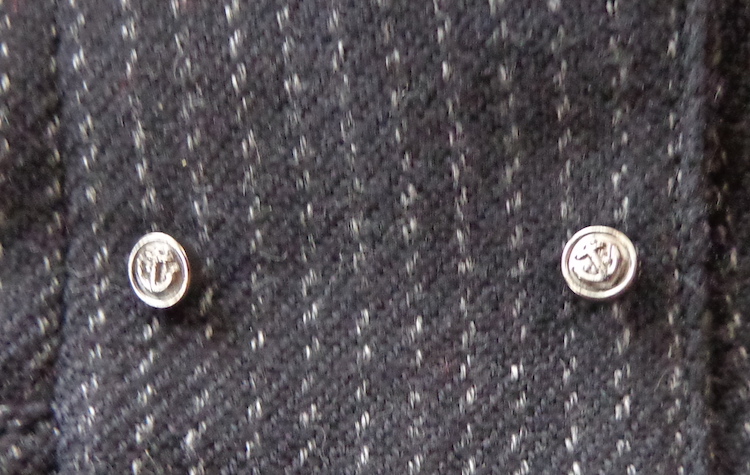
I also added a half-belt at the back to draw in the coat a bit. This makes an interesting problem since doll buttons are usually sold in packs of ten – I had to use only six on the front of the coat instead of the eight specified, because there are two on the cuff and I added two to the belt.
The buttons are adorable, IMO. They’re 6mm buttons with little anchors ordered from I Sew for Doll.
The tote bag is like a big LL Bean tote. I cut this one of grey pleather and lined it with a coordinating cotton print. (The pattern doesn’t include a lining, but it’s simple to add.) I even thought about adding a zipper since I dislike open totes when travelling, but gave up that idea (for the moment). The handles are satin ribbon, which snags a bit, and there are four beads on the bottom for feet. I added a charm, just for fun.
Finally, I knit a coordinating scarf in Kidsilk Haze Stripe, and Tyler’s ready for her weekend away. I still need to make the skirt.
I really like this pattern and am sewing some different colour combinations for the other girls. Weekend trips are more fun with friends!
I’ve been sewing clothes for my dolls again recently – I’ll show you when something is done. There’s a lot of handwork on this particular couturier gown! – and went looking for a video I watched a long while ago. I found a trove of videos made by Mattel for Silkstone Barbies which show fantastic dioramas.
This one from 2012 is called Behind the Scenes of the Atelier. It features the five new dolls, but also a really terrific diorama. It’s like a visit to a Paris couturier in the 1950’s. This is a longer video with some behind-the-scenes commentary from the designer, Robert Best.
The 2015 video – again showcasing five new dolls – takes us to a runway show at a Paris couturier. There’s also a quick visit to the atelier again. I love the colour choices, how the backgrounds are all black and cream (hello, Coco Chanel) so that the dolls really contrast.
There are six dolls showcased in the 2013 video (there was a new Ken that year plus five Barbies) on a ship similar to the Titanic. This one has a fashion editor voiceover and is sepia-toned.
The 2011 video showcases five dolls, and the diorama setting is a train station – the train being the Trans Siberian Express. it reminds me of the opening scenes of the movie Murder on the Orient Express, the one with Michael York.
This video from 2014 spotlights one doll (Fiorella) in an Italian town. I like how it starts in black-and-white then changes to colour.
And this is the one I was looking for in the first place! It’s from 2016 and is the reason my girls now have a Vespa. (Who knew such a thing existed in 1/6 scale?) Again, there are five new dolls, photographed this time in a photographer’s loft – but check out the Paris streetscape! That’s a diorama. I would love the opportunity to explore it more closely.
I went hunting about information about the artist(s) who built the dioramas or any sites that show the dioramas in more detail. There is this video showing the artists building the Russian train diarama, which is huge!
I also discovered that the Silkstone Barbie Fashion Model Collection is coming back, according to Robert Best, which is awesome news. I can’t wait to see what he designs for the girls next.
There were four dolls in 2019, of which I bought only Best in Black, and three in 2020. I bought Best to a Tea. The Gala’s Best is usually listed as the last Silkstone Barbie, but she won’t be any longer. These two are also the only two articulated Silkstones in my collection – this body sculpt is thinner than the original Silkstone doll.
2019 Barbie Silkstone Best in Black
2020 Barbie Silkstone Best to a Tea
2020 Barbie Silkstone The Gala’s Best
Here’s a reference website showing an inventory of all Barbies. FYI, clicking on the images takes you to eBay instead of a larger version of the image. Here’s the Silkstone page.
I should have a finished ball gown to show you soon. 🙂
My post is a bit late today, because it took me a bit to get all the pictures taken and edited this morning! But here we go.
McCalls 3701 is another out-of-print pattern for Tyler Wentworth and other 16″ dolls. It includes a straight skirt, a jacket and a blouse that’s actually a bodysuit.
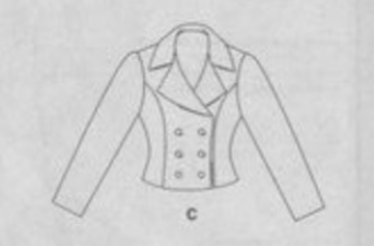
Here’s the line drawing for the jacket, which is the part that interests me.
But argh. It’s another digital download without a scale for reference. This time, I had a plan. I printed, cut and quickly assembled a test jacket from scrap fabric. Actually, I ended up doing this three times – printing the pattern at 100%, at 110% and at 115%. I sewed the samples out of plain cotton and cut off the hems. I also left off the collar since it was the main proportions I wanted to get right.
100%
110%
115%
You can see that the 100% version is just too small. The 110% one is a better fit, even though the shoulders are starting to get wide. (Maybe that was a 90’s thing.) The sleeves are still too short and the center front line can’t be brought together over the bust. At 115%, we have a much better fit over the bust – the CF can be brought together until just below the bust, which might be a design choice. The sleeves are still too short. I sewed a mock-up of the skirt at 115%, which she’s wearing in all three images. It was snug through the hips but otherwise fit okay, so I added 1/8″ to the side seams of each front and back piece for the final garment.
You might remember that in McCalls 3845, the sleeves were too short, too, AND they were too short on the DBDoll raincoat as well. This sent me down a rabbit hole, trying to establish whether the original dolls had slightly shorter arms. These are older patterns, after all, and show the original straight arm (SA) doll modelling the garments. Those dolls did have shorter arms, but not enough to explain this difference. The patterns were 1/4″ too short and the difference between the straight arm Tyler body sculpt (SA) and the bendable elbow Tyler body sculpt (BA) is maybe 1/8″. The bendable wrist Tyler body sculpt (BW) has arms the same length as the BA type. That ball joint at the elbow adds a bit of length but not enough to explain the issue with the patterns.
I still had to manually lengthen the sleeves and went with 3/8″. Here’s Sydney in the final suit:
There are buttons on the cuffs, too, which makes me happy. (I’m even happier that I had buttons of this design and colour in two sizes.)
You can see that it still tugs a little bit over the bust – that snap is visible. I think turn-of-cloth might have emphasized this more over the muslin, as the check fabric is thicker than the cotton used for the muslin—plus this final jacket is lined as well.
The skirt gave me some issues, the same issues as with this skirt for B, with a similar pleat design. The picture on the left is my version on B: the one on the right is the picture from the book. (Here’s the blog post about this suit for B.)
Double Breasted Suit
The pleat in the skirt is a reverse box pleat (on the suit for B, there are two of them), so if you line the skirt and sew the hem, then the center back seam, the lining and fabric will be together for the pleat. This is fine, but both of these patterns want the waistline turned into the inside – you can’t do that if the pleat is sewn from the top of the pleat to the waist. Hmm.
There are several possible solutions. The easiest one would be NOT to line the skirt. The second is to add a waistband to the skirt, which encases the seam allowances at the waist from both the lining and the main fabric. That’s what I did on Sydney’s suit. I cut a piece of fabric 1″ wide and 7″ long, then trimmed the ends. I think it’s a bit wide, finishing out at 1/4″, so would cut it at 7/8″ if I used this solution again.
The third option, which I thought of later, would be to add a facing at the waist, probably cut on the bias of the main fabric, that would be sewn to the top then turned to the inside. I’d have to sew the bottom edge of it to the lining by hand, but it would also make a nice edge and would retain the waistband-less design of the skirt. Next time. 🙂
You can also see a peek of cream silk in the first photo of Sydney and have a better view of the bodice in this one. I decided that she needed something under the jacket, so made a strapless blouse using the basic bodice pattern from the Fashion Doll Clothing book. I cut it of silk, then lined it – it has a pair of snaps on the back. It also fit perfectly the first time, which was awesome. Next time, I’ll make it a smidge longer. Ah, you can see the cuff buttons on this one!
It’s funny that I chose the same black and cream check for both double-breasted suits, but I do like how it finishes out with the black buttons. Sydney also has the perfect shoes. The one for Sydney has a better back closure on the skirt, too, because I added a tab of fabric to one back piece. Hmm. Methinks Sydney needs some black stockings. All the ones I have are nude (although she’s not wearing any in these pics.)
Phew. I have some silk chosen to make this suit again and will show you when that’s done. In the meantime, that bodice pattern – which has princess seams – has me thinking about ballgowns…
Remember this sewing pattern for Tyler Wentworth dolls, McCalls 3845? Well, I didn’t just make the purse from it. 🙂
The outfit on the left is a sleeveless dress with a jacket – they show the jacket with fur or feather trim. I used velveteen on mine.
Here’s the finished dinner suit. Red crepe, lined with black polyester with red polka dots. The collar and cuffs are black velveteen and I used two black rose beads on the fronts. I like a black purse with this one.
There were issues with this little suit. The first jacket I made was too small—the sleeves were too short and the fronts didn’t meet. I redrafted the pattern with longer sleeves and bigger front pieces so that they met up at the center-front. Since the pattern was a digital download, it’s possible that I didn’t print the pattern at the right % size originally. This is a tricky bit with digital downloads that don’t have any scale on them. I printed the pattern at 100% but that wasn’t right. At any rate, it’s mostly right now. (The sleeves are a bit too wide in this version.)
The red crepe wasn’t the best choice of fabric, since it’s pretty thick. That’s why the bolero doesn’t close when she has the dress on. It’s just bulky. (Without the dress, the jacket closes, but it’s a bit of a bold look.) The fabric was also stretchy in the crosswise direction, which made accuracy a challenge. I thought the fabric was the reason why the bodice didn’t fit as well as I would have liked. It’s just too wide at the top.
But no. I realized that there is a teensy mistake in the pattern.
This is the center piece for the bodice front. Usually, the printing on the pattern indicates the top and bottom by its direction – here, it looks like the larger edge should be the top. But the bodice doesn’t fit well into the top of the skirt this way, and the top gapes open on the final dress as you can see on the red dress above. On a whim, I turned it upside down for my second version of the dress and voilà! It’s PERFECT. So, the label on the pattern piece is upside down. Now, it has my handwritten labels on it. 🙂
Here’s the variation of the dress made by flaring the skirt, with the middle bodice piece the other way around. I cut it of the polka-dot polyester, lined with solid black. The plan was to give our girl an easy change of look with the jacket when she’s travelling. (You know how keen dolls are about globetrotting…)
Here’s the finished dress.
It fits MUCH better at the top front. The ruffle at the hem of the flared skirt is actually lingerie elastic trim, so it stretches, but it’s the perfect scale and it won’t be able to stretch now.
Of course, she needs a different purse for this outfit and I like the red one. 🙂
I also added a zipper to the back instead of the dress closing with snaps, which was bulky in the red version. There were a few tweaks to making that change – because the original closure with the snaps overlaps in the back, while the zipper means the back pieces just meet but don’t overlap. We’ll talk about that in a minute.
I ordered doll-sized invisible zippers online. The zipper has to be long enough to open over the widest point of the doll’s body – that’s her bum. 🙂 For a strapless dress for Tyler, I use a 10cm zipper. If the zipper went all the way to the nape, I’d use a 12cm one. Doll zippers tend to not have stops at the top – or maybe it’s just the ones I have – so it’s easy to zip them up with enthusiasm and end up with three pieces that won’t go back together. The first thing I do now before using a doll zipper is overcast a few stitches at the top of the teeth on each tape.
Because the pieces overlap in the original design, the seam allowances need to be reduced for the zipper. If the center back was marked on the pattern, this would be easy—you’d just make a new seam allowance from that. But the CB isn’t marked on this pattern and I didn’t want to guess since tiny increments can make a big difference with doll clothes. There’s a kind of a tab on the right back so I removed that, making both backs the same (mirror images of each other).
For the zippered back, I also changed the order of construction. The pattern instructions are to sew together all of the bodice pieces, then all of the skirt pieces, then sew them together at the waist and end up having only the center back seam open. Instead, I sewed all the front bodice pieces, then the front skirt, then sewed them together to complete the front. I sewed both back bodice pieces to their respective back skirt pieces, then inserted the zipper. It’s an invisible zipper, so it’s easier to set in when the back is flat. Once the zipper was in, I basted the side seams and tried the dress on the doll. I had to take a little bit extra out of the back to make it fit properly (that would be the seam allowance that I hadn’t already reduced), so I took it out of the side seams.
Here are the backs of the two dresses:
And yes, the red one should lap the other way. I realized I’d done it backwards after I’d wrestled the base of the slit into place (to minimize the gap). In fact, this exercise is what pushed me to trying the zipper – getting the overlap in place was frustrating and I don’t love the result. If the doll bends at the waist, the back gapes open, and there’s a lot of bulk at the center back with all those layers. The metal zipper stop on the black dress is still visible, a sign that I need to refine my invisible zipper installation technique.
As far as using the jacket with the flared dress, I ended up with a small problem – the red purse is an orange-red and the jacket is a cherry red. They don’t go together. (Fortunately, I had shoes in the right shade of red to match the purse!) I’ll cut out another jacket to go with the second dress. I finally found some fake fur that has a short enough nap for the dolls, so I’ll use that in black for the collar and cuffs, but am waffling about the fabric. Should it be solid black lined with polka dots, or polka dots lined with black? The polka dot polyester just feels a bit light for a jacket to me. Hmm.
A well-dressed doll needs accessories, but those little finishing details add up. I’ve yet to figure out what to do about shoes for my dolls – other than buying them for $$$ – but something fun happened recently with purses.
I bought a digital edition of this sewing pattern for Tyler Wentworth dolls, McCalls 3845. It’s out of print – I think it’s about 20 years old – so you can hunt down an old print copy or buy a digital download on Etsy which is (alas) unlikely to be a licensed and legal copy. I wish rights holders would make this older content available again but that seems unlikely to happen soon.
You can see that both dolls are carrying purses. You can’t really see the purse carried by the doll on the left in the dinner suit, beyond it being more square than the drawstring one.
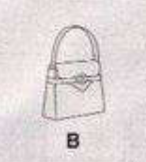
Well, lo and behold, it’s kind of a Birkin bag.
Here’s the line drawing from the pattern instructions:
Hmm. You cut the bag from faux leather and add a buckle to the strap across the front that holds the flap closed.
I cut one from a square of fake leather. These came in a package at the dollar store – there are two each of five colours (black, brown, navy, caramel and red) for a couple of dollars. The squares are about 7.5″ x 7.5″. (20cm by 20cm) It took less than half of one to cut out a purse – you can see that I could cut at least one more from the same square. I used a rotary cutter and ruler, btw, to get the straps perfectly straight.
And here’s my first purse:
I think it’s adorable!
It was careful sewing – I slowed down the machine speed – but not that difficult. The toughest part was the corner of each side at the bottom front. I backtacked each stitching line, but I think next time, I’ll pull the theads to the inside of the bag and knot them.
The buckle is one I bought online from China so it’s probably the most expensive element. I ordered 40 more in mixed colours on Etsy for about $16 CA including shipping ($11CA plus $5 for shipping), since I’m using a lot of them. That makes them about 40 cents each. Individually, they’re more like 70 cents each plus shipping. It’s a necessary touch, though.
I’m thinking also that I could use a Sharpie to color the white edges that peek out, or even do one with a contrasting color. Hmm. I put a rolled Kleenex tissue in the bottom to support the shape. Overall, I’m pretty pleased by it.
I’ll be making some more purses from the squares with this pattern since those buckles have arrived. The girls need brown and caramel purses and I’ll try the navy with contrast cream stitching, too.
Next week, I’ll show you the little dinner suit finished. 🙂
I have been AWOL lately and apologize for that. August was insanely busy with a Kickstarter campaign to fulfill and a book to finish and publish—plus the usual August garden and canning to be done. I did some crafting, but didn’t take pictures—until now.
The girls scored some new chairs recently, and today’s the day to share.
I started with this tutorial and free pattern at Resin Rapture (who creates the most amazing dioramas. Go on and look. I’ll wait.) which is for a 1:6 scale chair. I downloaded the pattern and followed the instructions to make the chair and pad it. (It’s a lot harder than you’d think to cut foamboard so the edges are perfectly square.)
There are two options presented for upholstery, gluing the fabric on or making a slipcover. The pattern creator preferred a slipcover. I wasn’t so fussed about having a slipcover as the final finish, though. I don’t like them in real life , so didn’t want them for my dolls—and while it’s removable and washable, I think the chances of my washing a slipcover for a doll chair to be pretty low. (Non-existent, actually.) I watched the video from Bentley House Miniatures linked in the tutorial (it’s right here) for making and upholstering a 1:12 scale chair. The fabric is all glued onto the chair for the final finish.
It seems that when it comes to minis and making for dolls, there are people who glue and people who sew. I wanted the finish of the Bentley House mini, but I shared Resin Rapture’s concerns about glue and fabric. They don’t always play well together. So, I made my own combination—for this first one, I tried to ensure that all the glue was where it wouldn’t be visible.
I didn’t take in-progress pictures, so here’s the 1:6 finished chair.
I made my own pattern pieces for the chair covering – I liked how BHI worked from a rough shape and trimmed once they were in place, so I left a lot of excess to be trimmed later. I glued the front piece so that the glue was on the seat and under the front of the chair. Then I pressed down the two vertical edges on the back piece, and sewed it to the side pieces on the machine. After pressing the seams, I positioned it on the back of the chair, wrapped the fabric over top and bottom, and glued it in place on the inside back of the chair and under the bottom of the chair. I pulled the sides around and folded under the front edge beneath the arm rest (the straight vertical that meets the front) and put a teeny bit of glue on the seam allowance to secure that edge in place. I also turned the bottom edges under and glued them on the underside.
I trimmed the curved edges so that the seam allowance was about 3/4″, then clipped the curves and folded the fabric over the chair. The glue is only on the inside of the chair. I clamped some of these bits until they dried.
Here’s a Monster High doll in the chair with some mini-books. (That’s Elle Eedee, who arrived naked from the thrift store.)
I created a template for the inside of the sides, trimming it until it was the right height. The template is the size of the heavy fusible interfacing and the fusible webbing – for the fabric, I added 1/4″ all around. I fused the fabric (wrong side down) to the interfacing, then set the fusible webbing against the wrong side, turned in all the edges and pressed them in place. I had to be careful with this as there was fusible webbing exposed in the middle of each piece and you don’t want that stuff melted to your iron. I could have trimmed it so it was only on the edges and will do that next time. Then these two pieces were glued in place on the chair. Again, I used clamps until they were dry.
I modified the strips that run down each arm from the back of the chair, too. Once again, I used interfacing to make a finished strip of perfectly consistent width. I topstitched it on each side, turning under and topstitching one end. That one goes at the top. Then I glued it in place, counting on all those layers keeping the glue from seeping into view (and being pretty frugal with the glue, too.) I pushed pins into the foamboard down the length of these pieces – every 1/2″ or so, to hold each one in place – and left them until the glue was dry.
I made my two cushions – seat and back – but cutting them out of foamboard, then building them up with multiple layers of padding. I fussy-cut their upholstery from a contrasting fabric, glued it onto each cushion, then glued them in place. All the glue is between the cushion and the chair, where it will never be seen.
The legs are 1 cm dowels cut into 3 cm lengths, as specified in the original pattern, then “stained” with Sharpie marker. I did sand down the bottoms to give them a little shape. Because these legs are round instead of square, I added a bottom piece to the chair in foamboard to create more surface area for gluing the legs in place. (The pattern piece is the seat with the corners cut out of it.)
I added a little cushion, too. The Resin Rapture pattern also includes some book covers and a book template for the foamboard and I made these, but they’re not in the pic.
Here’s Jade Feelin’ Extra, enjoying some downtime in her new chair. (She’s my one and only Integrity Toys doll – I like her, but she’s very tall and skinny to me. She’s 12″ tall.) She’s nicked Elle’s books, which are these 1:12 scale fairy tale books (printable PDFs) from Etsy.
Next, modified the templates for my 1:4 girls and changed up my method.
I didn’t love the glue on the black chair since no matter how careful I was, I got some on the visible part of the fabric. (The solid black may have been a bad strategic choice.) It’s a water soluble glue, so I managed to get most of the offending bits off with a damp cloth. Still.
This time, I made the chair the same way and padded it the same way. I added some pieces inside the bottom of the chair to make a stop for the final piece that goes on the bottom. That also gives another edge for gluing it in place.
Then I made a slipcover our of teal velveteen, sewing it together on the machine but leaving the back piece unattached. That piece that runs down the top of the arms is tricky to fit in place, so I’m thinking about how it could be changed or simplified. I fitted it, adding more padding to the chair over the arms, then pinned it in place and sewed the back piece on by hand. (The foamboard is great this way as you can jab pins right into it to hold things in place.) The result is a lot like a slipcover, but more fitted and it’s never coming off. I then stretched the fabric tight over the bottom and glued it there, putting the glue on the inside bottom of the chair and using clamps to hold it until it dried. The legs are square this time, cut from a longer piece, sanded and stained with a Sharpie.
Here are the two chairs beside each other:
One mistake I made in my drafting of this variation of the pattern is that I didn’t trim enough from the width of the upholstery and cushions for the inside back and seat. They’re kind of fluffy and could have been trimmed down another 3/16″ or so.
This time, the cushions are actual fabric cushions, without any foamboard. Because velveteen doesn’t always love being against velveteen, I cut one side of each cushion from a cotton lawn with a teeny print that coordinates – turns out they’re reversible now, which is kind of neat. (And yes, there is a certain irony that I bought this lovely expensive lawn for a blouse for myself years ago, and the first cut out of it is for chair cushions for the girls. I need to start sewing for myself again!) And I made a little throw cushion of the velveteen. I’m thinking I might need to embeliish it.
The 1:6 girls wanted to try the big chair. (You can see that I could have padded the arms more.)
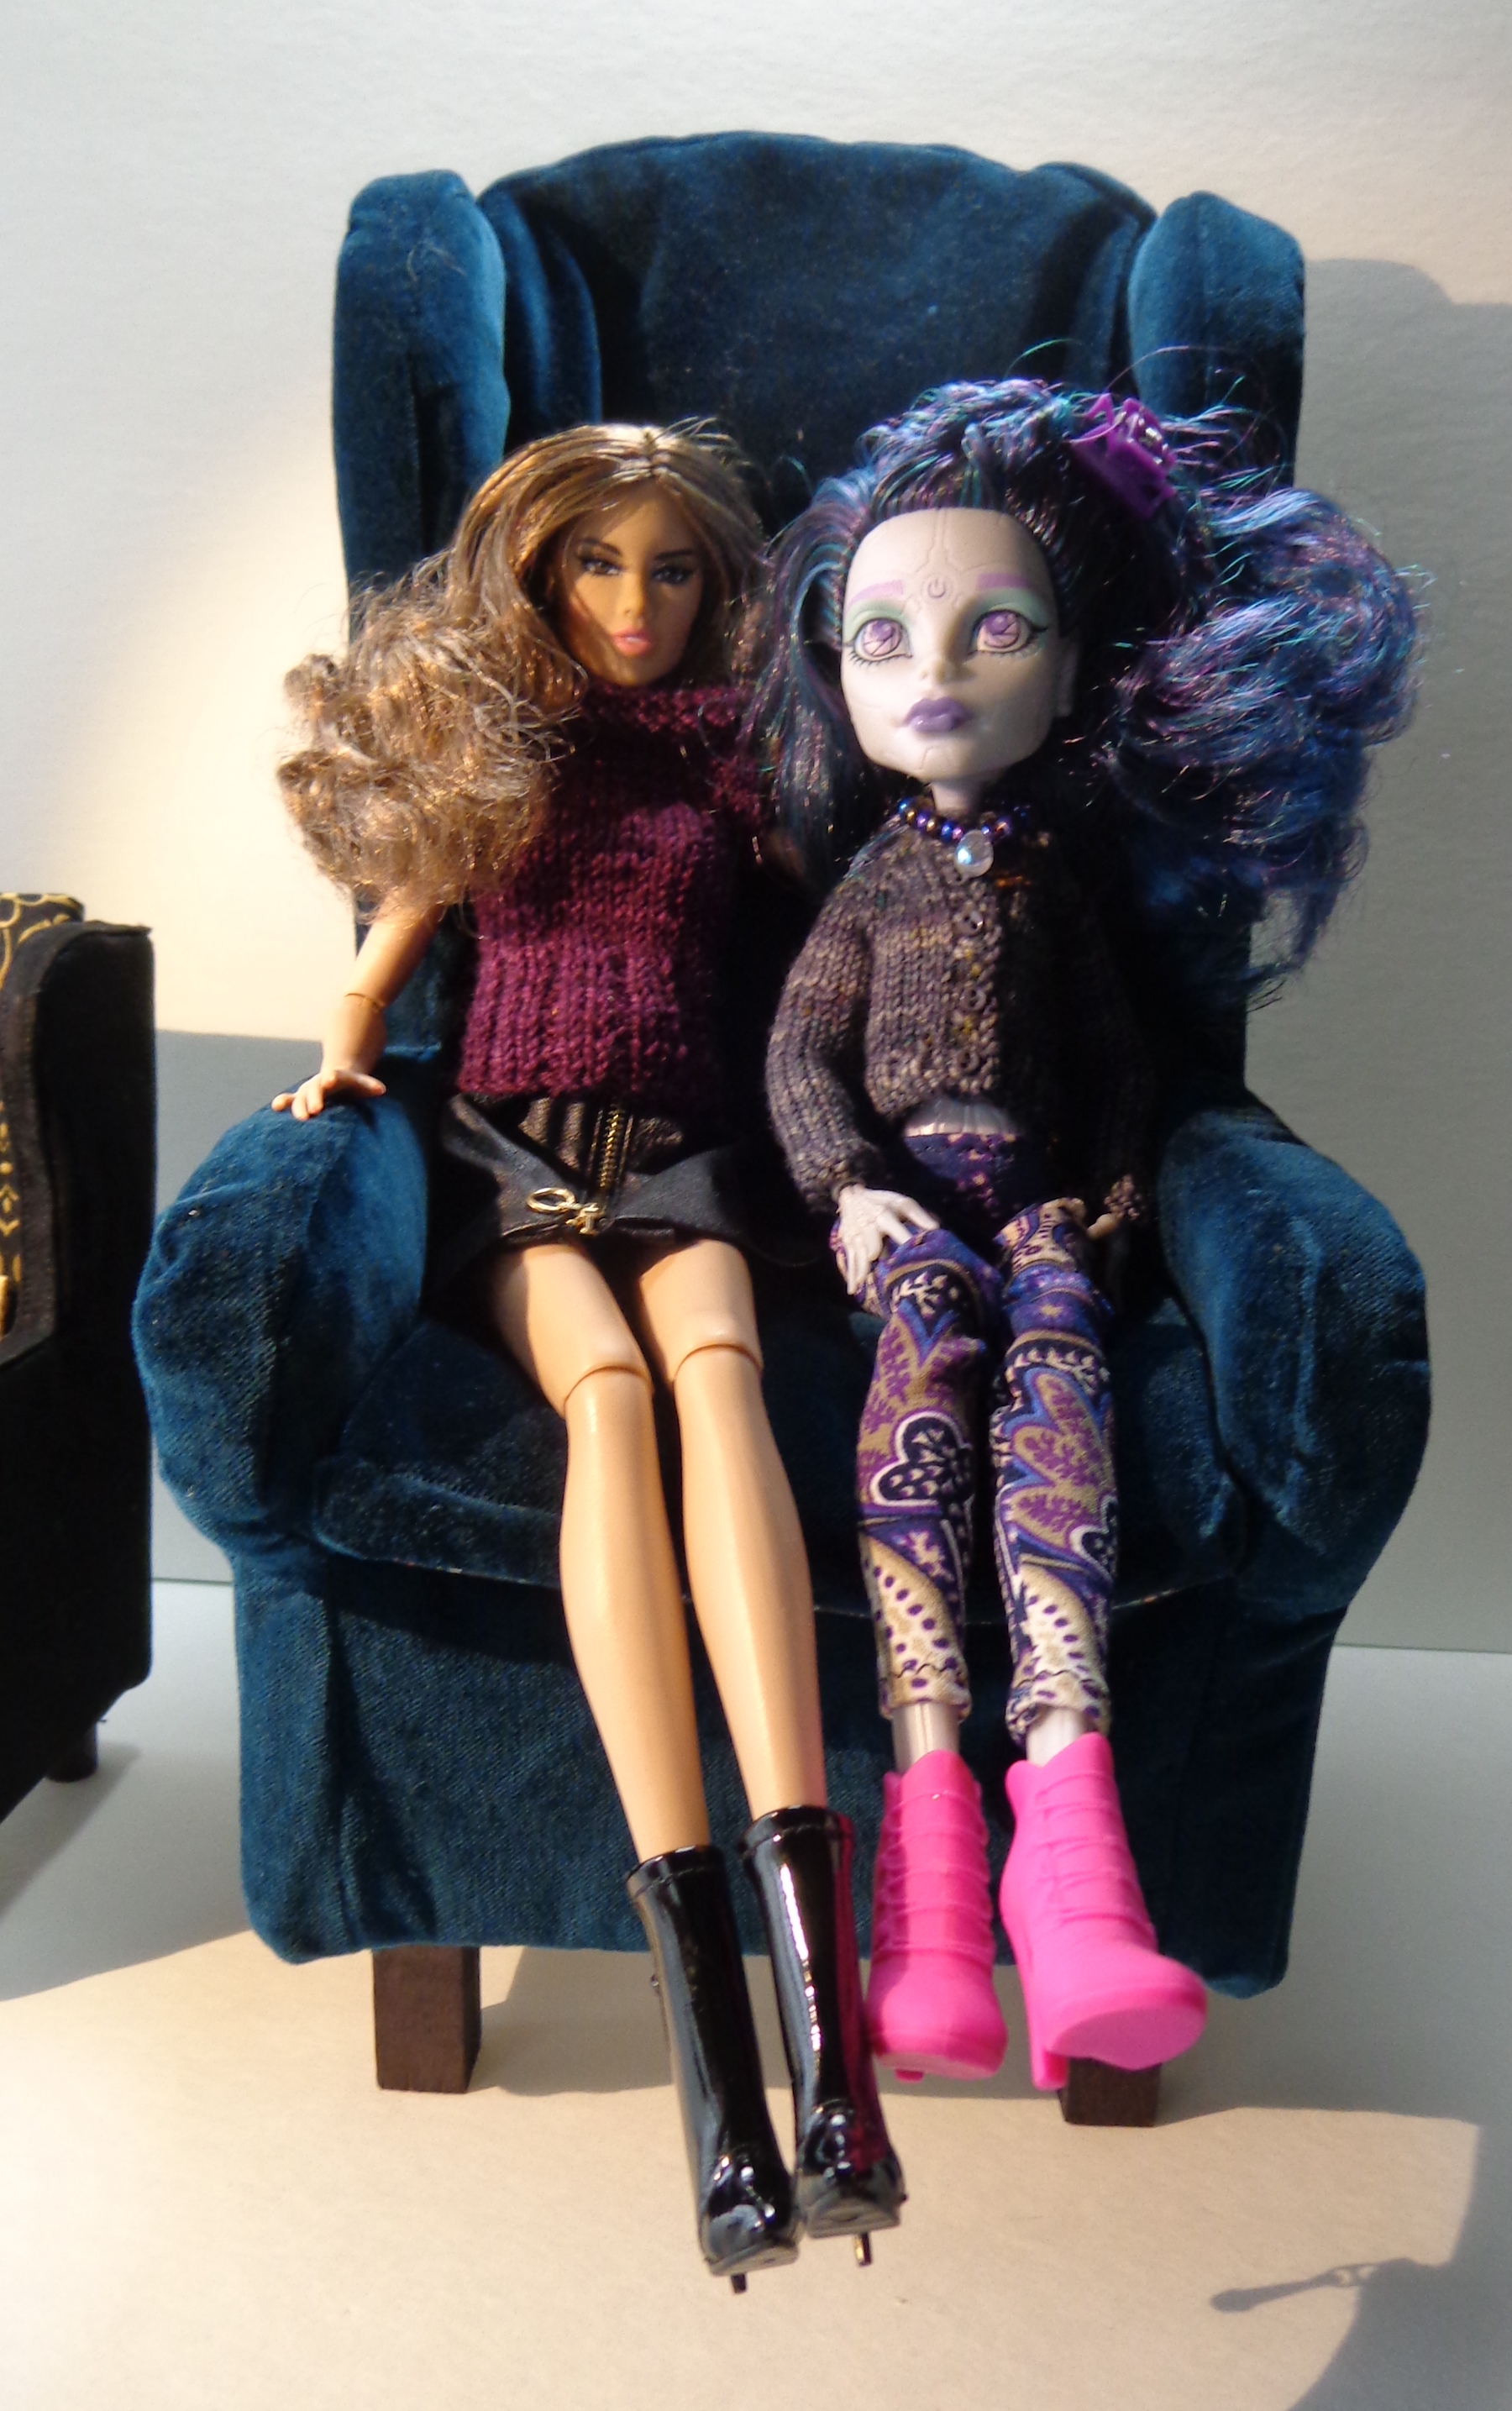
Here’s the completed chair, and here it is with Sydney, its rightful occupant in 1:4 scale.
I’m going to make another one upholstered in fake leather (because everyone loves a challenge, right?) but will make a few changes. I’ll cut the inside chair pieces narrower so they nestle in place better. I’ll also cut them of a plain cotton, maybe with fake leather pieces at top and bottom where that fabric might show. I’ll leave more fabric at the bottom of each piece for turning under, too. And I’m still thinking about how to modify that strip that goes down the arms. Hmm.
For now, though, the girls have somewhere to sit, although they’ll have to take turns.
I’ve also discovered that I really like making furniture for the girls out of foamboard.
I made a bookcase table (it doesn’t spin) and a bookcase, and have been making more books to fill it. Those books on the bookcase table and Sydney’s book are the ones from the Resin Rapture pattern, btw. I’m envisioning a library, so we’ll see how that goes.