Sometimes you need a quick project. I’ve been pushing dragon alphabets around the floor and needed some close-to-instant gratification. My go-to in these situations is making for Barbie and friends. Modern Day Goddess is a fantastic little pattern for a slip-on sleeveless dress for 11.5″ fashion dolls – and it’s free! (That’s a Ravelry link.) It requires a bit of sock yarn and is knit in the round from the top-down. There are just two ends to sew in and it’s ready to wear.
I knit the first in leftover sock yarn with a slow gradation and a tweedy flick. I followed the directions as written, then noticed that the pictures all showed Barbies with the Model Muse body sculpt. I have one (rescued from the thrift store) so here she is in her first dress. (She was naked at the thrift store and has since been washed and had her hair redone.)
This dress is the same front and back, which makes it easier to pull on right. It fits like a dream and was really a quick project.
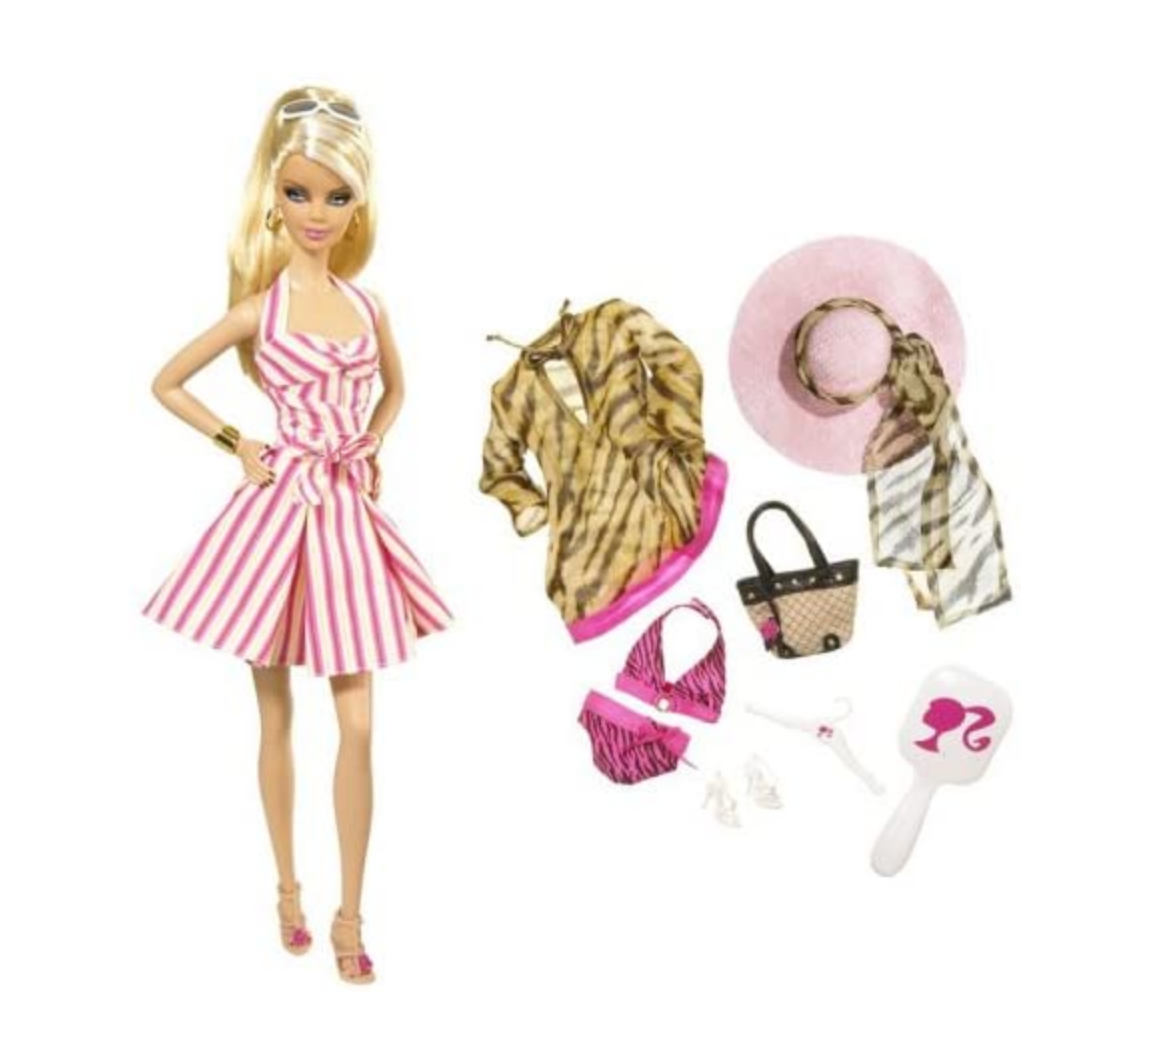
This Ms. B. is Top Model Resort Barbie from 2007, and originally looked like the image below:
Hmm. I need to steam down her bangs. But that hat! I see a listing for her on ebay NIB for $299US today, so I’ll stick with my thrift store girl and find a different hat.
The pink purse is a new acquisition – it seems to be hers now – which AstroJen sent me. It’s from a 5-Surprise Mini Fashion by Zuru. (That’s an Indigo listing. Amazon.ca doesn’t stock them. This company makes a lot of different miniature bundles, so check the fine print and make sure you’re getting the fashion bags if you want the purses.) Each one contains a mini purse and four other things (one might be a sticker. Hmm.) Jen sent me her duplicates, which was sweet. The purses are just the right size for the girls and are quite well made. (I succumbed and ordered a few myself now that I’ve seen them.) There’s a third one in kind of a silvery purple, but the Monster High girls made off with that one. (They made a quick getaway on the Vespa.)
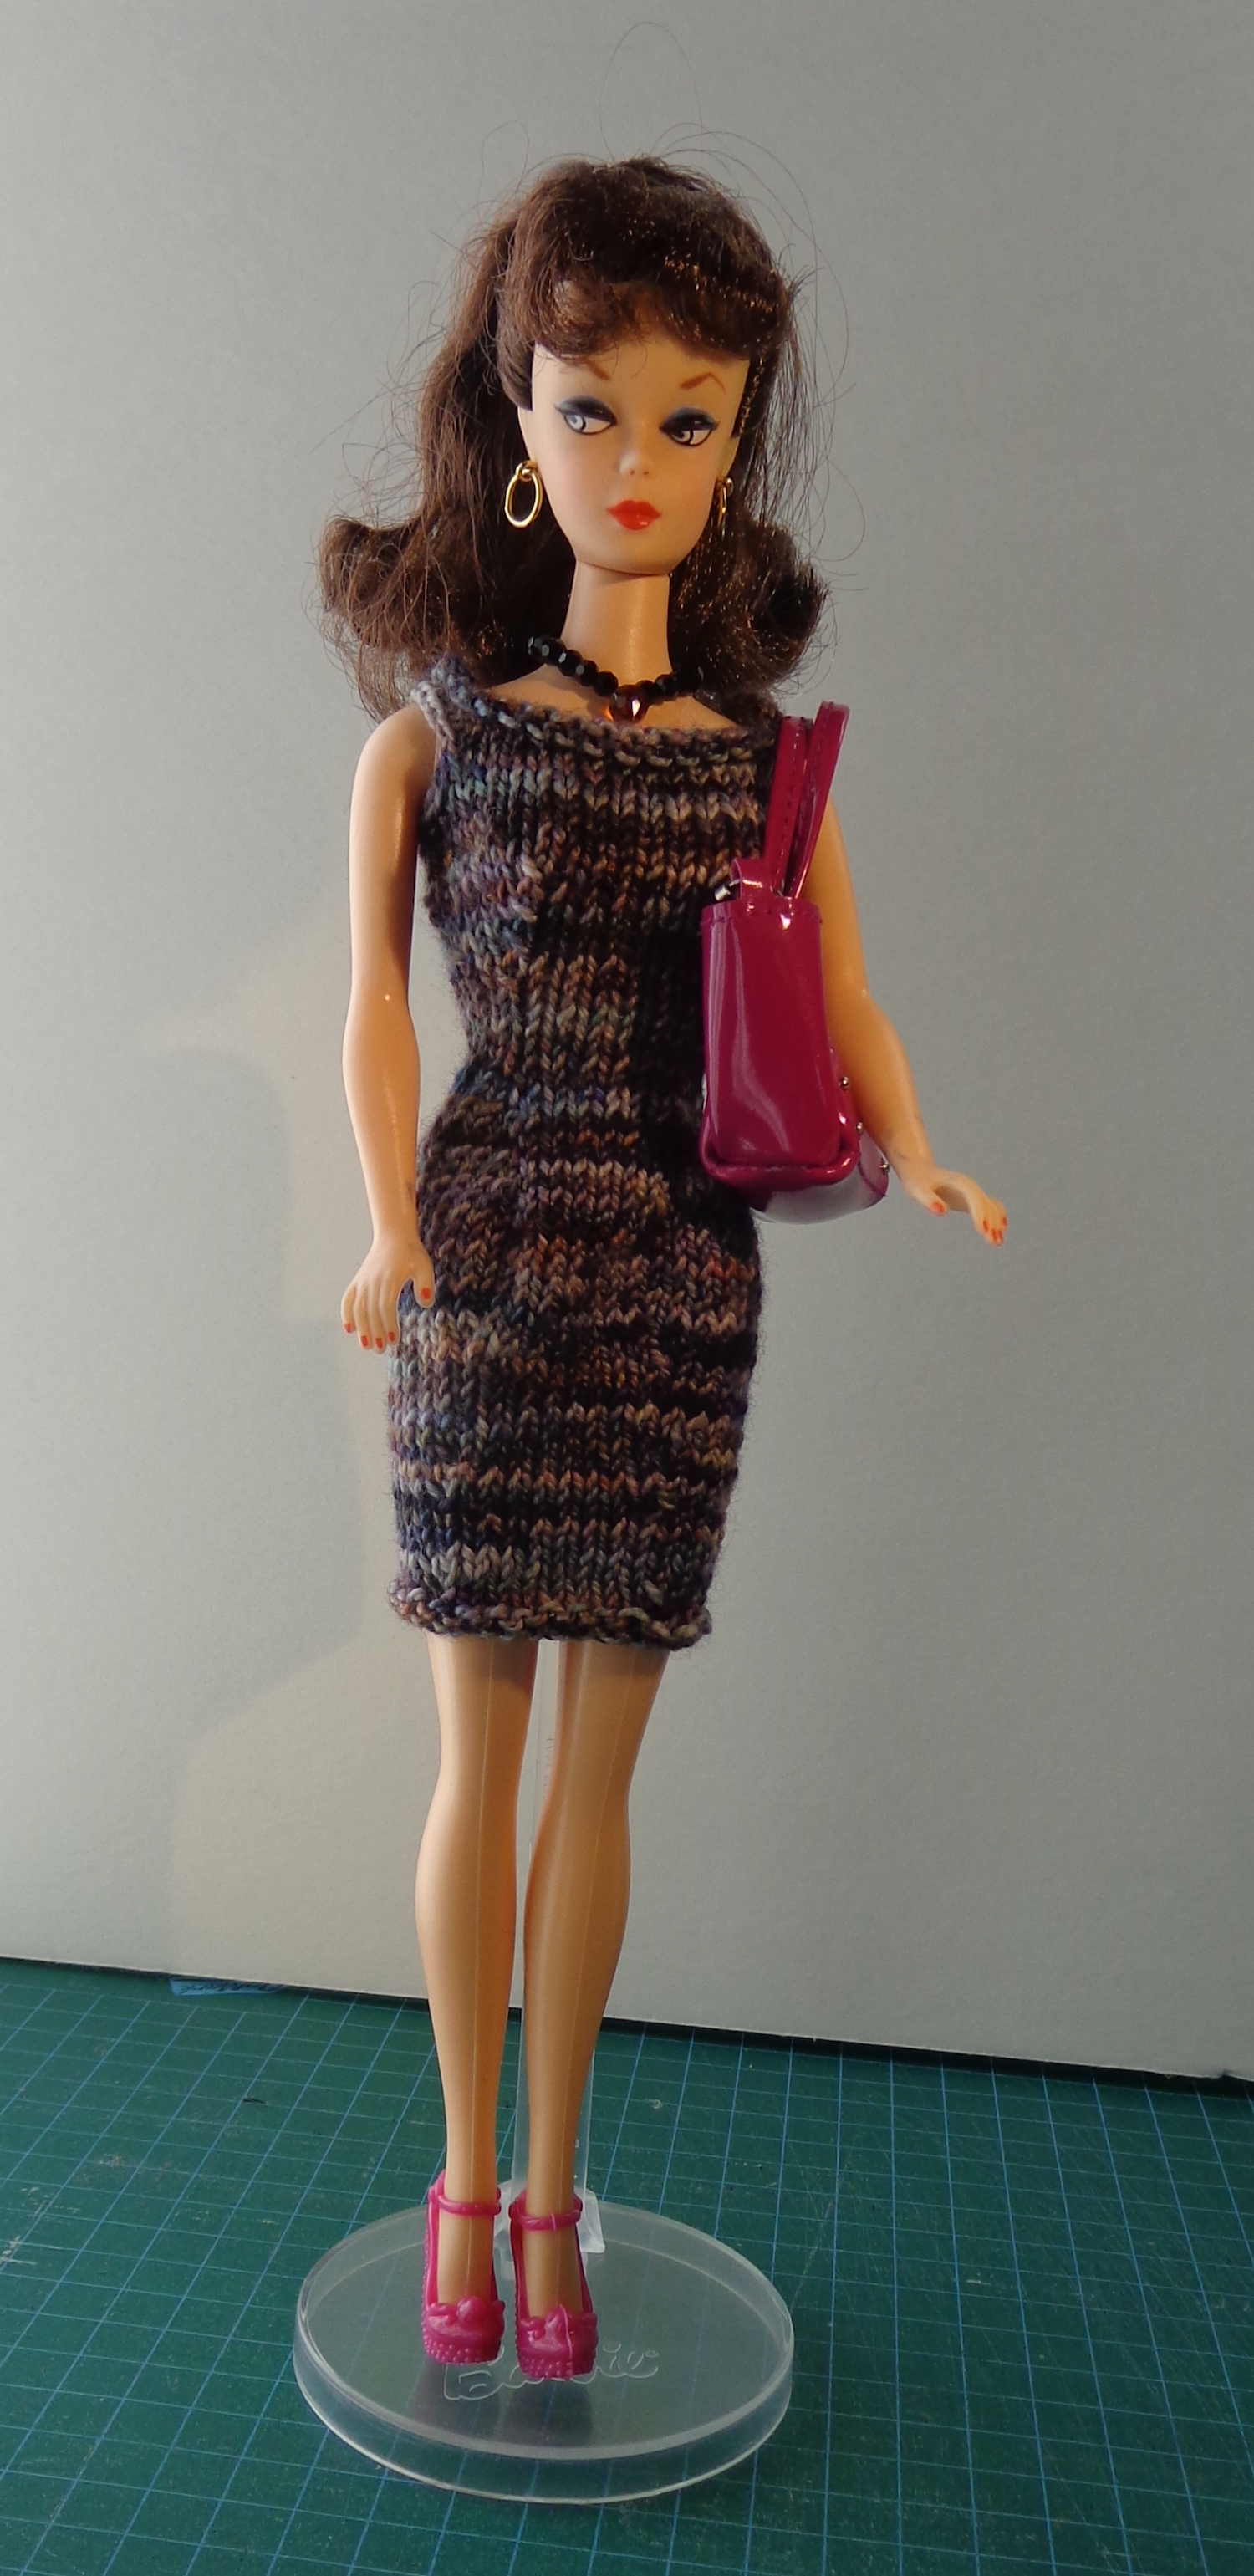
My only concern with the dress was that vintage B isn’t the same size front and back. The blue one stretched tight over the front and the armholes gapes. I made some modifications on my second version to give her a little more fabric over the girls. This one is knit in Koigu KPPPM. Ms. B. is also rocking a purse from those surprise packs.
You wouldn’t know it from her expression but she’s happy about the better fit.
What did I change?
• In the original pattern, the top decreases are at the sides. I moved the decreases to be below the bust, like darts, because there are more of them. The pattern has this nice 6-st panel running down the front and back of the skirt, so I lined up the bodice decreases with that.
• I cast on 4 more stitches.
• I also knit 2 more rows before splitting for the sleeves. That makes the neckline a bit wider and less like straps.
• I cast off fewer stitches for the sleeves. The armhole gaped on vintage B, probably because the fabric was stretching across the front.
• I positioned the sleeves so there would be more stitches on the front than the back. (That’s where my extra 4 stitches went, in front.)
• I added 2 rows to the bodice length. From that point on, I knit following the original instructions.
I really like how both versions came out. I still need to block them both, and that will uncurl the necklines a little bit.
This process inevitably gave me More Ideas, so I’ll have another variation to share later. I also found paper boxes in the stores again (yay!) so will be creating two more carriers, one for the Barbies and one for the Monster High and EverAfter High girls. We need more closet space!
A while back, I told you about the Rolife miniature room kits I’d ordered. I’ve made good progress on one of them, along with a bunch of changes, and thought I’d share an update with you today.
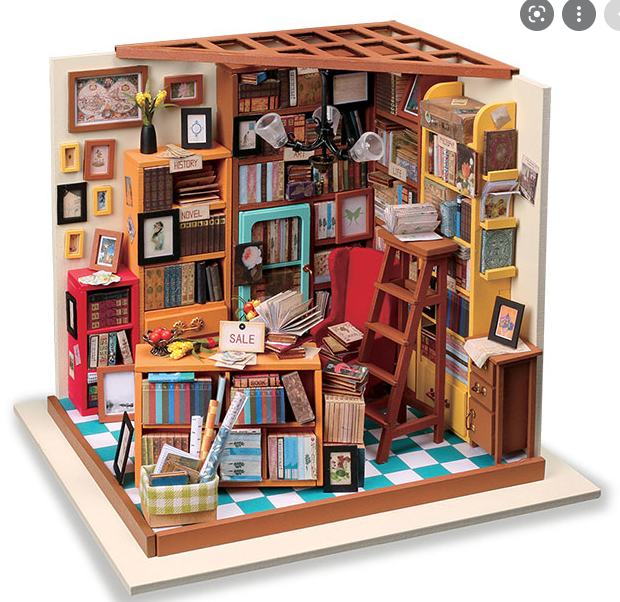
Here’s the manufacturer’s picture of Sam’s Study. (That link will take you to the Rolife website, but you can buy these kits at many places, including Amazon and Walmart.)
Rolife Sam’s Study
This is one jam-packed little room! It also has a lot of orange, which didn’t thrill me.
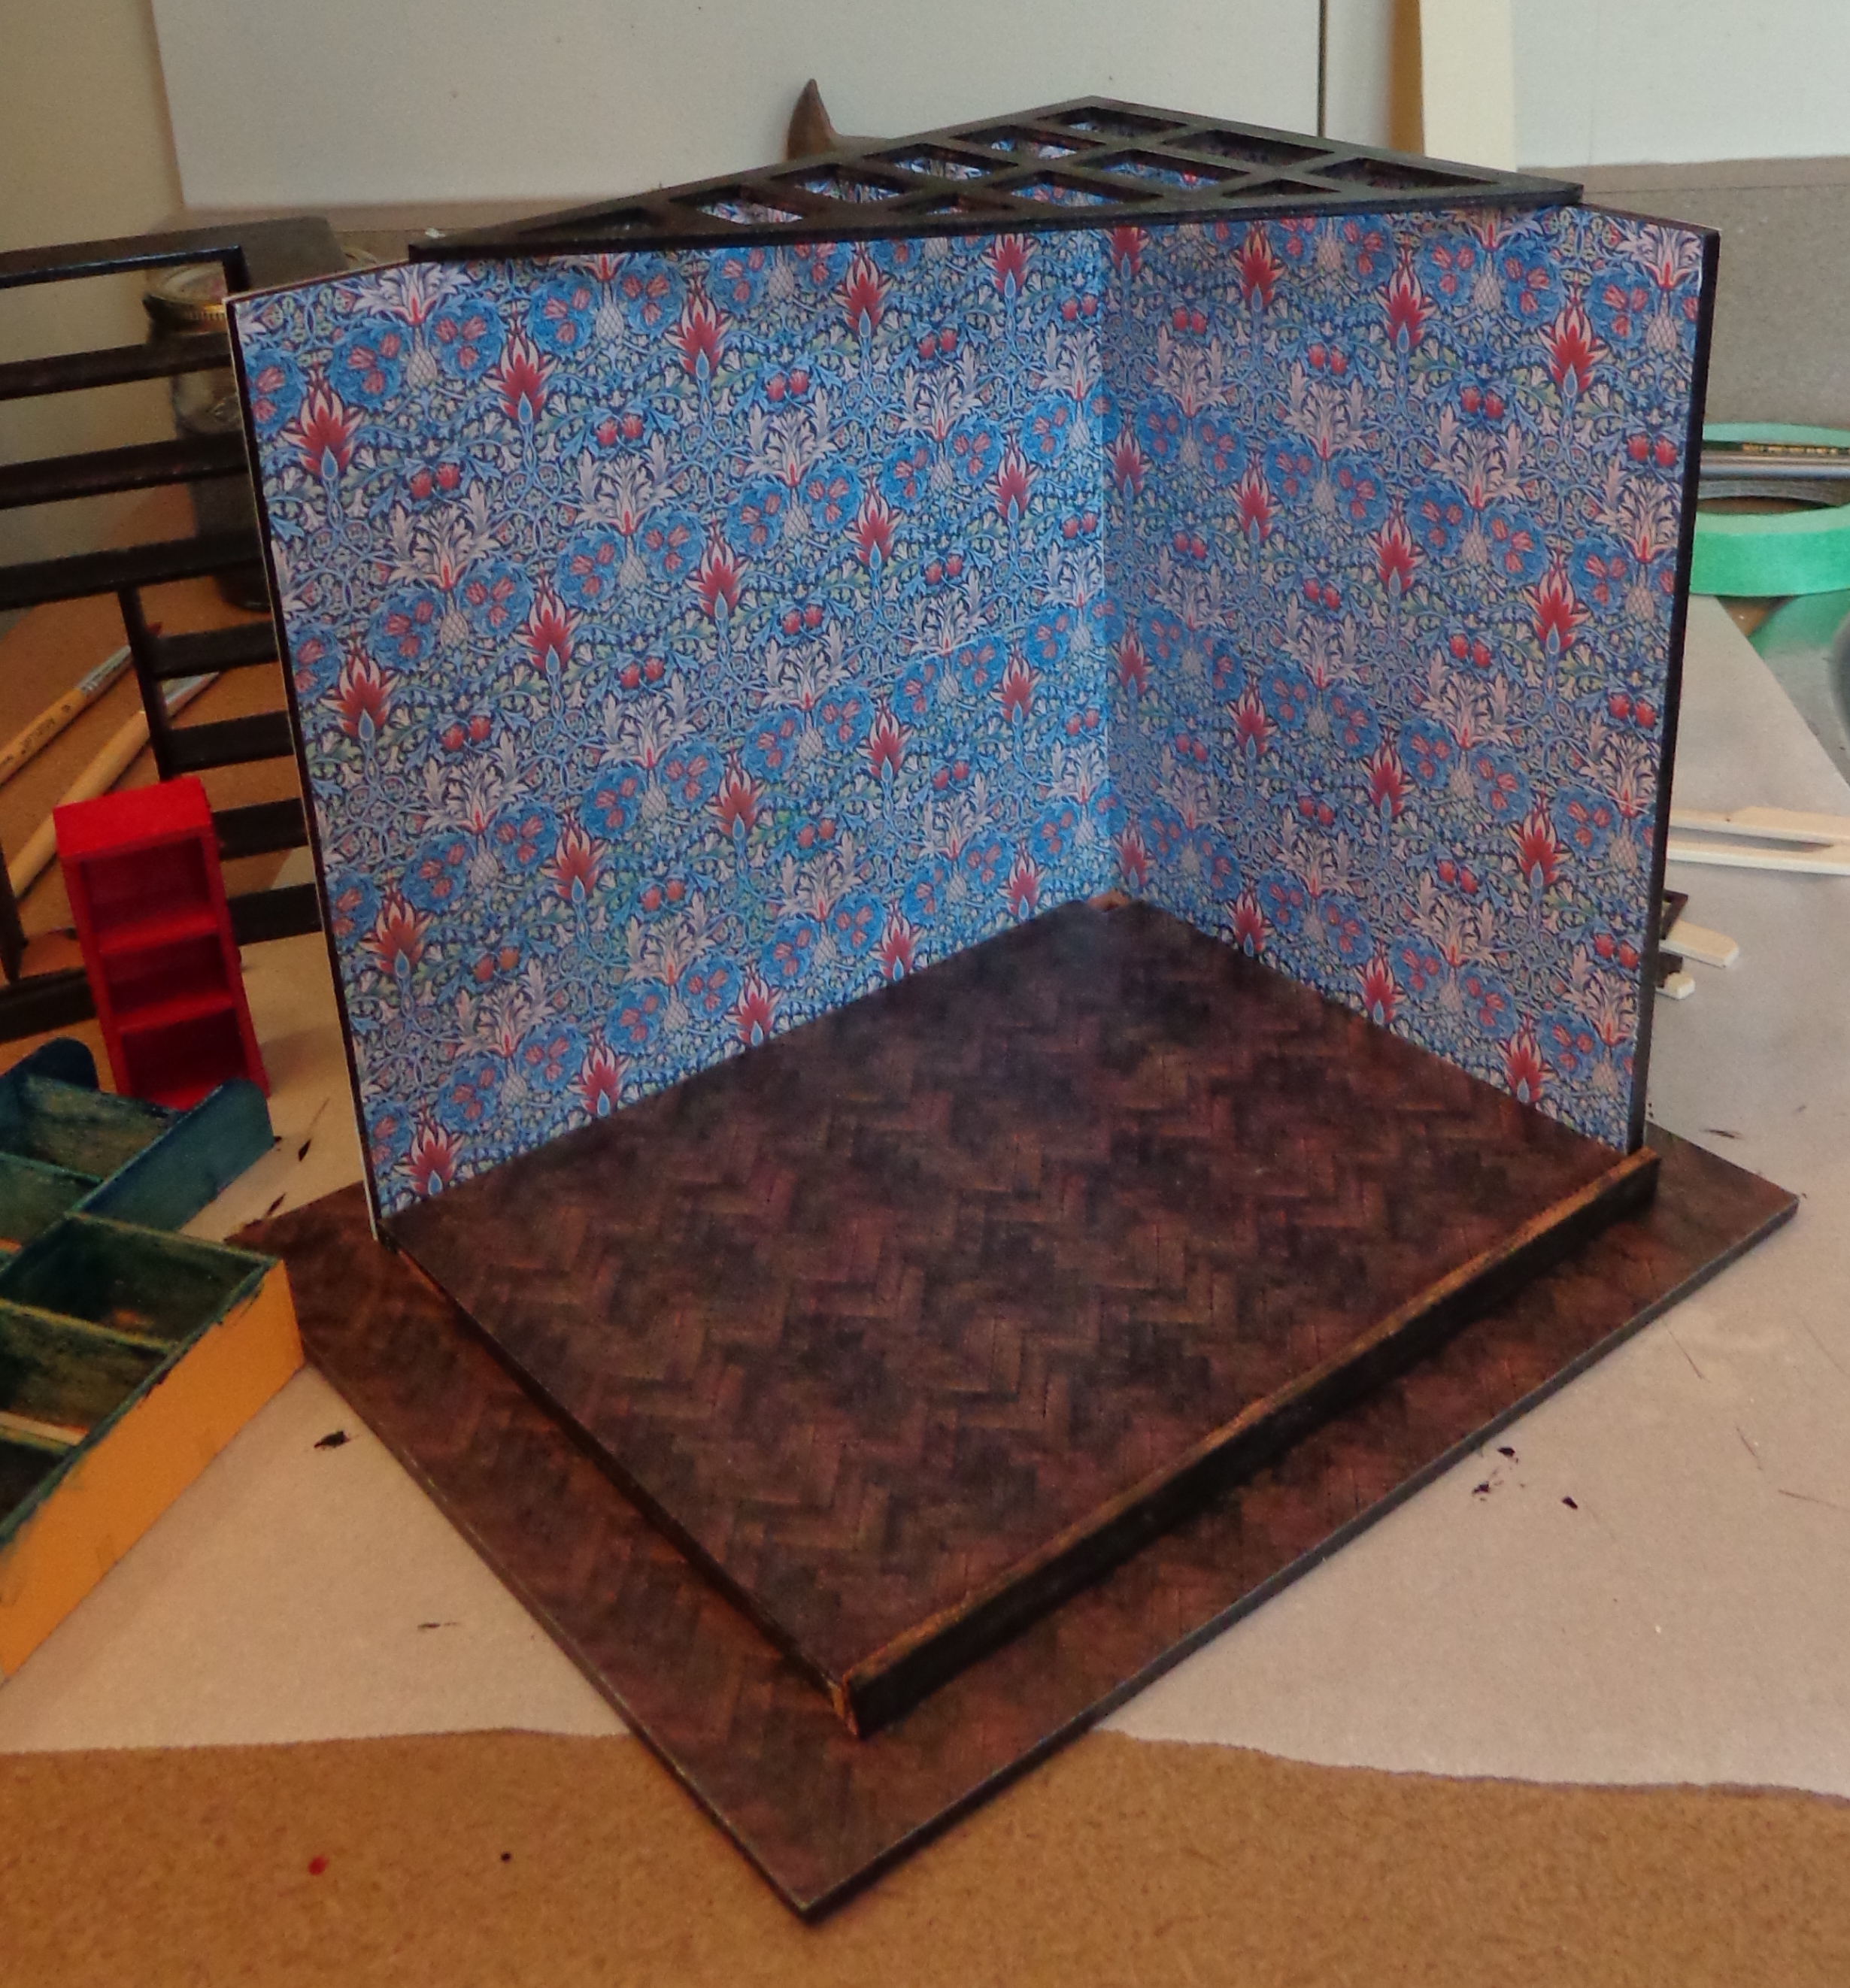
Here’s my study, which is still in progress. You can already see that I’ve made changes.
The printed floor included in my kit has dark green squares instead of turquoise ones. Either way, it had to go. I bought a downloadable printable PDF on Etsy for hardwood floors, printed out the one I liked and laminated it with matte transparent contact paper. I then cut it to fit the raised floor and the surround, and glued it in place. It’s much darker than the brown stain on the included wood pieces, so I painted the two that edge the floor black. (In this picture, they need a second coat.) I also painted the ceiling lattice pieces black.
I “papered” the walls of my study with a William Morris wallpaper design, also a downloadable and printable PDF from Etsy. I changed the size of it to make it look right, printing it at 25%, then matched the pattern on the walls. I also papered around the outside of the box, as if there’s a hall and foyer beyond it. I’m moving some of the pictures out there.
I tried a few kinds of glue and had the best success with Aleene’s Original Tacky Glue. It’s a white glue that dries clear. It’s great for the paper and the wood pieces. For metal and beads, I used E-6000 which also dries clear (but smells a lot worse).
There are a couple of frustrating things about these kits, although overall I’m enjoying them. The scale is a little bit arbitrary (I talked about that last time) and seems to fluctuate between 1:12 and 1:24 scale, depending on the item in question. That’s probably part of what makes the room look so crowded. Also, the included materials tend to warp so it’s hard to get crisp square corners. Everything is a bit tippity, but maybe that’s part of the charm.
All of the book and picture elements are pre-printed on a very thin paper. This works really well for folding pages of a book interior, but is a lot less effective for a suitcase or a book box. (Many of the volumes on the shelves aren’t individual books – they’re five-sided boxes, printed with spines and pages, that you assemble and fit into the shelf in a block.) After I mucked up the suitcase (mine has been around the world a few times and is a bit battered as a result) I made a change to the book boxes: I glued them to a sheet of bristol board to give them more structural integrity then cut them out and built them. This worked really well.
That’s a book box at the front left, and my study with the chandelier installed. It looks really cool when it’s turned on, but the LED lights are really bright – they fake out the camera. I”ll have to get around that to show you the finished room. I hung the map so it’ll be centered over that left bookcase, which will be centered between the other bookcase end and the corner. The little red bookcase is going in the hall.
The chandelier was the toughest part IMO. I was a bit concerned the electrical work, but it was just holding all those pieces together that was complicated. I checked the lights constantly and they worked until the chandelier was installed. Now the one on the bottom doesn’t light up, but I’m not taking it apart. My chandelier also hangs a bit low, but that’s where it’s staying. 🙂 You can see that I need to use a marker on the floor line, too, something that isn’t evident IRL but the camera picks up.
Here’s what it looks like around the back:
This is my foyer and hall “wallpaper”. It’s an Italian paper that I bought when I took a bookmaking class. It came from 32 Degrees North, but they no longer have this one in stock. (They have a lot of other beauties – that link will take you to their Italian Papers page.)
Now I have bookcases to finish painting and book boxes to build. I’ll show you the miniature again when the room is done.
I compile year-in-review posts on my writing blogs, so thought it would be fun to do one here, too.
Finished Projects
I typically start a lot of projects and tend not to finish them quickly. Instead of looking at what hopped onto my needles this year, let’s have a peek at what was finished.
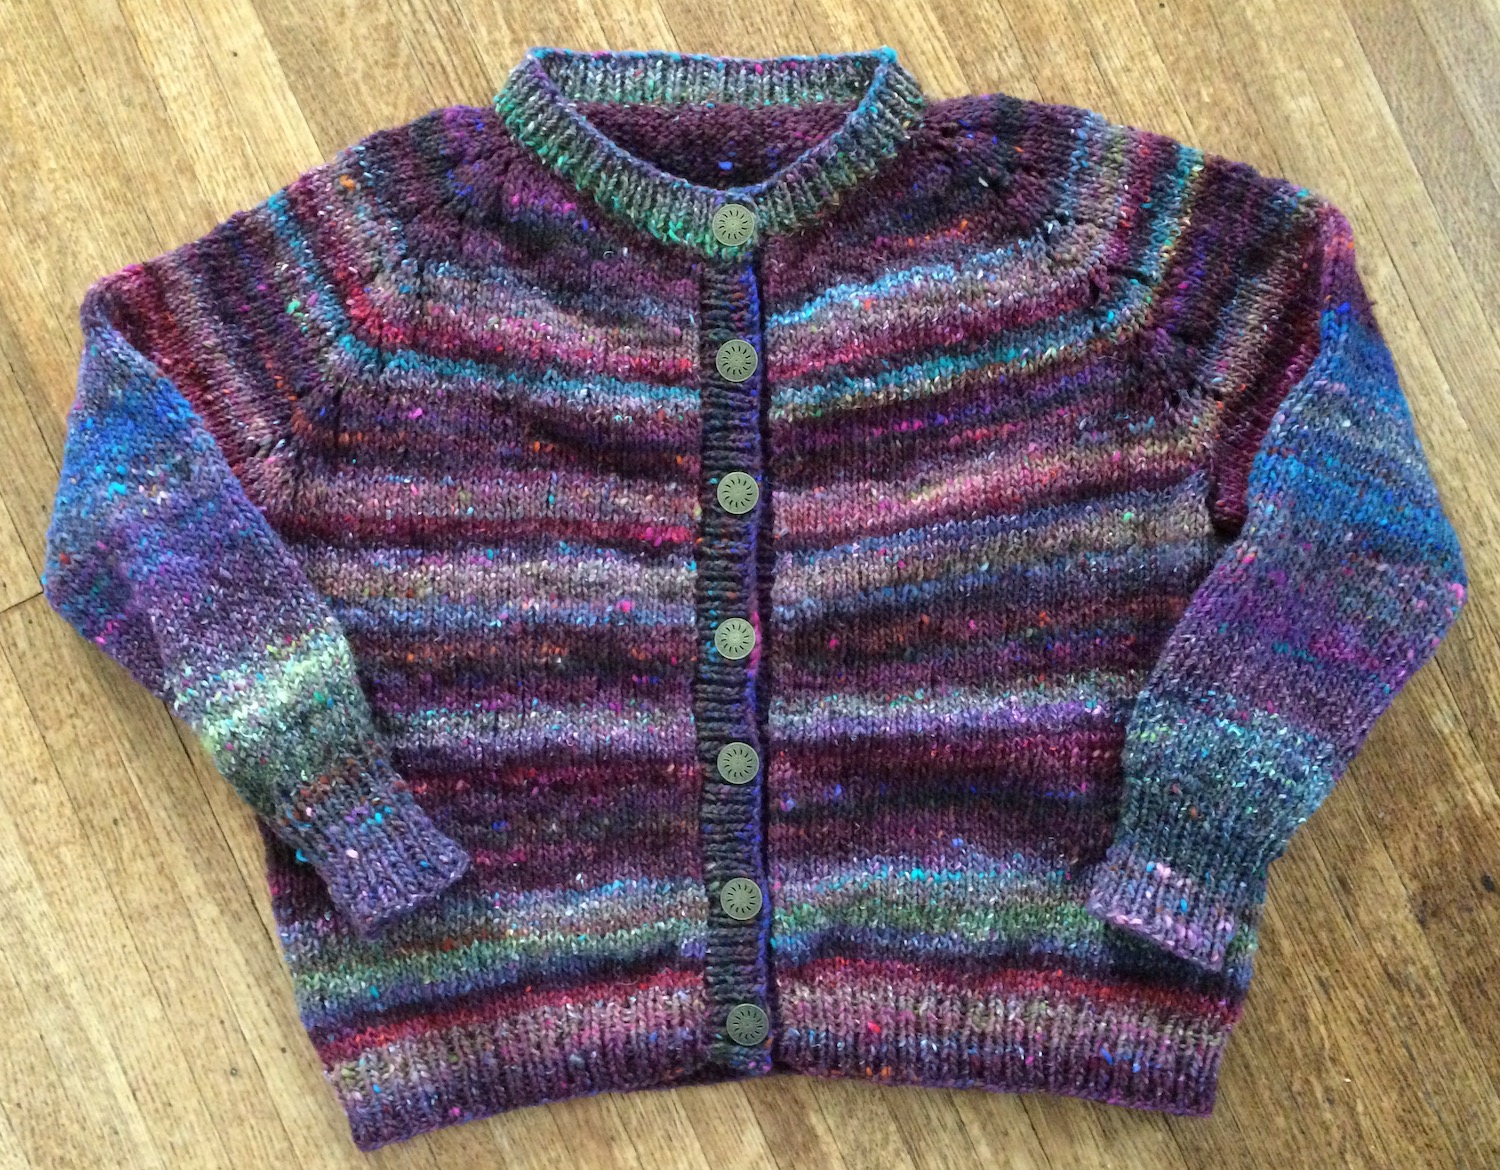
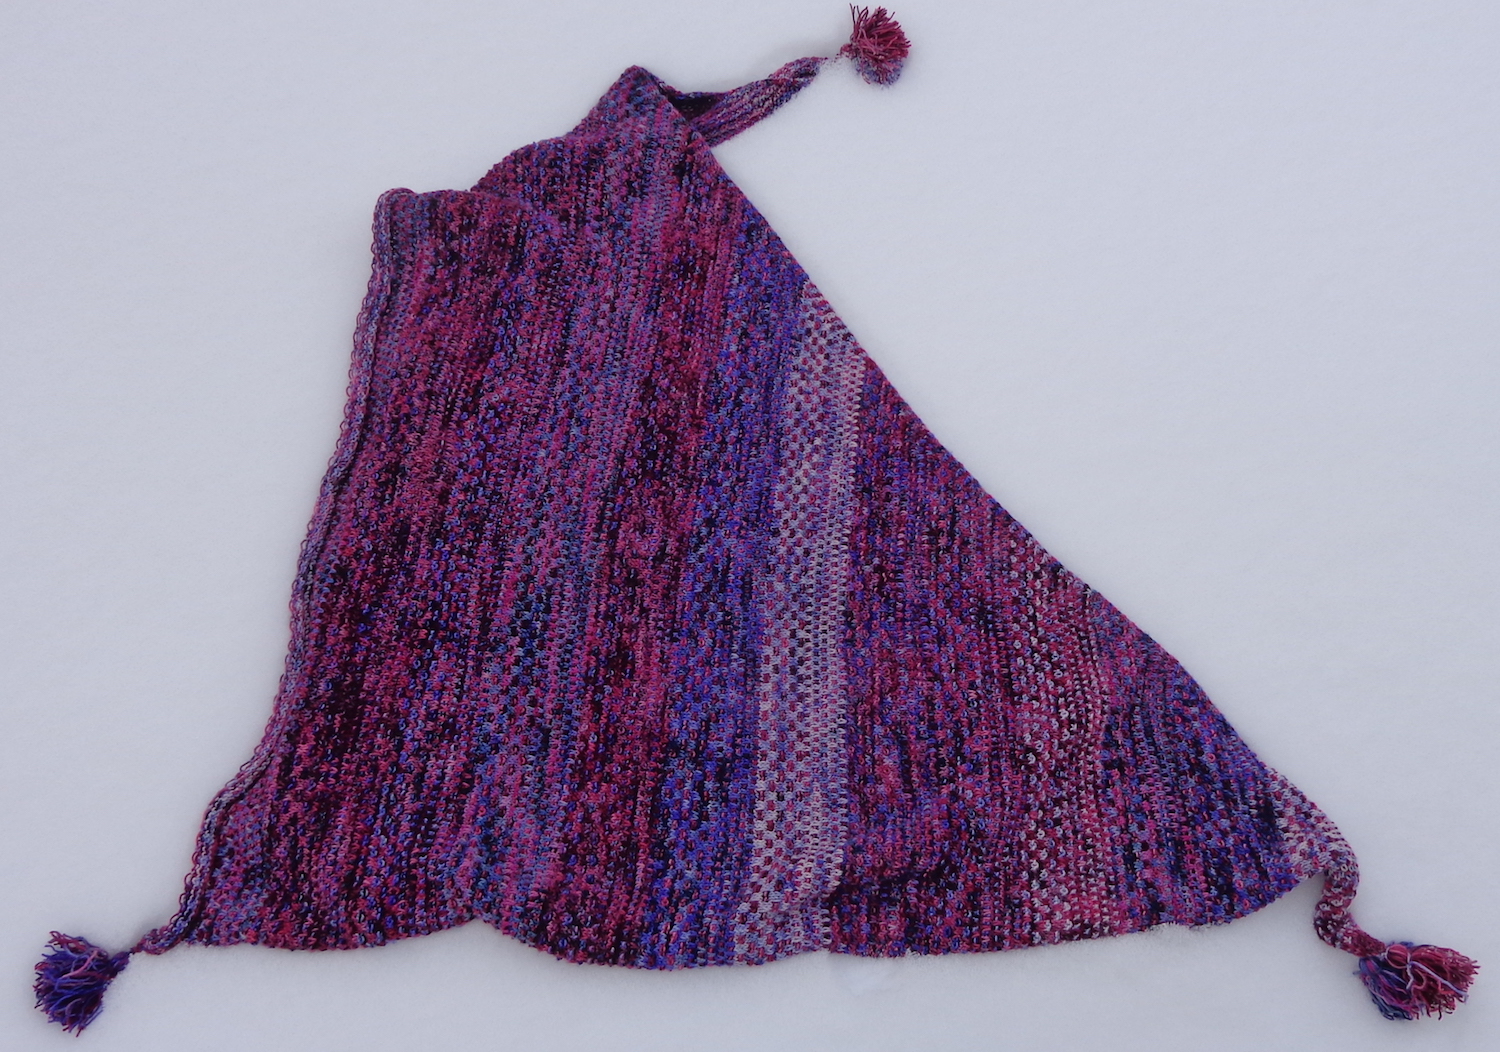
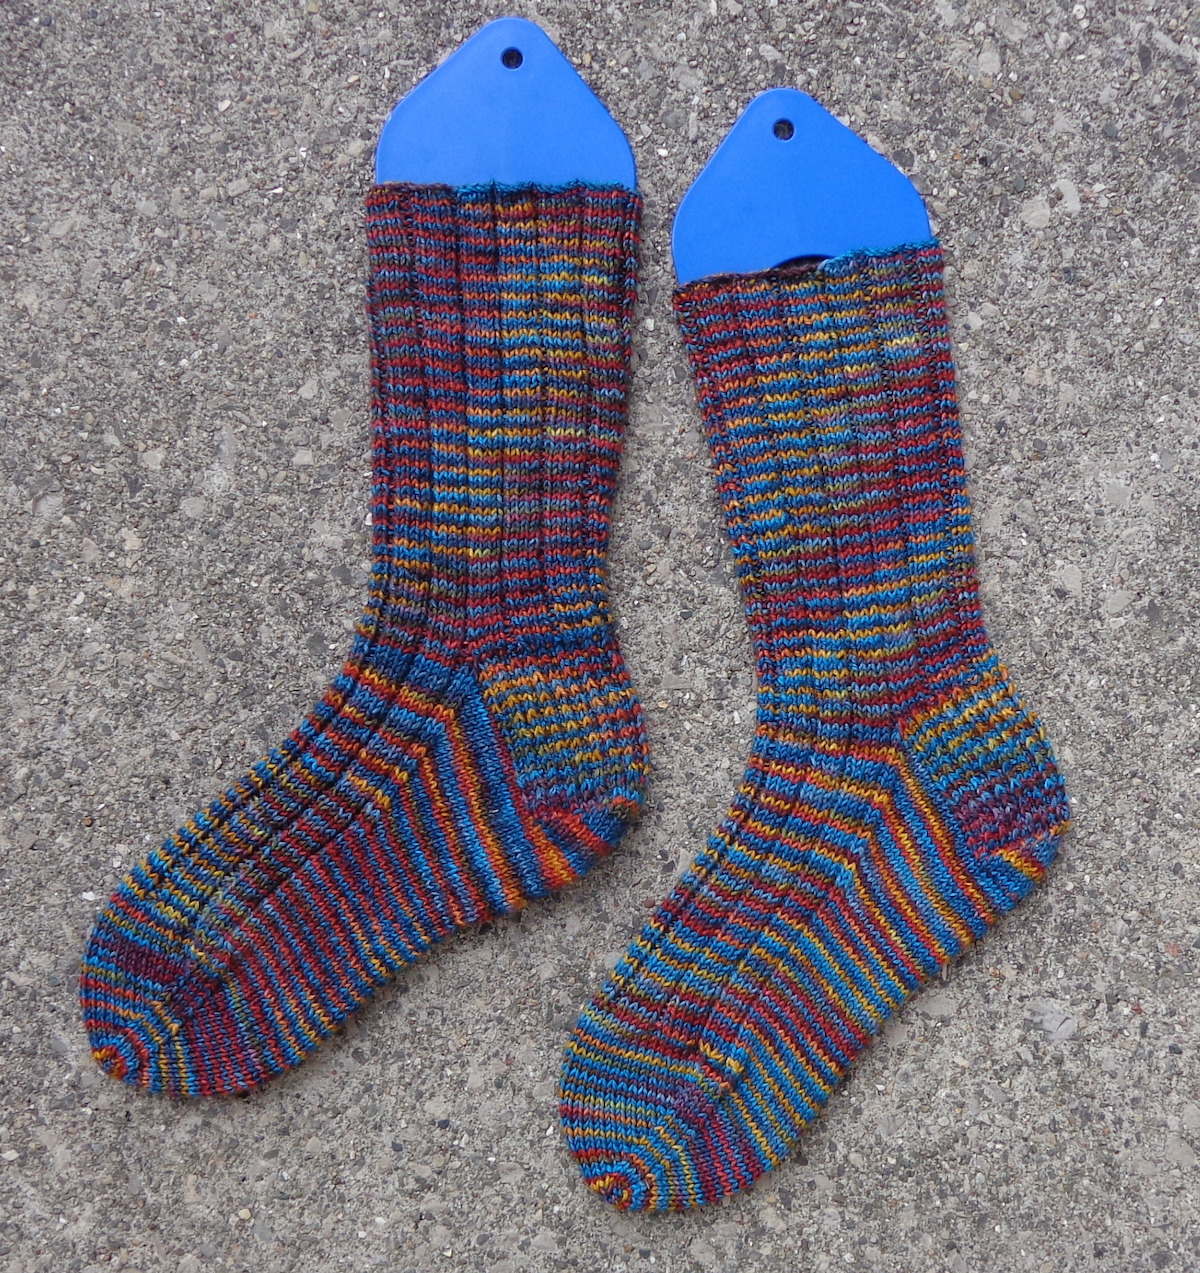
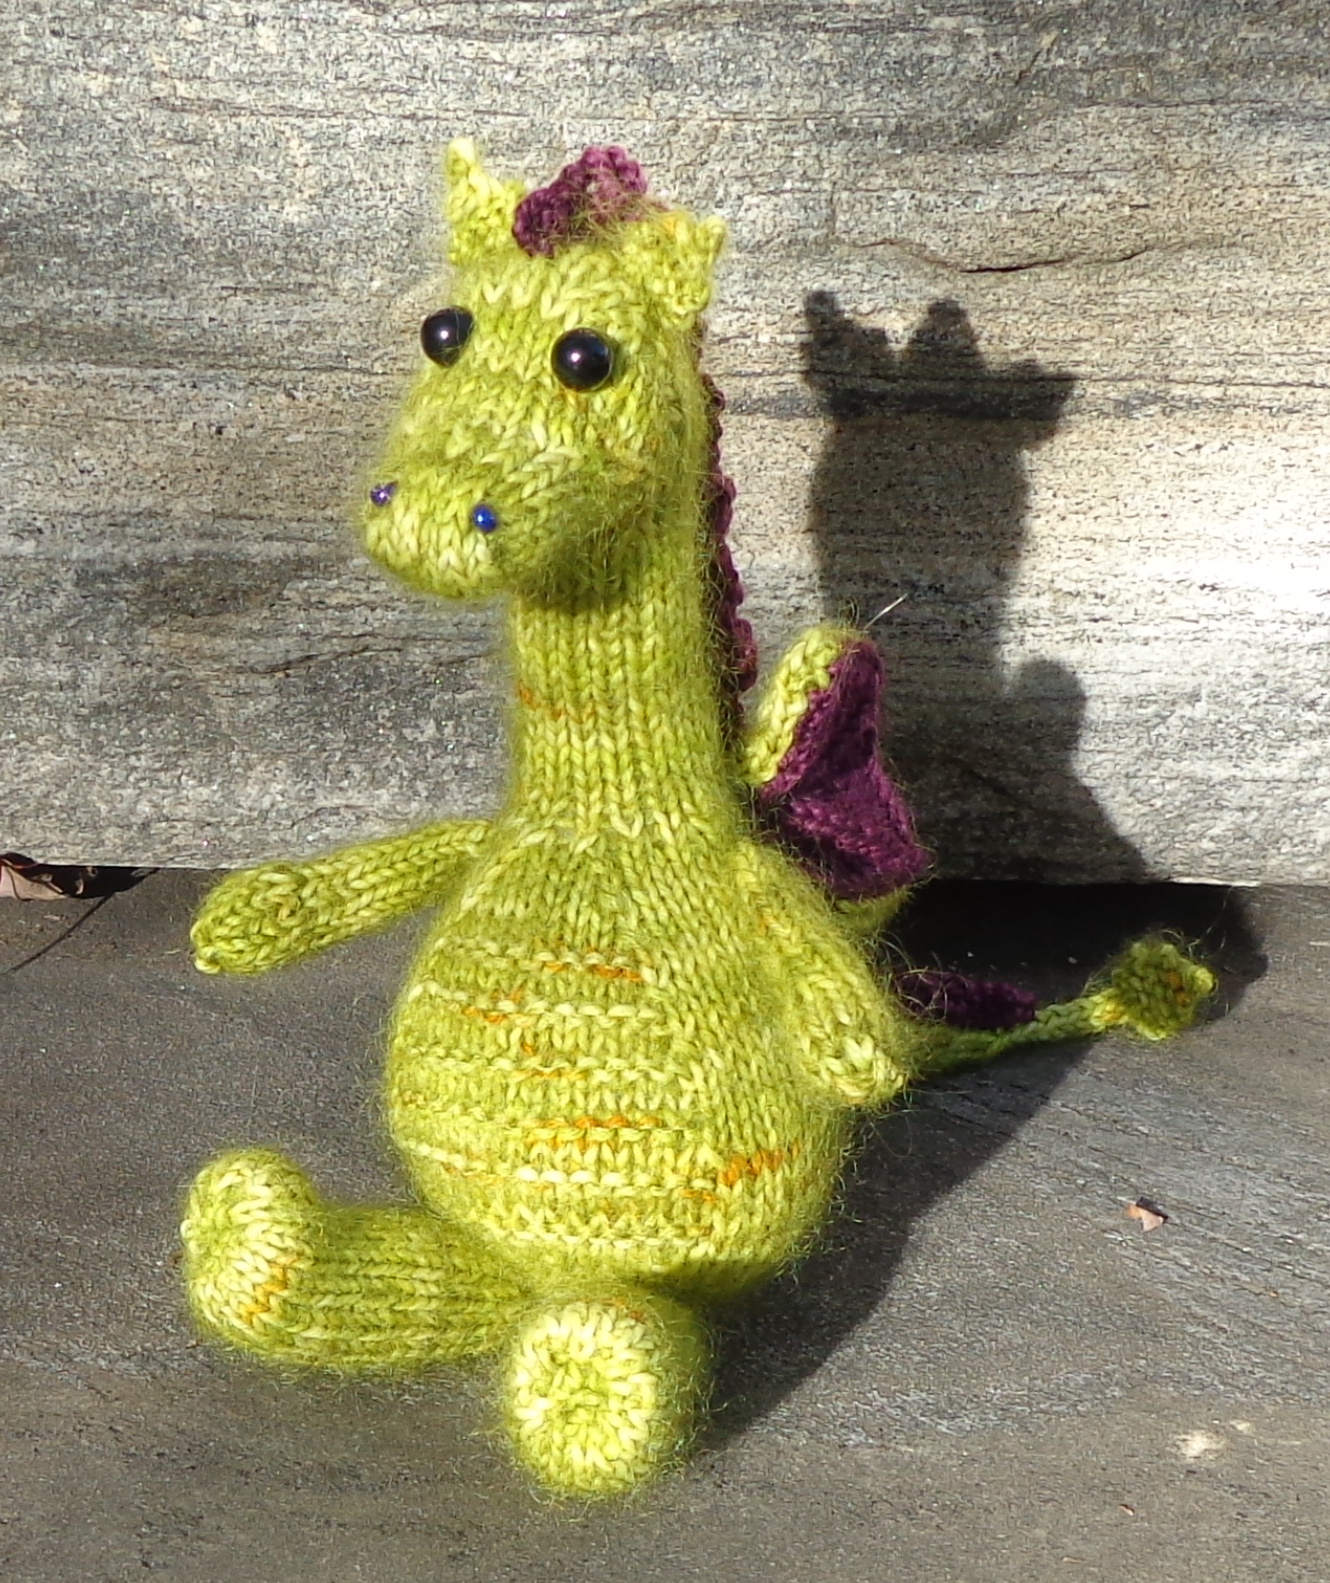
Felix in Noro CyochinNightshift in Koigu KPPPMStarling Wrap in Rowan Fine ArtFirst Snow in Noro CyochinSocks in Online SupersockeNavelli in MadTosh Merino LightJuicy Gloss in Koigu KPPPMBunny in Louet BonniePapillon in Noro Silk Garden SockSocks in Fleece Artist Trail SocksAlaska mittens in Sirdar Tweedie ChunkyAlaska mittens in Sirdar Tweedie ChunkySocks in Rowan Fine ArtTarragonFelix in Loving Path yarnsCrystal TwistStripes in Sugar Bush Motley
For Barbie
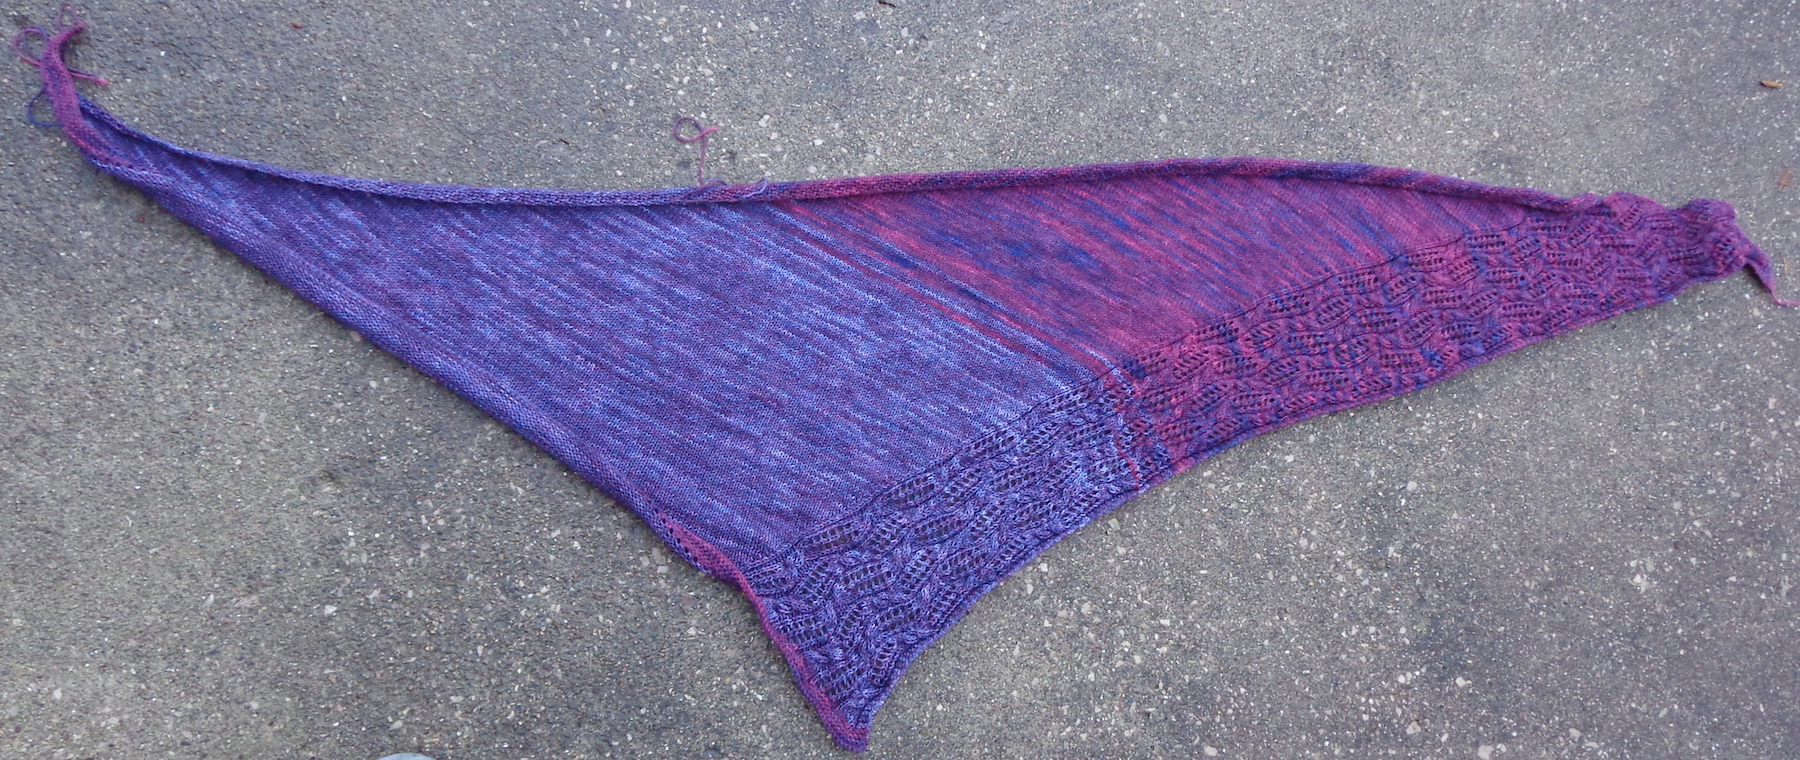
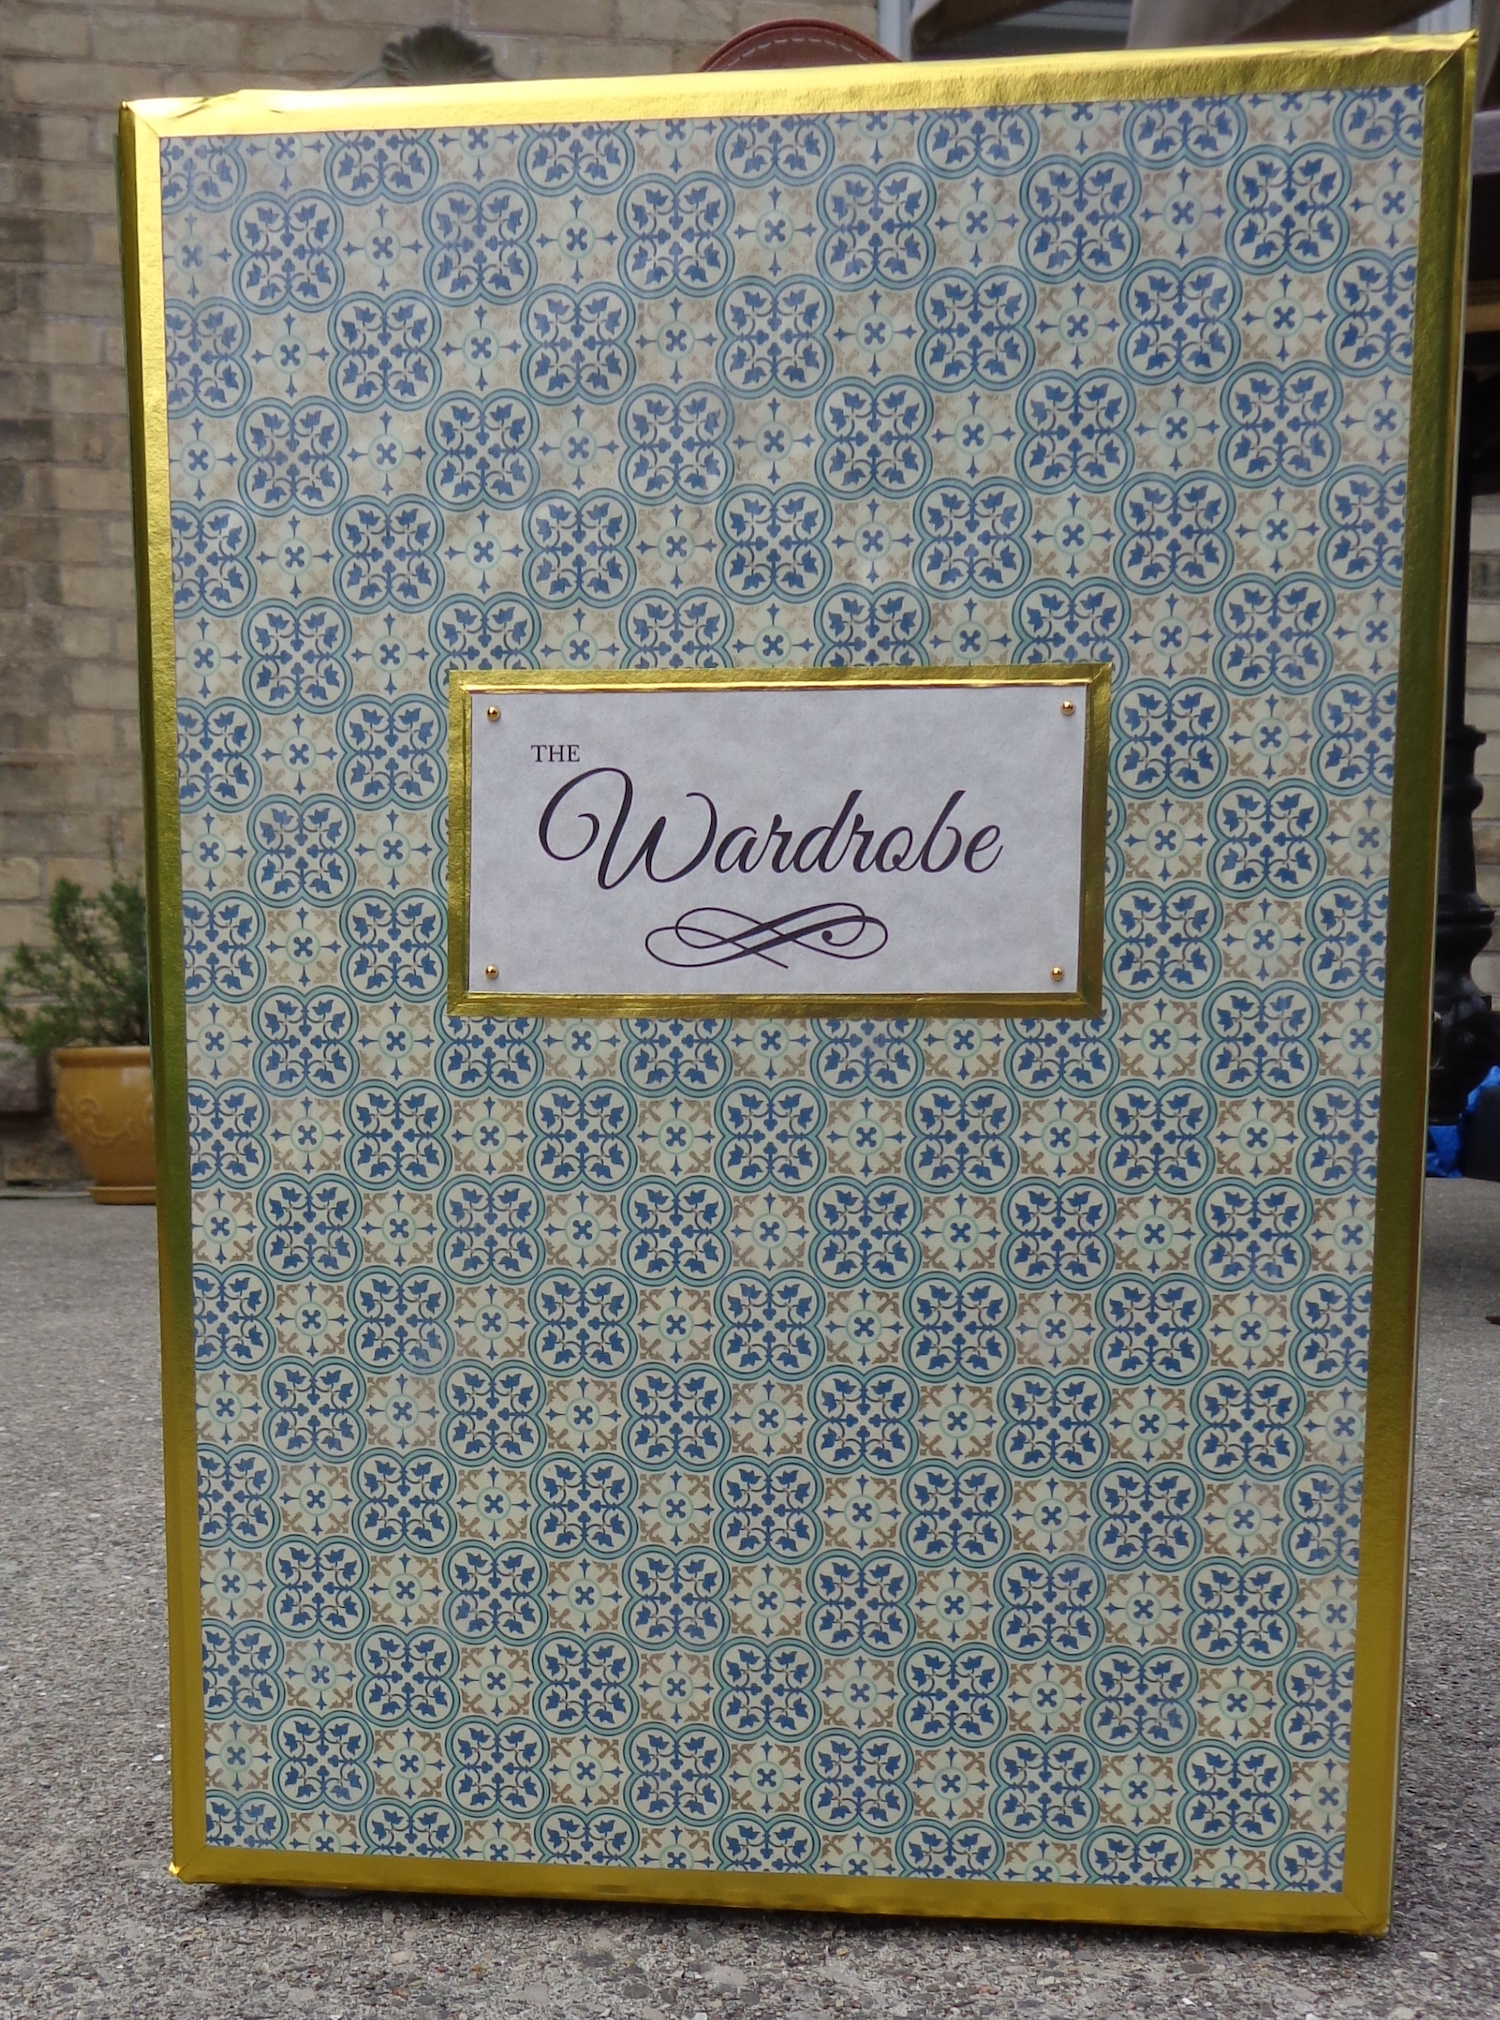
This year, I also started to knit and sew for Barbie and other (roughly) 1:6 dolls. This is fiddly and fussy, but kind of interesting. The last link is for a carrying case and wardrobe that I made out of a pretty box for my dolls.
Making the Wardrobe for Barbie got me thinking about miniatures. I have a shop for Barbie on the go and have also bought some miniature room kits. I’ll show you the first one of those (still in progress) tomorrow. Miniatures are definitely interesting so there will be more of them in my future!
2022 Plans
I didn’t have much success with sewing for myself in 2021 but I learned a lot so 2022 will be better. 🙂
And my quilting was pretty much ignored the past year. I’d like to finish piecing my my Moonglow and send it out to be quilted. It’s so pretty. The Escher quilt needs to be quilted and so does the Dragon quilt. I’ll get back to them all this year.
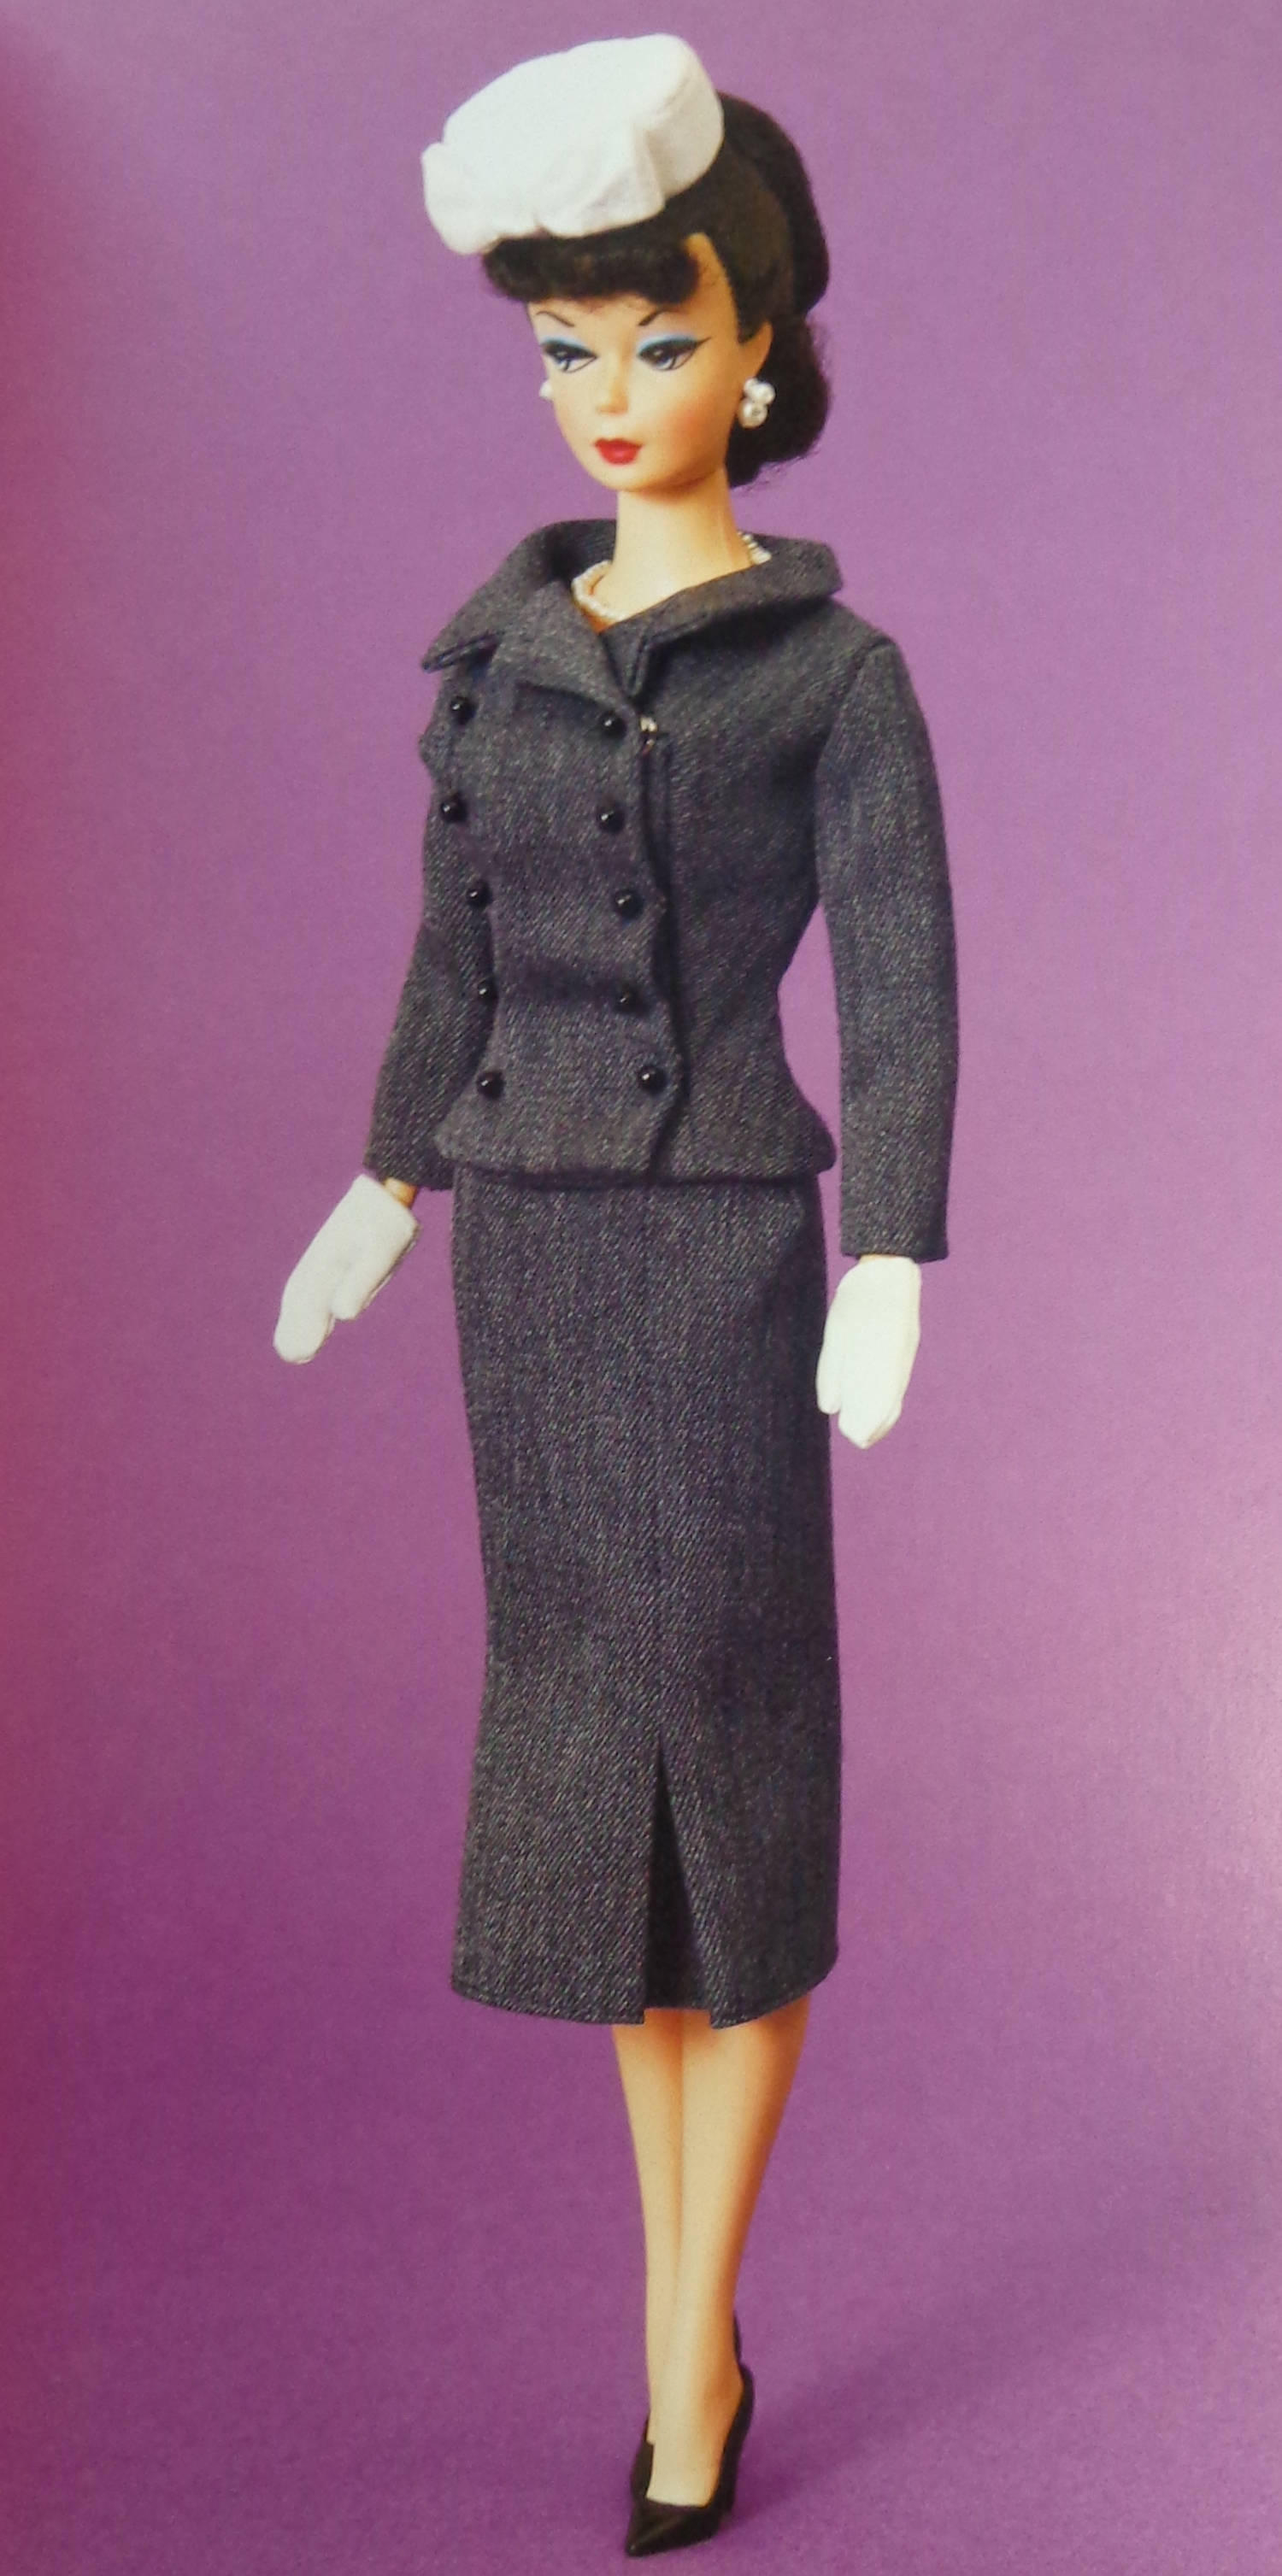
This is my second make from Kate Mitsubachi’s book, Stylebook of Doll’s Dress for Barbie. It’s called Soirée & Cape.
I love how glamourous and retro the fashions are in this book, and how lovingly they’re photographed. If you want to sew vintage for Barbie, this book is definitely worth a look.
Here’s the image of the dress from the photoshoot part of the book:
And here are the pattern instructions, just so you can see the mix. The instructions are all written in Japanese, but there are a lot of illustrations – if you know how to sew, it’s pretty easy to work out what to do.
That said, I’m finding that with each pattern, I have to make one to see where there need to be modifications. (This is actually true of all Barbie patterns so far. Every one of them seems to need a tweak. Part of that is the variation between different body sculpts, but the other part is construction choices.) This pattern shows a similar choice as that of other dress patterns for the girl – the bodice is lined, but the bodice and lining are sewn together at first, then treated as one piece after that. That leaves the raw edges of the big dart exposed on the inside of the bodice, and the seam allowance from the waist exposed, too. I don’t really see the point of lining the bodice if you’re not going to tuck all those seam allowances inside. (The point is that it’s easier to do it that way but the result still doesn’t give me joy.)
The first version of this dress I made in red crepe back satin. (Possibly a bad choice as that stuff is slippery!) It took me ages to figure out that pleat across the front, but now it seems so obvious. I then pleated the bodice lining, in reverse. I sewed the darts in the skirt at the waist, then pressed the pleats for that cluster of pleats. This was pretty easy – I laid the fabric on top of the pattern piece and folded it, one pleat at a time, then pressed the crease for that pleat before moving to the next one. This made it much simpler to gather those pleats together – because they radiate, they’re not all on the grainline. I sewed the bodice to the skirt waist, then sewed the bodice facing to the bodice. I hand-stitched the waist on the bodice facing, then added the “buttons” on the outside.
The tricky bit in my version is that the skirt waist extends beyond the CB of the bodice which leaves raw edge bits at the waist beyond the bodice. I finished the edge on those tabs, along with the CB edges of the skirt, then pressed the waist edge down. After sewing the CB seam, I top-stitched those waist edges and along the back opening of the skirt. I don’t love the back. 😦
I decided to hem the dress with self-bias, so cut 1″ wide bias from the fabric. I trimmed 1/4″ off the hem so the dress would finish to the same length as intended, then bound that edge. A pair of snaps on the back and it was done.
I’m only going to show you the front because the back still vexes me.
This is polyester crepe back satin, and those are seed beads on the bodice. I made the capelet of cotton velveteen lined with rayon Bemberg and used a small fancy button as a clasp. The gloves are made of that super-thin shiny knit from Fabricland that I mentioned previously—wow, does my sewing machine hate this stuff!—and she has another clasp purse from that McCalls pattern. It turns out I don’t love my hem solution. Mr. Math thinks the gloves make her look like she’s handling hazardous materials. I think the outfit looks Christmas-y.
The back remains vexing because 1/ those edges; 2/ the facing is bulky with the darts which means 3/ the fit is snug on vintage B—so skinnier Silkstone B wins this one. Here she is again with a “fur” cape that I knit for her:
Our model is Best in Black Silkstone B, (that’s an Amazon link since Mattel has taken the unavailable dolls off their site) who was divested of her crunchy black dress upon arrival. I took out the ponytail and just combed the hair over. I like her hair better loose although it is a bit wild.
The floor and wall are for my shop diorama but aren’t installed yet. I just propped them up on my sewing table to set the scene.
I had a think about the back of the ballgown and decided to try an alternate version with a simpler bodice facing. After pleating the bodice, I traced it on a piece of paper to make a pattern piece for the bodice lining. It’s a curve cut on the bias with no darts, and I cut it from Bemberg lining. I sewed the top seam of the bodice, attaching the lining, pressed the seam allowances toward the lining, then understitched that edge. It worked beautifully to make a nice edge at the top of the bodice. I sewed on two of the beads on the front to hold the pleat before sewing the bodice to the skirt, and also pressed up the waist edge of the lining. I also finished the CB seam allowances on the skirt.
After sewing the bodice to the skirt, I sewed the center back seams on the bodice. When piecing, I matched the cluster of pleats with the bottom of that front dart—that meant that one edge was even with the back of the bodice and the other extended 3/8″. The flush one was turned in 1/4″ and pressed, then top-stitched. I fused some knit interfacing to to the other edge to stabilize it at the waist, turned it in 1/8″ and top stitched across the extension at the waist, then down the CB seam. When I sewed the CB seam of the skirt, there was overlap in the skirt, instead of the dreaded butt opening – and all the edges are finished.
This makes me happy.
In fact, this version of the bodice gave me buckets of joy. It was simpler to constuct and the back is much neater. It also fits better – making this one a bit of a nipple-flasher for Silkstone B (if she had nipples, that is.)
This version is cut of black “Chinese brocade”, which is a very heavy polyester damask. Often these are multi-coloured but this one is just black. Our model is Dusk to Dawn Silkstone, a recent addition to my girls, and that’s another Amazon link. Her cape is knitted from a faux-fur yarn, closed with a hook-and-eye that has a sparkly.
Because of the thickness of the brocade, I knew I’d never manage a turned hem that was only 1/4″ wide in total. Instead, I fused knit interfacing to the wrong side to stabilize the edge, turned the hem 1/4″ and machine stitched it in place. Because it wanted to flip, even after pressing, I trimmed the seam allowance close to the stitching line.
I’m quite pleased with these and might manage to complete a few more in time for New Year’s Eve. Another completed mission in my Kate & Me challenge!
Next week, we’ll talk about stoles and capes, and making gloves.
This started as a quest for a string of pearls, but kept on going. Be warned – making these is like eating potato chips. You can’t stop with just one.
I made these necklaces on .5mm jelly elastic – knotted and secured with glue – and either 6/0 beads or plastic “pearls”:
You need to use a glue that remains flexible to secure the knot in the jelly, then you can cut the ends shorter. I used E6000.
Then I started to think about focal pendants (as one does). These butterflies were charms from Michaels, which I matched with other 6/0 beads.
Next up, I had a look through the other charms in my stash and tried these:
There are smooth teardrops with an A/B coating, little leaves with A/B coating, spiral charms and the one in the middle has the moon on one side and the sun on the other. I also realized that the jelly is stretchier than I’d originally thought, so I made some shorter necklaces.
These ones have faceted glass teardrops that are 9mm long. These were the smallest I could find and come on a string of mixed coloured drops. (I did find some quartz ones that are 7mm long, but they’re a lot more expensive.) Some of these are strung with 6/0 beads while others are with faceted glass 2mm beads.
Of course, you can go on and on with the variations. I’m thinking of necklaces with two or even three strands. Mixing the beads. Alernating beads. Beads of graduated sizes. (etc. etc.) Do my girls need dozens of necklace choices? No, but…potato chips!
We’ll see these in action when the girls model their ballgowns…
Time for an update on my sewing for Barbie. You might remember that I was planning to make the Soirée ballgown from this Japanese pattern book, Stylebook of Dolls Dress by Kate Mitsubachi, but I got distracted by the Double Breasted Suit instead. That started a little adventure that led me down a rabbit hole.
First, the suit pattern. Here’s the image from the book at right. It’s very cute.
The patterns in this book are written in Japanese, but there are illustrations for the assembly. You can see in the pattern layout below that the dark grey fabric is the main fabric – that’s the skirt, placed on the fold, the jacket cut twice, the sleeve cut twice, and the bias panel to line the skirt which only needs to be cut once – the stripe is the lining and the light grey fabric is the white used for the hat.
For this one, they’d forgotten to include the collar on the layout for the main fabric, but that was easily remedied.
I was less happy that the jacket is supposed to be unlined. I made one version as instructed, but didn’t finish it. I then cut another suit with a lining.
It was a bit tricky to line the skirt, given the construction order. In the end, I changed it. I cut a skirt lining the same as the main fabric piece, sewed the hem, the center back seam (which I made narrower, to allow more overlap for the snap) and then the pleats. I lined the top of the skirt with the bias piece, then hand-sewed that piece over the lower part of the skirt.
For the jacket, I needed a lining pattern piece. I traced the main jacket pattern and laid the back neck facing over it, tracing it. I then folded back the pattern on the front foldline and traced the self-facing of the fronts. Then I had to mark the seam line, and add a seam allowance on the other side before cutting the lining pieces. I also decided to cut the back collar facing in the main fabric, just as you would do with a bigger jacket, instead of in lining as instructed.
This also changed the construction order. I sewed the darts in both lining and jacket, then the center back seam in the fabric. I sewed only part of the CB seam in the lining, so I’d have a way to turn the jacket. I inset the sleeves in both lining and jacket (I basted these by hand first), then sewed the sleeve hems. Finally, I sewed all around the outsides and turned the jacket. When it was pressed and seamed, I added snaps to the jacket front and skirt back. The pattern suggests seed beads as mock buttons, but I had teensy Barbie buttons in black, so I sewed ten of them up the front.
So, here we are with the finished suit:
It’s important to press as you go with Barbie’s clothes as the garment keeps getting smaller and it becomes harder to get to the seam allowances. I made myself a little helper, not unlike a pressing ham, but rolling some cotton flannel into a tight tube, a little more than an inch across. I can get that into the waistband of any garment to press it. Sleeves require a skinnier tube, so I rolled more flannel around a dowel. These two funny little rolls are now part of my Barbie dressmaking toolkit.
What leads me astray with Barbie outfits are the accessories, because Barbie doesn’t just throw something on. She pulls it all together. It took me a while to finish the hat for this outfit, not because it was hard but because it was tiny and had to be handsewn. My pillbox hat doesn’t have quite as crisp of an edge, so I’ll have to figure out how to fix that next time. It’s possible I tugged the thread a bit and gathered it slightly.
I became a big fan of Avery mailing labels while making this outfit. They’re a really useful way to temporarily mark the finished size of any element – you cut a template out of the mailing label and stick it on the fabric. I did that with the crown of the hat, which allowed me to sew the band in place with more accuracy.
For the accent on this hat, after much deliberation, I went with a contrast bow like the one suggested in the pattern. There’s more inspiration on this website, though. (Actually, the whole site is pretty amazing as a fashion reference.)
Can this suit be worn without a string of pearls? I thought not. I used the tiniest jelly elastic I could find (it was at Fabricland and is .5mm wide) along with some seed “pearls” from the bridal department at Len’s Mills. I played around with different lengths and also pendants. This one has a black bead rose. I’d love to have a string of pearls that was shorter, but there are limits to how much the jelly will stretch to go over her head. (And clasps are another rabbit hole. I did find this teeny one.) The jelly has a square knot at the back, which has been reinforced with a dab of glue. There will be more on necklaces in next week’s post. They’re like potato chips – it’s hard to have just one.
Of course, she needs a purse. There’s a clutch bag on the McCalls 7550 pattern which reminds me of the classic dimpled gold clutch from days of yore. (I still have one.) It’s really easy to make and just requires a bead as a clasp. I made this one out of a red faux-leather which is very thin. I ordered a piece of it from I Sew For Doll and am using it sparingly. The clasp is a black bead in this case.
Finally, she needed gloves – which are actually mittens even though we always call them gloves. (Why do we do that??) I’m getting better at making these, although they’re still not perfect. Again, the mailing labels help. I traced the finished glove dimensions on a label, and cut it out as a template. I then hemmed a square of the fabric for the gloves so the wrist edge was finished, folded it, stuck the label on the fold and sewed around it. I trimmed it to the glove shape after sewing, not before. They’re tricky to turn as they’re so small, but a little crochet hook helps. These are made from a stretch knit with a shiny coating that looks like patent leather. It’s a very thin fabric. I got it at Fabricland in several colours, including metallics, specifically for gloves. Next time, I’ll try a second row of stitching parallel to the first. It might keep her from poking her finger out between the thumb and fingers of the mitten.
Barbie is modelling this suit on the construction site for my new diorama of a shop. I’ll talk more about that process another day.
What do you think of outfit #1 in my Kate & Me challenge? (The problem with sewing for Barbie and having multiple dolls is that now they all want a new suit.)
Earlier this month, I discovered these room kits to create scale models. I thought this study were so cute that I ordered one – and then, you know, another (but we’ll get to that).
Miniature Bookstore or Sam’s Study or Harper’s Library
These are scratch-build kits, which means you get a box of materials and have to build everything yourself. I thought I might learn some tips and tricks for building my 1:6 scale dioramas. This first kit comes with an LED light – that chandelier lights up when it’s done. It’s a bookstore but I’ll make mine a study by leaving off the SALE sign and the genre signs.
I bought the kit from Minihooo – that’s a link to their website, which has prices in US dollars. My order had free shipping and was dispatched from China. But then, I was at a hobby store with the mister the following week here in Ontario and they had the kits on display – except they were from Robotime or Rolife. The kits looked the same, just the company name changed.
I came home and did some searching online, and discovered the kits are stocked by Mary Maxim here in Canada, with prices in CA$. I bought Jason’s Kitchen from them.
Jason’s Kitchen
My first one is called Miniature Bookstore at Minihooo, but online you can find it labelled as Sam’s Study or Harper’s Library. (Yes, the Rolife kit has – or has had – two different names.) There are a lot of people building these kits and documenting the process on YouTube – I feel as if I’ve discovered another dimension of the universe, one that I never realized was there.
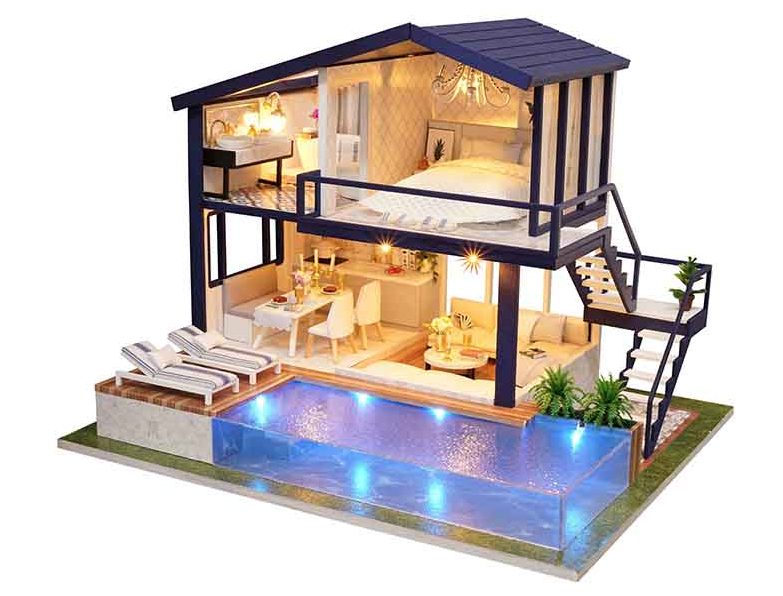
While searching all of this, I saw this apartment model and wanted that kit, too. (It was the pool that sealed the deal.)
I first saw it in MInihooo for $105US (It’s now $135US there. On Black Friday, it was $79.This is a moving target!) but had a look around at other options. There were six different listings on Amazon.ca for the same kit, ranging from $64 to $98 CA, some with free shipping and others not. The company names were all different, including Rolife, Robotime, Wadile and CuteBee. I bought the one from Cute-Eyfud which is fulfilled by Amazon. It appears that they are identical kits, but some may have only Chinese instructions. (There’s one on Amazon.ca with a lot of negative reviews about the Chinese instructions.) If you’re tempted by these kits, be sure the one you choose specifies that it has English instructions. There’s a similar variety of kits on Walmart.ca, at least half a dozen for each style, all listed as being from different manufacturers and supplied by different vendors. The kit is often (but not always) called Time Apartment.
I suspect they’re different distributors for the same kits and that the kits are assembled by the same company. The price variations could be because of the marketing – Minihooo, for example, has a pretty website and sells directly from it; Cutebee seems to have only a storefront on AliExpress. There appear to be slight variations in terms of what comes with the kit, especially glue and paint. There are differences about included dust covers, too – I’ll guess that these kits came with dust covers once but no longer do, so some people get them and some don’t, depending on when that particular kit was made. It might also be that the kits have variations in the additional stuff when ordered in Asia rather than elsewhere.
Amazon being Amazon, the kit I ordered last was the one that I received first. Of course, it came overnight even though I don’t have Prime. The other two came the same day, two weeks later.
The box for Time Apartment is like a little briefcase, with a cute carrying handle. The brand on the box is Cute Room. All the other text is in Chinese.
The other two both say they’re Rolife kits and that they’re made by Robotime. My bookstore is called Sam’s Study.
Let’s look at what’s inside.
The only kit that had paint and glue included was the kitchen that came from Mary Maxim. The study says it has paint included but it’s not there. The apartment says you need to get your own glue. I suspect this is due to how they were shipped – if coming by air, the kits couldn’t include any liquid. The kit from Mary Maxim must have come by boat. The Time Apartment kit also has that mothball smell I associated with dollar stores and Chinatown. It has a music box, too, which is a bit of a surprise. They all have lights and wiring with the box for the batteries but no batteries included, which is fair enough.
Inside, there’s an inventory of parts in each kit.
The Time Apartment has a list with measurements and diagrams, but they’re not in scale to each other. I needed to use a ruler when checking the parts. The Rolife kits have printed sheets with each part displayed to size in colour. That made it easy to check them – you just slide the piece along until you find the match. The Rolife kits didn’t inventory all the beads and bits, though, while the Time Apartment did. Out of the three kits, I’m missing one little piece of wood for the ladder in the library, but I can easily make a replacement.
They all have little sayings on the boxes which maybe didn’t translate very well. Under the carrying handle for the Time Apartment is printed “Love Handmade & Enjoyed Life”. The sleeve for Jason’s Kitchen says “Eating in such a nice kitchen alone, you may not feel lonely.” And the sleeve for Sam’s Study says “Pick up a book and taste a sense of isolation. I seem to touch my soul at this very moment.” Hmm.
How small is 1:24? Well, the scale means that 1 inch in the model is 24″ in real life. That means that Mr. Math, who is 6 feet tall, would be 3″ tall in this scale. It’s pretty teeny. And one of the first things I noticed was that these kits aren’t in the same scale, even though they’re all listed as being 1:24. Only the Time Apartment is in that scale. I think the Rolife kits are 1:12. (Mr. Math would be 6″ tall in this scale.)
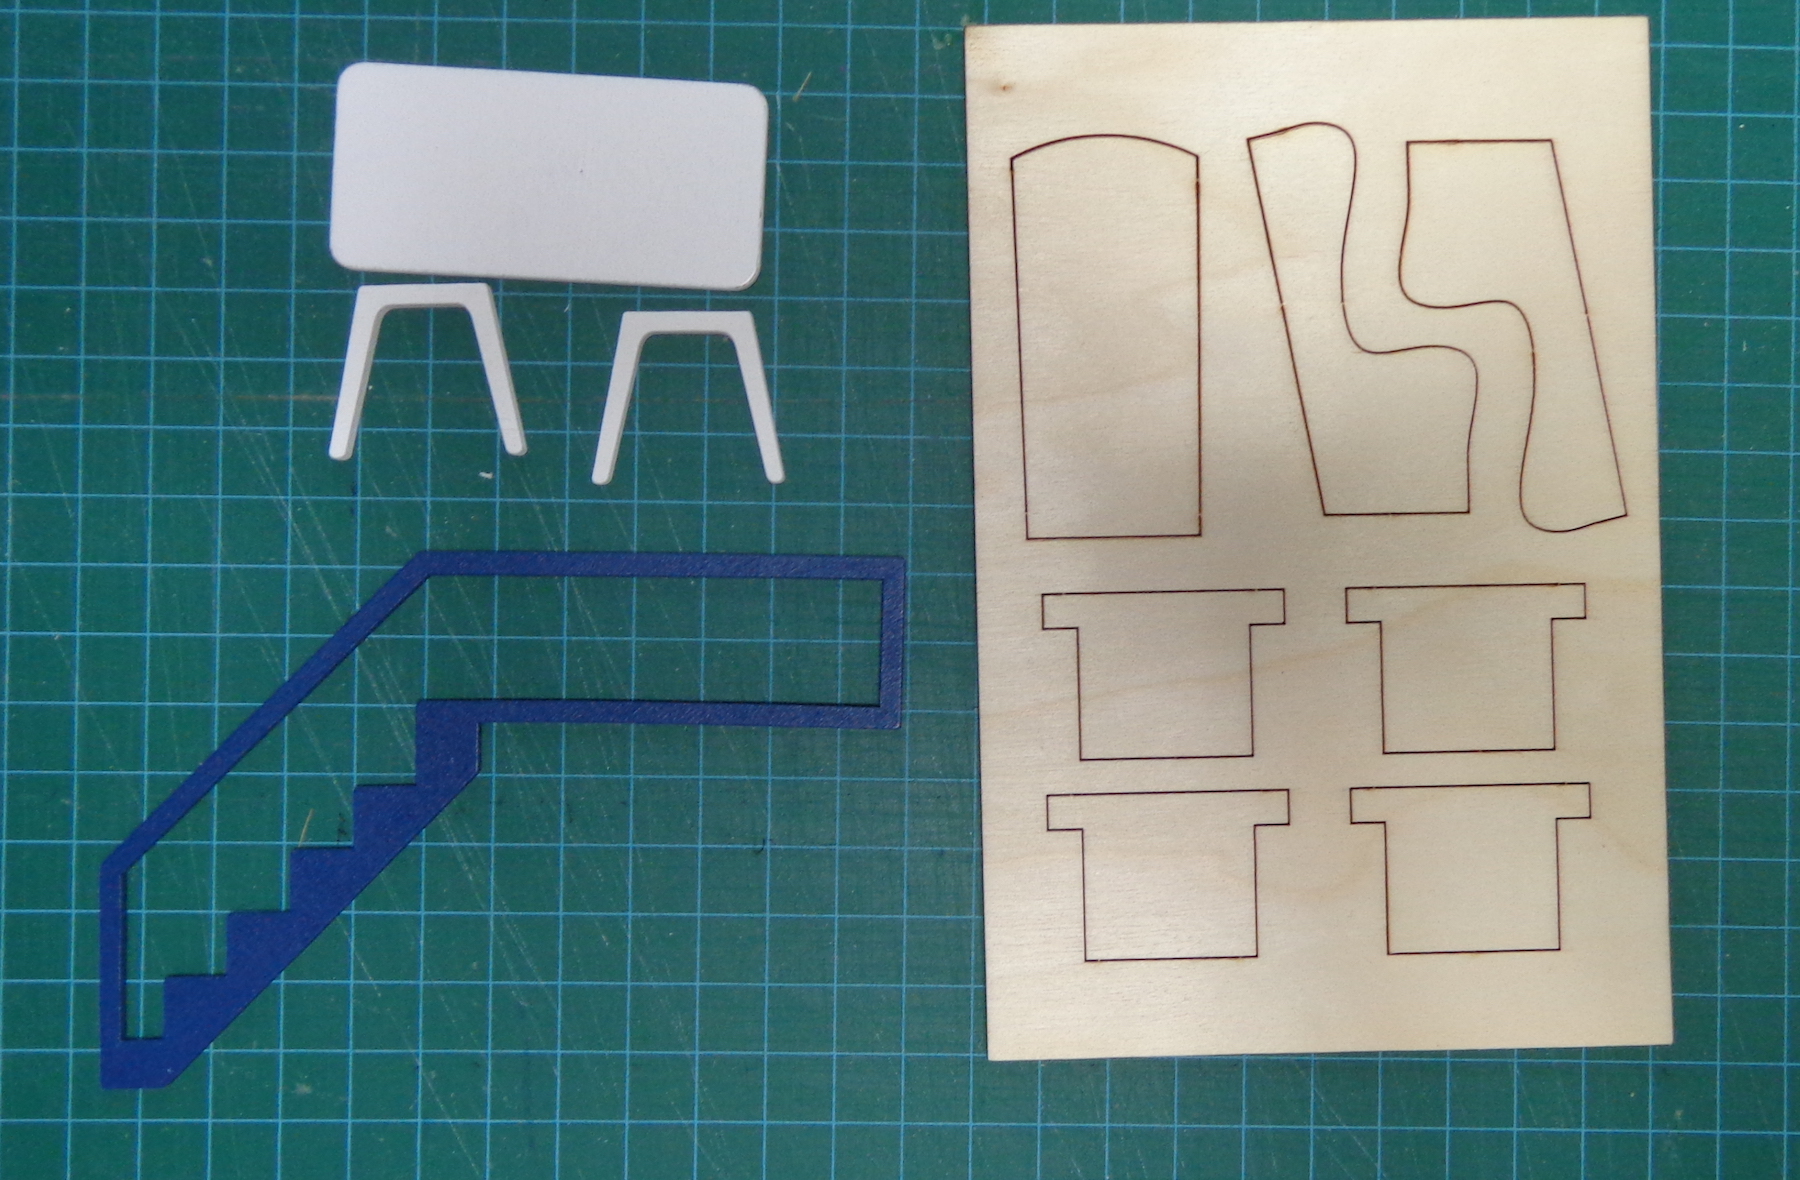
Look at the books:
You make the books the same way, by folding the pages like an accordian and pasting them into the covers. Of course, books can be different sizes, from paperbacks to coffee table books, but the Time Apartment books are 3/8″ high. (And the back covers are the mirror image of the front covers!)
That means they’re 9″ high in scale. The Rolife books are 3/4″ to 7/8″ high – in 1:24, they’d be 18 to 20″ high, which is big even for a coffee table book. In 1:12, they’d be 9 to 10″ high, which makes more sense.
The kitchen counters don’t provide a clear comparison – the Time Apartment seems to have a long counter and a small sink (that’s the marble paper covering on it), while the Rolife kitchen (orange) has a small counter and a big sink. But look at the cutting boards, and the cooking utensils. And those laser-cut clothespins!
And finally, the armchair – this is just the template, but I’ve put it beside the Time Apartment’s half-flight of stairs and kitchen table parts. That would be one big armchair in 1:24! Assembled with the legs on it, it would be as tall as one floor of the apartment.
Of course, the scale matters less between models than that everything within the model is in the same scale. If you wanted to add something, you’d need to keep the scale in mind. Also, because the items in the Rolife kits are a little bigger, the models will be easier to assemble – and there will be a teensy bit more wiggle room for fitting and matching. A smaller scale is pretty merciless, as I’m learning.
I’d started on the Time Apartment while waiting for the other two kits, since I’m making it pretty much as instructed. I’m using carpenter’s glue for the wood and white glue for the paper. I have some E-6000 for the metal, plastic and beads. I also have an X-acto knife and am going through a lot of toothpicks with the glue. I’m making good progress and will show you when it’s done.
It’ll take a bit of time, which is good as I have to think about the Rolife kits. There’s a lot of orange wood in those kits, which means I’ll probably be painting many of the pieces before assembling them. These are fantasy rooms, after all, and I have no fantasies that include orange furniture.
It’s been quiet here for a couple of weeks, partly because I’ve been pushing to finish a book and partly because I have a lot of projects on the go. I’ve had new project disease this summer, both in my writing and my crafting, but finally some things are getting finished up.
Today, I have two doll dresses to share with you. I like to sew and knit for dolls and Astro-Jen is a fellow enthusiast. She has different dolls than I do, though, so I picked up these two at the thrift store to check the fit of things. One is an EverAfterHigh doll – Briar Rose – and one is a Monster High doll – Clawdeen. They were both naked with tangled hair when they came home with me, but otherwise in good shape. I cleaned them up and untangled their hair, then bought them some shoes online. They’ve been sitting naked (except for their shoes) on my bookshelf for a while, and when I found this pattern, I knew it was time to do something about that.
I don’t know much about the body molds for these dolls, but many patterns suggest that they are the same. MIne aren’t. My MH doll is longer and thinner. The issue may be year of manufacturer: like all Mattel dolls, these have a copyright date on their back waists for the body mold. The EAH doll is 2012 and the MH doll is 2009.
And here’s a better look at those new dresses:
The pattern I used is Yet Another Monster High Dress by Samira Jessica. It’s a free download at Ravelry (that’s a Ravelry link) and an irresistibly cute pattern as well as an easy knit. The first one (turquoise) is knit of Koigu KPPPM without a contrast colour. I used Sugar Bush Drizzle for the underskirt, and just picked up the stitches at the waist to knit it in. Drizzle is a lot like KSH – it has the same content but I think the colours are cleaner. I like the muted and sometimes smoky colours of KSH for myself but for dolls, the bolder hues work well. I added a line of eyelets before the hem for a ribbon, then KFB again to create a ruffle at the hem. Because of the fullness of the underskirt, I had to undo the garter stitch hem of the main dress and add a similar ruffle to that hem.
The purple one is knit of Shibui Knits Sock with contrast in Lichen and Lace 80/20 sock. For this one, I worked back and forth at the neck until the arms were cast off, leaving a back slit, then joined in the round and continued. I knit the body a little longer than the first one, added two rows of contrast garter stitch at the hem and ruffled the hem, too. Because this dress is a bit longer, I didn’t knit an underskirt. I added a button at the back neck, which is a bit big but exactly the right colour, and made a loop to close it.
Now they can sit on my shelf in their dresses and boots.
I love Japanese sewing books so was pretty excited to find these two for vintage Barbie dolls.
The first one is called Stylebook of Doll’s Dress by Kate Mitsubachi. The second is Barbie Mode: Dresses for Classic Barbie Dolls, also by Kate Mitsubachi.
These books are both out of print and unavailable new. There are some vendors selling PDF scans of them on Etsy, but this made me uneasy – as a writer myself, I know that “unavailable new” isn’t the same as “in the public domain”. They’re probably still copyrighted material, and since I intend to use the patterns, I hunted down used copies of both books. They weren’t cheap, but they are beautiful. Most of the text is in Japanese, except for titles.
First there are photographs of the garments, as you’d expect. The next section is one I particularly like – it identifies the model of doll wearing each garment, and one book includes a picture of that doll as originally sold.
Then there are the patterns and instructions, again, all in Japanese. It’s a bit of a drag to be unable to read the specified notions or recommended fabric, but the illustrations are pretty easy to follow if you know how to sew. (It’s interesting that one book has the seam allowances included on the pattern pieces and one doesn’t.)
My plan here is to do a Julie & Julia thing and make all of the garments in both books. Here’s my first candidate:
This purse is A-1 (the first pattern under Accessories/Accessoarer) which is orange on the pattern. It’s a clever little pattern, mostly knit in stockinette with the bag seams in reverse stockinette and the flap in garter stitch. Instead of crocheting the shoulder strap as specified, I knit mine. I used sock yarn—the purple one is that Mad Tosh Twist Light that I used for the Timely Twin Set (still more left! LOL) and the red is some Diamond Yarn sock yarn. Here they are:
Size-wise, it’s more of a messenger bag than a purse, but I like the results a lot. The purple one is for my EverAfter Briar Rose doll, so it got a rose button for a clasp.