Swoon Blanche Barrel Bag

Swoon Patterns Blanche Barrel Bag

I seem to be making a lot of bags lately, but this one will finish me for a while. My favourite thing about it is that it’s done!

The pattern is the Blanche Barrel Bag from Swoon Patterns. I bought a paper pattern from Emmeline Bags because I was buying some hardware from them anyway. It’s also available as a PDF. (The first link is to the designer’s website.)

The pattern includes the bag in two sizes. I made the larger one. My plan is to make the smaller one as well, but not just yet.

My main challenge with this bag was self-inflicted. I chose vinyl for the handles, base and accent, and this did not bring joy to my sewing machine. I should have borrowed access to my friend’s industrial machine for sewing those thick bits.

Still, it came out pretty well:

Swoon's Blanche Barrel Bag, sewn by Deborah Cooke

You can’t be surprised that I got all matchy-matchy with the birds.

I made a couple of modifications. Originally, I had made piping with the light caramel vinyl and sewn it around the ends. I wasn’t happy with the appearance of it – as with the Weekender overnight bag, I had a hard time sewing up flush to the piping in some areas. This time, I just took out the piping. It means the piping on the top of the end pockets is kind of a solitary feature, but (luckily) the colour matches the fabric I chose for the lining. It ends up looking like a plan. 🙂

Swoon's Blanche Barrel Bag, sewn by Deborah Cooke

I also added one of those Ikea thin cutting boards into the base of the bag, and some bag feet. And I added an open pocket into the other side of the bag lining – this was partly to use up a piece of fabric that was cut the wrong way. The pattern seems to assume that your fabric doesn’t have a directional print. Mine did – both the birds on the outside and the lining inside, which has little flower buds – and I cut the pocket lining in the wrong direction. I cut it again, then (ha) ended up putting it in upside down. I have drunk birds inside the zipped pocket in my lining. (My guess is that few people will know or notice.) So, my pattern has a bunch of notes on it for future reference since I do like directional prints.

Swoon's Blanche Barrel Bag, sewn by Deborah Cooke

Finally, I sewed the lining to the inside of the zipper by hand, instead of by machine. This is the same modification I made with the Weekender bag, as I just couldn’t fit all that under the arm of my sewing machine.

The other thing I did on the vinyl was colour the cut edges with a Sharpie marker. Vinyl often has a white backing, so when you cut it, the edges look bright. A matching Sharpie marker squares that away. I should have done that on the edge of the contrast piece on the base of each side of the bag before sewing it to the main fabric. I’m thinking that if I do it now, I’d likely get the Sharpie on the bird fabric, which wouldn’t be cool.

Once upon a time, I had a purse that was this shape and loved it to pieces. This one is a bit big for a purse – it’s looking like a knitting bag to me right now – so I will make the smaller version, but my sewing machine and I need a little break first.

The girls are also certain they need some new clothes. 🙂

The Orange Purse Completed

Elegant Edibles purses from Knitpicks

I mentioned these two fruity purses to you a few weeks ago, as they’d risen to the surface of my projects needing to be finished. They were from a kit from Knitpicks called The Elegant Edibles kit. (That’s a Ravelry link – the pattern is no longer available.)

I knit the orange and the kiwi, but never finished them and put them aside. That’s changing now. 🙂

The orange was like this:

Orange purse from Elegant Edibles Knitpicks kit, knit by Deborah Cooke

Usually, when I put a project aside, there’s a reason. I had no idea how to line the orange, given its unusual shape, plus I thought it was too floppy to make a good purse. Similarly, I liked the handle of felted leaves, but it felt too soft to be functional.

One review, I decided to interface the lining. For the shape of the lining pieces, I flattened the bag and traced around the crescent shape, then around the arc of the “rind”. I added 1/4″ seam allowance on the edges and cut the lining. I then added some interfacing to the “rind” edge to give the purse some body. I trimmed a piece of curtain header (buckram) to the shape and stitched it to the lining fabric so it wouldn’t shift around, then assembled the lining.

You can still see those stitches. There was no chance of matching a print with so many colours, so I went with white for contrast.

Orange purse from Elegant Edibles Knitpicks kit, knit by Deborah Cooke - lining and reinforcement of base

Here’s how the lining looks with the purse on its side.

Orange purse from Elegant Edibles Knitpicks kit, knit by Deborah Cooke - lining completed

Of course, I added an interior pocket. Just for fun, I used a contrast batik. The open edge of the pocket is parallel to the zipper.

And here’s the bag turned right side out:

Orange purse from Elegant Edibles Knitpicks kit, knit by Deborah Cooke - bag with zipper

Finally, here it is all finished up.

Orange purse from Elegant Edibles Knitpicks kit, knit by Deborah Cooke - completed purse

I like the felted leaves a lot, but they’re a bit soft for a handle. Twining them around the fabric handle makes for a more sturdy solution. I’ll see how it works out but might stitch that felted wool handle right onto the batik. Overall, I’m pleased with the result. 🙂

Next up, the kiwi purse.

Another Bag Finished

I found this bag partly completed in a stash of WIPs. The pattern is Sipalu and I knit it in Patons SWS. (That’s Soy Wool Stripes in the red mix and Soy Wool Solids in the solid red. I used another yarn with the same content for the solid black, Gjestal Garn Bris. I suspect that yarn is discounted. The SWS is.)

Sipalu Bag by Kerin Dimeler-Laurence knit in Patons SWS by Deborah Cooke

My Ravelry project page says I knit it in 2011 and finished it in 2013 – but that, alas, is not entirely true. It was completed this far – as above – but the lining pieces were only cut out and unassembled. They were stashed away with it.

Here’s my original blog post about it.

I added piping to the interior of the red bands and you can see them in the picture above. That one is a before-felting picture – the one below is after felting. That button is a porcelain one from a local maker and I just love it.

Sipalu Bag by Kerin Dimeler-Laurence knit in Patons SWS by Deborah Cooke

So, the lining. I suspect I put this aside because the construction of the zippered edge was a little complicated. I had assembled the lining for the body and put a pocket on it already.

Base of Sipalu bag knit by Deborah Cooke in Patons SWS

I’d also secured a plastic base in the bottom with some purse feet. Ikea makes these thin ones that come in packs of two, and you can cut them to size with a utility knife. The colours change with each new batch, but I always have a few in my materials stash.

Now that tricky bit. The bag is essentially a box and is maybe 3″ deep, so I needed to centre the zipper between two pieces across the top, between the handle ends. Once I got out my ruler and made a plan for that, the lining came together quickly. There was a good bit of handsewing, to line the handle and secure the bag lining, but it wasn’t that big of a job.

Lining of Sipalu bag knit by Deborah Cooke in Patons SWS

Why is it that these incomplete projects that sit waiting for years always take a very short period of time to finish up? It happens every time.

And here’s the finished bag. It looks a bit dark in this pic, thanks to a dingy day – but it’s DONE!

Completed Sipalu bag knit by Deborah Cooke in Patons SWS

Unfinished Purses & A Beet

There are more projects in this stash of UFOs. Here’s the next one in my finishing queue.

This was a kit from Knitpicks with instructions and wool for six fruity purses, called The Elegant Edibles kit. (That’s a Ravelry link – the pattern is no longer available.) I remember thinking these were so cute.

Here are the official pictures from Knitpicks:

Elegant Edibles purses from Knitpicks

I did not remember that it was 2008! I finished the kiwi and the orange purses by 2010, and they’ve been waiting patiently ever since to be finished up. Enough!

Here’s how I found them:

Orange purse from Elegant Edibles Knitpicks kit, knit by Deborah Cooke
Kiwi purse from Elegant Edibles Knitpicks kit, knit by Deborah Cooke

These are really cute knits and I like that there are beads for the ‘seeds’. I made some changes to the pattern, noted on my Ravelry project page here.

I suspect what happened was that I didn’t like how floppy they were and wasn’t sure what to do about it. In the KP pix, they look more like pillows than purses to me. I did felt them a bit, which gave them a little more substance. I also decided against the handles shown in the pattern and adapted the leaves from the bunch of grapes for the orange. Those leaves are felted as well.

And now to finish them up. I found some coordinating zippers (there were zippers in the kit, but who knows where those ones are now) and pinned them in. I also cut linings and interfacing for those linings – in fact, I’ve cut buckram for the outer curve on each one. The kiwi one doesn’t have a handle at all, but my Rav stash lists the bin (in the attic) where the remaining yarn is supposed to be. (It was there at some point. Is it still there? I’ll have to go up and see.) I’m thinking a long i-cord in the green would be a good choice for a handle on the kiwi bag. If the yarn is gone, I’ll do one in black.

The beet and the grapes are also cute, but I have no idea what I did with the pattern. Hmm. If I find the yarn, I’ll hunt down the pattern. I do remember that the brighter purple (for the beet) was called Fairy Tale. 🙂

Did I use up the KP yarn on this Norah Gaughran beet? Here’s my Rav project page, and yes, the purple is the KP yarn. The green is Patons Classic Wool Worsted, so the green from the kiwi purse might still be in the stash. I’ll have to go hunting…

Beet by Norah Gaughan knitted by Deborah Cooke

A Tale of Two Purses

A while ago, I bought several of these metal purse frames when they were discounted at my local fabric store. I liked the curved antique gold ones with the detail on the frames. I finally got around to thinking about them, and making a purse with one of them.

It turns out there are two kind of frames – as well as many styles. One kind has holes like this own, so the bag is sewn into the frame. The other is smooth, and the bag has to be glued into the frame. I’m not fussed about the glue option, so am glad that I inadvertently bought the kind I prefer. Here are my two bags, as a preview, then we’ll look at each one and the differences between them.

two finished purses made by Deborah Cooke

The one on the left is the purse I made first.

pattern for first purse made by Deborah Cooke

The package for the handle contains a template but is pretty minimalist in terms of instructions. I traced the curve of the handle and created a pattern, then cut it from a tapestry fabric that I love (there are pieces in the stash from some pillows) and a coordinated lining.

Featuring a motif from this tapestry fabric on each side of the bag determined the size of my bag. Since it’s a very heavy upholstery fabric, I didn’t use any interfacing or padding. I could have used some interfacing on the lining, but didn’t. I did add a small pocket to each interior, since I like having a little pocket inside my purse. (Perfect for a hotel key card that I don’t want to lose.)

I sewed the lining first, only sewing an inch at either end of the seam at the bottom. I then pressed that seam as if it was sewn, giving me a nice crisp edge for closing that up once the bag was done. When I sewed the outside of the bag, I top-stitched all three seams so that the seam allowances would stay put. The bag is boxed out by sewing across the bottom corners.

Once the bag was constructed, turned and the space in the bottom seam of the lining was sewed up, I gave it a good press, then top-stitched around the top curve that goes into the frame. This made it a little easier to jam that edge into the gap in the purse handle – when I could see the top-stitching on the inside, I knew it wasn’t pushed in far enough. I basted the handle in place, then stitched it all together with a topstitching thread.

Here’s that first purse:

first purse with metal handle made by Deborah Cooke

The result is fine, but the finished bag doesn’t have much wiggle room at the top. The purse is very flat – I can just slide my hand inside. Hmm.

I did some searching online and came up with this tutorial at So Sew Easy. It’s for a different frame – there are so many styles available – but you can follow it to make a pattern to fit your frame. This tutorial shows how to adapt the tracing of the handle to create more fullness in the bag. Ha. Look at the difference between my two pattern templates:

pattern for first purse made by Deborah Cooke
pattern for second purse made by Deborah Cooke

The one on the right has been folded and didn’t want to lie flat for the picture. The bottom edge is straight.

Here’s the bag made from the second pattern:

second purse with metal handle made by Deborah Cooke

It’s much fuller. I’d even call it puffy. I would have loved to have included the top of that octagon shape beneath the handle – the yellow-ish outline – but there just wasn’t enough of the fabric for that.

When sewing the handle to the first purse, I used two stitches per loop, making a zigzag, but really, it doesn’t need this much reinforcement. And this sewing is hard on the hands – less is better! (You can see that I missed one zig on the left of the handle.) For the second (on the right) I just did one stitch per hole.

stitching on purse handles, purses made by Deborah Cooke

The stitches showed on the inside – I just couldn’t make them small enough to avoid that, as I was using a black buttonhole twist to sew in the clasp. I sewed in a bit of trim to cover that up. Here’s the second bag with the trim pinned in place.

inside of second purse sewn by Deborah Cooke

Here’s the first purse with the trim sewn in. It looks much neater. (You can also see how much flatter this one is.)

inside of first purse sewn by Deborah Cooke

The frame didn’t come with a handle – I think there were matching chain handles, but they were sold out by the time I wanted them. I cut a length of pleather, sewed the outside edges in place then folded the ends over a d-ring. I then fed a length of cording though it. For the second handle, I just hemmed a piece of grossgrain ribbon. The loops on the bag handle had to be coaxed open a little with a pair of plyers to join the handle, but it all worked out just fine.

Here are those two finished bags, side by side.

two finished purses made by Deborah Cooke

I may change the ribbon handle at some point, but for now, it’s just fine.

Clematis Wristlet

In the beginning dragon quilt in blue, assembled by Deborah Cooke, and completed.

I’ve gotten back into making bags this fall and here’s a completed one to show you. I’ve been waiting for a sunny day to take some pictures, but it’s raining raining raining, so we get some pix taken on my sewing table instead. The blog has been too quiet and I’m done with waiting for sun.

You might remember my blue dragon quilt, which was a kit (and is now FINISHED! HA!). That’s it at right.

I had some leftover of the various fabrics and used them for this, along with a shiny black pleather. They really were bits and ends, so it ended up a bit patchworky but everything coordinates well.

This is the Clematis Wristlet, a free pattern from Blue Calla Patterns. This little bag has fusible fleece on the outside pieces, which gives it a bit of substance, and more interfacing besides. I didn’t have a 9″ brass zipper, so I cut down a 14″ one for this project.

Clematis wristlet by Blue Calla patterns sewn by Deborah Cooke

On one side, I used the scales. I also had a strip of this print to use on the inside of the strap.

Clematis wristlet by Blue Calla patterns sewn by Deborah Cooke

On the other side, I used the background with dragons and circles.

Clematis wristlet by Blue Calla patterns sewn by Deborah Cooke

The lining is the Celtic/tattoo background fabric. (I see I picked up a thread on my cutting table and included it inadvertently in this shot.)

Clematis wristlet by Blue Calla patterns sewn by Deborah Cooke

And the pocket inside is made of the dragons from the border print. There are only scraps now, so they’ve gone into my bag for real patchwork.

This pattern is a pretty easy make, and the finished bag is a useful size. I’m always looking for something flat to hold my cash at bookfairs and this might just do the trick.

I like the idea of the dragons watching over my hoard!

Tumbleweed Toiletry Bag

Tumbleweed Toiletry Bag from Blue Calla Patterns

This was a satisfying project. The Tumbleweed Toiletry Bag is a beautiful bag filled with lovely little details. I first saw it when the owner of Blue Calla Patterns did a presentation to our sewing guild, and knew I had to make one. Here’s the page on their site where you can buy the downloadable pattern. The pic at right is from from their site, also linked to that page.

I was hoping for a kit, like the one I bought from Blue Calla for the Foxtail Cross Body Sling, but there wasn’t one available. There was a kit for the hardware, which are always the toughest bits to find IMO. (It lives at that link, but availability of all the various options does vary.) They did have a sale running at the time, so I chose fabric and zippers etc., and essentially built my own kit. I did have to buy the fusible foam from my local fabric store as they were out of stock of that.

And here’s my finished bag:

Tumbleweed Toiletry Bag, pattern by Blue Calla Designs and sewn by Deborah Cooke

I love these fabrics and the little bird in the floral print. The construction was remarkably easy, once I stopped overthinking it and trying to figure out how it would all come together. I just needed to follow the instructions and let it happen.

I made only two changes. First, I used a fake leather for the base and the handles, instead of fabric or cork. Secondly, I inserted a piece of 1/4″ cord into the handles to make them round. In the pattern, they’re just flat.

I love this bag so much!

Here’s the inside of the bottom section. It has a zippered mesh pocket, which is on the bottom of the top section.

Tumbleweed Toiletry Bag, pattern by Blue Calla Designs and sewn by Deborah Cooke

And here’s a peek inside the top section:

Tumbleweed Toiletry Bag, pattern by Blue Calla Designs and sewn by Deborah Cooke

I picked the feather zipper tabs to coordinate with the lining fabric.

I had some trouble sewing the thicker areas with my domestic machine. For example, the stitching line around the top to hold the frame should meet below the hinge, but with those seam allowances, I couldn’t manage it. I left a gap and it’s fine. Similarly, I couldn’t do the topstitching on the top side of the lower zipper, for the same reason.

When I make it again, I’ll add some more topstitching – around the base, for example, and on the top side of that zipper, as well as in the base of the lining – just to manage the seam allowances better. I have a crazy amount of materials left over, so there will be more bags in these fabrics, as well as at least one in this design.

I’m not planning a trip so don’t really need a toiletry bag. I’m thinking I’ll use it as a knitting project bag – the yarn supply can go in the bottom, the needles and notions in that zippered pocket, then the project on the needles in the top section.

The Weekender Bag

The Weekender Travel bag by Amy Butler

Finishing up that Foxtail Cross Body Sling had me digging into my unfinished projects. I remembered starting this bag a few years ago, becoming overwhelmed with some detail and putting the project aside. I got it back out again and finished it up.

The pattern is from Amy Butler and is called The Weekender Travel Bag. You can buy the pattern on her site, from this page. (Just scroll down a bit to find it.)

Here’s the official picture at right. (Clicking on it will also take you to her PDF download page to buy the pattern.)

Although I love the look of this bag, I was worried about using quilting cotton on the exterior, specifically how well it would wear. For this first one, I used several table runners that had a woven design. I think they’re polyester. They were available in two colour combinations – here’s a green one, uncut.

uncut table runner

I used the burgundy/pink variant for my bag and fussy-cut the pieces to play with the design. Instead of making my own piping, I bought drapery piping in a coordinating colour. Here’s my bag:

Weekender Travel Bag designed by Amy Butler and made by Deborah Cooke

I did add piping to the tops of the pockets on the bag ends, though there isn’t supposed to be any. I had some left and liked the look of it.

I also used the needle off-set on my machine for the final row of stitching along the piping, so that I could get as close to it as possible. I still didn’t get as close as I’d like, but it worked out pretty well.

The reason I put my bag away initially was the zipper. I couldn’t find one with tabs that met in the middle. (I’ve since learned how to make one from the Blue Calla tutorials – I’ll tell you about that with another post about bag-making.) At the time, I bought two heavy plastic zippers to use instead – a burgundy one for each side – but wasn’t entirely happy with that solution. (Now, after making the bag, I think that the heavy plastic zips might be too heavy. It gets a bit bulky around the zipper opening with that fusible foam inside.) Recently, though, there were some separating zippers discounted at my local fabric store, probably because the zipper tape is mustard yellow. There was a 32″ one that was long enough for me to cut off one end, and the mustard matched the stripe in the fabric.

One change I did make was putting a heavier bottom in the bag. I often use these cutting boards from Ikea for that – they’re inexpensive and easy to cut to size with a heavy knife. The base of this bag was too big, though. The mister came up with a solution for me – he’d noticed cheap cutting mats at a discount store. They aren’t the same quality as the one I use on my cutting table, but in this case, one was perfect. I cut it down to size and put it in the bottom of the bag, before the lining went in.

I also really (really) like bag feet. I put eight on this one, because they’re smaller in size than might be ideal. They’re secured to that cutting board base, which means the base doesn’t come out and the bag can’t be washed. Would I wash an overnight bag? Not likely. If anything, I’d spot-clean it. I can’t imagine that this fabric, and all the layers of fusible goodness, would survive a trip through the washing machine either.

This bag is quite easy to assemble. There are a lot of layers but not many pieces and the instructions are excellent. The tricky bit was getting close enough to that piping, but a lot of that is on me, because I used heavier fabric and heavier piping than specified. I had no fun putting in the lining, but again, that’s on me – because I had put that hard base into the bag, I couldn’t turn it inside out as instructed. There were a lot of contortions to get the lining sewn in as a result!

I had thought this fabric might be easy to clean and mark-resistant, and I was proven right. When sewing in the lining, I stabbed my finger and bled on the bag. The mark came right out with cold water. 🙂

If you want to make a small bag, this is a good one to try! Keep it simpler than I did, though, and use the specified weight of fabric and binding.

You’ve probably guessed that the green runner is destined to become a different bag. I’ve already cut it out…and yes, it uses another of the sale zippers with mustard tape.

Foxtail Cross Body Sling

Foxtail cross body sling by Blue Calla patterns

Here’s something a little different today. Last year, I attended a presentation on bag-making given by the founder of Blue Calla, and bought one of her kits. It’s the Foxtail Cross Body Sling.

Here’s the pattern for the bag on the Blue Calla website. (Clicking on the picture will also take you to this page.)

I don’t see any kits on the site now, but I do recommend a kit for your first bag. It’s a good way to make sure you have all the parts, especially the hardware.

And here’s my Foxtail:

Foxtail cross body sling by Blue Calla patterns, made by Deborah Cooke from a Blue Calla kit

I’m really pleased with how well it came out, and it wasn’t very difficult. I really like that fabric, too. (The inside is an abstract print from the same line, with a light background, just the thing for a bag interior.) The instructions were clear, though I had to read them through a couple of times – since bagmaking is comparatively new to me, I tended to overthink it all. I should have just done what I was told and not worried about it. 🙂

The only thing I had to redo was the strap – I put it on upside down the first time, so had to unpick the stitching at the one end to redo it. That actually makes sense, since I routinely attach bra straps upside down. This is a similar technique, with a loop so that the strap length can be modified.

Foxtail cross body sling by Blue Calla patterns

One thing I didn’t consider was which way I sling a crossbody bag. I always put the strap over my left shoulder, as shown in this pic of the bag from Blue Calla’s site. But this means that all the zipper tabs are at the left and the compartment along the left side is a little tough to reach.

Now, imagine the bag is slung over the right shoulder. It would tip to the right then, and all the zipper tabs would be front and center.

I think I’m going to make a second one that’s the mirror image of this one that I’ve made. That way, when I put the strap over my left shoulder, all the zipper tabs will be readily accessible. This one, I’ll wear over the right shoulder.

One thing about making bags is that it’s addictive. I had started a bag years ago and wasn’t sure I had all the right pieces so put it aside. I’ve dug that one back out to finish it up, and ordered all the parts (I hope) to make a different Blue Calla bag. They also offer a free pattern, the Clematis Wristlet, and I’m going to try that one, too. Oh, there are some kits available for that one, right here.

Have you ever made a bag or a purse?

McCalls 3845 for Tyler & Friends

McCalls Craft 3845 sewing pattern for Tyler Wentworth

Remember this sewing pattern for Tyler Wentworth dolls, McCalls 3845? Well, I didn’t just make the purse from it. 🙂

The outfit on the left is a sleeveless dress with a jacket – they show the jacket with fur or feather trim. I used velveteen on mine.

Here’s the finished dinner suit. Red crepe, lined with black polyester with red polka dots. The collar and cuffs are black velveteen and I used two black rose beads on the fronts. I like a black purse with this one.

McCalls 3845 for Tyler Wentworth dolls sewn by Deborah Cooke

There were issues with this little suit. The first jacket I made was too small—the sleeves were too short and the fronts didn’t meet. I redrafted the pattern with longer sleeves and bigger front pieces so that they met up at the center-front. Since the pattern was a digital download, it’s possible that I didn’t print the pattern at the right % size originally. This is a tricky bit with digital downloads that don’t have any scale on them. I printed the pattern at 100% but that wasn’t right. At any rate, it’s mostly right now. (The sleeves are a bit too wide in this version.)

The red crepe wasn’t the best choice of fabric, since it’s pretty thick. That’s why the bolero doesn’t close when she has the dress on. It’s just bulky. (Without the dress, the jacket closes, but it’s a bit of a bold look.) The fabric was also stretchy in the crosswise direction, which made accuracy a challenge. I thought the fabric was the reason why the bodice didn’t fit as well as I would have liked. It’s just too wide at the top.

Bodice top from McCalls 3845 for Tyler Wentworth dolls sewn by Deborah Cooke

But no. I realized that there is a teensy mistake in the pattern.

Bodice correction for McCalls 3845 for Tyler Wentworth dolls sewn by Deborah Cooke

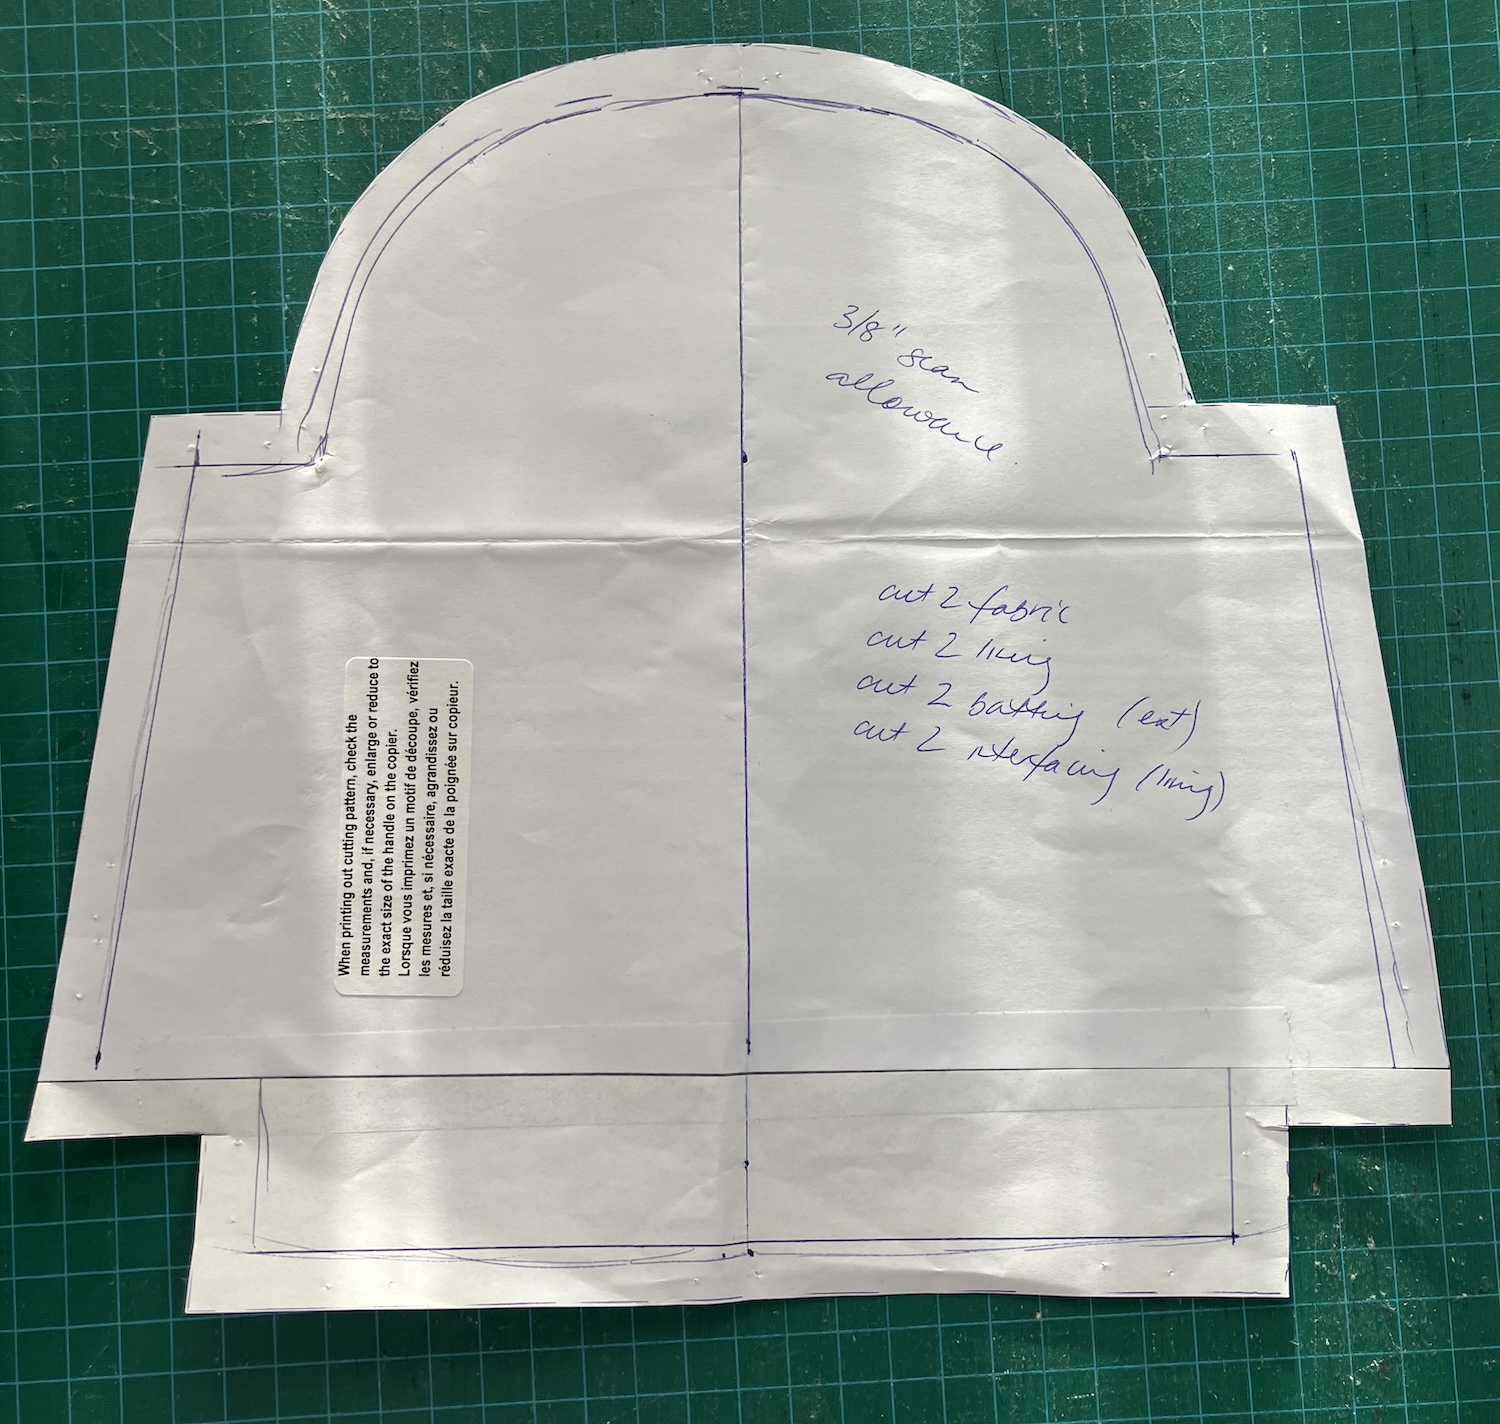
This is the center piece for the bodice front. Usually, the printing on the pattern indicates the top and bottom by its direction – here, it looks like the larger edge should be the top. But the bodice doesn’t fit well into the top of the skirt this way, and the top gapes open on the final dress as you can see on the red dress above. On a whim, I turned it upside down for my second version of the dress and voilà! It’s PERFECT. So, the label on the pattern piece is upside down. Now, it has my handwritten labels on it. 🙂

Here’s the variation of the dress made by flaring the skirt, with the middle bodice piece the other way around. I cut it of the polka-dot polyester, lined with solid black. The plan was to give our girl an easy change of look with the jacket when she’s travelling. (You know how keen dolls are about globetrotting…)

Here’s the finished dress.

McCalls 3845 for Tyler Wentworth dolls with modified skirt sewn by Deborah Cooke

It fits MUCH better at the top front. The ruffle at the hem of the flared skirt is actually lingerie elastic trim, so it stretches, but it’s the perfect scale and it won’t be able to stretch now.

Of course, she needs a different purse for this outfit and I like the red one. 🙂

I also added a zipper to the back instead of the dress closing with snaps, which was bulky in the red version. There were a few tweaks to making that change – because the original closure with the snaps overlaps in the back, while the zipper means the back pieces just meet but don’t overlap. We’ll talk about that in a minute.

I ordered doll-sized invisible zippers online. The zipper has to be long enough to open over the widest point of the doll’s body – that’s her bum. 🙂 For a strapless dress for Tyler, I use a 10cm zipper. If the zipper went all the way to the nape, I’d use a 12cm one. Doll zippers tend to not have stops at the top – or maybe it’s just the ones I have – so it’s easy to zip them up with enthusiasm and end up with three pieces that won’t go back together. The first thing I do now before using a doll zipper is overcast a few stitches at the top of the teeth on each tape.

Because the pieces overlap in the original design, the seam allowances need to be reduced for the zipper. If the center back was marked on the pattern, this would be easy—you’d just make a new seam allowance from that. But the CB isn’t marked on this pattern and I didn’t want to guess since tiny increments can make a big difference with doll clothes. There’s a kind of a tab on the right back so I removed that, making both backs the same (mirror images of each other).

For the zippered back, I also changed the order of construction. The pattern instructions are to sew together all of the bodice pieces, then all of the skirt pieces, then sew them together at the waist and end up having only the center back seam open. Instead, I sewed all the front bodice pieces, then the front skirt, then sewed them together to complete the front. I sewed both back bodice pieces to their respective back skirt pieces, then inserted the zipper. It’s an invisible zipper, so it’s easier to set in when the back is flat. Once the zipper was in, I basted the side seams and tried the dress on the doll. I had to take a little bit extra out of the back to make it fit properly (that would be the seam allowance that I hadn’t already reduced), so I took it out of the side seams.

Here are the backs of the two dresses:

Dress backs of McCalls 3845 for Tyler Wentworth doll , one as pattern and one modified for a zipper, sewn by Deborah Cooke

And yes, the red one should lap the other way. I realized I’d done it backwards after I’d wrestled the base of the slit into place (to minimize the gap). In fact, this exercise is what pushed me to trying the zipper – getting the overlap in place was frustrating and I don’t love the result. If the doll bends at the waist, the back gapes open, and there’s a lot of bulk at the center back with all those layers. The metal zipper stop on the black dress is still visible, a sign that I need to refine my invisible zipper installation technique.

As far as using the jacket with the flared dress, I ended up with a small problem – the red purse is an orange-red and the jacket is a cherry red. They don’t go together. (Fortunately, I had shoes in the right shade of red to match the purse!) I’ll cut out another jacket to go with the second dress. I finally found some fake fur that has a short enough nap for the dolls, so I’ll use that in black for the collar and cuffs, but am waffling about the fabric. Should it be solid black lined with polka dots, or polka dots lined with black? The polka dot polyester just feels a bit light for a jacket to me. Hmm.