Tights for the Monster High Dolls – and a New DIY Wardrobe

My Monster High and Ever After dolls are mostly thrift-store finds, which means they usualy come to me naked or close to it. I buy shoes for them online, but make clothes for them otherwise. I had written a post about a dress I made for my dolls from a free downloadable pattern – I also made a cloak to go with it that I figured out on my own. – but realized this week that I hadn’t published it. (I sent the dress and cloak to Astro Jen as a gift for her girls and didn’t want her to see them before they arrived – then I forgot to queue up the post. Gah. That’s why it published yesterday.) It’s right here. I need to finish the variations of that dress and cloak that I’d cut out for my own girls, but will show you both when they’re done.

Today, we’ll have a look at some tights I made for the girls last weekend.

Leg-cessories pattern from DG Requiem for MH and EA doll stockings and tights

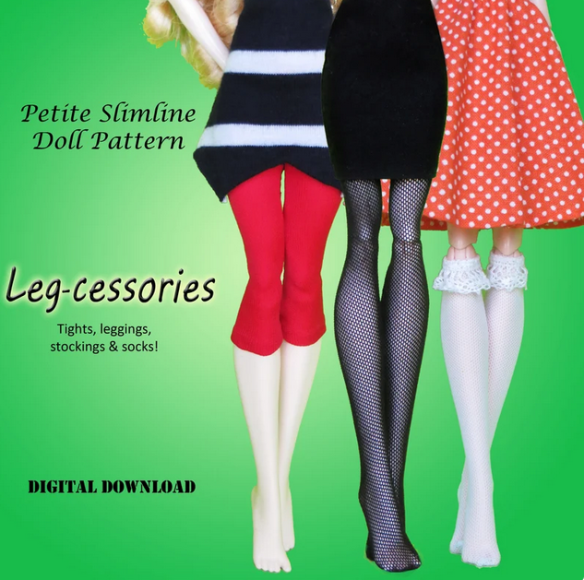
The pattern is Leg-cessories from DGRequiem – here’s the pattern on Etsy. It’s a PDF download that you print out.

Here’s the designer’s Etsy store, and here’s her website and store. She offers a lot (a lot, a LOT!) of cute patterns for different dolls.

So, yes, this is a paid pattern, but it offers many options. There are socks and stockings/pantihose, plus tights in four lengths. (I want to make knee socks with lace tops still. They’ll look great with those little knitted dresses.) Even better, the instructions are really good and filled with tips for getting good results. It includes instructions for both machine and hand-sewing, and also there’s a sizing chart for the dolls. I only made tights so far, but I think this pattern is a good deal.

These two pair are my favorites.

tights for MOnster High Dolls sewn by Deborah Cooke using DGRequiem's Leg-cessories pattern

The girls seem to like them, too.

Mirri dress from Wardrobe by Me knit by Deborah Cooke

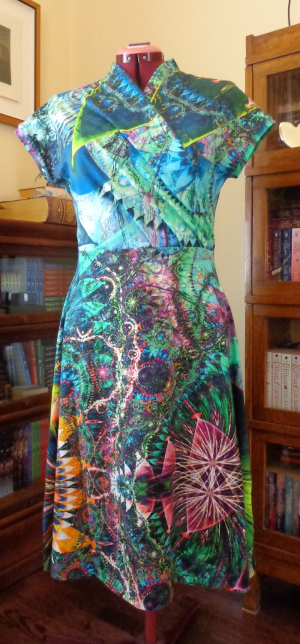
They’re both cut from scraps of a cotton knit with a really large-scale pattern and repeat, but lots of teensy detail. The repeat is about 45″ in length. Here’s the Mirri dress I made from this print (it’s also at left) and here’s the link to the product page of the online shop where I bought it. The product page is still live, even though the fabric is sold out. You can see better detail of the fabric there.

I did some strategic cutting from my scraps, to end up with two legs from the same area of the print. They don’t even look like they’re from the same fabric, and I could make a dozen more unique pair. (And, yes, I just might.) This was also the easiest fabric to sew. It’s a cotton with lycra and a bit thicker than the others.

Did you notice that the girls have cardigans, too? I’m writing out that pattern to share it with you as a free download. Frankie also has one of the purses from a 5-Surprise Mini Fashion by Zuru (That’s a Chapters link.) because yes, after Astro Jen sent me the two pink purses, I surrendered to temptation and bought a pair of surprises myself. This green bag was in one of them, and the homage Louis Vuitton tote that I was coveting was in the other, so that worked out well.

But back to those tights. Here are a few more pair that I made last weekend:

tights for MOnster High Dolls sewn by Deborah Cooke using DGRequiem's Leg-cessories pattern

These are like potato chips: I can always go for one more pair. I could have fitted them tighter (there are instructions for that) but the girls like to share and the EverAfter High girls aren’t quite as thin as the Monster High ones. The pair on the left were fussy-cut from a knit with wide bands of patterned stripes. The repeat on it is about 18″ so it was possible to cut several (many!) pair, all of which came out differently. (My naked Skeleta is coveting these.) The purple pair were also fussy-cut from a large scale paisley print. (Clawdeen wants those.) The next two were the obvious choices, cut from small-scale prints that are closer to being in scale for the girls. (Although, again, the brown print has areas that are predominantly teal, which would give a different look.) The last pair were also fussy-cut – that starry pattern has a lot of variation over the repeat and some “suns” that could fill half a piece. I chose places with smaller stars and similarly coloured background. Lots of tights for the girls!

And they have a space to keep them, too. Look at those empty clothes racks.

DIY wardrobe for Monster High and Ever After High dolls made by Deborah Cooke

This is another of my DIY wardrobes for dolls. (That link is to my first one, for Barbie.) I used a paper box with magnets on the lid flap, and stood it on end. The back wall of the wardrobe should be the bottom, and the box top lifts. Now it drops down to be the dressing room floor. This box has a floral print on the outside and gold foil on the inside, which I like a lot. For this one, I made a U-shaped insert of bookbinders’ board and “wallpapered” it with a pretty print paper. It’s held in the U shape by the two clothing rods, which are bamboo skewers glued in place. They have bamboo beads at each end as escutcheons and all the bamboo was coloured black with a Sharpie marker. There are some hooks on the right wall, too, made of bent headpins. The mirror is a bevelled one from Michaels, framed with beads and backed with gold paper. The dresser is a make-up organizer from the dollar store. The rugs are screenshots of carpets printed on cardstock and cut out. (The front one is glued down.) I didn’t make a handle for this one and might not bother. (I’ll be busy sewing more clothes.)

Back to the leggings pattern review – this is a good pattern with lots of customizable options, clearly written with great instructions. I’ve bought several more patterns from this designer and will show you the results soon. (The girls are excited.)

Sewing Skirts

I’ve been sewing more garments for myself lately, but with mixed success. There are a few reasons for this: I’m picky, I’ve changed shape since my glory days (when I always cut a size Vogue 8 and it always fit), and I’m learning new tricks. Previously, I’ve mostly sewn woven fabrics but have been learning to sew knits. There are new techniques to learn and new tricks, and also some old habits that are hard to leave behind. I’ve also been experimenting with patterns from indie designers instead of just shopping from the Big4. These designers don’t always come to patterns with the same assumptions, which is both exciting and (sometimes) vexing.

Vogue 7947

I love skirts and wear them a lot. It makes more sense for me to sew skirts than pants, and makes for an easier fit, too. One of the skirt patterns I go back to all the time is Vogue 7947. It’s a Five Easy Pieces pattern (they probably don’t make those anymore) including a jacket, shell, dress, skirt and pants. The pattern isn’t available anymore and the photographs are pretty dark on the envelope.

The skirt has a yoke and is slightly flared. The top edge sits just below the waist, which makes it really comfortable. The hem falls just below the knee. It has a side zipper, which is slightly less than ideal, but I’ve never taken the time and trouble to split the back yoke and move the zipper to the centre back. I’ve made this skirt a lot, from a wide variety of fabrics.

Here’s the schematic from the back of the pattern envelope:

Vogue 7947 line drawings

So, when I saw the Ravinia Skirt from Love Notions, I thought “aha! this is the knit version of my fave skirt.” Well, it didn’t quite work out that way, but that’s okay—sewing fails are disheartening, but I always learn something from them. One big takeaway here is that I want to sew knits the way I sew wovens, and that’s not always the best strategy.

Love Notions is an indie pattern company probably best known for their Laundry Day Tee, which is a free pattern download for an a-line t-shirt and a pretty easy knit. I downloaded that pattern, then indulged in a few more because they were having a sale. The patterns are sold as PDF downloads, which you then print and tape together (ugh) or take to a shop to have them printed on a single sheet. All of the sizes are on the same page, the way Burda patterns have always been. Unlike Burda patterns, though, the seam allowances are included. Unlike Big4 patterns, the seam allowances vary in width between companies and even within a design itself. I’m so used to that 5/8″ standard from the Big4. Now I go through the instructions in advance and circle or highlight the seam allowance so I don’t mess up. Love Notions patterns tend not to have notches to match pieces – they have little bars that you need to transfer to the fabric. (I now cut notches instead since I’ve never liked transferring markings.)

The Ravinia Skirt by Love Notions

The Ravinia Skirt can be cut in multiple lengths, has a full swingy skirt, a contour waistband that sits below the waist (a fave style of mine) and – pockets!

I wanted to love this skirt so much. I made it twice and in the end, I’m just not a fan. It’s comfortable to wear, but I don’t think it’s that flattering. What’s the difference between it and my standard skirt? Gathered pockets, and that is my issue. In the end, I liked having pockets but not how they looked.

I also found this a confusing pattern, and so I did a lot of stitch ripping. I had to read the directions multiple times to figure out what I was supposed to do—since I’ve sewn a lot of skirts together.

Ravinia skirt sewn by Deborah Cooke

The first version I sewed was in a knit remnant with a red graphic design. I thought I had enough for the shortest version—I’m glad I checked the length before cutting, though. I prefer skirts to be just below the knee and the shortest (“knee length”) would have been above my knees. I’m 5’5″ so it’s not because I’m tall. I added four inches to the skirt length and the finished skirt is just below my knees. I put one pocket piece in backwards by mistake—the wrong side is showing instead of the right, but it’s the pocket facing against the skirt front, so no biggie. I followed the directions to zigzag a length of elastic around the top of the waistband and really disliked how it looked and fit. I ripped it out. As a result, the skirt fits but the waistband is really loose – if I lose 5 lbs, it’ll fall right off. This one isn’t a keeper, but it was a test sew.

You can see that part of the issue is body shape. Nell is rocking this skirt much better than I do, but then my tummy is a little more fluffy since lockdown. (Nell remains as svelte as ever and I had to pin it at the back for her.) So, it’s possible I’ll like this more after I lose those pounds – but I’ll have to redo the waistband.

On this one, I used the option of binding the pockets with a self-facing, the way you’d bind the neckline of a t-shirt. This looks nice, but it’s really thick and stiff, which doesn’t keep those pockets from bulging. There are six layers of fabric under the top stitching: the skirt, the pocket lining, the edging and seam allowance on the back, plus the edging and seam allowance on the front. To be fair, this is my issue – the pattern instructs you to top-stitch the binding in place without turning under the seam allowance on the inside of the pocket, then to trim away the excess. This would leave a raw edge on the inside of the pocket, which I thought might fray with wear. I also thought it might be visible.

Here on my pocket, you can see the wrong side of the fabric on the facing, which was my mistake. You can also see that it’s a puffy little gathered pocket and that the weight of it pulls the side seam toward the skirt front. It reminds me of a medieval purse. 🙂

Ravinia skirt, pocket detail, sewn by Deborah Cooke
Ravinia skirt sewn by Deborah Cooke

I cut a second skirt in the calf-length variation out of a really soft drapey knit which is black with flowers. Of course, the fabric weights more and there’s more of it, so I tried the option of adding power mesh into the back of the waistband in an effort to defy gravity. This very effectively tightened the waistband—too much. I couldn’t wear it. I didn’t want to rip out all the stitching, so I just cut off the waistband, making the skirt 1/2″ shorter. I cut a new contour waistband, trying it on before attaching it to the skirt and shortening it to a snug fit before attaching the skirt. it’s comfortable now and I have more confidence in it staying up than the red one, but I’m still not smitten.

Nell, however, looks great in it. (Even if the picture is on a bit of an angle.)

On this one, I piped the edges of the pocket. I did not use cotton cord as suggested by the pattern, because this skirt will be machine washed and when it is, the cotton would shrink. I used a black polyester cord from my stash instead. I think this is a better finish than the top-stitched version, but it’s still bulky. There are six layers of the knit in the seam allowance – the skirt and seam allowance, the pocket facing and seam allowance, and the two seam allowances from fabric covering the piping – but it’s all in the gathers. This leaves the edging less bulky and stiff than the first option, but doesn’t keep that pocket from being puffy. In this softer knit, it really pulls the side seam forward.

Ravinia skirt, pocket detail, sewn by Deborah Cooke

And in the end, I just don’t love the skirt. This project doesn’t feel like a win, but I did learn a bit about edging pockets. The funny thing is that I discovered that I have a linen skirt that I don’t love so little that I’d forgotten I had it. It’s a Vogue pattern, too, but I don’t know which one. I love the fabric and it has my fave a-line shape—but it has front slash pockets. They’re not gathered, but they still change the look and hang of the skirt. At least I’m consistent.

I’m going to give the black skirt a try this winter. I’m going to make a long-sleeved t-shirt of the same black print and hem it to fall just at the base of the contour waistband. That might work as I like having a top and skirt that go together to look like a dress.

I may also try to modify it to have flatter pockets. If I give that a try, I’ll let you know. In the meantime, I cut another Vogue 7947.

Easy as Mirri 1-2-3

I’ve been learning to sew with knits lately, which has proven to be a lot of fun. Today, I’ll show you three versions I made of a dress pattern called Mirri, from Wardrobe By You. It looks like a wrap dress but actually isn’t—the bodice is sewn in place, which is how I prefer wrap dresses. (They can’t come unwrapped this way.)

Here’s my first Mirri, modelled by the ever-lovely Nellie:Mirri dress from Wardrobe by Me knit by Deborah Cooke

This is sewn from a knit fabric that I found in the sale bin at my local fabric store. It’s probably a polyester and lycra blend. The idea was that the test-sew would be cheap—and disposable, if it didn’t work out, but pretty enough to wear, if it did work out.

This pattern has a minimum of pieces—left front, right front, back bodice and the skirt, which is the same for front and back. The fronts have self-facings, and there are two bands to finish the sleeves. No zipper or fastening. You just tug it over your head.

The dress is quick to cut out and quick to sew—the only note I made on the instructions was to finish the edge of the self-facing on both fronts before sewing the dress together. (Because you know what I did the first time.) I used the serpentine stitch on my machine to do that, then the overlock stitch for the seams. I sewed down the collar with the twin needle and top-stitched the sleeve band with it, too.

For the hem, I pressed on a narrow strip of fusible knit interfacing to stabilize the hem, pressed it into place, then sewed it with the twin needles, too. I like how polished that finish looks.

The fit is perfect and the length is just right. No fitting changes! Yay!

Mirri dress from Wardrobe by Me knit by Deborah CookeI cut out a second Mirri in a scuba knit, which is heavier than the first knit fabric, that I also found in the sale bin. The image on the scuba knit was printed in 80cm panels, and also mirrored on the center fold. I pushed this around a bit and decided that there was no ignoring that mirroring so I should work with it. I centered the skirt pieces and the bodice back on the center fold. Each skirt piece used the better part of one 80cm panel, then the bodice pieces all came out of the third one.

This one is a bit bolder, but I like it a lot:

Mirri dress from Wardrobe by Me knit by Deborah CookeThe side seam on the skirt mirrors similarly to the center front and center back.

This version of the dress taught me a lot about the differences between knit fabrics. The scuba knit is a lot thicker so I made a few changes as I was sewing. On the first dress, I pressed both waist seams down, but to avoid bulk at the side seams in the scuba knit, I pressed one up and one down.

By this time, I also had a system for the collar. You sew the bottom of the collar (on the fronts) to the back neck, then the shoulder seams after that. This is the only tricky bit, as there is a nice 90 degree corner at the end of the collar seam where it meets the shoulder seam. I had the best luck sewing the shoulder seams from the sleeve toward the neck on each side. I pressed the collar seam up (towards the collar) and the shoulder seams back. I had turned under the seam allowance on the back neck facing on the first dress, making a neat inside collar with no visible seam allowances. On this one, I finished the facing and didn’t turn it under, which reduced the bulk of the seam. It still looks neat, and I like the look of the twin needle stitching to hold the facing in place.

This dress fits more snugly and the collar stands up higher. The scuba knit just has less stretch and drape. (I think it’s going to be warmer, too.) In future, I’ll cut a little more ease when using a scuba knit.

You can also see that while I was sewing the second Mirri, Nellie’s corner got a little more crowded. Now, she has to share the space with a bookcase to hold my stock for booksignings, as well as (inevitably) some dragons.

Mirri dress from Wardrobe by Me knit by Deborah CookeFinally, I graduated to more expensive fabric. I’d been saving this piece of cotton and lycra knit until my skills improved. It’s from the Netherlands and is really amazing. I loved it as soon as I saw it, but wasn’t sure what to make with it. Mr. Math always hums Go Ask Alice when I pull it out to look at it and it is a bit wild. (That’s why I love it.) I should have taken a picture of it uncut, but you can see it at EmmaOneSock where I bought it – this link will take you to their product page for this fabric, if they still have any of it left. I actually used the pieces cut of the scuba knit as my pattern when cutting this out—then I used the first cut skirt as a pattern to cut the second, so I could make sure the pattern matched up.

Mirri dress from Wardrobe by Me knit by Deborah Cooke
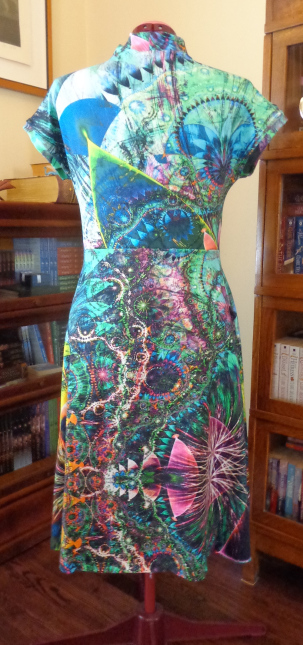
It still needs a good pressing, and to be hemmed, as well, but Nellie really wanted to try it on:

Since I only had two panels, I didn’t have many options for placement of the pieces. In hindsight, I don’t know why I was convinced that the two skirt pieces had to be identical. There really is no matchy-matchy with this fabric and more chaos might have been more interesting. Also, if I’d used another zone for the second skirt piece, the two front bodices would have been more different than they are.

This knit is stretchier than the scuba knit, but still a bit thicker than the first knit fabric. The fabric is fabulous – very soft. It does have a little more tendency to stretch in the cross wise direction – and ripple – so I’ll stabilize the shoulder seams with interfacing the next time I knit with it. The fit is (no surprise) right in between Mirri 1 and Mirri 2.

I feel as if my choices for pattern placement didn’t do justice to the fabric and might have to buy another panel of it to make a T-shirt.

I’ve cut out (yet) another Mirri, but will show you that in another post. It’s in a lighter knit than the first one so I’m going to line at least the bodice. (New challenges abound!) Also, I’ll play compare-and-contrast between it and a wrap-front dress that I’ve cut using a pattern from one of the big pattern companies.

And yes, I love wearing dresses. 🙂

What do you think of my Mirri‘s?  The more, the Mirri-er?

Vogue 1477 and Vogue 9300

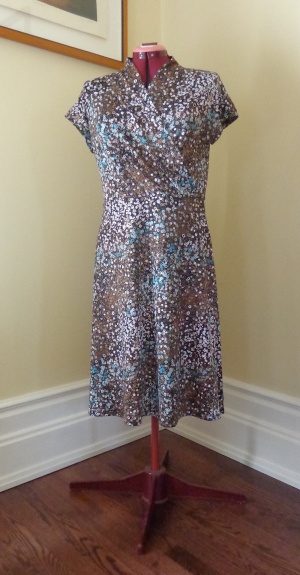
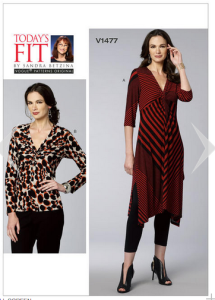
I’ve been sewing again lately, which I really enjoy. Part of what made me get back to it was the gift of a new-to-me serger. Oooo, what a wonderful thing! I could sew all those knits that had intimidated me before! I bought some patterns and scoured the discount bins of my local fabric stores for knits. I haven’t had much luck with patterns for woven fabric in recent years – nothing seems to fit, despite my efforts – so I wanted to test the knit patterns first.

This was a plunge back into the pond.

There are two funny things about the results:
1. I haven’t used the serger yet. It intimidates me, so I’ve been using the overlock stitch on my favorite machine.
2. Every single garment I’ve sewn of knit fabric fits. Really.
First time.
Every. Single. Garment.

This is incredibly exciting!

So, let’s look at some of the results. First up, a Sandra Betzina pattern, Vogue 1477, which has a va-voom gathered front. Apparently, it’s also out of print.

I bought a remnant of this olive green print. I don’t know all the names of the various kinds of knits: this one feels like a silky t-shirt knit.

Vogue 1477 sewn by Deborah CookeI cut my size and held my breath as I sewed it up.

The body was a bit long. I shortened it by almost 3″ before hemming. The v-neck plunges a bit deeper than is my usual style, but I like it (and I have no idea how to modify it.) Here’s the result – the ever-stylish Nell is wearing it with a favorite black wool 8-gore skirt of mine from Daniel Hechter Paris.

You can see that the neck plunges deeply, but it still looks good.

Vogue 1477 sewn by Deborah Cooke
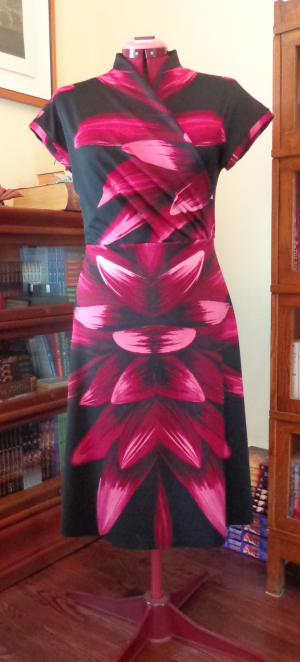
I also bought about 3 meters of a russet and black print. It feels like it belongs in t-shirts but is more cottony than the first one. So, I cut another of the Sandra Betzina tops from it and sewed it up.

Another great fit!

I’m going to cut a dress from this pattern in a green abstract knit, extending the lines for a flared skirt instead of the squared-off one shown in the tunic pattern. I believe this knit fabric is called a scuba knit. I’m pretty excited about this, and will show it to you once it’s done. It’s still on the dining room table right now. 🙂

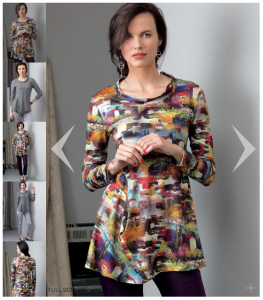
Next, I cut a Marcie Tilton swing top out of the russet and black fabric. This is a fun t-shirt with a bit more style. The pattern is Vogue 9300. The line drawing doesn’t really show that there’s a little horn on that diagonal seam at the front.

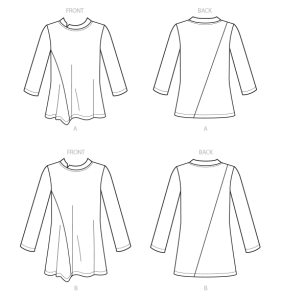
I cut the shorter version, but because I’m short 🙂 it probably looks like the longer version on me. The neckline is a little deeper than I wanted, but I followed the pattern the first time.

Here’s my test swing top.You can just barely see that Nell decided my little black suede boots would be perfect with this combo.

Vogue 9300 sewn by Deborah Cooke
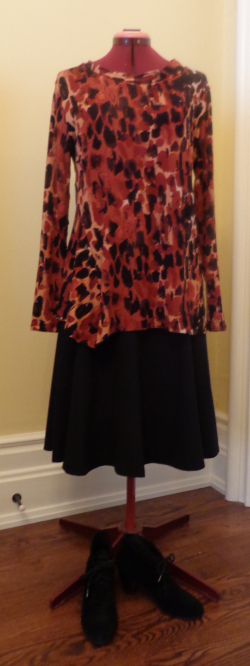
I liked this top enough that I started to think about variations. (I also discovered Marci Tilton’s blog, which has a post about this pattern and possible variations. It would have been good if I’d found this before I started sewing the pattern but there you go.)

In my treasure hunt for knits, I found a fuzzy knit in the discount bin, which is very soft, in black with cream. I’ll call it a sweater knit, because it makes me think of cozy dresses, although that might not be technically what it’s called. I changed the neck to more of a cowl and extended the length to make a dress. I also went down a size in the bodice – even though I made my size in the orange top, it seemed a bit generous. I thought negative ease might work better, especially as this softer knit was more drapey.

This post is getting a bit long, so I’ll show you that dress, and the green one from the Sandra Betzina pattern, in another post. What have you been sewing lately?