The pattern is free from Yarnspirations and you can download it from their site here. It’s also listed on Ravelry right here. The specified yarn is Red Heart Boutique Treasure, which is discontinued. Here’s the Ravelry page for the yarn and you can see that it’s a two-ply yarn with a slow gradation of colours and made of acrylic. I used a yarn from Lionbrand called Scarfie in the Charcoal/Aqua colourway. It’s not listed on the manufacturer website anymore, so here’s a Ravelry link.
What I liked about this cowl is the buttons. I find cowls are great outside, but then too warm if I step into a shop or get in the car. This one gives you the option of unfastening a bit of it without taking it off.
And here’s the finished cowl:
I used 5mm needles because I liked the look on the knitting better on that size, but that also meant that I used a lot less yarn. (a LOT less. Maybe the yardage is wrong on the pattern.) This one took 140g, leaving 10g from one ball of yarn. That’s just 265m and the pattern says you need three balls of yarn with 138m in each.
What’s funny is that I don’t love the buttons so much now that it’s done. They don’t seem to make a lot of difference, since the cowl gapes open at the throat anyway. So, I’ve cast on another one in Caron Cakes in the colourway Rainbow Sprinkles, modifying it to be worked in the round. I’ll knit this one on 6mm needles and see how that affects the yardage. I kind of want to use the whole ball to get through the entire gradation, but it’s 350m.
Interestingly, this yarn has vanished from the Michaels website, which is where I bought it. Seems like everything gets discontinued these days before I even find it!
I always sign my quilts – I write my name on the quilt then embroider over it – and add the date, but there’s always the challenge of easily documenting more than that. For years, I kept a little book, a Quilt Diary or journal, which had a place for a picture of each quilt then some details about it. Naturally, the book is not with any specific quilt (and I’m not entirely sure where it is now.) So I was excited to find these panels at my LQS.
This is one panel of the labels, which are part of the Sewing is My Happy Place line by Nina Djuric. Here are the fabrics in that line on the Northcott website. Each label is about 5.5″ by 5.75″ after washing (because the fabric shrank more in the lengthwise dimension, of course). I’m trimming them so that there’s half an inch all around, then turning down 1/4″ and stitching around the perimeter on the machine. I’ll sew them onto the backs of my quilt by hand once I’ve added the information to each one.
I also did a little test, writing on the selvedge with a black Sharpie marker before washing the fabric. That held perfectly, so I’ll use the Sharpie for my documenting. I need to find that old quilt diary to copy any details from there.
btw, the link on the Northcott page for the free tote bag pattern isn’t right. (It takes you to ALL of the patterns available there.) You can download that bag pattern right here. It’s hard to see in the thumbnail but the tote has pleated outer pockets. I’m going to try one and use those panels with the black background on it somewhere. 🙂
One of my goals for this year was to finish up my quilts. I have a lot of quilt tops pieced but they haven’t become finished quilts. Part of this is because I’ve always pieced by machine but quilted my tops by hand, so the first part of the process is much faster than the second. Either I needed to hire someone to quilt my tops, or I needed to learn to machine quilt them myself. I went for option B and ordered a walking foot for my machine.
This (ironically) meant that I needed to make more quilt tops in order to practice machine quilting before taking on my existing quilt tops. Also, I thought it would be easier to work with a smaller quilt first, and my existing tops are mostly big. So, I began to piece lap quilts from scraps.
This one was inspired by this YouTube video from Missouri Star, Make a Summer Squares Quilt. They suggest using a jelly roll with two contrasting solid fabrics, but I dove into my scrap bag instead. I have a lot of strips in there, many of them from my Escher quilt, and it drives me crazy to waste fabric. I grouped strips into lights and darks to piece them together, using a Kaffe Fassett stripe in greens cut crosswise and KF yarn-dyed solid mauve as my contrast squares in the middle. Here it is:
I used all the pieces leftover from the Escher quilt but was missing two strips to make enough blocks for this layout. I used some lime Roman Glass in my stash then added one non-KF fabric – it’s the lime with polka dots that’s in the border. Because fabric was so tight, I didn’t really manage the light and dark assignment of colours in the Missouri Star quilt, but I like how bright and cheerful mine is.
The walking foot was delivered while I was piecing this, so I got right down to quilting by machine for the first time. (eek) I added one more tool to my arsenal – Odif 505 temporary fabric adhesive. (That’s an Amazon link.) You spray it on the batting then iron the fabric to it, then flip it over and do the same with the backing. It keeps the layers from sliding around as you stitch and is pretty awesome. (It washes out.)
I watched this video and thought this diagonal quilting was something I could do. The trick was that I’m using my vintage Singer 185 for this project, which is a workhorse but a straight stitch machine. (My Elna has an appointment for a sewing-machine-spa-day next month!) In the video, she uses a wave stitch chosen from the machine’s options. I decided to make my own waves, even though they’d be less regular.
I used Guterman 100% cotton thread in black, a Schmetz 14 sharp “chrome” needle, and my new walking foot. I set the guide on the foot for an inch but didn’t follow it faithfully. I wanted a more organic look to the “waves” and I like how they worked out. There are a few tucks but I expected that since my borders were a bit wavy (which comes from sewing fabric cut on the crossgrain onto strips with a bias edge. Next time, I’ll be more careful!)
It was a bit of a wrestle moving the fabric, but I got used to it. And my waves improved over the course of quilting. I noticed that the 185 likes to stop with its needle up, so I learned to crank it down before doing anything else (to avoid any little jumps). My curves were also smoother when I didn’t stop in the width of the quilt. Faster and smoother is better, too. Lessons learned. 🙂
There are a lot of things you can buy to make this machine quilting easier, but I’m trying to keep a lid on expenses until I decide whether I like it or not. Instead of buying quilting gloves, for example, I used a new pair of garden gloves. I did find it a bit tough to move the quilt, even with the walking foot, so I ordered a LaPierre Studio Supreme Slider (that’s another Amazon link.) This is a reuseable plastic sheet that you lay over the machine bed to make it smoother and more slippery.
The cool thing about this quilt is that it came completely from the stash and my scrap bag, even the batting. I’d bought a big roll of 100% cotton batting to layer up all my quilt tops and this is 1/3 of the last piece. (The very last piece is destined for Scrappy Test Lap Quilt #2 which is a bit bigger than this one.) The backing is a piece of yarn-dyed cotton that I got at the thrift store, leftover from the Purl Soho apron I made for the mister.
You can see some pins there – I’ll sew the bias binding down by hand on the back side. The finished quilt is about 30 by 42″.
The one thing I’d change was the colour of the thread for the quilting. I used black, because I didn’t know what to pick, but I don’t love the look of the black on the solid mauve border. So, in future, I’ll hold the quilting thread against the most solid fabric to choose a colour.
On to the next one! I’ll have some knitting to show you soon, too – a cowl, a new pair of socks and a cardigan.
I’ve recently finished a new quilt top, one that hadn’t been in my plans but just fit into my schedule perfectly. Here it is:
(I have to figure out a better way to photograph quilt tops. Hmm. I end up holding the camera overhead (even when I stand on a chair or ladder) and hoping for the best, about 10 times in a row. (Thank goodness for digital cameras!) I wish I had a wall high enough and big enough to hang each quilt. Hmm. I’ll keep thinking about it.)
The fabrics are mostly from a collection called Mermaid in Blue Jeans by Chelsea Design Works from StudioE. I’d ordered the panels, thinking they might make good tote bags, but changed my mind once they arrived. I decided to make a quilt instead and ordered another set of blocks to make it bigger. There are two free quilt patterns available for download on the StudioE website, but I didn’t see those before I started. (It’s okay. I don’t mind having designed my own.) You can also see on that page of the StudioE website that only the panels and the pink contrast fabric are currently available from the manufacturer. I bought my fabric on Etsy where all of the fabrics are still available.
Here are the fabrics that I used and the quantities. First, the mermaid panels. There are eight 10.5″ squares sold in the panel. You can see that there are really four designs then the mirror image of each one (with two having a colour change.) I bought two of these sets.
Then the allover mermaid print:
I had some of this left from my tote bags but ordered another meter for the outside border and used pretty much all of it for that. I cut 5″ strips lengthwise for the border and had only two inches left over. (I prefer to cut borders on the lengthwise grain, since it’s less inclined to stretch than the crosswise grain. This means, though, that you either need more fabric or have to do more piecing.) Even though this is a one-way design, there’s a lot going on, so I didn’t bother to match the seams for that outside border. I just didn’t sew any mermaids in half.
The third fabric I used from the line was the Dark Blue Mermaid Wave. I had one meter of this fabric, but once I started the sashing, I had to buy another. I have some left and I made some cutting errors. You could probably make it work with 1.5m, especially if you were less matchy-matchy than me.
The bright pink was in my stash. It’s a basic blender that comes in lots of colours and is stocked at Fabricland. It’s called Mystic Vine by John Louden. (That’s a UK site that shows many of the colours. I’ll guess mine is the Fuchsia.) Besides the fact that I like pink and navy together, the brighter pink gives the quilt some punch. I tried a paler one that matched the pink in the blocks more closely, but it was dull. I had maybe half a meter which I used to border the blocks and bought another meter for the border and binding. That’s a .75″ strip used to border the blocks (which finishes out to .25″ – I used .25″ seam allowances throughout) and a 1″ strip around the border that was cut at 1.5″.
There’s a challenge with these printed blocks that I also experienced with the dragon quilt. The blocks are printed square, but when you pre-wash the fabric, the cotton shrinks more in one dimension than the other, leaving rectangles instead of squares. Mine were about half an inch longer than they were wide after washing, which confounded me for a while. OTOH, it’s better to have this shrinkage before the quilt is pieced. Ultimately, I realized it didn’t really matter since I wasn’t coordinating these blocks with other square blocks. I just cut longer borders for the height.
The second challenge was that wave fabric. It’s a one-way design, which meant some planned cutting of the sashing. Also, it looks so much better when the wave is continuous across the quilt. (This is probably why it’s only used as an accent fabric in the free patterns. That’s a lot simpler.) I discovered that the wave shape repeats every 4″, with the complete design repeating every 12″. That’s why I cut 4″ sashing – it was easy to make matches then. My blocks finished out to just under 12″ with the pink borders, which was a happy coincidence. If I did this again (not going to happen!) I would plan for them to be 12″ wide.
I was going to have the blue horizontal sashing go all the way across, but again, it looked a bit bland. Instead, I cut 9 blocks of the allover print and didn’t like that at all. Next, I fussy-cut 9 mermaids out of the allover print for the blocks at the junctions of the sashing. This was less bright than I’d hoped, but the backgrounds blend so well that it’s not immediately obvious where my seams don’t join with surgical precision. I like the small mermaids there, too.
I found some turquoise-green cotton in the sale bin that matches those green mermaid tails and bought it for the backing. I’ve cut bias binding from the rest of the bright pink for the edges. The quilt will finish out at 60″ by 64″ or so. I’m going to try quilting it on the machine once my walking foot arrives. (Not as a first project, but it’s in that queue.)
I like this one. It presented a few challenges but was a pretty easy make while I finished writing a book. What do you think?
I’m working on a number of projects this week, trying to finish things up, which means I have no completed project to show you. I’ve finished the second orange sock but you’ve seen the first and (surprise) the second is the same. It’s not very newsworthy. I’ve also been knitting on the Halo cardigan while watching movies at night (the back is done). I’ll definitely run out of Koigu KPPPM on that, so need to make a plan. Hmm. (Those links go to previous blog posts here at A&K.)
Sewing-wise, I’ve finished two Schoolhouse Tunics and don’t like either of them, so won’t be showing those off. (That link goes to the designer’s site.) I finished my Purl Soho Cross Back Apron and don’t love that on me either – fortunately, the straps were long enough that I could position them for the mister. He loves to cook and the apron looks great on him, so that’s solved. It’s a good pattern, if you’re looking for one, well described and comes out with a nice finish. (That’s a link to the pattern on the PS site.) I’ve just come to the conclusion that my friend Terri is right: square pieces of fabric don’t look good on round bodies. 🙂 I’m currently in the midst of making some bucket hats. Of course, I need to tweak the patterns – I’ll show you the results soon.
This may be more interesting.
Inspired by a friend’s machine quilting, I’ve decided to learn and finish up some of my quilt tops. I ordered a walking foot for my sewing machine, but in the meantime, I’ve put this quilt back on the frame. I’d started the hand quilting and put it away. Time to finish up.
This is my Pineapple Star quilt, being quilted. I pieced this one a while ago – I know it was before we could shop easily online because I ran out of the big poppy print. I remember that the local shop that carried KF fabrics was out of stock of that one, so I had to piece one of the squares for the corners. Now, I’d just order another meter from someone else.
You’ve probably noticed that I’m quilting with embroidery thread. I like using this thread, even though it’s a bit thicker. I usually choose a contrasting colour – like the lime here – so the stiches show up. I split the thread into two strands of three ply each.
Here’s the quilt in progress, when the central star was completed, so you can see the design. I fussy cut the center of the medallion from that large scale Kaffe Fassett peony print. (The print is actually called Kimono. It’s fabulous, but discontinued.) The only other KF fabrics in the top are the lime green at the points of the stars and the cherry red outside the lime green ring – both are the same print, Roman Glass. The purple is a batik, the dark pink is kettle-dyed, the light pink is a solid (probably Kona, because it’s thick) and the lime green is a fun print with suns. There’s yellow Kona in the central squares in each point, with a leaf fussy-cut from another print in each one.
After this, I added additional triangles of the poppy fabric to the corners to square it up and added outer borders. It has a skinny border of that lime green from the middle and then a slightly wider border of purple batik – not the same batik as in the middle, since I’d run out of that too. (You may have guessed that this quilt wasn’t planned in advance.) I have some of the cherry Roman Glass cut on the bias for the binding.
The inspiration was a book called Pineapple Stars by Sharon Rexroad. Here’s the book at right and here’s an Amazon.ca link. It says at the ‘zon that the book was published in 2005, so I’ll guess that I pieced this top fifteen years ago or so.
Right now, I’ve got the big corner squares left to quilt – they’ll be quick, since I’m just doing them with diagonal lines – then the borders and binding. I’m going to try a technique featured in one of the serger tutorials I’ve been watching – the instructor uses her serger to trim the outer edge of her quilts while sewing one edge of the binding in place at the same time. I’ll handsew the other edge on the back side.
I like this quilt. It’s bright and cheerful, just the kind of thing to work on right now. What do you think?
Citron is a free pattern for a semi-circular shawlette Hilary Smith Callis. It’s available from Knitty.com and has been around for a while. (Ha. It’s in the Winter 2009 edition, so that is a while!) Here’s a link to the pattern at Knitty.com.
I’ve made a couple of these in the past. First, I made one for my MIL in Noro Kureyon Sock. (This yarn is discontinued, which is a sad truth. Here’s its page on Ravelry.) She wanted something cheerful and bright.
There are a couple of variations in this version from the original pattern. The original has stockinette bands alternating with gathered sections for a ripple effect. I added some eyelets and beads to this version. Here’s the blog post about it (which has now reminded me of the Gaia Shawl, also a nice one skein knit and a free pattern. That’s a Ravelry link. Hmm.)
One of the things that still irks me about this shawl (I have it now, since my MIL passed) is the lack of a second band of pinky-purple. Knots in yarn are frustrating, but in self-striping yarns, a knot may also mean that part of the colourway is missing. This was made from one skein of Noro Kureyon Sock, but it had a knot. Instead of a second repeat of the pink and purple part at the outer edge, I got a third repeat of the green. It looks to me as if the pink and purple part shouldn’t be there at all.
The second version I knit of this shawl was in one colour, a kettle-dyed laceweight yarn from an indie dyer.
I added beads to this one, as well, gradually increasing the number of them toward the hem. It’s edged in black Malabrigo Lace. There’s a blog post about this one here.
And now on to the new version. This is knit of Noro Silk Garden Sock in the colourway 211.
It’s had a gentle block to make it rounder, but not a hard one to stretch it out. I wanted to preserve the ripple (which was lost in the first one for my MIL, because of a very hard block.) I could – and maybe should – have knit it on larger needles. The fabric is quite sturdy on the 4.0mm needles but I do like the colourway. Here’s the yarn on Ravelry, and here it is on the Diamond Yarns website, which is Noro’s distributor in Canada.
The put-up for this yarn is less because it’s thicker – it’s a sport weight (while Kureyon Sock was a fingering weight) and has 300m per skein (while Kureyon Sock had 420m). So, having two balls didn’t make a huge shawl.
I also added some eyelets and beads but not as many as the first one.
For the cast-off edge, I did a simple crochet edging to keep it frilly. A single crochet in each stitch, then chain 2 before repeating. I ran out of yarn when the cast-off was almost done so substituted in a piece of leftover Silk Garden Sock from another colourway (in my stash for sock yarn squares). I picked out the turquoise section so it would match a bit.
The first skein had no knots at all, which made me happy. The second one, however, had three knots in rapid succession. I can see what that did to the colour progression (grr) but still I like this shawl a lot. It’s 22″ deep and 44″ across the long edge, just enough to hang over my shoulders to the elbows.
Last week, I mentioned my afghan in progress made of mitred squares knit in leftover sock yarn and realized I’d never given that project its own post. Today we fix that!
Here’s the base square. This one is knit in (hmm) Collinette Jitterbug, in the colourway Monet. That’s the Ravelry link as it looks like this yarn might be discontinued.
I like knitting mitred squares. They’re easy and the result looks good. One of my favorite books about them is Domino Knitting by Vivian Høxbro – here’s the Amazon.ca link for the book, here’s the Ravelry link and here’s VH’s website. This is a lovely little book with a number of interesting projects.
From this, I developed my sock yarn square. For a mitred square with a central stockinette stitch, you cast on an odd number of stitches, and this makes the outer edge of the L. That central stitch remains in stockinette (knit on the right side and purled on the wrong side) while the rest of the square is knit in garter stitch (all knit, all the time). It makes a prettier edge if you slip the first stitch on each row, and that also makes it easy to pick up stitches and add new squares to the existing ones. it saves you seaming if you just knit them together.
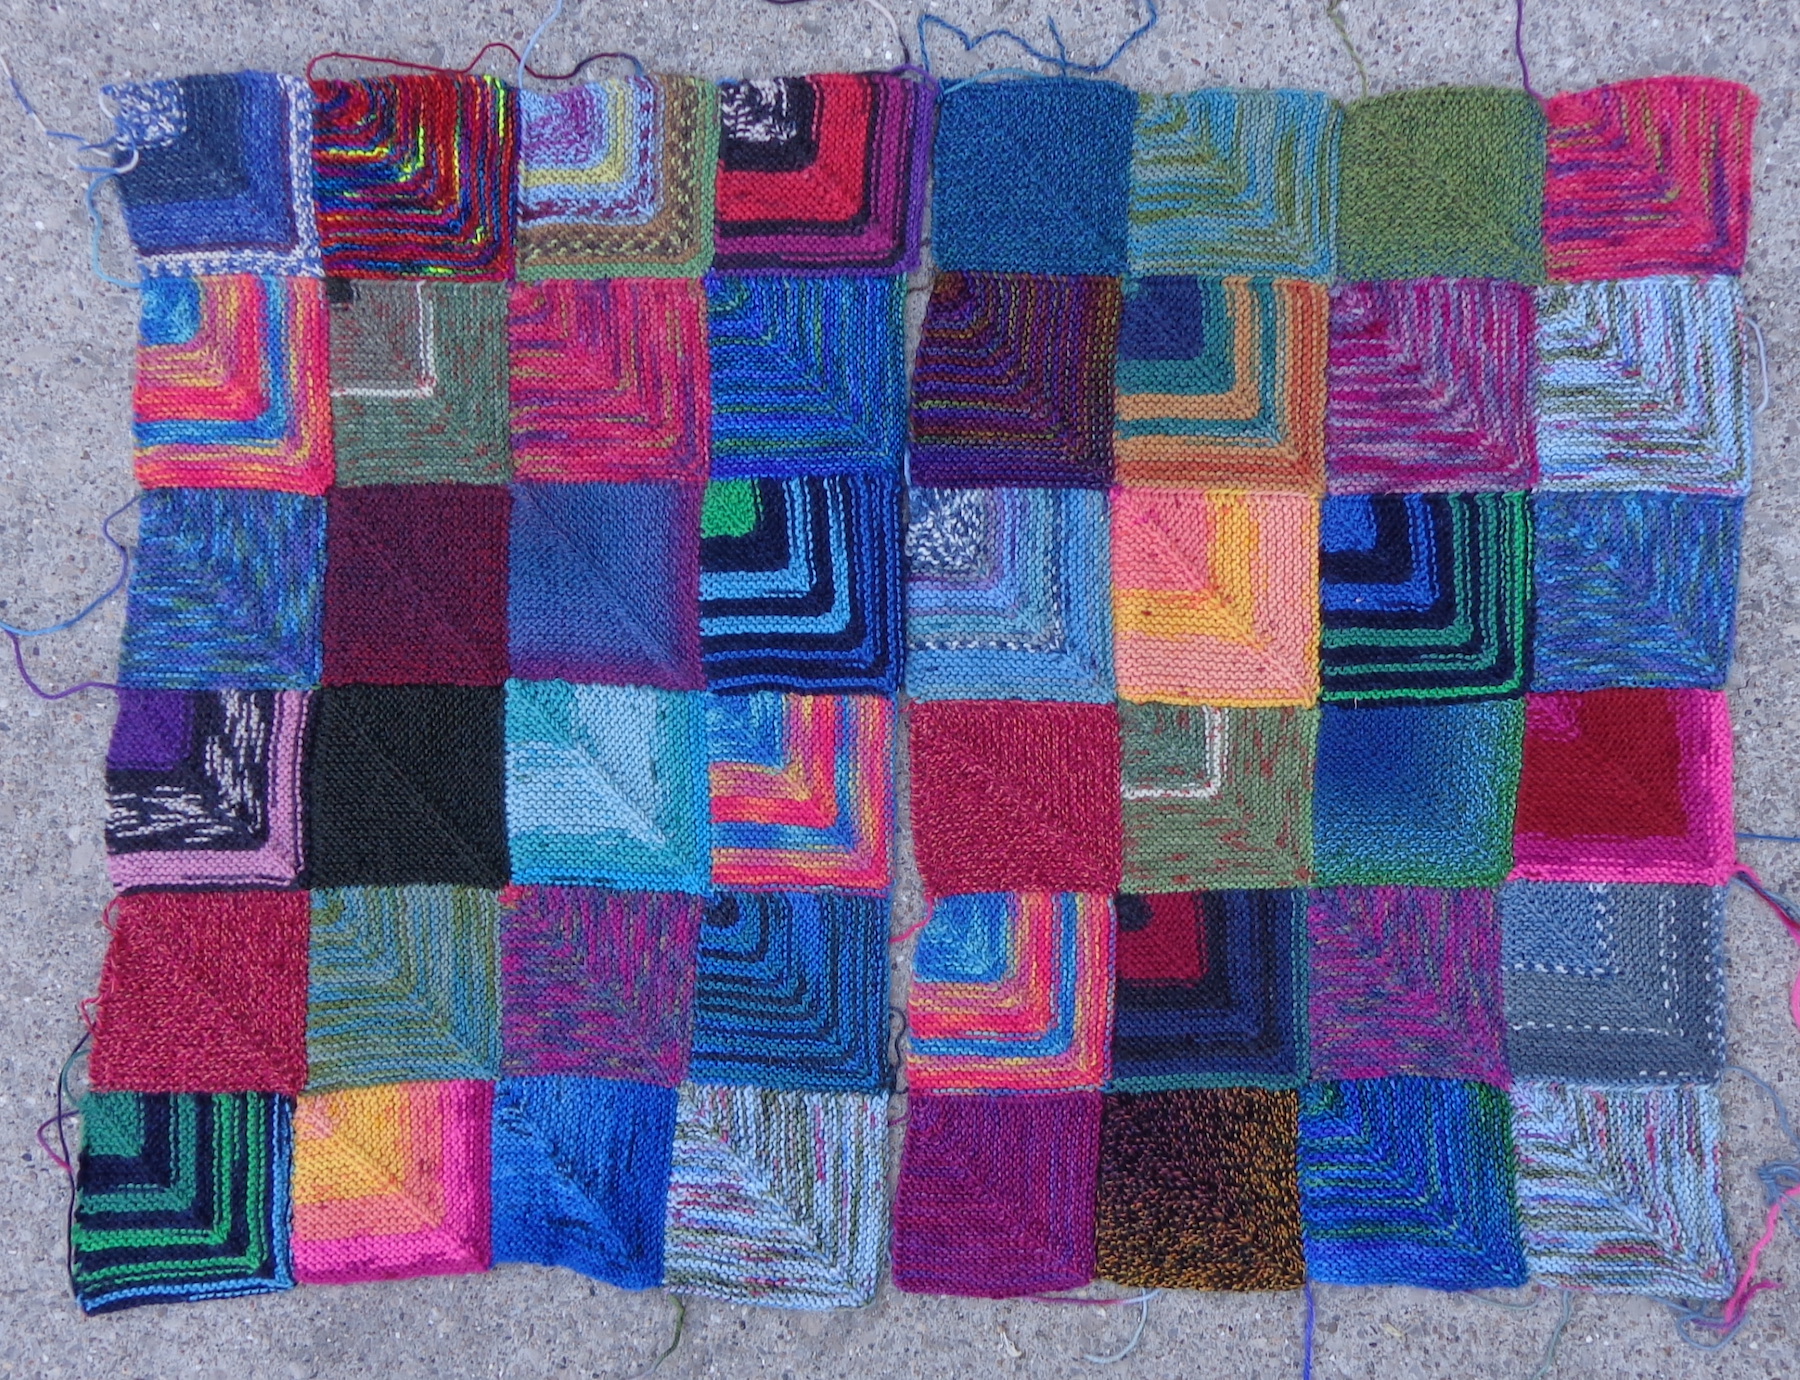
Here are my afghan blocks so far:
I’m piecing them together in blocks of 24 squares. I decided on a big block size to keep from having too many repeats in the same area – you can see that these two blocks shouldn’t be right beside each other. I might set them up to make them radiate from a central point instead of like this. We’ll see.
Mitred Sock Yarn Block I knit mine on a 2.5mm needle.
Cast on 49 stitches. R1 (RS): Knit R2 (WS): knit 24, P1, place marker, knit 24 R3 (RS): Slip one, knit to 2 sts before marker, k2tog, slip marker, k1, SSK, knit to end. R4 (WS): Slip one, knit to 1 stitch before marker, P1, knit to end
Continue as established, repeating rows 3 and 4 and decreasing two stitches on each RS row, until there are 3 sts left. SSK and draw end through the loop to finish.
I’m due for some new socks so took on that project for my summer knitting. After all the sock yarns I’ve tried, I keep coming back to Patons Kroy Socks. The colours aren’t as unique as hand-painted yarns, but the socks always wear well. (My other fave yarn was Fleece Artist Trail Socks, which was both pretty and durable, but they don’t use that yarn base anymore.)
Kroy Socks (that link goes to the Yarnspirations site) is a thicker version of this yarn, with four plies instead of three, so it has less yardage. There’s 166 yards per ball. Usually, I buy three then have close to half a ball left over. This time, I decided to use just two balls.
The first pair is a blue colourway called Magic Stripes. (It’s the last colourway on the Yarnspirations site.)
I used my usual sock pattern, casting on 72 stitches, working in 2/2 rib for about 12 rows, then switching to 6/2 ribbing to the heel. I usually knit a total of 72 rows before starting the heel (because it’s easy to remember) but this time I worked only 56 in the hope of making each sock out of one ball. As you can see, I ran out and had to make the toes black.
For the next pair, I followed the same strategy, accepting the fate of black toes. This colourway is called Mexicala Stripes (it’s the second colour in the third row of swatches on the Yarnspirations site). I’m always up for some bright socks and these are definitely bright. The colourway has a really long repeat: there were only two repeats in the skein. You can see that the yellow from the top of the cuff starts again at the end of the heel flap.
This time, I worked 55 rows to the heel flap, then only 18 RS rows on the heel flap. (There were 19 on the blue pair above.) I was surprised by how much difference this made – I not only finished the first sock from one ball but had 3g of wool left over. The second sock is still on the needles, but it will match exactly.
How do you make socks match exactly and effortlessly? This strategy only works when you shop in-person and can look at the skeins. Choose two that start at the same point in the repeat of the colourway. My second ball of Mexicala Stripes starts with the same yellow band, so the socks will match without any trouble at all. When you order online, of course, the person filling the order will usually just grab the next two balls, so this plan won’t work.
My next lot of Kroy Socks is three balls in the colour Blue Raspberry. I’ll make taller socks and have some left over for my sock afghan. I’ve been adding to the one made of mitred squares. Hmm. I talked about those in this post, although they don’t have a post of their own. I’ll write a post about that for Friday.
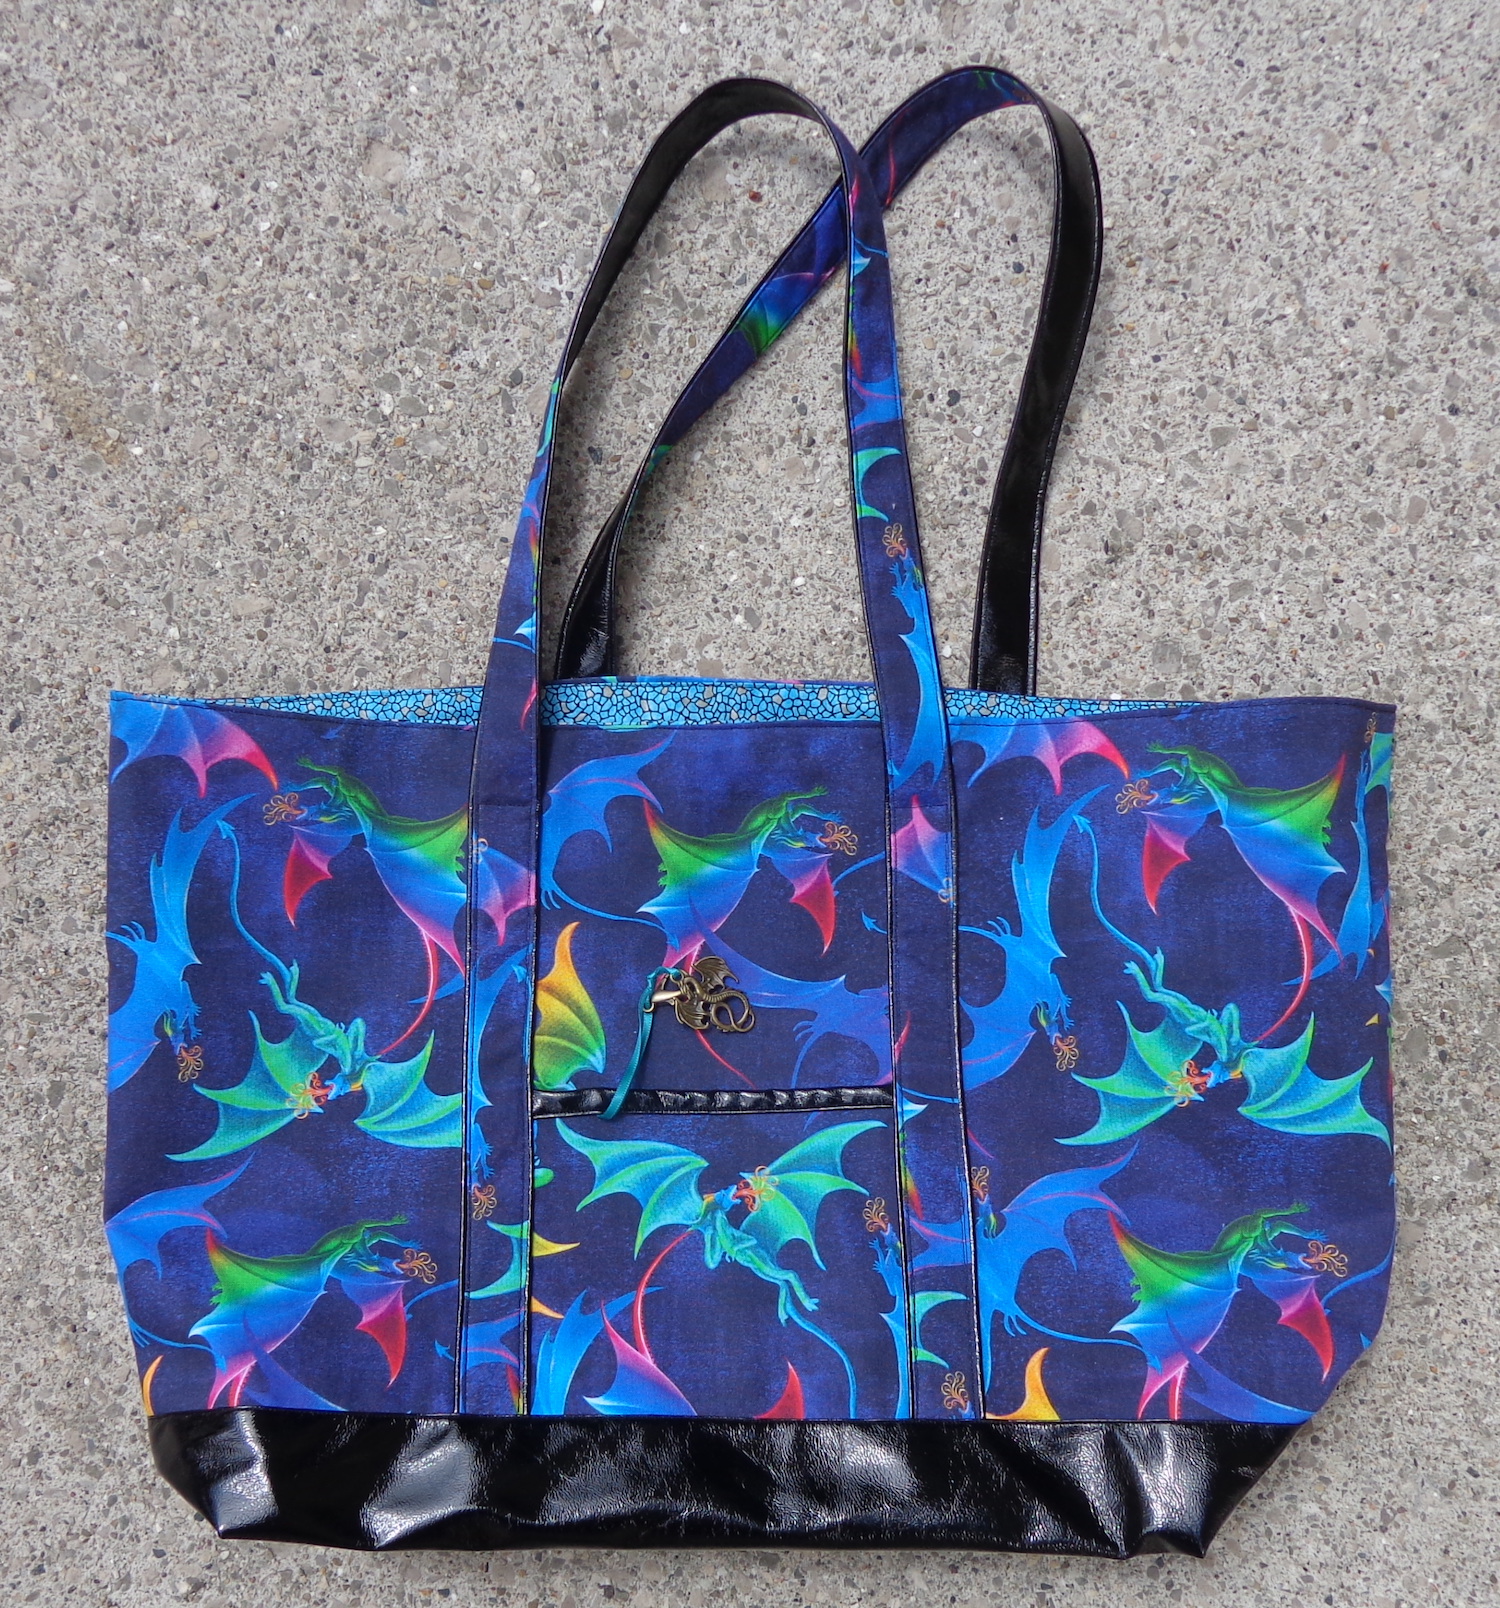
A few weeks ago, I showed you a tote bag I made from a dragon print fabric. (The post is right here.) Well, I’d cut out a few more and finally got them sewn up. First, one in a different dragon fabric.
The pattern is a free download from kokka-fabric.com. It’s in Japanese, but there are illustrations of the assembly and measurements to cut the pieces. You can find their free downloadable patterns here, and this bag pattern here.
Once again, I used the black faux-leather as an accent for the pocket as well as on the base and the straps. What I did differently this time was interface the entire outside – all the dragon fabric – to give the bag more stiffness. I still think it’s a bit floppy and the pattern would work better in a canvas or drapery fabric.
Here’s another one in a different print:
This was a bit tough to match up since the design is so regular but not quite printed on the grain. I did my best. 🙂
I like them both, but now it’s time to make some re-usable grocery bags. I’m making a variation of this pattern – no outside pocket, straps of nylon webbing and bigger dimensions – out of drapery fabric from my stash. I’m also putting feet on them and bases for stability, and some of them will have zippered tops. I’ll show you those bags when they’re done.
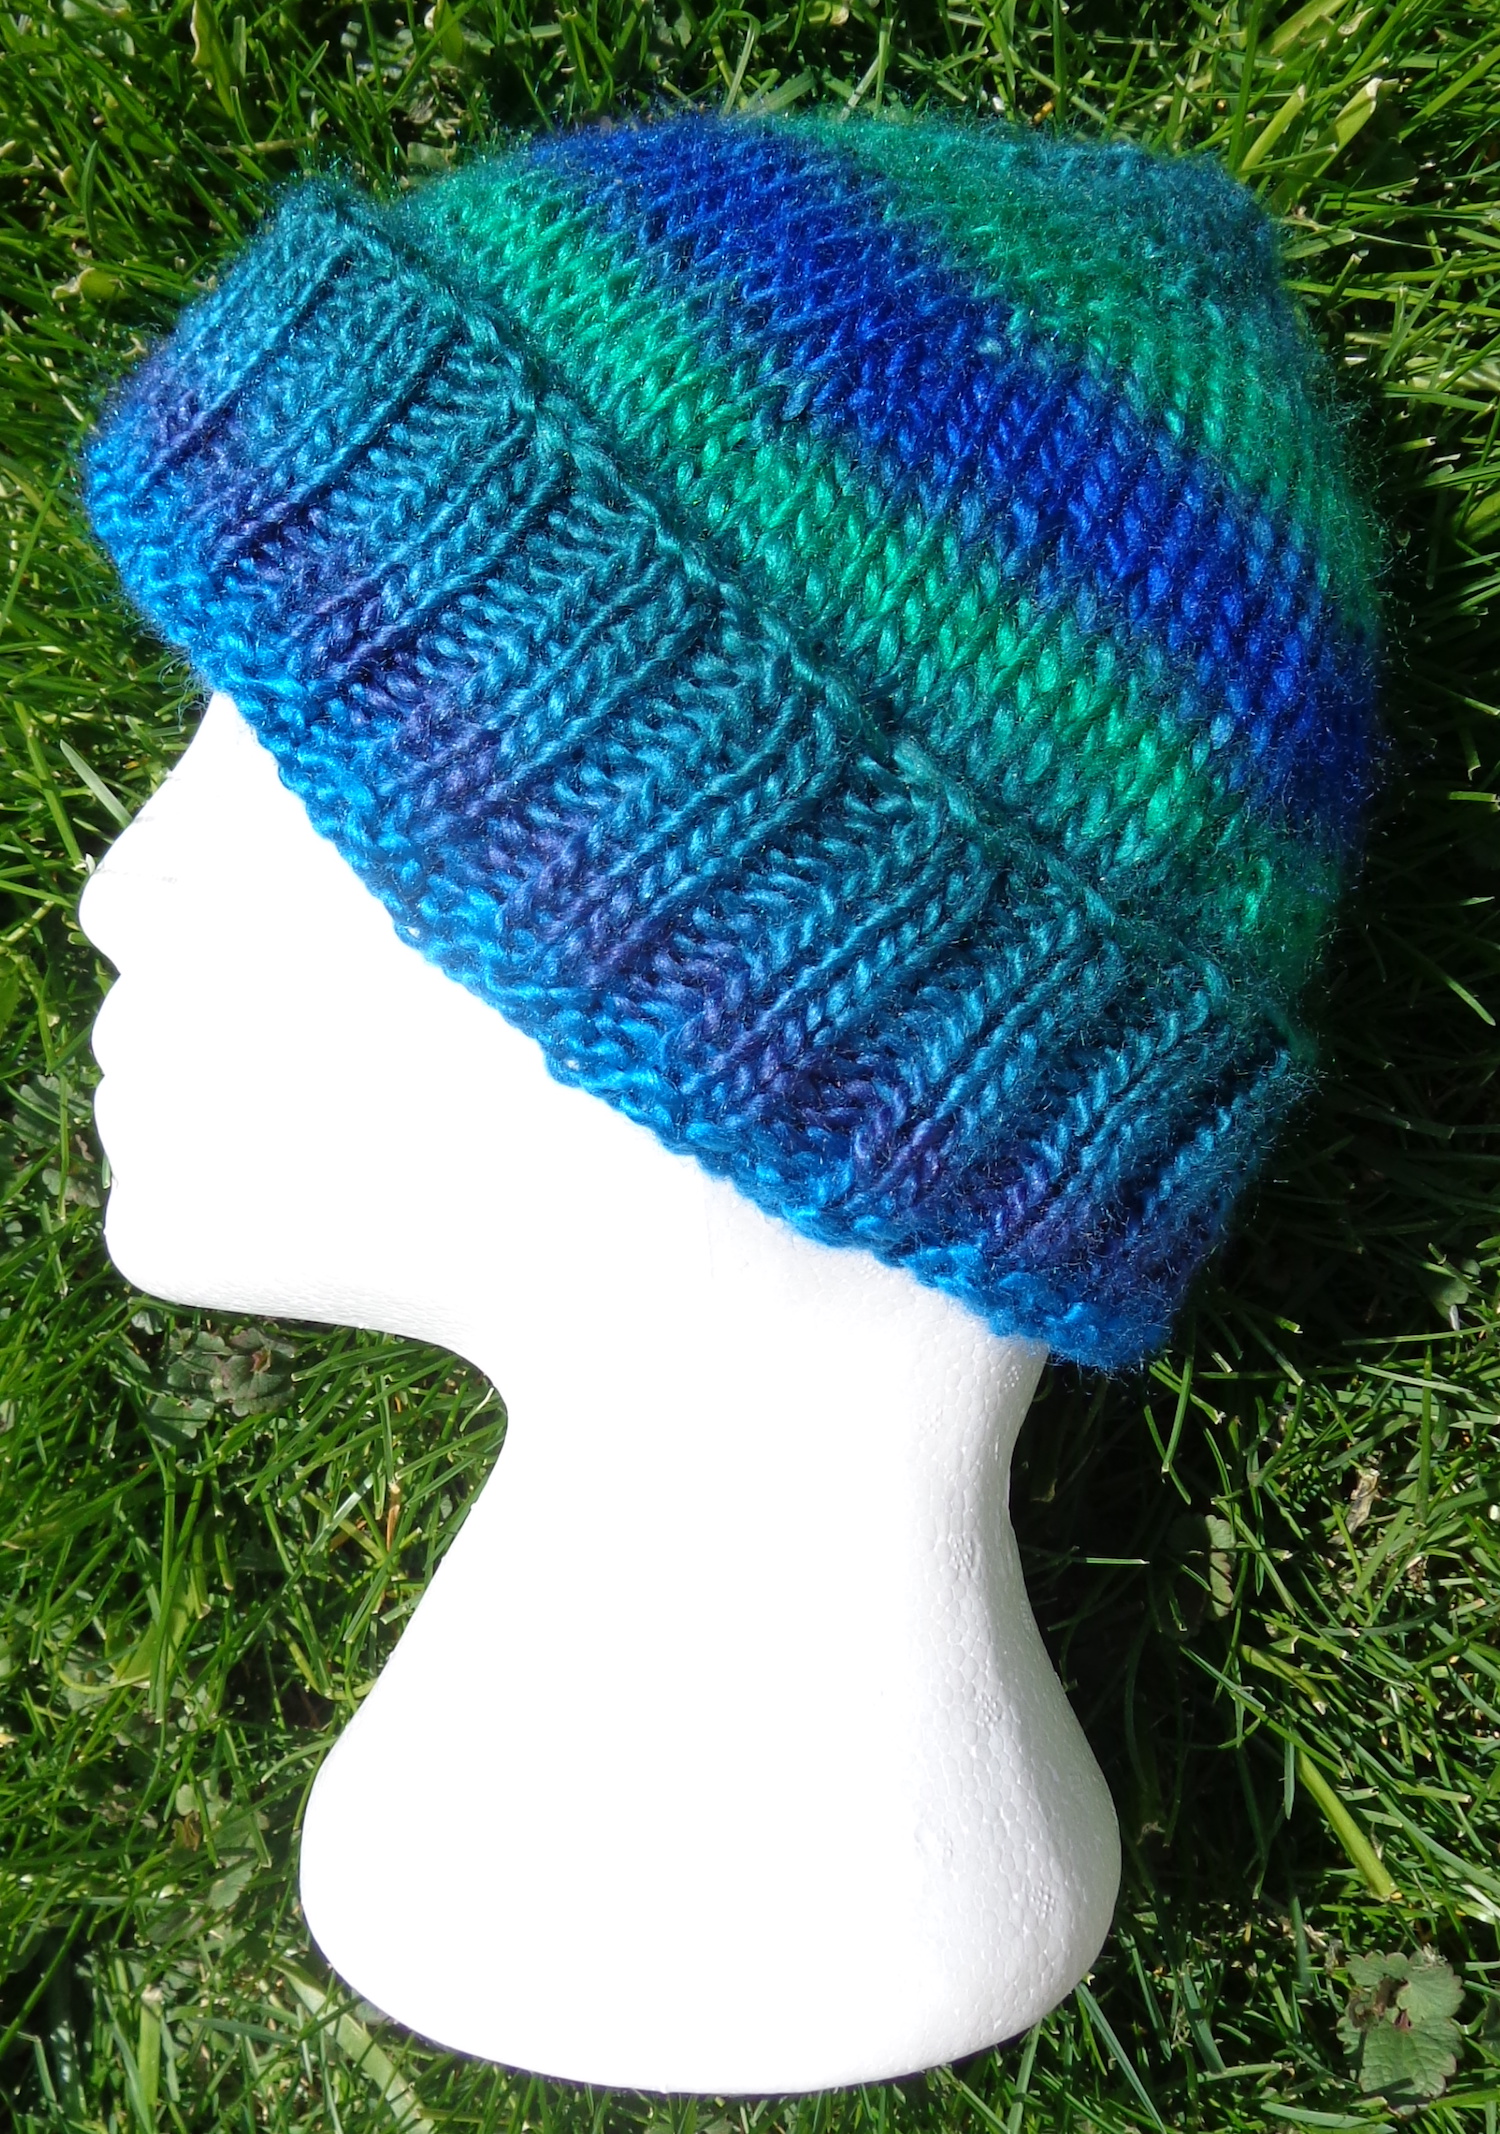
I know far too many people who are battling cancer right now, and recently offered to make some chemo hats. I expected this to be an easy project, but it was a challenge instead. When I found a yarn I liked (soft and squishy), I couldn’t find a pattern for it (or even its gauge) that I also liked. In the end, I merged some patterns together and came up with my own.
Here’s one, for an aran weight yarn.
This yarn is Lionbrand Landscapes, a 100% acrylic yarn that comes in wonderful graduated colours. (That link will take you to the Lionbrand website product page.) I used a colourway called Blue Lagoon for this first one, and bought the yarn at Michaels. One thing with this yarn is that it’s a loosely spun single ply, so be careful not to split the strand when knitting. I ended up making more of a scoop motion than usual to catch the entire ply and that worked really well.
This hat is knit from the top down. Many of the ones that were knit cuff-up ended up having too tight of a cast-on edge, so I preferred this method. You might prefer it inside out as the knit side of the stockinette is smoother. Check with the recipient before you sew in the ends as you’ll want them on the wrong side, whichever side that’s going to be.
You’ll need: • one skein of Lionbrand Landscape yarn (I used .7 of a ball in Blue Lagoon for the hat with the ribbed cuff, and .85 of a ball in Wildflower for the version with the rolled hem.) • 6.0mm needles, a set of DPNs and (if you prefer) a 40cm circular • 5.5mm needles, either a set of DPNs or a 40cm circular (for the ribbing) • stitch markers (optional) You’ll need one to mark the beginning of the row, and five more (in a different colour) to mark the repeats. • a needle to sew in the ends.
Gauge: 18 stitches and 22 rows = 4 inches, in stockinette on 6.0mm needles
There are instructions for two sizes for the finished hat is 21″ (regular) and 23″ (large) around. If the recipient has a much smaller head (or you aren’t sure) the version with the ribbed cuff is more likely to stay put.
Instructions: Cast on 6 stitches on a 6.0mm DPN and arrange them over three needles (2 stitches on each). Join in the round and place a marker at the beginning of the round.
Round 1: KFB in each stitch (12) Round 2: Knit Round 3: *K1, KFB, place marker. Repeat from * to end of round. (18) Round 4: Knit Round 5: *K to one stitch before marker, KFB. Repeat from * to end of round. (24)
Repeat rows 4 and 5 until you have 78 (for regular) or 90 (for large) stitches. Change to the circular needle when you have enough stitches, if that’s what you prefer.
Knit the next round, removing the markers after each wedge and leaving only the marker at the end of the round. Continue to knit for 3″ after the last increase.
Work next row in K1 P1 ribbing, changing to 5.5mm needles as you work the row. Continue in ribbing on the smaller needles for 2.5″ (In my case, that was 13 rows.) Cast off in ribbing.
Sew in ends and you’re done!
Variations: • I wanted 2/2 ribbing on the blue hat, so I knit two stitches together halfway through the first row of ribbing and again at the end of the round. That gave me 88 stitches instead of 90, which is divisible by 4. • you can also make a variation with a rolled brim. I made one with the colourway Wildflower but forgot to take a picture before sending it away. Instead of changing to ribbing, just keep knitting in stockinette to at least 8″ from the cast-on edge. I made mine with 6″ of stockinette after the last increase, then cast off loosely. This used more of the ball but had a nice rolled cuff.
Abbreviations: K: Knit P: Purl KFB: Knit front and back. This increases one stitch, making one stitch into two. You could substitute any other increase you prefer, like M1 (make one) or YO (yarn over).