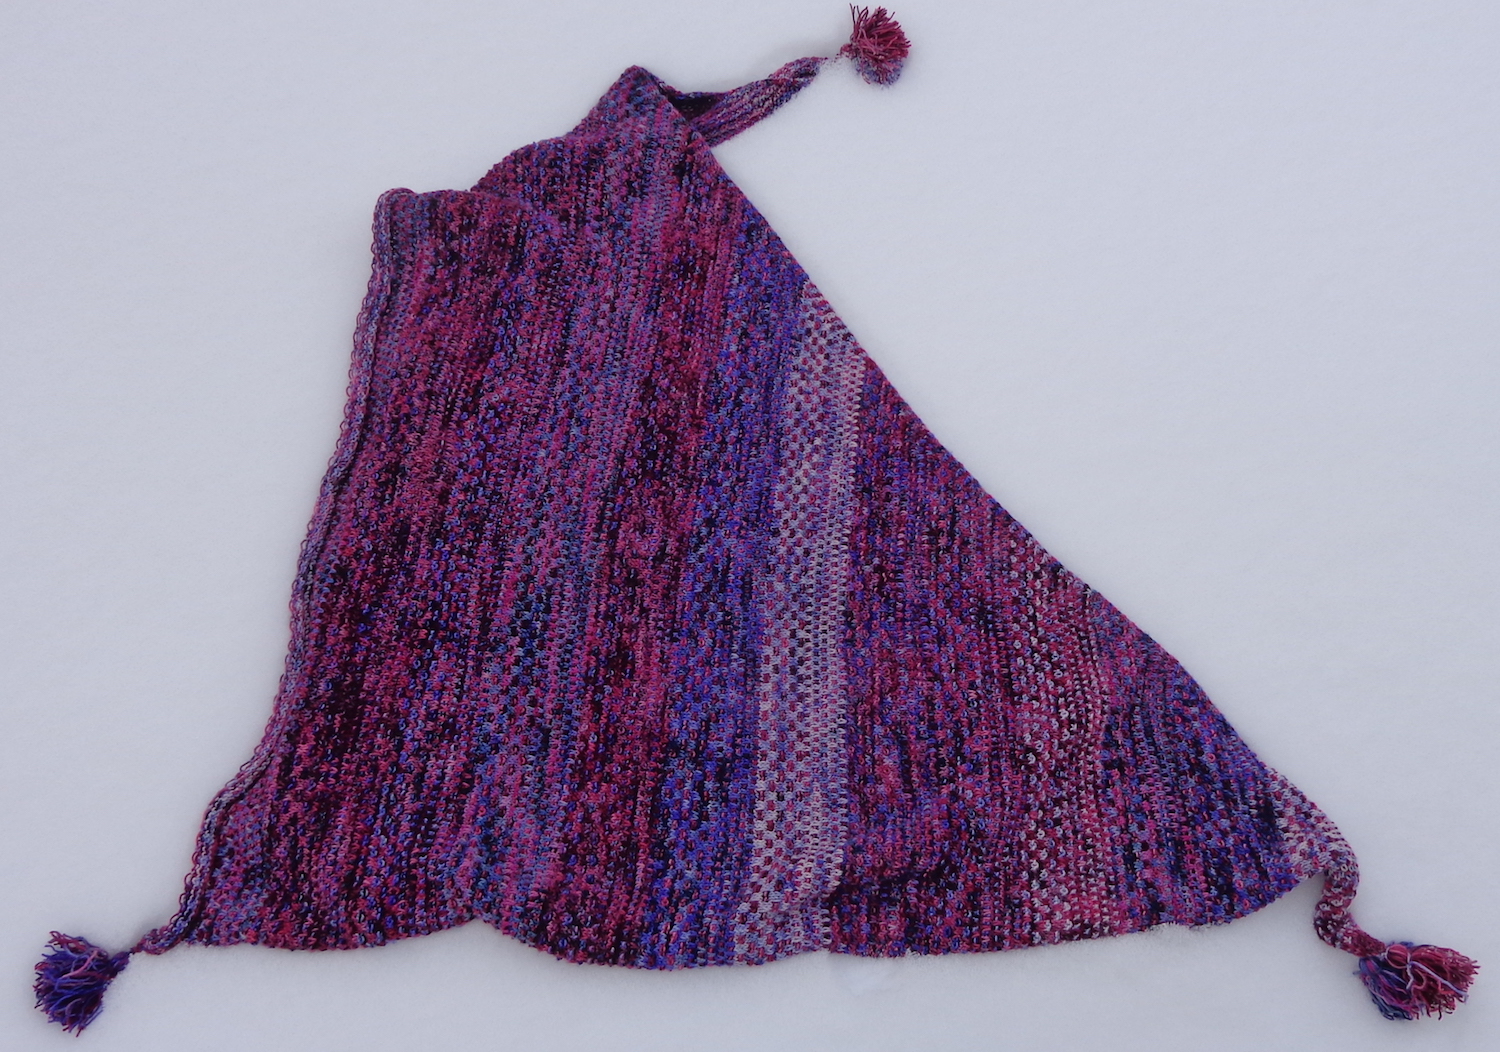
This was a project that I feared would never be done. It’s Nightshift, a pattern by Andrea Mowry, (that’s a Ravelry link) but I knit it in Koigu KPPPM – a fingering weight yarn – instead of the aran weight yarn specified. It took a while, but it’s finally finished – and here it is!
And here’s a detail of that left corner:
Yes, I threw it in the snow for the picture. I haven’t blocked it and the cast-off edge (on the left) is rolling a bit. It’s pretty big and has fourteen repeats of the 40 row pattern.
I’ve blogged about this one a couple of times – here (August 2019) and here (September 2019) and here (June 2020). A year and a half. I’m so glad it’s done!
It’s knit in five colours of Koigu KPPPM and I used up all of the yarn – that’s why there are tassels. They used up the last bits.
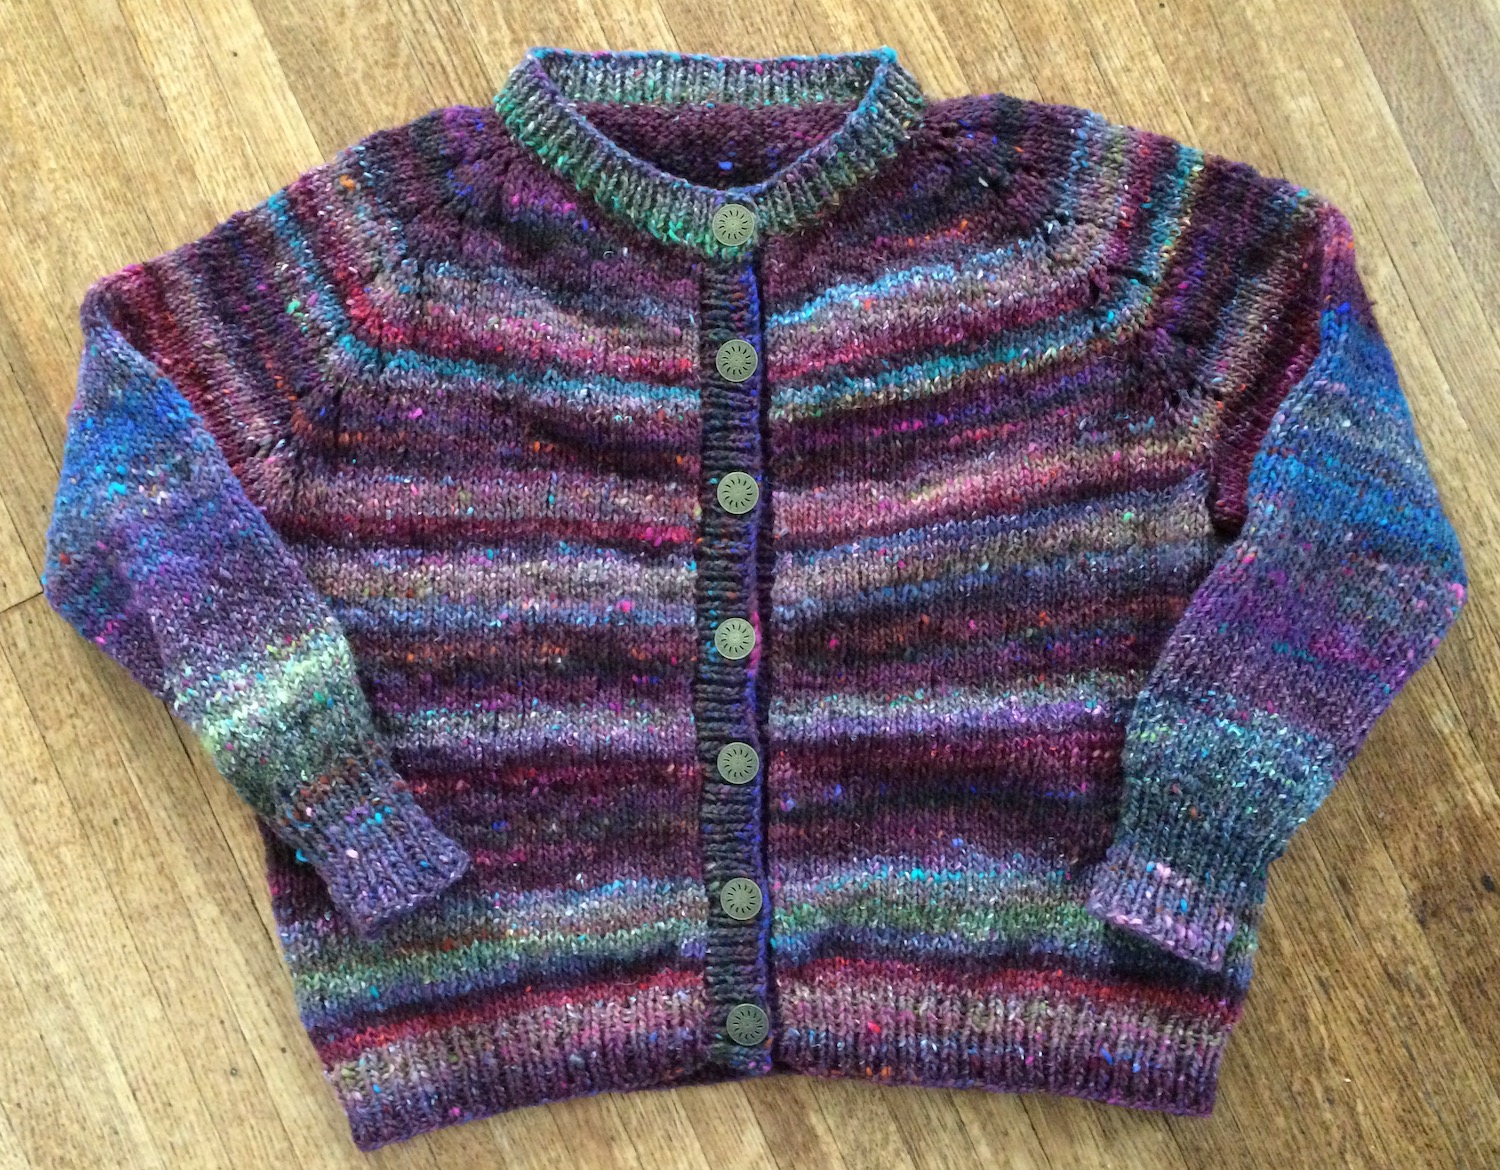
I had so many fingering-weight projects on my needles last year that it felt as if they were all taking forever. For a quick break, I cast on another Felix cardigan, this time in Noro Cyochin. (That’s a Ravelry link – Cyochin is discontinued now.)
I bought this Noro when I fell in love with this poncho, called Iced Blackberry. It was designed by Claudia Wersing, specifically for Noro Cyochin, which is a blend of wool, mohair and silk. I bought the same colourway as shown in the pattern photo – that’s the picture from the Noro book, Sweet Winter.
Here’s Sweet Winteron the website of the distributor, Knitting Fever, so you can see all the patterns included in it. They were all designed by Claudia Wersing. This is her website, which is in German.
I love this poncho and bought the book for this one pattern, but partway through knitting it, I realized I’d never wear it. I love the look of ponchos, capes and stoles, but I never wear them. I didn’t want to waste the Cyochin, though.
I ripped it out and then knit a Jane Ellison sweater called Tithe. (That’s a Ravelry link. My finished sweater is on the right.) This pattern is included in a book called Noro Unlimited – that’s a link to Knitting Fever – which includes all Jane Ellison designs. This is her website. I got gauge but the fabric was a bit stiffer than I wanted. I discovered that I don’t really like sweaters with 3/4 sleeves or floppy lapels. If it’s warm enough for a bulky sweater, I want long sleeves! And the lapels drove me a bit nuts. This one lasted long enough for a picture before it was frogged.
I have learned (alas!) that my taste in sweaters is deeply conventional.
I really like both of my Felix cardigans (here’s the red one and here’s the green one) so last fall I cast on a third with my Noro Cyochin. It spent some time on Sleeve Island, as all of my sweaters do, but I finished it up last week. Here’s the finished sweater:
I like the fabric better than the Tithe sweater since it’s knit at a looser gauge. It’s nice and soft. I had lots of yarn but couldn’t get matchy-matchy – of all my skeins of Cyochin, I had only one run of those turquoise-y blues. The Cyochin seems to have more variation skein-to-skein than other Noro yarns I’ve used – that run of icy green doesn’t appear in every ball either. The sleeves couldn’t be matched – and yes, I thought about ripping it out for a while. I do like it, though – it’s comfy, warm and purple – so this one is a win.
I’m currently in the Land of Use-It-Up with my knitting wool leftovers, so next week, I’ll show you what I knit of the remaining Cyochin.
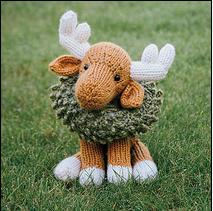
Juniper Moose is an adorable stuffed moose, and the pattern is free right now from Knitpicks. (Here’s the link.) That’s the official image from Knitpicks at right. Isn’t the moose cute? It was designed by Rachel Borello Carroll – here’s her Ravelry page showing all her patterns and here’s her website. There are a lot of cute stuffies: I’m looking at her hedgehog pattern as well.
Because everyone needs a stuffed moose for the holidays, I dug into my stash and cast on. I had some Sirdar Tweedie Chunky in brown and beige, which apparently had been waiting for this project. The yarn is discontinued, so here’s a Ravelry link. A tweed moose seemed ideal to me.
I did drop down a needle size, and worked with 5mm needles. That seemed a better match with the yarn, and I prefer to have a denser fabric with toys so the white stuffing doesn’t show through. (If I knit it again, I might go down to 4mm, because the stuffing does show through a bit, esp in the rivers between my DPNs.) I also decided to use buttons for eyes, instead of the safety eyes recommended, as no children will be playing with my moose.
The pattern is really well written and quite easy. Of course, there are many pieces – that’s the way of it with knitted toys. Here are all the moose pieces:
I decided against the wreath and just gave him a ribbon. Here’s my assembled moose:
I made one modification: Juniper Moose has no tail, but of course, real moose do. I joined the main colour yarn where the base of his tail should be and worked an inch of I-cord before binding off.
I think he needs a pompom nose, but I don’t have one. We’ve entered lockdown so it will have to wait. He is cute, though, don’t you think?
No post last week because I was publishing a book. My knitting always falls behind in those last few days to launch. This week, though, I have two new hats to show you. I love them both! It doesn’t hurt that I found the yarn at the thrift store, either.
Both use the Vulgar Knitter’s First Snow hat pattern, which I really like and have used many times before. (That’s a Ravelry link.) Here’s a post featuring some other hats I’ve knit with this pattern: First Snow Hats.
The first of the two new ones was knit in Cascade Yarns Jewel Hand-dyed, a discontinued yarn in a beautiful red colour. (That’s a Ravelry link.) The colour is 9969. It still needs a pompom but I’ve ordered a black one.
The second hat is knit of Malabrigo Worsted – this skein had no label at the thrift store but I recognized it all the same. I think the colourway might be Forest. I knit this one a bit longer, with 10 extra rows of ribbing and an extra repeat of the 7-row braid.
I’ve picked up two new pattern books this past month that I also wanted to share with you. I’m fascinated by the sweater on the cover of each one. First there’s a new Noro magazine. This one is Fall/Winter 2020 and #17.
Look at that fascinating cardigan on the cover! The design is really clever.
You can see a carousel preview of the magazine’s patterns on the Noro Magazine site right here or on Ravelry right here. I think it’s a really great issue.
Secondly, I ordered a copy of PomPom Quarterly issue 35, Winter 2020, which was edited by Stephen West.
Again, it’s the sweater on the cover that caught my eye – this one is knit with mini-skeins of graduating colours. It’s also available in a cardigan version, which is just as gorgeous.
You can check out the included patterns on the PomPom website, right here, or on Ravelry, right here.
Incredibly (!) given my stash, I don’t have the yarn to cast on either of these sweaters, so I’m thinking about yarn choices. Which would you knit first?
I have a tendency to buy yarn because I like it, without a specific project in mind. (This inclination is worse if the yarn is on sale.) That means I guess on quantities and sometimes, I guess too low. That’s what happened with these skeins of Manos del Uruguay Wool Clasica—that’s a Ravelry link btw. Here’s a Fairmont Fibres link, which I think is the US distributor. I loved the colour (it’s #114 Bramble – this link shows the colourway on the FF site) and bought four, but four skeins of aran weight yarn isn’t very much. It’s just 604m and I wanted to make a garment from this.
I first made a vest from this yarn and had to even use the bits from the tags to finish casting off. Even so, the vest was too snug for me so (after some mourning), I frogged it and returned the yarn to the stash. And there it’s been for about a decade.
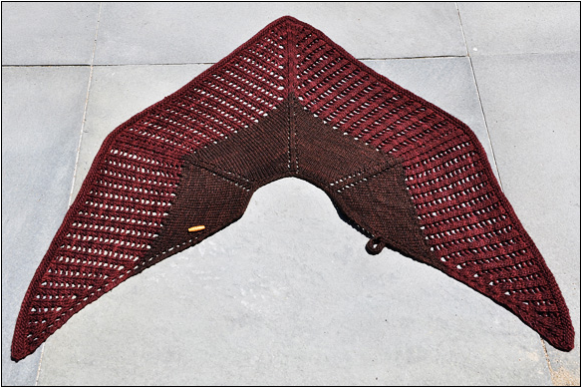
I rediscovered it recently and remembered how much I liked it. I searched on Ravelry for patterns specifying this very yarn and found Colonnade, a free pattern on Knitty by Stephen West. It might have been one of his earliest patterns—it was posted in 2009. Here’s the Ravelry link, and here’s the Knitty link. The pattern calls for three skeins of this yarn, and uses two different colours. I had four and wanted to use them all up. Hmm. Here’s a picture of the shawl laid flat from the Knitty website:
You can see that the shawl is in four quadrants. If you look a little closer, you’ll see that each quadrant has increases on just one side: the increases are at the front edges and on either side of the centre back. I looked through the project images on Ravelry and it seemed that many knitters found the neck a bit snug—they’d added stitches, but I decided to add an entire section. My fifth section is inset into that centre back seam to keep the shawl symmetrical—and to keep it symmetrical, this new section has increases on both sides. The idea was to make the shawl wider but not much deeper, and use up the four skeins.
The pattern has a four-row repeat for the lacy part: I considered those instructions to be for sections one, two, four and five, then did my addition in the middle. If you’re inclined to do this yourself, here’s the pattern stitch for that new section in the middle:
I cast on 52 (instead of 42) stitches and worked as instructed. I had 212 stitches when it was time to start the lace and 38 stitches between markers.
I did nine repeats of the lace pattern, then cast off. With a gentle block, here’s the result:
And a closer view:
I’m really pleased that it didn’t pool, but that’s probably because the number of stitches increases every second row. There’s just 23g of the Wool Clasica left over, so that’s one more gone from my stash.
I haven’t been working on my Moonglow quilt for a while, so a few weeks ago, I pulled it out again. I’ve always loved this quilt design and thought that when I bought the kit, I’d be obsessed with it until it was all pieced. Not so. It’s been a very fits-and-starts project. I tried to figure out why. (The picture at right is of someone else’s completed quilt.)
I first posted about it in April of this year, although I’ve had the kit for at least a year. Here’s that first post, with the alternating blocks and the first three stars done. In my May post, with the next two stars, I admitted to not loving the process, even though I’d switched to paper piecing.
I figured out that I’m not having fun because I’m disappointed in my results. My blocks aren’t completely flat (they ripple) and the points don’t match as neatly as I’d like. There are a bunch of reasons for this, even though I’m a fairly accurate seamstress. You can paper-piece some parts of each block, but never yet has it been possible to piece the entire block on paper.
Many of the blocks have set-in corners, like this one. So, the corner quadrants are paper-pieced, but then have to be set into the central star.
Many (many) seams are on the bias of the fabric, so they stretch.
There are many slightly angled seams, and it’s tricky to pivot at the right point. Under the sewing machine foot, it’s hard to see the point.
So, I used some techniques from dressmaking to minimize the effect of these things. When I have paper piecing, for example, I’m leaving the paper on each piece until it’s sewn in on every side. That helps to stabilize the seams on the bias. I’m also pinning the beginning and the end of each of those seams, then using more pins in the middle, to make sure it doesn’t shift while being sewn.
When setting in a corner, I sew the seam that comes to the corner only as far as the seam allowance and backtack it. That means I can move the seam allowances more readily when insetting the other piece. I’m also sewing out from the point, doing the inset in two seams (instead of sewing in to the corner, pivoting, then sewing out). Lots and lots of pins on these insets, too.
When there’s a slightly angled seam, I poke a pin through the paper at the pivot point, leaving a hole. That’s visible when I’m sewing so I know exactly where to pivot. I’m also clipping the paper at those points, which makes it easier to re-align the seams (when the needle is down in the turning point) to continue sewing.
(You can also see in this image how much fabric is wasted in the trims. I’ve been saving these pieces as they’re big enough to cut the corner squares in the sashing.)
And of course, pressing, pressing, pressing. I was pressing a lot before but now I’m doing it even more.
I’ve done three more stars and am much happier with the results. I also enjoyed sewing them more. They’re still not perfect, but they’re better. These three blocks allowed me to complete the second column and the fourth column of the quilt. Here they are:
They all look much better once pieced into the quilt. I have five more blocks to make – the four corners and the middle star. There are two blocks designed for the corners and you make each one twice. The centre star is kind of the big finish, the most complicated block of all.
All my borders are cut and the alternating squares pieced, and many of the fabrics won’t be used again. There’s a lot of fabric left over, which means I’ll be able to redo any of the blocks that really irk me. (And there will still be a lot of fabric left! The cuts in this kit are really generous.) I’m getting close!
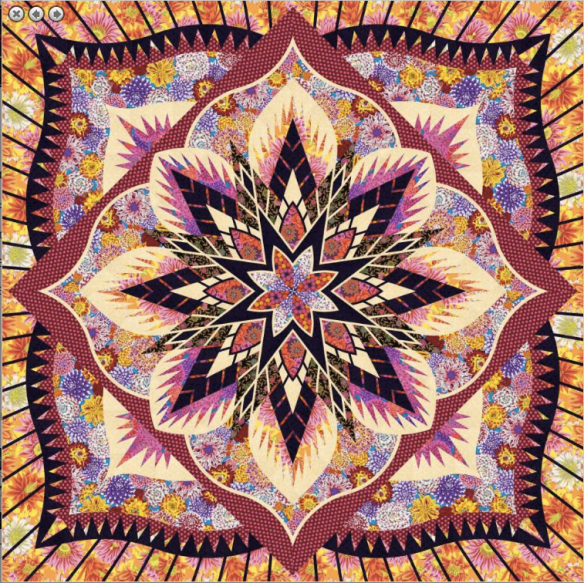
In the meantime, I’ve been seduced by another beauty: look at this!
This is called Crimson Poppy and was designed by Judy Niemeyer (the designer of Jumping Jax Flash, which I’ve made) and sold at Quiltworx. Here’s a link to buy the pattern for the central medallion – it ends with the red polkadot square. The central block is on point in this version. You can also buy a kit for this larger version, with the four corner extensions and all the fabric required at Quiltster, right here.
On this page, there are a number of colour options and corner additions displayed, also as kits including fabric. You can also (be still my heart) join Quiltster and change out the fabrics online, customizing your own version, then buy your own kit from them. Hello, timesink – but what fun!
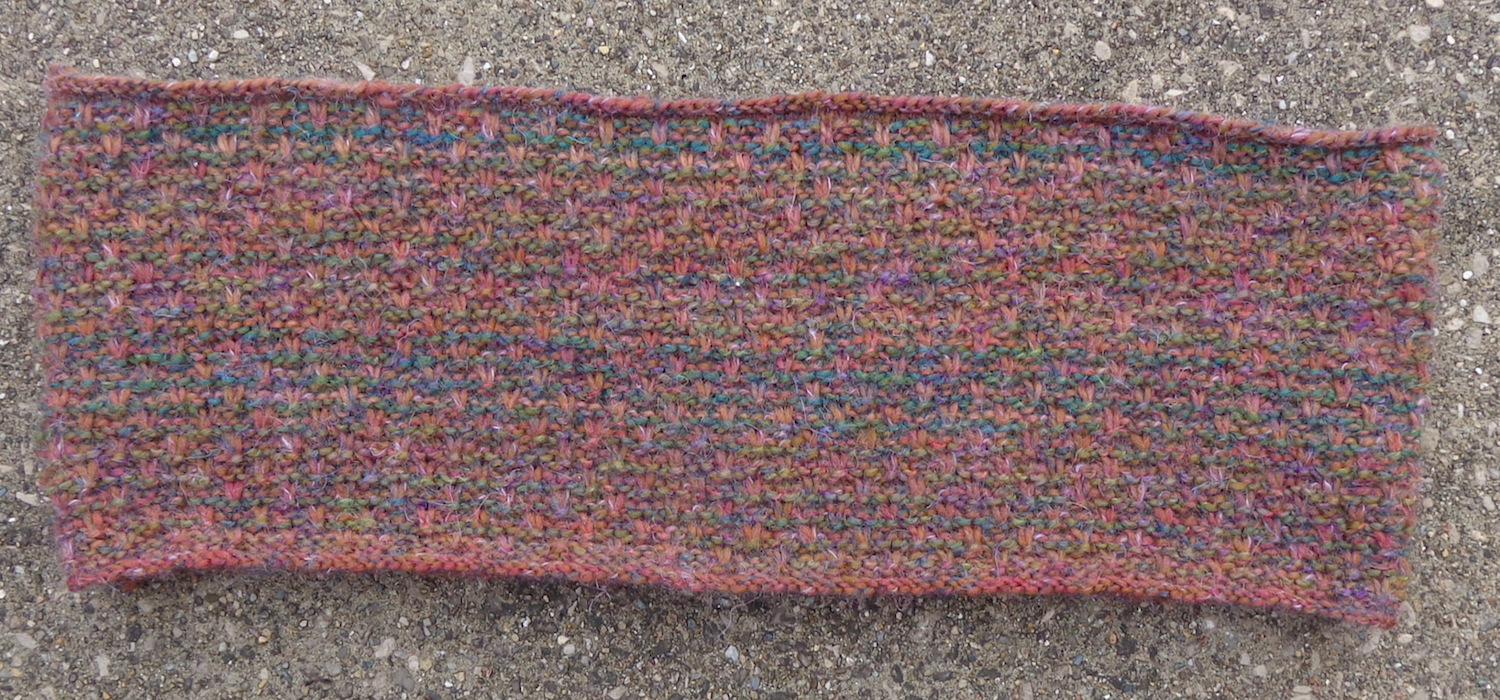
When I finish a knitting project, I often think about using up all the leftover yarn, rather than returning it to the stash. I finished my Wilhelmina reindeer cardigan (that link goes to my blog post) in Rowan Colourspun (that link goes to Ravelry, since the yarn is discontinued) this fall and have quite a few balls of that yarn leftover. I also have some left from the mister’s Skye vest (blog post link), even after making my own Comfort Fade cardigan (blog post link). I’ve made a pullover out of Colourspun too and, while I don’t like the fit of the body so much, I love its big squishy collar. That made me think of cowls.
The Cupido Cowl pattern is free on Ravelry and that’s a Ravelry link. There are several thousand projects, so there’s a lot of eye candy to explore. (Four of them were worked in Colourspun, too.) Although it calls for aran weight yarn, it’s the kind of pattern that can be worked in any yarn. I liked the appearance of the pattern stitch, and the directions by another Raveller for making it in two colours (see my Ravelry project page for the link) so cast on. Because Rowan Colourspun is a DK weight yarn, my cowl will be smaller in diameter and I’ll have to work more repeats to get the depth of the cowl shown. How much shorter? How many more rows? There was only one way to find out.
I cast on with the red (Appletreewick) and used the green (Pen Y Ghent) as the contrast colour. I used 4.5mm needles as that’s one size up from the recommended size for this yarn. I figured that would make a more supple fabric. Colourspun has a slow variegation in each colourway and both of these colourways include similar accent colours. I knew this would blur the distinction between them. Here’s the glorious tweedy-looking result:
The colours do look brighter in the pictures than they appear in real life.
And here’s the finished cowl:
In the end, I worked 9 repeats of the pattern stitch instead of 8 and used about 60g of the red (just over one ball) and 50g of the green (1 ball). I could have made it deeper, but I ran out of Pen Y Ghent. The finished cowl is 7.5″ deep and 42″ around.
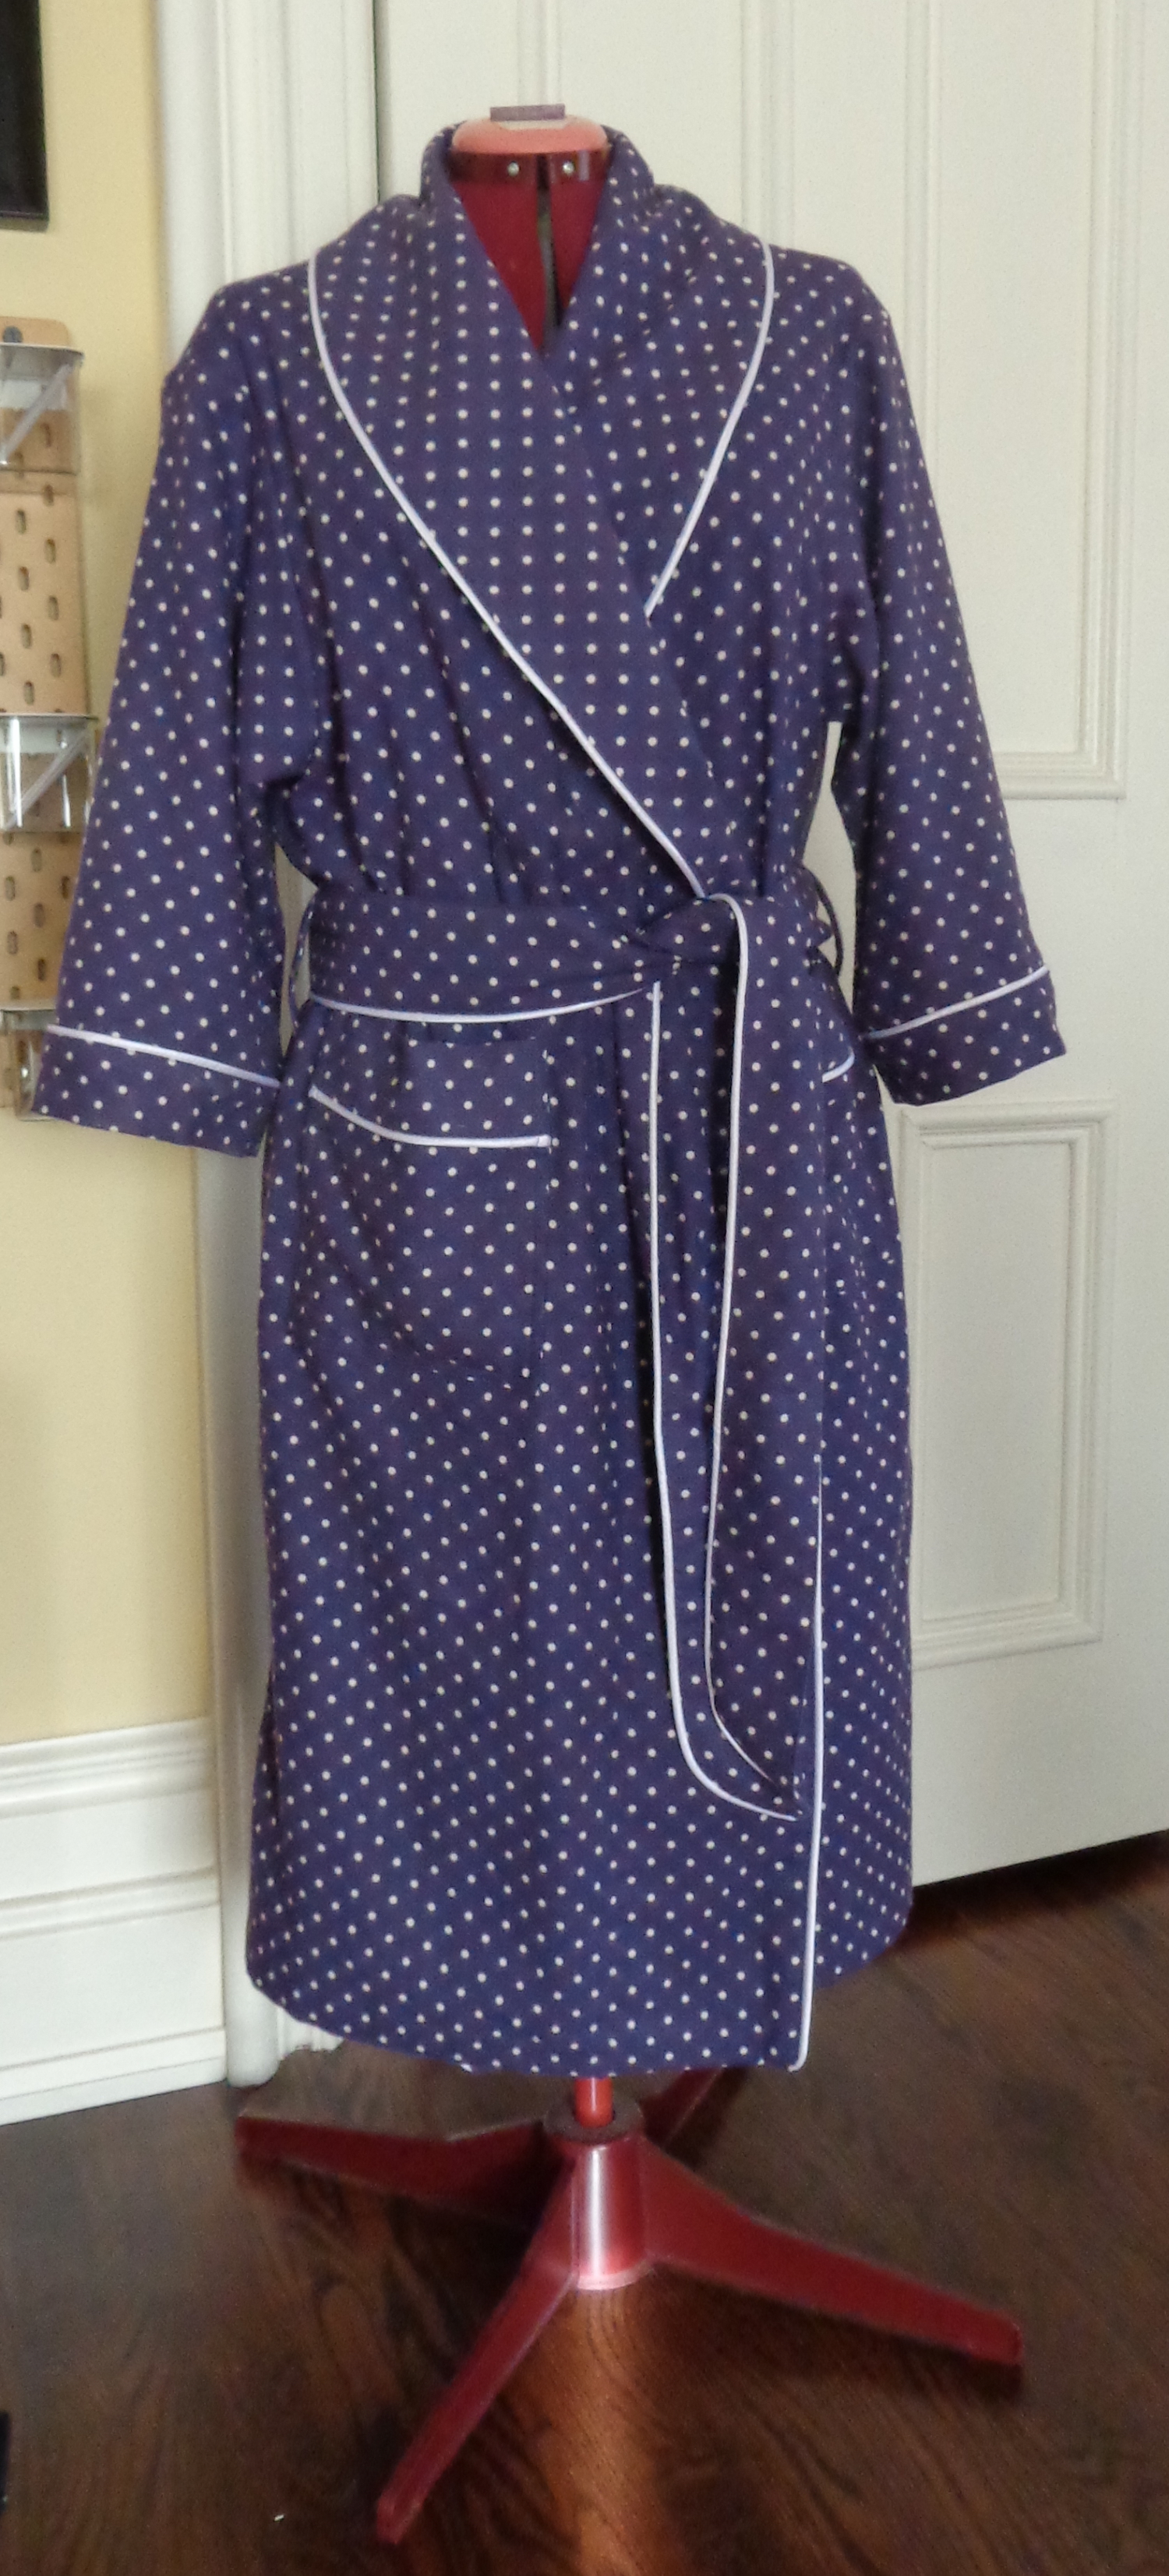
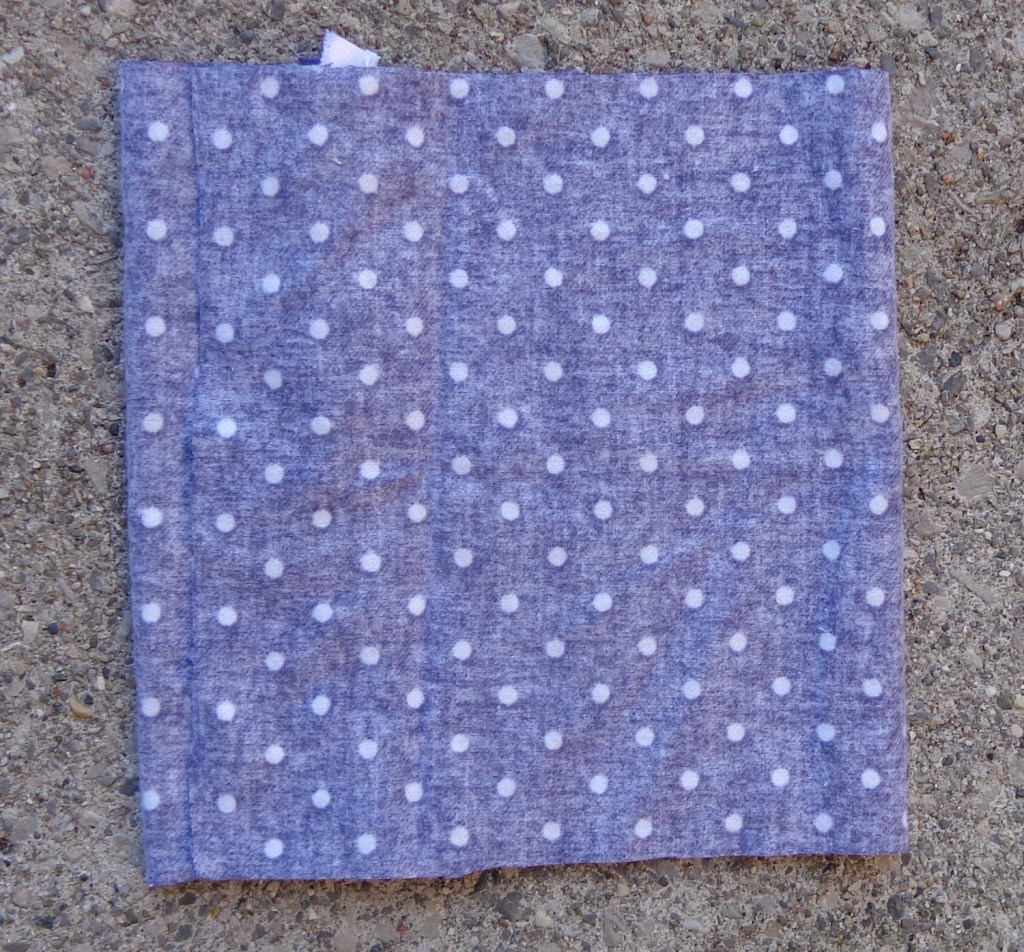
Butterick 5537 is a unisex pattern for a robe and pajamas. I needed a flannel robe and like the shawl collar on this one, so I gave it a try.
It gave me a Eureka moment so I’ll just skip right to that. I’ve only made one unisex pattern before. It was a Hawaiian style shirt and didn’t fit me well. I remembered it when I’d cut this robe because I had a similar result.
Mr. Math is 6’2″. I’m 5’5″. He has a 40″ chest and I have a 39″ bust. No matter whether I was making this robe for him or for me, I’d cut a Medium (which I did). But which of us will it fit? It can’t possibly fit both of us well and it doesn’t. This isn’t really a unisex pattern – it’s been drafted for a man. It fits the mister perfectly and the details are proportionate. I, on the other hand, was overwhelmed by fabric. So, if you’re a woman who is buxom or who has broad shoulders, a broad back, is tall, or wants a robe that is longer than mid-calf, this pattern might work for you right out of the envelope. If you’re a shorter, pear-shaped woman with narrow shoulders, who chose a pattern for a mid-calf length robe because you actually wanted a mid-calf length robe, then you (like me!) will have some modifications to make.
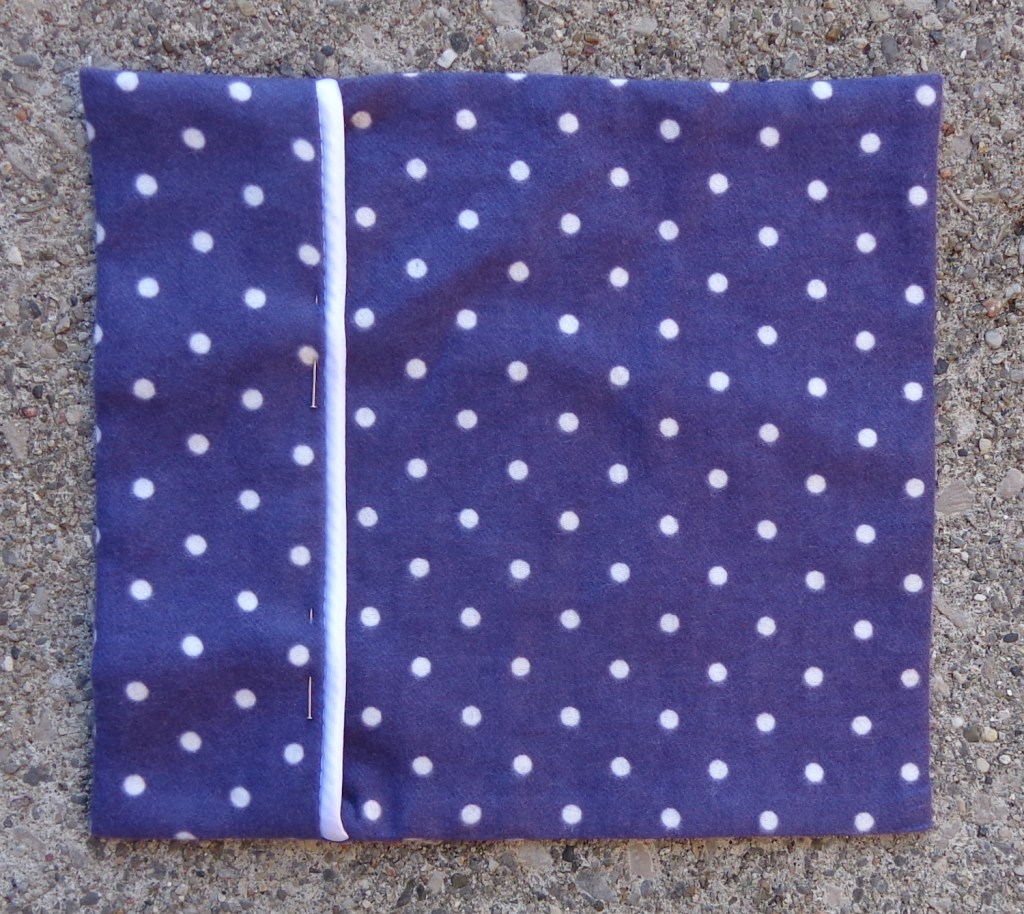
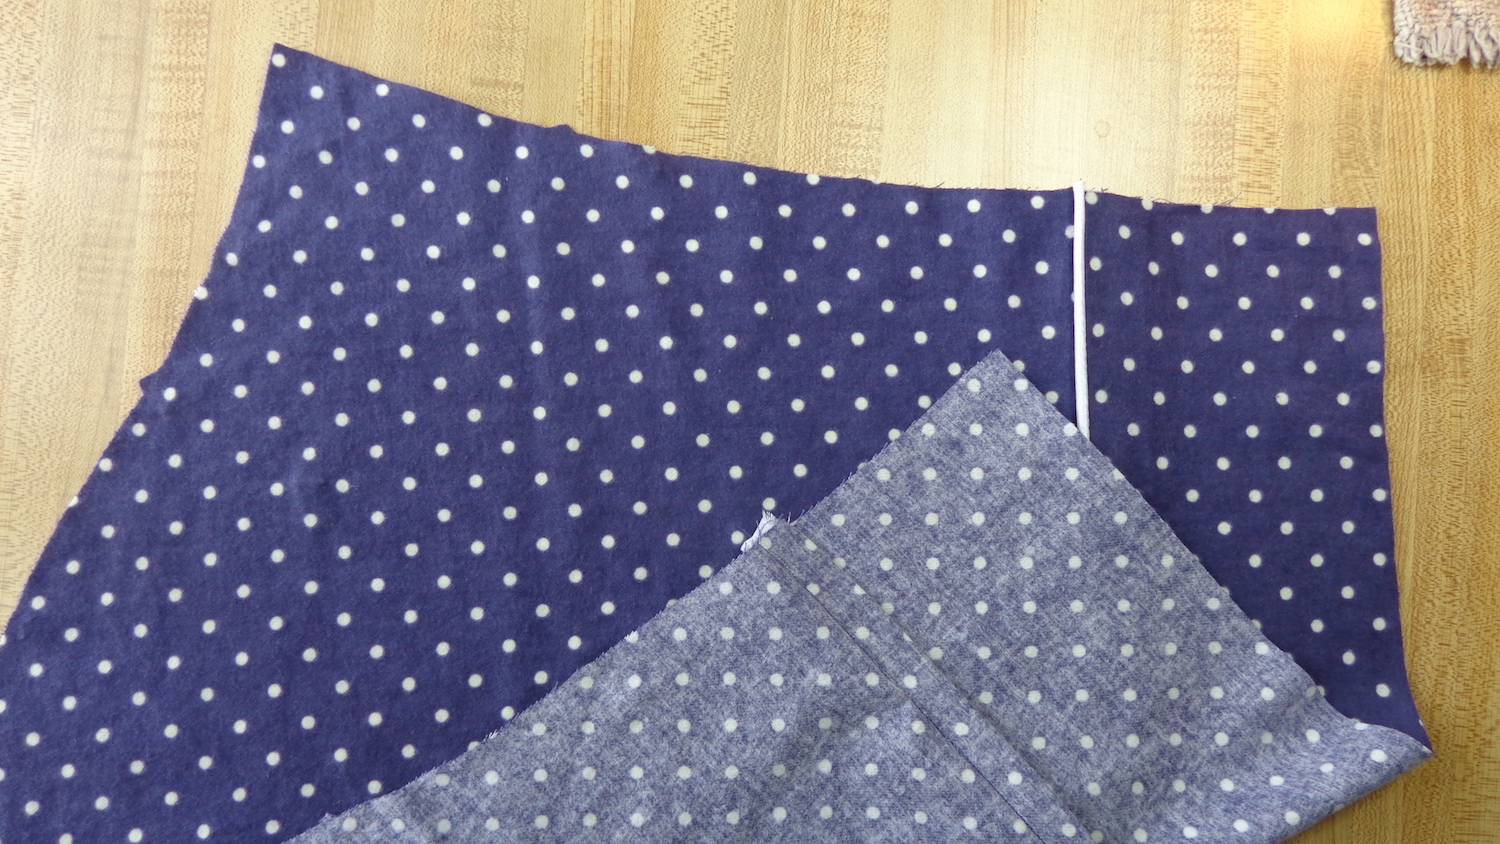
I bought a purple 100% cotton flannel with white polka dots (115cm wide) at Fabricland. The design is printed, and (as is so often the case) it’s printed off-grain – this made it a bit of a challenge to match the pockets but I did my best. I added some satin piping in white, as well. Since this robe is going to be washed, I pre-washed both the flannel and the piping (put it in a pillowcase or lingerie bag in the washer), so there won’t be any surprises later. I used a fusible knit interfacing for the collar facing and also interfaced the belt.
Here’s my finished robe, so you don’t lose hope reading about my modifications!
The surprises were in the dimensions of the garment: it was absolutely enormous for me. When I seamed the shoulders, thought “wowza” and tried on the unfinished robe, the bottom edge was on the ground. There was no way it would hem to mid-calf as in the illustration. I cut six inches off the hems right away and began to modify. The pocket placement was far too low – sadly, I sewed them on before having my “wowza” moment, so I got to pick them off again. I could only put my fingertips in the pockets – and the pockets were proportionately too big, IMO. The armscye is closer to my waist, so naturally, the placement of the belt loops is too low. The sleeves are similarly long and wide – I knew at that point I’d have to cut at least 4″ off them. At this point, I abandoned the directions and began to make modifications each step of the way.
I had already decided to fell the seams wherever possible, since that finishing will ensure it wears better. I picked off the pockets and put them aside, working on the collar first. I felled the shoulder seams, added the piping to the outside edge of the collar, then sewed the facing to the fronts along the outside edge but stopped about 6″ from the bottom edge. Then I sewed the side seams and felled them, then I turned up a two-inch hem (one inch rolled twice) and ironed it in place. With this done, I could fold under the hems at the front edge and finish that seam. Then I sewed the hem. Once turned and pressed, I top-stitched the outer edge of the collar near the piping to make that edge crisp.
The facing on the collar was supposed to be slip-stitched in place over the shoulder seams, which didn’t make sense to me. I pressed mine, but before sewing it in, I added a loop at the center back to hang the robe on a bathroom hook, and a label, just because. 🙂 I then pinned and sewed the collar facing down, from one hem, all the way around to the other. Phew!
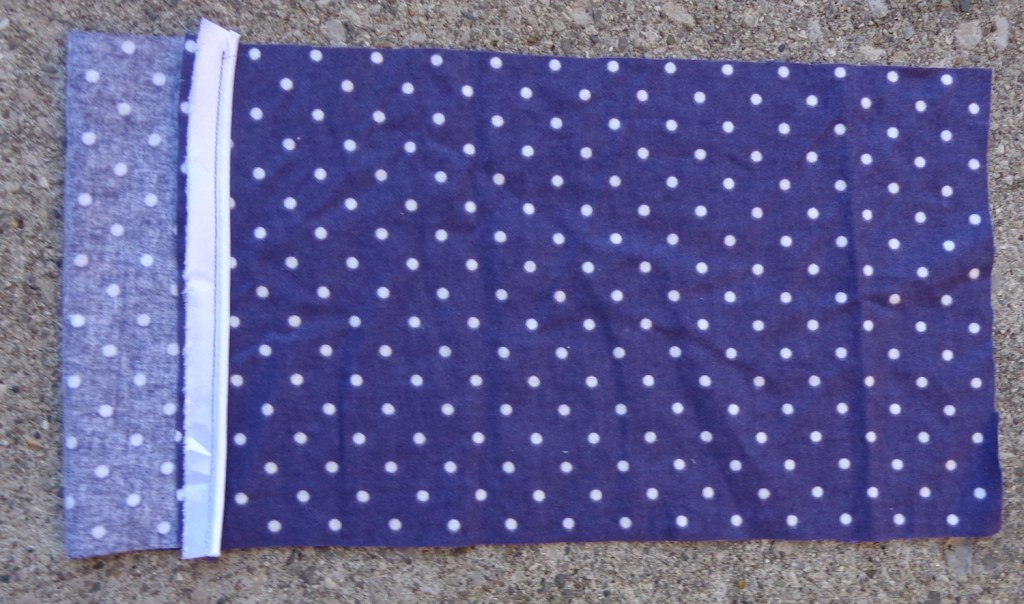
On to the pockets. (If you place them sooner, you might inadvertently catch them when sewing down that collar facing.) I made a modification to the pockets since I had to do them again anyway. I wanted the piping to run across each one, like a cuff, and thought it would be better for the pockets to be lined so there’d be no raw edges inside. I cut two pockets, each 8″ by 18″. I sewed the piping on one 8″ edge, and pressed the seam allowance to the inside. In these pictures, the top of the pocket is at the left and the bottom on the right. (They look off-square partly because I’m bad at holding the camera level.)
Next, I turned it over and folded the “cuff” to the inside, right sides together – mine is 2.25″ from the fold to the outer edge of the piping.
I folded the length of the pocket over this, so that the depth of the pocket was 8″. This created an overlap at the cuff end. See the raw edge at the left?
I sewed the sides of the pocket with 1/4″ seam allowances – in these pictures, those are the top and bottom edges – then turned the pocket through the cuff. This is is before it was pressed: I then top-stitched along the edge of the piping to close the opening forever, leaving a nice lined pocket.
I tried on the robe and positioned the pockets after I’d sewn down the collar facing, then edge-stitched and top-stitched them in place. I couldn’t match them perfectly because of that off-grain thing – also, I had to cut them crosswise instead of lengthwise out of the leftover fabric. If I’d shortened the robe in the first place, there would have been lots of fabric to cut them lengthwise. It turned out that the placement line closest to the center front was good, but my pockets are 4″ higher than the pattern specifies. They are too high, but they’re staying put—I should have only moved them up 2″
The sleeves were my next challenge. I knew they were too long, so pinned one in and tried on the robe. I marked a hem, took off the robe to pin it all the way across the sleeve, then tried it on to verify the position again. I pinned for a bracelet-length sleeve, so the cuff (which is wide on me) doesn’t slide through my breakfast. I had 11″ of fabric folded back for the hem, but I didn’t cut it yet. I wanted a piped cuff like the one on the pockets. I marked two inches above the pinned hemline, then removed those pins. (They were about to become incorrect.) Then I sewed a piece of piping across that line, piping cord toward the shoulder.
I pressed and folded up the hem to encase the raw edges of the piping and sewed again.
I pressed that seam allowance down toward the cuff, then cut the sleeve 4.5″ from the piping. There was over 7″ of excess that had to go away.
Next I sewed the sleeve seam and felled it.
I pressed under 1/2″ on the cuff, then pressed it up 2″. This makes a cuff with that seam allowance from the piping trapped inside. (Ha.) If I did this again, I’d fell the seam first and do the cuff in the round afterward. That would simplify the bulkiness of the two ends of piping coming together at the same place. Here’s one sleeve inside-out, and one turned the right way.
I then pinned the sleeves into the robe and sewed them in place, trimming back the seam allowance. Since I was all-in at this point, I cut some bias binding from the flannel and bound those shoulder seams with it to finish them neatly.
I also put piping around the belt, and interfaced it, just to give it a bit more definition. The piping could only be on one side – I realized belatedly – since the belt folds lengthwise and is seamed in the middle. If I cut it again, I’d split the belt lengthwise and eliminate that middle seam so it could be piped all the way around.
I’m basically happy with the result but am still swimming in it, mostly because of those deep armholes and the extra fabric in the bodice. (It makes me look like a blueberry hobbit.) If I cut this pattern again, I’d take two inches out of the length between the shoulders and the bottom of the armholes – I’d just fold the pattern an inch on the front, back and collar facing. That would also mean folding two inches out of the sleeve width, one on each side of the center line. They’d still be 13″ wide, so that would be fine. That would take 2″ out of the length, so I’d cut the robe 4″ shorter than the pattern piece. (It’s rectangular, so I could just fold up the hem.)
I also think the collar is proportionately a bit wide for my size – it’s perfect on Mr. Math – but I’d probably leave that alone. I might take an inch out of the width on the fronts and the back, to make that drop shoulder extend a little less than it does now. That would mean adding an inch to my modified sleeve length.
The interesting thing is that I cut a pair of the pants from this same pattern for Mr. Math. To my surprise, they weren’t drafted for either of us – I had to add 3″ to the length for his, and would have to shorten them by at least that much for me. The inconsistency is strange.
I can’t believe this sweater is finally done! This one has been on my needles for a long time. The scary thing about Ravelry is that your project pages will tell you exactly how long you’ve been working on something – I cast this one on in December 2016. As so often happens when I modify a pattern, I got myself into a corner (or two) and so it was put aside. And, as often happens when I lose interest in a project, when I finally pick it up again, what’s left to be done is no big deal. This sweater sat with one sleeve for the longest time, but I finished it up last week.
The yarn is Rowan Colourspun, a discontinued yarn that I really like. (I knit the mister a vest of this – Skye – and Ice Cable Mitts in it, too. ) The colourways are Jervaulx (the red), Winterburn (the light grey) and Semer Water (the dark grey). I used Felted Tweed for the bit of blue, but really should have hunted down the Colourspun blue.
Wilhelmina designed by Marie Wallin
Wilhelmina is in the Nordic Tweed pattern book from Rowan. (That’s a Ravelry link.) I modified the pattern, though, because it has dropped sleeves and an angled shoulder. The original design also has no fair isle pattern on the sleeves. So, I used the stitch counts and basic shape from Bute (that’s a link to the one I knit here on the blog) with the reindeer and snowflake pattern from Wilhelmina. (That’s a Ravelry link, too.) Bute is fitted through the shoulders, a style I prefer.
This seemed like a good idea at the time, but was more complicated than I expected. The first issue is that Bute is knit with Rowan Colourspun and Rowan Felted Tweed. Since I wanted to use Colourspun, I thought it would work well. It did, but Bute is mostly Felted Tweed, which is thinner, and this sweater is almost all Colourspun – so my Reindeer sweater is bigger than my Bute, even on the same needles with the same stitch count. (And no, I didn’t swatch.) That part is okay. It’s kind of a teddy bear sweater this way.
Wilhelmina also has plain sleeves and I decided to put the snowflake pattern on them – then I decided the pattern had to match at the shoulder. More complication, more work, and really, in this yarn, the fair isle snowflakes are kind of lost. I shouldn’t have bothered – and if I hadn’t, it would have been done a lot sooner. I do like it, though, and the red is nice. It’s incredibly warm, too.
Below is the back of my Wilhelmina.
You can see that the Colourspun self-stripes a bit. I suppose I could have been strategic and started the red where it was darker and the grey where it was lighter, but since there are more red stitches than blue ones, that contrast wouldn’t have lasted anyway. I think the softness of the fair isle is inescapable – and kind of dreamy. I do like it. I made sure my reindeer started with light feet so their legs would be more visible.
And below is the finished cardigan. You can see what I mean about it being a teddy bear sweater!
The weather is dingy here, so even taking the sweater outside for a picture didn’t really show the detail well. Here’s a close up of my reindeer:
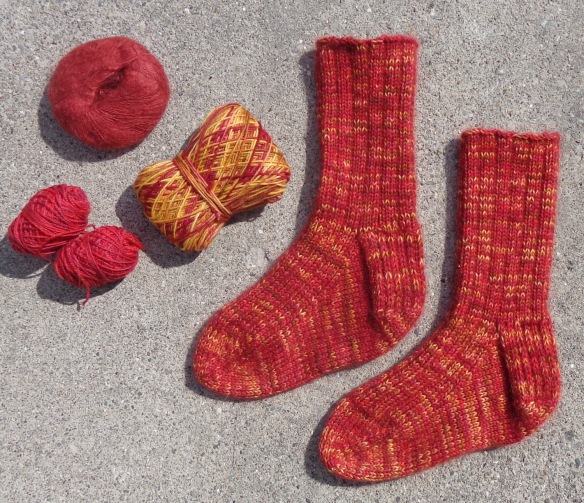
The red pair are knit with one strand of Kidsilk Haze in Blood, one strand of Zen Yarn Garden sock in Cherry Tart and 1 strand of a red sock yarn missing its labels. I think it might have been from Diamond yarns. You can see that I made one heel a little deeper by mistake, but they’re so squishy and warm that I don’t care.
The purple pair have a single strand of Kidsilk Haze in Nightly (navy) with a strand of Lorna’s Laces Shepherd Sock in Mixed Berries, plus another fingering weight sock yarn which has lost its label in the stash.
This is the Snowshoe Sock pattern by Emily Foden that I’ve knit before: I showed you a pair knit for the mister and a pair for me in the smaller size. I went with the medium this time and it’s a little loose but that’s better than them being snug.
I like them both, and have cast on one more pair as a gift.