Modifying the Slippery Slope Scarf

The Slippery Slope Scarf by Deborah Cooke knitted by Deborah Cooke
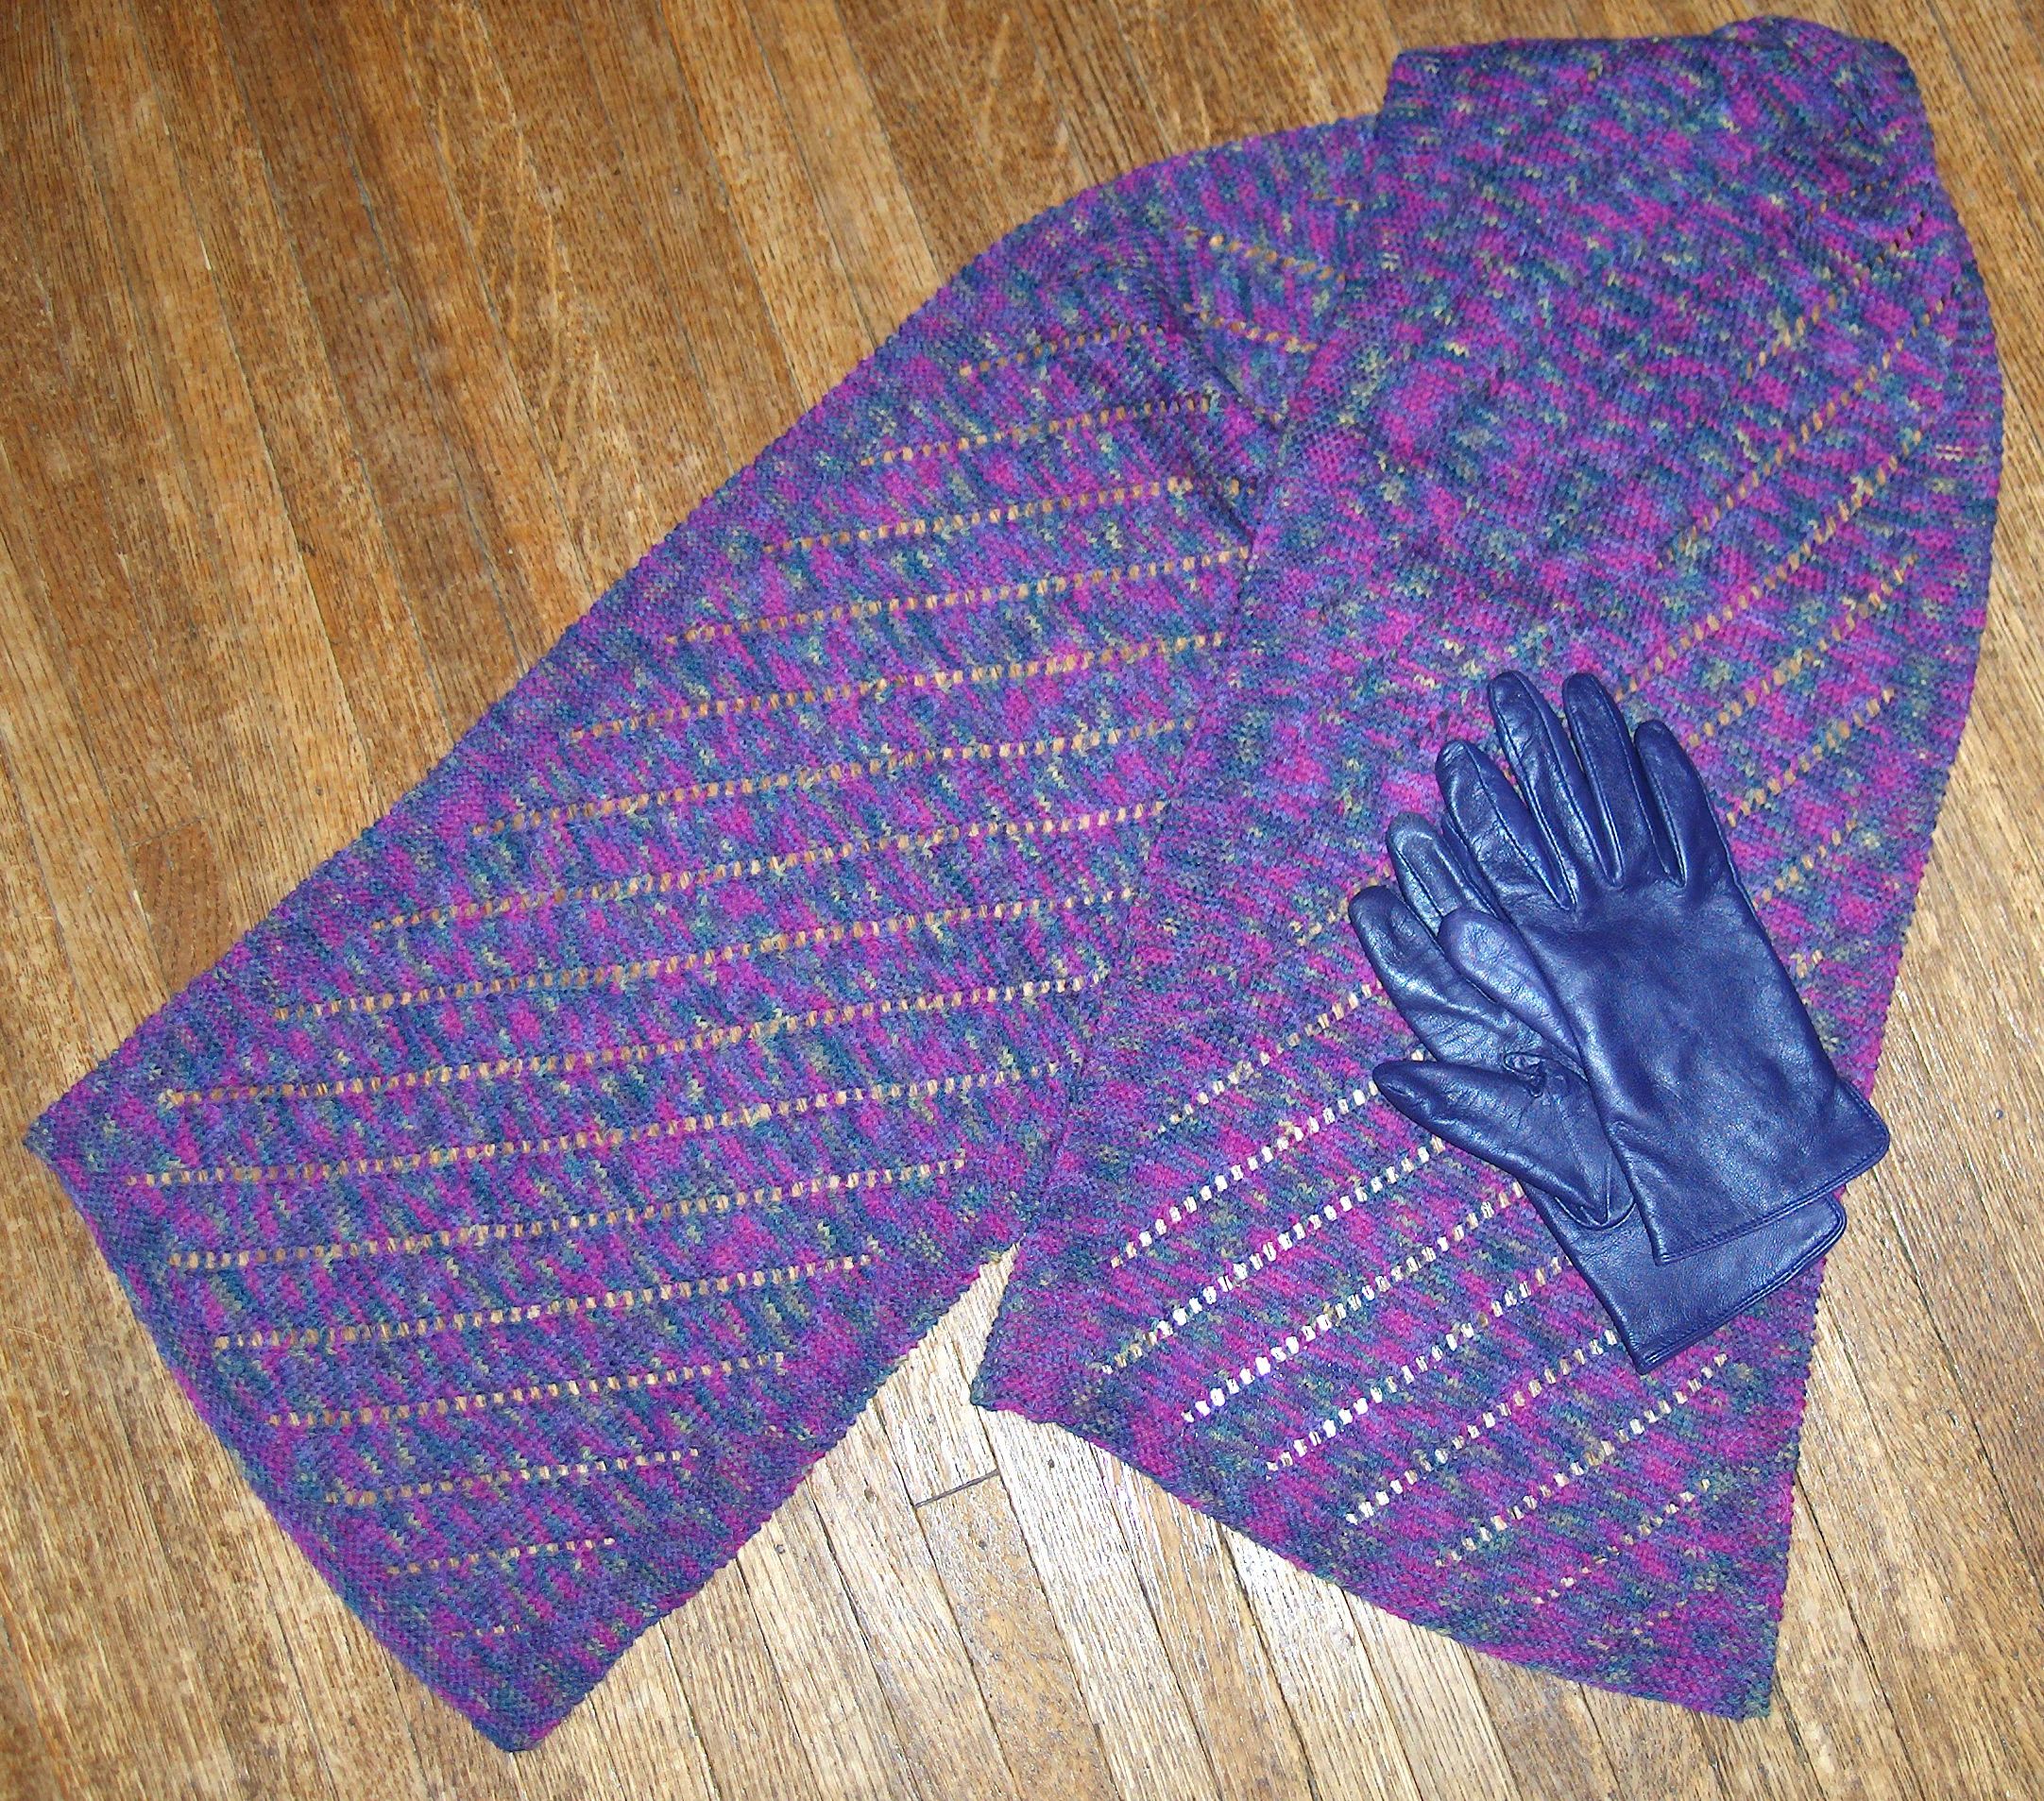
This post includes some suggestions for modifying the Slippery Slope Scarf pattern.

Knitters call their modifications “mods”. They may be modern or moderate or not. They certainly are changes to the basic pattern – and the variations are always infinite.

1/ Make a cleaner lead edge.

When you’re knitting a garter stitch border like this one, you can make the long edges neater by slipping the first stitch on each row. Knitters can have long debates about the relative merit of slipping purl-wise (inserting the needle as if to purl, then slipping the stitch) or slipping knit-wise (inserting the needle as if to knit, then slipping the stitch) but the most important thing is to be consistent. Slip whichever way you prefer. You’d start each row with Slip 1, K7 instead of just K8.

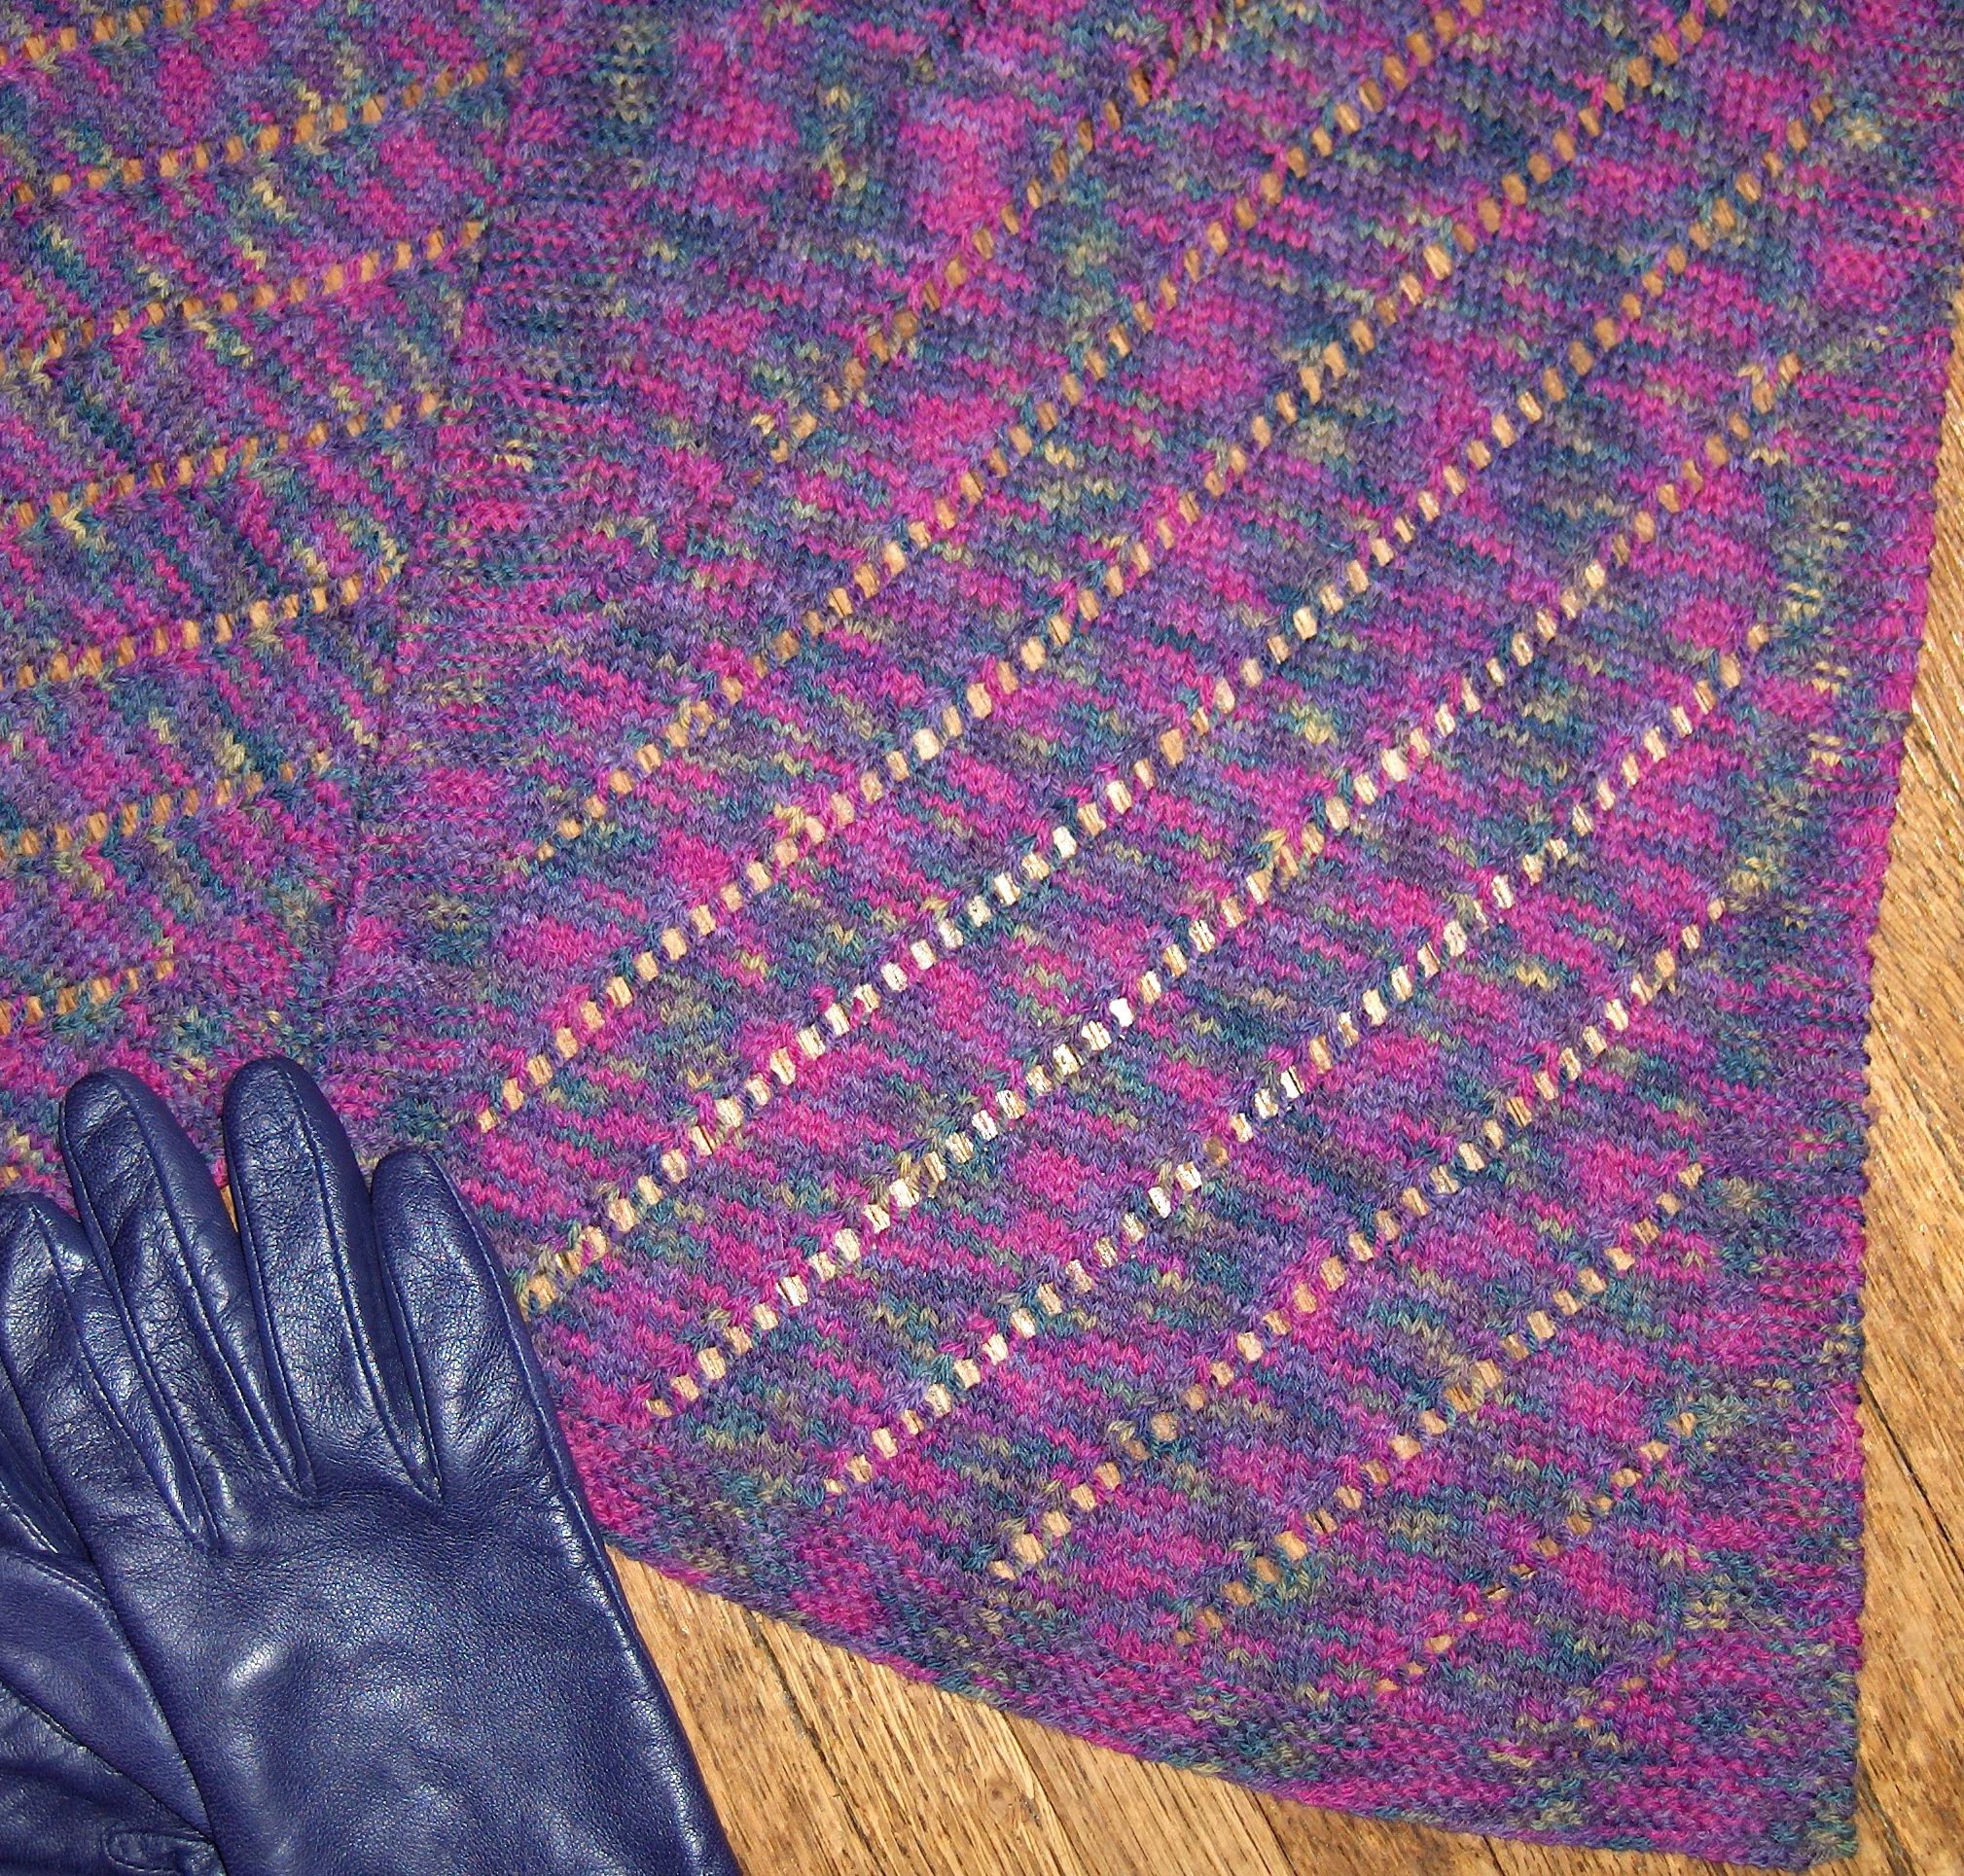
2/ Beads are easy to add into lace.

The easiest way to add beads is with the crochet-hook method. Essentially, you add a bead wherever you want one, by picking up the stitch before you knit it and putting a bead on it. Then you put the stitch back on the left needle, and knit (or purl) the stitch. The bead gets locked in, on the row beneath the one you just worked.

First you need beads. You’ll need beads that can slide over a double thickness of your yarn.

Then you need a crochet hook, one that grips your yarn yet also fits through the hole in the bead with the yarn on it.

Then you need to decide where to put the beads. With the crochet hook method, the beads slide down to nestle on the stitch on the row below. Because of this, I always add these beads when I’m purling back on the wrong side row. As a bonus, I don’t need to pay attention to the pattern when I’m purling, so I can pay attention to the beads.

There are lots of places you could put beads on the Slippery Slope Scarf/Stole. You could put them above each k2tog and make a diagonal line of beads. It would get heavy, though, so you might want to do alternate rows or even every third row.

You could put beads all around the perimeter of the pattern stitches. Place beads on the first and last stitches of the stockinette central pattern panel, on every second row. Just to balance things out, put beads on every second stitch on either end of the scarf.

Or, you could commit random acts of beadness. Put one bead somewhere on every second 4th row. (That’s every second purl row.) Go crazy and put two beads on one row every once in a while. You’ll get a night sky starry thing going on.

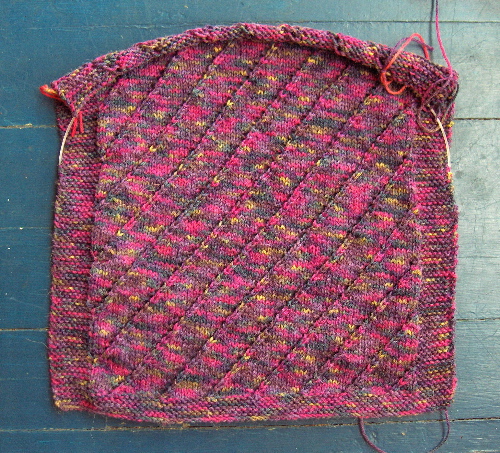
3/ Making a wider border.

You could knit 12 rows or even 16 rows of garter stitch at either end. I’m doing that on my stole, because it’s wider and I think the bigger end border balances it better.

4/ Knitting the border in a contrasting colour.

Just for fun, you could knit the garter stitch borders in another colour. Cast on with your border colour, knit the first 8 rows, then on the first row of the pattern, use that thread for the first K8. Join the yarn you’re using for the pattern stitch, then join another ball of the border colour for that last K8. Knit the length, then bind off both the colour for the pattern and one of the balls of border colour before knitting the last border with the last border colour ball. Easy. It would look really striking to border a hand-painted yarn with a coordinating solid.

5/ Adding a fringe.

I’m not a fringey chic but maybe you are. If so, go for it.

You could even put beads in your fringe.

6/ Making stripes.

You could use two or even three colours of yarn and work the pattern – for example – through once in one colour, then change to the next. Or you could work two rows – knit and purl back – in each colour, alternating them out.

7/ Knitting on larger needles.

If you knit on larger needles, the holes will be bigger and the fabric will be looser. You might like it better. You’ll also need more yarn to do as the same number of rows.

My other proposed mods are bigger, and justify being patterns in themselves. Look for them in the next few weeks. (I need to knit a bit faster to be able to show you what I mean!

Knitting the Slippery Slope Scarf/Stole in Other Yarns

The Slippery Slope Scarf by Deborah Cooke knitted by Deborah CookeThis post is about modifying the Slippery Slope Shawl.

If you use thick yarn, you’ll get quick results and a different look. You could make an afghan with this stitch pattern, for example, and it would be wonderful. You could also do this scarf in very fine lace weight yarn, and it would be lovely too. Either way, you’ll have to figure out your own stitch counts.

Here’s how I figured out mine for the instructions given yesterday.

1/ The ball band is your friend.

Yarn always has a ball band, which includes a bunch of useful information. Have a look at yours. My ball band says that each ball of the Diamond Fancy Free is 50g in weight and 206 m in length. (Be warned that I flip between meters and yards, as the difference isn’t enough to really matter.) I had three skeins, so I had 618 m of yarn.

The ball band says that on needles between 2.5mm and 3.5mm, I should get 30 stitches to 10cm (which is a whole lot like 4″). That means 7.5 sts to the inch. That’s a big range in needle sizes though. I know my own knitting and would guesstimate that on 3.5mm needles, I’ll get more like 6 stitches to the inch.

When choosing a needle size for knitting lace, go a bit bigger than you would otherwise (or than the ball band recommends). For socks, for example, I always use a 2.5 or even a 2.25 mm needle. For lace with the same yarn, I’ll use 3.5mm. The spider’s web shawl I showed you a while back was knit on 4.5mm needles, and the Noro Silk Garden Sock yarn is both thinner and thicker than this Fancy Free. Lace needs a fluid fabric to show it off, so go up a size or even two sizes from what you’d expect to use with that yarn. (And yes, when in doubt, swatch.)

So, if I’m going to get 6 stitches per inch and I want to make a wide scarf that’s about 12″ wide, then I’ll need (6 x 12) 72 stitches. By happy coincidence, that’s a multiple of 8. Use the same calculation for your yarn, then round up or down from your calculated result to get a multiple of 8 for this scarf/stole.

2/ The 7th Row Sneaky Trick

If you want to use up all of your yarn and make your scarf/stole as long as possible, then you need to know how much yarn it takes to knit a row. Before you knit the 7th row of the garter stitch border, mark one yard (or one meter) on the yarn that you’ll knit. Measure right from your needle – where the yarn comes from the last stitch on the 6th row – and tie a slip knot at the 1 yard point. Make it loose enough that you can pull it out, but tight enough that it stays put. Then knit the row.

If you have to knit past the slip knot, then measure another yard/meter from that point, remove the first slip knot and knit on.

When you get to the end of the row, calculate how much yarn it took you to knit that row. For example, if you didn’t reach the knot, measure back from the knot and subtract – a knot at 36″ with 4″ left means it took you 32″ to knit the row. For my wide scarf, it took 46″ to knit a row.

This is your magic number. Multiple this magic number by 10. This distance is how much yarn you must leave to knit the end border on the shawl. My 46″ is a whole lot like 117 cm – since metric is easier to multiply, I rounded that up to 120 cm or 1.2 m. So, I will need 1.2m x 10 = 12m to finish the last garter stitch border on my shawl.

If you are compulsive (like yours truly) measure that point from the other end of your yarn (or from the last end of the last ball) and put a slip knot there. This slip knot marks the very latest point at which you can begin the garter stitch border at the other end of the scarf/shawl. Now you have no stress about running out of yarn. Isn’t that fun?

3/ How big?

The second part of this sneaky trick is even better – you can ballpark the finished length of your shawl with this number. I know, for example, that I need 1.2 m per row and I know that I have 618 m of yarn in total. So, I can calculate that I’ll be able to knit (618 divided by 1.2) 515 rows in total. A peek back at my ball band revealed that I should get 10 rows per inch – so the finished length of my scarf will be at least 51.5″.

In reality, since I’m using larger needles, I suspected I’d get more like 8 rows per inch, which would give me a finished length of 64″ or so. (That’s exactly what I am getting.) I’m good with scarves and shawls being bigger – what I hate is when they’re too small. So, consider the ball band calculation to be a worst case (or smallest case) scenario. If you’re good with it, knit on. If not, rip back those couple of rows and try a different number of cast on stitches.

4/ Math Geek Bonus Round

Deep in my heart, I am a math geek. I loved math in high school, loved it so much that I was excited when a guidance counsellor told me I could have a job that involved doing math all the time. Wow! What kind of a job would that be? He told me I could be an actuary, or a high school math teacher. The prospect of being an actuary did not make this girl’s heart go pitapat, and neither did the idea of facing a room full of hostile teenagers every day for the rest of my life. So, I wandered off and ultimately became a writer instead.

If I’d had a more imaginative guidance counsellor – maybe one who wasn’t so floored by the idea of a girl liking math – I could have been off calculating the area inside parabolas every day, or figuring missile trajectories, or constructing elaborate proofs. There you go. Be careful what you tell teenagers – they might believe you.

So, my inner math geek loves this bit. When I finished knitting one whole skein of yarn, I counted up my rows and refined my 1.17m/row ballpark estimate. It turned out that I got 162 rows out of that skein. With 72 stitches per row, there were 11,664 stitches in that skein of yarn. (Who knew?) But if I know that I can get that many stitches on that size needles, then I can figure out how many rows I’ll get from each skein with 56 stitches or with 88 stitches. Multiplied by the number of skeins, that tells me how long each piece will be, and how many repeats of the pattern I’ll get. And that’s how I figured out the instructions for the other two sizes of the scarf without actually knitting them.

Ha.
Don’t you feel empowered? Go forth and knit!

The Slippery Slope Scarf/Shawl Free Pattern

Ta DAAAAAAAA! Here’s one end of my Slippery Slope Scarf/Stole.The Slippery Slope Scarf by Deborah Cooke knitted by Deborah Cooke(It’s a slippery slope because once you make one lace shawl, you’ll need to make another. And another. And – well, you get the picture.)

Technically, this is not lace but only lacey. Afficionados of lace knitting insist that true lace requires YO’s or patterning on every row. With this pattern, you do all the work on the right side then just purl back. You get a rest row, which means it’s not “true lace”. Now you know. It’s still pretty.

Because it’s not blocked – and may never be blocked – and because it was photographed on a dark surface, you can’t see the lace holes too well. Here’s another shot:

The Slippery Slope Scarf by Deborah Cooke knitted by Deborah CookeThis easy lacey pattern is based upon the number eight:
• it has eight rows of garter stitch at either end.
• it has eight stitches that stay in garter stitch up either side.
• And the pattern in the middle is a repeat of 8 stitches. That means you can make it as wide or as narrow as you like without doing a whole lot of math.

Why use a garter stitch border? Well, it’s a bit more trouble than not using one, but the finished product looks as if you had a plan. You did. If you just knit a scarf in a pattern from a stitch dictionary, well, it looks like that’s exactly what you did.

Let’s look like brilliant planners instead.

The garter stitch border also keeps the edges of the scarf from rolling. Plain stockinette rolls, which doesn’t look too chic.

The Slippery Slope Scarf by Deborah Cooke knitted by Deborah CookeHere we go!

I’m assuming that you have some yarn you like, some yarn that is a sock yarn or a fingering weight. You could also have a heavier yarn – it won’t hurt my feelings if you do! – but the calculations below, such as they are, are based on fingering weight.

1/ Pick Your Yarn.

My yarn is a house brand from Diamond Yarns, which is a distributor here in Canada. This is their alpaca/wool blend sock yarn ( 70% superwash merino, 20% alpaca and 10% nylon) which is called “Fancy Free”. It might be handpainted or it might be space dyed. It’s pretty either way.

Sock yarns that are space-dyed often have a picture on the label, showing how the self-patterning works up. If you’re making a scarf or a wide scarf, that’ll be a pretty fair representation of what you can expect.

With fingering weight, plan to make a scarf with 400 m, a wide scarf with 600 m and a stole with 800m. That’ll ensure that the finished scarf/stole is long enough. Let’s assume that a scarf is 8″ wide, a wide scarf is 12″ wide and a stole is 16″ wide – buy the right number of balls to give you the yardage needed to make the width you want.

2/ Cast on.

If you have 400m/yds of fingering weight yarn, then cast on 56 stitches on size 3.5mm needles for a scarf.

If you have 600m/yds of fingering weight yarn, then cast on 72 stitches on size 3.5mm needles for wide scarf.

If you have 800m/yds of fingering weight yarn, then cast on 88 stitches on size 3.5mm needles for a shawl.

3/ Knit the garter stitch border.

The border is 8 rows of garter stitch – that’s 8 rows knitted. Knit 7 rows.

Row 8 Make-Life-Easier Trick: When you knit row 8 in garter stitch, place your markers as follows: K8, place marker, k to last 8 stitches, place marker, k8.

Markers don’t need to be fancy. All they need to do is remind you that you need to change from garter to pattern. A length of contrasting yarn knotted into a loop makes a good marker. Some people use plastic bread ties. Others use huge beads. You don’t have to run out and buy anything – save your money for YARN! – the marker just has to move easily along the needle and contrast with your knitting. When you get to a marker, just move it from the left needle to the right – don’t knit it! (If you do knit it and you’re using scrap yarn, you can just cut it and pull it out of your work. Go ahead – ask me why I thought of that.)

4/ Begin the pattern.

The pattern for this scarf is an easy 16-row repeat. I’ve written it up here including the 8 border stitches, but keeping them separate from the pattern – the border stitches are those K8’s on either end of each row.

Row 1: K8, K3, *K2tog, YO, K6. Repeat from * to 5 stitches before marker. K2tog, YO, K3, K8.

Row 2 and all other even numbered rows: K8. Purl to last 8 stitches. K8.

Row 3: K8, K2, *K2tog, YO, K6. Repeat from * to 6 stitches before marker. K2tog, YO, K4, K8.

Row 5: K8, K1, *K2tog, YO, K6. Repeat from * to 7 stitches before marker. K2tog, YO, K5, K8.

Row 7: K8, *K2tog, YO, K6. Repeat from * to 8 stitches before marker. K2tog, YO, K6, K8.

Row 9: K8, K7, *K2tog, YO, K6. Repeat from * to 1 stitch before marker. K1, K8.

Row 11: K8, K6, *K2tog, YO, K6. Repeat from * to 2 stitches before marker. K2tog, YO, K8.

Row 13: K8, K5, *K2tog, YO, K6. Repeat from * to 3 stitches before marker. K2tog, YO, K1, K8.

Row 15: K8, K4, *K2tog, YO, K6. Repeat from * to 4 stitches before marker. K2tog, YO, K2, K8.

5/ Knit on.

Keep knitting. If you see pools developing in your scarf and don’t like it, you’ll need to either rip back and use a different cast on count or pick a different yarn. (“Pools” are little blobs of colour, say where the red in the space dyed yarn ends up gathering on each row. I have some very small pools of pink on my scarf, but because they’re small they don’t bother me. We’ve all seen ugly pools, great oceans of one colour gathered together in a massive blob. Ugh.) Because the rows are the same length, whatever the self-patterning does will be consistent for the whole scarf.

Begin the second garter stitch border when you have done:
• 23 more repeats (24 in total) of the 16-row pattern for the scarf
• 27 more repeats (28 in total) of the 16-row pattern for the wide scarf
• 29 more repeats (30 in total) of the 16-row pattern for the stole
6/ Knit the second border.

Finish the pattern on an even number or purl side row, then knit your 8 rows of garter stitch. Then cast off.

7/ Sew in your ends.

And block if you need/want to. There it is!

Tomorrow, we’ll talk about calculating counts in different weights, and next week, we’ll look at some variations.

Knitted Fruit

Once upon a time – in April 2007 – a book of mine was published that featured a heroine who liked to knit. It was called All or Nothing and Jen, our heroine, specifically liked to knit fruit. Some of you thought this was a bit weird.

Well, it had nothing on Norah Gaughan’s Knitted Beet.

What is not to love about that?

I want to knit one. I bet you do, too.