When you need a quick project, a doll garment can provide that almost-instant gratification – and a free pattern from Sticka-till-Barbie might be just the thing.
Here’s the Internet Archive backup of the Sticka till Barbie patterns. There is no longer the option of downloading individual patterns at the Wayback Machine, but the Internet Archive offers a zip file of the entire catalogue. I’d grab it now.
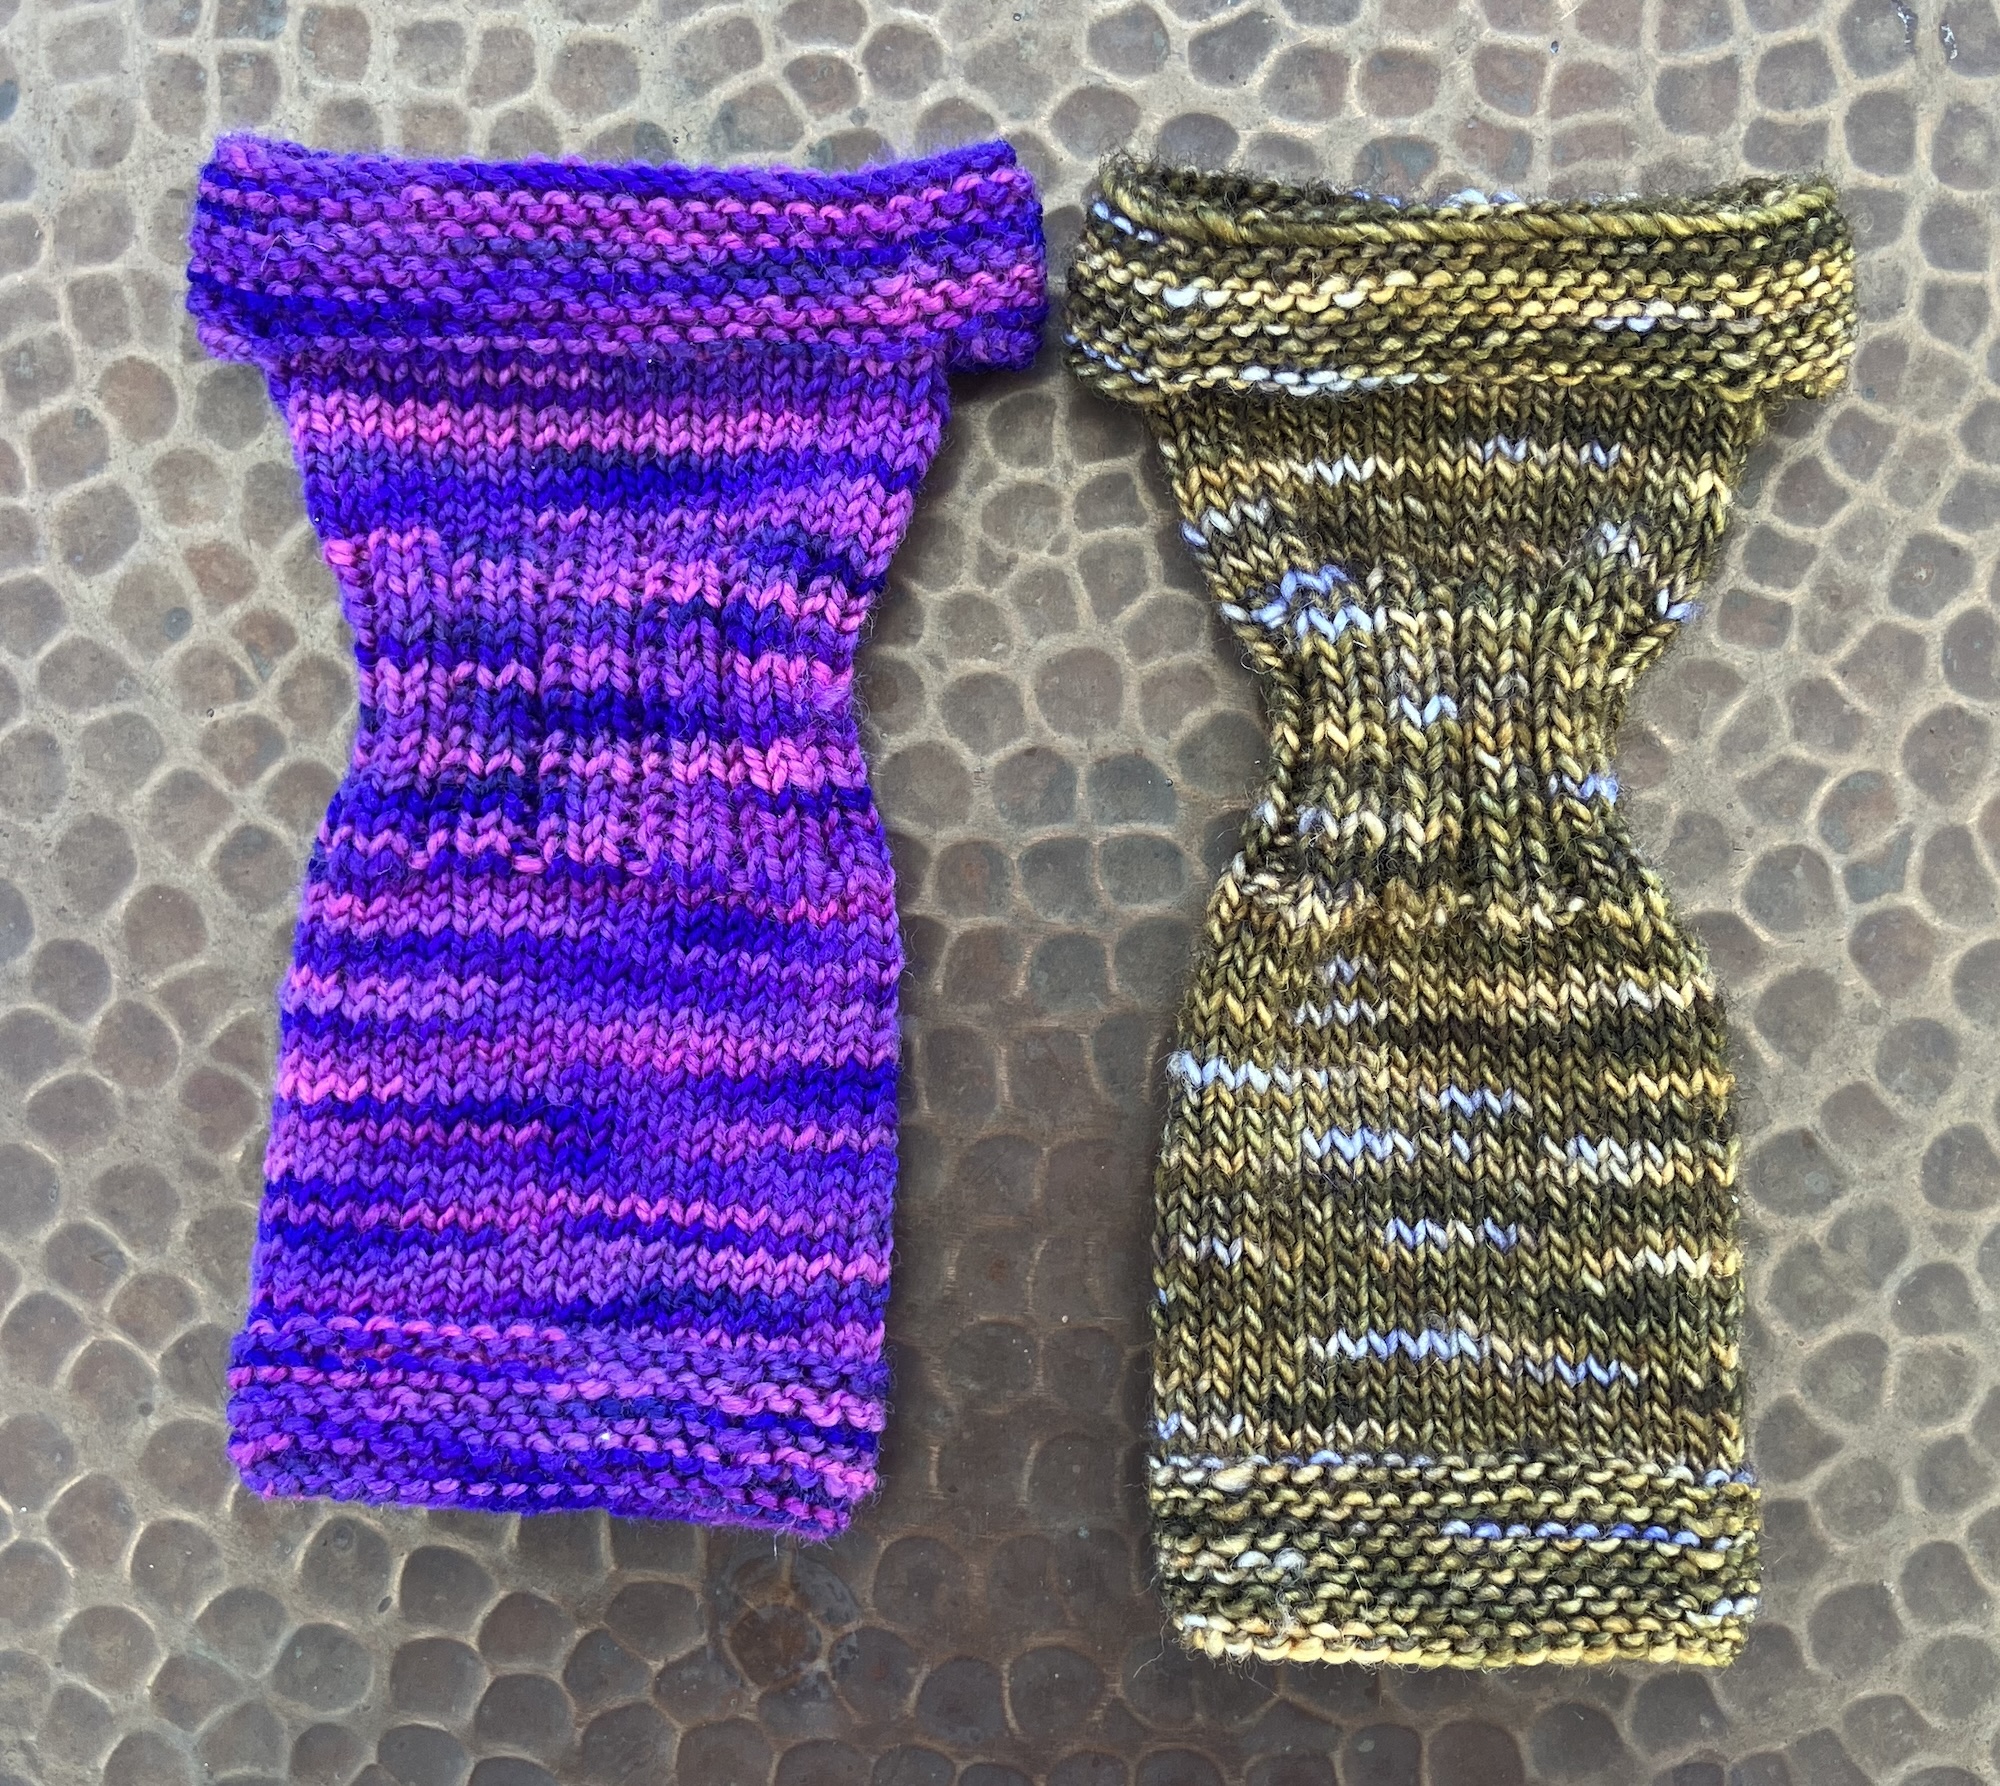
This is a straight dress knitted top down with ribbing at the waist. The original pattern is seamed down the back, but I joined the cast-on stitches in the round.
I think they allowed two stitches for the CB seam, as the first dress was a bit broad in the back for Barbie (who is bigger in the front than the back). I knit that first dress, then modified the pattern and knit the second. I liked it much better so I frogged the first and reknit it following the modified instructions.
This one fits vintage B best. The yarn is Koigu KPPPM and it used 10g on 2mm needles.
My modifications: Instead of casting on 52 and knitting flat, I cast on 50 and knit in the round.
Row 1 in the pattern says: K9, cast off 8, K7, k2tog, K2tog, K7, cast of 8, K9 (34 sts)
My revised Row 1 is: K7, cast off 8, K20, cast off 8, K7 (32 sts)
I tried the dress on my skinnier girl and it was too big, especially in the shoulders. I could have diminished the stitch counts again, but remembered the differing results I had with different yarns when knitting sweaters for the girls. Mad Tosh Merino Light is still a fingering yarn, but it’s much thinner than Koigu KPPPM – Koigu KPPPM has 160m per 50g, or 320 m per 100g, while MadTosh Merino Light has 384 m in 100g. It’s thinner.
I followed the same instructions and used the same needles, and look at the size difference:
Purple is Koigu KPPPM and the brown is MadTosh Merino Light. I may have added a row or two more to the length, but it’s amazing how much skinnier the second dress is. (It also took 10g of yarn.)
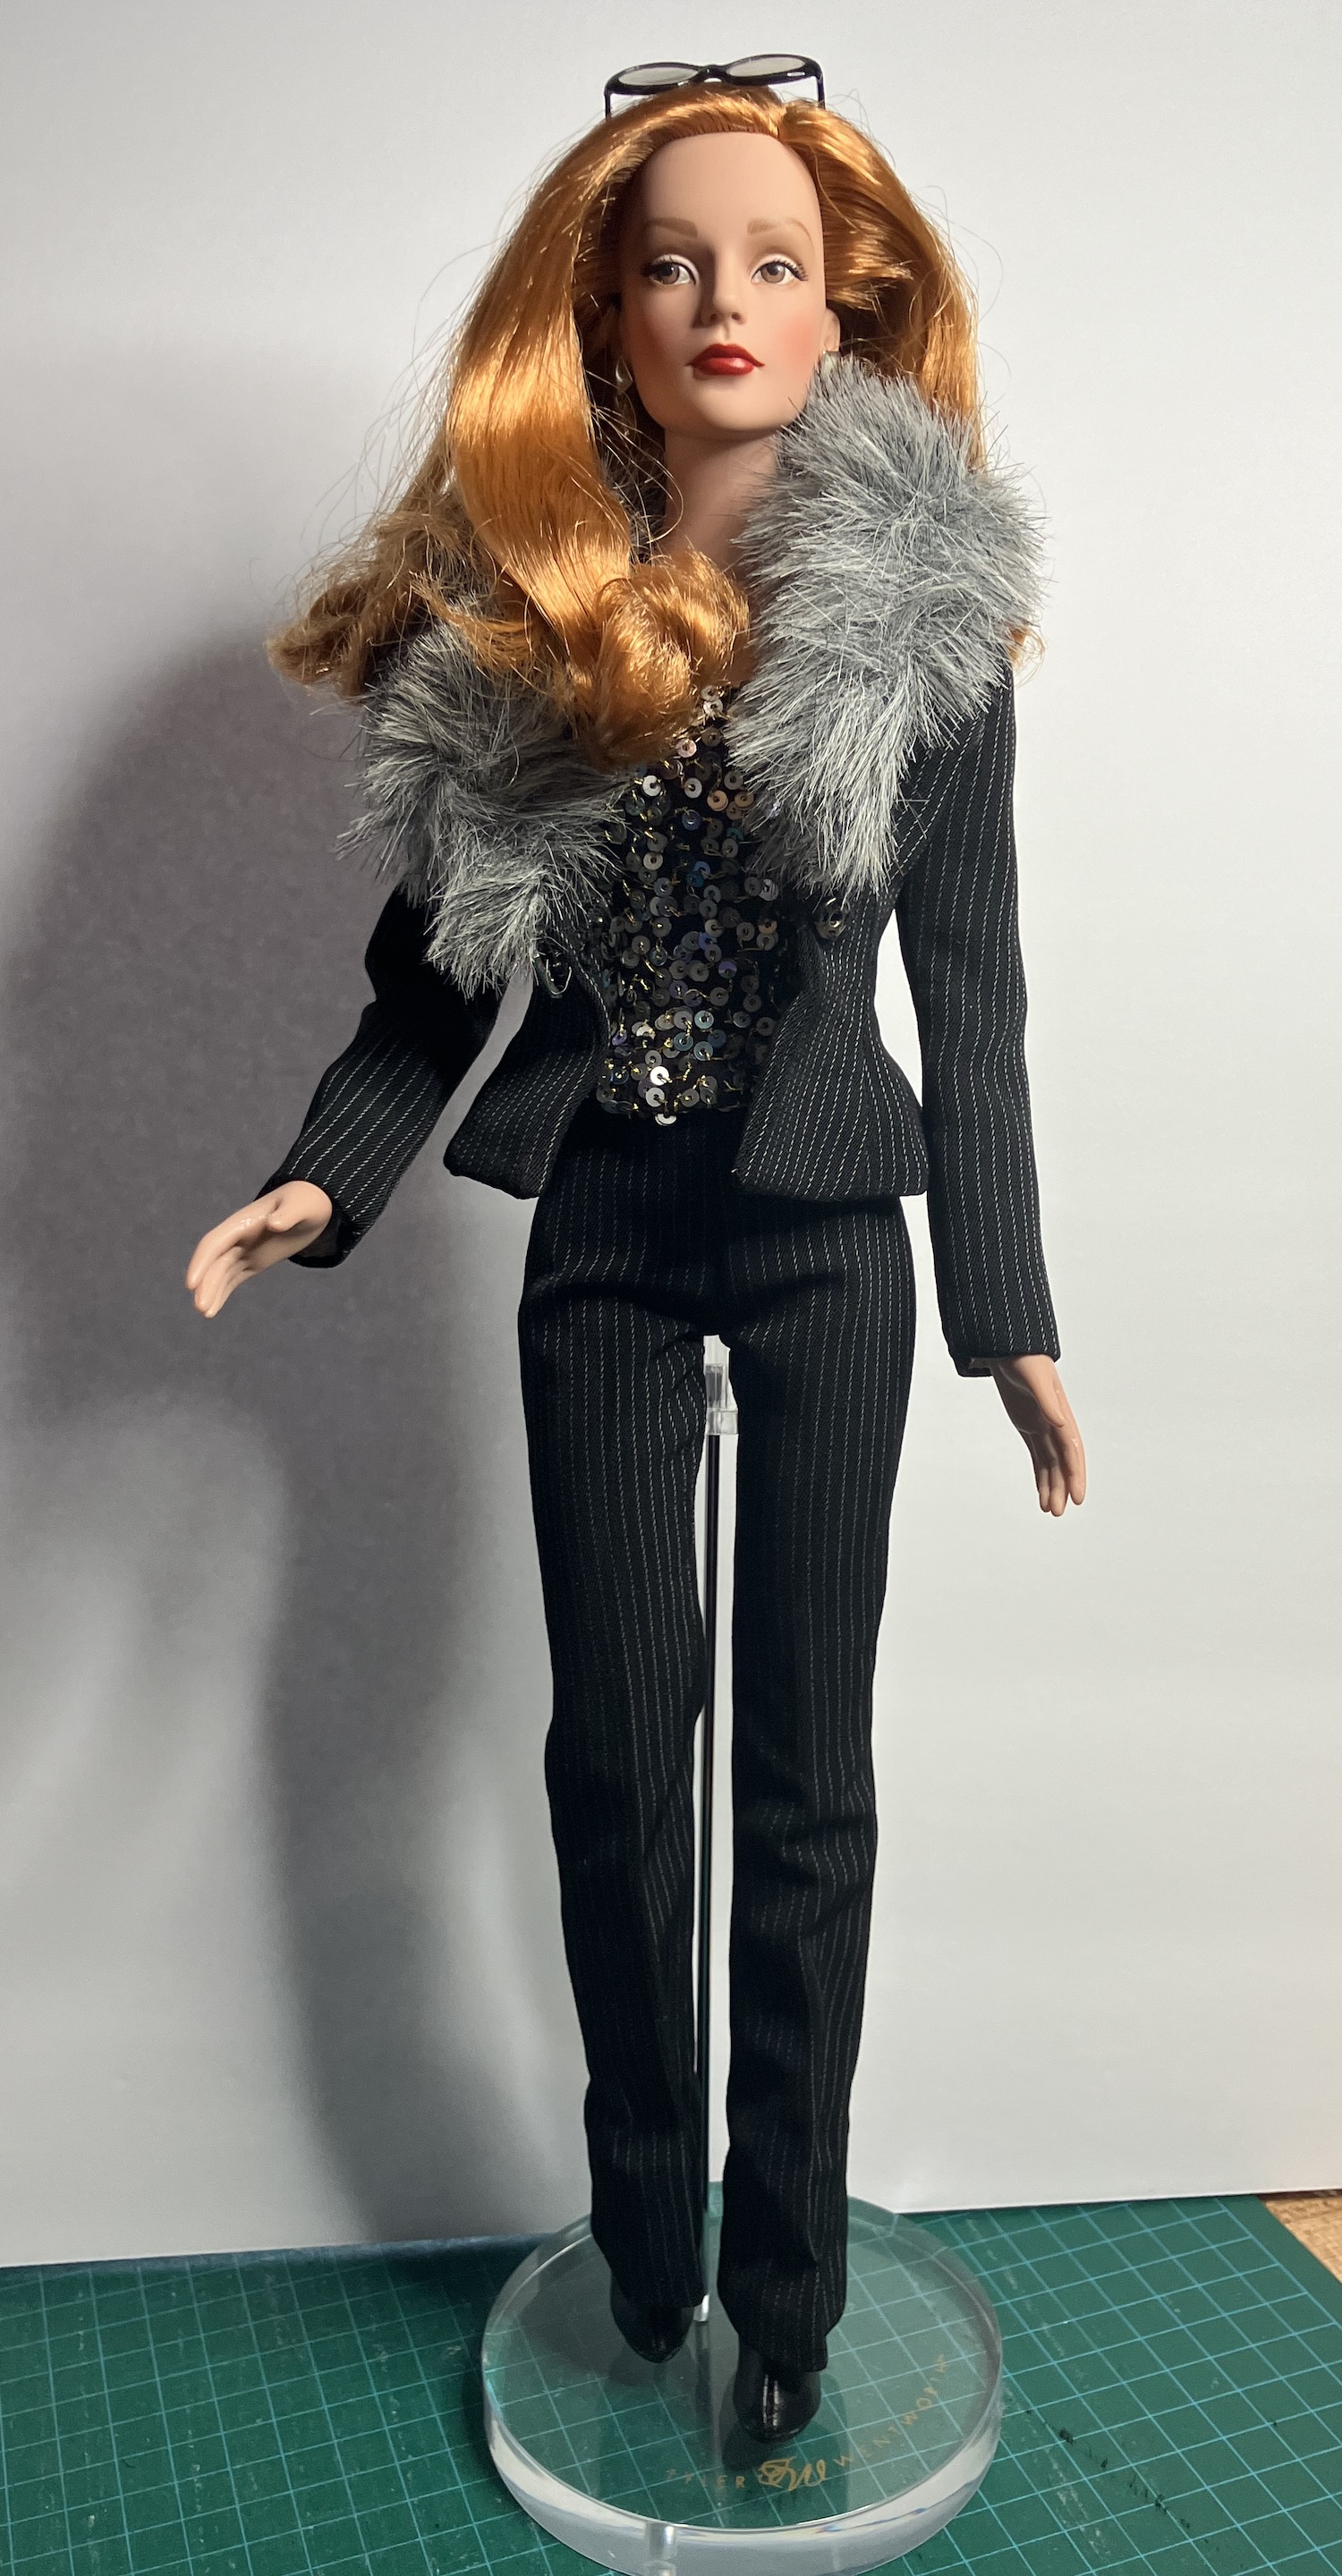
And here’s the brown dress on a MTM Barbie with the regular body sculpt:
She’s the 2025 Barbie Basics #2, and yes, her hair does have a bit of a violet cast to it. Here she is for sale at the big river. (Interesting that it notes this product is often returned. All of the boxes on my 2025 Barbie Basics dolls were damaged. The dolls were fine, but for those who keep their dolls boxed, that would be an unacceptable situation.)
This week sees some more changes in the world of makers like me. I’m not in the States but was saddened to see Joann’s Fabric stores closing there recently. There’s nothing like a local store to finger fabrics, and pick up notions.
This week, there are two more changes. One is more local to me. The Spinrite factory in Listowel Ontario is closing down. It’s been there over seventy years and the retail store is a great place for mill ends and sales. They haven’t been spinning yarn there for a while, but they ball-and-band yarns for Patons, Bernat, Red Heart and various store brands (like Michaels). Their annual tent sale is a huge summer event. I like to drive up there (or have the mister drive me) when I’m thinking. It’s a lovely drive through farmland with yarn at the end. I will miss it.
The second big change was announced yesterday – the parent company of the big four pattern brands (Simplicity, Butterick, Vogue and McCalls) was sold to a liquidator. It’s the same company that liquidated Joann’s. Curiously, it seems that the impact of tariffs on sewing product brands owned by the parent (Wrights trims and Boye needles, for example) was a driving factor in the decision, as well as the loss of distribution with the closure of Joann’s in the US. It seemed that they were struggling with the shift to digital in recent years, but it’s sad to see them go.
What happens from here? Are we shifting to smaller companies and boutique suppliers, or are we becoming a society of people who don’t make things themselves? I know which option I prefer. I’m not sure who I’d be if I wasn’t always making something.
I also feel vindicated for having my various stashes. If this is the apocalypse for makers, I’m all stocked up.
When times are uncertain, people become more careful with their money. I can certainly see that in the book market, and it’s also evident in the doll resale market. My birthday money, earmarked for dolls, has gone a little further this year than expected – and I was able to add one of my grail girls to my collection.
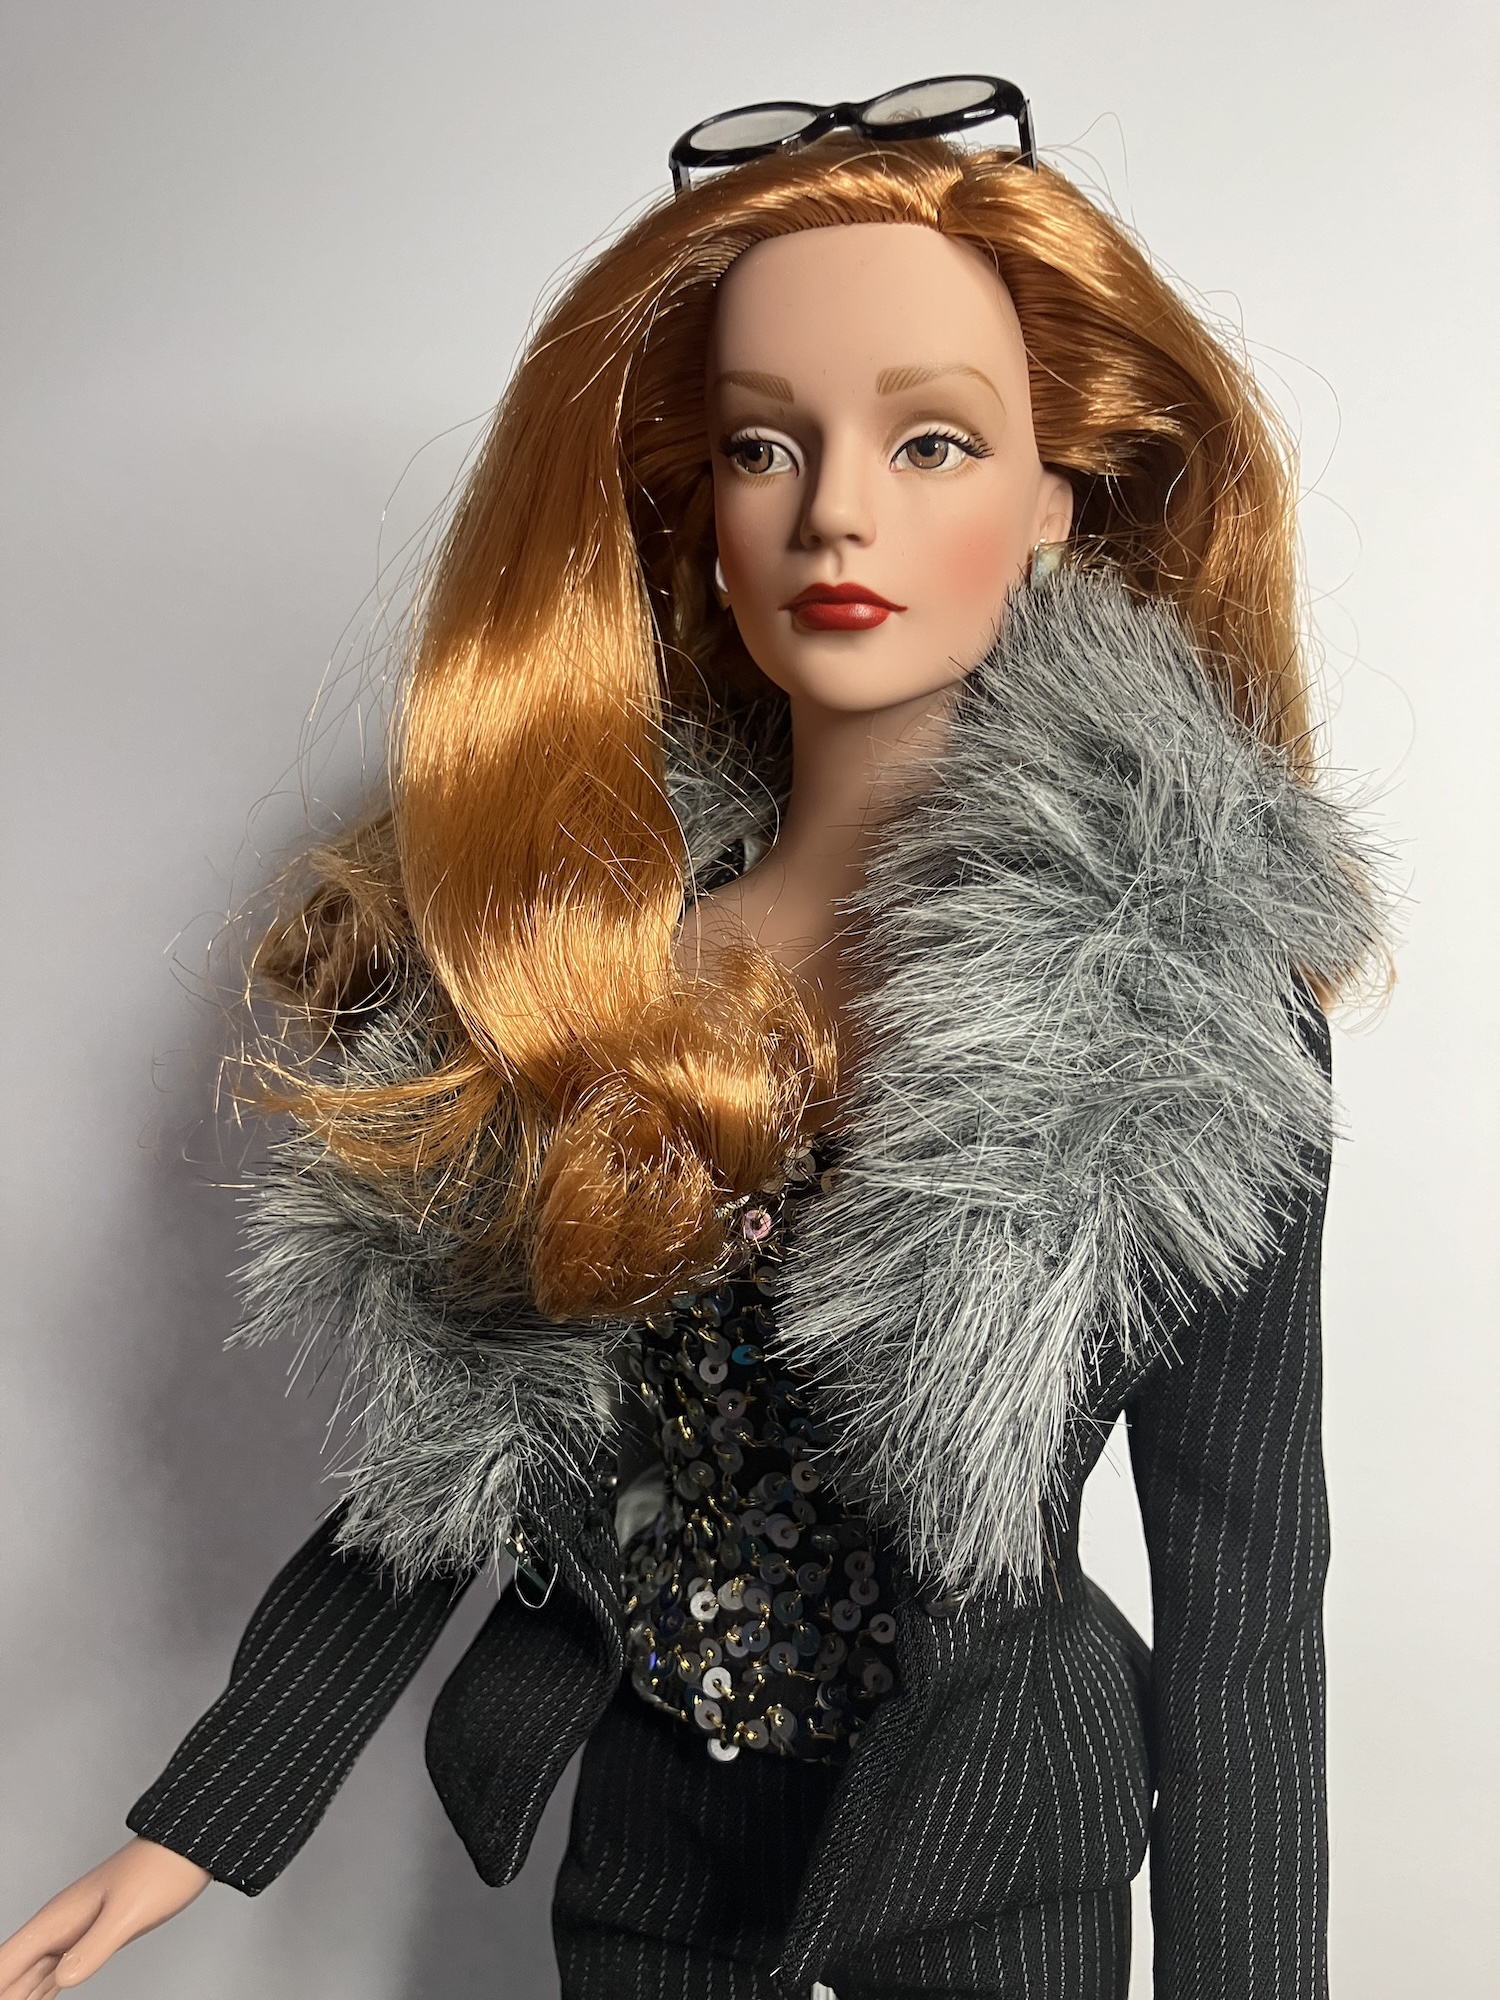
First up, that doll. She’s Tonner’s Sydney Chase Mover & Shaker from 2003.
She is just soooooo pretty.
At left is the official image of her. Even though it’s small, you can see that her lips are pale. IRL, this doll has red lipstick.
In one of the doll forums, a long-time collector explained that the make-up choices were transposed in production between two Sydney Chase dolls being made at the same time. Sheer Glamour (above right in her official image) was supposed to have the red lipstick: instead the actual doll has the paler make-up.
Here’s my girl. I love that red lipstick so much. It’s hard to imagine her with a paler choice.
Some of these older dolls get marks on their bodies from the clothes, particularly if they have been left in their boxes for over 20 years. Mover & Shaker is one said to get those marks – thanks to the black suit – but I bought a NRFB one all the same. She does have some marks on her shoulders, so I’ll have to look into removing them when I change her clothes. For the moment, though, we’re both happy that she’s here, just the way she is.
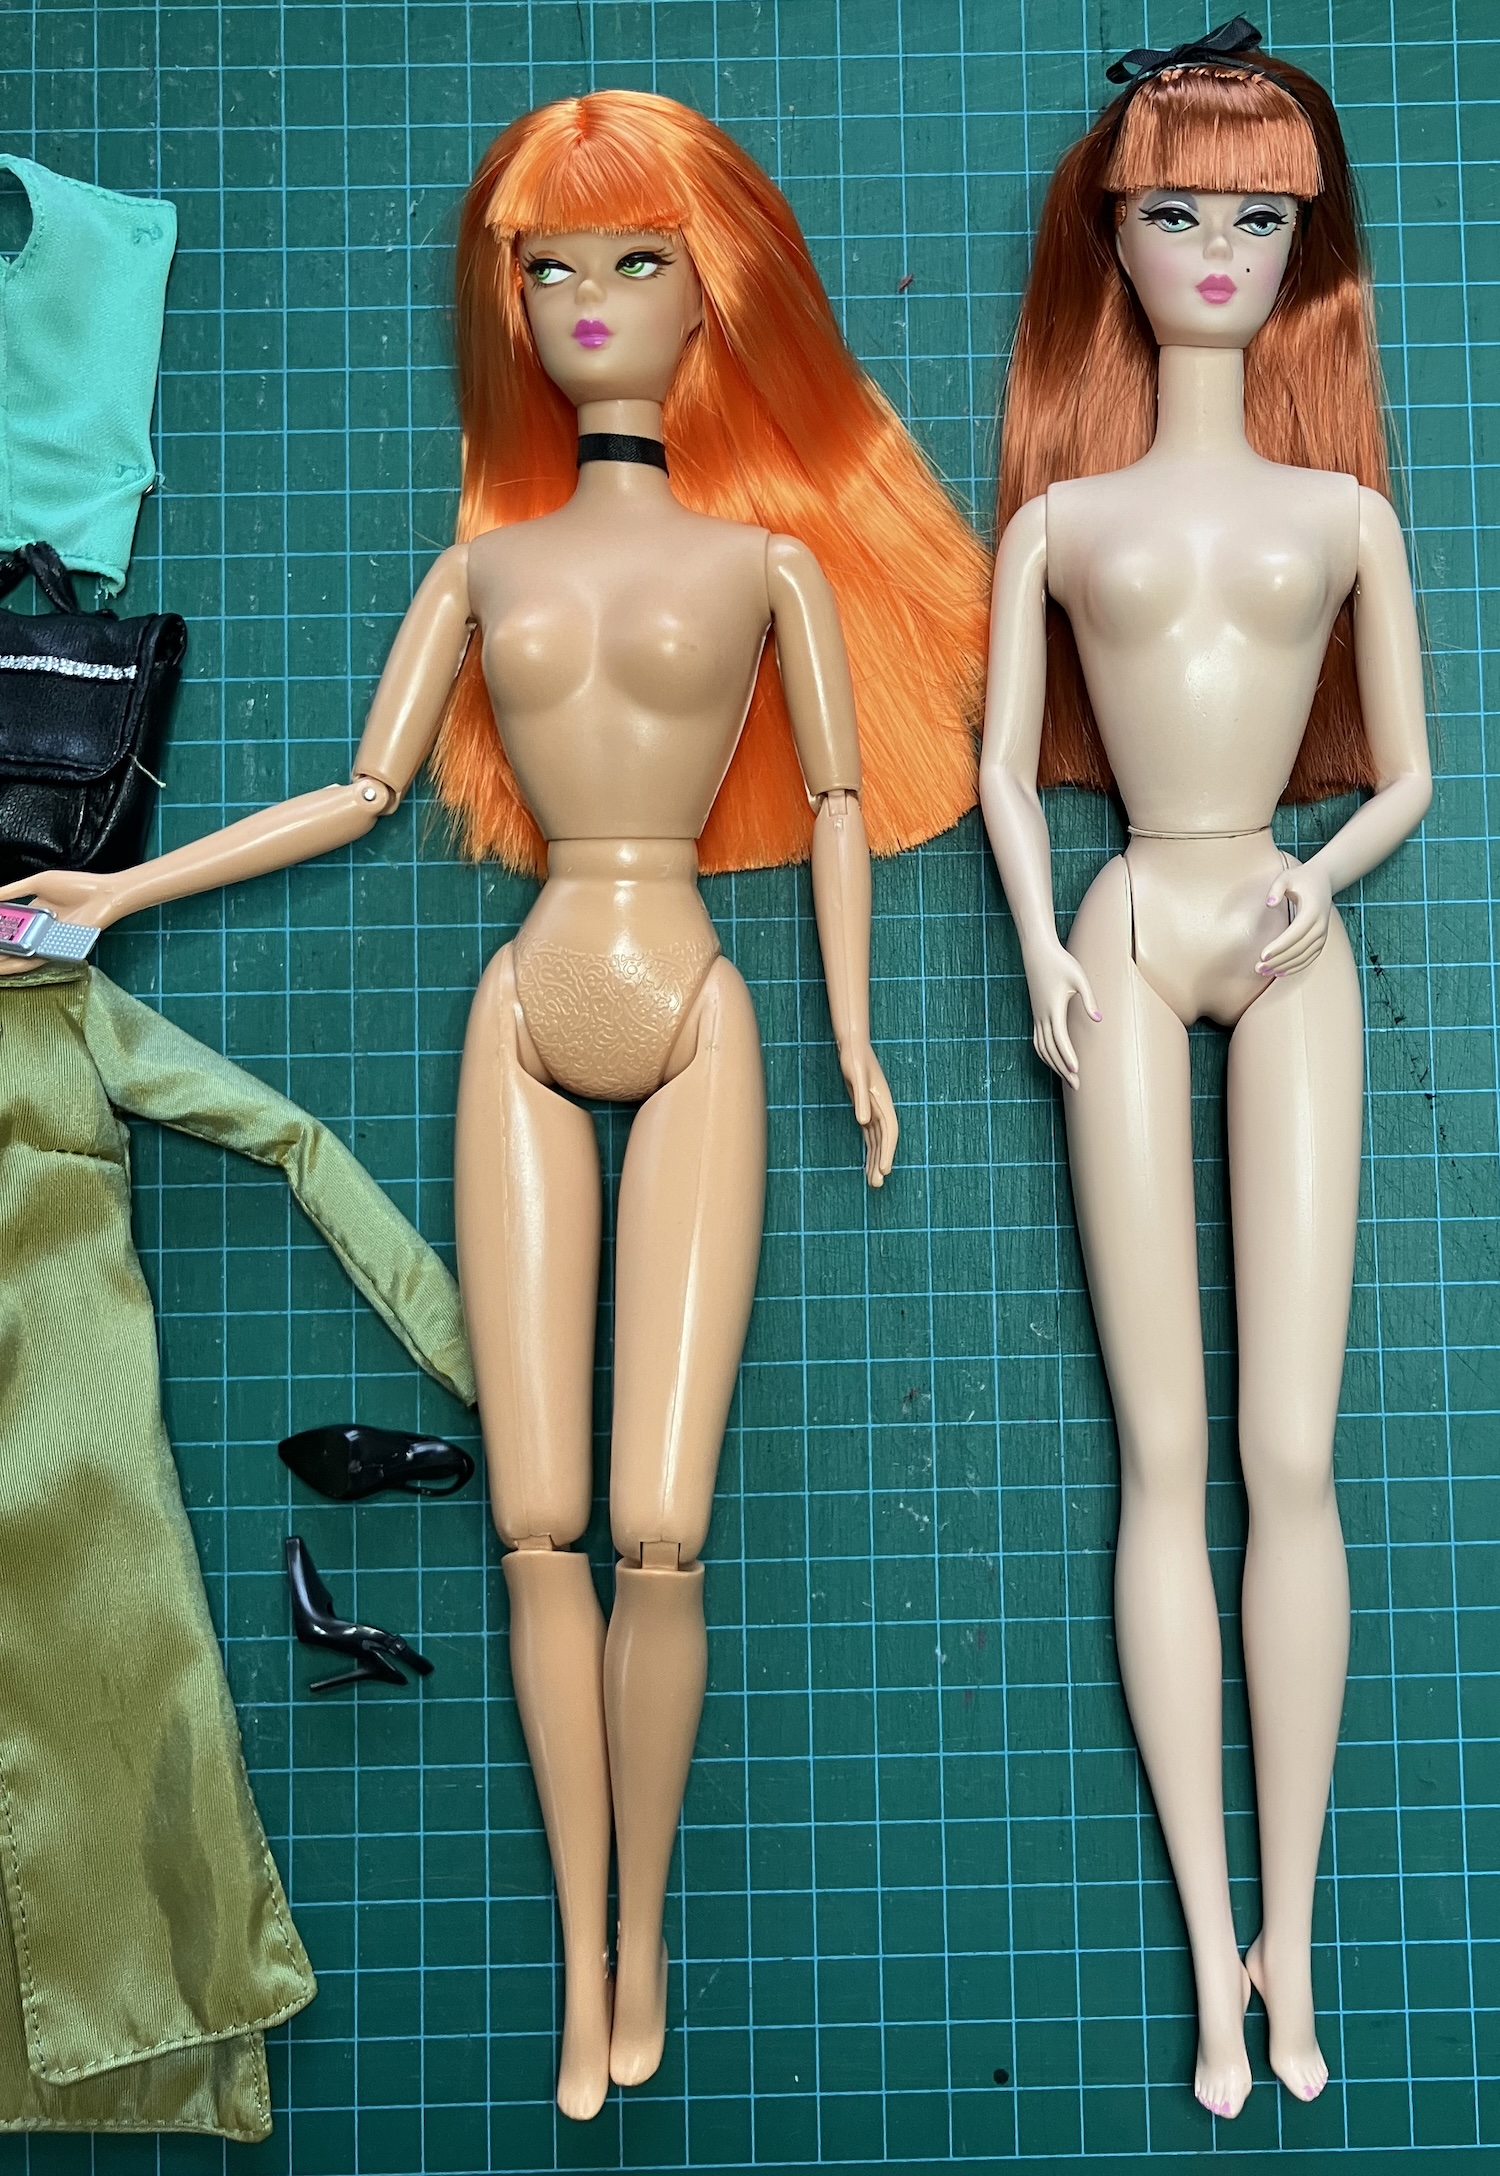
I also finally identified a Barbie doll that I’ve seen in the past and liked a lot. It’s tough to hunt down a doll if you don’t know the name or serial number, but the universe moved for me and I found both her name and a NRFB doll at a good price. She’s 1 Modern Circle Barbie and that’s her official pic at right.
I just love the orange hue of her hair. It’s lovely and silky, too.
She’s from 2003 – clearly a year I should have been buying dolls! – and is almost the twin of Silkstone Lingerie #6, also from 2003. Here they are together.
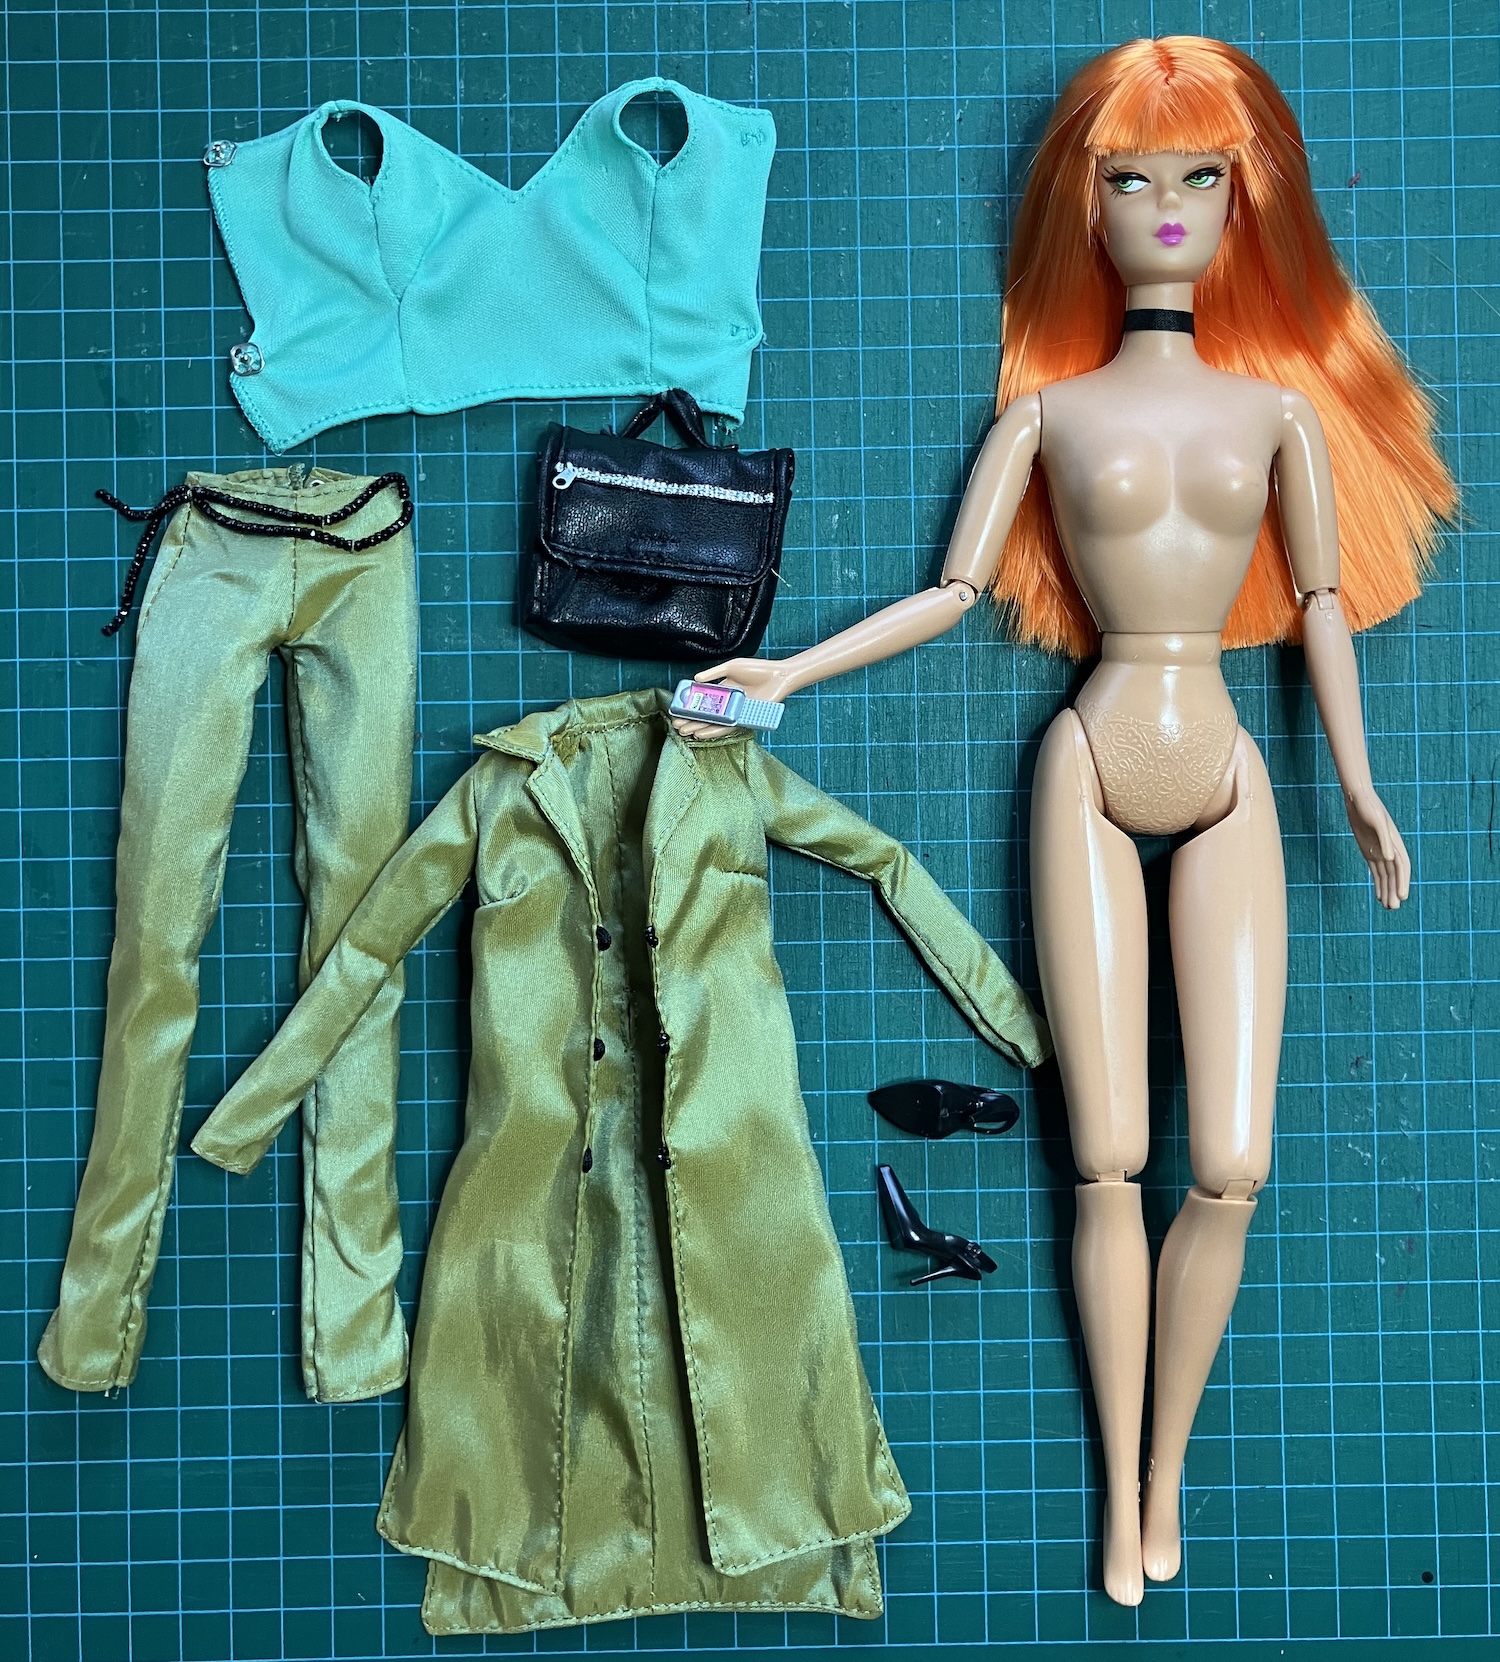
This new girl has a different body sculpt than I’ve seen before. She’s articulated, but the pins in the elbows are visible with this sculpt. Also, her hands are very flat – but she can hold her phone, thanks to a knob on the back of the phone and a hole in her hand. The flip-phone is a lot like the one we used to have, and that makes me smile. Here she is unpacked:
She has a laptop, too, but I’d put it inside the briefcase before taking this pic. It’s a great thick one, similar to a Compaq monster that the mister used to sling around before laptops got thinner, lighter and cheaper.
One thing about buying dolls is that there are little tips and tricks to be learned from their garments – for example, the “zipper” on her briefcase is a line of silver trim with a teeny tiny tab sewn at the end. Ha. I like that the older dolls don’t have velcro fastening on their clothes, but that turquoise top could use a third snap.
She came, strangely enough, with two left shoes instead of one left and one right. I have a lot of those black slingbacks – I bought a bag of 50 pair once upon a time – so I can make it right.
As is so often the case with Mattel dolls, I like the style of her clothes but am less fond of the fabrics they’re made from. I’m going to start on my plan of replicating the girls’ clothes in fabrics I do like, and reproducing this long coat will be my first project.
This girl also will be my first hip repair. Her legs are so loose that she can’t stand up, but there’s nothing fancy about the joint – it’s just a piece of 1/4″ black elastic holding her legs in place. It’s sewn into a loop at each end, which is looped around the eyelet in the hip. I can (and will) easily replace that. I won’t be able to sew both ends, but one knot should be fine.
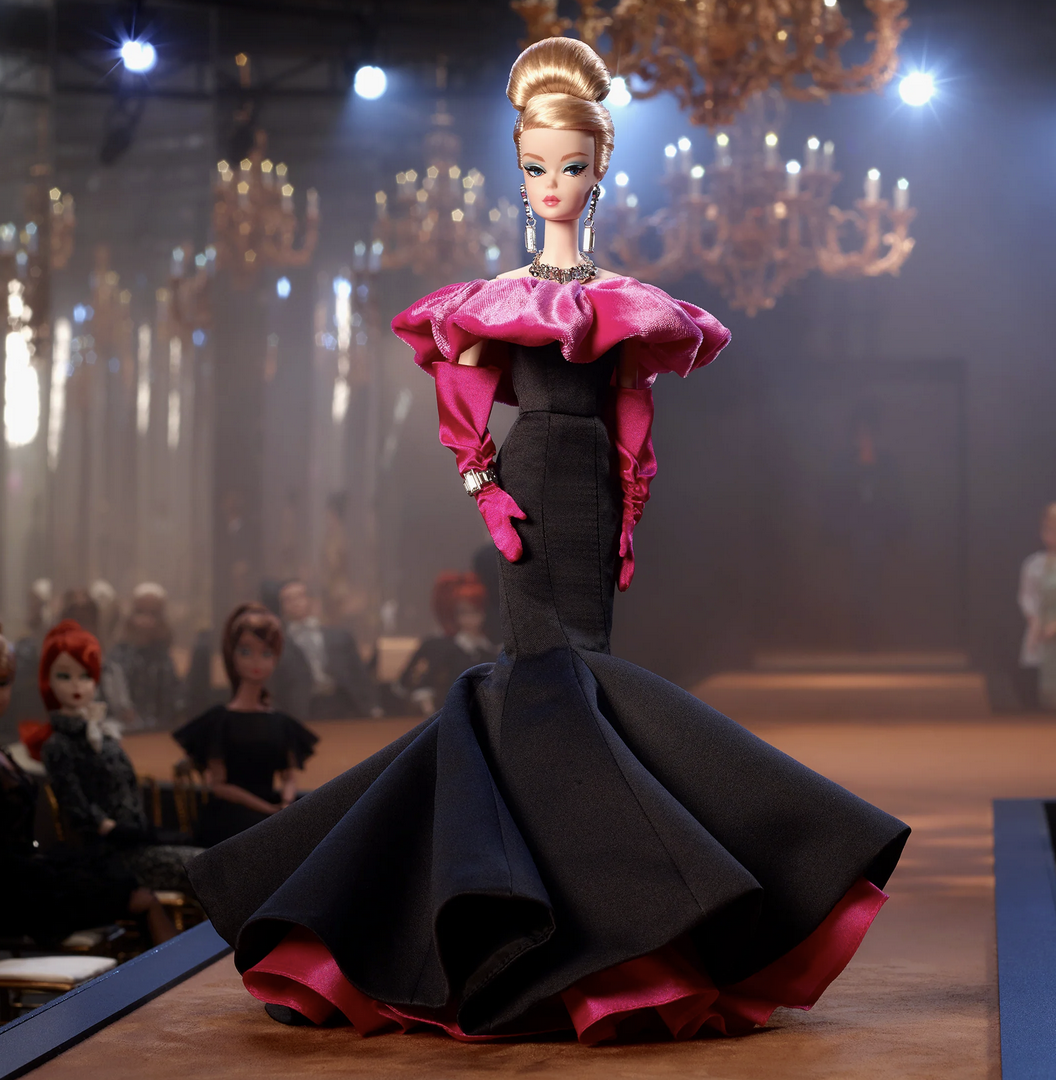
The third girl on her way who arrived last week is the second BFMC Silkstone from last year, the blonde. I thought she was too expensive at the time – actually, it was the conversion to $CAD that I didn’t find compelling – but Mattel put her on sale this past month for 30% off, so I indulged. They also released the third BFMC Silkstone but I chose this one instead.
I was quite impressed with this girl when I unpacked her – the dress is quite lovely and more full than expected. The pink underskirt is actually a separate ruffled slip, and the pink velvet stole is attached to the dress. Of course, I undressed her and took down her hair, which was crunchy with some fixative. (I’ll wash it out.) I still have to decide what to do about her necklace. It doesn’t have a clasp – I’ll have to open a link to take it off, then it probably won’t go back on easily. Hmm. I’ll have a rummage in my jewelry findings and see if I have a clasp that can be put to work.
I had originally thought that she would be very similar to Best in Black, the other blonde articulated Silkstone in my collection, but she has a much paler skin tone and her make-up is very different. She’s quite elegant and I’m glad I got her.
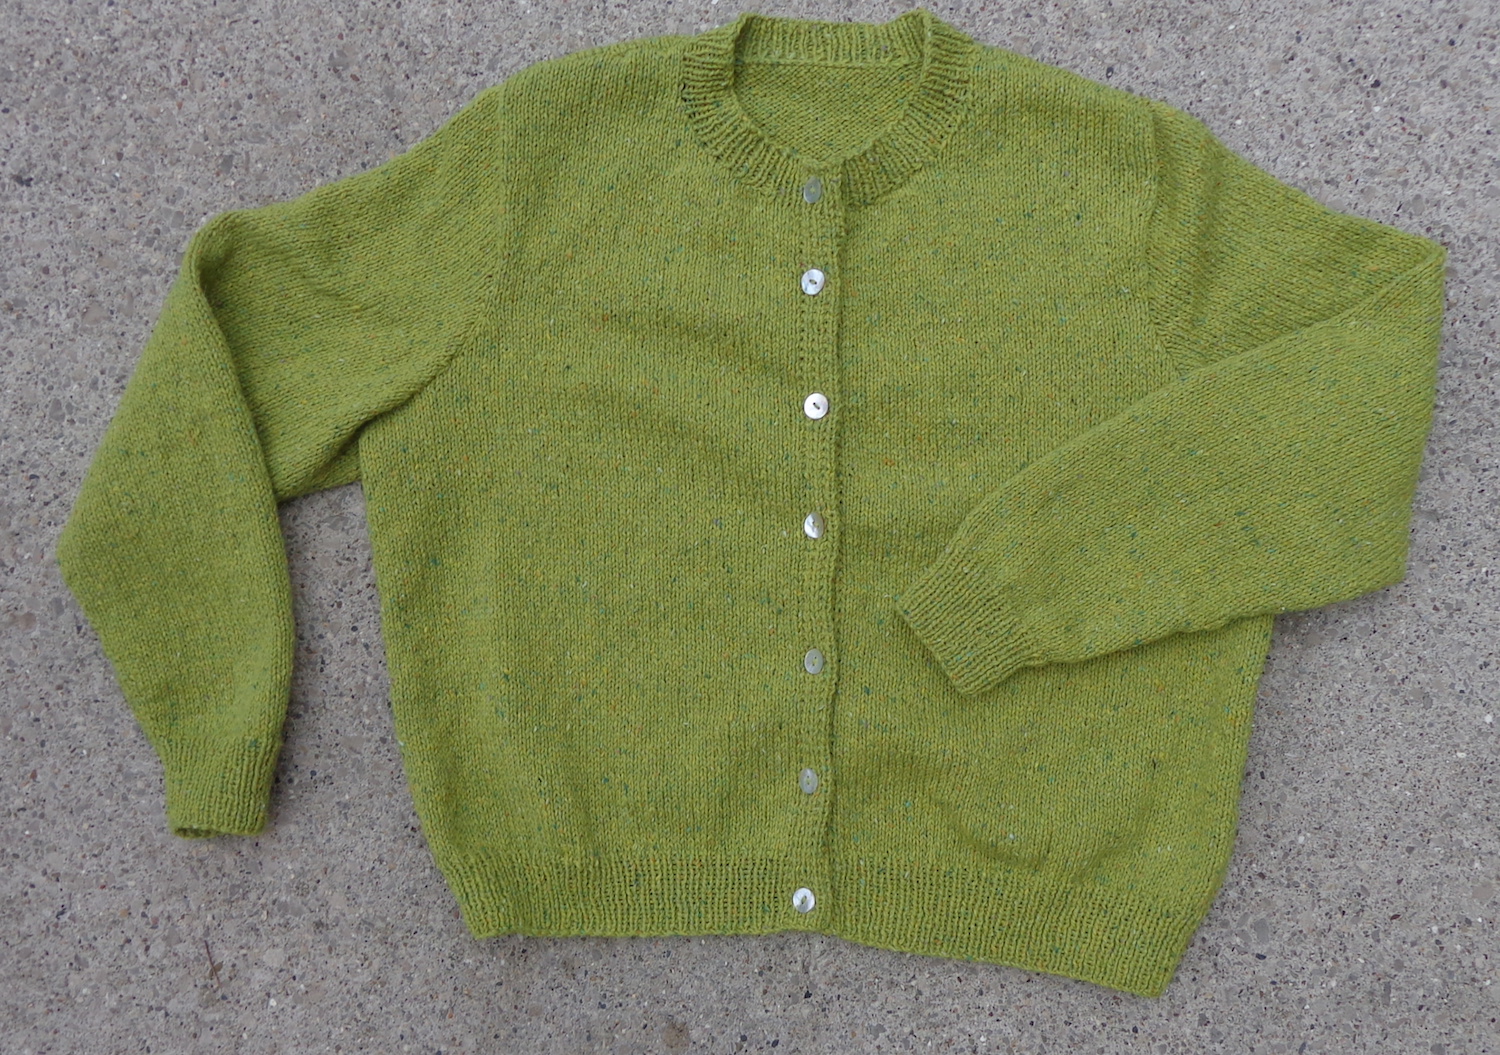
The Quintessential Cardigan is a jewel-necked long-sleeved cardigan that is just a wardrobe staple. I bought it as a kit in two colourways, green and purple, with a tweedy yarn. Here’s the green one, which I finished almost a year ago:
I cast on the purple after finishing the Which Way Shawl. This time, I decided to knit the button bands in moss stitch instead of ribbing. I’ll also add a few more stitches to the cuffs to make the wrist a little wider. The sleeves on the green one fit, but I often push up my sleeves and that’s a big snug with wrists like this. I like how the tweed is knitting up.
This style of cardigan is one I wear a lot, so I also got out two others of a similar shape to compare the fit. On the left is one of my Hebrides cardigans, knit in Rowan Kidsilk Haze. This is my favourite cardigan – light, warm, pretty and a perfect fit. The hems and button bands are in moss stitch on this one. On the right is my Lunenberg cardigan, knit in Koigu KPPPM. This one is a little wide in the shoulders and the sleeves are a bit long, but that’s okay since I push them up. I also wear this one a lot. The hems and button bands are in garter stitch on this one.
Comparing them all, I decided to make the body of the Quintessential cardigan slimmer as well as longer, turning it to more of box shape. I did lengthen the pattern last time by 2″ but still had yarn leftover, so it can be even longer than that (esp if it’s narrower). The moss stitch hems will help with that change of shape, too.
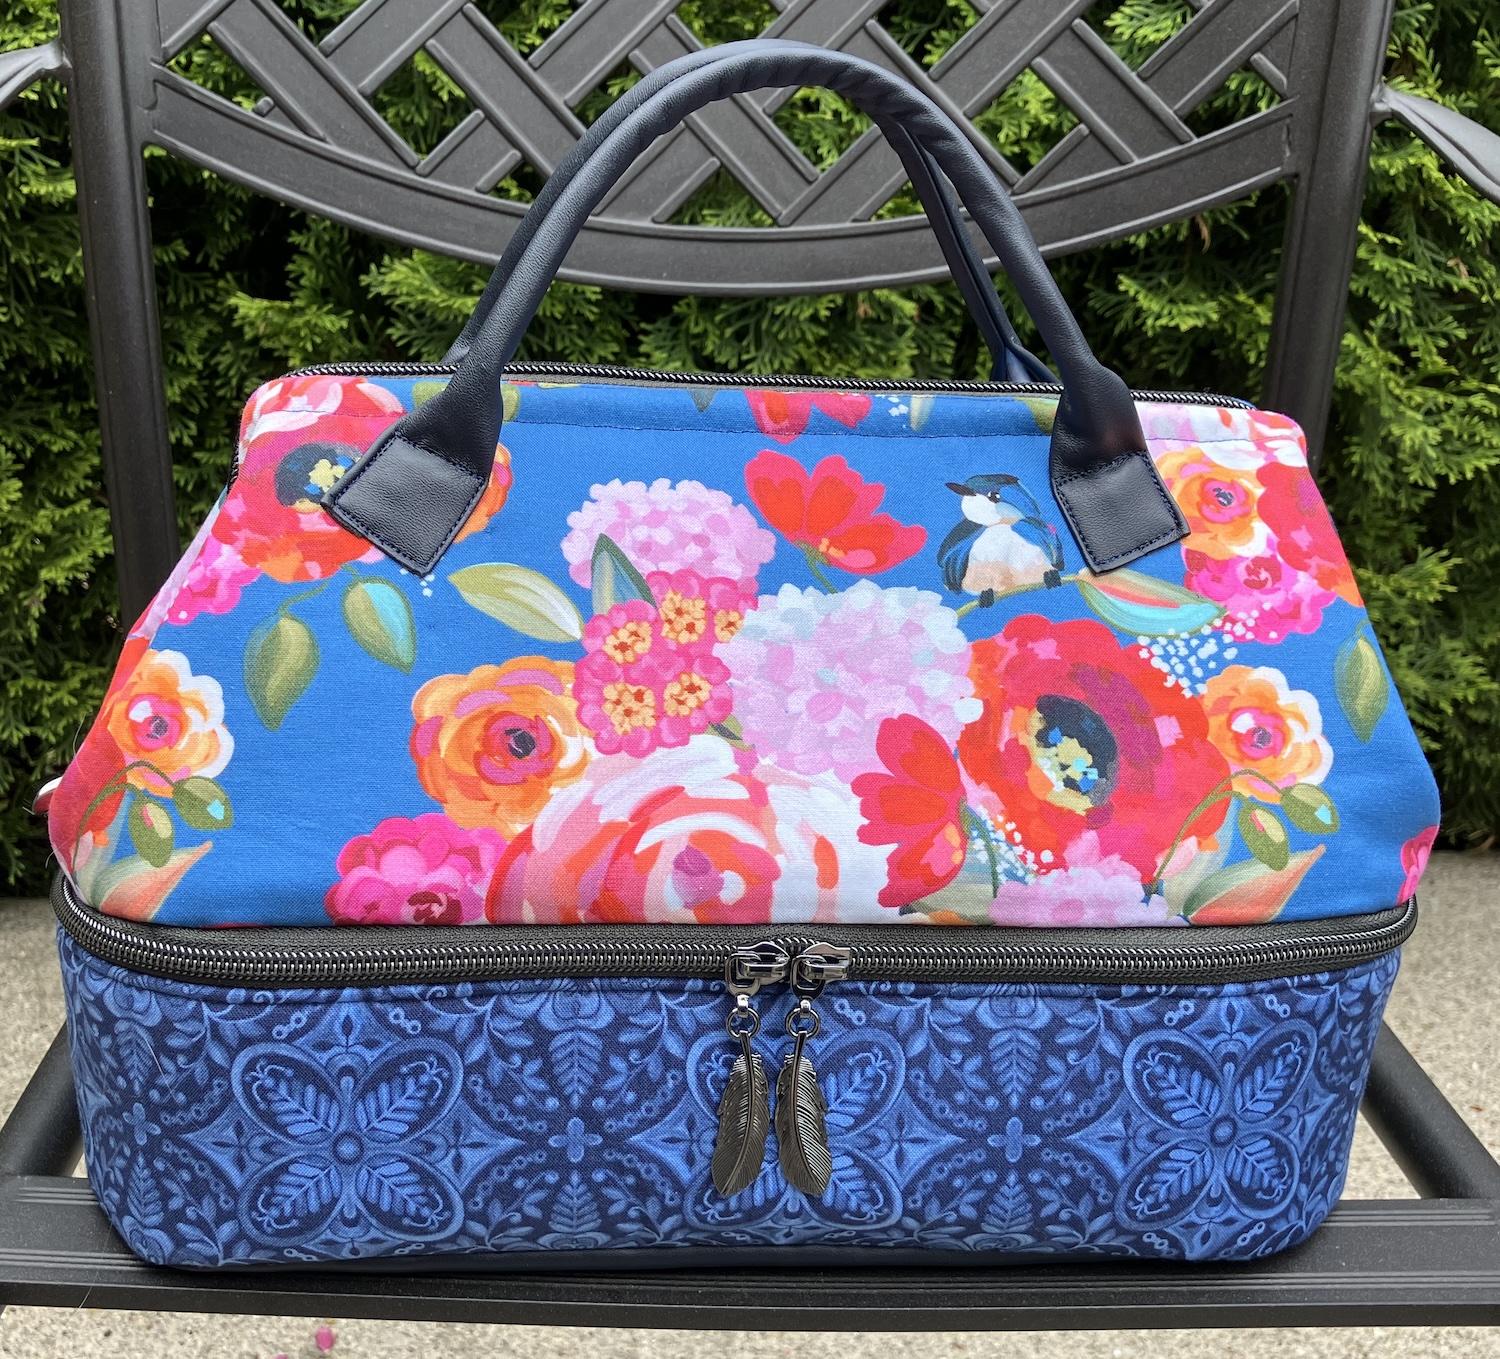
This was a satisfying project. The Tumbleweed Toiletry Bag is a beautiful bag filled with lovely little details. I first saw it when the owner of Blue Calla Patterns did a presentation to our sewing guild, and knew I had to make one. Here’s the page on their site where you can buy the downloadable pattern. The pic at right is from from their site, also linked to that page.
I was hoping for a kit, like the one I bought from Blue Calla for the Foxtail Cross Body Sling, but there wasn’t one available. There was a kit for the hardware, which are always the toughest bits to find IMO. (It lives at that link, but availability of all the various options does vary.) They did have a sale running at the time, so I chose fabric and zippers etc., and essentially built my own kit. I did have to buy the fusible foam from my local fabric store as they were out of stock of that.
And here’s my finished bag:
I love these fabrics and the little bird in the floral print. The construction was remarkably easy, once I stopped overthinking it and trying to figure out how it would all come together. I just needed to follow the instructions and let it happen.
I made only two changes. First, I used a fake leather for the base and the handles, instead of fabric or cork. Secondly, I inserted a piece of 1/4″ cord into the handles to make them round. In the pattern, they’re just flat.
I love this bag so much!
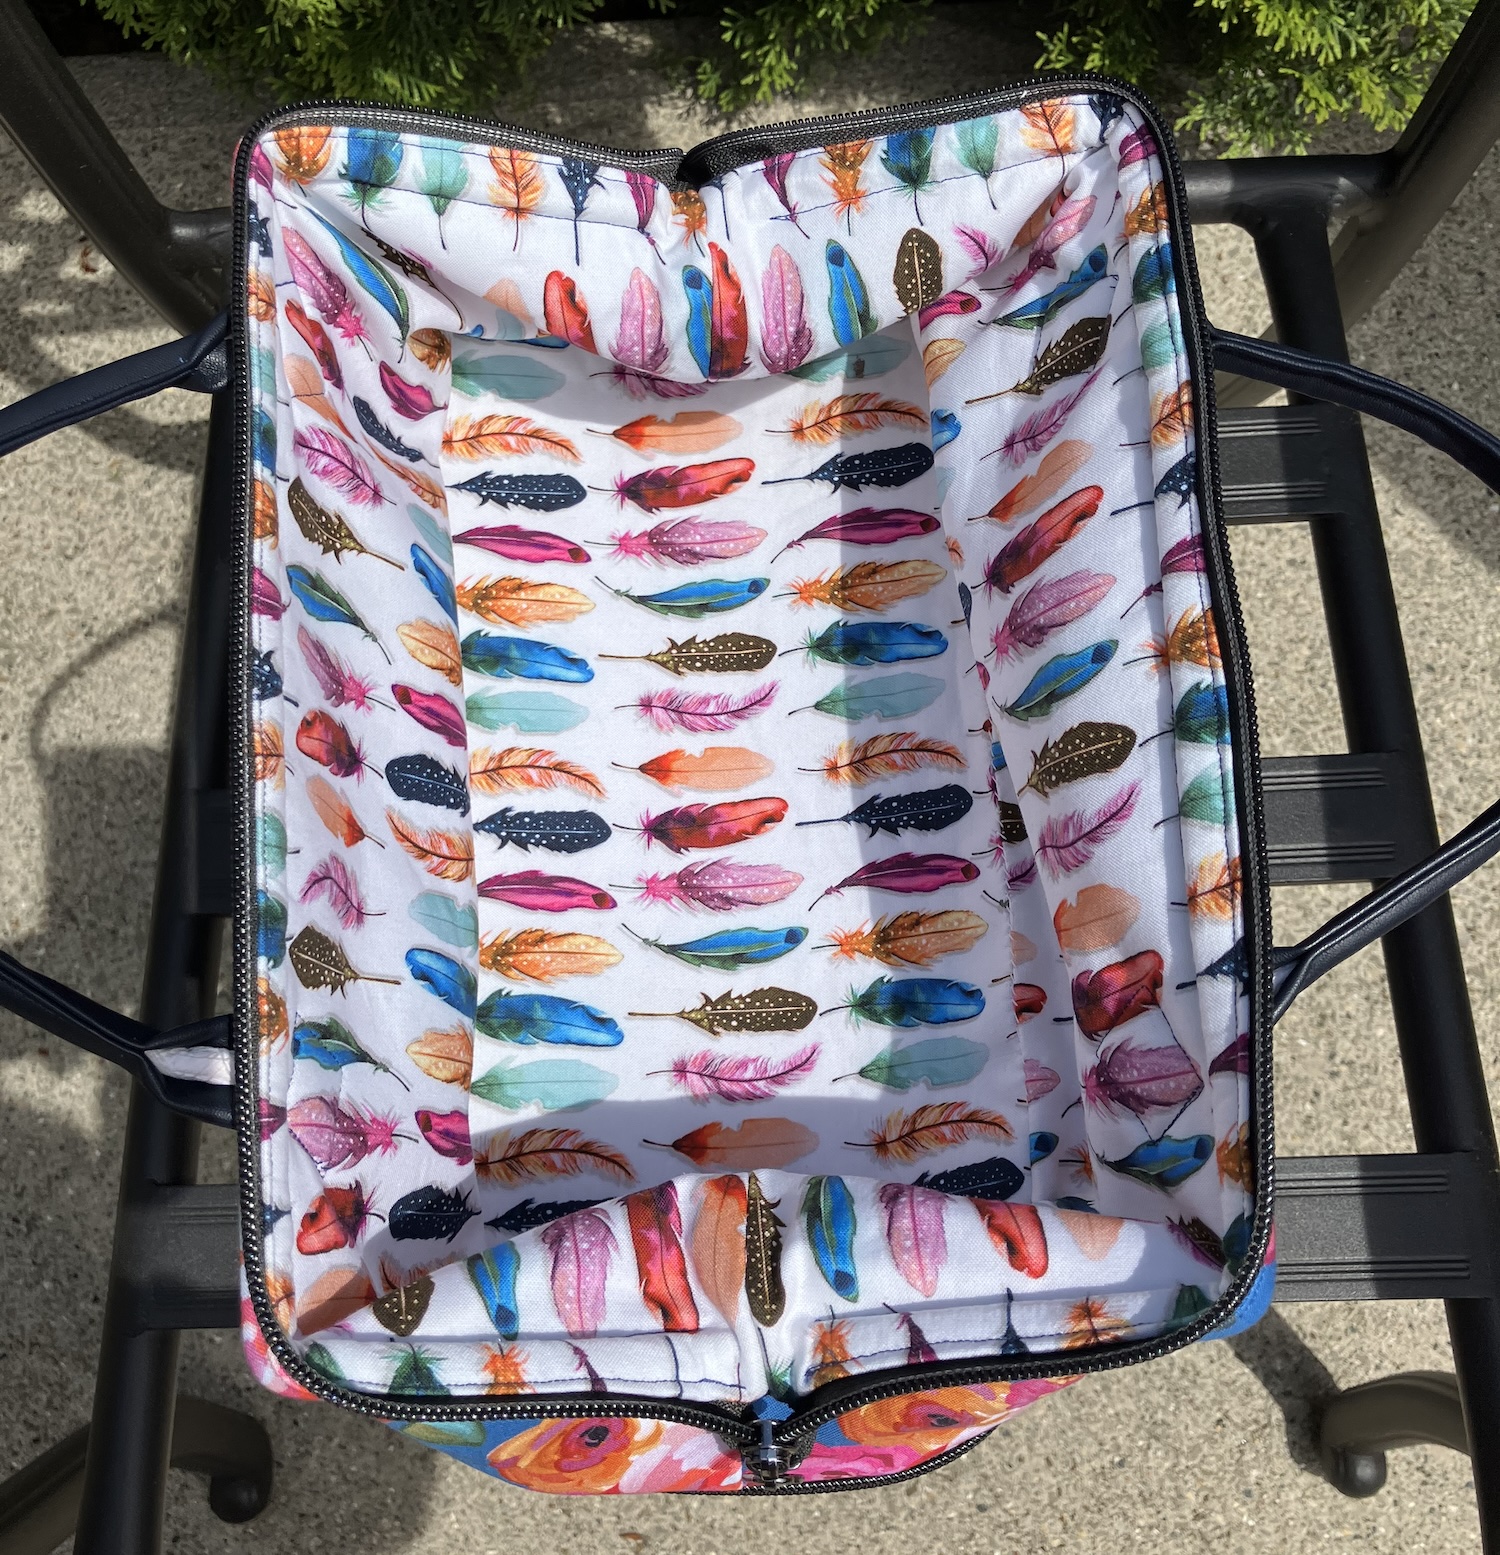
Here’s the inside of the bottom section. It has a zippered mesh pocket, which is on the bottom of the top section.
And here’s a peek inside the top section:
I picked the feather zipper tabs to coordinate with the lining fabric.
I had some trouble sewing the thicker areas with my domestic machine. For example, the stitching line around the top to hold the frame should meet below the hinge, but with those seam allowances, I couldn’t manage it. I left a gap and it’s fine. Similarly, I couldn’t do the topstitching on the top side of the lower zipper, for the same reason.
When I make it again, I’ll add some more topstitching – around the base, for example, and on the top side of that zipper, as well as in the base of the lining – just to manage the seam allowances better. I have a crazy amount of materials left over, so there will be more bags in these fabrics, as well as at least one in this design.
I’m not planning a trip so don’t really need a toiletry bag. I’m thinking I’ll use it as a knitting project bag – the yarn supply can go in the bottom, the needles and notions in that zippered pocket, then the project on the needles in the top section.
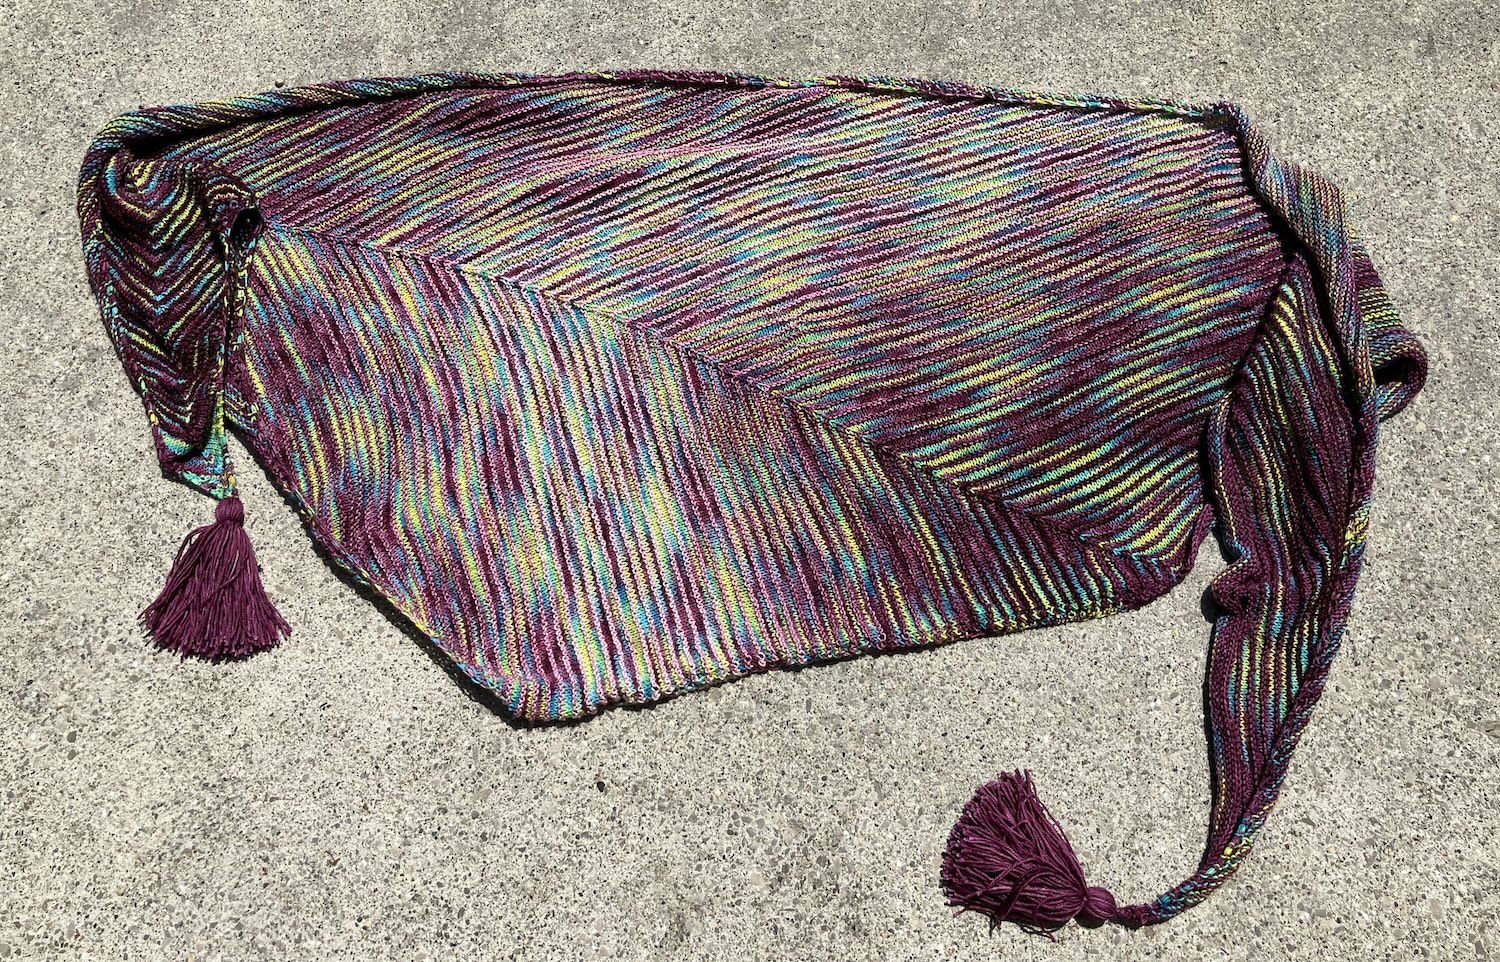
Do I love this shawl? Mmmmm, I dunno. The design is interesting – I’d probably go down a needle size if I ever made it again, though it is nice and squishy. That contrast colour is a different choice for me – while it’s a good idea to try new things, I think I would have loved the result more if I’d gone with my original impulse of using a navy or black for the main colour. Maybe it will be just the right bright thing on a winter’s day. I do like the colours better at the ends than in the middle.
The shape of the shawl is unusual, but it makes a manageable cowl when wrapped around the neck. I expect I’ll wear it that way when I do wear it. I added tassels to the points that I’ll probably tie together.
Now to choose another project. It would be best to finish up something already started. There’s a little summer cardigan that would be a good choice to finish right now, and I love the colour of it. It’s a Martin Storey pattern called Peridot, which I’ve been knitting in Patons Silk Bamboo for half of forever. (Lots and lots of stockinette stitch.) That’s a Ravelry link, btw. Also my chunky No. 9 pullover in Blackstone Tweed still needs sleeves – funny that it’s almost the same shade of blue as the little cardigan. More blue on the needles with my Water shawl that needs finishing. That’s a blog post link. And of course, there’s my Wild Grass pullover which is at the point of needing acres of stockinette knit.
While considering all of these options, I cast on the purple version of the Quintessential cardigan. I’d bought two kits, one in green and one in purple, so will knit the second one with a few changes. It also requires miles of stockinette, but it’s purple and I need a purple cardigan. 🙂
Last fall, I ordered a doll from AliXpress who I ended up calling Natasha. She has (kind of) a Silkstone Barbie head sculpt and an articulated body similar to the Integrity Toys Fashion Royalty dolls.
Recently, I noticed there were new dolls there, so (yes) I ordered one. Here’s a landing page, although there are plenty of vendors selling these dolls. This is FR-25. She has her left hand raised in all the product pix.
The box is optional – I ordered it, to protect the doll in shipping, and it came dented but the doll was fine. There’s no stand with the doll. She was a little cheaper than Natasha, costing me just over $30 CAD including shipping etc.
Natasha came with a pair of black slingbacks, but not this girl.
And here she is, wearing the mauve silk suit I made for the girls last year – even though it doesn’t fit her very well – and catching some rays after her long flight. She’s so tall that the sleeves on all the items for B are short, and these girls are actually a little wider in the hip than either of the B sculpts that I sew for. That dress is a big snug.
She is staring off at the sky (watching contrails, maybe) because her head doesn’t tip down any further. I had to ease something so it *popped* to be able to bend her knees, which was a bit daunting but worked out fine in the end. Her feet are too big for most B shoes, but she fits FR shoes.
Her hair is nice, similar to Natasha’s, very soft but could be a little more thickly rooted. Her nails are shorter than Natasha’s, which is a good thing IMO, and her skintone is more lifelike. I think she’s a good value for the price.
Her face does remind me a little of Linda Evangelista, so I’ll call her Evangeline.
I’m going to have to make clothes for these two, since they can’t borrow from the other girls…
My friend sent me this book at Christmas, full of pretty sock patterns. I don’t usually make pretty socks – I stick to my tried and true, usually in a self-striping yarn – but the socks on the cover are so pretty (and knee socks!) that I had to cast on a pair. I was due for a little fair isle project.
It’s curious that I find knee socks so irresistible – I never wear the ones I’ve knitted, but I do love them.
The book is called Knitted Socks from Finland, and it’s by Niina Laitinen. (The title and image are both linked to the book’s page on the publisher website, which displays buy links too. A lot of smaller stores appear to have the book in stock, so there are plenty of places to buy a copy other than the big river.) The pattern for the socks on the cover is called Dear Sister, and the book includes complete charts. I had a peek on Ravelry before casting on, and could only find the book in the original Finnish: the pattern is called Siskoni Mun. (Those are both Ravelry links.)
It’s always fun to scroll through the completed projects there and look at yarn choices – some Ravellers had knitted the socks in Knit Picks ChromaFingering, a single ply fingering weight that is available in both solid colours and gradients. (That link will take you to KP’s product page.) I have some Chroma in my stash, but wouldn’t have thought of using it for socks – it’s very soft, partly because of the loose way it’s spun, and even though it has 30% nylon, I wouldn’t expect it to be tough enough for socks. But, I love the gradient look and I had the yarn, so I cast on. I used my trusty pair of short circular needles in 2.5mm, which usually have a sock on them.
I also loved the projects that had used a different background colour than the off-white shown in the pattern picture – why not have dramatic socks? I’m using the solid black for the background and a gradient – the colourway is Lupin – as the contrast. Making a change like this always bends my brain a bit when it comes to the charts. I’m knitting the white squares in black so have to think about that for a minute each time I pick up the project again. I have used some patterns (mittens, mostly) that offered the charts both ways around, which was just great. They were digital downloads, though. In a printed book, that would take up too many pages.
Here’s my progress on the first one. I didn’t do a twisted rib because I’m not a fan – my socks have just plain ribbing at the top.
This is the first chart completed, about a dozen rows of ribbing and fifty-some of pattern. There’s another chart of another 40 rows or so before the beginning of the heel. I’m not sure they will actually be knee socks. They might be mid-calf socks, which is fine, too. We’ll see. Part of that will be due to the yarn substitution, but another variable is legs. 🙂 You can see the model has slender calves. My hiking/biking calves are not that slim, so the sock will be stretched wider rather than taller.
It’s not a difficult knit, but not a TV knit either. Each row is different and there are deceases down the center back of the sock. I have to pay attention a bit. Although I always worry that stranded knitting in socks will get too tight, I think my tension is in a good place on this project. I’m not one of those fast fair isle knitters with one colour in each hand. I put down each yarn and pick up the next one, which does give me a chance to check my tension. It means for slow progress, but it’s meditative. Watching the butterflies form and the colour change keeps me knitting just one more row.
This project also had me reaching into my knitting library for a book filled with wonderful fair isle sweaters – The Tudor Roses by Alice Starmore. I have the hardcover edition from Calla Editions and it’s such a lovely book. I’m tempted to order up the yarn and cast on the Mary Tudor cardigan (that’s a Ravelry link) but need to finish up some other projects first. I have two fair isle cardigans already on the needles, waiting on me. (There were changes to the sweaters between editions. In the first edition, the Mary Tudor sweater was a pullover. That’s a Rav link again.)
The Chroma yarn is very soft (and a bit splitty, as loosely spun single ply yarns tend to be.) These will be lounging socks, not hiking socks. And yes, I’m hoping to make them match because that’s just how I roll. It looks as if there are two repeats of the colour gradation in the ball, so fingers crossed.
Onward. They are a bit addictive once you find a bright spot to work…
I have been making progress on the Which Way shawl. I first told you about it in this post than updated you in this post. This is a whole lot of knitting.
Today’s milestone is that I’ve run out of yarn. Both bundles of gradient-dyed yarn are used up and the shawl isn’t done. This is likely because I’ve somehow mucked up the decreases. I want the lower edge to be decreased to nothing before binding off, as I think it might look odd otherwise. This requires a lot more repeats than specified in the pattern.
I have a persistent feeling that I’ve made a mistake, so took the shawl off the needles to have a look.
Here we are. It’s a dingy day and raining too hard to take the shawl outside for a pic. Also, it’s huge, and I couldn’t get it all in the shot.
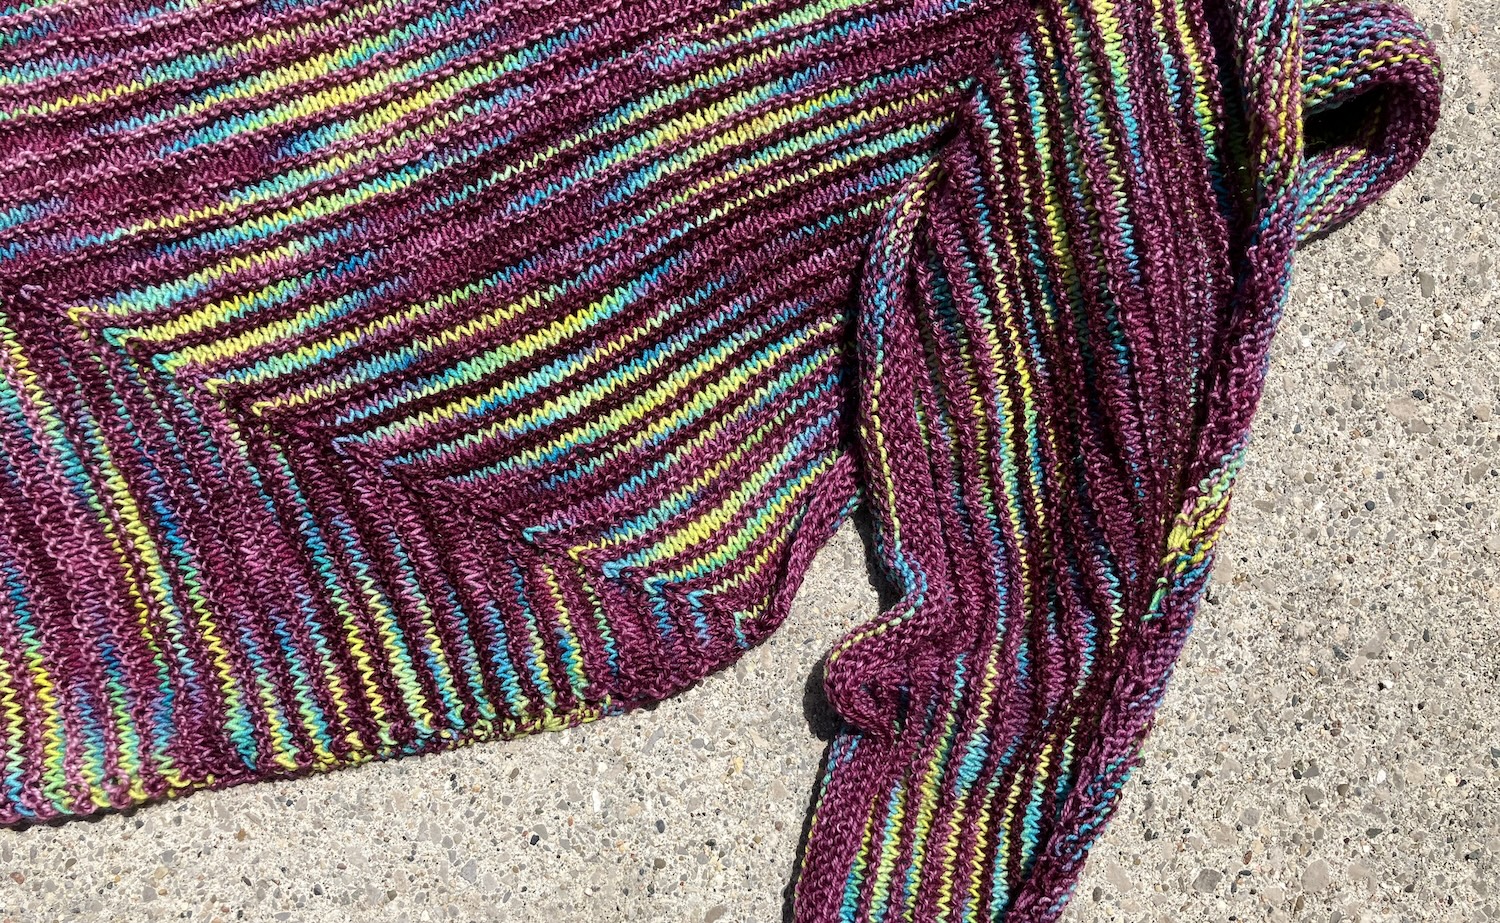
It’s that bottom wedge that I’m diminishing until it vanishes. At this point, there are 18 stitches there so I’ll need another 9 contrast stripes to finish that out. The pooling is from the main colour, which is hand-dyed, but it seems to have worked out pretty evenly. I don’t mind it. And I don’t mind the size of the shawl. I’m just wondering where I went wrong…
You can just barely see the orange marker in the middle when the decreases were started. The shawl from this point should (I think) be rectangular, and it looks like it will block out that way. I pulled that right tip out longer when I was laying out the shawl.
The pattern specifies 22 contrast stripe repeats after the decreases begin (where the orange marker is). I’m currently at 43. Following the directions, the decreases would have stopped around the point that the contrast yarn (the gradient) started to get darker. (Eyeball a halfway point between the orange marker and the live stitches at the right.) I think the shawl would have been too small then, and an odd shape. There are some finished project pictures on Ravelry that are shaped the way my shawl is now, which does nothing to explain the 21 contrast stripe difference.
Here’s the pattern on Ravelry again. It calls for 4 oz of the main colour, a sport weight yarn, (that’s 113g) and 5 oz of the gradient skeins (let’s call it 150g), knit on US 6 needles (4.0mm). My yarn is fingering weight so I used 3.75mm needles. (I could actually have gone down another size as it’s a loose garter stitch, but it is nice and drapey this way.) I had 144g of the gradients, and 2 skeins of the main colour for 220g total (732m). I’m into the second skein of the main colour and I guess it was predictable that I’d run out of the contrast.
Fortunately, I have another skein of sock yarn in a mulberry shade that is pretty close to the gradient colourways – probably more like the fifth shade than the sixth (maybe even the fourth. You can see it on the right.) I’ll go with it anyway. The fiber content is the same.
I’ll keep knitting and will show you better pix once it’s completed. I still have no clue what I did wrong, but the end result looks okay, so it will be what it will be.
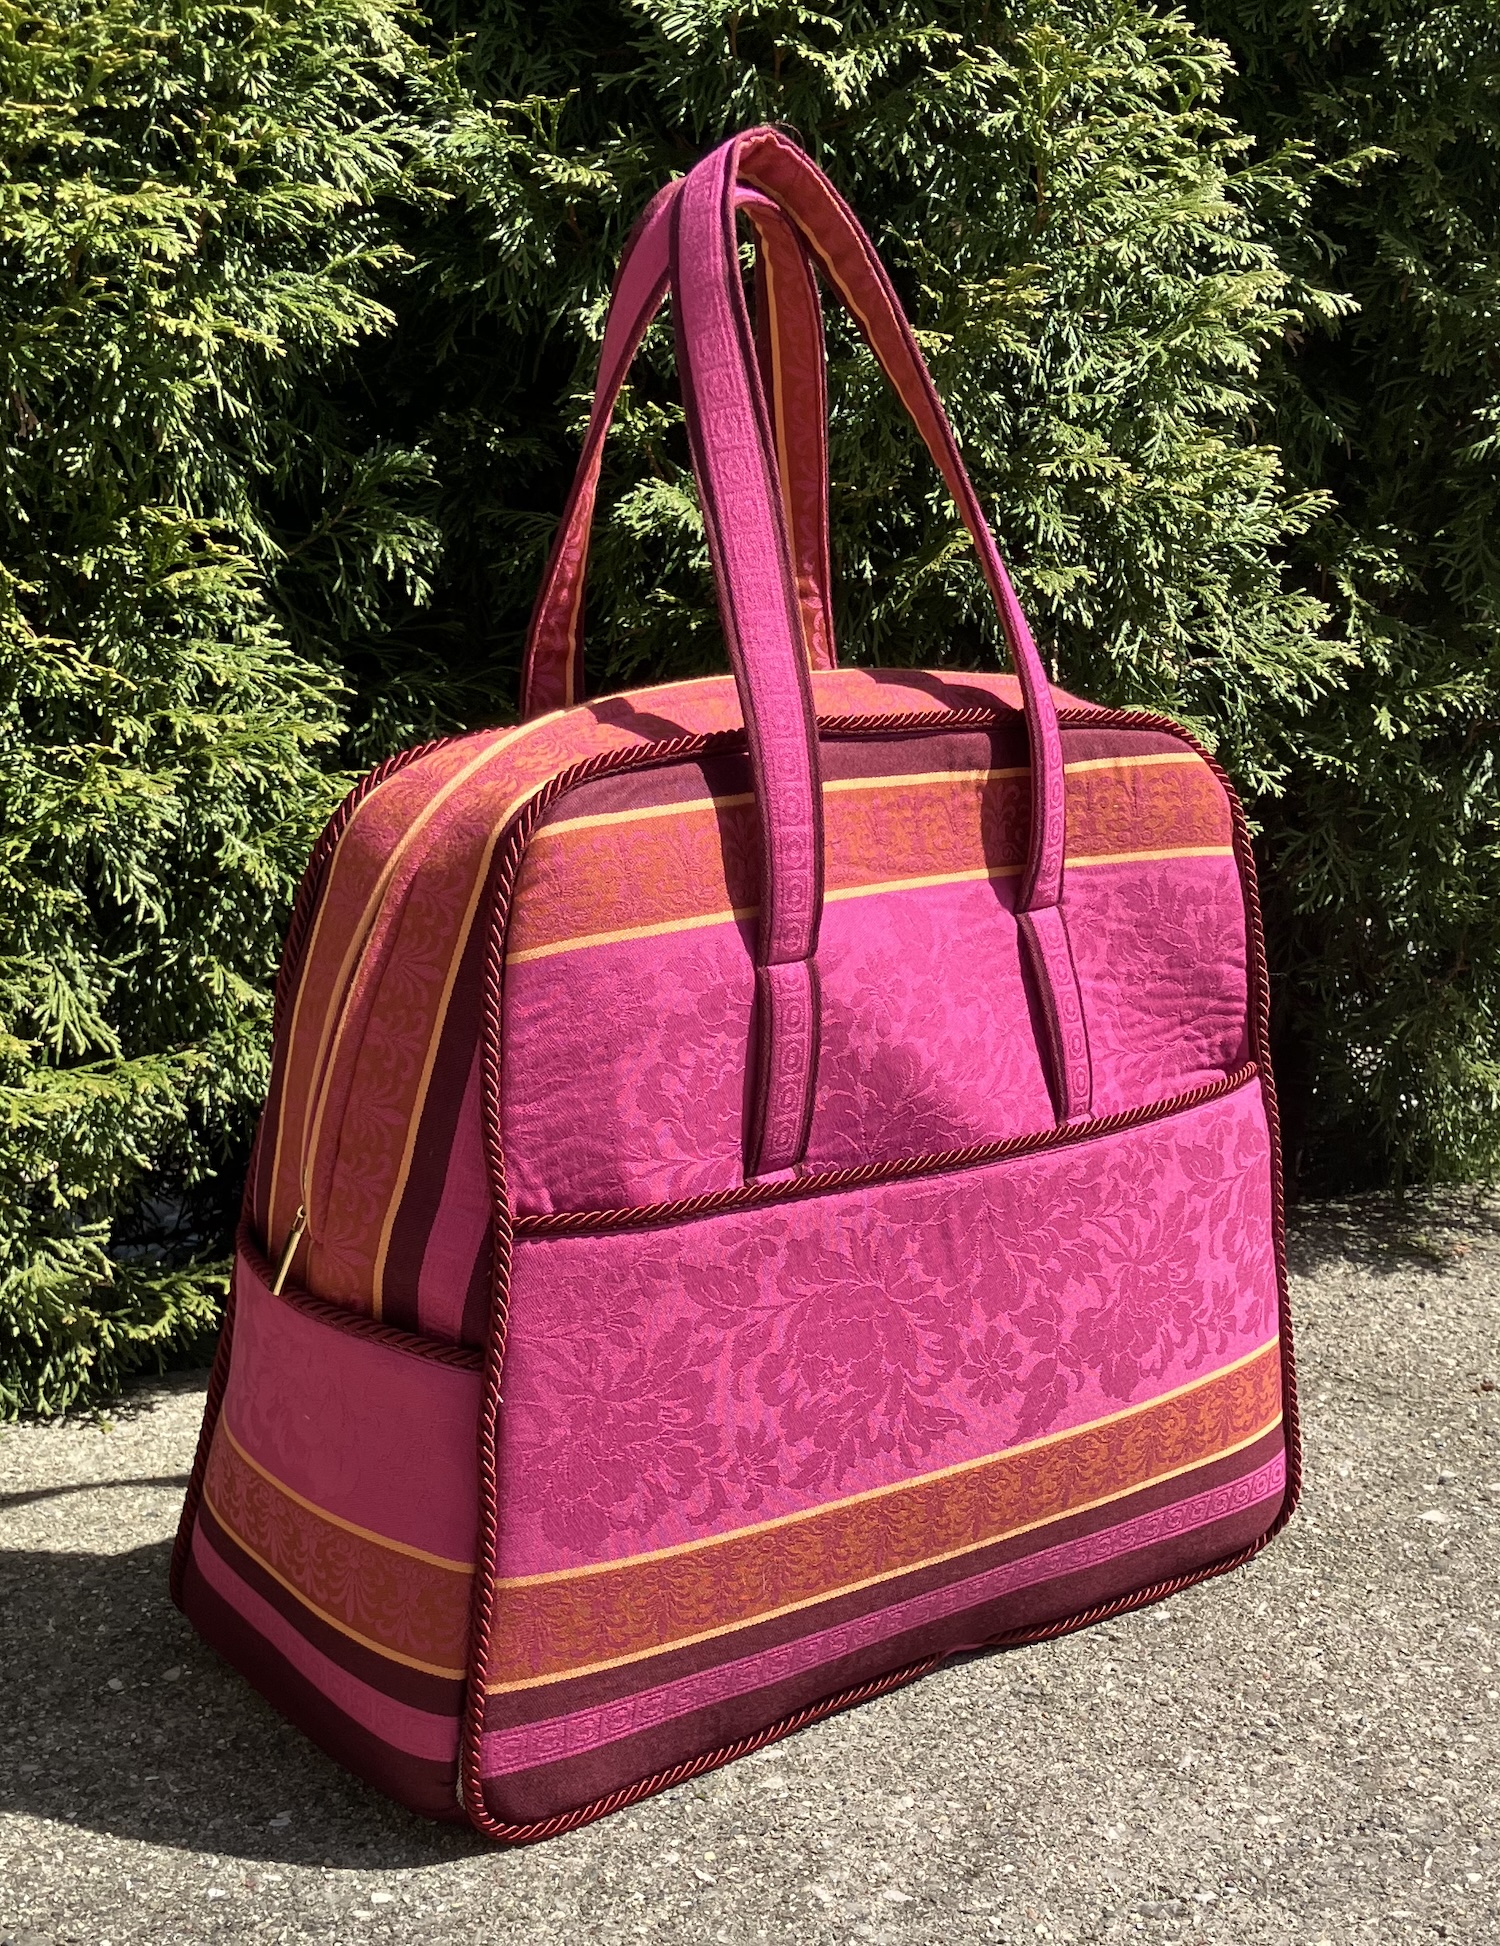
Finishing up that Foxtail Cross Body Sling had me digging into my unfinished projects. I remembered starting this bag a few years ago, becoming overwhelmed with some detail and putting the project aside. I got it back out again and finished it up.
The pattern is from Amy Butler and is called The Weekender Travel Bag. You can buy the pattern on her site, from this page. (Just scroll down a bit to find it.)
Here’s the official picture at right. (Clicking on it will also take you to her PDF download page to buy the pattern.)
Although I love the look of this bag, I was worried about using quilting cotton on the exterior, specifically how well it would wear. For this first one, I used several table runners that had a woven design. I think they’re polyester. They were available in two colour combinations – here’s a green one, uncut.
I used the burgundy/pink variant for my bag and fussy-cut the pieces to play with the design. Instead of making my own piping, I bought drapery piping in a coordinating colour. Here’s my bag:
I did add piping to the tops of the pockets on the bag ends, though there isn’t supposed to be any. I had some left and liked the look of it.
I also used the needle off-set on my machine for the final row of stitching along the piping, so that I could get as close to it as possible. I still didn’t get as close as I’d like, but it worked out pretty well.
The reason I put my bag away initially was the zipper. I couldn’t find one with tabs that met in the middle. (I’ve since learned how to make one from the Blue Calla tutorials – I’ll tell you about that with another post about bag-making.) At the time, I bought two heavy plastic zippers to use instead – a burgundy one for each side – but wasn’t entirely happy with that solution. (Now, after making the bag, I think that the heavy plastic zips might be too heavy. It gets a bit bulky around the zipper opening with that fusible foam inside.) Recently, though, there were some separating zippers discounted at my local fabric store, probably because the zipper tape is mustard yellow. There was a 32″ one that was long enough for me to cut off one end, and the mustard matched the stripe in the fabric.
One change I did make was putting a heavier bottom in the bag. I often use these cutting boards from Ikea for that – they’re inexpensive and easy to cut to size with a heavy knife. The base of this bag was too big, though. The mister came up with a solution for me – he’d noticed cheap cutting mats at a discount store. They aren’t the same quality as the one I use on my cutting table, but in this case, one was perfect. I cut it down to size and put it in the bottom of the bag, before the lining went in.
I also really (really) like bag feet. I put eight on this one, because they’re smaller in size than might be ideal. They’re secured to that cutting board base, which means the base doesn’t come out and the bag can’t be washed. Would I wash an overnight bag? Not likely. If anything, I’d spot-clean it. I can’t imagine that this fabric, and all the layers of fusible goodness, would survive a trip through the washing machine either.
This bag is quite easy to assemble. There are a lot of layers but not many pieces and the instructions are excellent. The tricky bit was getting close enough to that piping, but a lot of that is on me, because I used heavier fabric and heavier piping than specified. I had no fun putting in the lining, but again, that’s on me – because I had put that hard base into the bag, I couldn’t turn it inside out as instructed. There were a lot of contortions to get the lining sewn in as a result!
I had thought this fabric might be easy to clean and mark-resistant, and I was proven right. When sewing in the lining, I stabbed my finger and bled on the bag. The mark came right out with cold water. 🙂
If you want to make a small bag, this is a good one to try! Keep it simpler than I did, though, and use the specified weight of fabric and binding.
You’ve probably guessed that the green runner is destined to become a different bag. I’ve already cut it out…and yes, it uses another of the sale zippers with mustard tape.