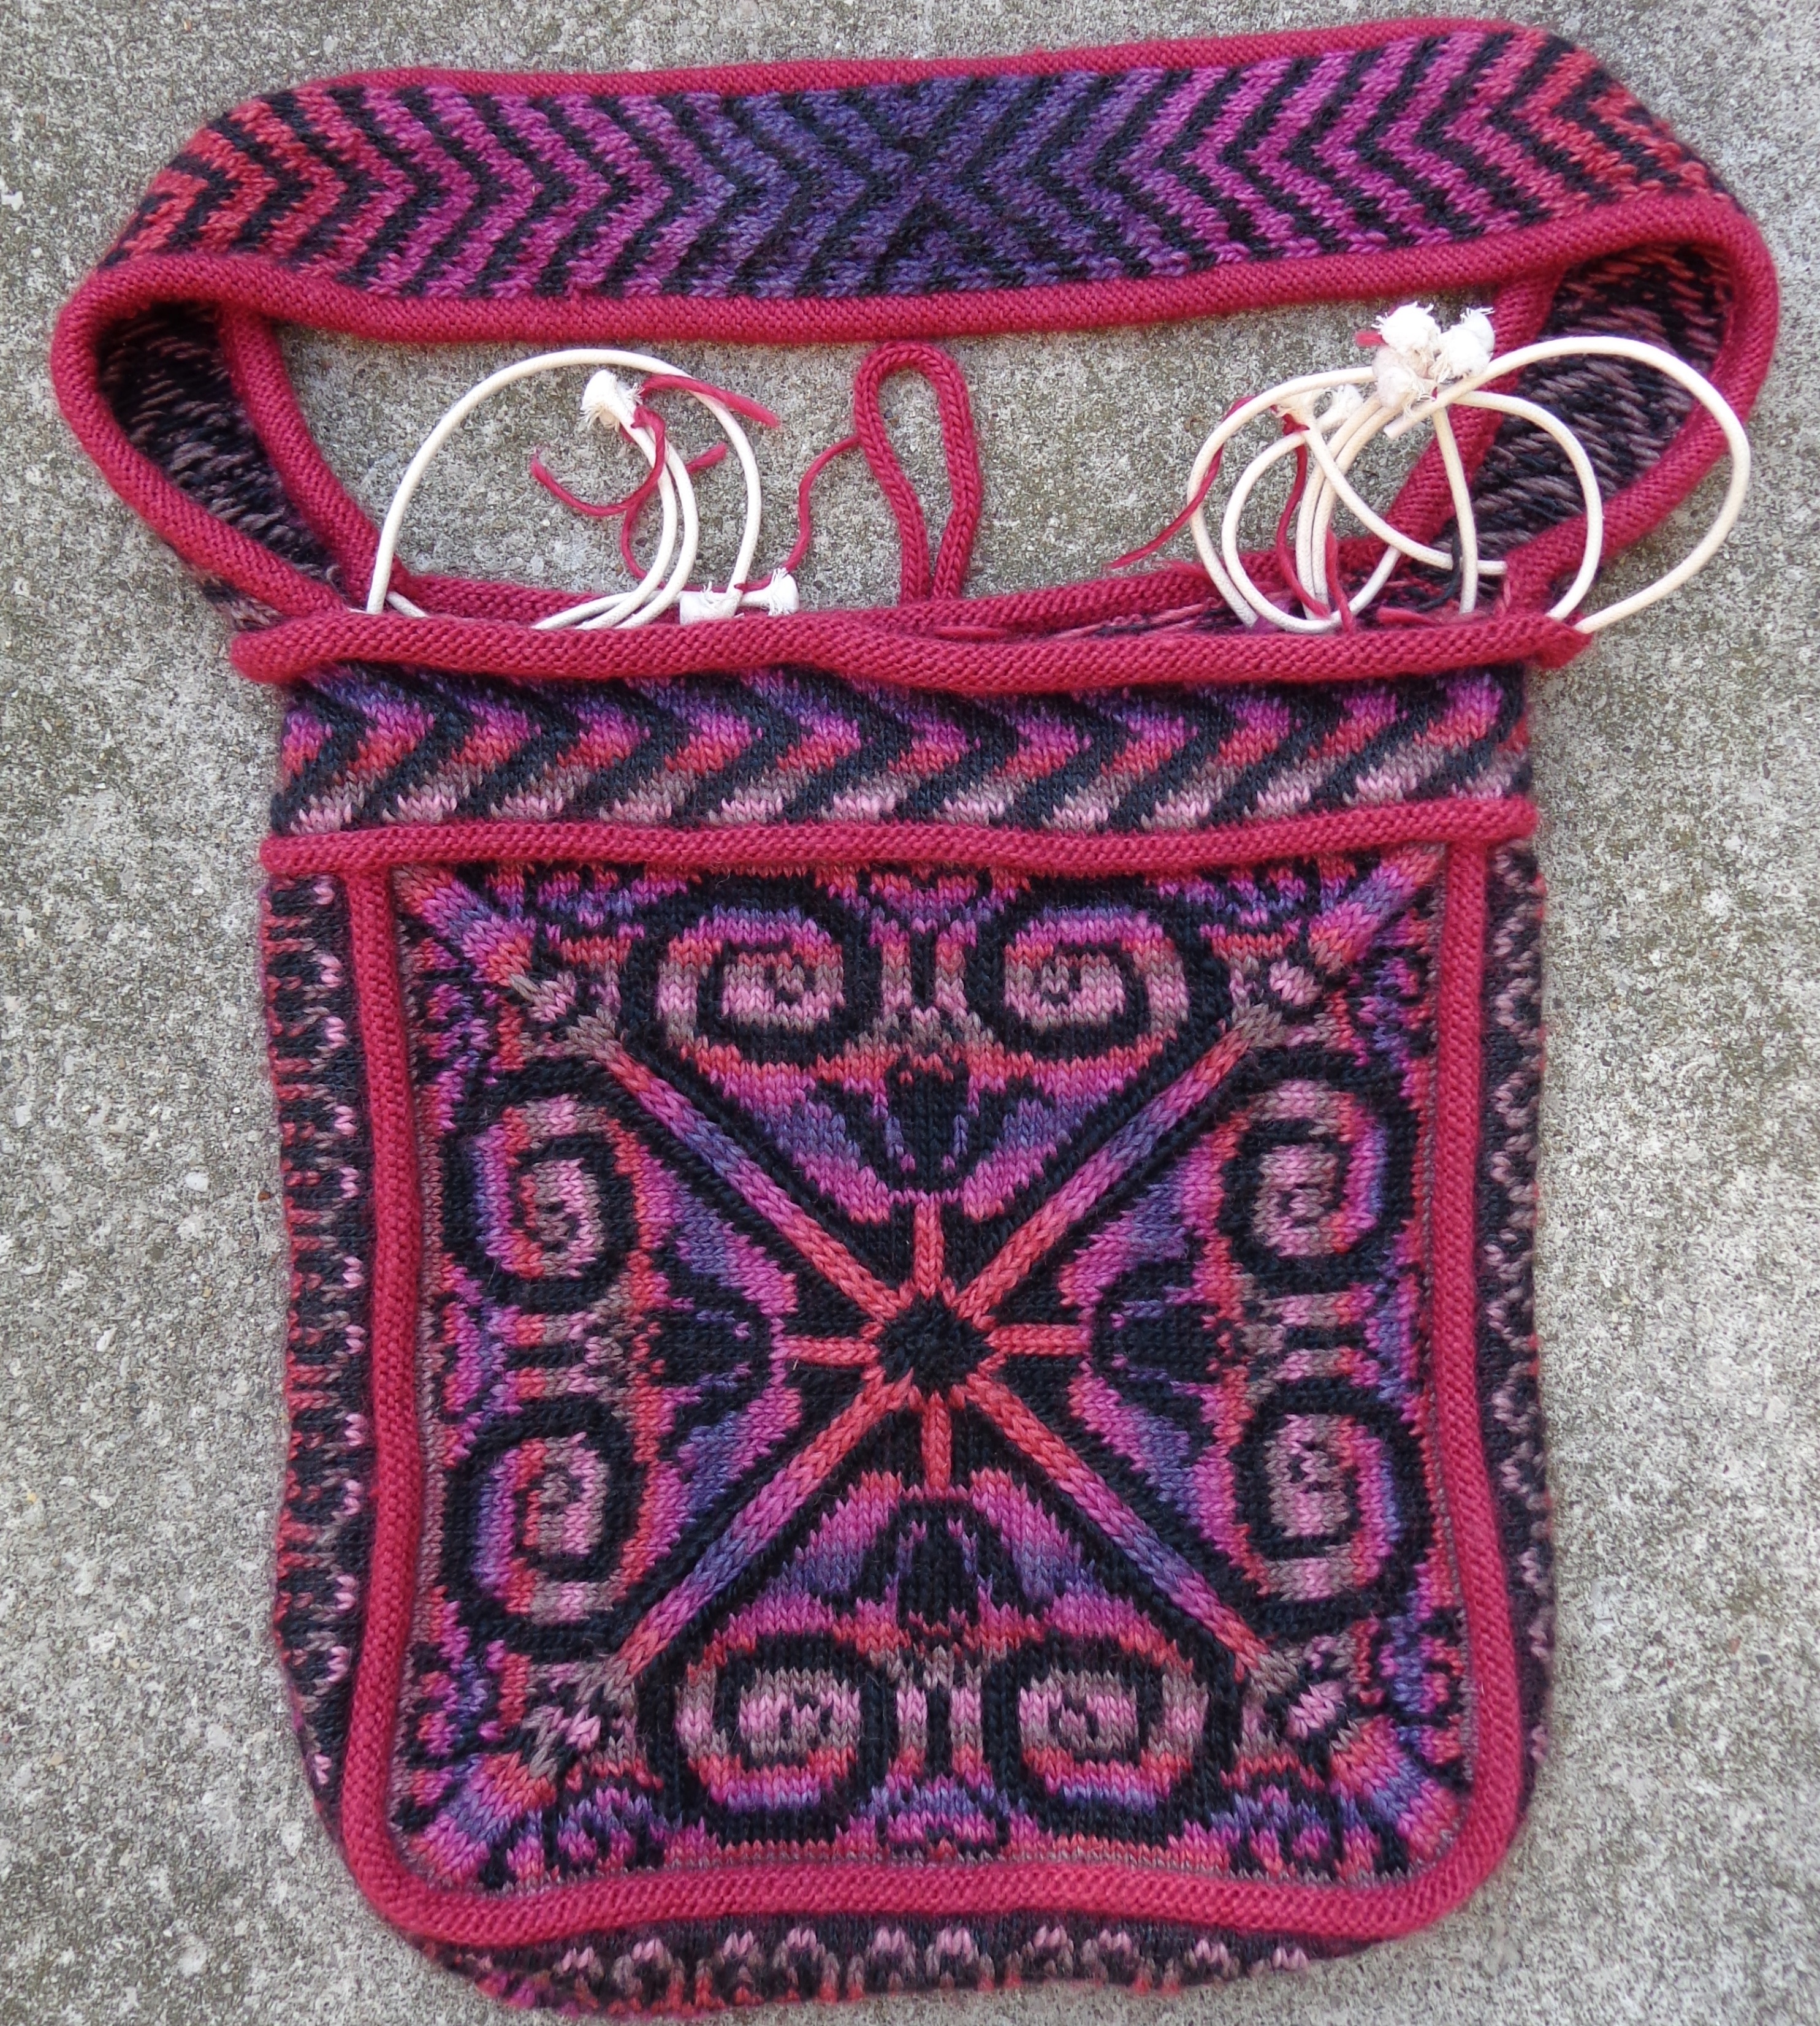
I found this bag partly completed in a stash of WIPs. The pattern is Sipalu and I knit it in Patons SWS. (That’s Soy Wool Stripes in the red mix and Soy Wool Solids in the solid red. I used another yarn with the same content for the solid black, Gjestal Garn Bris. I suspect that yarn is discounted. The SWS is.)
My Ravelry project page says I knit it in 2011 and finished it in 2013 – but that, alas, is not entirely true. It was completed this far – as above – but the lining pieces were only cut out and unassembled. They were stashed away with it.
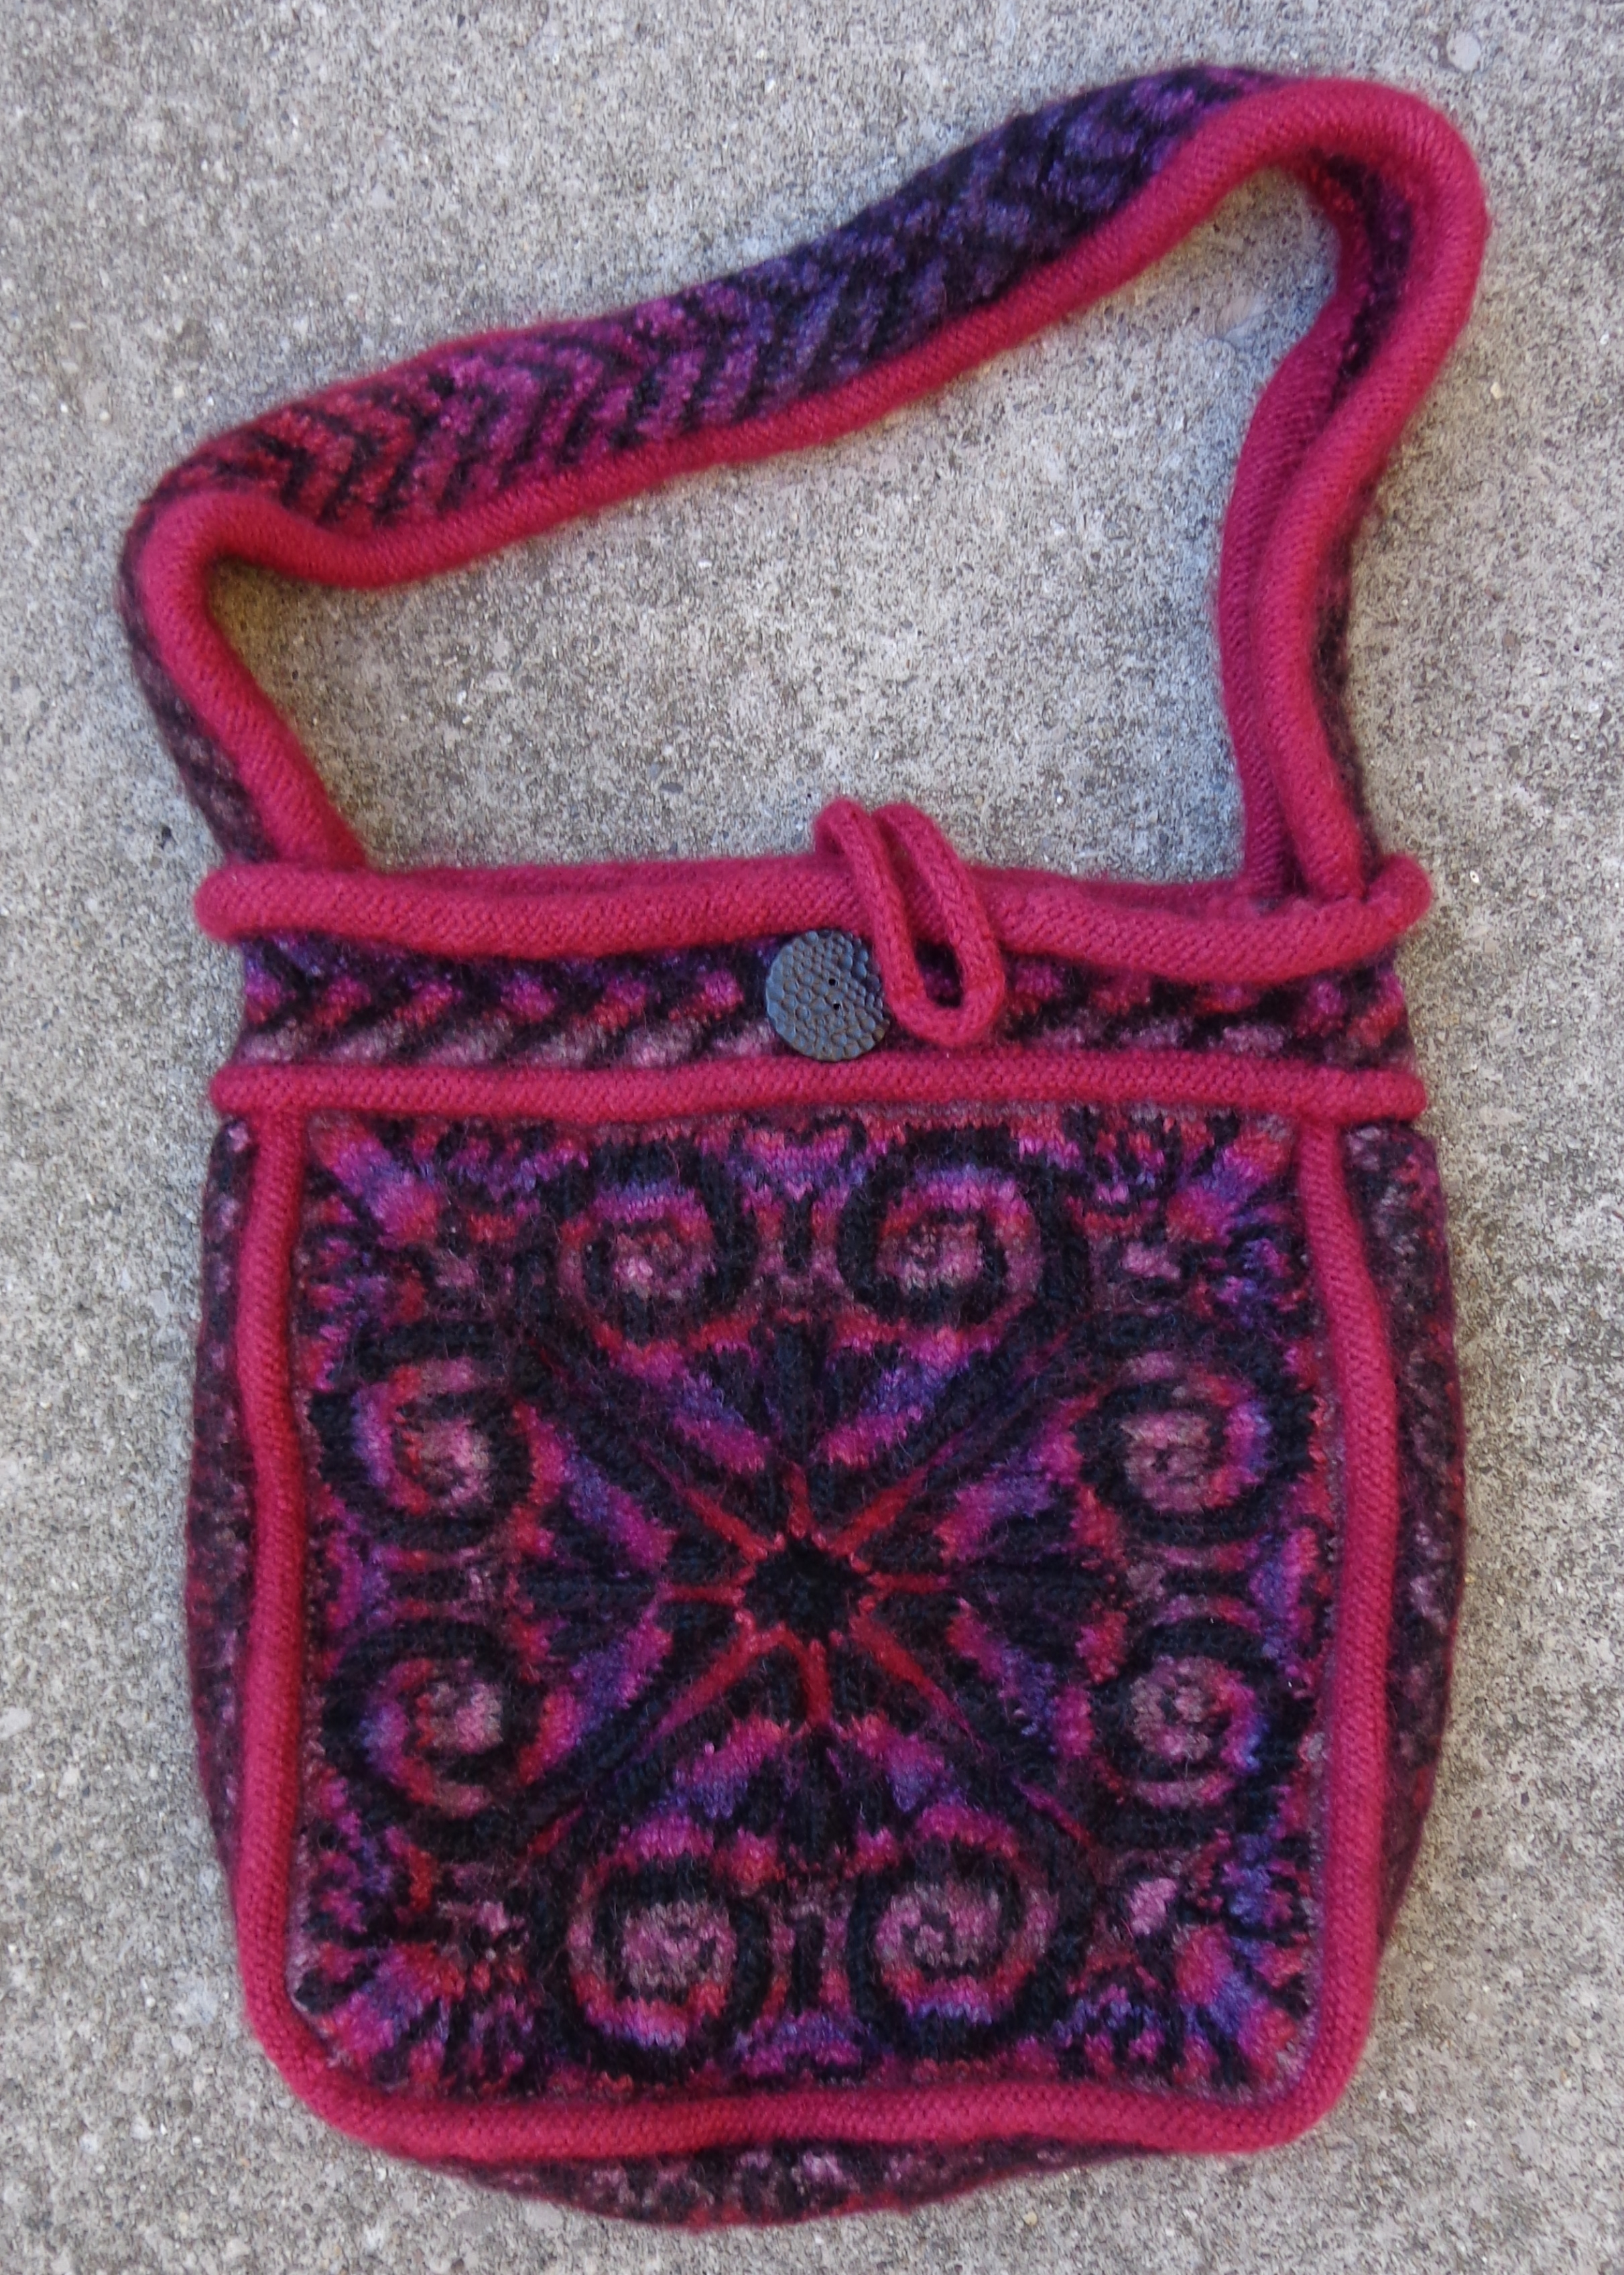
I added piping to the interior of the red bands and you can see them in the picture above. That one is a before-felting picture – the one below is after felting. That button is a porcelain one from a local maker and I just love it.
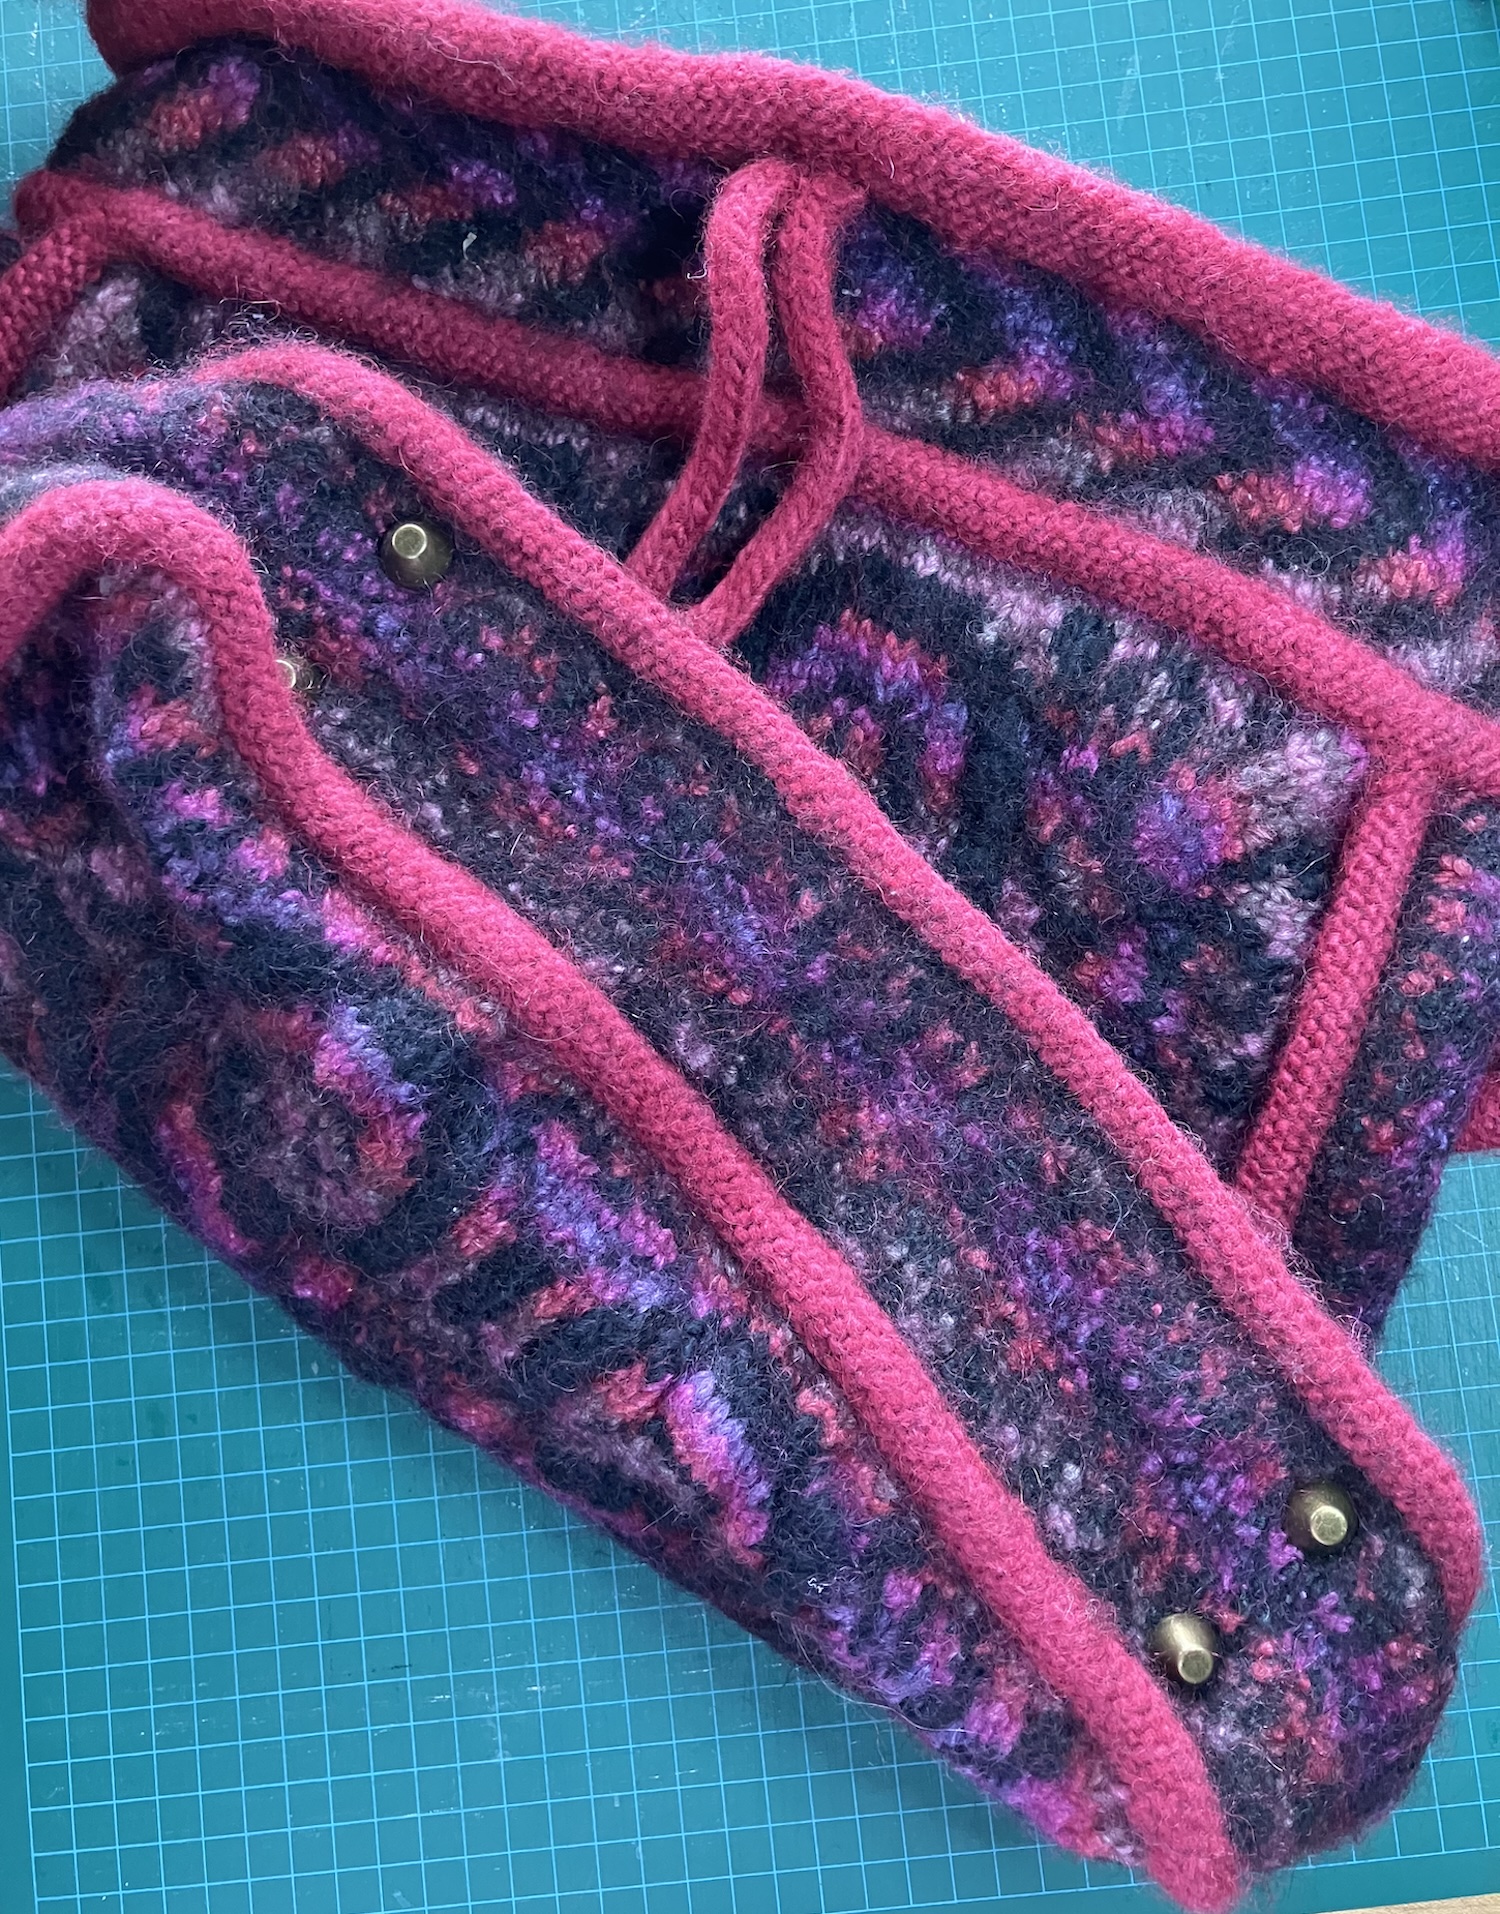
So, the lining. I suspect I put this aside because the construction of the zippered edge was a little complicated. I had assembled the lining for the body and put a pocket on it already.
I’d also secured a plastic base in the bottom with some purse feet. Ikea makes these thin ones that come in packs of two, and you can cut them to size with a utility knife. The colours change with each new batch, but I always have a few in my materials stash.
Now that tricky bit. The bag is essentially a box and is maybe 3″ deep, so I needed to centre the zipper between two pieces across the top, between the handle ends. Once I got out my ruler and made a plan for that, the lining came together quickly. There was a good bit of handsewing, to line the handle and secure the bag lining, but it wasn’t that big of a job.
Why is it that these incomplete projects that sit waiting for years always take a very short period of time to finish up? It happens every time.
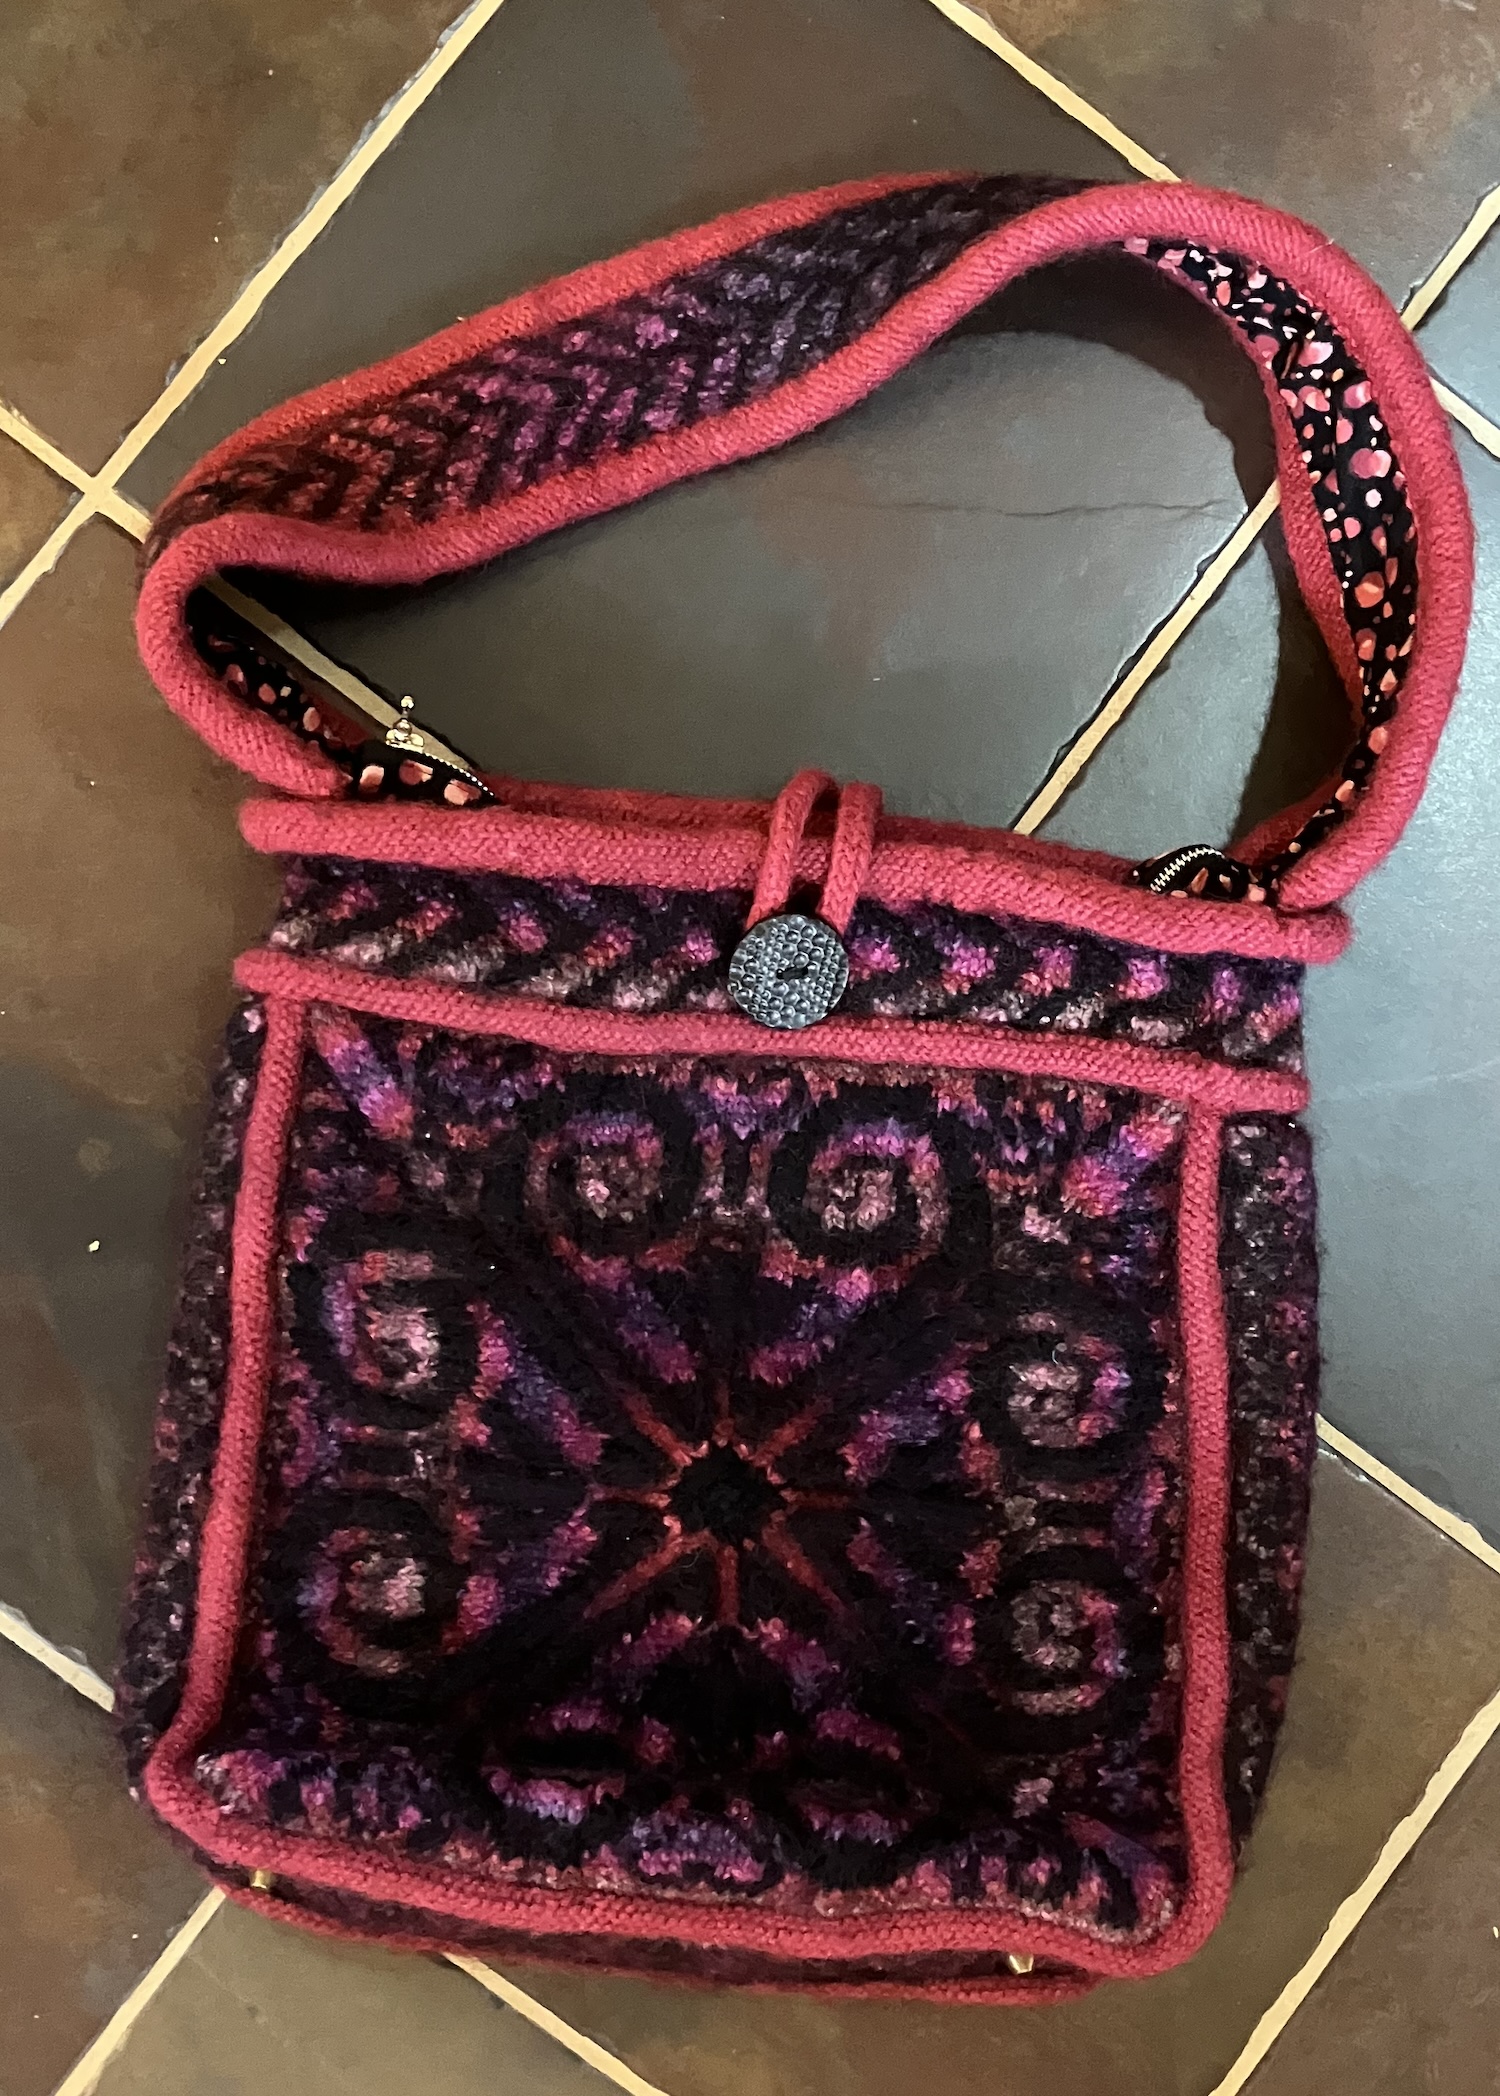
And here’s the finished bag. It looks a bit dark in this pic, thanks to a dingy day – but it’s DONE!
You don’t have to buy many patterns for doll clothes to come across Aileen’s Petite Fashions. These patterns are hand-drawn and clearly vintage. The title is hand-printed and the instructions look as if they’ve been typed. There’s usually a drawing of the doll and garment. At right is part of the one I’ll show you today.
Something about them reminds me of “ditto” copies, which our teachers made in the 1960’s and 70’s. (Dittos were made on spirit duplicators and characteristically were purple copies. The machines were hand-cranked and had a specific sound, and the process produced a memorable scent.)
I don’t know the history of these patterns, but they seem to date from the early sixties. There are a number of APF patterns reproducing original Barbie outfits. I found a list of them, here, though the site is old and it’s not clear whether the patterns are still being sold from this site. I’ve mostly come by mine via Etsy purchases, though often the finished garment is shown in the picture and I don’t realize it’s an APF pattern until I’ve downloaded it.
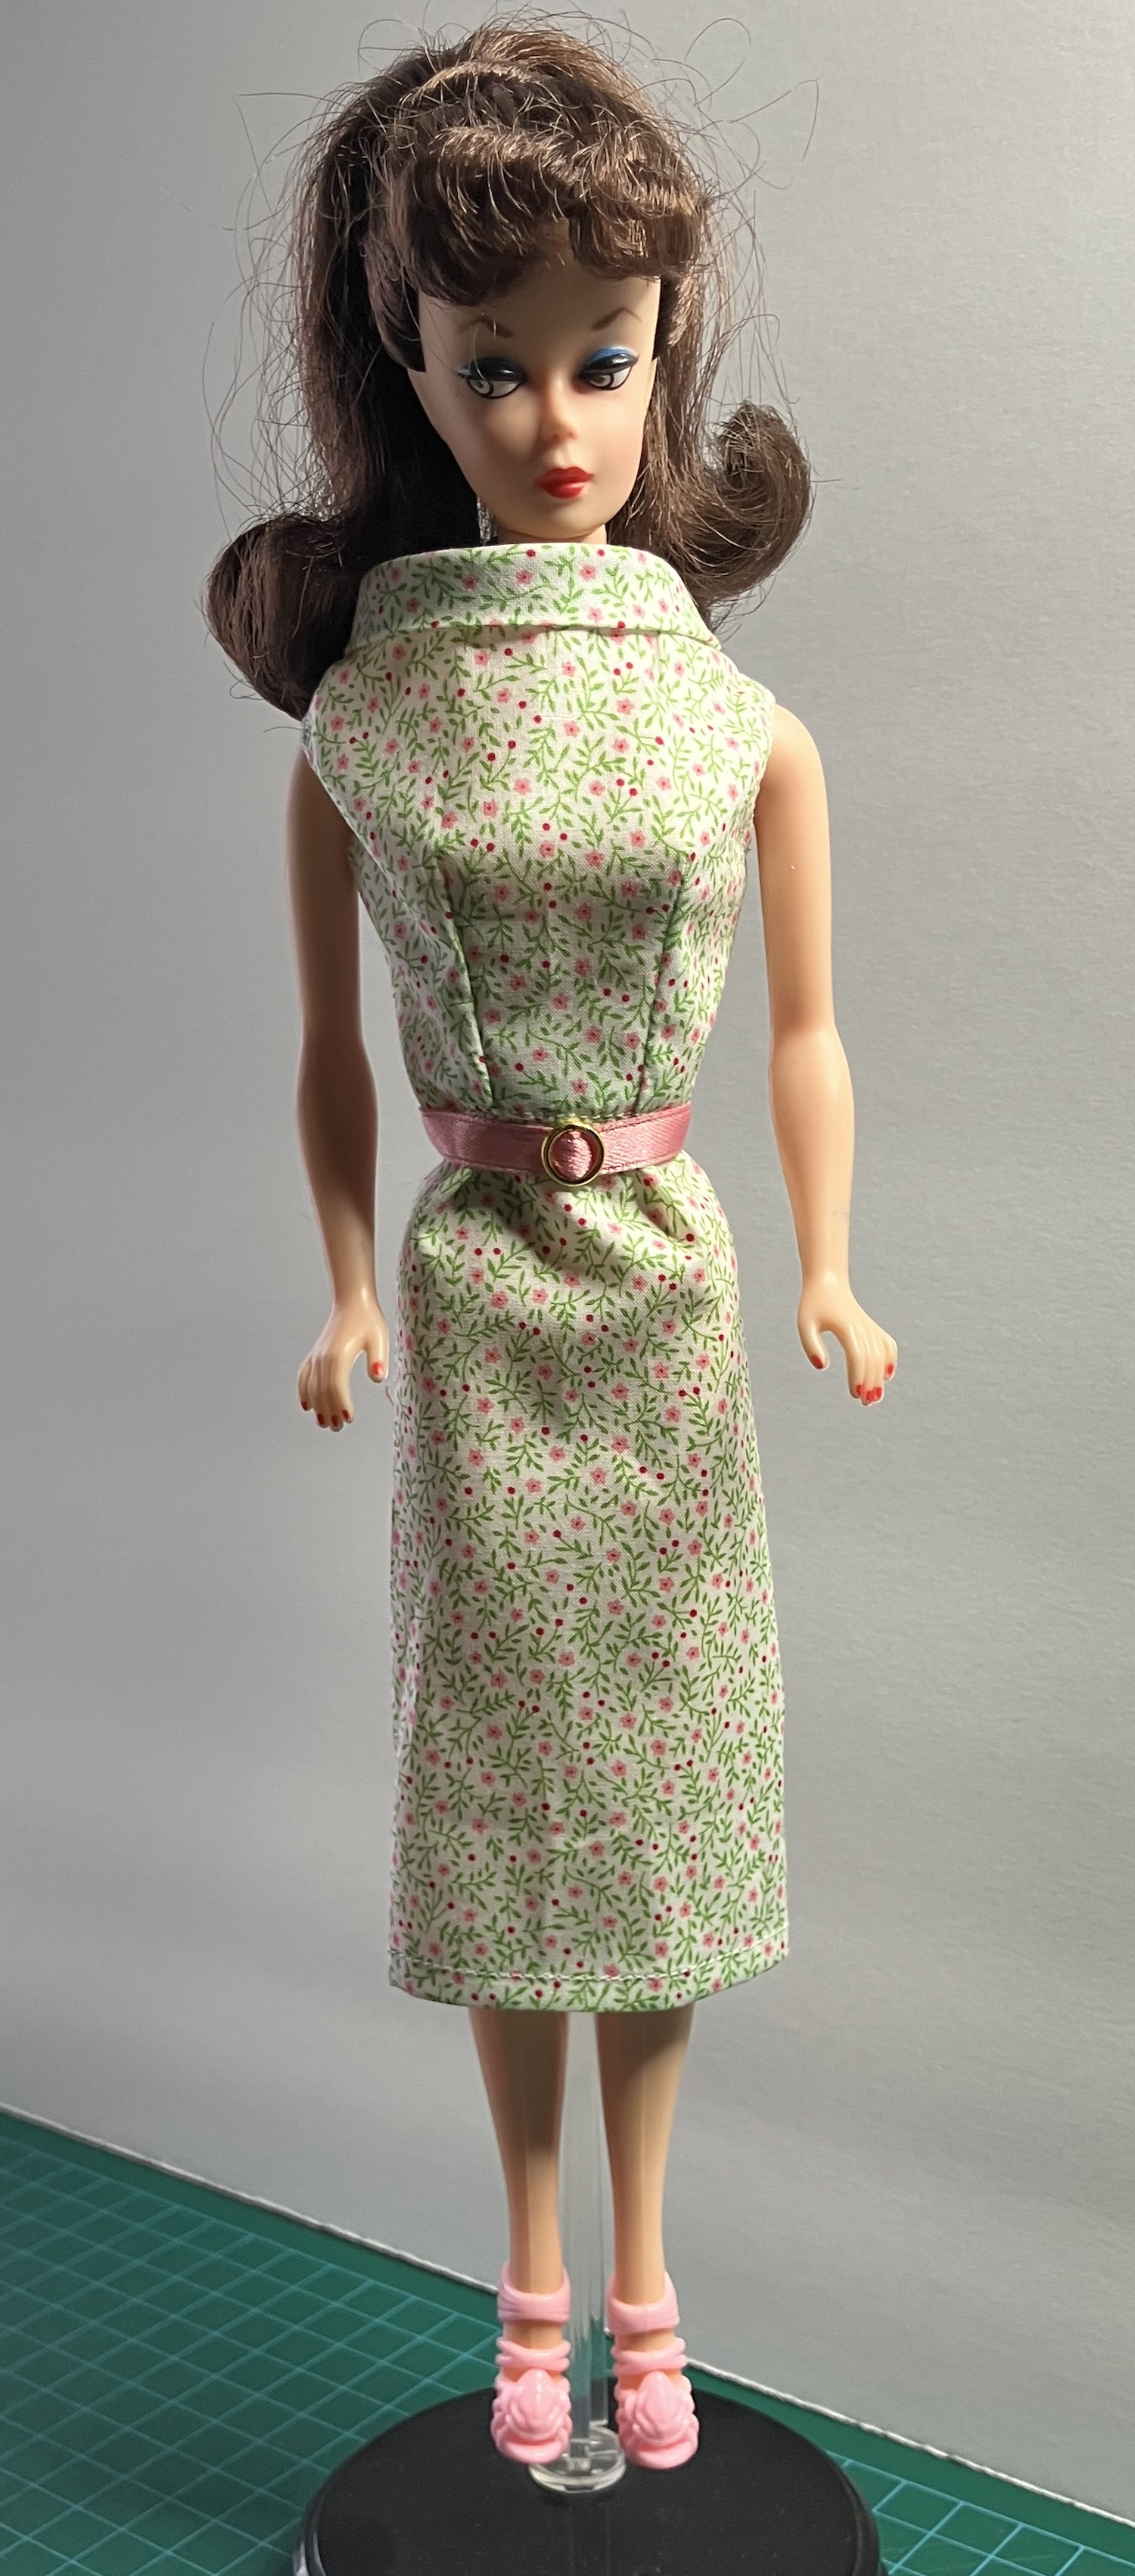
I recently made my first APF pattern. It’s APF 82 – Easter Parade, a reproduction of a 1959 Barbie fashion from Mattel. It included a black unlined coat, a print sleeveless dress, a purse and a “hat” (which is kind of a hairband, made with a “garbage tie”. Hmm.) Here’s a description on the Barbie Wiki with a picture of the Mattel original. I got this pattern on Etsy somehow, probably in a bulk pattern purchase.
And here’s my first attempt.
I made the coat of black Kona cotton. The instructions, like those on many older patterns, seem to assume that you already know what you’re on about. I used ribbons for the bows on the pockets, because I had no idea how big to cut the bias strip to make them, and couldn’t see them well in the picture to mimic the original. The coat has no front fastening because it’s pretty full. I did finish more edges than instructed and it came out reasonably well. I think it would benefit from a lining as the back collar bit does not give me joy but there you go.
Vintage B is wearing it here with a sheath of emerald satin and a pillbox hat with two feathers. (I love this little hat!) I’ll show you the sheath in another post, once I work out some kinks in the pattern.
I also made the dress from the pattern, using a teeny-tiny cotton floral print that I bought on Etsy. This one seems very generous in bodice, particularly in the upper front. I think if I made it again, I might curve down the neckline that takes the bias band. Overall, the fit is generous, more suited to “little fingers” than sleek couture.
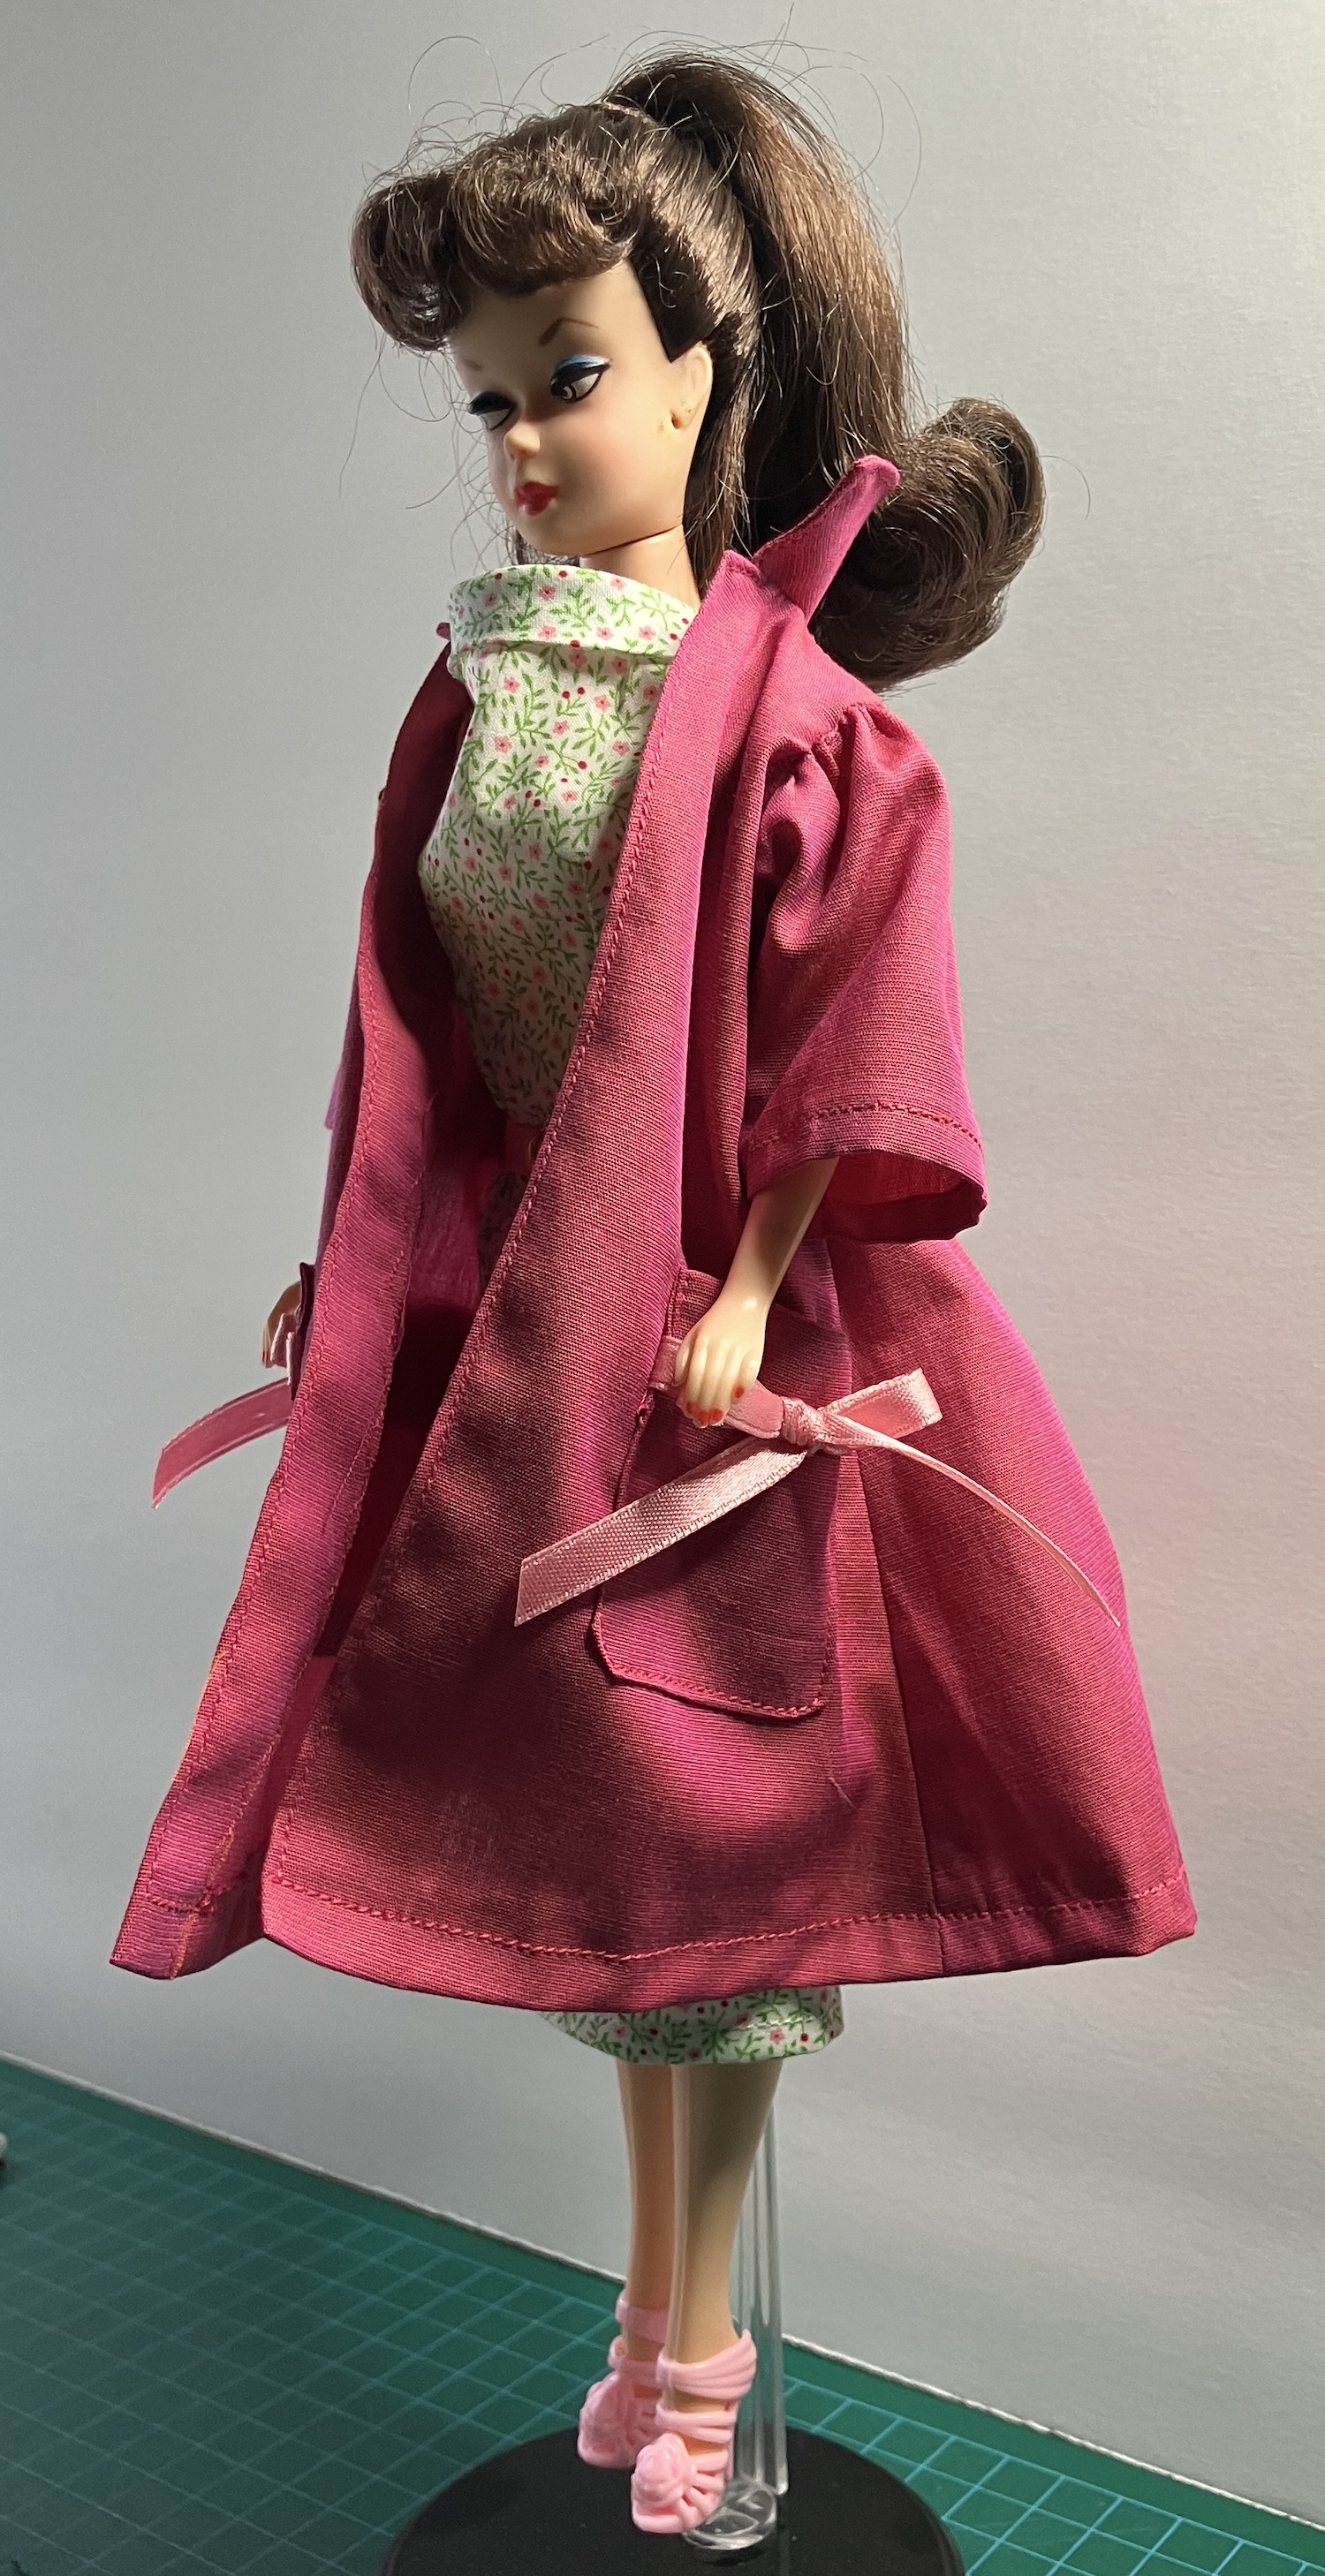
The black seemed a bit austere for an Easter coat, so I cut another of bright pink. This is a French shirting cotton with two shades of pink that gives it a pretty crosswise stripe. (I originally made myself a shirt of this fabric. What happened to that shirt???) I added 1/4″ to the length of the sleeves to allow for a doubled hem, and again used ribbon on the pockets. You can see that this kind of collar doesn’t fit under a coat very well.
And here’s an interesting detail. I recently bought Kenneth King’s book on sewing for dolls and was intrigued that he used bridal tulle as a lining on some garments. It’s very thin, as he notes. Well, Aileen was using bridal tulle sixty years ago – the top of the dress is lined with it. It does work out quite well, making a very thin lining. The skirt of the dress is unlined.
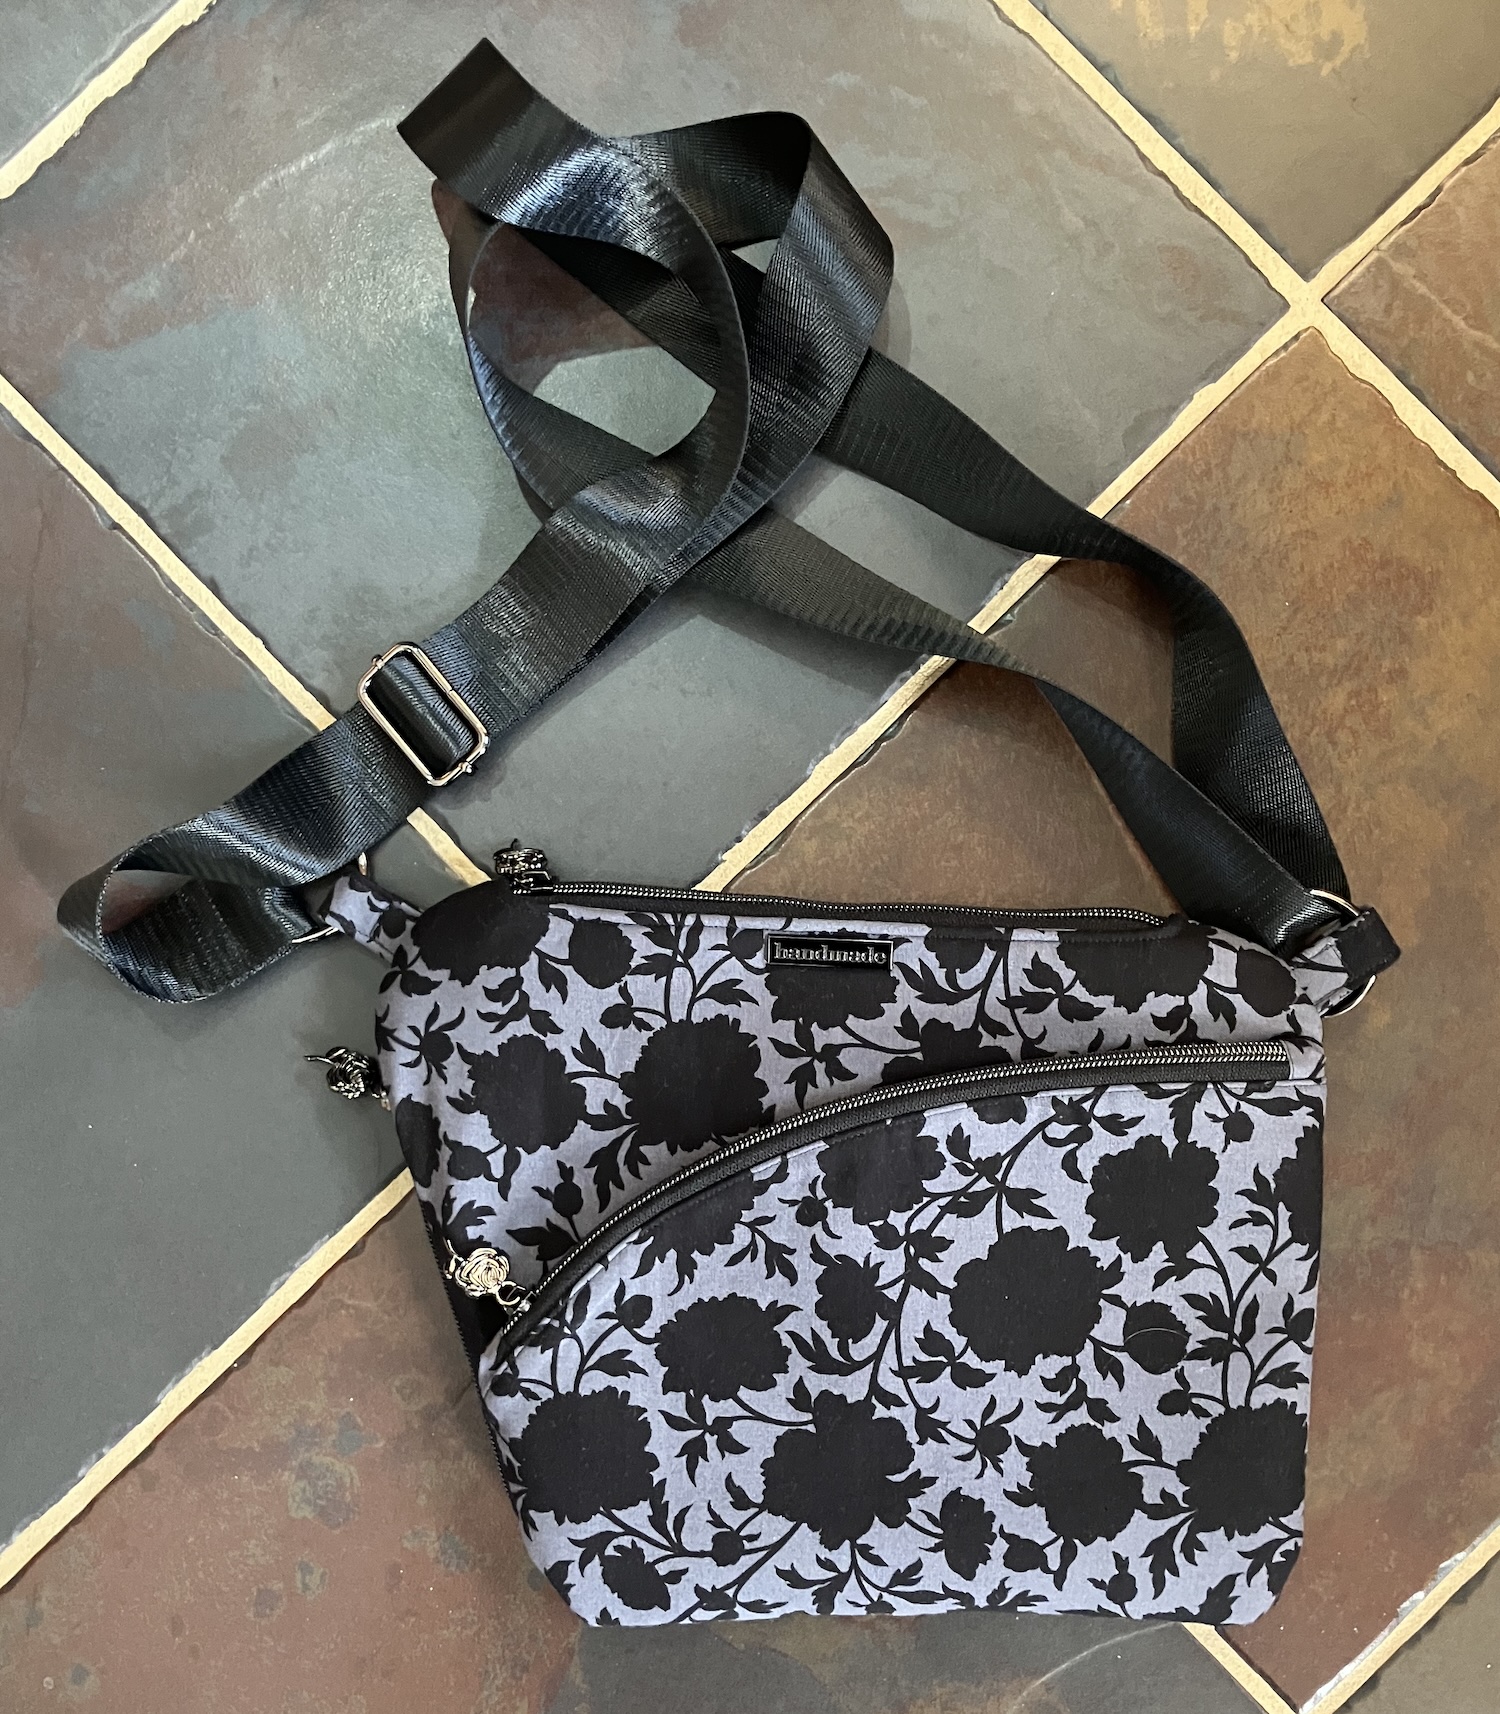
Here’s something a little different today. Last year, I attended a presentation on bag-making given by the founder of Blue Calla, and bought one of her kits. It’s the Foxtail Cross Body Sling.
I don’t see any kits on the site now, but I do recommend a kit for your first bag. It’s a good way to make sure you have all the parts, especially the hardware.
And here’s my Foxtail:
I’m really pleased with how well it came out, and it wasn’t very difficult. I really like that fabric, too. (The inside is an abstract print from the same line, with a light background, just the thing for a bag interior.) The instructions were clear, though I had to read them through a couple of times – since bagmaking is comparatively new to me, I tended to overthink it all. I should have just done what I was told and not worried about it. 🙂
The only thing I had to redo was the strap – I put it on upside down the first time, so had to unpick the stitching at the one end to redo it. That actually makes sense, since I routinely attach bra straps upside down. This is a similar technique, with a loop so that the strap length can be modified.
One thing I didn’t consider was which way I sling a crossbody bag. I always put the strap over my left shoulder, as shown in this pic of the bag from Blue Calla’s site. But this means that all the zipper tabs are at the left and the compartment along the left side is a little tough to reach.
Now, imagine the bag is slung over the right shoulder. It would tip to the right then, and all the zipper tabs would be front and center.
I think I’m going to make a second one that’s the mirror image of this one that I’ve made. That way, when I put the strap over my left shoulder, all the zipper tabs will be readily accessible. This one, I’ll wear over the right shoulder.
One thing about making bags is that it’s addictive. I had started a bag years ago and wasn’t sure I had all the right pieces so put it aside. I’ve dug that one back out to finish it up, and ordered all the parts (I hope) to make a different Blue Calla bag. They also offer a free pattern, the Clematis Wristlet, and I’m going to try that one, too. Oh, there are some kits available for that one, right here.
You might remember the Blue Glitter Dress from Stickatillbarbie.se (pattern number 619) that I showed you in December.Here’s a Ravelry link, and here’s the link at the Wayback Machine for that page (patterns #601-650).
I made another one in plain black. This is an acrylic fingering yarn that’s labelled as baby yarn, that I bought at Walmart for a couple of bucks. I liked how soft it was, but (of course) that means it’s splitty, too.
Here’s the finished dress, which looks much better in plain black than in that glittery stuff:
I knit this one longer, so it would fit the Silkies, and that turned out to be a good thing. Even though the stitch counts and needles are the same on the bodice of both dresses, this one is much skinnier. Only the Silkie girls can wriggle into it. This time, the hem wants to roll, even though it’s in garter stitch. The acrylic yarn won’t take a block, so I sewed a line of beads into the garter stitches to weigh it down. That didn’t actually work – I had to fuss with the hem to get this picture and it flipped up again right afterward – so I’m thinking I might thread some wire into the hem to hold it in place.
Otherwise, I’m quite pleased with it, though – and I’m done with knitting ballgowns. They take forever!
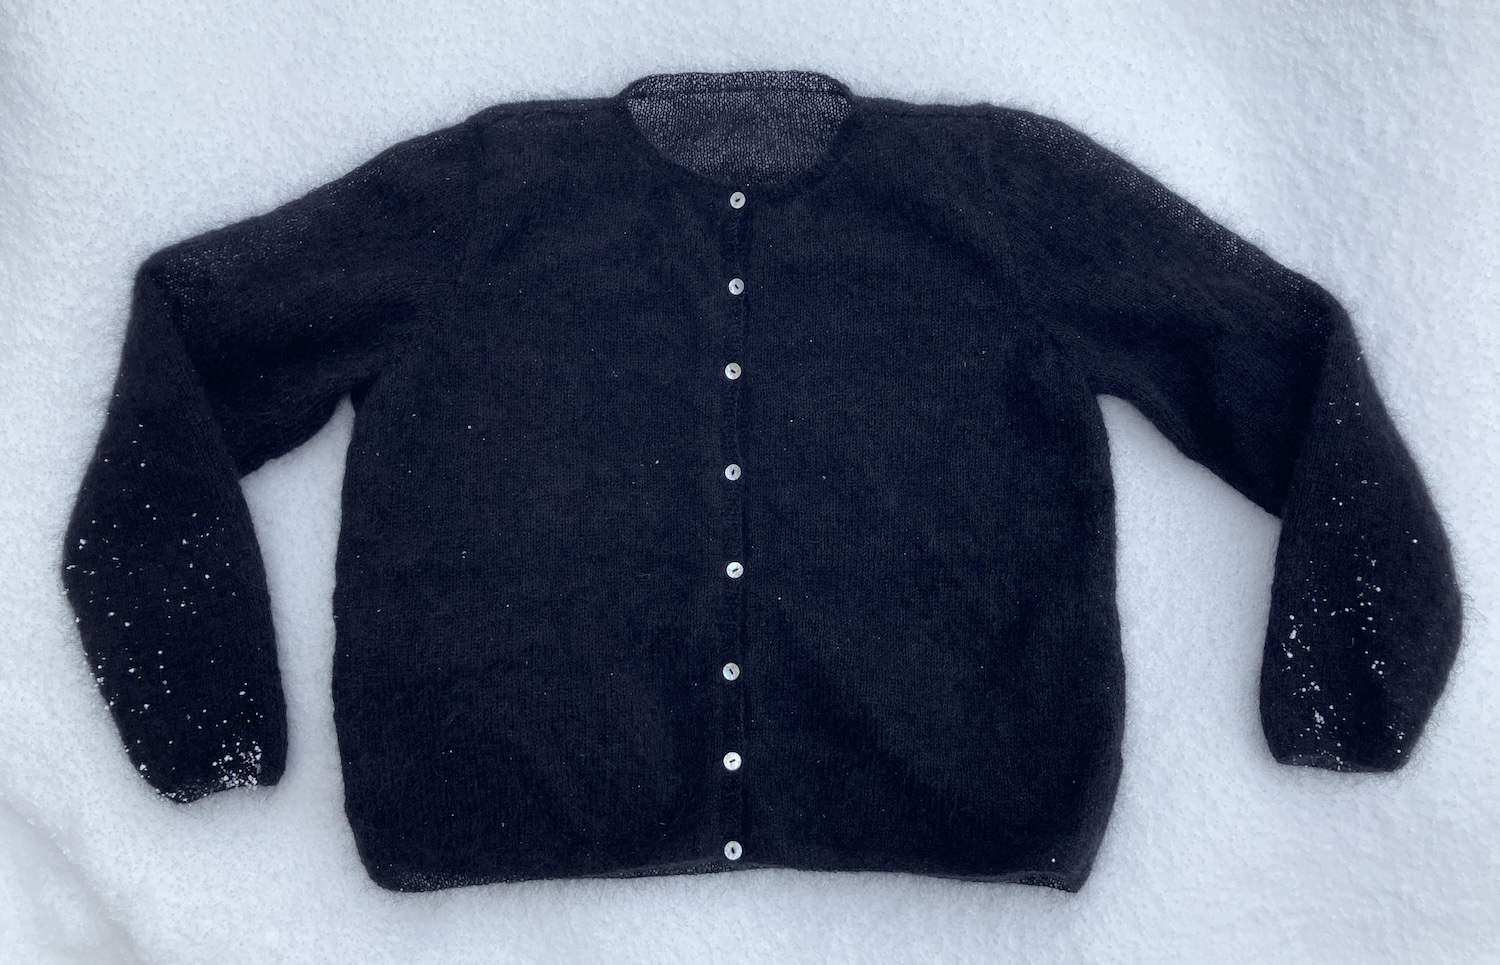
Finally, I finished my Hebrides in black Kidsilk Haze. I’d finished the pieces in October and it’s been waiting to be sewn up. On New Year’s Day, I thought “enough!”, turned on a bright light and threaded up my needle.
It’s done.
We’re having snow today, so the light in the house isn’t very bright. I tossed the sweater into the snow outside for this pic.
Hebrides is a pattern from Rowan 52 by Lisa Richardson. (That’s a Ravelry link.) It was originally knit up in Rowan Kidsilk Haze Stripe, and I’ve knit two in that yarn.
It’s a great basic jewel-necked cardigan. The Kidsilk Haze is both light and warm – that green and purple one has done a lot of travelling with me. It takes up almost no space in my carry-on and always looks great.
I’m not sure the pattern is available online anymore. Rowan changed the name of it at one point to Belle and the sample was in a solid colour of KSH. (Another Ravelry link.) The Ravelry link for the pattern on the Rowan site goes 404, but most of them do since the Rowan site was redesigned. It looks as if it’s available in more publications, though whether those are downloads or print editions is something you’d have to check out.
Will I be making another one? Hmmmmm. Maybe. But it won’t be black! LOL
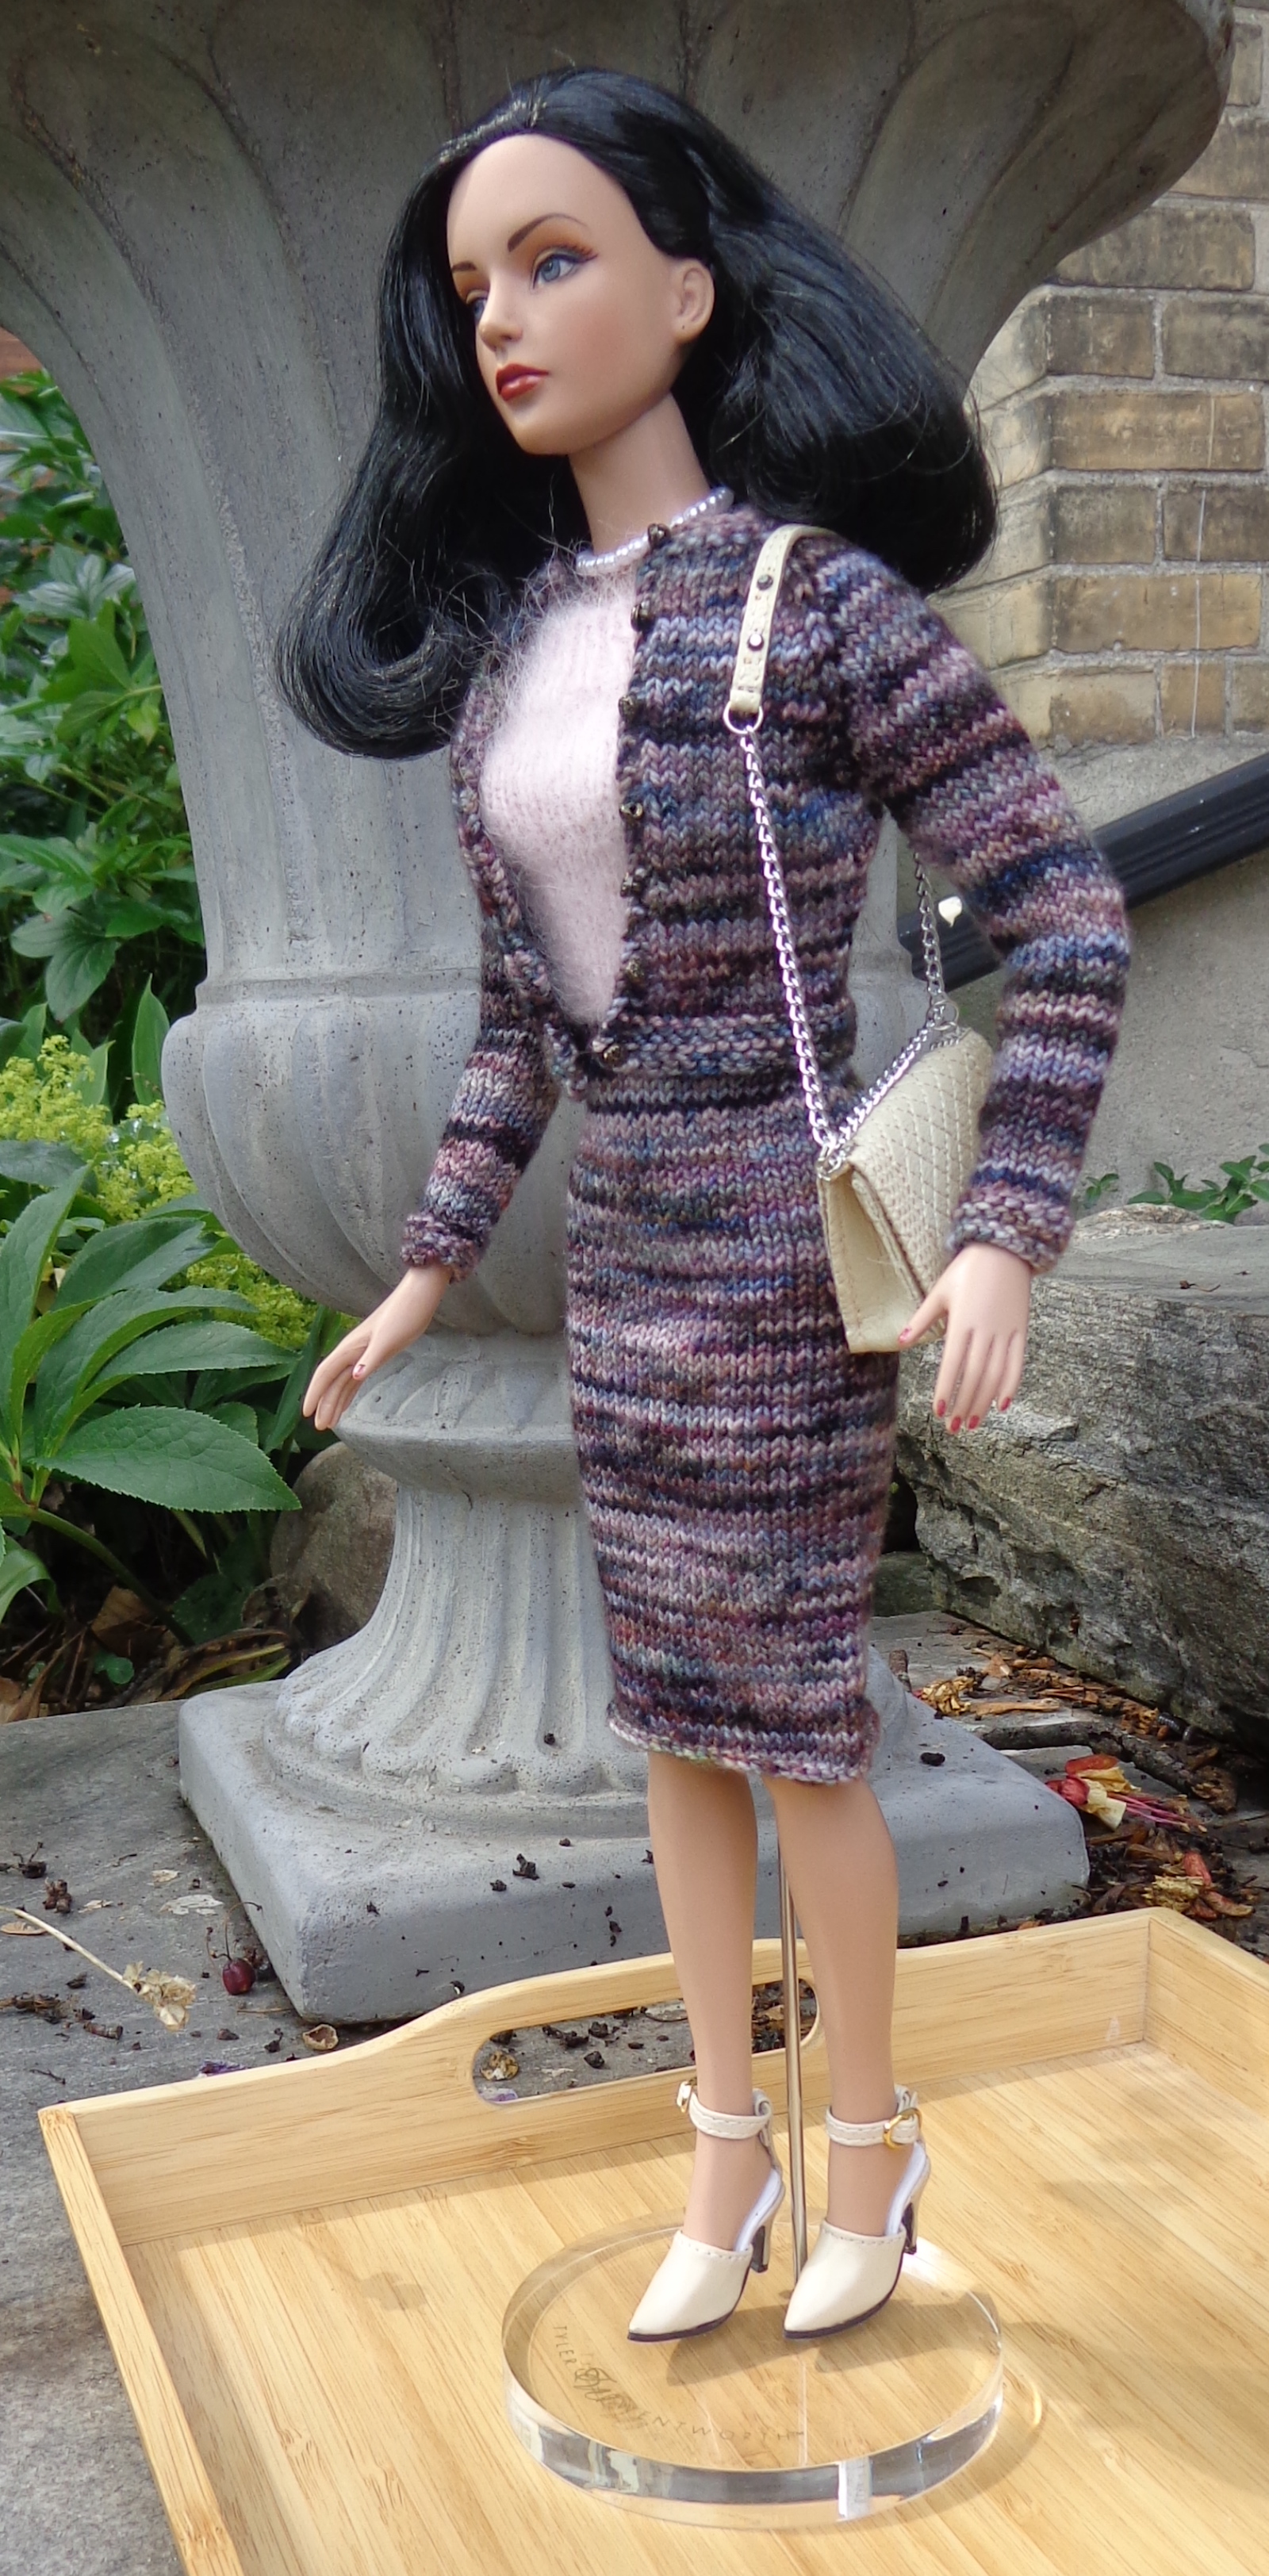
Last summer, I showed you a top-down cardigan I’d designed and knit for the girls in many sizes, from Monster High to Barbie and finally to Tyler.
I’ve also showed you this Tyler-size version. It’s knit of Koigu KPPPM in colourway 513P – KPPPM is 175m for 50g. I knit this one a little longer and also did some back neck shaping to make the front of the collar sit better. It’s modelled by RTW Rouge Sydney Chase, with a matching dress.
For the dress, I used the free pattern T-Shirt Dress for Tonner Dolls by Samira Jessica (that’s a Ravelry link) but divided the color. It’s a top-down knit with cap sleeves that are created when you cast off for the arms. I started with Sugar Bush Drizzle, held double, in Pink Puddle. At the waist, I changed to the Koigu KPPPM. I didn’t rib the skirt (as the pattern instructs) but just knit it in stockinette, then purled one row and cast off purlwise. I thought that might keep it from curling at the hem, but the hem still wants to roll up, even after blocking. I also added a little kickpleat at the center back. 🙂
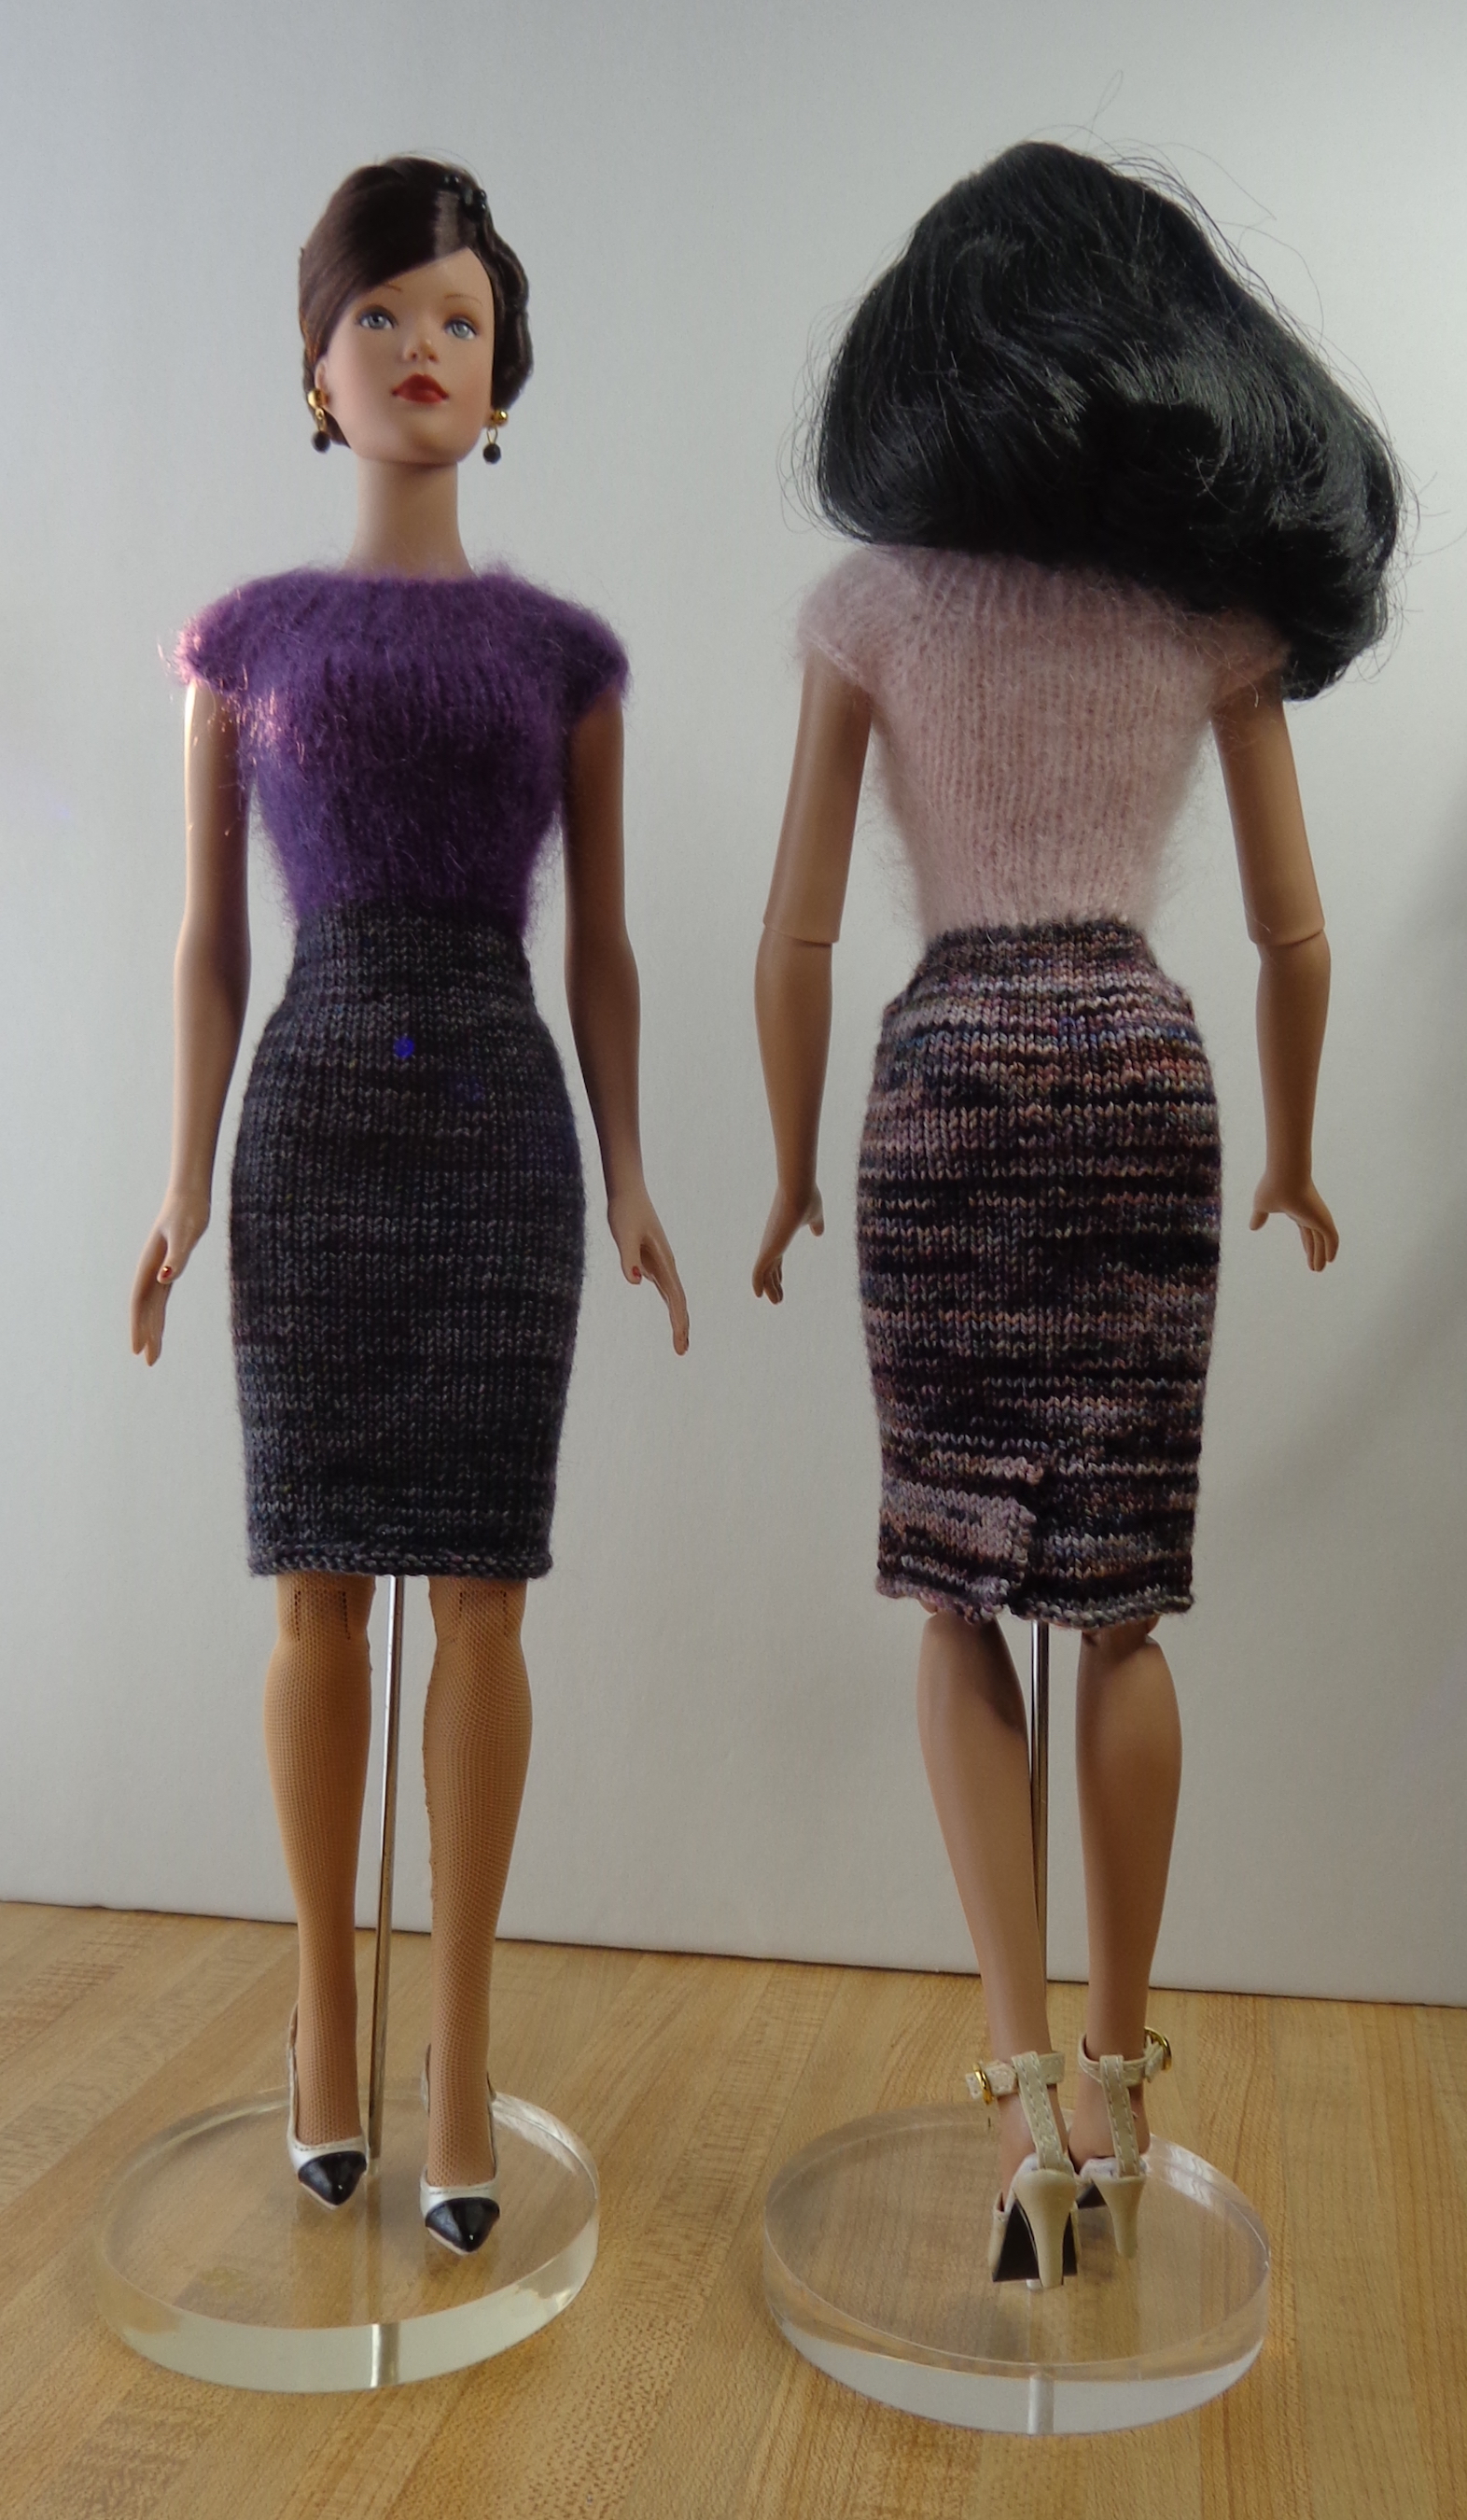
I quite like this little dress, so I made a variation of it for Tyler in a different colourway. Here are the two of them together – Sydney is still wearing the first one – the light isn’t as good in my office this time of year as it was on the steps in the summer, but you can see the little kick-pleat on Sydney’s dress. Tyler has one, too. (Don’t you love Tyler’s shoes? They’re sling=backs, too. I want a pair myself.)
The top of Tyler’s dress is Sugar Bush Drizzle held double – the colourway is Monsoon Mauve – and the skirt is a fingering weight yarn leftover from a sweater knit for me, The Loving Path Fibre Arts High Twist Sock. It came with a dyed-to-match Kidsilk Haze type yarn, The Loving Path Fibre Arts Aura Lace. I held the two together to knit a Felix for myself. (Those are Ravelry links., the last one going to my project page.) The colourway is Bewitched, a glorious mix of greys and blacks with flicks of purple and green. No photograph can do it justice.
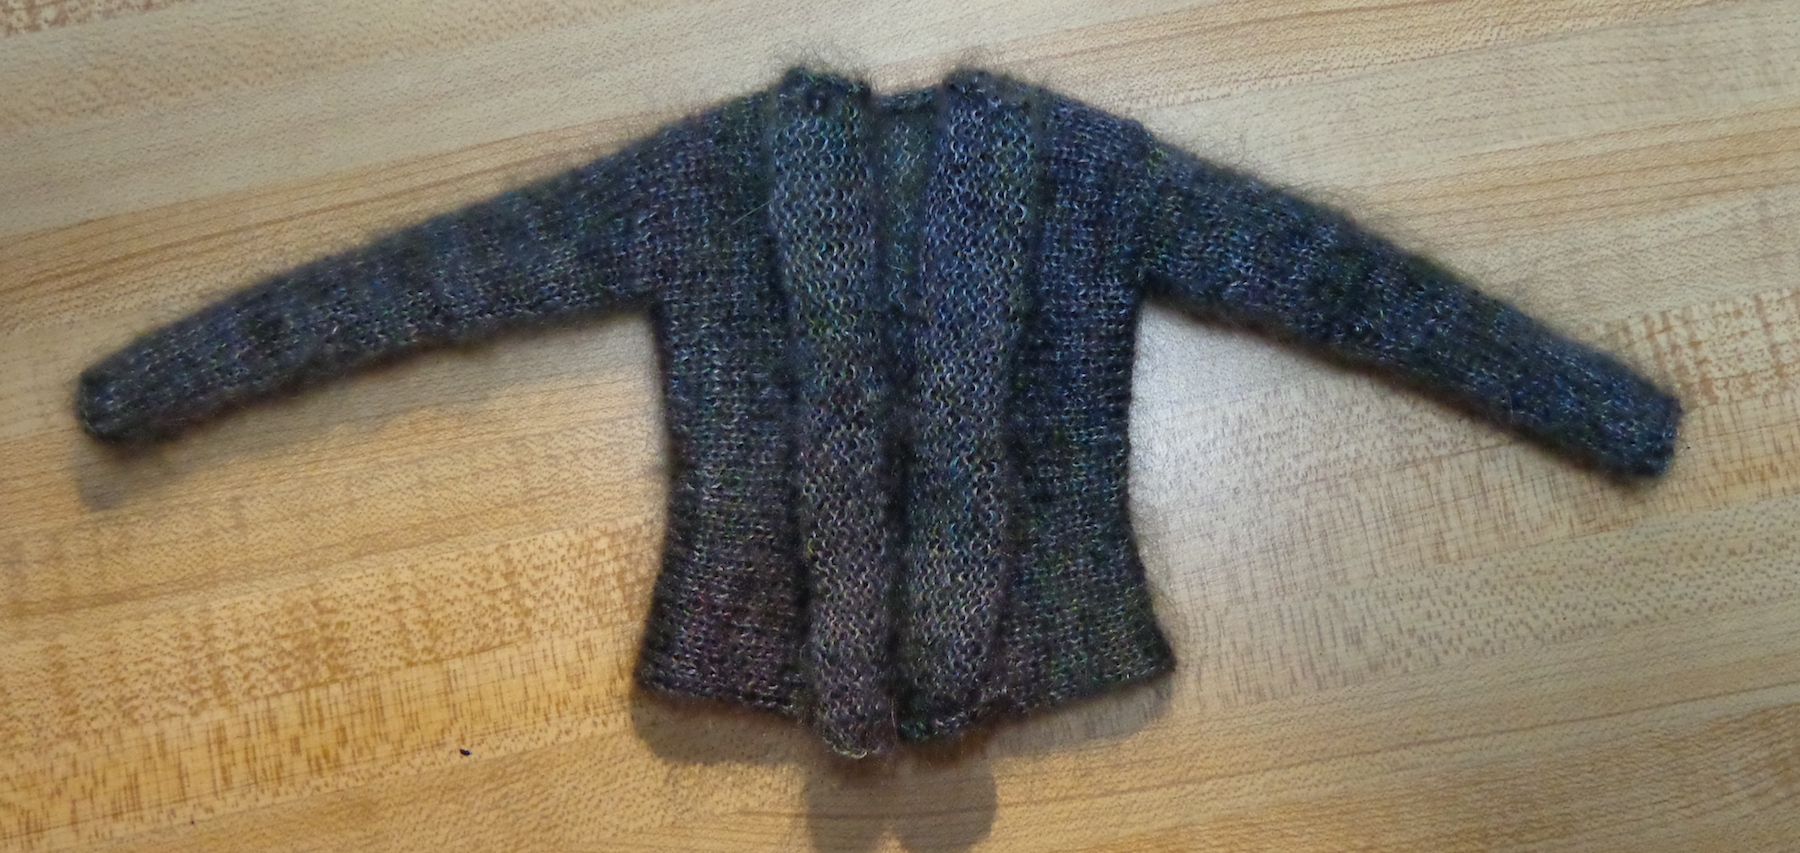
I wasn’t so fussed about the way the top-down cardigan looked on Sydney. It makes her shoulders look quite broad, which wasn’t the feminine look I was after. So, for this one, I knit a side-to-side cardigan in the Aura Lace to coordinate with Tyler’s new dress.
Here’s the sweater laid flat.
It has been blocked but those fronts want to roll. This was a bit of a surprise as I’d thought they might drape – sweaters knit like this in human size have cascading fronts. But on these needles, the fabric ends up too stiff to cascade, thus it rolls.
I knit the sweater from front to front – casting on at the front edge, knitting to the side seam, putting the sleeve stitches on a holder, knitting across the back, putting the other sleeve stitches on a holder, knitting to the front edge and casting off. I then sewed the shoulder seams, picked up the stitches for one sleeve in the round and knit down to the cuff, then repeated for the other sleeve. The only seams were the teeny ones at the shoulder.
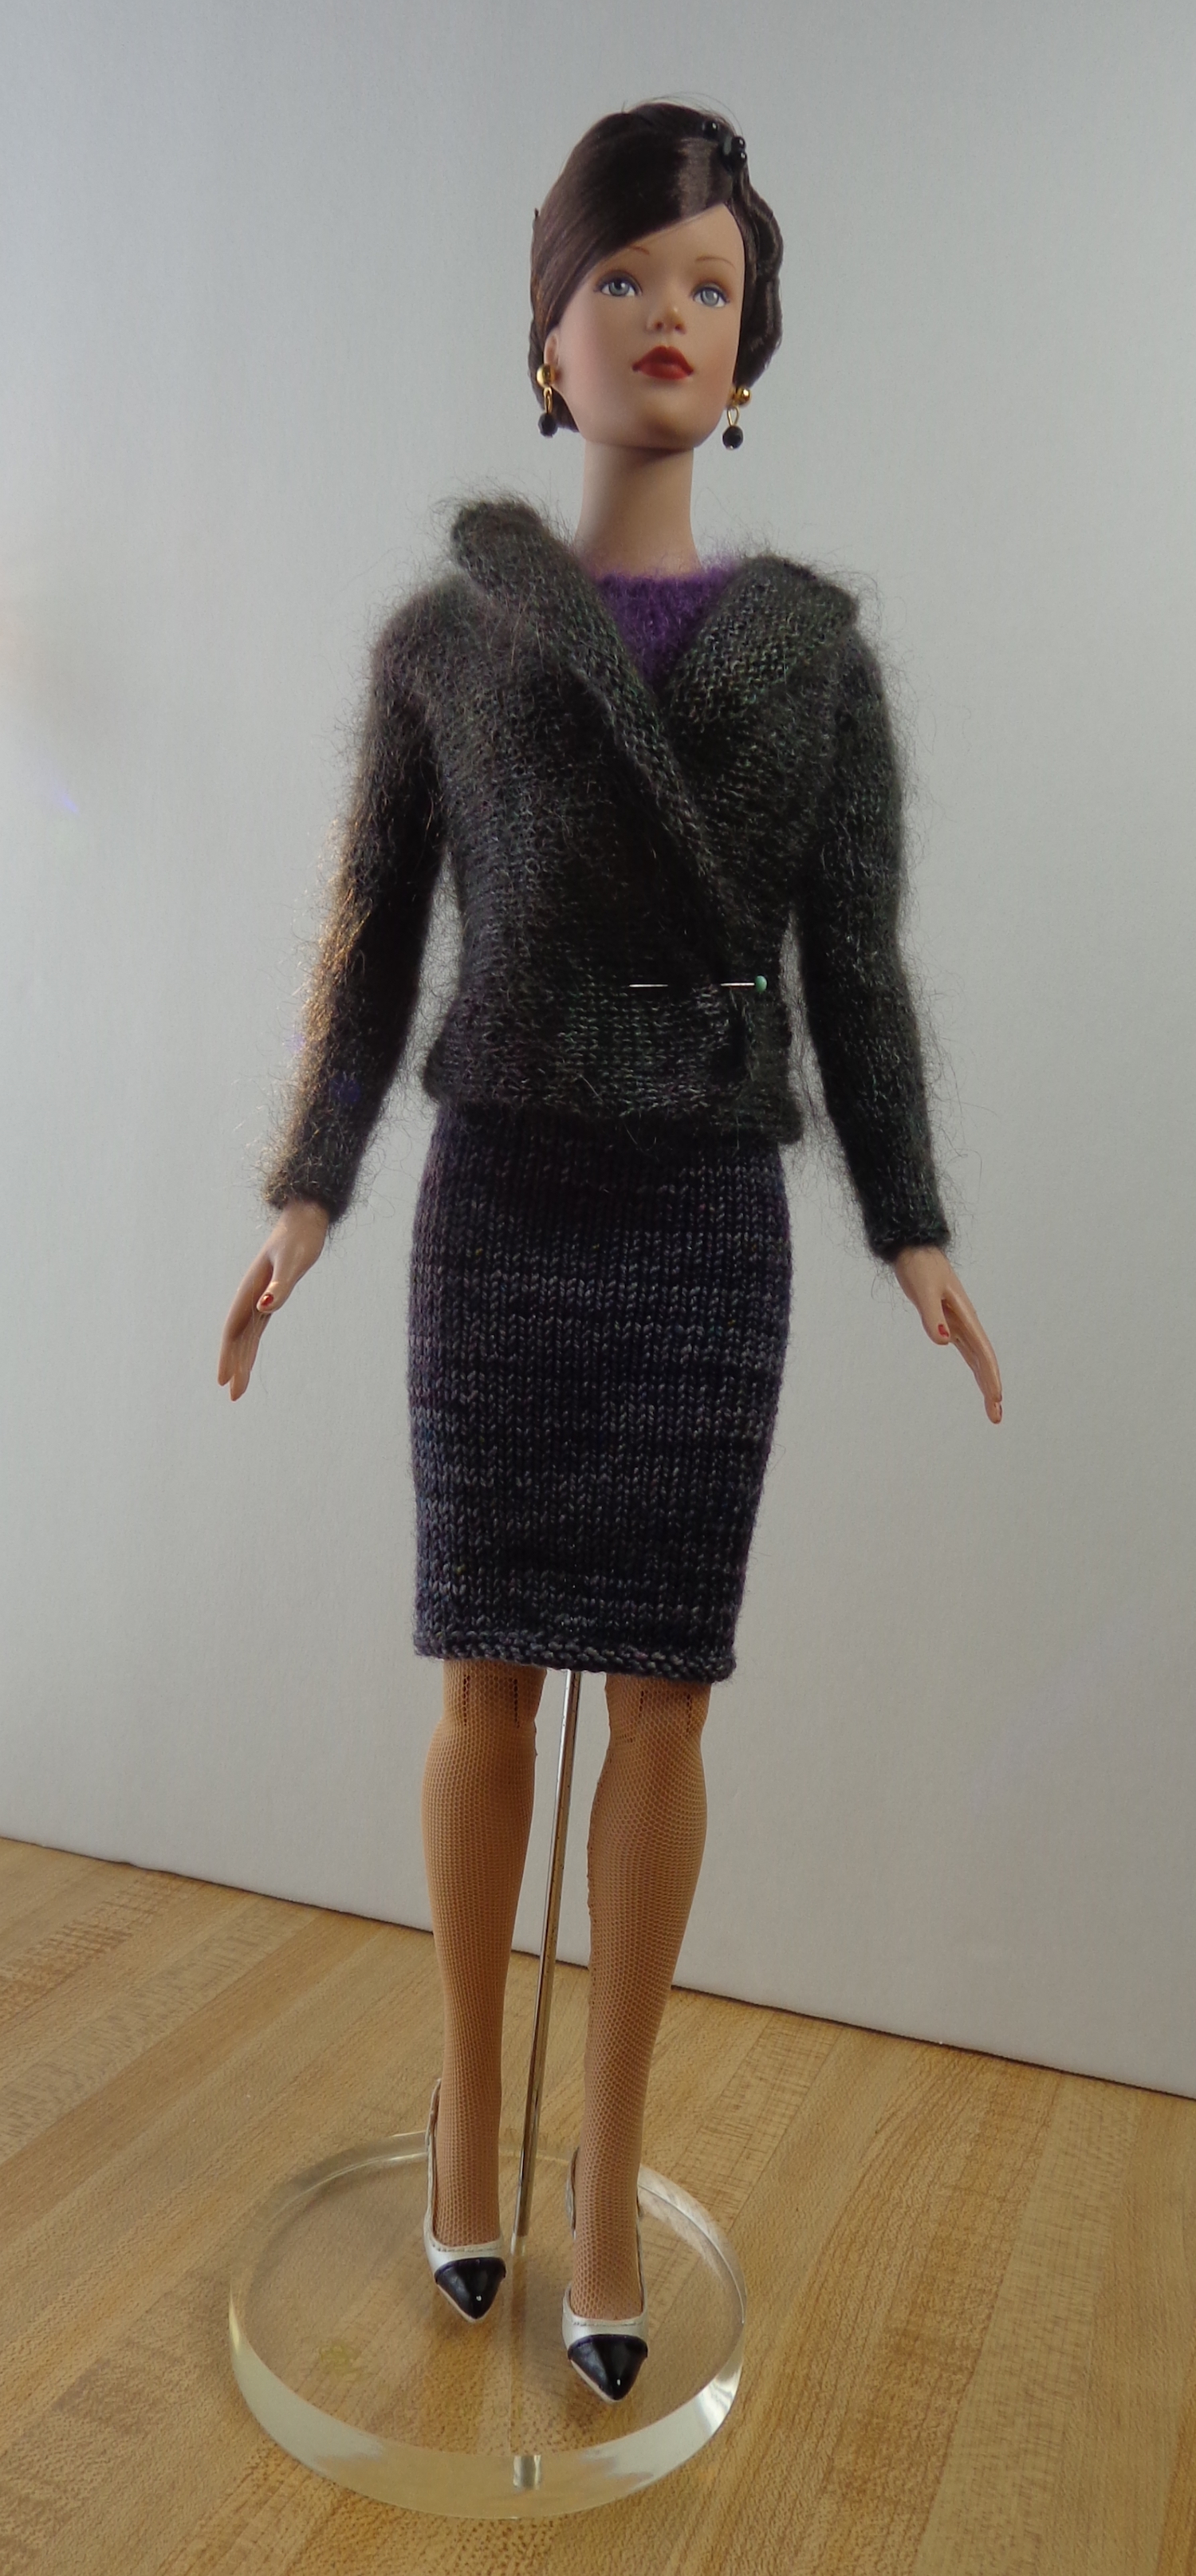
Here’s the sweater on Tyler – I had to cover her hands to get it on, btw:
I put a pin in it because I’m still thinking about the fastening, since it won’t cascade. It wants to be a double-breasted sweater jacket. With a pin at the waist, the fronts curl back like lapels. I put a clear snap at one side and three little black beads on the outside. The other side will stay tucked under when it’s closed. It’s a little more formal look than I expected, but this Tyler seems to like it.
I’m going to knit another version, but from cuff to cuff and without the extended fronts. I may pick up a collar afterward, and am thinking of adding a cable, too.
I have a sweater for myself to show you next week. 🙂
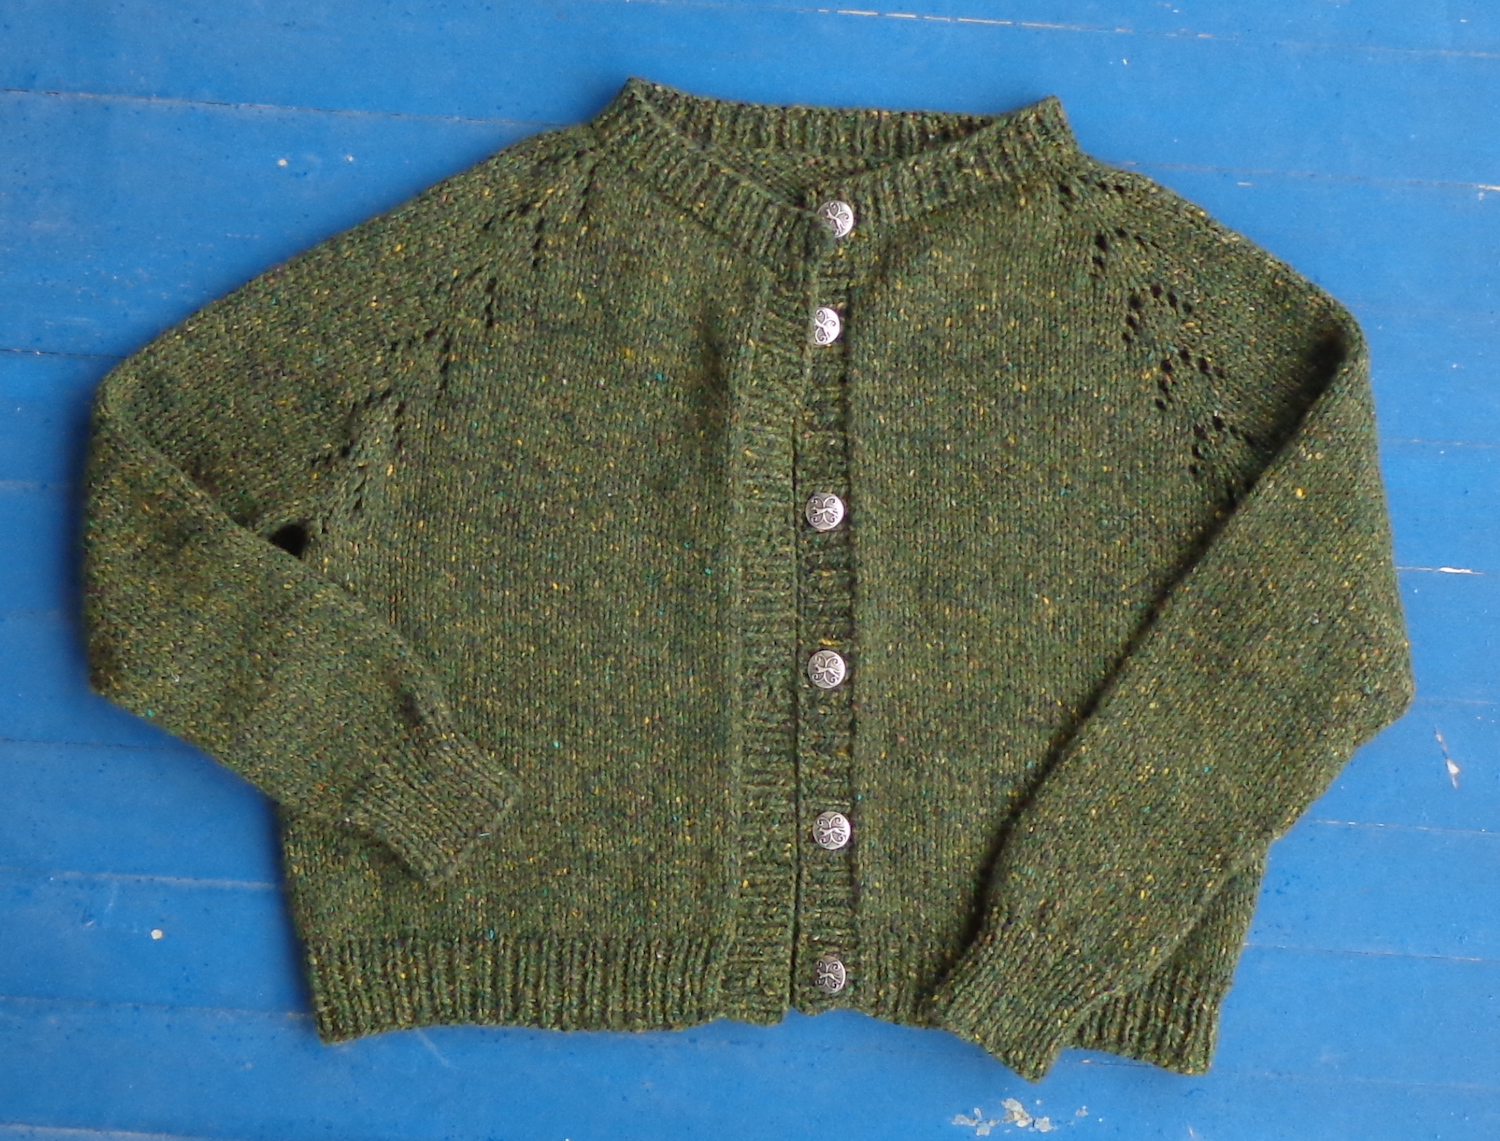
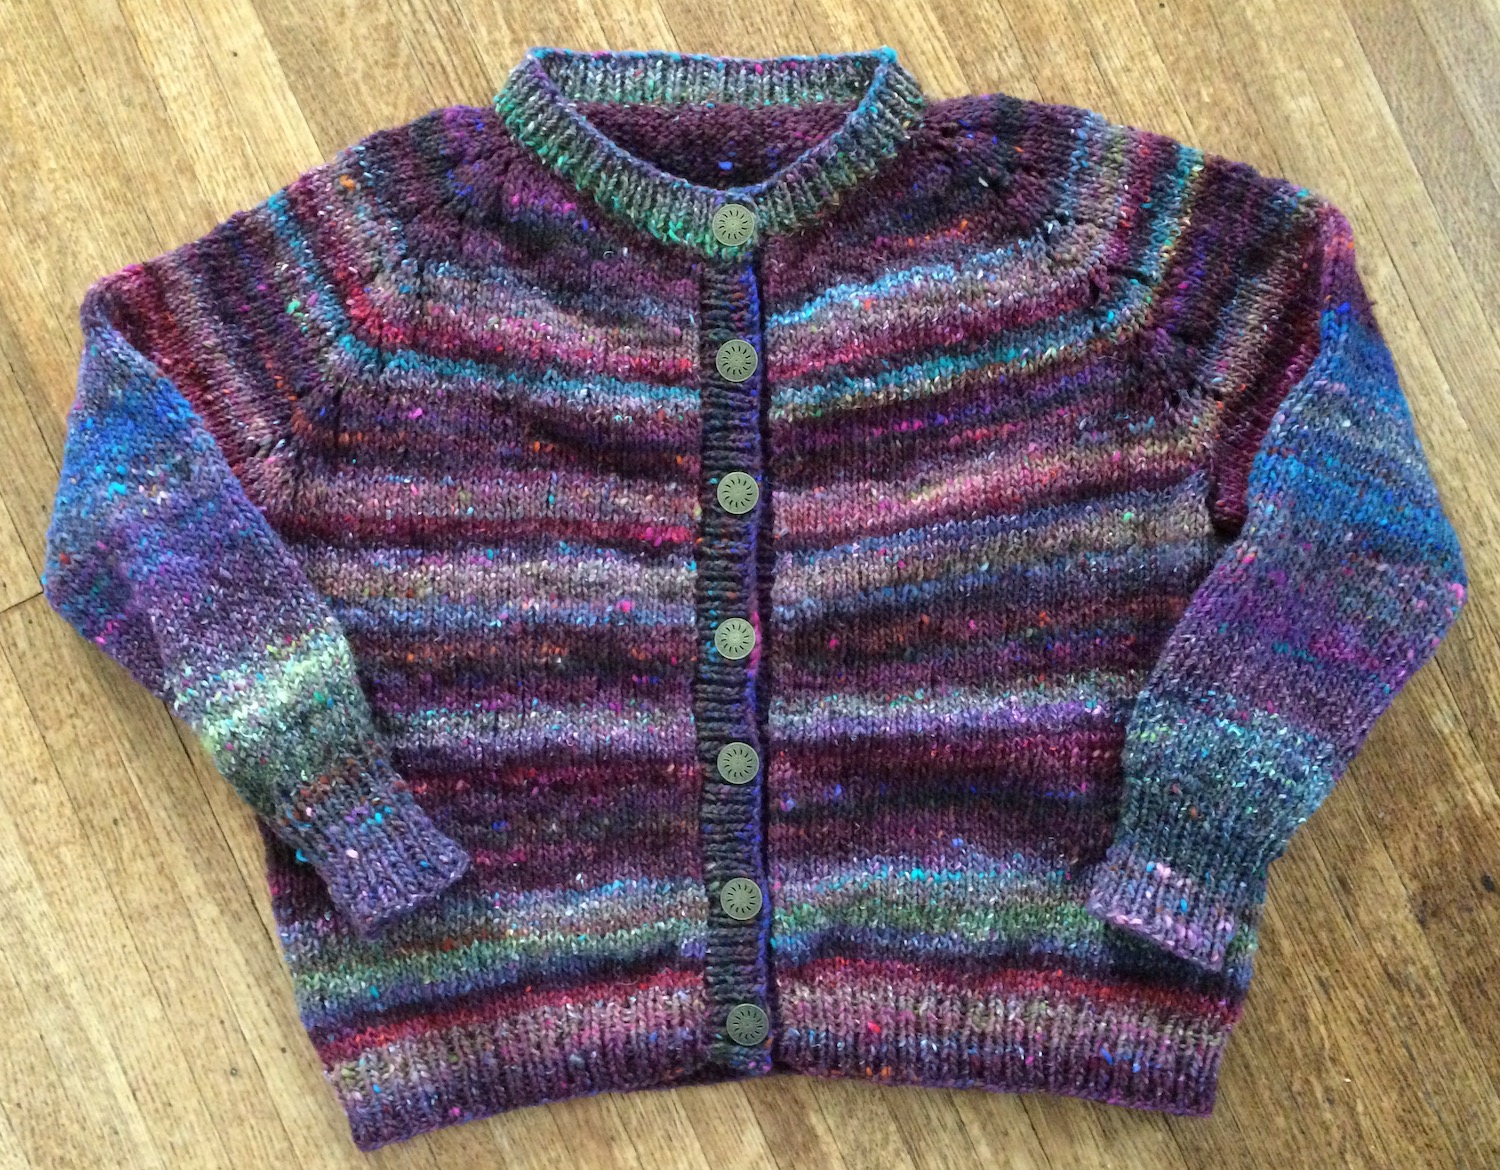
Here’s a sweater I started a while ago and shoved away. I dug it out again recently and got back to work. What made me put it away? The yarn is black and it’s Rowan Kidsilk Haze – and I knit at night while watching TV. Fortunately, it’s in stockinette and I was able to find my rhythm this time.
Here’s the current state of my progress on the back of the sweater:
You can see that it’s crumpled where it was shoved in the bag. What I’ve knit recently is smoother. The pattern is Hebrides, which was a free pattern from Rowan by Lisa Richardson – although it was designed for Kidsilk Haze Stripe. I knit it twice in that yarn:
It’s just a basic sweater with long sleeves and a round neck. I wear these cardigans all the time, especially the purple and green one. The KSH is awesome, too – the sweater is light (it weighs less than 150g) and I especially loved it for travel. You can scrunch it into any bag then pull it out whenever you need it.
I’ve needed a plain black cardigan for a long time and had the black KSH in my stash, so a match was made. Sometimes Ravelry is a bit scary – I evidently cast on the back of this sweater in July 2016. (!!) Well, I’ll get it done by next July. I remember that the back was the trudge and the project picked up speed after that. Maybe not the best choice of a night knitting project in the winter, but knitting KSH in the summer heat didn’t work out either.
I’ll keep on keeping on with this one, but will probably sneak some smaller projects into the queue in between.
I’ve been sewing more garments for myself lately, but with mixed success. There are a few reasons for this: I’m picky, I’ve changed shape since my glory days (when I always cut a size Vogue 8 and it always fit), and I’m learning new tricks. Previously, I’ve mostly sewn woven fabrics but have been learning to sew knits. There are new techniques to learn and new tricks, and also some old habits that are hard to leave behind. I’ve also been experimenting with patterns from indie designers instead of just shopping from the Big4. These designers don’t always come to patterns with the same assumptions, which is both exciting and (sometimes) vexing.
I love skirts and wear them a lot. It makes more sense for me to sew skirts than pants, and makes for an easier fit, too. One of the skirt patterns I go back to all the time is Vogue 7947. It’s a Five Easy Pieces pattern (they probably don’t make those anymore) including a jacket, shell, dress, skirt and pants. The pattern isn’t available anymore and the photographs are pretty dark on the envelope.
The skirt has a yoke and is slightly flared. The top edge sits just below the waist, which makes it really comfortable. The hem falls just below the knee. It has a side zipper, which is slightly less than ideal, but I’ve never taken the time and trouble to split the back yoke and move the zipper to the centre back. I’ve made this skirt a lot, from a wide variety of fabrics.
Here’s the schematic from the back of the pattern envelope:
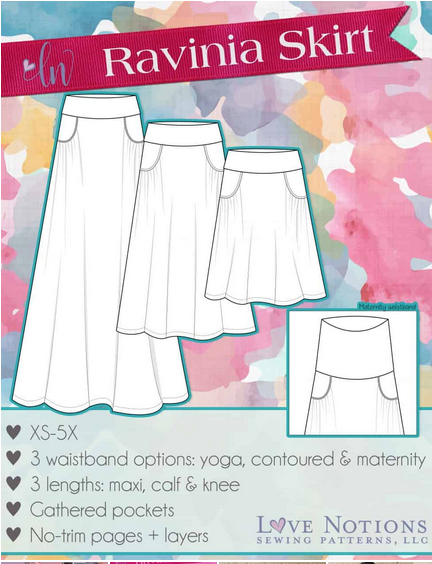
So, when I saw the Ravinia Skirt from Love Notions, I thought “aha! this is the knit version of my fave skirt.” Well, it didn’t quite work out that way, but that’s okay—sewing fails are disheartening, but I always learn something from them. One big takeaway here is that I want to sew knits the way I sew wovens, and that’s not always the best strategy.
Love Notions is an indie pattern company probably best known for their Laundry Day Tee, which is a free pattern download for an a-line t-shirt and a pretty easy knit. I downloaded that pattern, then indulged in a few more because they were having a sale. The patterns are sold as PDF downloads, which you then print and tape together (ugh) or take to a shop to have them printed on a single sheet. All of the sizes are on the same page, the way Burda patterns have always been. Unlike Burda patterns, though, the seam allowances are included. Unlike Big4 patterns, the seam allowances vary in width between companies and even within a design itself. I’m so used to that 5/8″ standard from the Big4. Now I go through the instructions in advance and circle or highlight the seam allowance so I don’t mess up. Love Notions patterns tend not to have notches to match pieces – they have little bars that you need to transfer to the fabric. (I now cut notches instead since I’ve never liked transferring markings.)
The RaviniaSkirt can be cut in multiple lengths, has a full swingy skirt, a contour waistband that sits below the waist (a fave style of mine) and – pockets!
I wanted to love this skirt so much. I made it twice and in the end, I’m just not a fan. It’s comfortable to wear, but I don’t think it’s that flattering. What’s the difference between it and my standard skirt? Gathered pockets, and that is my issue. In the end, I liked having pockets but not how they looked.
I also found this a confusing pattern, and so I did a lot of stitch ripping. I had to read the directions multiple times to figure out what I was supposed to do—since I’ve sewn a lot of skirts together.
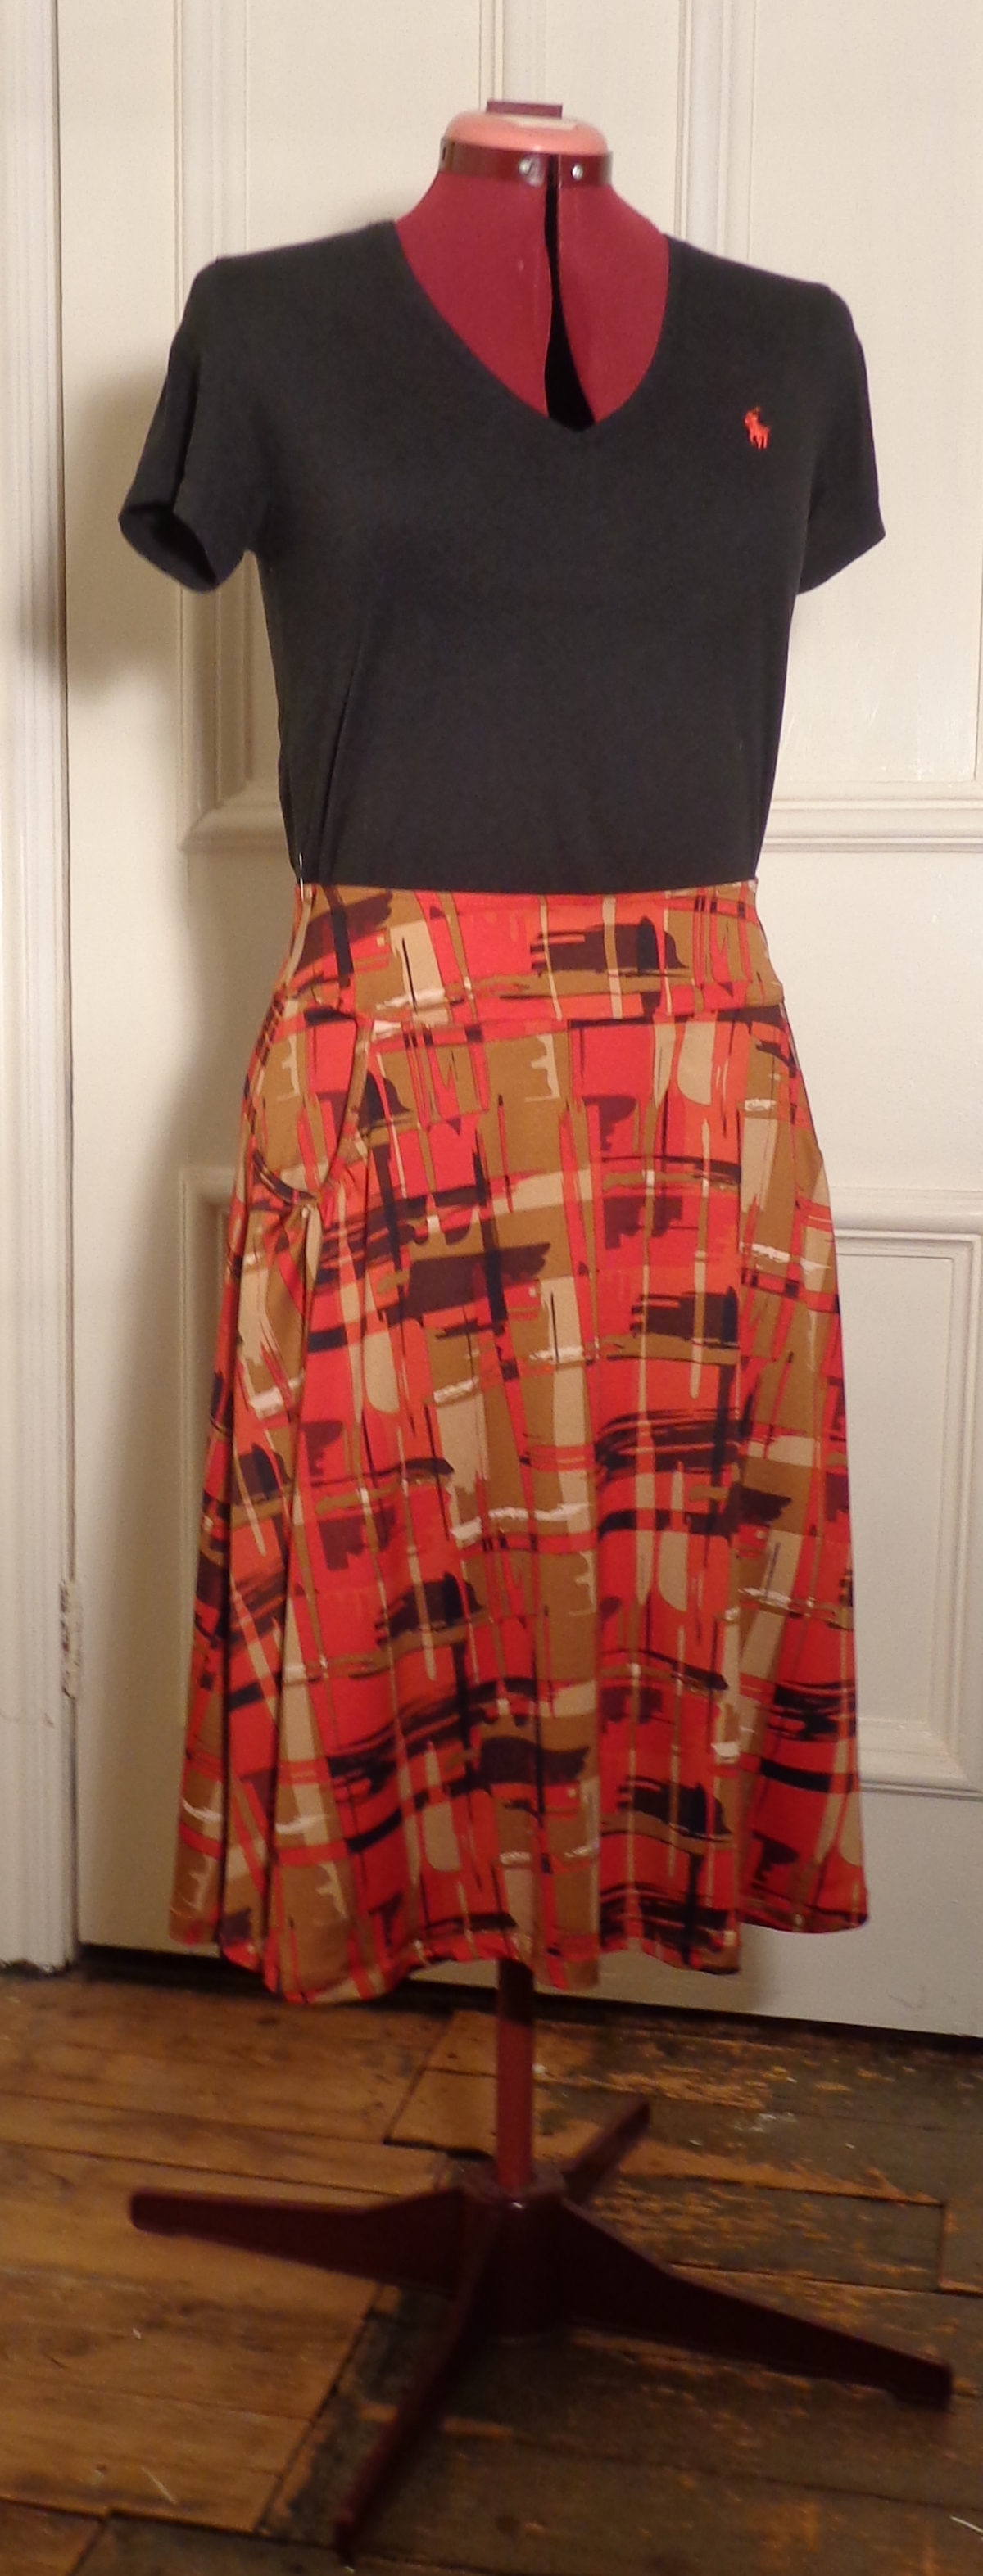
The first version I sewed was in a knit remnant with a red graphic design. I thought I had enough for the shortest version—I’m glad I checked the length before cutting, though. I prefer skirts to be just below the knee and the shortest (“knee length”) would have been above my knees. I’m 5’5″ so it’s not because I’m tall. I added four inches to the skirt length and the finished skirt is just below my knees. I put one pocket piece in backwards by mistake—the wrong side is showing instead of the right, but it’s the pocket facing against the skirt front, so no biggie. I followed the directions to zigzag a length of elastic around the top of the waistband and really disliked how it looked and fit. I ripped it out. As a result, the skirt fits but the waistband is really loose – if I lose 5 lbs, it’ll fall right off. This one isn’t a keeper, but it was a test sew.
You can see that part of the issue is body shape. Nell is rocking this skirt much better than I do, but then my tummy is a little more fluffy since lockdown. (Nell remains as svelte as ever and I had to pin it at the back for her.) So, it’s possible I’ll like this more after I lose those pounds – but I’ll have to redo the waistband.
On this one, I used the option of binding the pockets with a self-facing, the way you’d bind the neckline of a t-shirt. This looks nice, but it’s really thick and stiff, which doesn’t keep those pockets from bulging. There are six layers of fabric under the top stitching: the skirt, the pocket lining, the edging and seam allowance on the back, plus the edging and seam allowance on the front. To be fair, this is my issue – the pattern instructs you to top-stitch the binding in place without turning under the seam allowance on the inside of the pocket, then to trim away the excess. This would leave a raw edge on the inside of the pocket, which I thought might fray with wear. I also thought it might be visible.
Here on my pocket, you can see the wrong side of the fabric on the facing, which was my mistake. You can also see that it’s a puffy little gathered pocket and that the weight of it pulls the side seam toward the skirt front. It reminds me of a medieval purse. 🙂
I cut a second skirt in the calf-length variation out of a really soft drapey knit which is black with flowers. Of course, the fabric weights more and there’s more of it, so I tried the option of adding power mesh into the back of the waistband in an effort to defy gravity. This very effectively tightened the waistband—too much. I couldn’t wear it. I didn’t want to rip out all the stitching, so I just cut off the waistband, making the skirt 1/2″ shorter. I cut a new contour waistband, trying it on before attaching it to the skirt and shortening it to a snug fit before attaching the skirt. it’s comfortable now and I have more confidence in it staying up than the red one, but I’m still not smitten.
Nell, however, looks great in it. (Even if the picture is on a bit of an angle.)
On this one, I piped the edges of the pocket. I did not use cotton cord as suggested by the pattern, because this skirt will be machine washed and when it is, the cotton would shrink. I used a black polyester cord from my stash instead. I think this is a better finish than the top-stitched version, but it’s still bulky. There are six layers of the knit in the seam allowance – the skirt and seam allowance, the pocket facing and seam allowance, and the two seam allowances from fabric covering the piping – but it’s all in the gathers. This leaves the edging less bulky and stiff than the first option, but doesn’t keep that pocket from being puffy. In this softer knit, it really pulls the side seam forward.
And in the end, I just don’t love the skirt. This project doesn’t feel like a win, but I did learn a bit about edging pockets. The funny thing is that I discovered that I have a linen skirt that I don’t love so little that I’d forgotten I had it. It’s a Vogue pattern, too, but I don’t know which one. I love the fabric and it has my fave a-line shape—but it has front slash pockets. They’re not gathered, but they still change the look and hang of the skirt. At least I’m consistent.
I’m going to give the black skirt a try this winter. I’m going to make a long-sleeved t-shirt of the same black print and hem it to fall just at the base of the contour waistband. That might work as I like having a top and skirt that go together to look like a dress.
I may also try to modify it to have flatter pockets. If I give that a try, I’ll let you know. In the meantime, I cut another Vogue 7947.
As I mentioned last week, we went to a knitting event a few weekends ago, and some yarn demanded to be adopted. It’s so pretty that it jumped the queue—even though the sweater isn’t finished, I thought I’d show you the yarn and my progress today.
The yarn is from The Loving Path, an indie dyer, and was put up in a kit for Love Note, a pullover pattern from TinCanKnits. (The dyer’s link goes to Etsy and the pattern link goes to Ravelry.) It included two skeins each of a fingering weight yarn (High Twist Sock) and a mohair silk blend (Aura Lace), both dyed in the same colourway (Bewitched) and intended to be held together to knit the sweater. I wasn’t sure I wanted a pullover but realized once I got home that the yarn combo would work perfectly for the Felix Cardigan. (Another Ravelry link.) I’ve knit this three times and love it.
Here are my three previous incarnations of Felix:
Felix in Rowan Renew
Felix in Rowan Renew
Felix in Noro Cyochin
Felix is a shorter boxy cardigan, knit top-down with a lovely eyelet detail on the raglan increases. All three of these were knit with a single strand of Aran weight yarn. These two yarns together will be more like a DK weight, but Love Note is knit on even larger needles than Felix. The result is a lacy airy fabric, like this:
The fabric is soft and squishy, and as light as a cloud. I just love all the gradations in this hand-dyed yarn. It’s all silvers, greys, blacks with hints of turquoise, blue and pink. This looks lighter than the actual yarn in real life. It was a dingy day so I added a lot of light, which means you can see the colours but the shot is slightly over-exposed. It really appears as a smoky black with flicks of other colors. I have some buttons in my stash which perfectly mirror that combination, too.
Another great thing about this is that I’ve known for a while that I need a black cardigan. I have a Hebrides on my needles in solid black Kidsilk Haze but haven’t made a lot of progress—since I tend to knit at night while watching TV, thin black yarn isn’t the best choice for my eyeballs. I’m almost half done this Felix in a week, so (as long as it doesn’t get stuck on Sleeve Island) I should have that black cardigan soon. I’ll show it to you when it’s done.
And finally a bit about admin. I feel the need for a little more organization here on the blog. I’ve been cutting back on my online time (which had crept upward during the pandemic) and am spending more time with my many projects. This is all good but I’ve ventured beyond just knitting. As projects near completion, I want a plan for posts. I’ll keep knitting posts on Wednesdays but will put sewing posts on Fridays and anything related to dolls on Mondays. That should give you an idea what to expect when you visit.
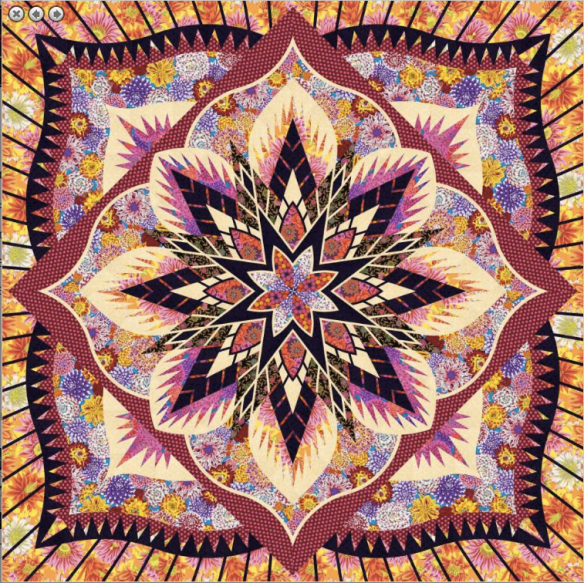
I haven’t been working on my Moonglow quilt for a while, so a few weeks ago, I pulled it out again. I’ve always loved this quilt design and thought that when I bought the kit, I’d be obsessed with it until it was all pieced. Not so. It’s been a very fits-and-starts project. I tried to figure out why. (The picture at right is of someone else’s completed quilt.)
I first posted about it in April of this year, although I’ve had the kit for at least a year. Here’s that first post, with the alternating blocks and the first three stars done. In my May post, with the next two stars, I admitted to not loving the process, even though I’d switched to paper piecing.
I figured out that I’m not having fun because I’m disappointed in my results. My blocks aren’t completely flat (they ripple) and the points don’t match as neatly as I’d like. There are a bunch of reasons for this, even though I’m a fairly accurate seamstress. You can paper-piece some parts of each block, but never yet has it been possible to piece the entire block on paper.
Many of the blocks have set-in corners, like this one. So, the corner quadrants are paper-pieced, but then have to be set into the central star.
Many (many) seams are on the bias of the fabric, so they stretch.
There are many slightly angled seams, and it’s tricky to pivot at the right point. Under the sewing machine foot, it’s hard to see the point.
So, I used some techniques from dressmaking to minimize the effect of these things. When I have paper piecing, for example, I’m leaving the paper on each piece until it’s sewn in on every side. That helps to stabilize the seams on the bias. I’m also pinning the beginning and the end of each of those seams, then using more pins in the middle, to make sure it doesn’t shift while being sewn.
When setting in a corner, I sew the seam that comes to the corner only as far as the seam allowance and backtack it. That means I can move the seam allowances more readily when insetting the other piece. I’m also sewing out from the point, doing the inset in two seams (instead of sewing in to the corner, pivoting, then sewing out). Lots and lots of pins on these insets, too.
When there’s a slightly angled seam, I poke a pin through the paper at the pivot point, leaving a hole. That’s visible when I’m sewing so I know exactly where to pivot. I’m also clipping the paper at those points, which makes it easier to re-align the seams (when the needle is down in the turning point) to continue sewing.
(You can also see in this image how much fabric is wasted in the trims. I’ve been saving these pieces as they’re big enough to cut the corner squares in the sashing.)
And of course, pressing, pressing, pressing. I was pressing a lot before but now I’m doing it even more.
I’ve done three more stars and am much happier with the results. I also enjoyed sewing them more. They’re still not perfect, but they’re better. These three blocks allowed me to complete the second column and the fourth column of the quilt. Here they are:
They all look much better once pieced into the quilt. I have five more blocks to make – the four corners and the middle star. There are two blocks designed for the corners and you make each one twice. The centre star is kind of the big finish, the most complicated block of all.
All my borders are cut and the alternating squares pieced, and many of the fabrics won’t be used again. There’s a lot of fabric left over, which means I’ll be able to redo any of the blocks that really irk me. (And there will still be a lot of fabric left! The cuts in this kit are really generous.) I’m getting close!
In the meantime, I’ve been seduced by another beauty: look at this!
This is called Crimson Poppy and was designed by Judy Niemeyer (the designer of Jumping Jax Flash, which I’ve made) and sold at Quiltworx. Here’s a link to buy the pattern for the central medallion – it ends with the red polkadot square. The central block is on point in this version. You can also buy a kit for this larger version, with the four corner extensions and all the fabric required at Quiltster, right here.
On this page, there are a number of colour options and corner additions displayed, also as kits including fabric. You can also (be still my heart) join Quiltster and change out the fabrics online, customizing your own version, then buy your own kit from them. Hello, timesink – but what fun!