Another Bag Finished

I found this bag partly completed in a stash of WIPs. The pattern is Sipalu and I knit it in Patons SWS. (That’s Soy Wool Stripes in the red mix and Soy Wool Solids in the solid red. I used another yarn with the same content for the solid black, Gjestal Garn Bris. I suspect that yarn is discounted. The SWS is.)

Sipalu Bag by Kerin Dimeler-Laurence knit in Patons SWS by Deborah Cooke

My Ravelry project page says I knit it in 2011 and finished it in 2013 – but that, alas, is not entirely true. It was completed this far – as above – but the lining pieces were only cut out and unassembled. They were stashed away with it.

Here’s my original blog post about it.

I added piping to the interior of the red bands and you can see them in the picture above. That one is a before-felting picture – the one below is after felting. That button is a porcelain one from a local maker and I just love it.

Sipalu Bag by Kerin Dimeler-Laurence knit in Patons SWS by Deborah Cooke

So, the lining. I suspect I put this aside because the construction of the zippered edge was a little complicated. I had assembled the lining for the body and put a pocket on it already.

Base of Sipalu bag knit by Deborah Cooke in Patons SWS

I’d also secured a plastic base in the bottom with some purse feet. Ikea makes these thin ones that come in packs of two, and you can cut them to size with a utility knife. The colours change with each new batch, but I always have a few in my materials stash.

Now that tricky bit. The bag is essentially a box and is maybe 3″ deep, so I needed to centre the zipper between two pieces across the top, between the handle ends. Once I got out my ruler and made a plan for that, the lining came together quickly. There was a good bit of handsewing, to line the handle and secure the bag lining, but it wasn’t that big of a job.

Lining of Sipalu bag knit by Deborah Cooke in Patons SWS

Why is it that these incomplete projects that sit waiting for years always take a very short period of time to finish up? It happens every time.

And here’s the finished bag. It looks a bit dark in this pic, thanks to a dingy day – but it’s DONE!

Completed Sipalu bag knit by Deborah Cooke in Patons SWS

Sipalu Felted Bag

I’ve finished another felted bag – is it possible to have too many of them? – and although it still needs to be lined, I thought I’d show it to you today. It won’t look any different from the outside once it’s lined, after all. 🙂

The Sipalu bag was available from Knitpicks as a kit, including the wool, but I didn’t like that it wasn’t felted. I knew the result would be less sturdy unfelted, particularly knit of a fingering weight yarn (the kit came with Palette.) The pattern for the Sipalu bag was and is available on its own, so that’s what I bought. The pattern specifies knitting with a number of colours, but I decided to use a self-striping yarn with a contrasting solid instead. I dug into my stash and came up with my felting standby, Patons Soy Wool Stripes and Soy Wool Solids. I used Black and Natural Plum.

I did run out of black. Since the SWS yarn is discontinued, I couldn’t find any more. (I tried.) I then substituted solid red SWS, but didn’t like it in the fair isle – there wasn’t enough contrast with the self-striping Natural Plum – so I frogged that back but used the red on the garter stitch edges. The bag sat, unfinished, in my knitting basket while I tried to figure out what to do. One day I saw a very similar yarn to SWS balled with another company’s label, which gave me the idea of using the Ravelry search engine to find a substitute. Ravelry has a great search engine that lets you specify many variables – I used the content (soy and wool) and the weight (aran) , then looked for single ply yarns in solid colours. I found Gjestal Bris, with a buy link, so ordered some of that. It’s a bit thinner than the SWS, but since I was felting the end product, it worked out just fine.

Here’s the unfelted version of the bag: Sipalu Bag by Kerin Dimeler-Laurence knit in Patons SWS by Deborah CookeYou’re probably wondering about the white cording. I decided that I wanted the edges of the bag to be more round than the garter stitch alone would make them. I wanted them to be like piping around the edge. So, I bought some cotton cord at the fabric store, the kind that’s used to make piping (!), and sewed it in to all the edges. (I slip-stitched the garter stitch ridge closed on the inside of the bag, with the cord trapped inside.) Because I wasn’t sure if the cord would shrink – or whether it would shrink at the same rate as the SWS – I left the ends long. After the felting was done, I tugged the cords so that the piping was smooth on each edge, then trimmed them and secured the ends inside the bag.

Here’s the bag felted and ready for its lining. It could have been felted just a little bit less, but felting is an inexact science. The button is handmade of porcelain. Sipalu Bag by Kerin Dimeler-Laurence knit in Patons SWS by Deborah CookeHere’s my project page on Ravelry, if you want to see more nitty gritty details.

What do you think?


Another Upcycled and Felted Bag

In the midst of all this blog tour frenzy and book promotion, let’s talk about something different.

Let’s talk about knitting.

In fact, let’s talk about recycling other people’s knitting. I stepped away from my computer and from my desk this weekend to create something. Here it is:Felted bag made from an upcycled sweater by Deborah Cooke

The bag is a gift – for someone who almost certainly doesn’t read my blog, so it’s safe to show it here. It’s made primarily from a Gap sweater, which was a crew neck pullover with raglan sleeves and lovely fair isle patterning. I got it at the thrift store for a buck, because someone had tossed it into the washing machine and started the felting process. It probably hadn’t fit the person after that. I brought it home and tossed it into the washing machine again to felt it even more. I really liked how colourful it was and knew it would make a great bag.

The bag itself is made of the body of the sweater – you can see the ribbing from the hem at the bottom of the bag. I often cut that off, but this sweater had shrunk a lot and I didn’t want to make the bag smaller than it could be. (It’s about 12″ deep finished and 13″ wide.)

As far as shaping goes, I used the body of the sweater up to the underarms. The flap is actually the front of the sweater. I cut the raglan seams open on either side of the front and kept all of the front, shaping it at the neck to have a nice curve for the flap. Then I cut straight across the back of the sweater at the underarms – the fair isle pattern made it easy to do that straight! – and removed the sleeves.

The sleeves will become another small purse. I’ve cut the pieces and all that will go in the trash from this sweater is the neck ribbing. 🙂

Then I dove into my fabric stash, which is quite considerable. I chose a colourful check for the contrast piping and cut it on the diagonal, making piping with cotton cording. The lining is the same cotton. The bag is lined with a drawstring top, contrast piping all around and nylon straps. I like the button a lot. I’m less happy about the straps but handles are always an issue for these bags. I have bought leather handles in the past, but they’re expensive and I haven’t seen any locally for a while. I used the handles and lock strap from Grayson E. on this bag, for example, but the set cost over $100. It was fine for a special project – I had actually knit this bag myself – but is not something I’ll do for every bag.The tapestry bag also has feet, which I didn’t put on this newest little purse.

As far as the purse goes, my only regret is that I didn’t put a zippered pocket inside – I usually put one in the lining but just forgot this time.

What do you think? Do you recycle anything to make it into something else?

Damask Bag in SWS – 4

Well, you probably remember me going on and on (and on) about this fair isle messenger bag. Happy to say that it is DONE and you won’t have to hear anymore about it after today. I finally finished the knitting after abandoning that double knitted strap that wasn’t going to get knitted in my lifetime.

The most recent post on the bag is HERE, and it has links to the earlier posts. Unfortunately, the nifty black I-cord I was showing you in that picture is no more. After finishing the strap, I decided that all of the I-cord had to be in the variegated violet — so I ripped out the black I-cord. I’m not a huge fan of knitting I-cord, so it nearly made me weep to tear out three feet of it. BUT it looks much better with the I-cord all the same colour.

Here it is, ready to be felted:Kauni Damask Understated Bag by Karen Stelzer knit in Patons SWS by Deborah Cooke

It’s about 24″ wide and 22″ deep in its unfelted state. My hope was for a bag more like 18″ wide and 13″ deep. I’ve felted a lot of SWS and that seemed about reasonable to expect in terms of shrinkage. I was a bit worried about it being so humungous – would this be the felting project that finally finished off my trusty (ferocious) top-loading washing machine?

Nope. But it didn’t felt the way I expected. Felting is, by nature, somewhat unpredictable, at least the way I do it. Putting the piece into a pillowcase then chucking it into the washing machine and coming back in half an hour leaves lots of opportunity for variation. I just don’t have it in me to stand guard over a felting piece though, pulling it out of the machine at regular intervals, much less to felt by hand in the tub with a plunger. I have made my peace with unpredictability.

Sometimes. On the first ride through the washer, the bag felted quite a bit. The flap and strap hardly felted at all. The design was starting to lose definition on the bag, but the bag was still pretty big. I had to leave it on the top of the washing machine and visit it regularly – poke it, prod it – to come up with a plan. Mostly I had to accept that I was past the point of no return – it was useless as it was; there was no going back; I might as well risk another run through the washer.

Before putting it back into the pillowcase, though, I tried to figure out how to make the strap and flap felt more than the bag on this run. The front of the bag had also felted more than the back on the first pass. So, I rolled up the bag and tied it into a big roll, with the back of it on the outside, much the way a butcher ties up a roast. It seemed that less exposure to hot water and less agitation could make the bag felt less. (Remember that I make stuff up for a living.) The flap and strap were free to move around inside the pillowcase. Back into the machine it went.

This worked pretty well. I made progress. But now, I have to get down to regional felting. Ugh. This is the handwork, in the sink, rubber gloves and hot water, just to get the flap and the strap to felt consistently with the rest. I have doubts. For the moment, I have to let it sit, maybe visit it, poke it and prod it once in a while. It’s still huge – about 18″ by 18″, but mostly I’m not loving it as much as I did (although this photo might change my mind.) Here it is:Kauni Damask Understated Bag by Karen Stelzer knit in Patons SWS by Deborah Cooke

What do you think?

Damask Bag in SWS – 3

So, I’m still knitting on this ginormous bag, and still loving it to bits. Let’s see – I started to tell you about it HERE, then continued the story HERE. This is the third installment of the story!

I’ve finished one side of the bag, in the same checkerboard pattern as the base. Here’s what it looks like now:Kauni Damask Understated Bag by Karen Stelzer knit in Patons SWS by Deborah CookeSo, the bottom of the bag is at the bottom of the photo here, folded behind the front and back. The top that will remain open is at the top, and the flap off to the top right. To knit the side, I picked up the stitches across the bottom, then picked up stitches all along the edge of the front and the back. Those I left on spare needles. As I knit the side, I joined it to the front and back by working two stitches together at the end of every row. Once I got up to the top, I worked applied I-cord all the way down the join, across the bottom and up the other side – that makes that nice thick black line. Right now, the live stitches at the top of the side are on that green piece of sock wool.

I’ve flipped it over since taking this picture and am repeating this exercise on the other side of the bag. Once that’s done, I’ll just need to knit the handle. I think I’m going to try double knitting on that, so the checkerboard pattern will be on both sides. I’ll knit from one end, make the strap, then graft it to the other side of the bag once I guess that it’s long enough.

After that, there’s just the felting to be done! I can’t wait to see this bag felted and finished.

What do you think of it so far?

Damask Bag in SWS – 2

I told you a few weeks ago about a fair isle bag I had started to knit and intended to felt.

Well, here’s an update. (I’m going on about this bag because I really really really like it, so you get to hear about it!)

I’ve finished the knitting of the bag itself and here’s a picture of it flat:Kauni Damask Understated Bag by Karen Stelzer knit in Patons SWS by Deborah Cooke

The edges really want to curl, and it’s not entirely straight, but you get the idea. I had to hold the camera over my head to get the shot – it’s that big – so the end of the button loop didn’t make it into the image. Oh well! It is about 66 inches long and roughly 22 inches wide – of course, it will shrink a lot when I felt it.

I changed direction twice with my knitting to get the flowers to all be knitted the same way. The first part I knit actually ended up in the middle – it’s the section with the black flowers with the coloured background: I knit from the black line which is just below the checkerboard in this picture down to the pink line. This will be the back of the bag.

When that was done, I picked up stitches at the bottom (a provisional cast on would have been an excellent plan) and knit in the other direction: I knit the checkerboard for the bottom of the bag, then the panel with the coloured flowers on the black background, casting off at the end. This will be the front of the bag.

I used the same technique as in my Stripey Noro Messenger bag and knit two rows in reverse stockinette where the bag will fold.

Then I knit the flap, starting at the point. I tried to replicate the curve of the original, even though my gauge was completely different and I was knitting in the other direction. It’s not too far off. I knit one flower motif, then 40 more rows of plain black. When that was done, I knit that pink line and left the stitches on the needle. I knit pinky-purple I-cord around the flap, then grafted the flap to the top of the first panel I’d knit. The bag will open at the top and the flap will hang over the front of the bag.

And presto – all the flowers are knit in the same direction AND they will all be right side up when the sides are done. I really like how the shading worked out for the single flower on the flap – the brown at the bottom looks like roots in the soil, then yellow- greeny bits for the leaves and pink/purple for the flowers. A happy accident there.

Since this photo was taken, I’ve continued with the sides. I’m knitting them the same way as my Stripey Noro Messenger bag too – first I picked up stitches across the bottom of the bag (on either side of the checkerboard), and now I’m knitting up the sides of the bag, joining to the front and the back as I go. When I get to the opening and flap at the top of the bag, I’ll knit the handle.

Getting there!

What do you think?

Damask Bag in SWS – 1

I have a tendency, it seems, to make things more complicated than they need to be.

In fact, I really enjoy when a project of any kind evolves into a much more complicated project than I’d originally anticipated. This is true of books and it’s true of knitting projects. In a way, a project that becomes a complicated beast is a good thing – it means, to me, that the project has taken on a life of its own, and demands its own shape. And when it does that independent of how such a move impacts my own scheduling and other demands, I know it’s not just got a life of its own – it’s got a bit of attitude. I like that a lot.

So, this month, I have been wrestling with a book manuscript that ran off and did that, as well as a knitting project that has run off and done that. We’ll talk about the knitting project today. This was supposed to be straightforward.

Uh huh. Nothing worth doing is ever straightforward, and this bag has proven to be very much worth the doing.

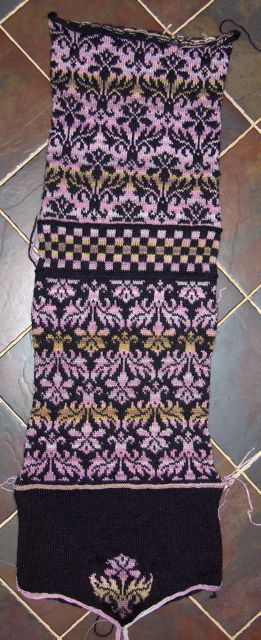
Here’s the basic idea. There is a fair isle pattern which is extremely popular in the land o’ knitters, and is particularly gorgeous in our old fave Kauni Effektgarn. It’s become known as Damask.

Here’s the sweater and quite possibly the first reference to it. (The stripey bits in the middle are for steeks – she would later cut open the front to make a cardigan.)

As much as I like this sweater, I didn’t want to make a cardi like this. I have other plans for my Kauni.

But then, I saw this pattern, for a tote bag, using the same fair isle pattern. It’s called Kauni Damask Understated Bag. (Not sure if you can see this without being on Ravelry, but it’s free to create an account. Go for it.) Since I noticed in the notes that some people were unhappy with the resolution of the design once the bag was felted, I decided to use thicker yarn. Venturing into the almost-endless wealth of the stash, I discovered a hoard of Patons SWS, which is excellent for felting. I decided to use one variegated colourway with black.

Of course, I didn’t actually have enough of either colourway in my stash, so had to hunt down more. This was my first complication. Both are discontinued, but I found the yarn with some online searching. Getting it only required a trek through the snow on a Friday to a LYS which isn’t particularly local. No worries. I had the materials.

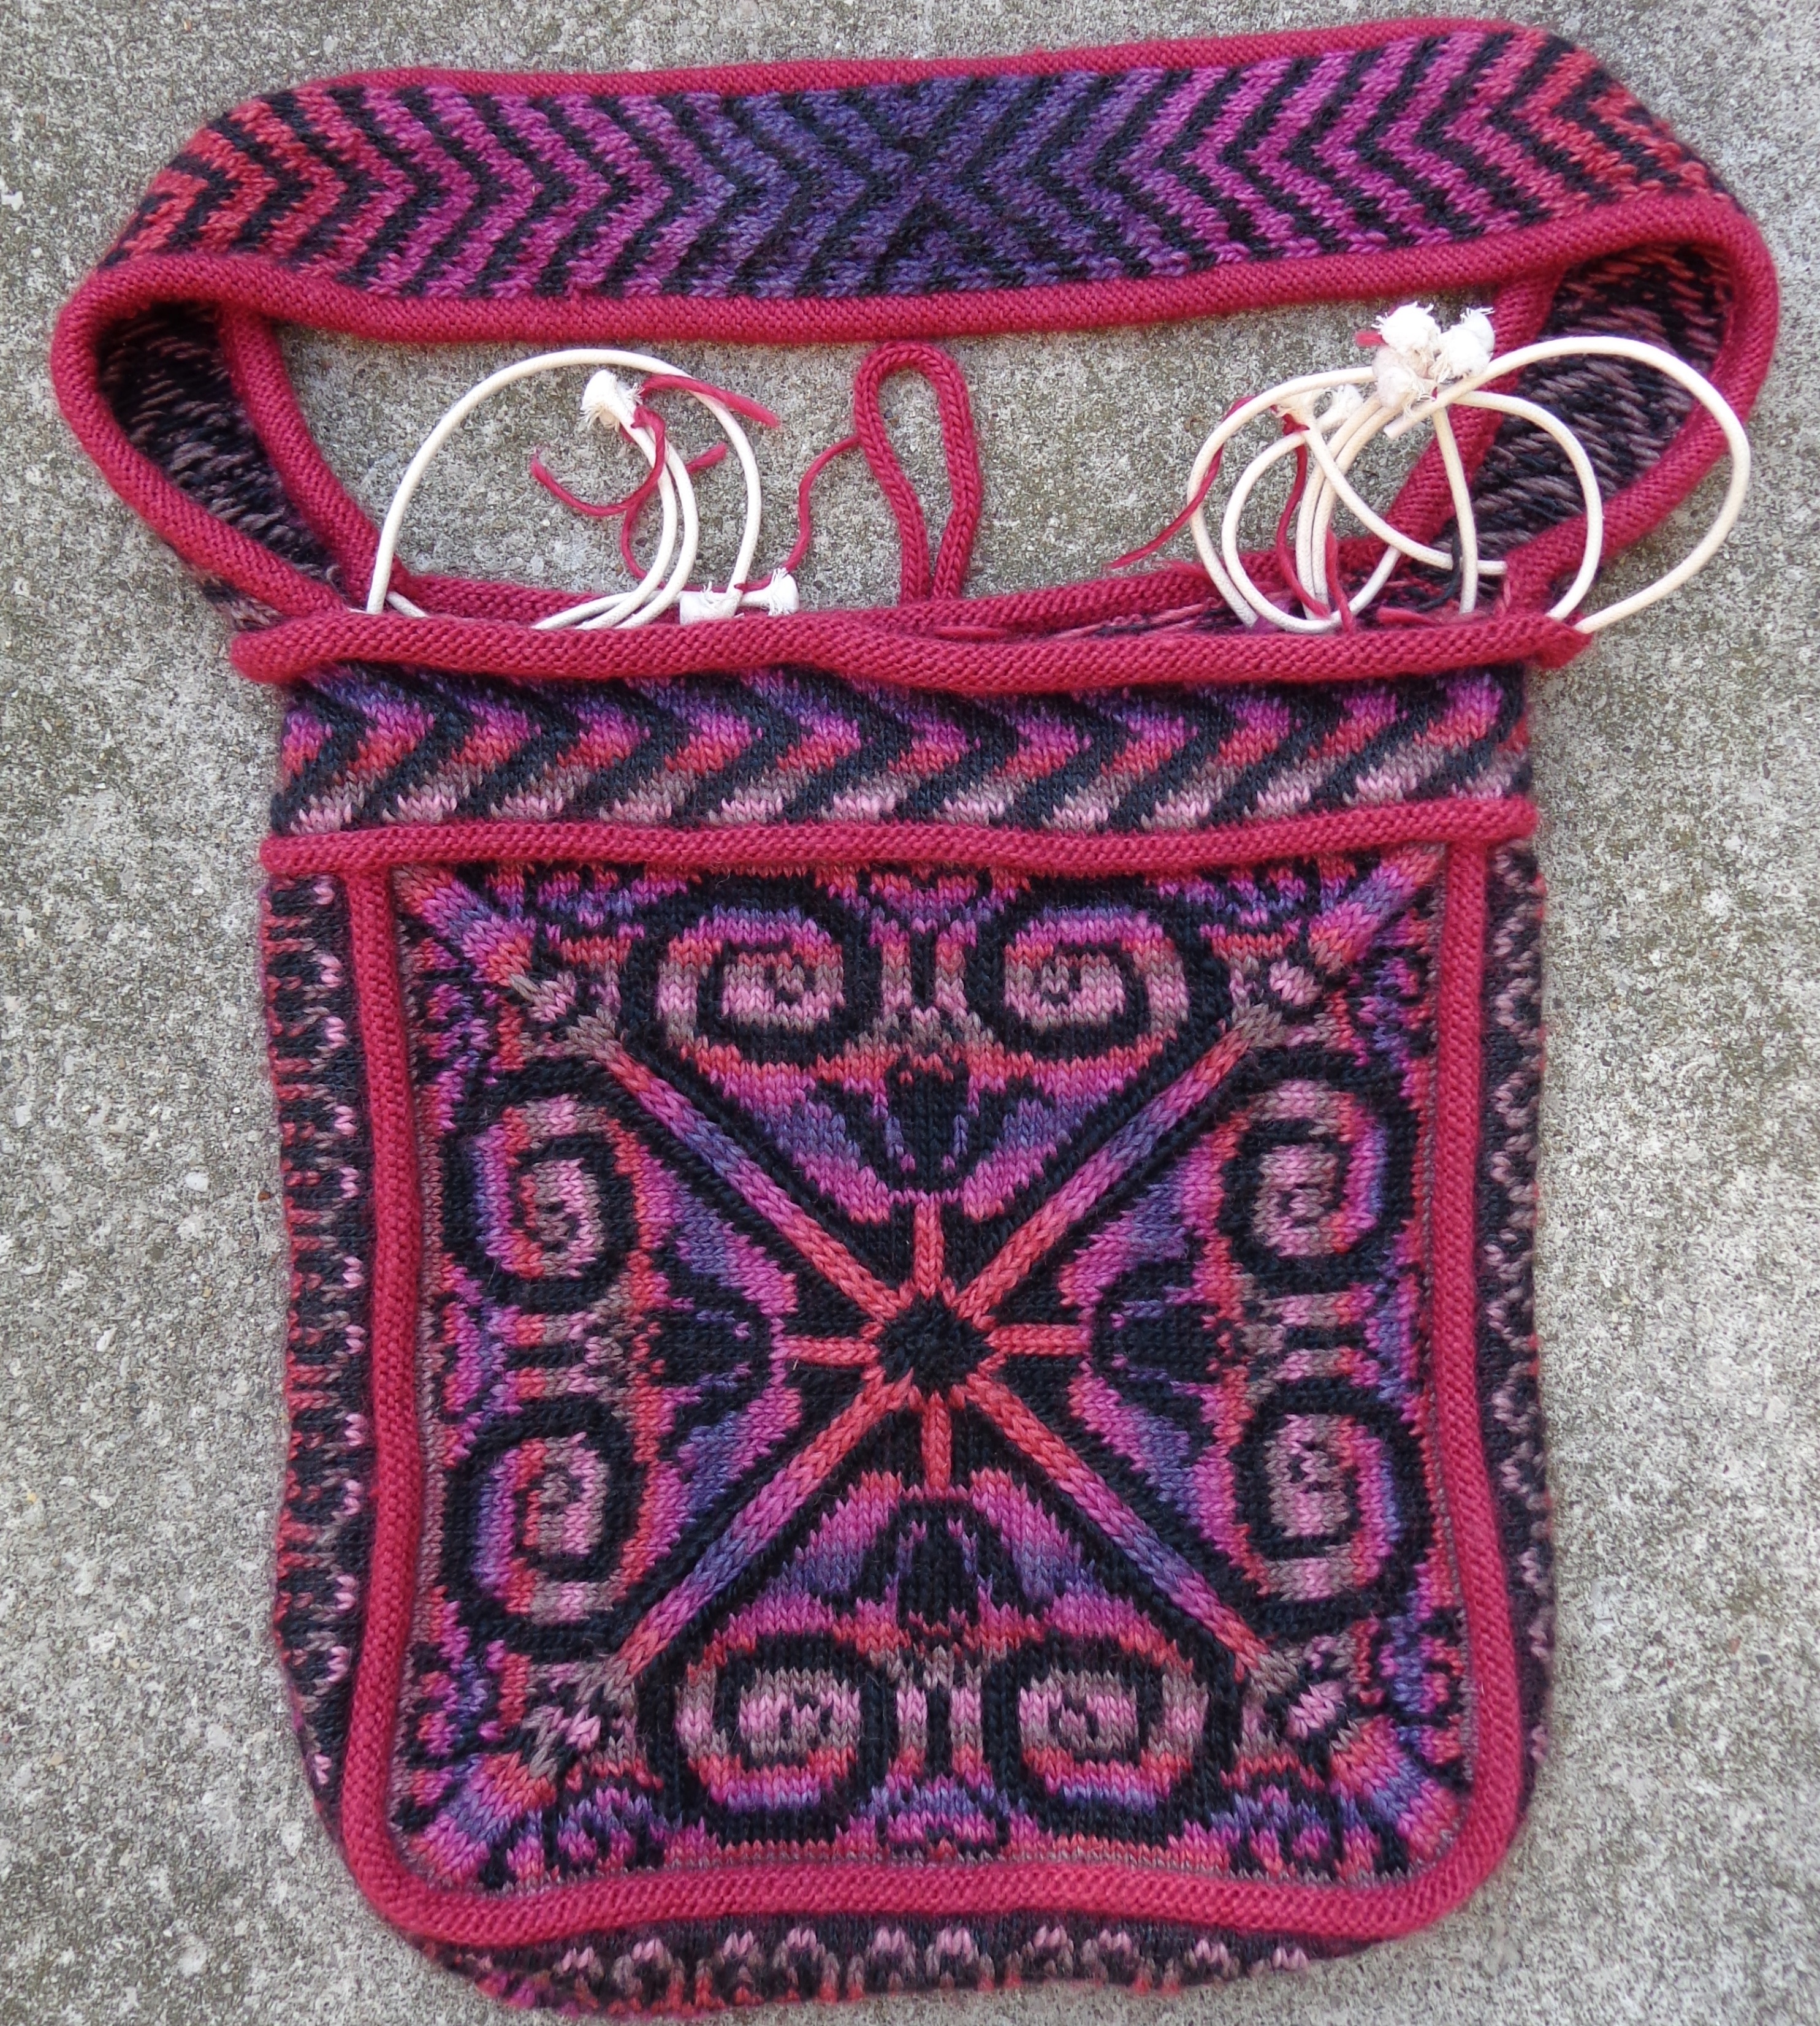
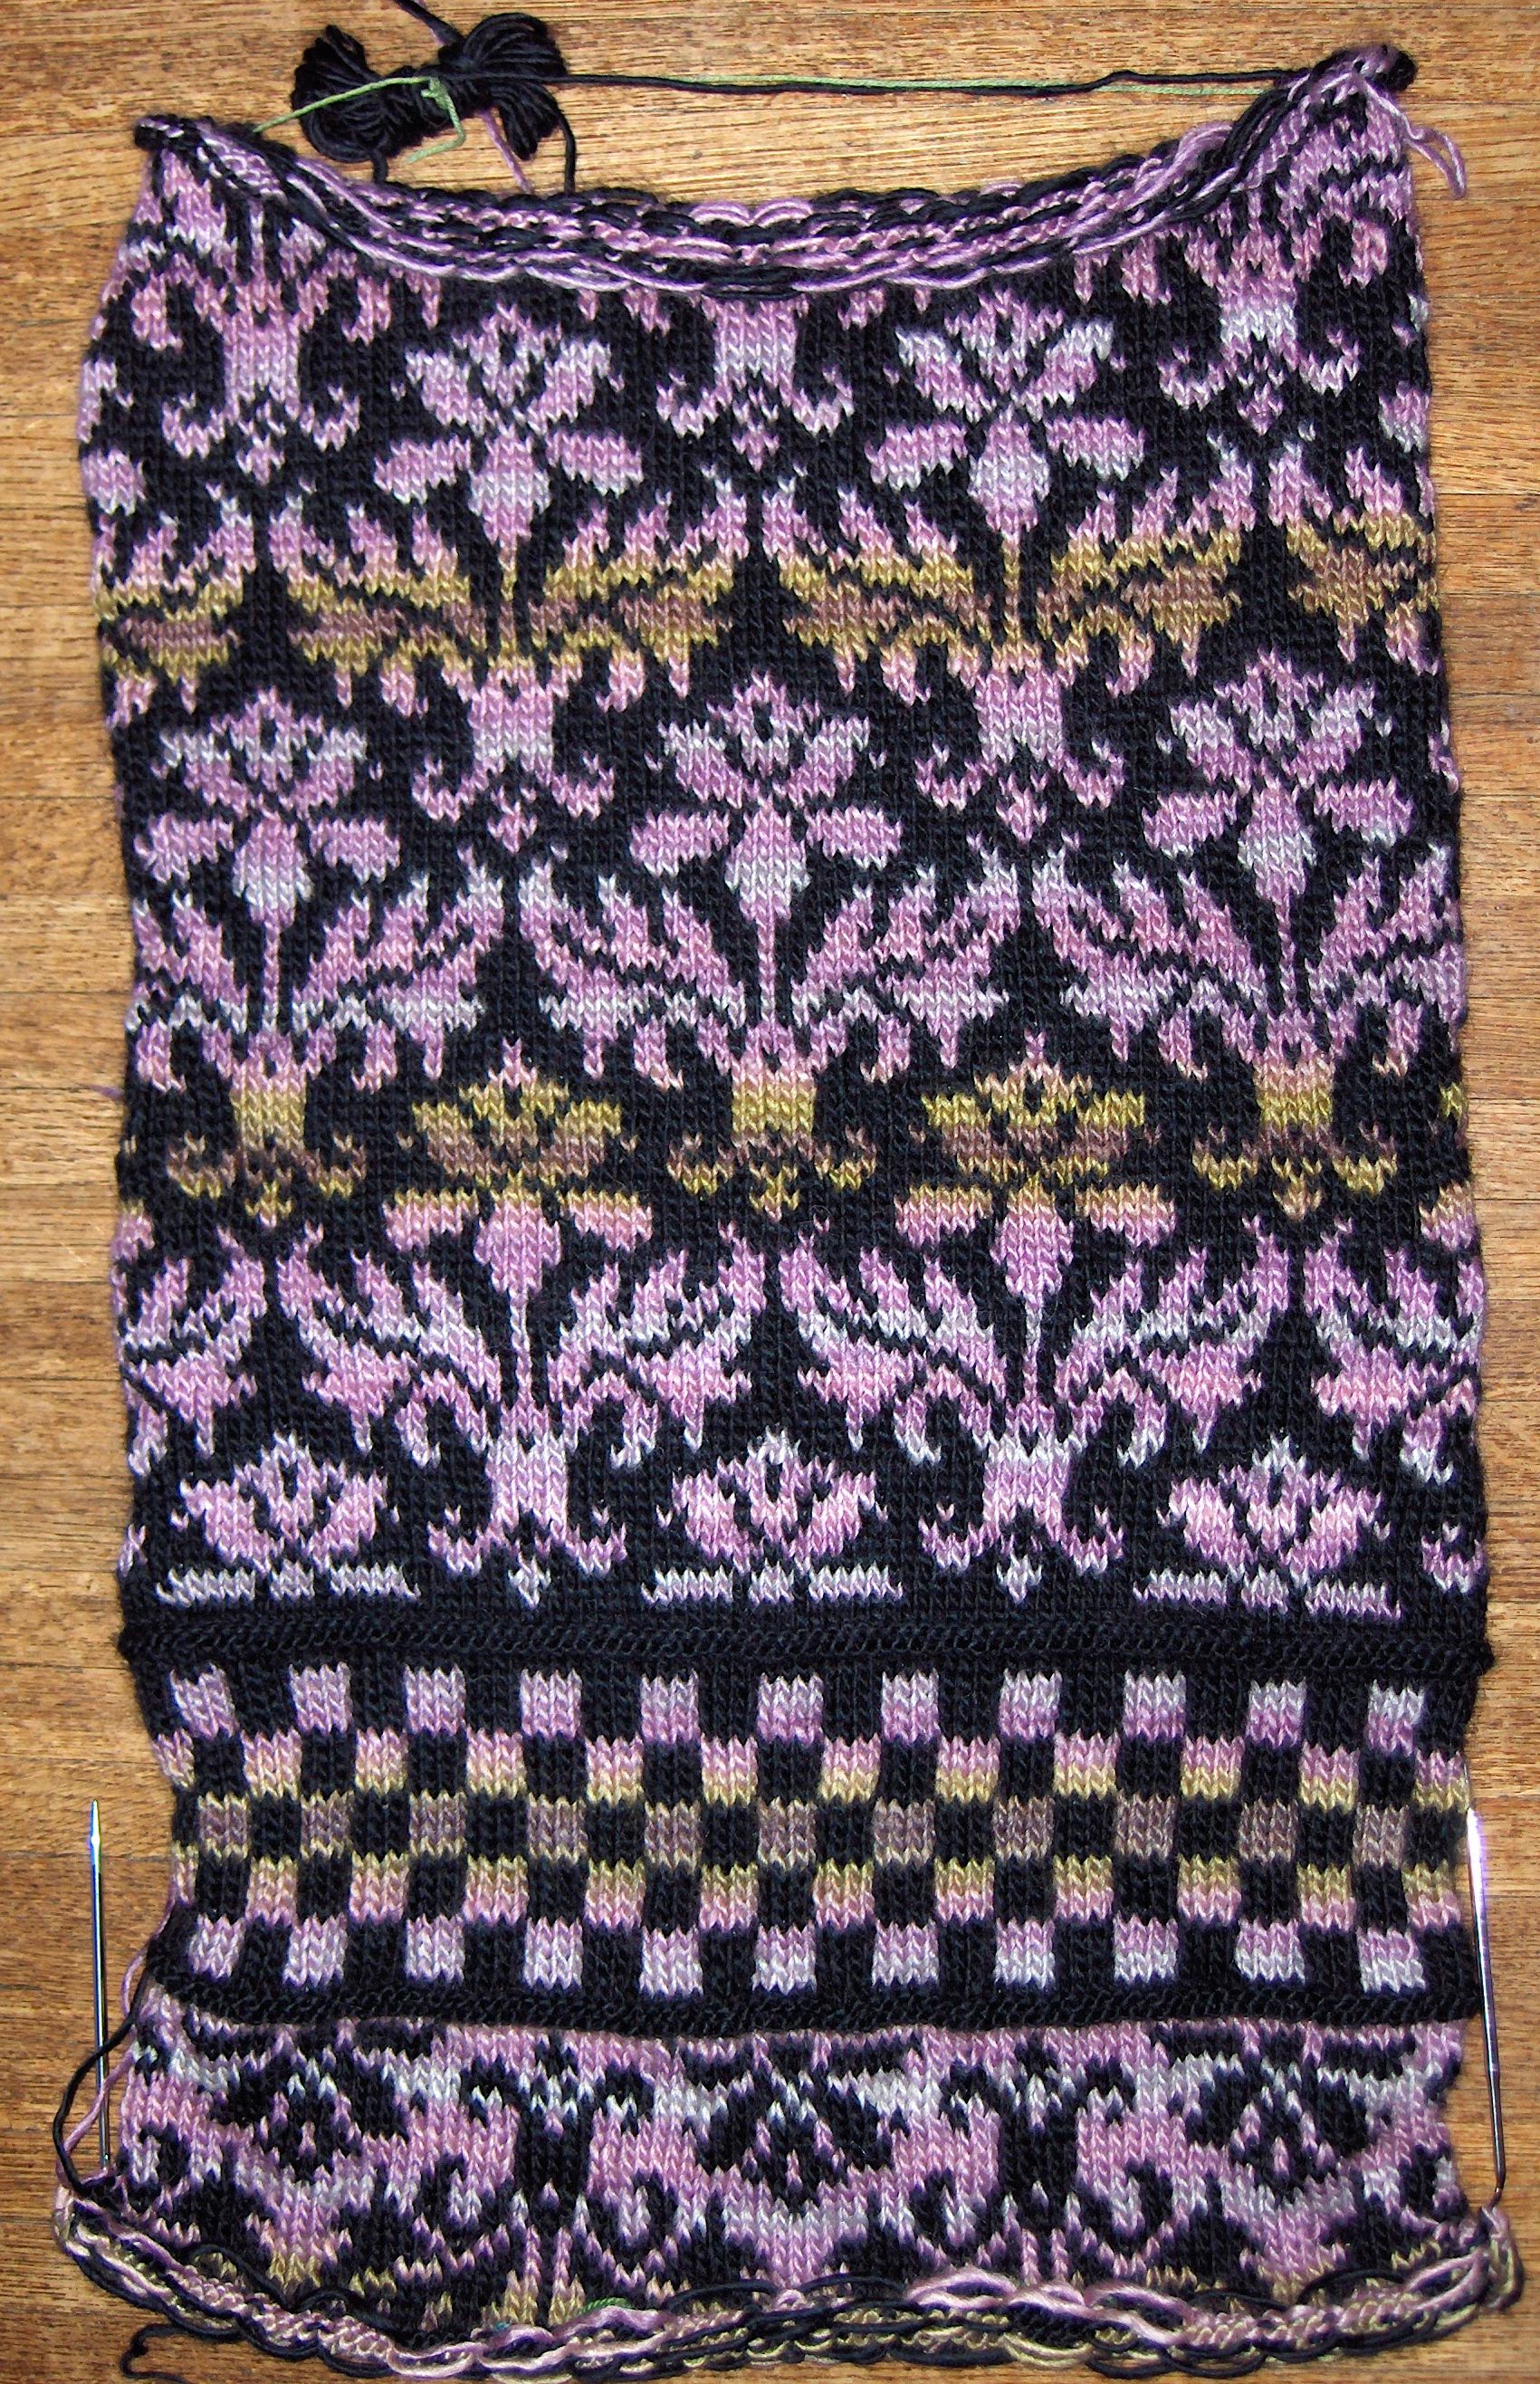
Time for the second complication. This bag is worked in the round. You knit the rectangle for the bottom of the bag, then pick up stitches on all four sides and knit up. This works because the Kauni has very long colour gradations. SWS does not. Sooooo, I decided to knit the front of the bag, then knit the back. This would allow the SWS to do better stripey things.

I cast on. As I knit the front, the third complication came to me. I realized that the flower would have to be right side up on both sides of the bag. I hadn’t started at one edge – I’d started at the bottom and I would have to start the other side from the bottom as well.

Okay. After I knit the front, I put all my stitches on waste yarn because I’m not sure yet about the flap. I then picked up stitches for the bottom of the bag on the cast-on edge. (At this point, I realized that a provisional cast-on would have been an excellent idea, but no, I hadn’t done that. This counts as a consideration, not a complication. It’s not that hard to pick up from a cast on edge and since the bag is going to be felted, any extra tension there isn’t an issue.) I knit the bottom, then started up the other side, reversing the colour usage. Just because.

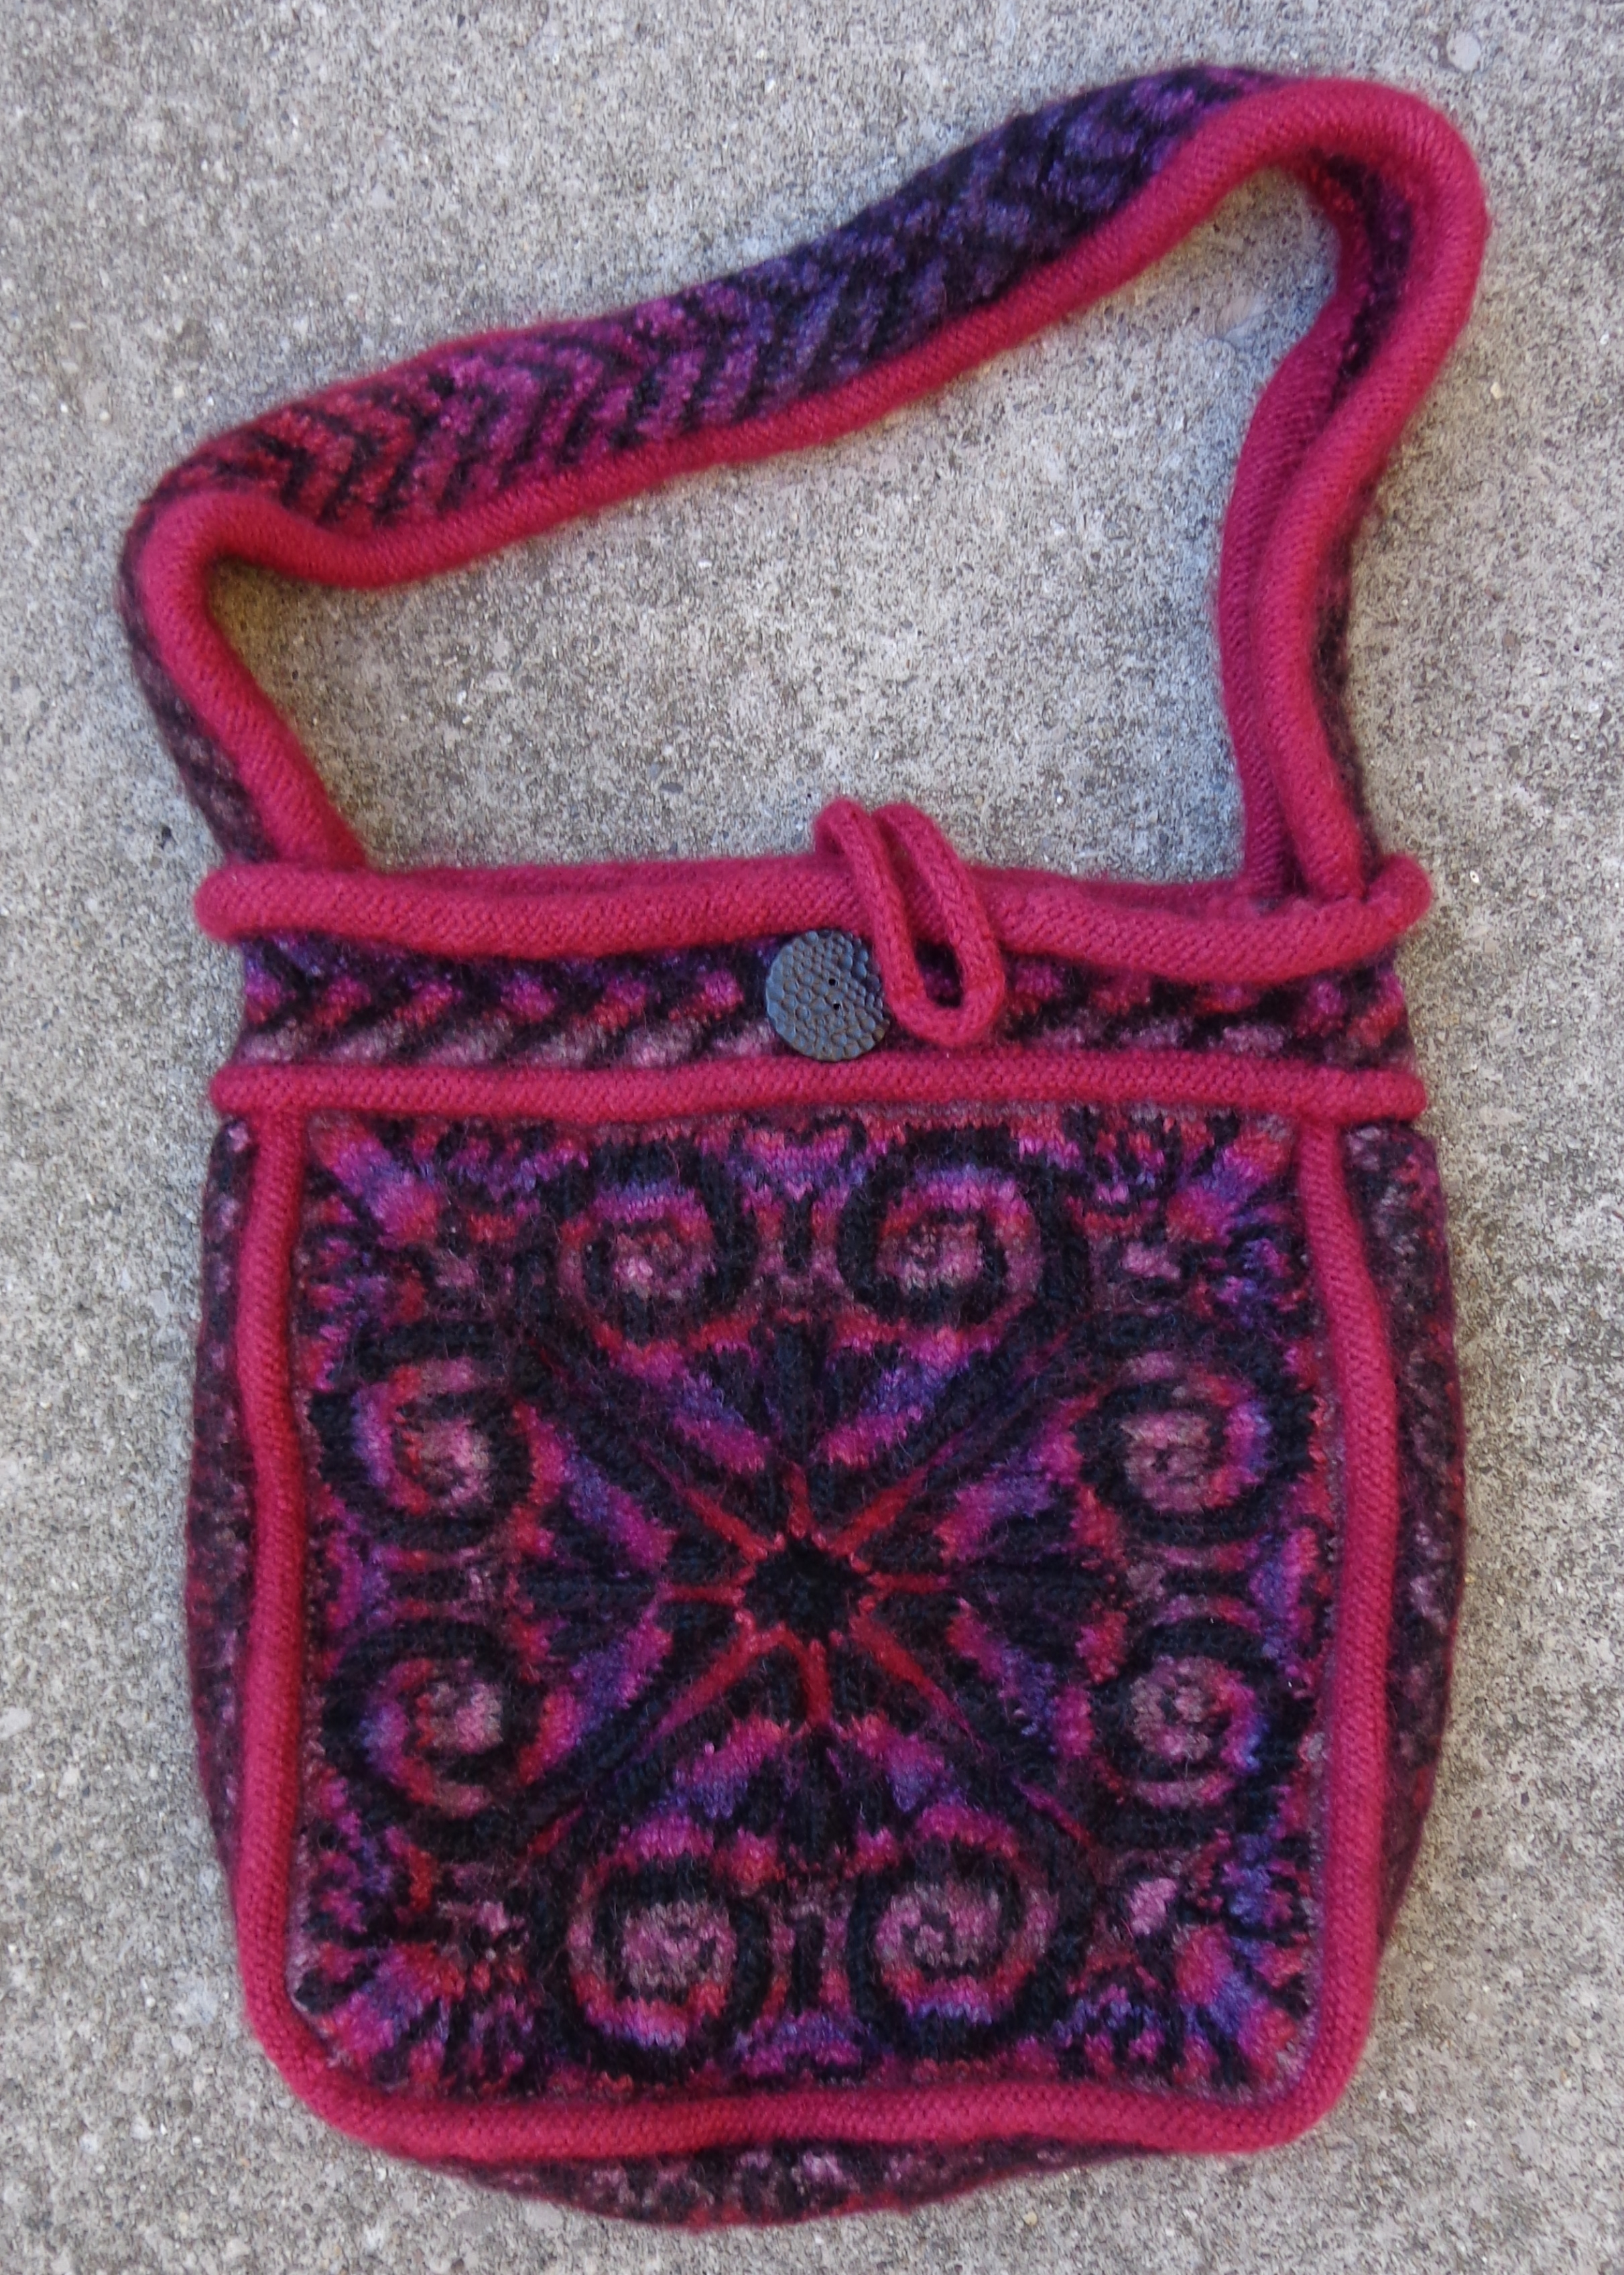
It’s a good thing I really like how it’s coming out. Here’s how it looks, on the needles and unfelted.Kauni Damask Understated Bag by Karen Stelzer knit in Patons SWS by Deborah Cooke

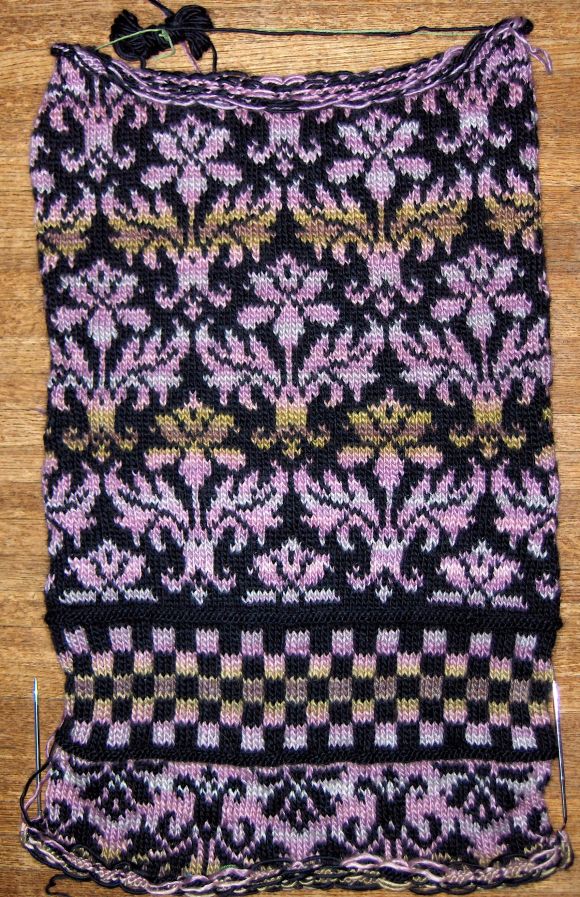
Time for another complication? It is! I had been thinking of putting a flower on the bag flap, instead of leaving it plain as in the pattern. That’s why I left those stitches on waste yarn – I was pretty sure I wanted the first colour combo on the back, and I figured I’d just grab those stitches and knit the flap. As I knit the other side, though, I realized that the flower on the flap would also have to be knit right side up. There’s our complication. Instead of carrying on from the back to knit down the flap to the point, I’ll have to cast on the point of the flap and knit UP, then graft the flap to the back of the bag.

I haven’t even thought about the handles yet. There’s got to be another complication there, just lurking…

Do you ever start projects that morph into more than you expected? Do you like that challenge or not?

Stripey Noro Messenger Bag

Well, this week we have kind of a re-useable bag theme going on here, at Alive & Knitting. First there were bags we could make from reclaimed or vintage sweaters, that had been felted to make them tough. And now, here’s a bag knitted from scratch, ready to be used again and again and again.

But first, a bit of a saga. Remember the sweater I made from Noro Kureyon? Well, I had some leftover yarn and wanted to use it. (Stash management is key, right?) Remember my Dr. Seuss Socks? There’s just something about using a self-striping yarn like Noro in stripes that works for me in a big way. Noro Kureyon is said to felt wonderfully, so I decided to make a felted stripey messenger bag with those leftovers.

I paired the Noro with a colourway of Patons Classic Wool that I bought on a pilgrimage to Spinrite – thus, yes, doing some responsible stashbusting while pursuing a responsible project. This must have been a test colour because it’s not on their site. ($9.99 C for 8 x 100g balls. That’s not temptation. That’s inescapable acquisition.) Actually, there were a number of colours available at the mill, all of which had one ply that had a long graduated colour change. This is a mustard with the coloured ply changing through reds and purples. It worked well with the greens in the Noro Kureyon.Patons Classic WoolThis is the massive project that has been taking up my needle time. After all the knitting was done, I wanted to add I-cord. Ugh. There are about 10,000 miles of applied I-cord on this bag. It’s not strictly necessary, but it does make the edges look so much better. Here’s a shot of the I-cord in progress – it’s done on the left but not on the right:Stripey Noro Messenger Bag by Deborah Cooke knit by Deborah CookeSee how the I-cord neatens up those edges, and makes the bag look more crisp? I get really bored knitting I-cord, but I love the results.

I found some amazing buttons in my stash – I bought these because they were so wonderful, but never found a project for them. (Until now.) They look like pieces of amber, but have little lines inside them – Mr. C. says they look like rutilated quartz. I’m taking his word on that.

And here’s the finished bag before felting:Stripey Noro Messenger Bag by Deborah Cooke knit by Deborah CookeIt’s HUGE. The edges wanted to roll so I pinned them down – here’s hoping they just stay flat once it’s felted.

And here it is, after felting and finishing. Of course, it has a zipper and a lining, because I’m kind of compulsive like that.

Stripey Noro Messenger Bag by Deborah Cooke knit by Deborah CookeI LOVE this bag! What do you think of it?

My Ravelry project page is here.

The pattern is posted as a free download on Ravelry right here.

Amazing

Here’s something that happened last week, which just amazes me.

On Monday last, I posted my Stripey Noro Messenger Bag pictures and pattern on Ravelry. I also queued up a post about it for my blog, for Wednesday. On Ravelry, people can mark a project or pattern as a favourite – it’s kind of like bookmarking it – which puts little hearts on the project or pattern in question. So there were little hearts showing up on my bag project and the pattern, people downloading the pattern, people sending me comments. It was quite fun to see that people liked my bag. (The first download was minutes after I posted the pattern. Talk about instant gratification!)

The amazing thing was that on Thursday, a knitter and Ravelry member on the other side of the world let me know that her knitting group had decided to have a KAL (knit-a-long) with my bag pattern. I think this is so cool!

And I can’t wait to see their finished bags. 🙂

Weekend Getaway Satchel

I can’t believe this beast is finally done. I love it, but it was a lot more work than anticipated.

Then I couldn’t figure out how to photograph it!

But finally, here it is, my Weekend Getaway Satchel from Interweave Knits (hmm. I can only find a picture on Ravelry), designed by Marta McCall:

Weekend Getaway Satchel knit in Patons Classic Wool by Deborah CookeMake no mistake – it’s huge. The base is 24 x 8 and it’s so tall that I have to put it on my shoulder. Part of the height issue is my fault – I couldn’t bear to cut away all the excess knitting to make the felted pieces the same size as the schematic, so mine is a few inches taller than recommended. I never thought about the extra height from the handles (or my lack of height) but the end result is that I can’t just carry it in my hand without it dragging. Oh well. I like shoulder bags.

I changed the handles as well, using leather handles from Grayson E. instead of the felted handles suggested in the pattern. I don’t find that felted handles stand up to stress that well – plus didn’t like the idea of knitting that enormous length of red strap shown in the pattern. These handles are beautiful but expensive – I could only justify them by using odd balls and mill ends for the wool. It’s mostly Patons Classic Merino, which is now called Patons Classic Wool – you can see that one teal blue, the one that outlines the flower at the bottom left, was NOT wool and didn’t felt, but I like how frilly it looks.

working on the Weekend Getaway SatchelThe pattern is easy to follow and the knitting isn’t complicated. Most of the detail is embroidered on to the intarsia. I had thought to pattern the back as well, but by the time I finished the front, I was ready to knit a plain back as the pattern specified. The finishing, though, was a bear. I lined the bag – because I hate unlined bags – and sewing that lining in, after the base was installed, the handles were sewn on and the hex frame was sewn in, was an acrobatic feat. Fortunately, blood doesn’t show in black tweed because I stabbed myself with the needle a number of times!

I really love this bag, but I won’t be in a hurry to make another. In fact, I think I’m worn out with felted bags for a while.

What do you think? Do you knit felted bags?