Last week, I picked up two more finished quilts at the longarm quilting place. They both needed their edges bound, of course. For both quilts, I chose a meander quilting pattern and it proved to be the perfect choice. 🙂 It’s always so exciting to get a quilt back and have it almost finished. I end up trimming the edges right away.
For this one, I had the fabric for the bias tape already. I had it cut up and sewn onto the front of the quilt by the next morning. I’ve been handstitching it to the back ever since. It’s motivating to have a quilt almost done!
I meant to show you this Friday, but it was raining when I finished the binding on Tuesday. My plan was to take it outside then photograph it on the driveway, but no joy. Rain, rain, rain, and then Friday, the snow started. So, we get kitchen pix instead.
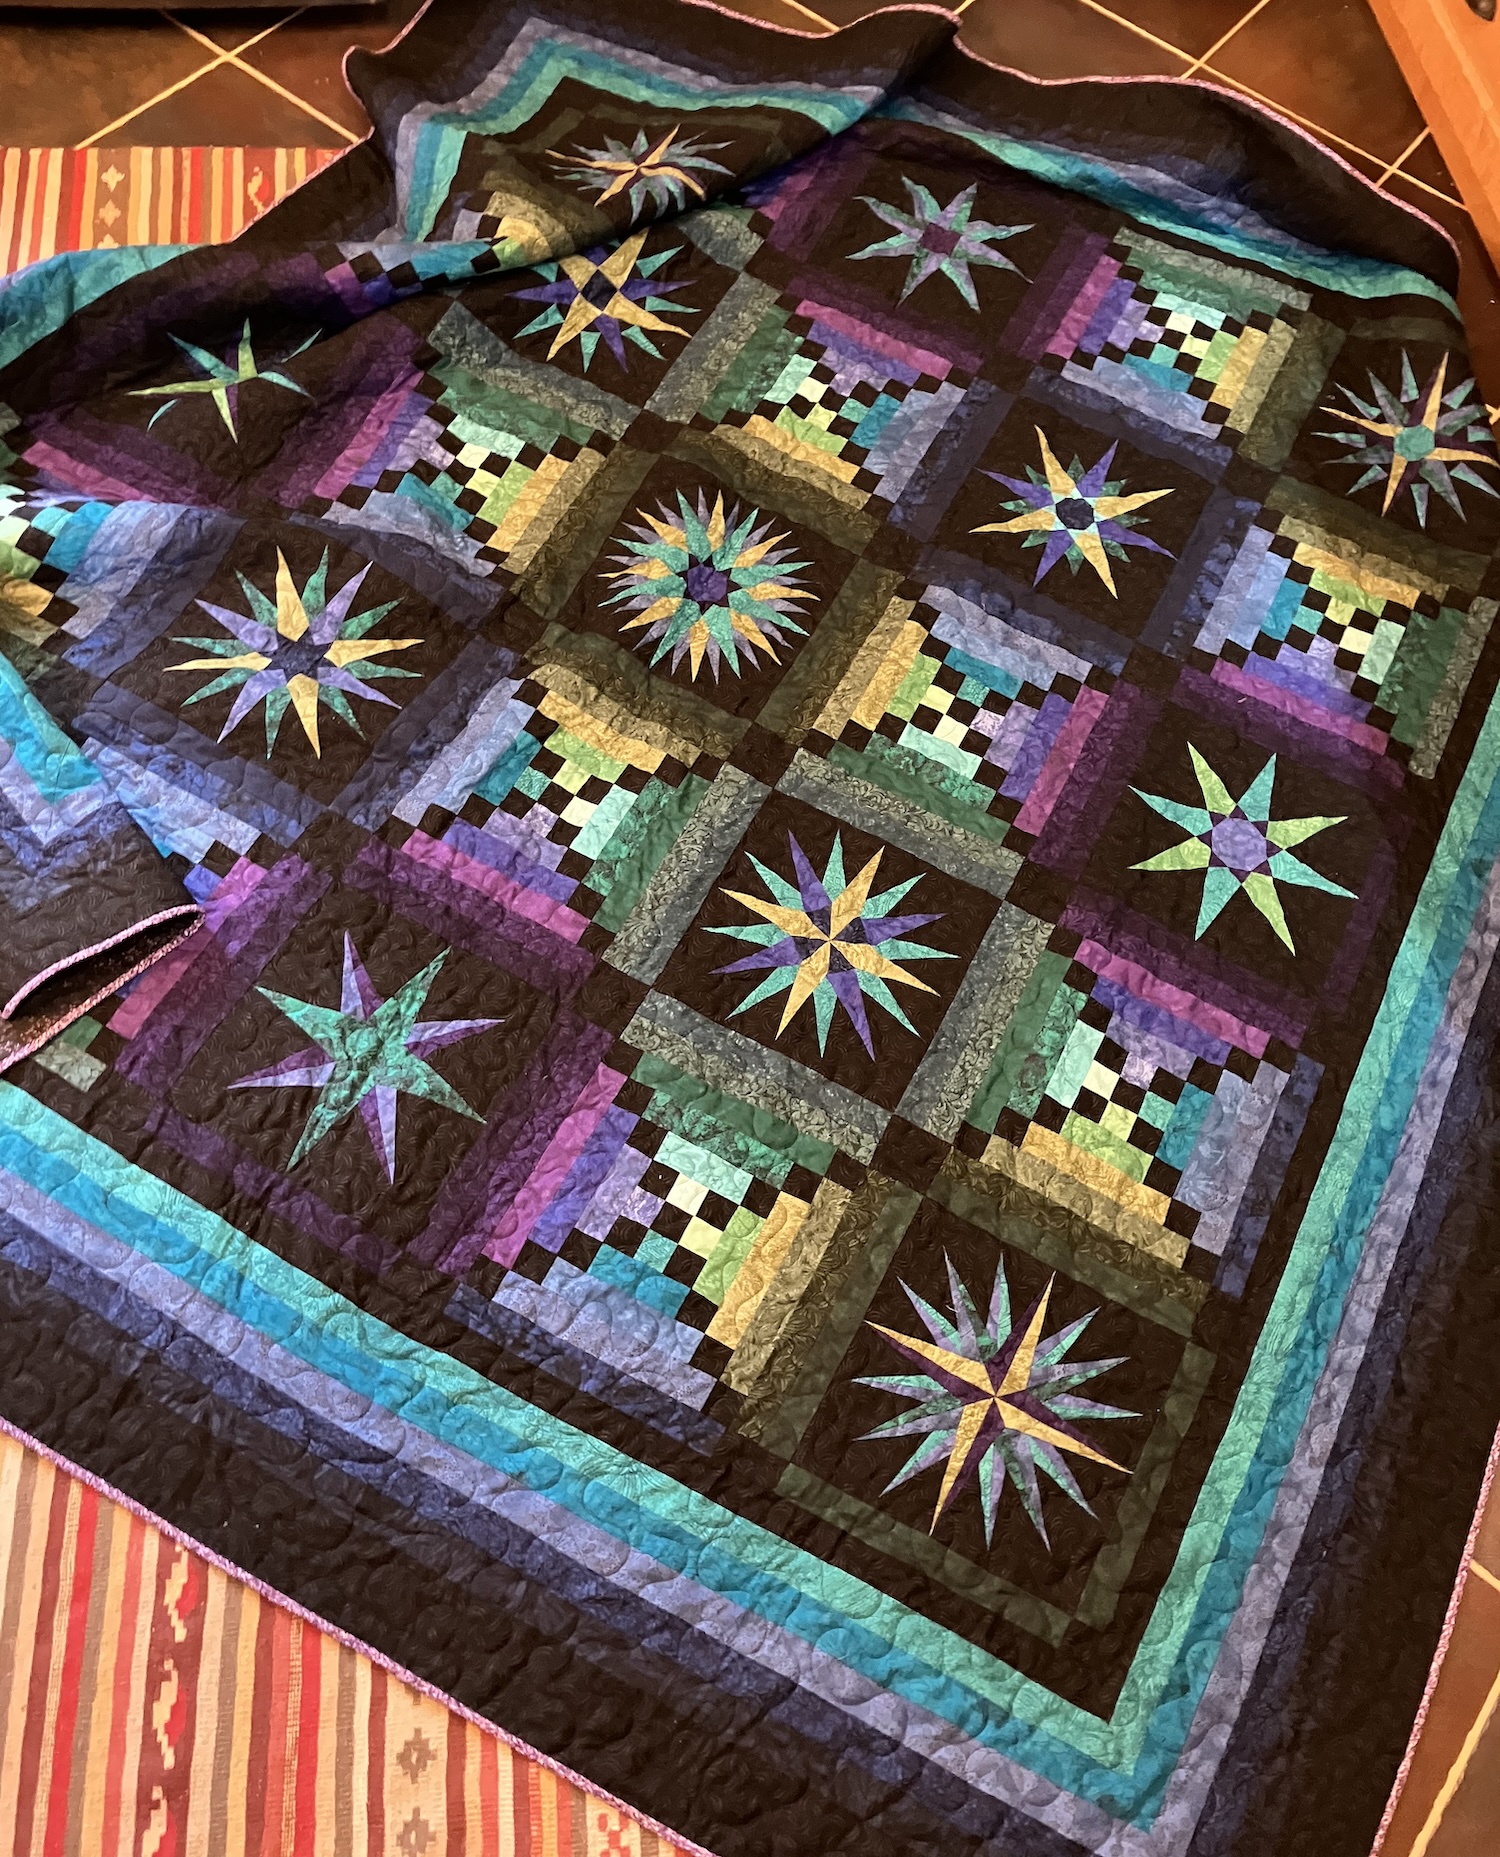
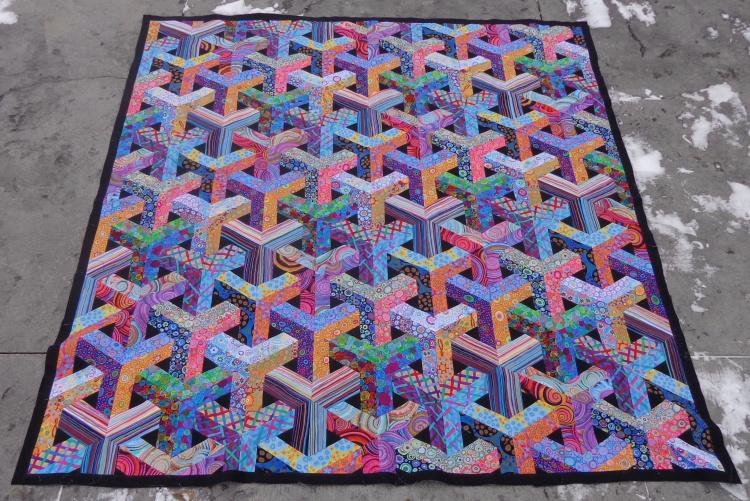
Here’s my finished Moonglow quilt.
My first thought was that the binding could be black, but I thought that was a bit of a predictable choice. Instead, I chose this purple print and kept it very narrow. The backing is a black print with purple.
I really like how this one came out.
There are a number of posts about piecing this one, which was a kit from Jinny Beyer. I began to piece it in April 2020, apparently.
The other quilt that’s home to have its edges bound is my Jumping Jax Flash quilt, which has an edge that needs a bit of thought. Because I put prairie points on the outer edge, I asked them to leave the coral border unquilted. So, I’ll need to figure out a binding, then maybe add a bit more quilting myself to finish it up. As my friend, Terri, said, it will have more of a facing than a binding.
Here it is unquilted to show you what I mean.
It also has a bit of a ripple around the outer edge, as I added this coral border before I realized that strips cut crosswise will stretch a bit when sewn. Hmm. This one needs a plan – but first, I need to check in the attic to see if I have any of those fabrics still in my stash!
It has so many fabrics that it wouldn’t really matter if I used a new one for the border, but it would be more satisfying to use one that’s already in the quilt. There’s a coral French shirting that I think it in the stash – I just used a bit of it in the points, because I was planning to make myself a shirt with the rest, so I’m thinking there’s 1.5m or so stashed away.
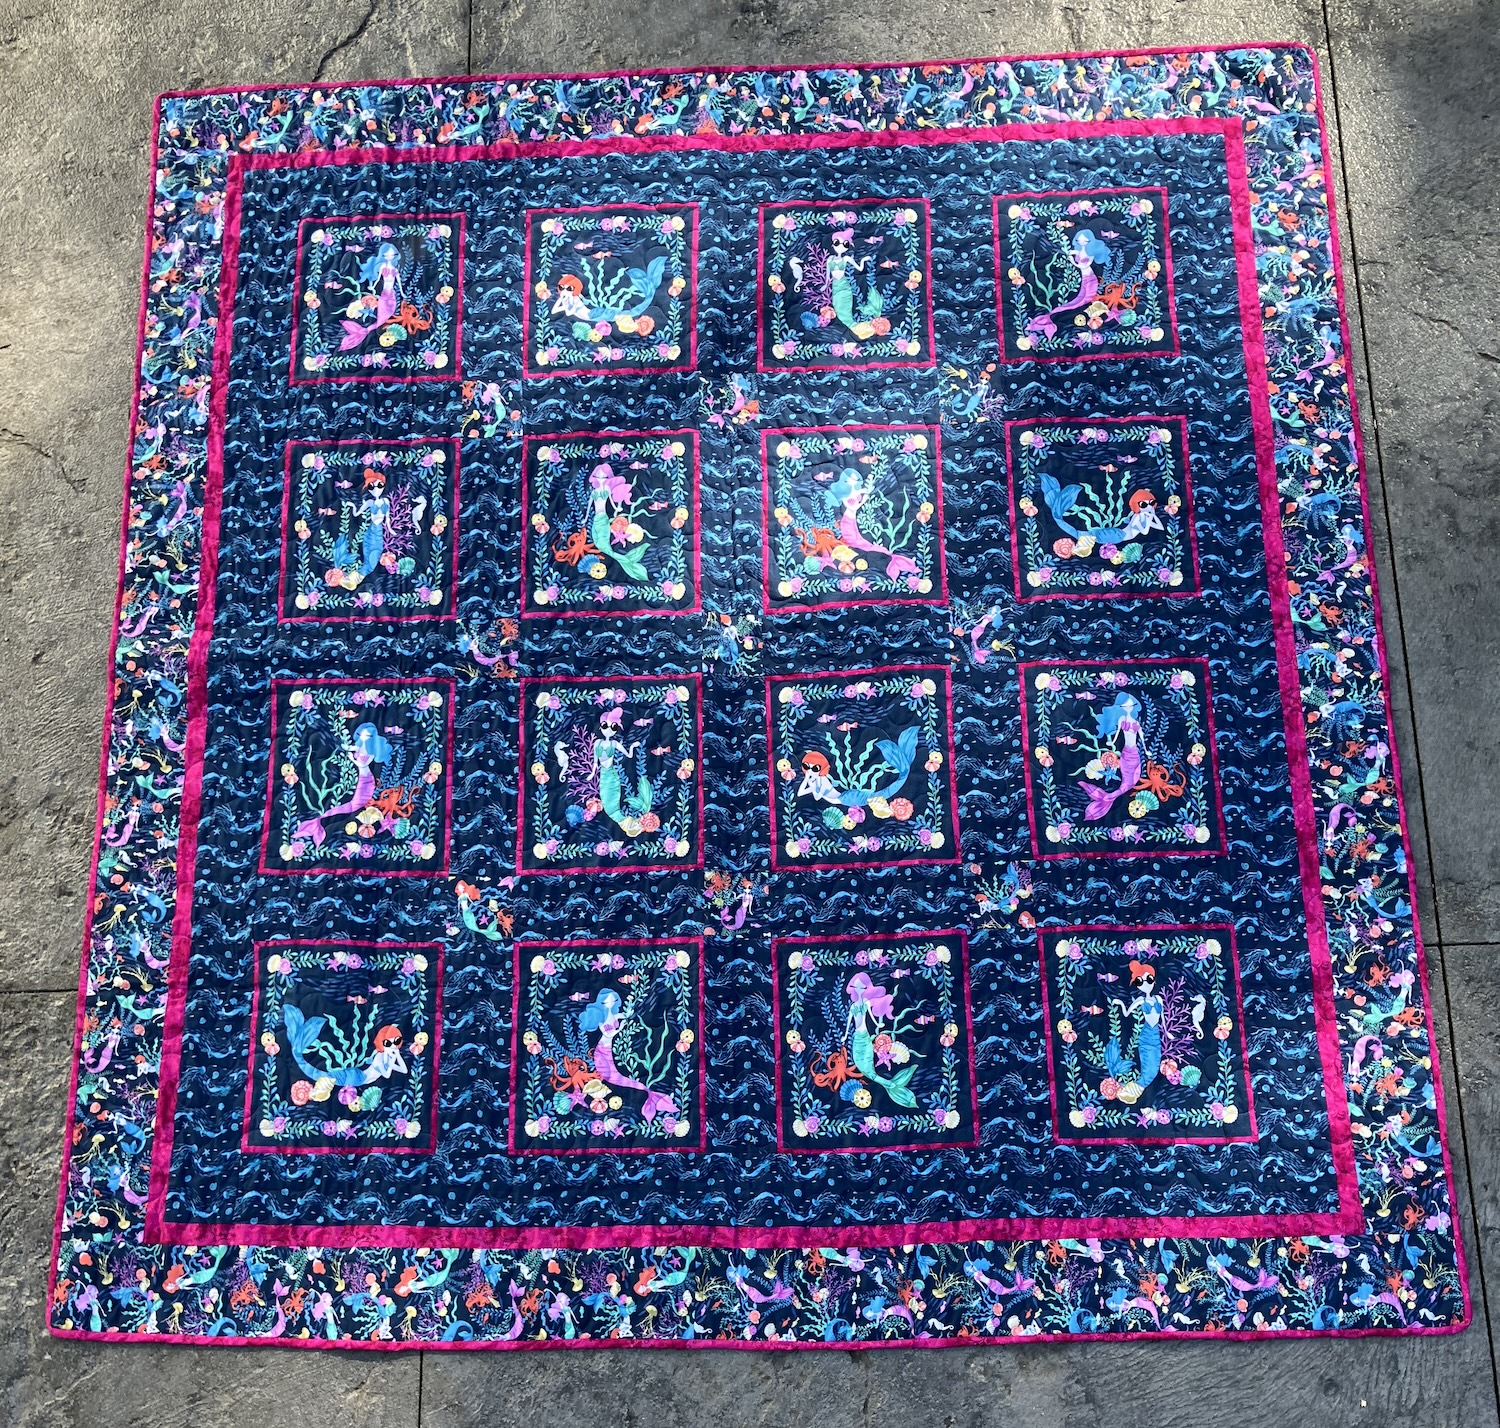
You might also remember my mermaid quilt, which used some pre-printed panels and coordinating fabrics. This one wasn’t a kit. I just made it up.
It’s been to the long arm quilter, too – the dragons and the mermaids went on that adventure together – and now it’s all finished up as well. Here it is:
The print was called Mermaid in Blue Jeans, if you’re looking for it. I think it’s so cute. There’s a blog post about piecing this quilt – from 2022! – right here.
When I pieced the top, I really wanted to use that allover print from the border for the backing, but at full price, it would have been pretty expensive. I decided to look for something that coordinated and was cheaper (I needed 6m.) About six months later, I was at my local fabric store and they’d marked down this entire line. I think it was $5 a m. So, I got my 6m and another one too, just because, and was able to make the backing match the front. It’s seamed and I was able to match the print, too. (Ha.)
Again, this was quilted in a meander pattern, also with blue thread.
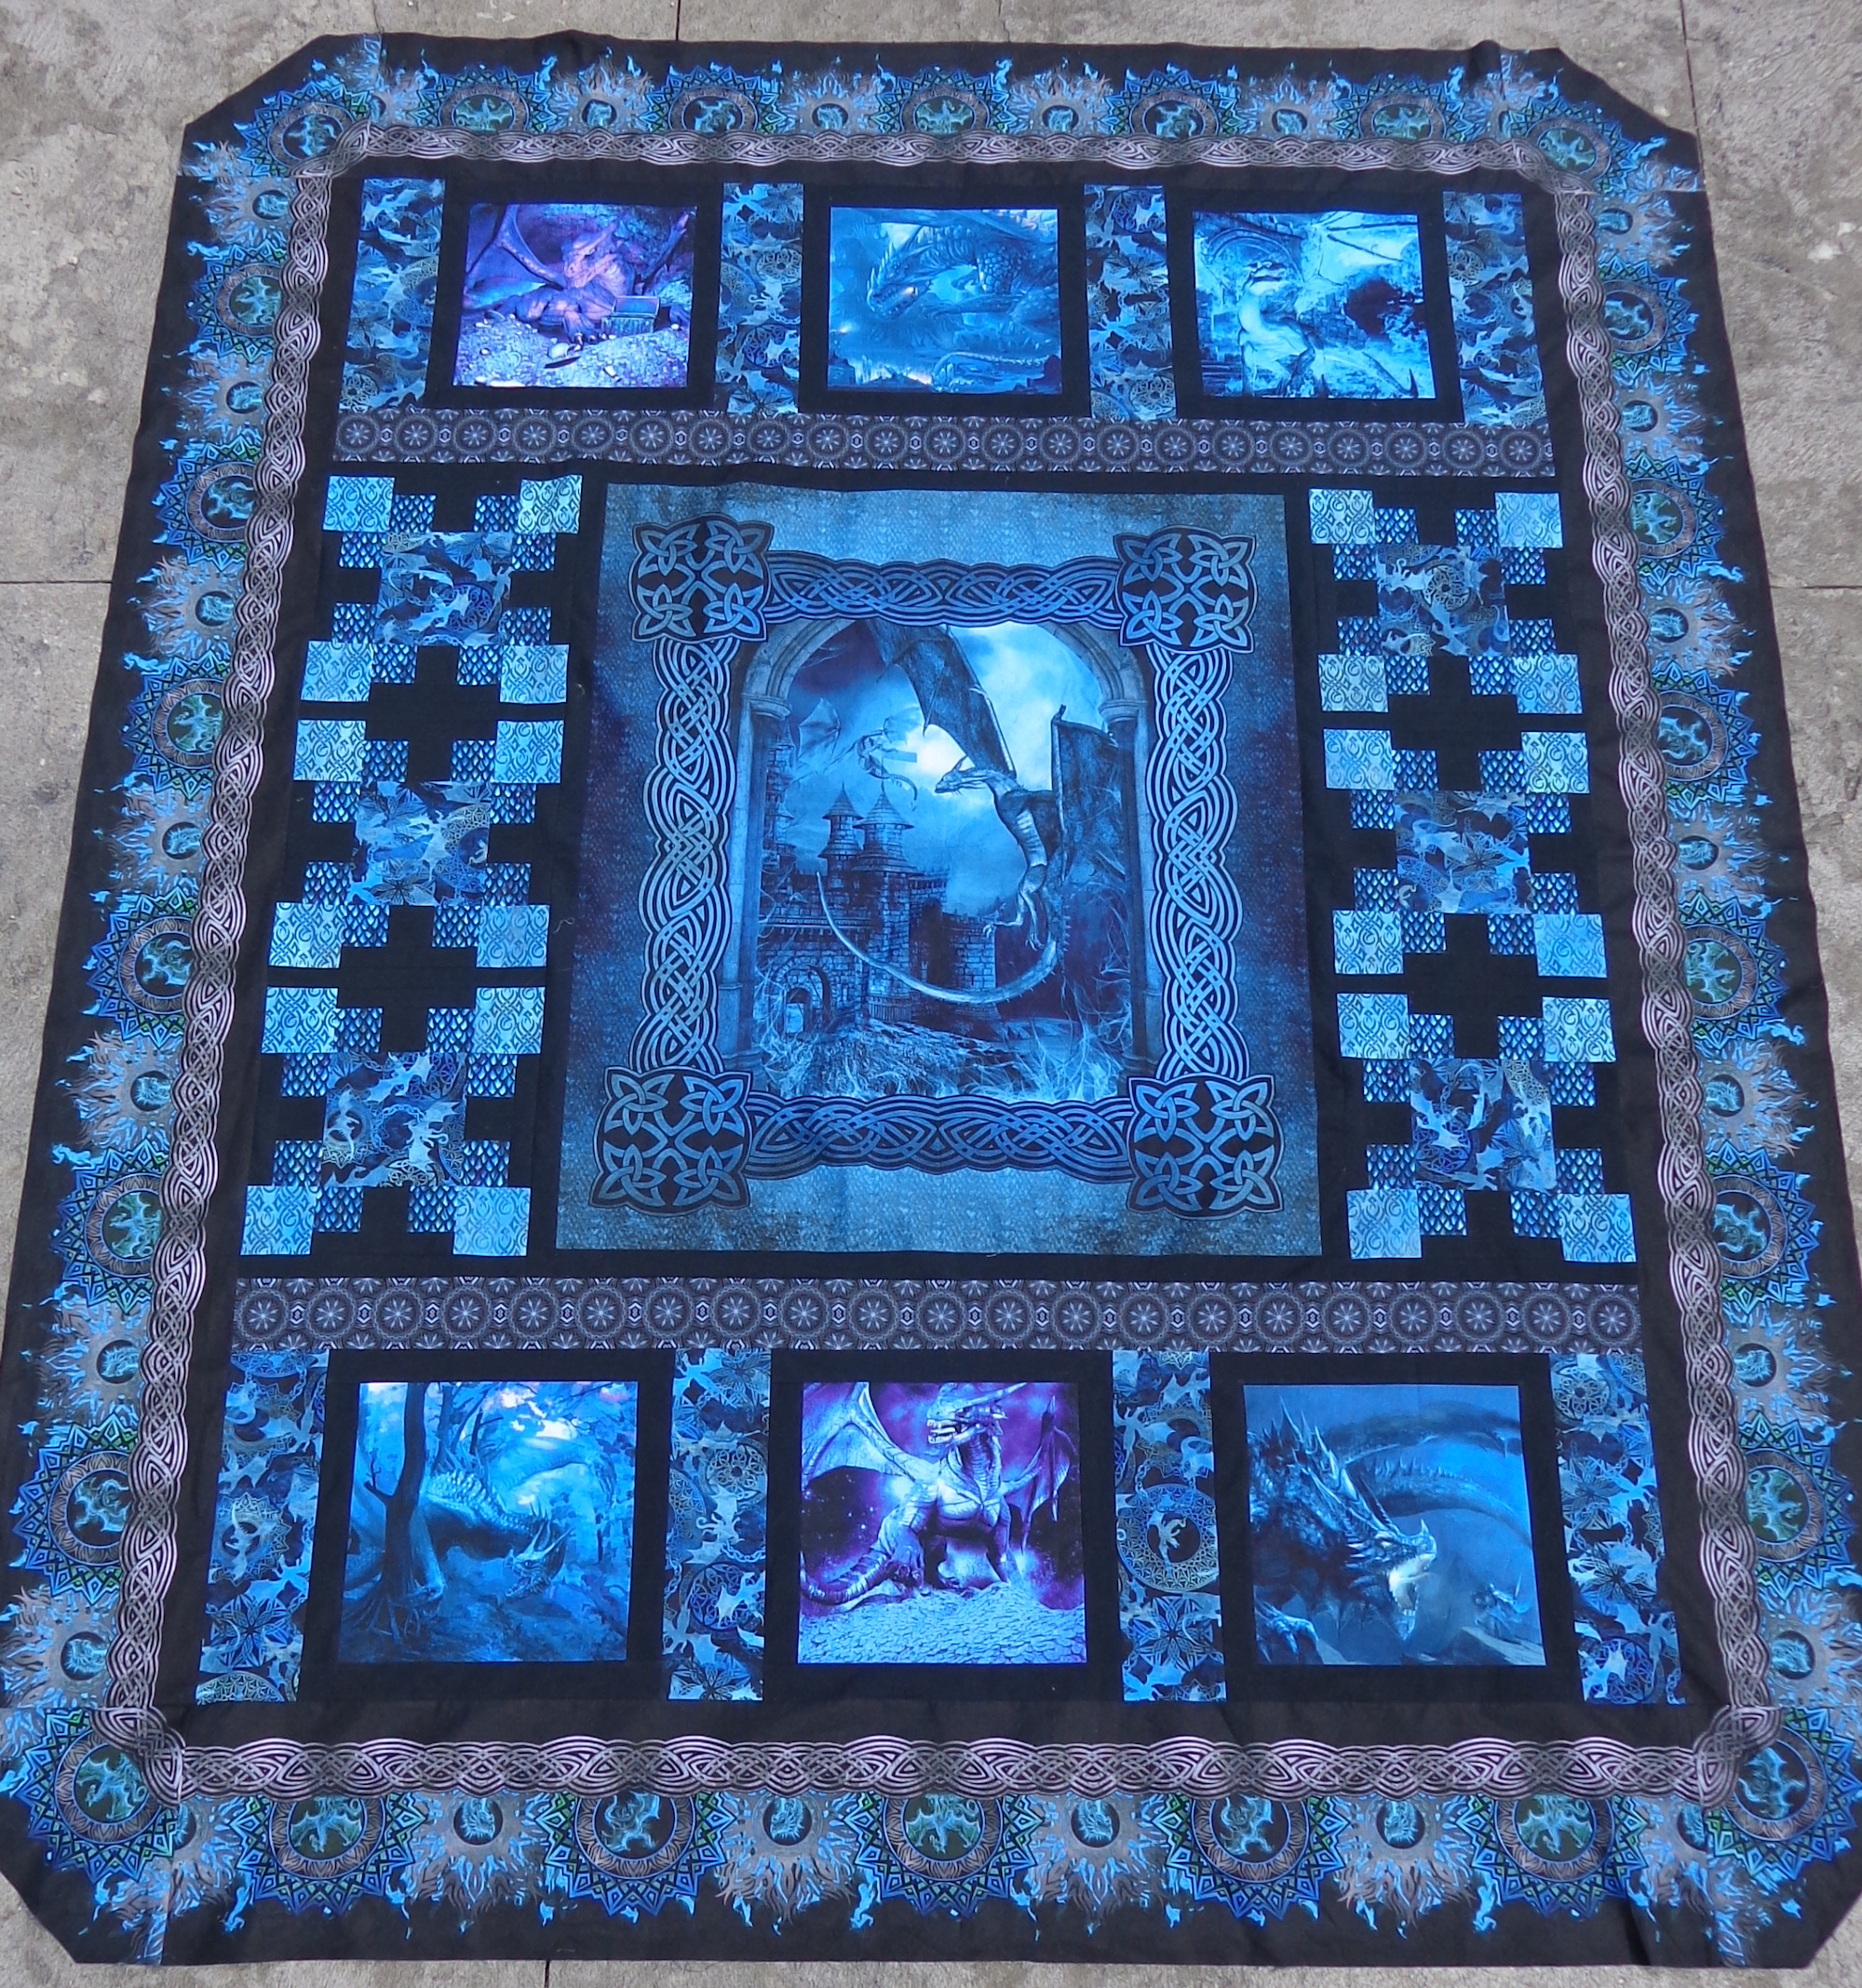
About five years ago, I had a pandemic project of assembling a quilt kit called In the Beginning. Here’s the finished quilt top from the final post about that project:
I’d decided that this would be the first quilt that I had quilted by the shop with the long arm machine and took it in there last month. I picked it up and have been sewing on the bias binding – I sewed it to one side by machine, then handstitched it on the back all the way around. This is a big quilt!
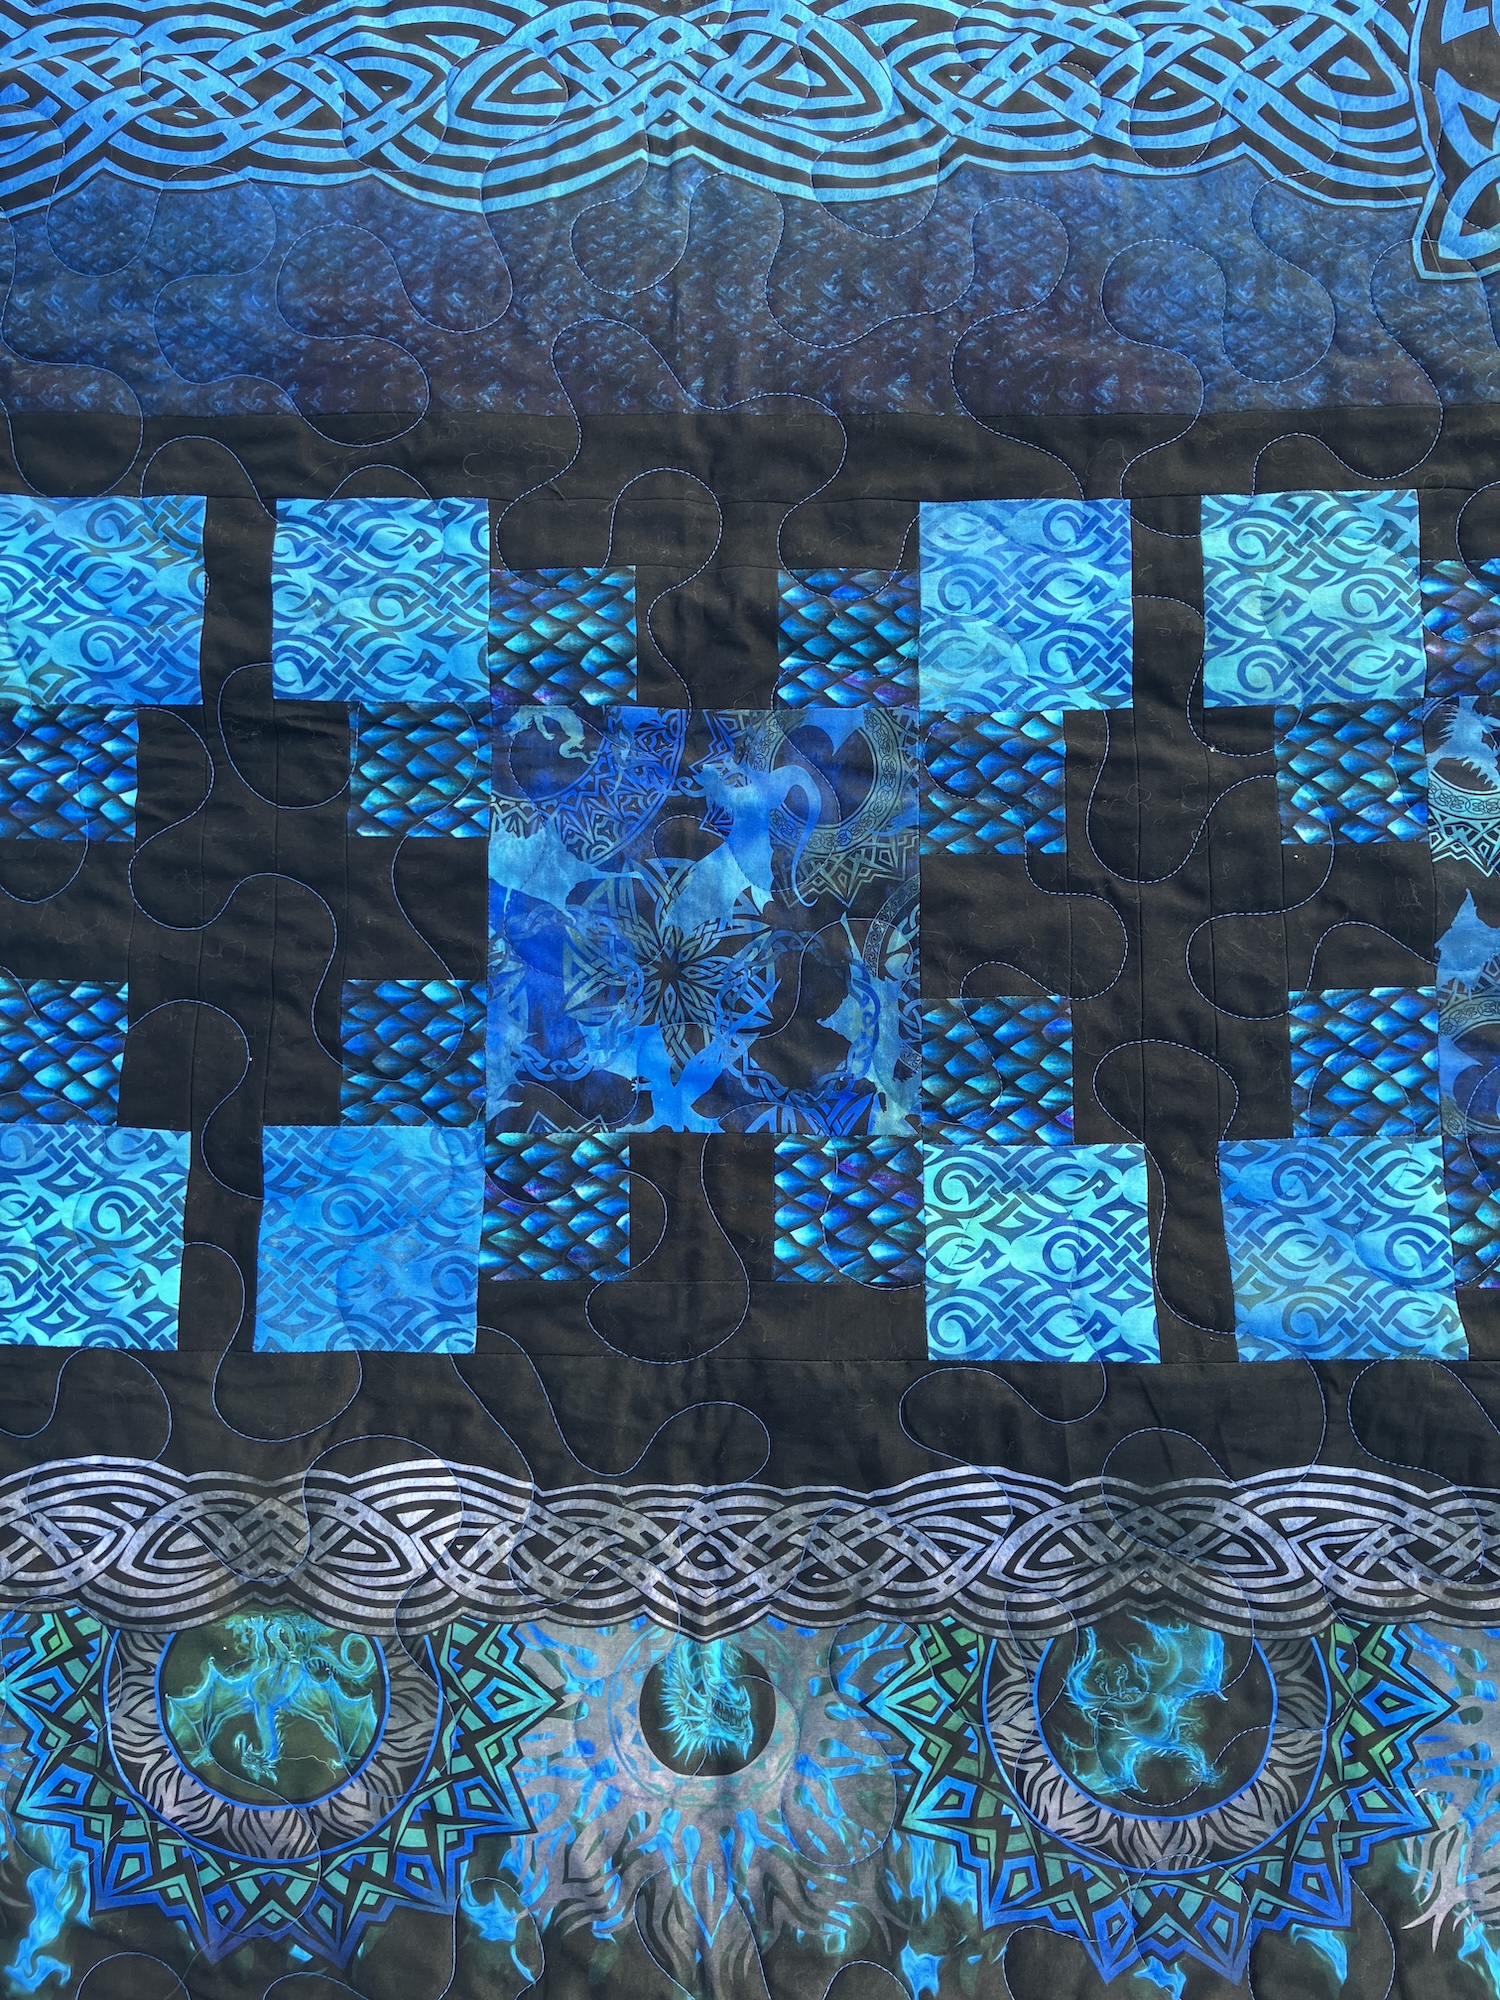
The binding is the allover print with the Celtic knots. You can see it more clearly in the detail below.
I chose a meander pattern for the quilting and they used a blue thread. It looks really great!
This is one from the vaults. Last year, I went through all of my unfinished projects and found this quilt top, which I’d forgotten about. It’s a pieced quilt top in the Storm at Sea pattern, which was always one of my favorites. I bought cotton for the backing and folded it up to put it away, maybe 30 years ago.
It’s not a perfectly flat top by any means, so I layered it up to quilt on the machine. I figured it would be good practice. Here’s where I’m at.
Of course, I had to use a stripe with red roses on the border to liven up that blue and white. I just love red. 🙂 I haven’t decided on the binding fabric yet. Looking at it here, maybe it should be navy.
This might be the test quilt that I toss in the washing machine to see what happens.
You can’t really see the quilting in the photo – maybe a bit at the top right – but it’s about half done. I decided to do a wavy pattern on the diagonal that turns back at the centre – so overall there’s a big X and I never have more than half of the quilt under the arm of the sewing machine. I quilted the Escher quilt that way and it was comparatively easy. Big difference there, though, as the top was absolutely flat. (This one has some puckers and tucks.) That was a good size for machine quilting – as a max – so that will be my new benchmark.
Finished Escher quilt
I’m using my vintage Singer 185 for this, because it’s such a rock. My stitches are more even this time – progress is made! – so that’s a good thing. The thread is a Gutermann cotton quilting thread in variegated shades of blue.
I don’t love machine quilting. I don’t love how it looks and it’s hard work – my hands hurt after doing a bit of it – so it’s teaching me to make fewer quilts and certainly to tend to smaller ones.
After this is done, I’ll quilt the mermaid quilt, which is a teensy bit bigger. More diagonal lines turning back at the middle, methinks. I’m debating whether I should quilt the blue dragon myself or not. I’m also wondering with those two whether I could do the borders of the blocks on the machine, then quilt inside the blocks by hand. Hmm. So many details to ponder!
Mermaid in blue jeans quilt
In the beginning blue dragon quilt
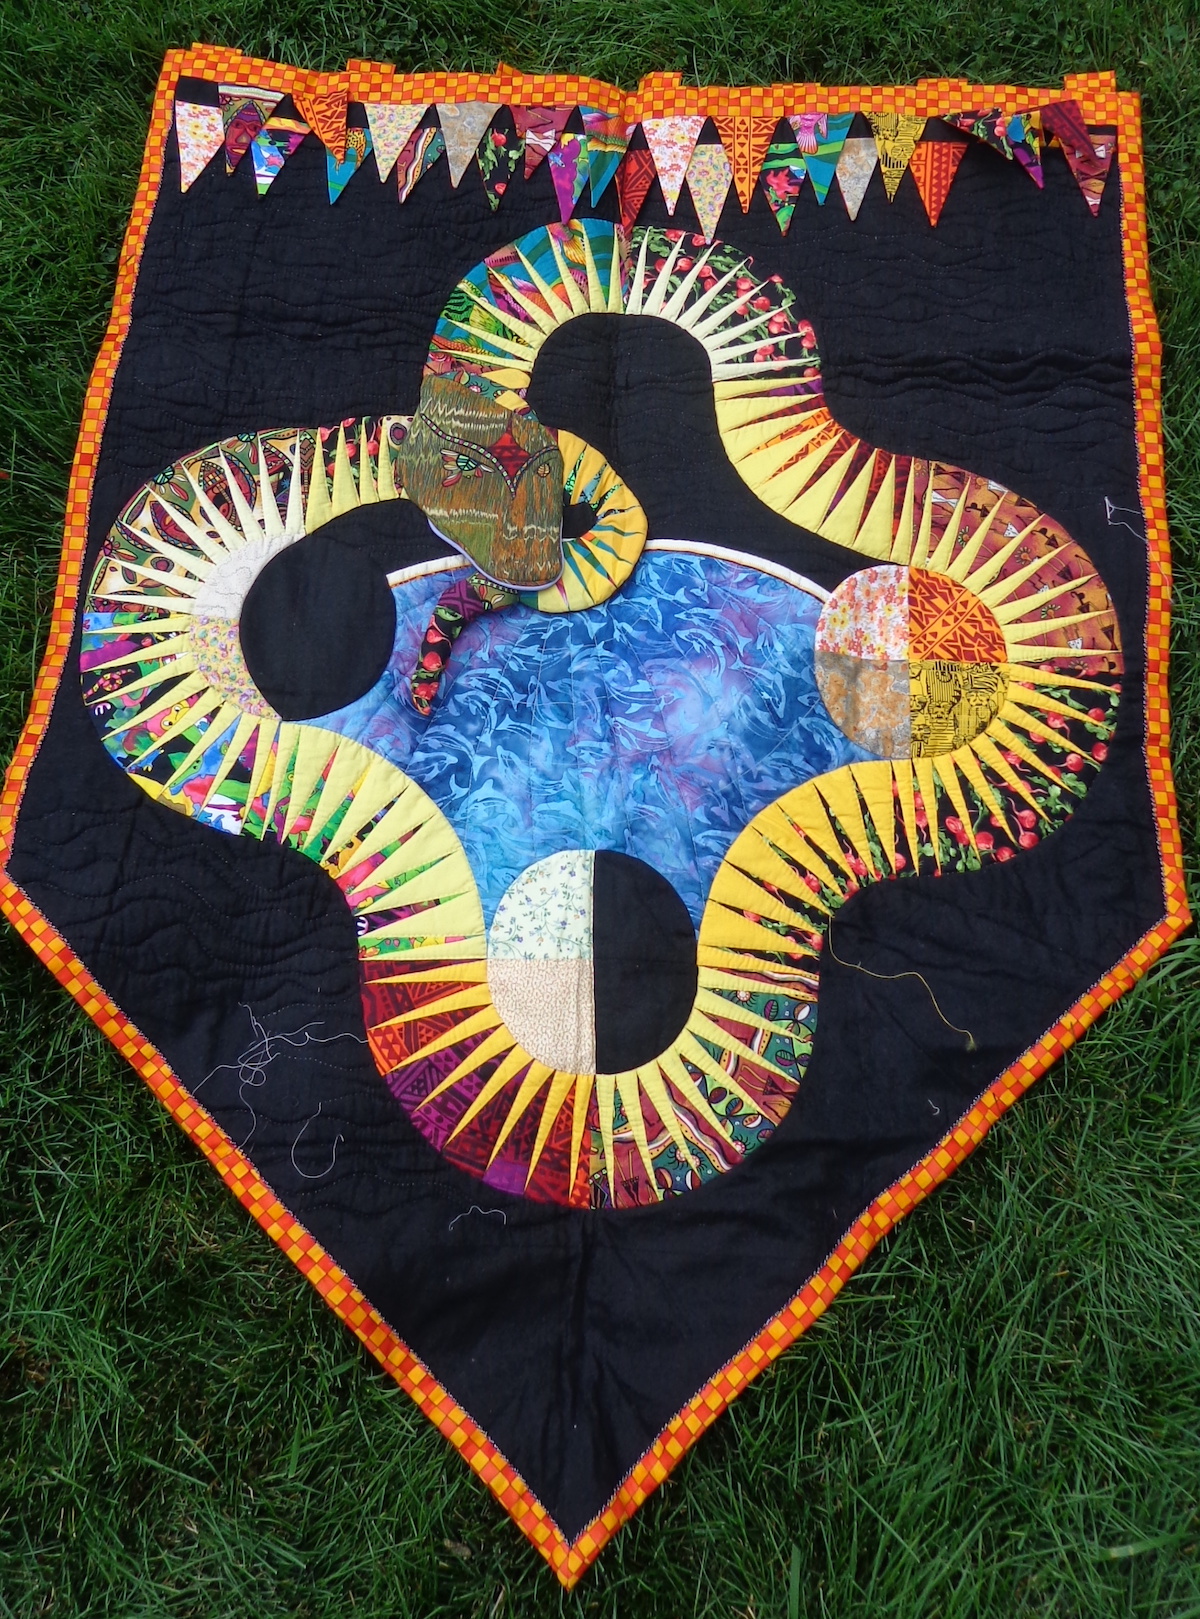
I still have a couple of quilts that I’ve started to quilt by hand, which need to be finished up. The pineapple star has corners now and is about half quilted – in lime embroidery thread. 🙂 The ourobouros dragon banner needs more quilting on the black background. The dragon is done.
Pineapple star quilt in progress
Ourobouros quilt in progress
Then there are two big ones to go to the long arm quilting place. Phew. I think I’ll leave that until the fall. I got all the borders on the Moonglow, so it’s ready to go, as is Jumpin’ Jack Flash.
One of my goals for this year was to finish up my quilts. I have a lot of quilt tops pieced but they haven’t become finished quilts. Part of this is because I’ve always pieced by machine but quilted my tops by hand, so the first part of the process is much faster than the second. Either I needed to hire someone to quilt my tops, or I needed to learn to machine quilt them myself. I went for option B and ordered a walking foot for my machine.
This (ironically) meant that I needed to make more quilt tops in order to practice machine quilting before taking on my existing quilt tops. Also, I thought it would be easier to work with a smaller quilt first, and my existing tops are mostly big. So, I began to piece lap quilts from scraps.
This one was inspired by this YouTube video from Missouri Star, Make a Summer Squares Quilt. They suggest using a jelly roll with two contrasting solid fabrics, but I dove into my scrap bag instead. I have a lot of strips in there, many of them from my Escher quilt, and it drives me crazy to waste fabric. I grouped strips into lights and darks to piece them together, using a Kaffe Fassett stripe in greens cut crosswise and KF yarn-dyed solid mauve as my contrast squares in the middle. Here it is:
I used all the pieces leftover from the Escher quilt but was missing two strips to make enough blocks for this layout. I used some lime Roman Glass in my stash then added one non-KF fabric – it’s the lime with polka dots that’s in the border. Because fabric was so tight, I didn’t really manage the light and dark assignment of colours in the Missouri Star quilt, but I like how bright and cheerful mine is.
The walking foot was delivered while I was piecing this, so I got right down to quilting by machine for the first time. (eek) I added one more tool to my arsenal – Odif 505 temporary fabric adhesive. (That’s an Amazon link.) You spray it on the batting then iron the fabric to it, then flip it over and do the same with the backing. It keeps the layers from sliding around as you stitch and is pretty awesome. (It washes out.)
I watched this video and thought this diagonal quilting was something I could do. The trick was that I’m using my vintage Singer 185 for this project, which is a workhorse but a straight stitch machine. (My Elna has an appointment for a sewing-machine-spa-day next month!) In the video, she uses a wave stitch chosen from the machine’s options. I decided to make my own waves, even though they’d be less regular.
I used Guterman 100% cotton thread in black, a Schmetz 14 sharp “chrome” needle, and my new walking foot. I set the guide on the foot for an inch but didn’t follow it faithfully. I wanted a more organic look to the “waves” and I like how they worked out. There are a few tucks but I expected that since my borders were a bit wavy (which comes from sewing fabric cut on the crossgrain onto strips with a bias edge. Next time, I’ll be more careful!)
It was a bit of a wrestle moving the fabric, but I got used to it. And my waves improved over the course of quilting. I noticed that the 185 likes to stop with its needle up, so I learned to crank it down before doing anything else (to avoid any little jumps). My curves were also smoother when I didn’t stop in the width of the quilt. Faster and smoother is better, too. Lessons learned. 🙂
There are a lot of things you can buy to make this machine quilting easier, but I’m trying to keep a lid on expenses until I decide whether I like it or not. Instead of buying quilting gloves, for example, I used a new pair of garden gloves. I did find it a bit tough to move the quilt, even with the walking foot, so I ordered a LaPierre Studio Supreme Slider (that’s another Amazon link.) This is a reuseable plastic sheet that you lay over the machine bed to make it smoother and more slippery.
The cool thing about this quilt is that it came completely from the stash and my scrap bag, even the batting. I’d bought a big roll of 100% cotton batting to layer up all my quilt tops and this is 1/3 of the last piece. (The very last piece is destined for Scrappy Test Lap Quilt #2 which is a bit bigger than this one.) The backing is a piece of yarn-dyed cotton that I got at the thrift store, leftover from the Purl Soho apron I made for the mister.
You can see some pins there – I’ll sew the bias binding down by hand on the back side. The finished quilt is about 30 by 42″.
The one thing I’d change was the colour of the thread for the quilting. I used black, because I didn’t know what to pick, but I don’t love the look of the black on the solid mauve border. So, in future, I’ll hold the quilting thread against the most solid fabric to choose a colour.
On to the next one! I’ll have some knitting to show you soon, too – a cowl, a new pair of socks and a cardigan.