It’s been a bit crazy around here lately. I apologize for the silence here on the blog. I have a number of posts queued up that need pictures. Today, I’ll make a start on finishing them up to be shared.
First up, I finally got back to Kate Mitsubachi’s books, Barbie Mode. Previously, I made the Double-Breasted Suit and the Soirée evening gown from Kate’s other pattern book, Stylebook for Dolls. I had an idea when I first got these that I’d make every garment for the girls, but life happened and I was distracted by other projects. In December, I dug back in.
Both books are in Japanese, but the instructions have illustrations and are easy to follow. I have a print copies of the books, but you can buy scans of them on Etsy.
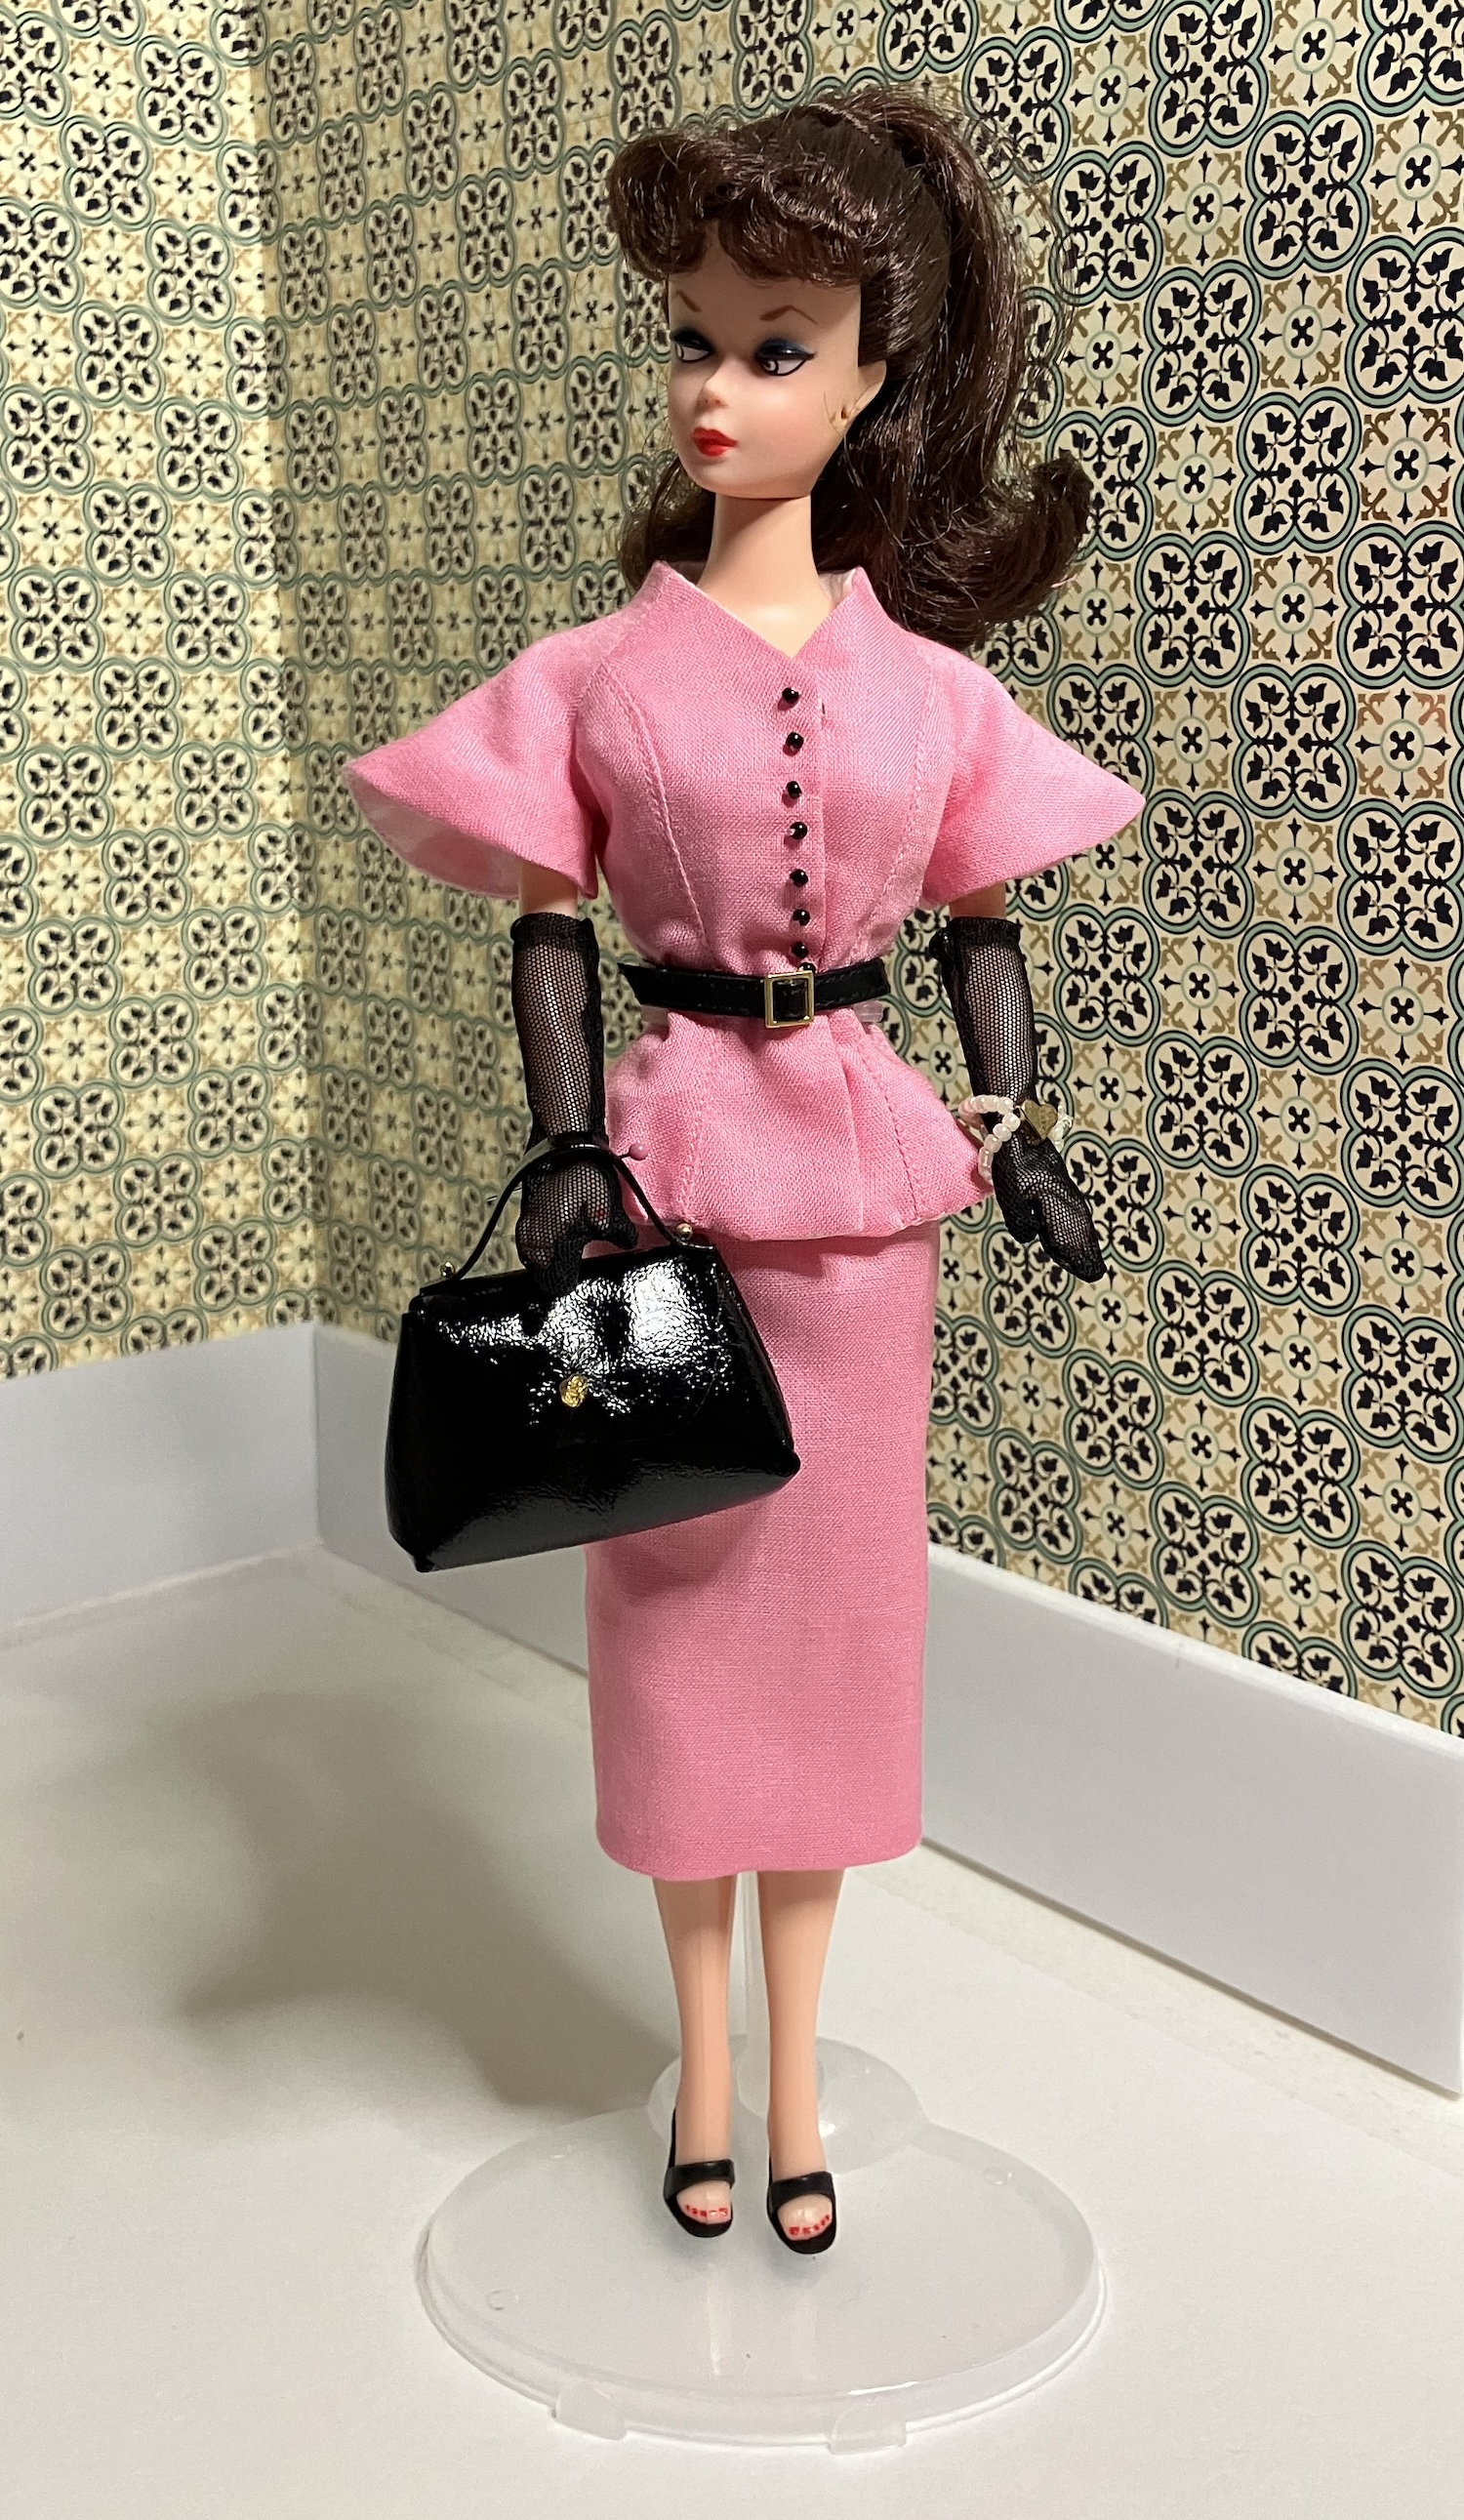
The third garment featured in Barbie Mode is a two-piece suit called Danielle, which is shown in red and black. At left is the picture from the book.
I made mine in a linen and cotton blend, because it looked to me as if the sleeves would hang better in a lighter weight of fabric. I lined mine with white voile, and it came out pretty well. I haven’t made the hat and am not sure I will.
Here’s mine:
I like the seed beads on the front of this one. I think the belt in the book is made of satin ribbon, but I made this one of belting that’s available for dolls. I thought the sleeves might be softer in such a fine fabric, but they’re still a bit structural.
One change I made was to add some top-stitching to the jacket. I find that princess seams on a jacket lie flatter in doll-size if they’re sewn down. I pressed the seam allowances away from the centre, and trimmed one to 1/8″ inch before pressing then top-stitched on the outside of the seam, catching the seam allowances underneath. It would have been tidier if I’d sewn a little more of the jacket hem before turning it and handstitching the rest, but overall I’m pleased with the result.
There’s something classic and feminine about a Chanel suit, so I’ve been seeking a good pattern to make them for the girls. Here’s one pattern I tried recently.
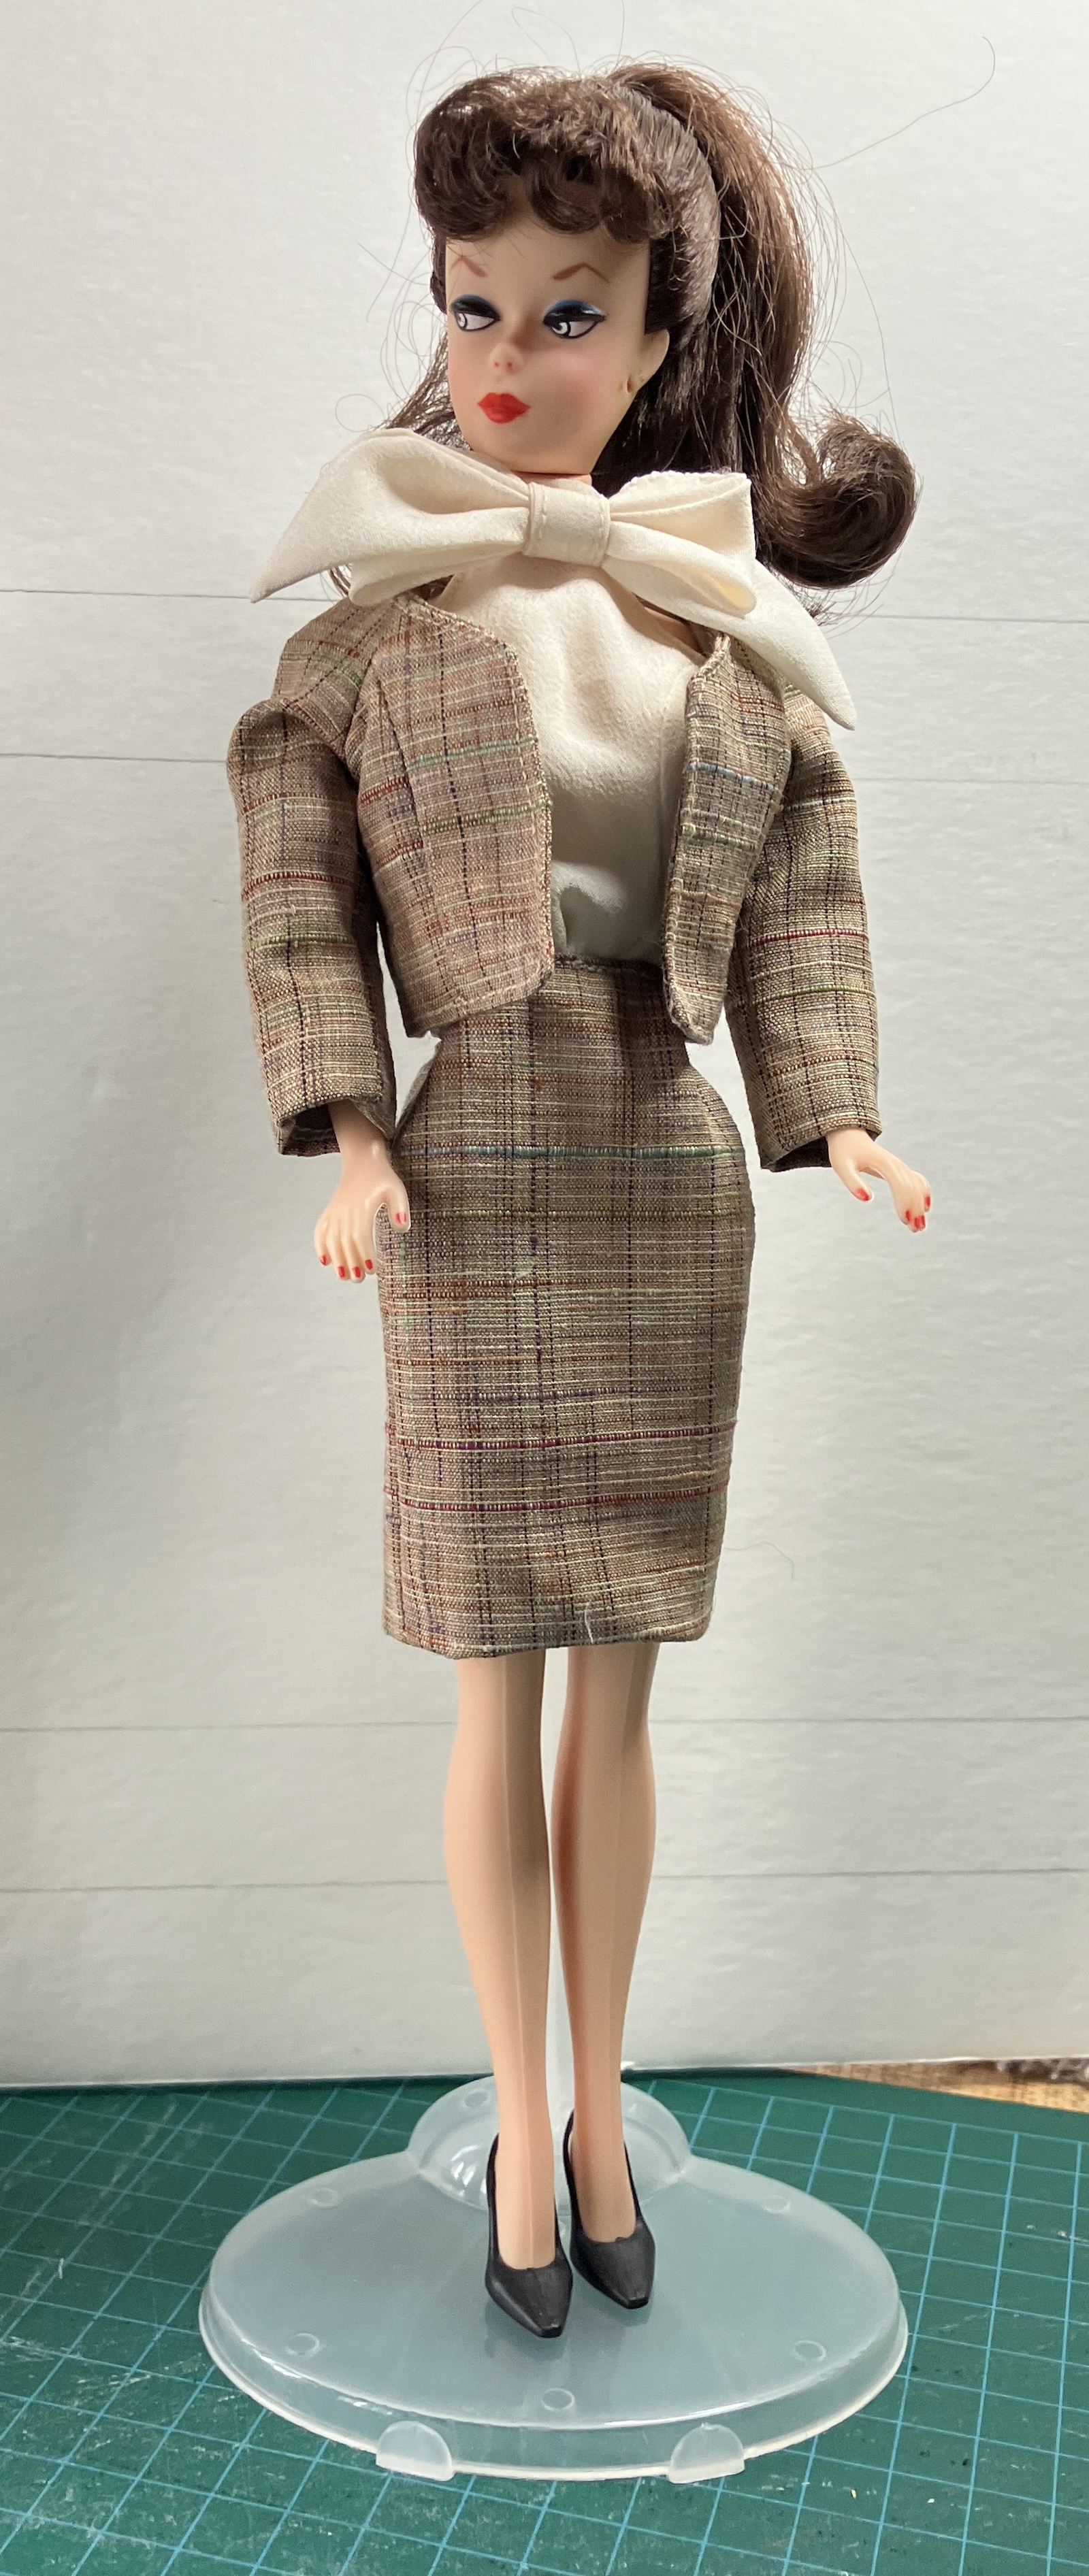
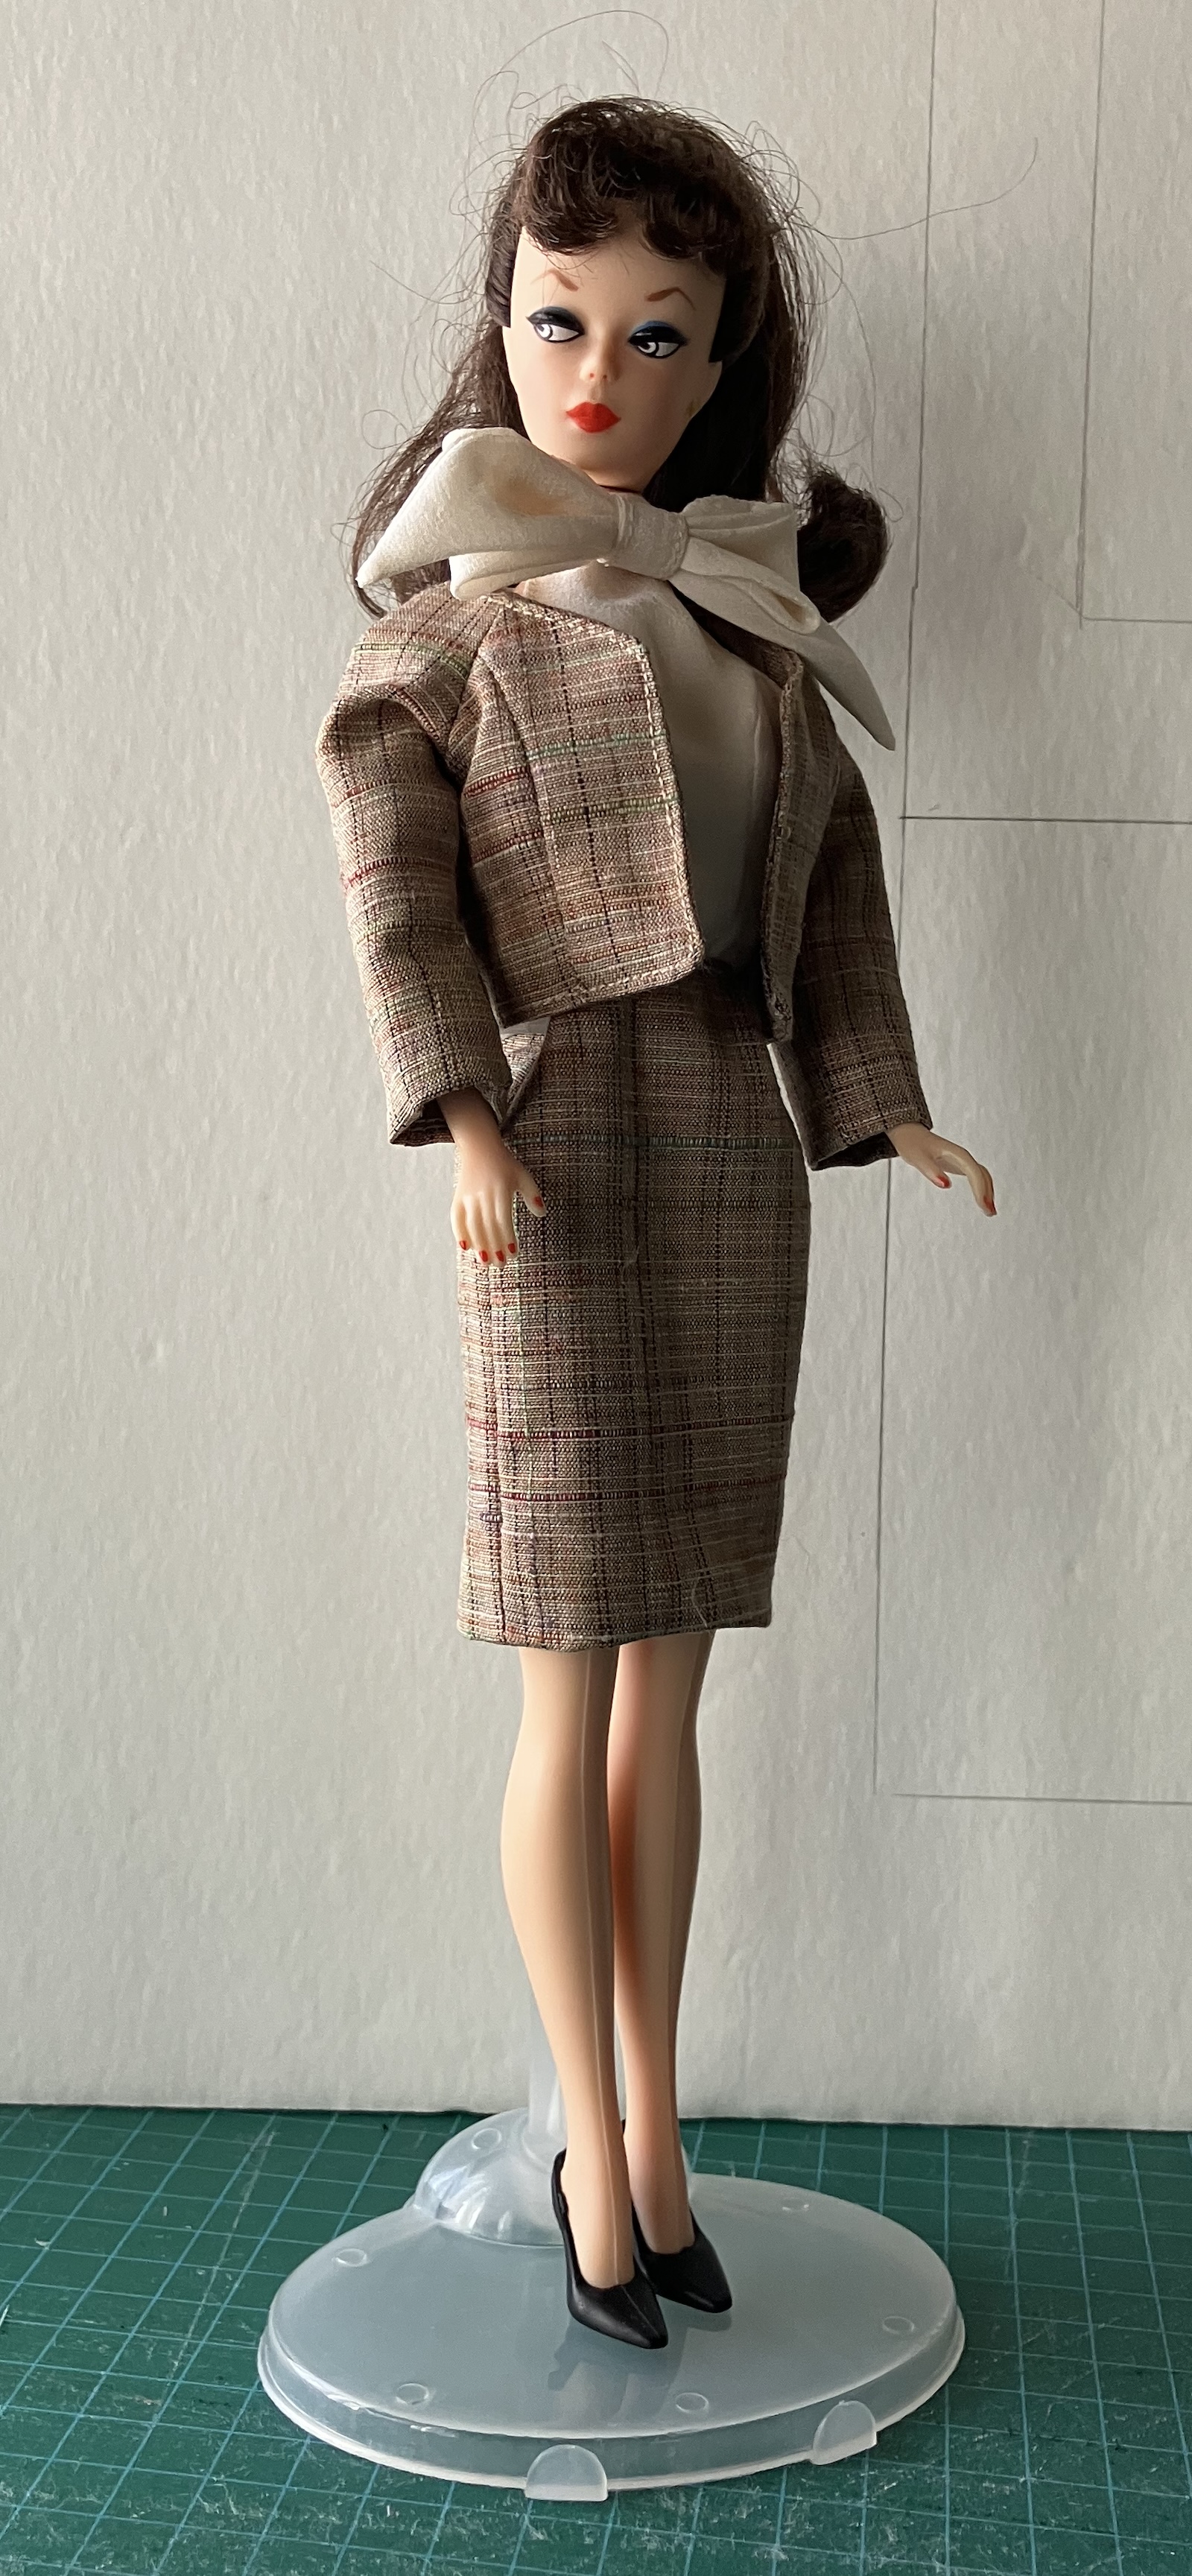
This one is Coco from HankieChic. This designer has moved from Etsy to another host since I last posted about one of her patterns: you can now find her patterns here.
I wasn’t sure about the big bow, but tried the pattern anyway. The top and skirt are actually a dress, and the top is a halter. It’s shown with an added belt. Both the dress and the jacket are lined.
I cut the suit from a yarn-dyed silk obi in taupe, and the blouse from a scrap of silk leftover from a blouse I made for myself ages ago. I cut the skirt and jacket lining from Bemberg rayon, and lined the halter top with the same silk fabric.
The jacket has raglan sleeves and a shoulder dart, then princess seams. The skirt has side seams and a center back opening.
There aren’t grainlines on the pattern pieces, which is characteristic of these HC patterns. I guessed, making the grainline vertical on all the pieces. I had some bias stretch on the front edges of the halter so if I made it again, I’d stabilize that edge by putting it on the grain.
Here’s the finished suit:
I think the neckline on the jacket is a bit wide on this one, and to me, the shoulders of the jacket are a bit big for B. There’s a gap between the neck of the halter and the jacket that could be addressed by adding maybe 1/8″ to the neckline all around. I might do the skirt differently too, with darts or pleats in the front and back. Also, I’ll probably lengthen the sleeves. I’m not much for a bracelet length sleeve on a jacket, though it’s common for dolls (probably because it’s easier to get a shorter wider sleeve over their hands.) So, modifications planned for this one. Overall, though, it’s quite cute – and I like the bow better than anticipated. 🙂
I also cut out a pillbox hat in the silk, using the pattern from that first suit, but haven’t sewn it together yet. They are fiddly to make.
I’m also in the midst of trying another suit pattern (the quest continues!) and will show it to you when it’s done.
I’ve been sewing for the B girls again and trying some different pattern companies. The vintage patterns are great for vintage B, but the Silkstone girls are skinnier – and the articulated Silkstone girls are even skinnier. (I’m starting to think of them as social media girls – they photograph really well and look great in clothes but in real life, they’re really thin.) But I wanted to try some patterns drafted specifically for the thinner dolls.
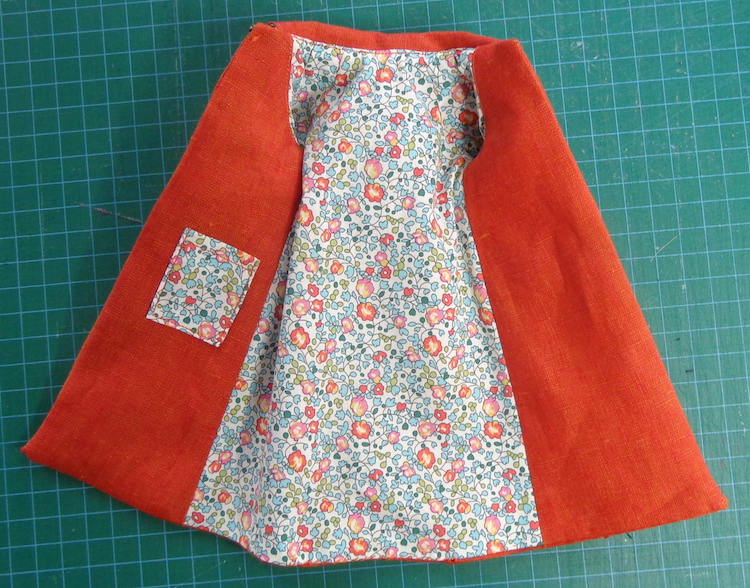
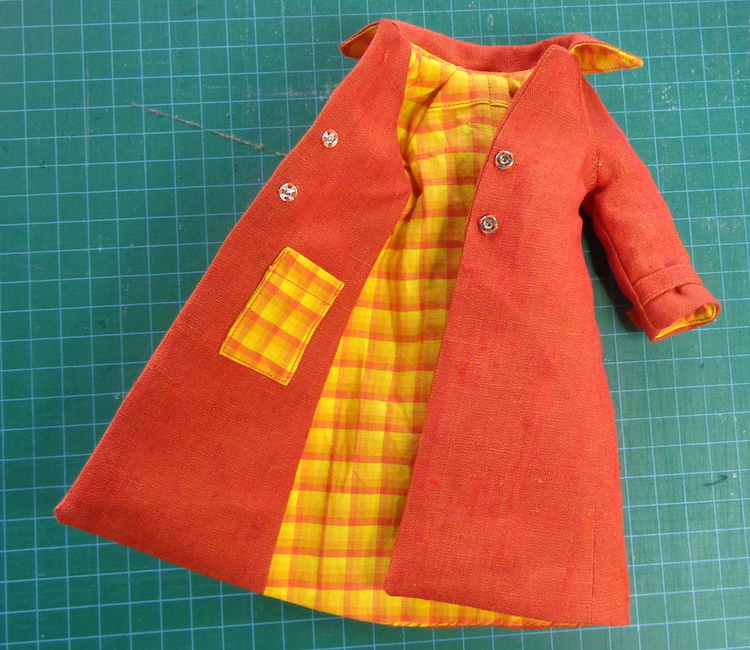
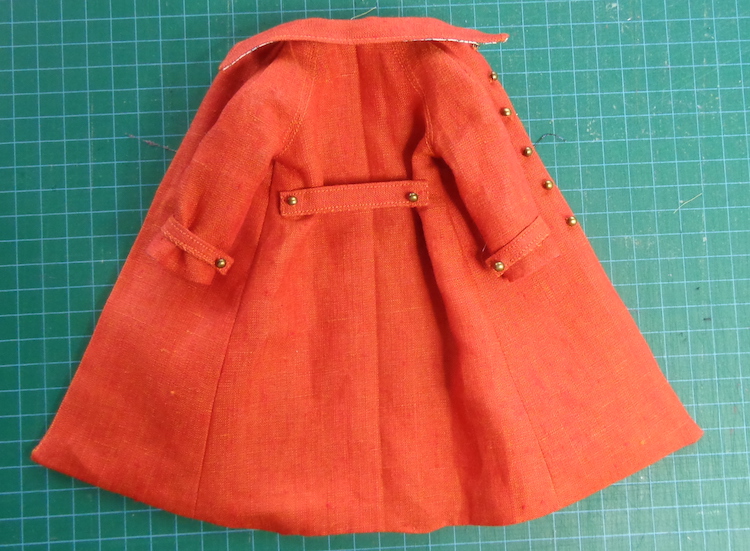
First up was Trench Setting from Hankie Chic patterns on Etsy. (This designer is not the same person who wrote the Hankie Couture books that I blogged about before.) This pattern for a coat and dress is designed for 11.5″ dolls. As has become my habit, I shop based on the doll used to model the garment – that’s an original Silkstone B, so I know it will fit that body. It’ll probably be a little loose on the articulated Silkstone and will be too small around (esp the dress) for vintage B. The sleeves of the coat might be too long for her, too.
For some reason, I cut two coats of an orange shot linen. I gave them different linings and buttons – plus an inside pocket—as a social media girl, Silkstone B needs somewhere to put her phone.
The one on the left is lined with Liberty Tana Lawn, and the one on the right with a cotton check that’s been in the stash forever. It was a strange little remnant but I liked it with the orange linen, even though I had to piece the back. (See that little seam across the shoulders?)
The Tana Lawn one has bronze dome buttons while the orange plaid version has shiny gold buttons.
The straps seemed a little out of proportion to me, so I halved the width of them for the sleeves and for the half belt at the back. The coat appears to be designed to be worn open, although I put snaps on one with the check lining to close the fronts. (The problem then is that when it’s open, you can see the metal snaps. Always a conundrum for the girls!)
Here’s B in both. (The pic is a little fuzzy so it’s small here. I really need to get my lighting sorted for doll pictures. The issue here is that there’s not enough of it.)
I sewed the coats almost entirely by machine and added some top-stitching, because that’s just how I roll.
I think the orange linen is a bit too thick of a fabric choice, so it looks more bulky than would be ideal. The linen also gives her a bit of a rumpled Columbo look – but Silkstone B prefers to look polished and sleek. I might make her another one. We’ll see. (I have another coat pattern to try first, a more fitted one that she might prefer.)
The doll modeling the combo here is Silkstone Barbie Dusk to Dawn.
The dress is a complete gem. Here’s my first one, made in Liberty Tana Lawn to match the lining on one of the coats. (I wish I had more of that yellow check, but I had to piece it to get the coat lining.) It’s lined with white cotton voile.
I love this one!
Again, I sewed it almost completely by machine – I hand-stitched the center back seam in the skirt lining and that was it. I also buried the back ends of the shoulder straps. The pattern instructs you to sew them inside the finished bodice back, but I wasn’t so fussed on that plan. I remembered this trick from a vintage pattern – I left a gap in the seam of each upper back, where the fabric is sewn to the lining. I put the dress on the doll to fit, slid the strap ends into the gap and pinned them in place. Then I caught them in the seam when I top-stitched the edges.
You can see that the left one could have been tucked in a teensy bit more on the edge closest to the center back.
The belt is a piece of 1/8″ gross-grain ribbon – in the most absolutely perfect colour! – with a teeny tiny buckle included as a gift in one of my orders from I Sew for Doll. She always tucks in a teeny ziplock with a sample of something. This one had four of these buckles. It’s a brilliant marketing strategy because I now know what size of buckle is perfect for this kind of belt for B and will order more in more colours. (Mr. Math likes the teensy ziplocks the buttons come in and has suggested I pack lunches for the girls, with teeny sandwiches in the teeny ziplocks. Maybe some teeny carrot and celery sticks. The problem with jokes like this is that they make me go “hmmmm” and think about modelling clay…)
I’ve cut out two more of the dress, one in a teal crepe-backed satin, and one in a navy cotton with a teeny tiny leaf print. Quilting cotton would be too heavy for this dress design, so I’m rummaging through my various cotton lawns and silks, too. I’ll be on the hunt for more Liberty Tana Lawn prints, too.
Then – because I am that person – I decided that B needed a little clothing rack. While the girls have their cases with clothing racks, B’s are getting full. I made this rack from foamboard with a dowel for the clothing bar.
It worked out pretty well, so I plan to make another in basa wood, maybe even with wheels…
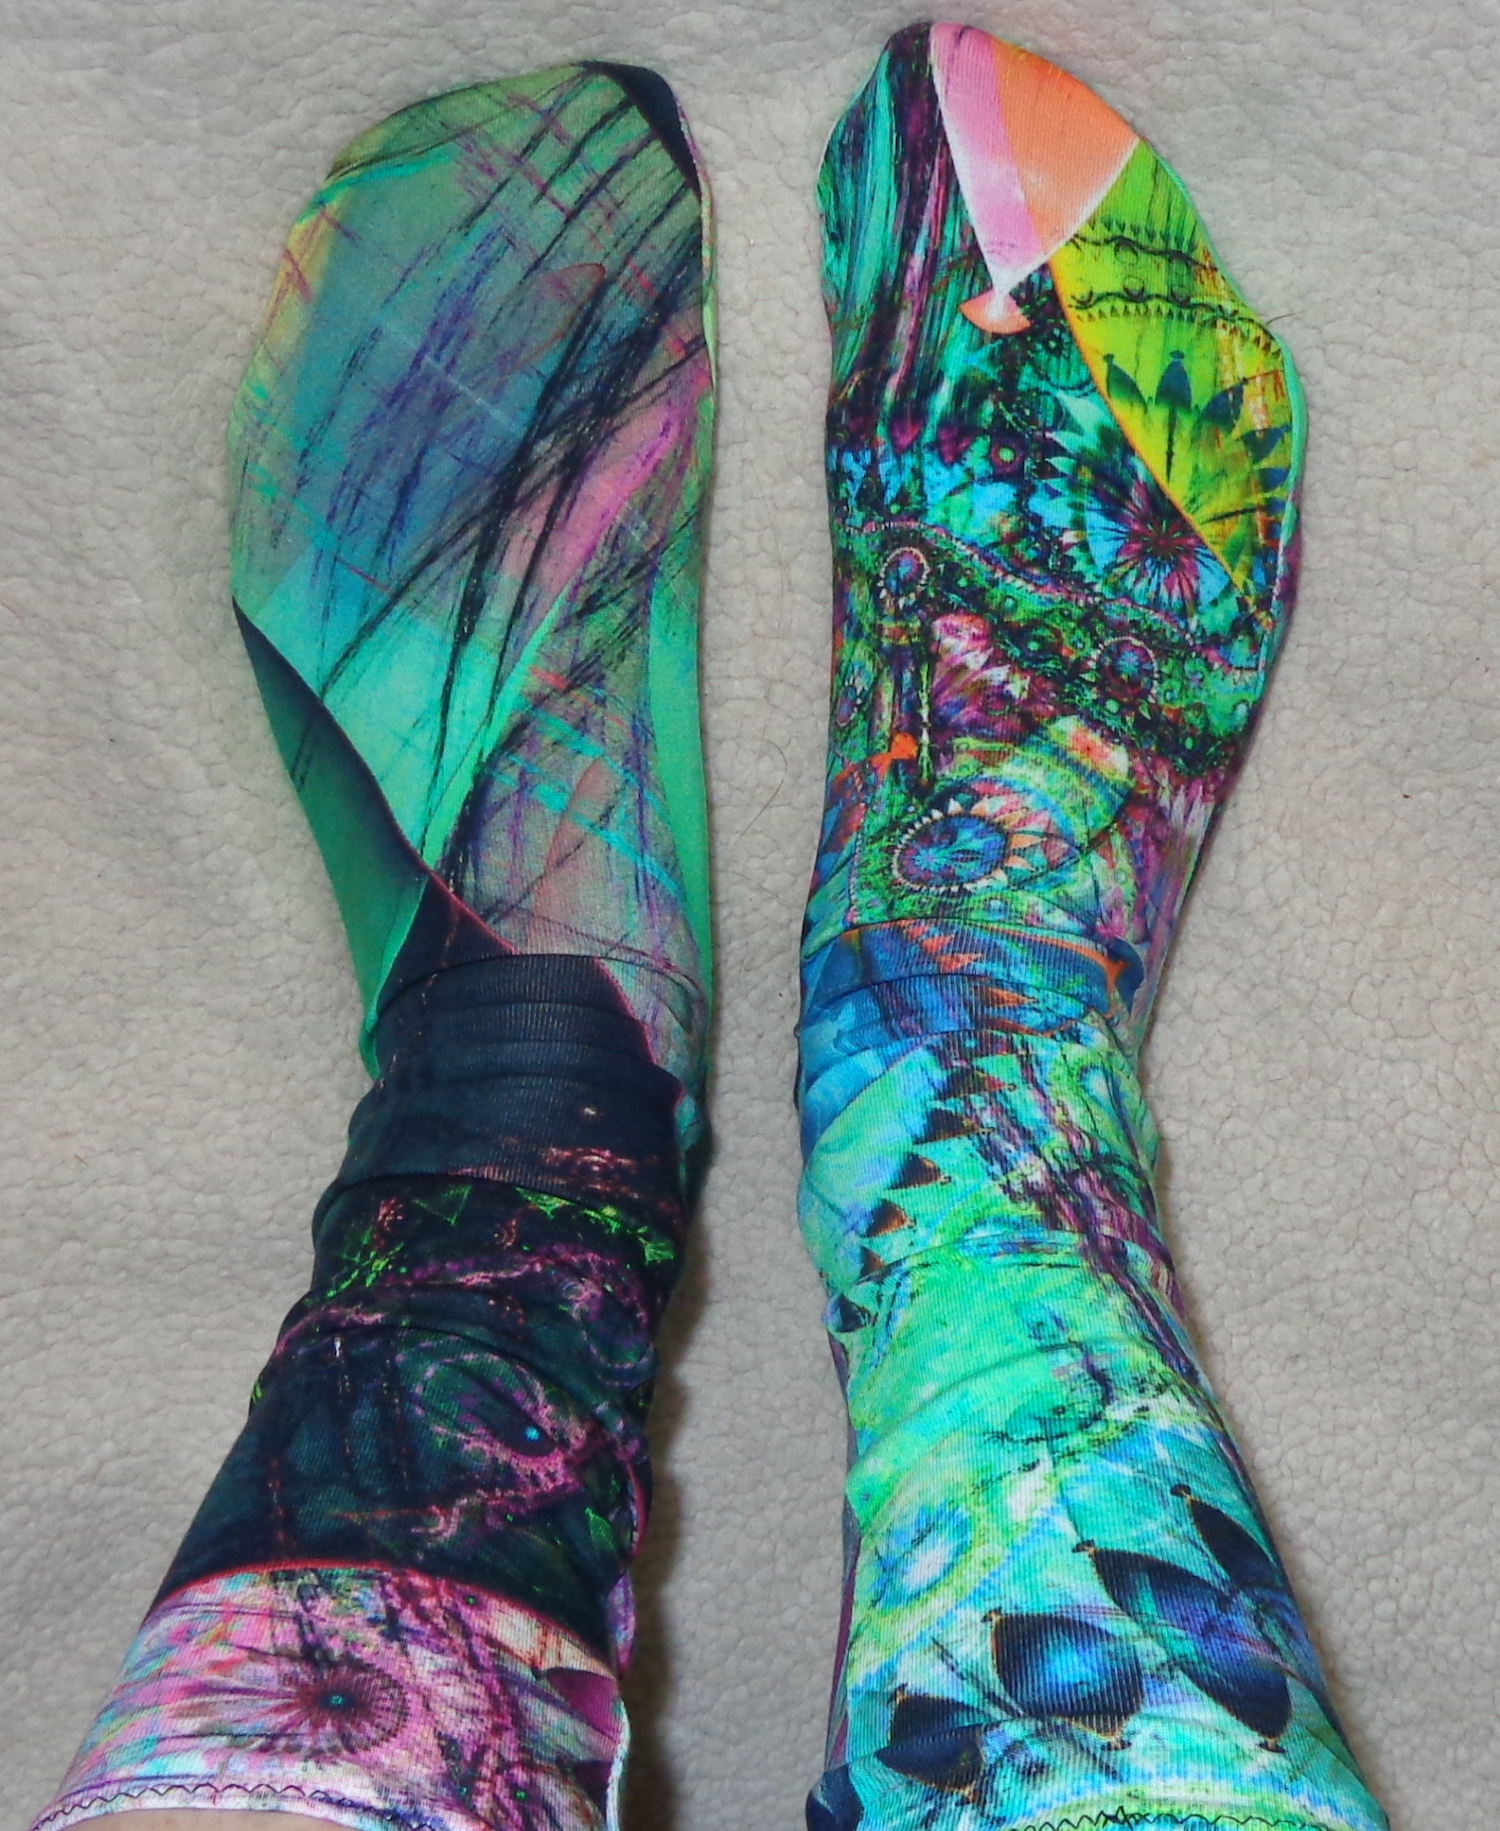
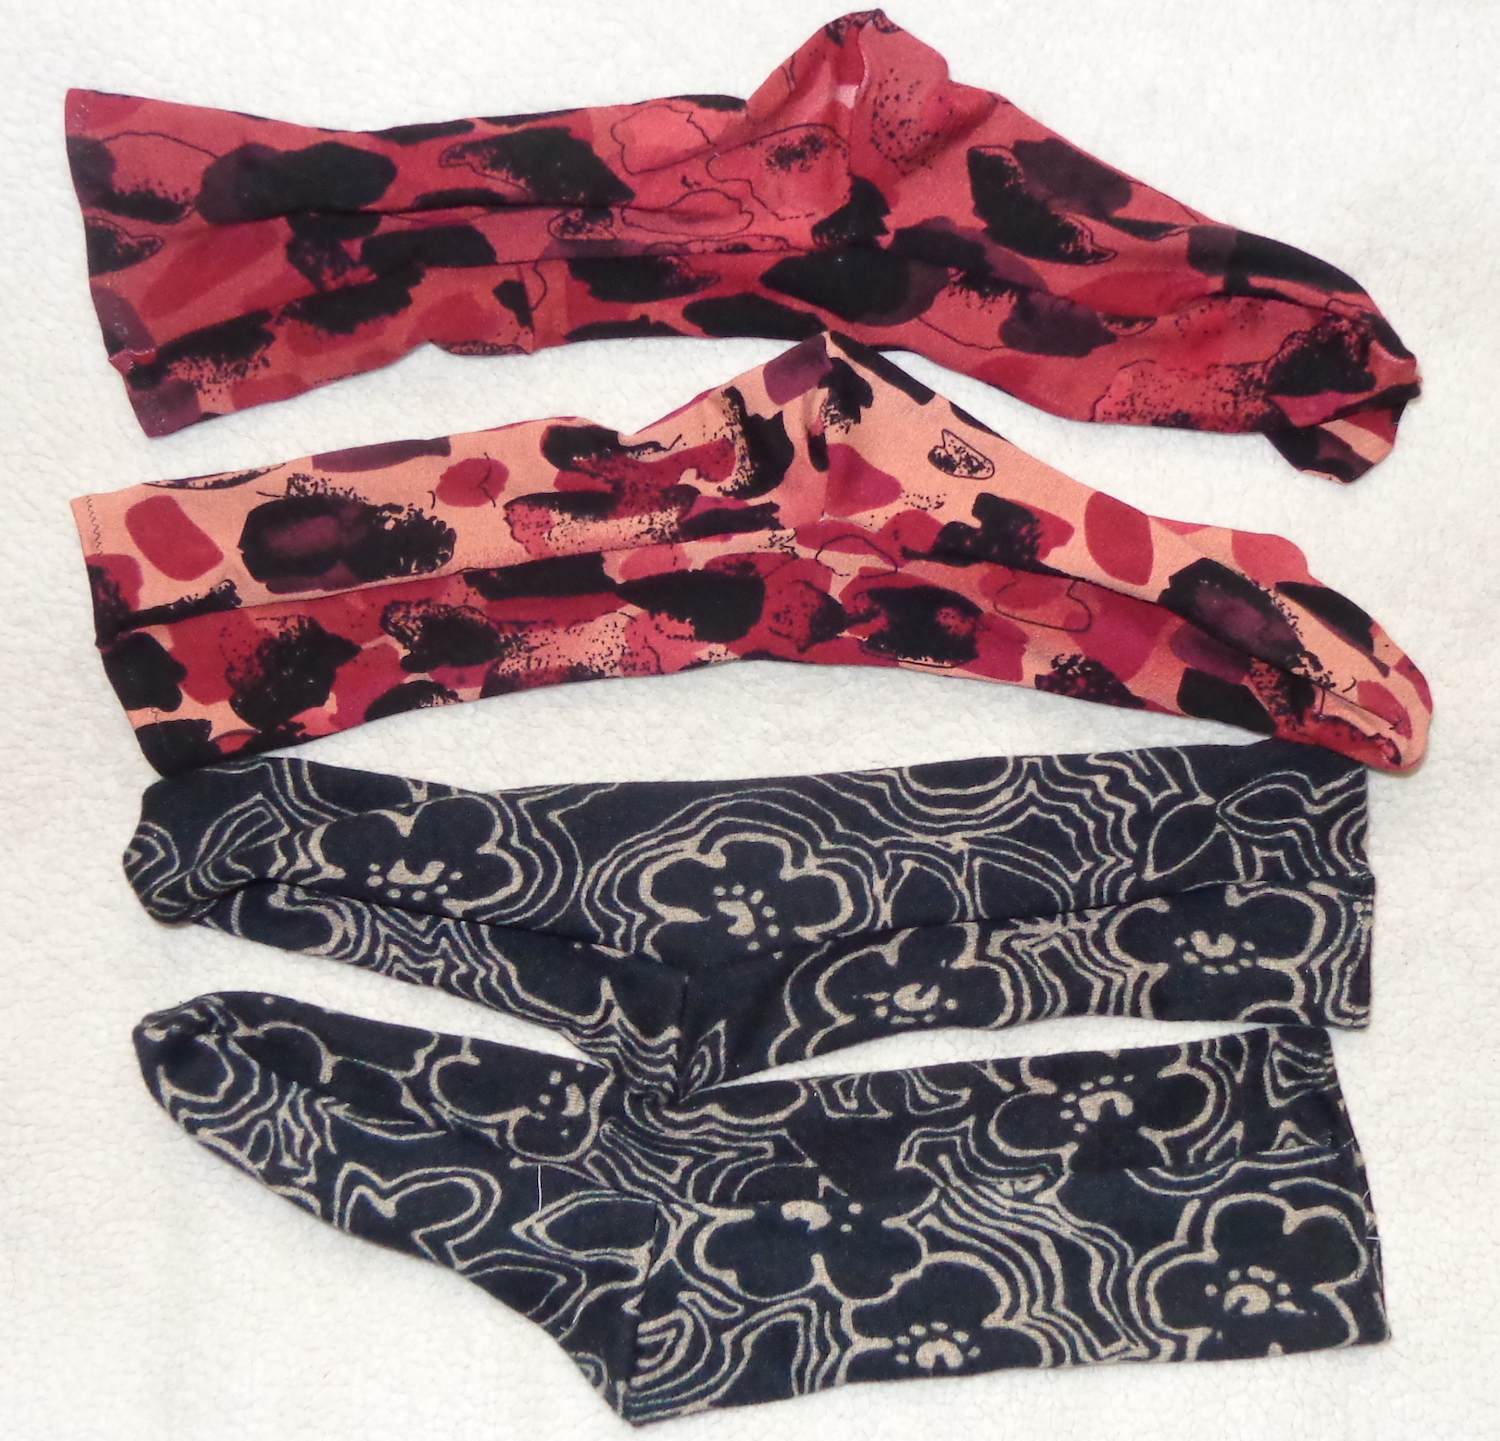
I usually knit socks, but recently someone at my sewing group talked about sewing socks from leftover pieces of jersey knit. I was intrigued and had a look around the internet, then drafted my own pattern. Here’s a pair of my finished sewn socks:
These are sewn from a Dutch print on cotton jersey that I used for one of my Mirri dresses. It was expensive, so I kept every shred – plus I really like it.
The pattern for these is a tube, pieced from two long rectangles. One has darts for the heel so needs to be cut a bit longer. Originally, I measured the length of my foot for the pattern, but ended up shortening it by about 2″ – because of the stretch of the jersey knit. I first tried these with rounded toes but the fit wasn’t good, so I shaped the toes for left and right socks. Here’s my pattern now:
It’s 4.25″ wide, with a .25″ seam allowance on each side. I have skinny feet. 🙂 These end just above the ankle and things are getting snug – if I wanted to make taller socks or knee socks, I’d need to widen the pattern and maybe even shape it to fit the calf.
Here are the other two pair I made of scraps:
They don’t look like much when they’re laid flat, but they are quick to make. I serged the darts, then all around the perimeter. It literally took minutes to make three pair. I just used a zigzag to hem the tops, but could have used the twin needle instead.
They’re more like sock liners to me, but then I tend to wear thick socks when I wear socks. They’d be easy to make to match another garment and would be fun to wear with shoes that will only allow a thin sock. I might also wear them as sock liners this winter. The tan and black ones are made of a sweater knit and they’ll be the warmest of them all.
Have you ever sewn socks?
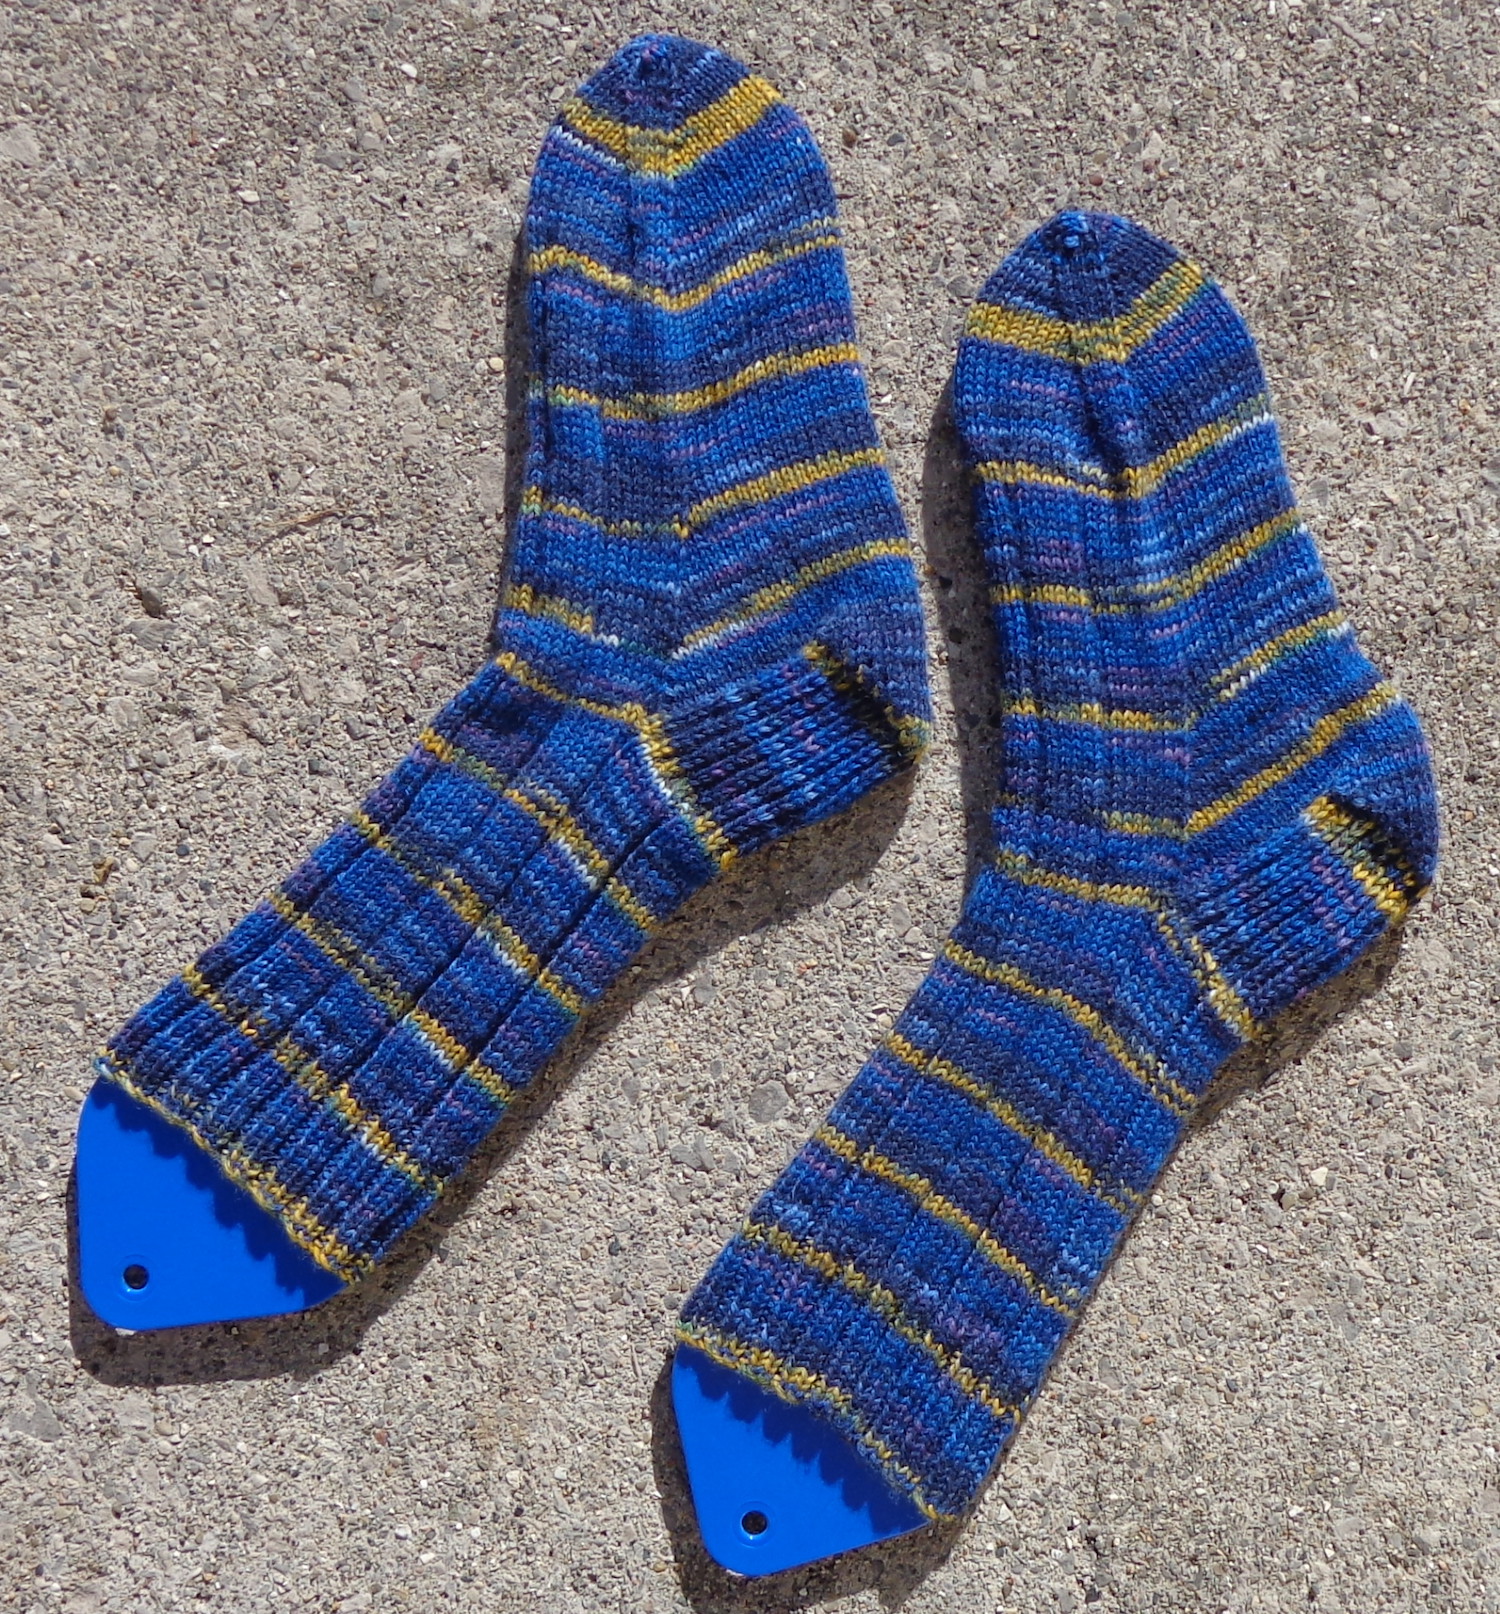
I also finished kniting a new pair of socks for myself in self-striping yarn.
This is Online Supersock 6-fach Stripe Color, which has been well-aged in the stash. I think I bought it originally to make socks for the mister, but he missed out this time. 🙂
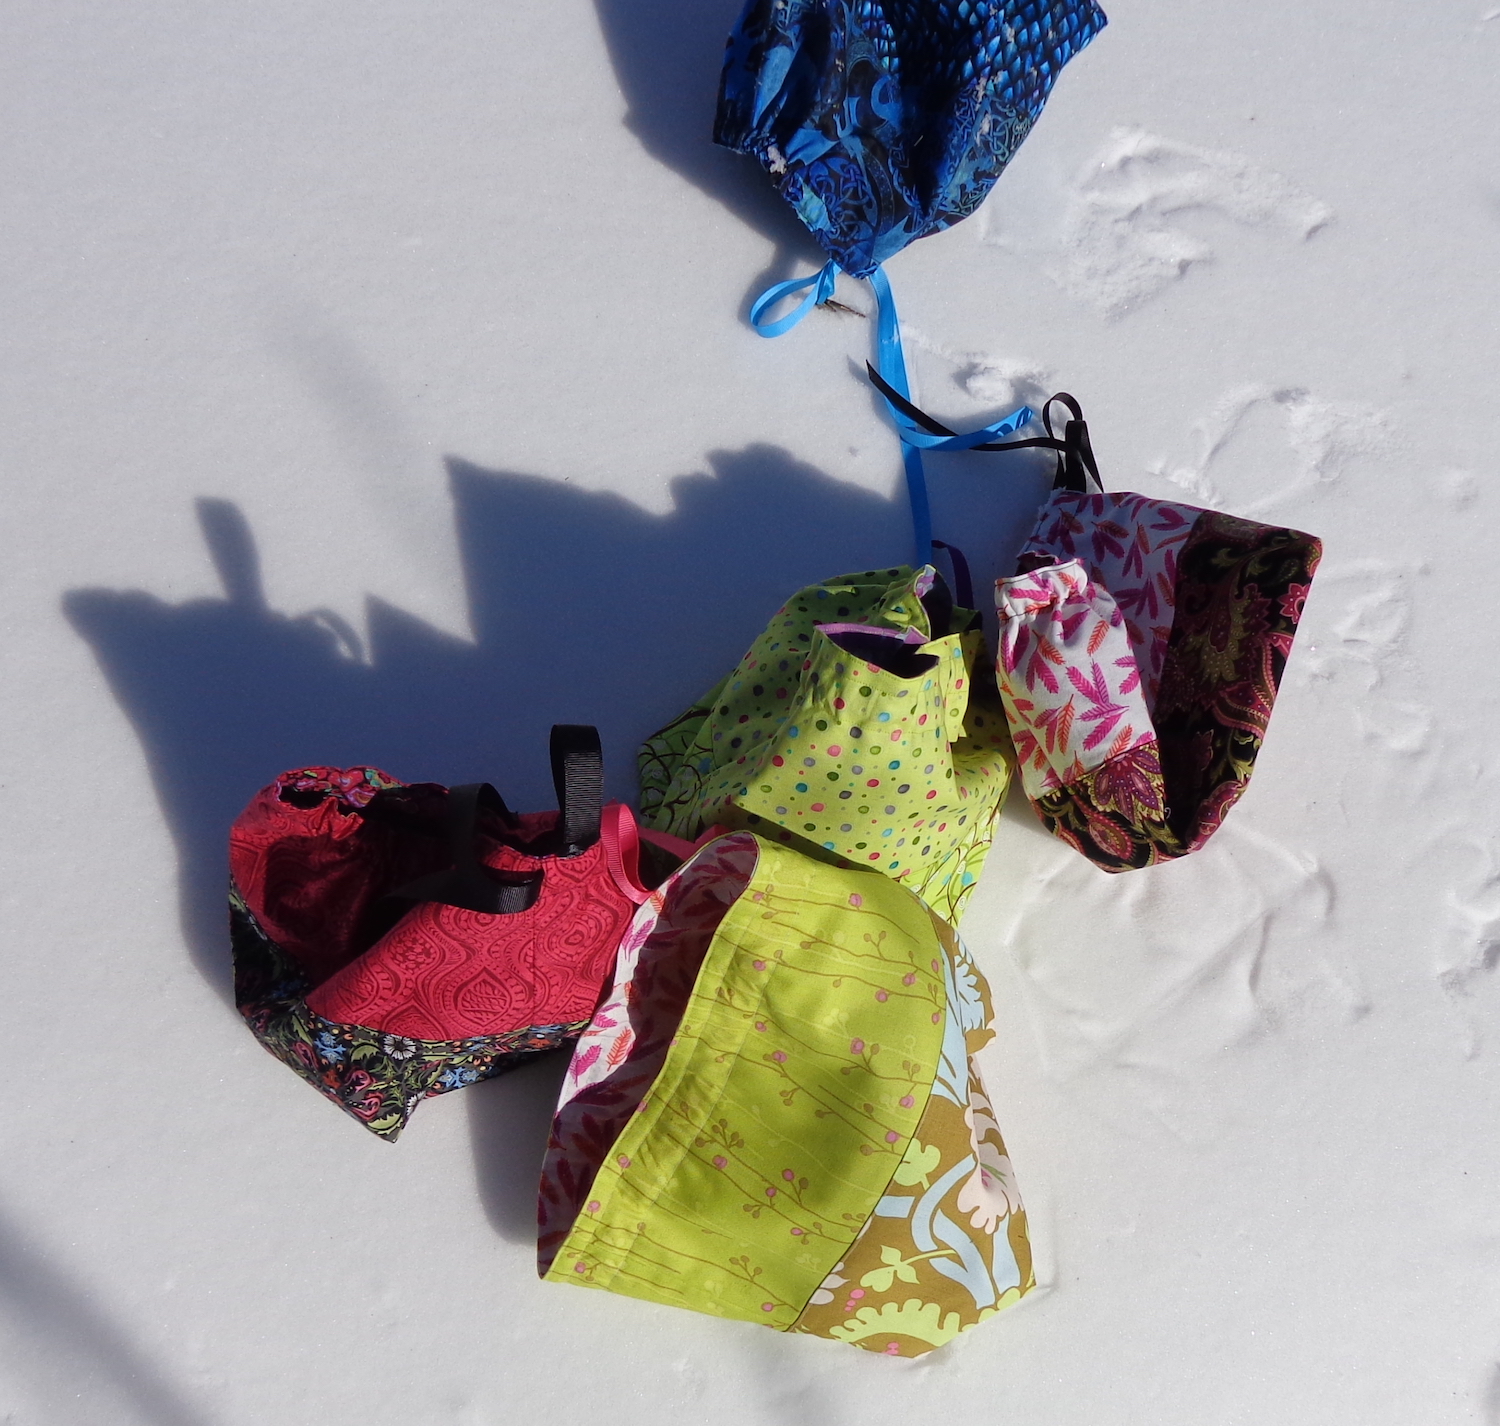
I usually clean my desk when I finish a book, but last week, things went a bit further. I published a book that had fought me from start to finish (inevitably, this means that I love the result) and so I did a long-overdue spring clean on my office. I also have my sewing table in there and a bunch of yarn stash, so this was a huge sort, clean and reorganization process. I found many projects in the works that I’d forgotten about, and now that everything is shiny and clean, I’m determined to finish some of them up.
First up, I completed some knitting project bags. I had made some a few years ago (here’s that blog post) and at that time, I’d cut out some more. Last week, I pulled out the pieces. There were some combinations that didn’t sing for me, so I ended up cutting more pieces 🙂 plus I found the remnants from my dragon quilt and put them to work. In the end, I have eight new project bags. I don’t need them all, but they’re not taking up space in my to-be-sewn pile anymore.
(This was a bit of a challenging photo-shoot, btw. We had a blizzard over the weekend and while it’s sunny today, the wind is wild. That blue bag was in the snow indent below the black and pink one when I went to take the picture.)
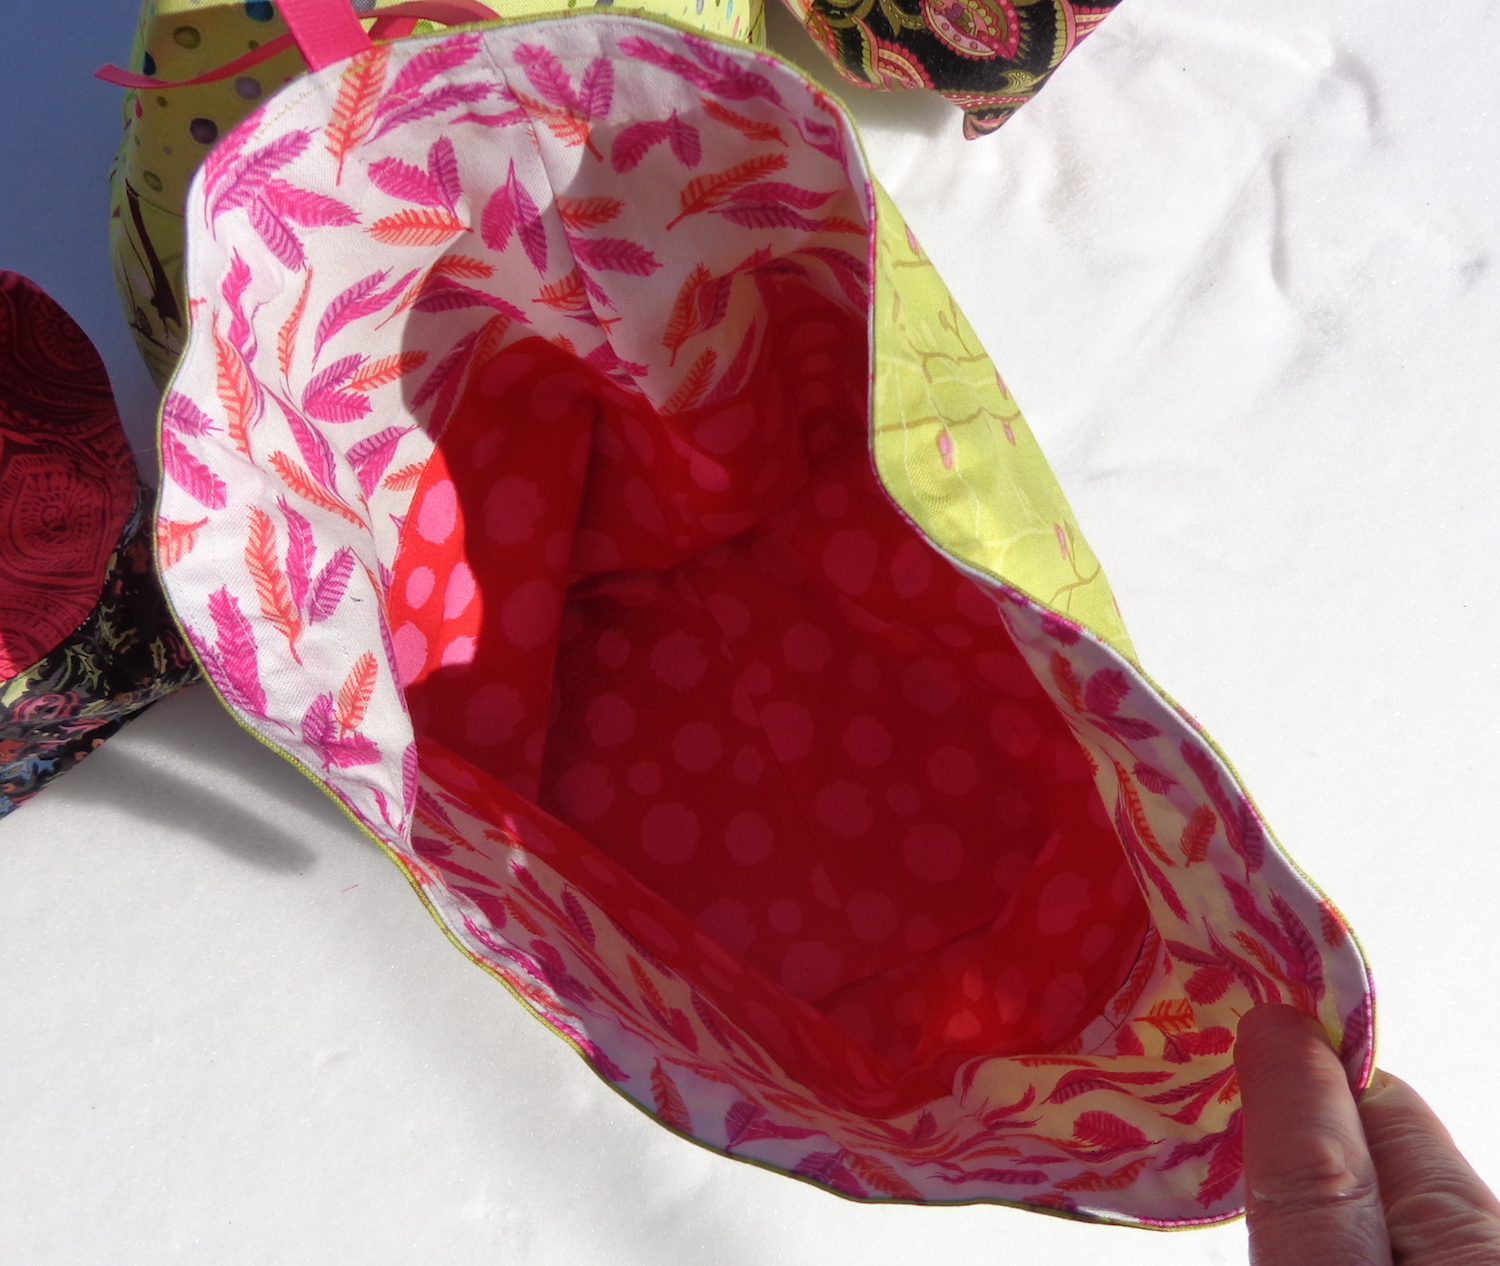
I’m still using the free pattern mentioned in that blog post, but I’ve finalized some more changes. Each of these new bags has a zippered interior pocket – the zipper is in the seam between the two parts. Once the zipper is sewn in, I sewed a square of matching fabric behind it to make the pocket. I often take a small pair of scissors with my knitting and don’t want them to cut the yarn. A zippered pocket is also a good way to keep track of a darning needle.
None of these new bags are interfaced, because the additional layer of the pocket gives them enough structure, I think. I added a loop of grossgrain ribbon as a handle at the top, and also another loop of ribbon with a clip and a charm, just for fun. Each zipper has a pull of the same ribbon used for the charm and clasp.
This one reminds me of a pink grapefruit. It’s the green one at the middle bottom in the picture above.
Here’s the dragon one. I’ll definitely keep this one myself!
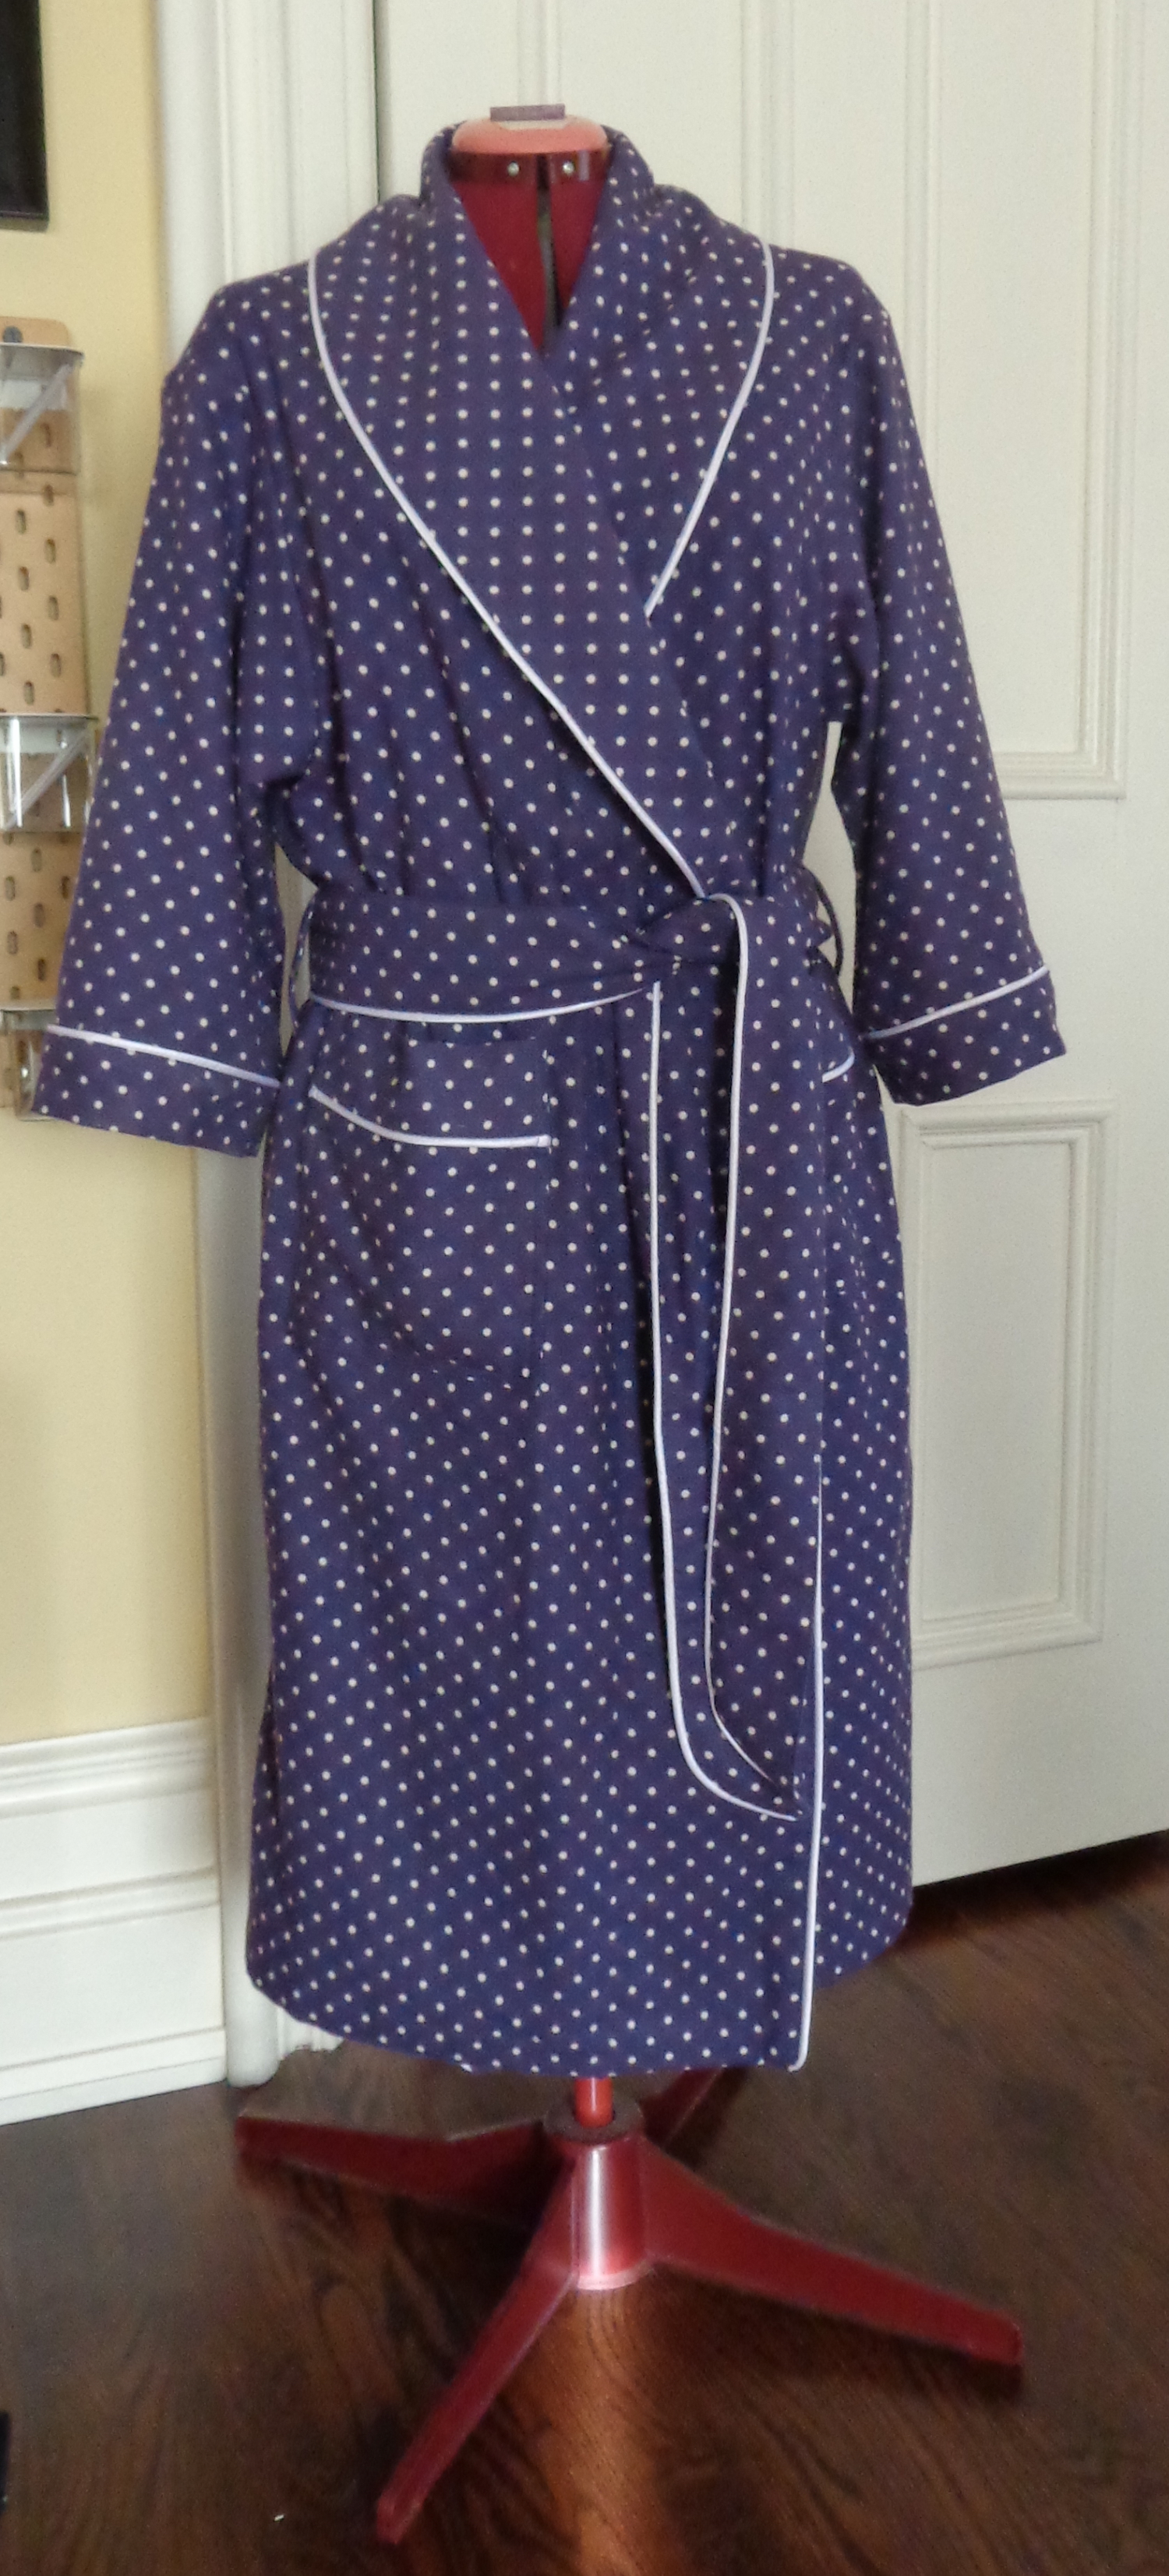
Butterick 5537 is a unisex pattern for a robe and pajamas. I needed a flannel robe and like the shawl collar on this one, so I gave it a try.
It gave me a Eureka moment so I’ll just skip right to that. I’ve only made one unisex pattern before. It was a Hawaiian style shirt and didn’t fit me well. I remembered it when I’d cut this robe because I had a similar result.
Mr. Math is 6’2″. I’m 5’5″. He has a 40″ chest and I have a 39″ bust. No matter whether I was making this robe for him or for me, I’d cut a Medium (which I did). But which of us will it fit? It can’t possibly fit both of us well and it doesn’t. This isn’t really a unisex pattern – it’s been drafted for a man. It fits the mister perfectly and the details are proportionate. I, on the other hand, was overwhelmed by fabric. So, if you’re a woman who is buxom or who has broad shoulders, a broad back, is tall, or wants a robe that is longer than mid-calf, this pattern might work for you right out of the envelope. If you’re a shorter, pear-shaped woman with narrow shoulders, who chose a pattern for a mid-calf length robe because you actually wanted a mid-calf length robe, then you (like me!) will have some modifications to make.
I bought a purple 100% cotton flannel with white polka dots (115cm wide) at Fabricland. The design is printed, and (as is so often the case) it’s printed off-grain – this made it a bit of a challenge to match the pockets but I did my best. I added some satin piping in white, as well. Since this robe is going to be washed, I pre-washed both the flannel and the piping (put it in a pillowcase or lingerie bag in the washer), so there won’t be any surprises later. I used a fusible knit interfacing for the collar facing and also interfaced the belt.
Here’s my finished robe, so you don’t lose hope reading about my modifications!
The surprises were in the dimensions of the garment: it was absolutely enormous for me. When I seamed the shoulders, thought “wowza” and tried on the unfinished robe, the bottom edge was on the ground. There was no way it would hem to mid-calf as in the illustration. I cut six inches off the hems right away and began to modify. The pocket placement was far too low – sadly, I sewed them on before having my “wowza” moment, so I got to pick them off again. I could only put my fingertips in the pockets – and the pockets were proportionately too big, IMO. The armscye is closer to my waist, so naturally, the placement of the belt loops is too low. The sleeves are similarly long and wide – I knew at that point I’d have to cut at least 4″ off them. At this point, I abandoned the directions and began to make modifications each step of the way.
I had already decided to fell the seams wherever possible, since that finishing will ensure it wears better. I picked off the pockets and put them aside, working on the collar first. I felled the shoulder seams, added the piping to the outside edge of the collar, then sewed the facing to the fronts along the outside edge but stopped about 6″ from the bottom edge. Then I sewed the side seams and felled them, then I turned up a two-inch hem (one inch rolled twice) and ironed it in place. With this done, I could fold under the hems at the front edge and finish that seam. Then I sewed the hem. Once turned and pressed, I top-stitched the outer edge of the collar near the piping to make that edge crisp.
The facing on the collar was supposed to be slip-stitched in place over the shoulder seams, which didn’t make sense to me. I pressed mine, but before sewing it in, I added a loop at the center back to hang the robe on a bathroom hook, and a label, just because. 🙂 I then pinned and sewed the collar facing down, from one hem, all the way around to the other. Phew!
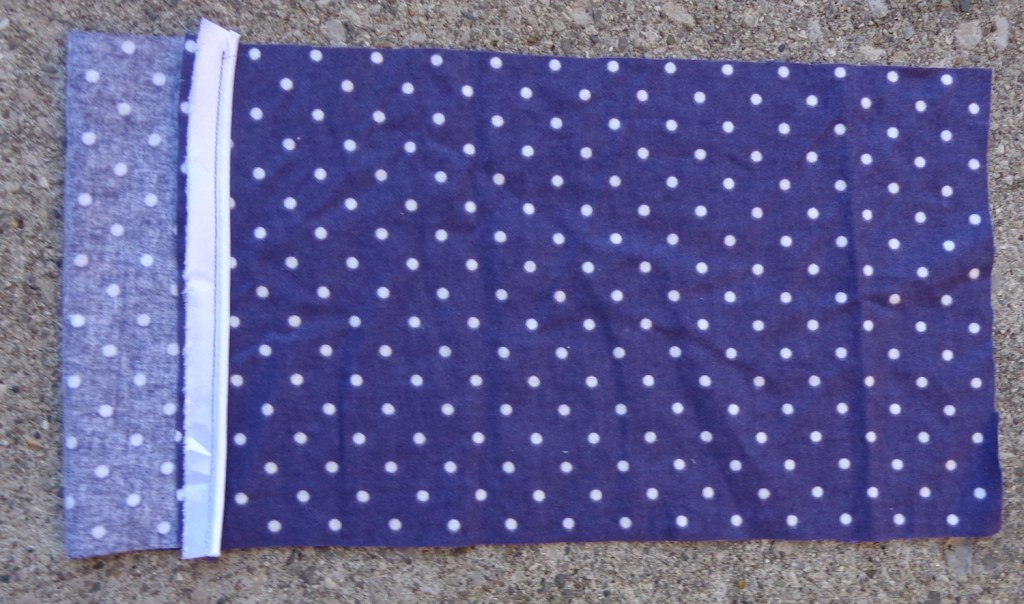
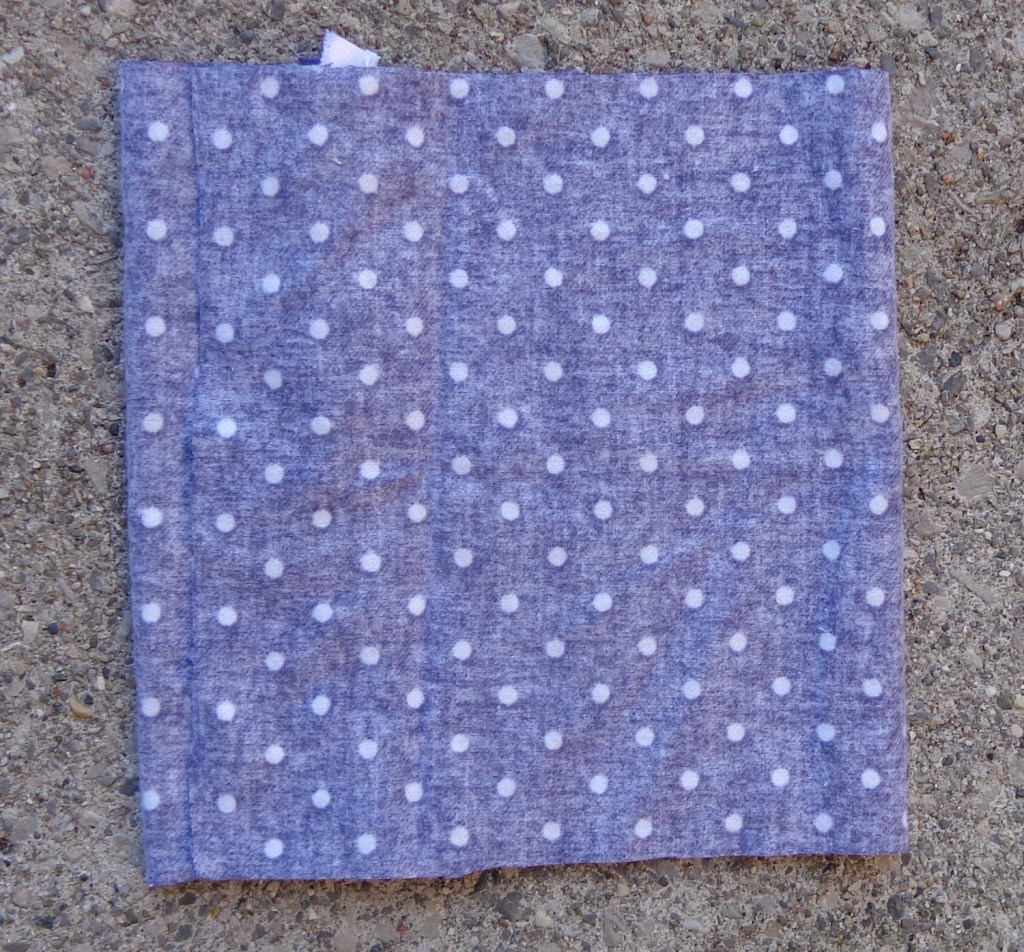
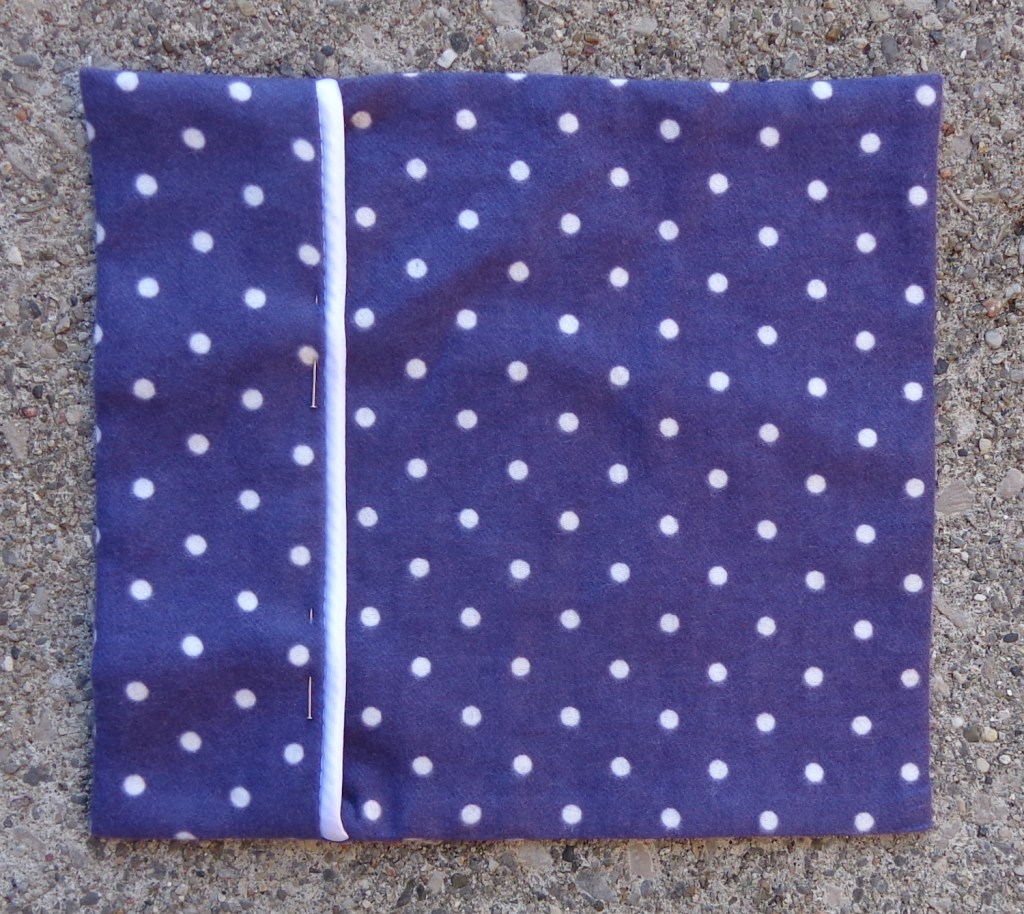
On to the pockets. (If you place them sooner, you might inadvertently catch them when sewing down that collar facing.) I made a modification to the pockets since I had to do them again anyway. I wanted the piping to run across each one, like a cuff, and thought it would be better for the pockets to be lined so there’d be no raw edges inside. I cut two pockets, each 8″ by 18″. I sewed the piping on one 8″ edge, and pressed the seam allowance to the inside. In these pictures, the top of the pocket is at the left and the bottom on the right. (They look off-square partly because I’m bad at holding the camera level.)
Next, I turned it over and folded the “cuff” to the inside, right sides together – mine is 2.25″ from the fold to the outer edge of the piping.
I folded the length of the pocket over this, so that the depth of the pocket was 8″. This created an overlap at the cuff end. See the raw edge at the left?
I sewed the sides of the pocket with 1/4″ seam allowances – in these pictures, those are the top and bottom edges – then turned the pocket through the cuff. This is is before it was pressed: I then top-stitched along the edge of the piping to close the opening forever, leaving a nice lined pocket.
I tried on the robe and positioned the pockets after I’d sewn down the collar facing, then edge-stitched and top-stitched them in place. I couldn’t match them perfectly because of that off-grain thing – also, I had to cut them crosswise instead of lengthwise out of the leftover fabric. If I’d shortened the robe in the first place, there would have been lots of fabric to cut them lengthwise. It turned out that the placement line closest to the center front was good, but my pockets are 4″ higher than the pattern specifies. They are too high, but they’re staying put—I should have only moved them up 2″
The sleeves were my next challenge. I knew they were too long, so pinned one in and tried on the robe. I marked a hem, took off the robe to pin it all the way across the sleeve, then tried it on to verify the position again. I pinned for a bracelet-length sleeve, so the cuff (which is wide on me) doesn’t slide through my breakfast. I had 11″ of fabric folded back for the hem, but I didn’t cut it yet. I wanted a piped cuff like the one on the pockets. I marked two inches above the pinned hemline, then removed those pins. (They were about to become incorrect.) Then I sewed a piece of piping across that line, piping cord toward the shoulder.
I pressed and folded up the hem to encase the raw edges of the piping and sewed again.
I pressed that seam allowance down toward the cuff, then cut the sleeve 4.5″ from the piping. There was over 7″ of excess that had to go away.
Next I sewed the sleeve seam and felled it.
I pressed under 1/2″ on the cuff, then pressed it up 2″. This makes a cuff with that seam allowance from the piping trapped inside. (Ha.) If I did this again, I’d fell the seam first and do the cuff in the round afterward. That would simplify the bulkiness of the two ends of piping coming together at the same place. Here’s one sleeve inside-out, and one turned the right way.
I then pinned the sleeves into the robe and sewed them in place, trimming back the seam allowance. Since I was all-in at this point, I cut some bias binding from the flannel and bound those shoulder seams with it to finish them neatly.
I also put piping around the belt, and interfaced it, just to give it a bit more definition. The piping could only be on one side – I realized belatedly – since the belt folds lengthwise and is seamed in the middle. If I cut it again, I’d split the belt lengthwise and eliminate that middle seam so it could be piped all the way around.
I’m basically happy with the result but am still swimming in it, mostly because of those deep armholes and the extra fabric in the bodice. (It makes me look like a blueberry hobbit.) If I cut this pattern again, I’d take two inches out of the length between the shoulders and the bottom of the armholes – I’d just fold the pattern an inch on the front, back and collar facing. That would also mean folding two inches out of the sleeve width, one on each side of the center line. They’d still be 13″ wide, so that would be fine. That would take 2″ out of the length, so I’d cut the robe 4″ shorter than the pattern piece. (It’s rectangular, so I could just fold up the hem.)
I also think the collar is proportionately a bit wide for my size – it’s perfect on Mr. Math – but I’d probably leave that alone. I might take an inch out of the width on the fronts and the back, to make that drop shoulder extend a little less than it does now. That would mean adding an inch to my modified sleeve length.
The interesting thing is that I cut a pair of the pants from this same pattern for Mr. Math. To my surprise, they weren’t drafted for either of us – I had to add 3″ to the length for his, and would have to shorten them by at least that much for me. The inconsistency is strange.
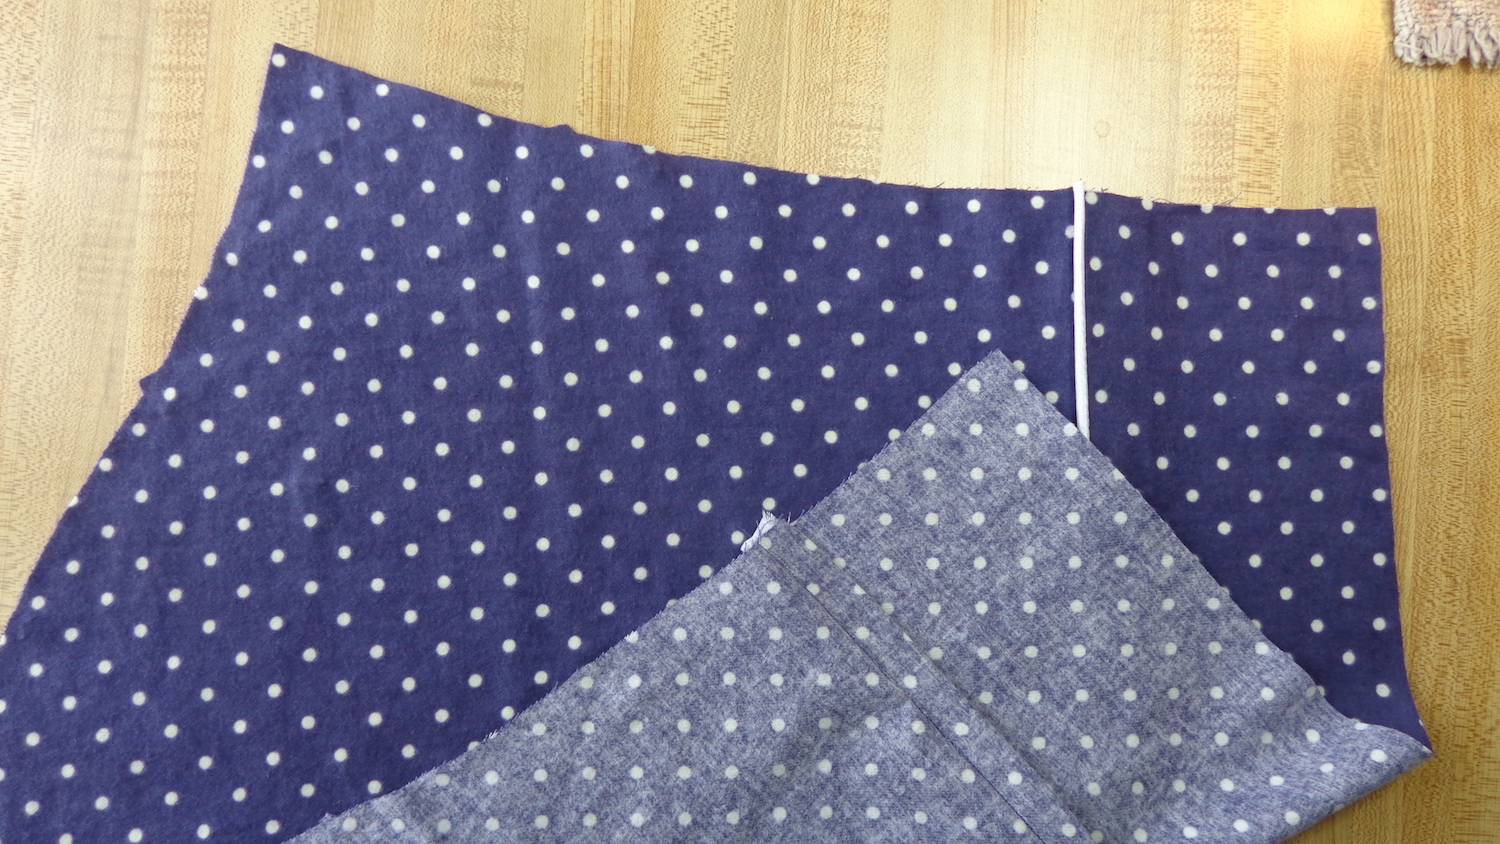
This is Jalie’s 3881 Rose sewing pattern. It’s a sleeveless shirt with a collar, back pleat and shirt tail hem. You can buy the pattern directly from Jalie here. I have several ready-made sleeveless shirts that I’ve loved to death and thought that it would be a great idea to make some new ones.
The description says the pattern is A-line and it looks slightly so in the schematic.
This pattern has a huge range of sizes (28), from a girls’ size 2 to womans 24. What’s interesting is the grading – the front of the smallest size is just barely A-line, but by the time it’s a woman’s blouse, it looks closer to a swing top. The back doesn’t show the same change: it remains pretty straight.
Since the line drawing on the pattern envelope might not be giving a good indication of results for larger sizes, I searched online for more info. This blog post is a comparison between two button-down shirt patterns, Jalie Rose and Grainline Alder. Scroll down to the image of Bonnie wearing both completed shirts. The purple one on the right is Jalie Rose and you can see that it’s closer to a swing top for her than an A-line shirt.
I suspect this shirt in the women’s sizes might offer a better fit to women who are more buxom than me. Those side seams might have to come in for me to be happy. The question is “how much?” I decided to cut my first test version of this shirt in a lightweight cotton just as it is, in the hope that I’ll still like it and wear it. And here’s the finished shirt:
I do like it! The instructions for this shirt are great, very clear and quite clever in places. I don’t think I’ve ever had a two-piece collar go in so easily and come out so perfectly. The way they instruct you to put in the yoke is brilliant. The garment ends up being beautifully finished, too. The sleeves are finished with bias binding. I felled the side seams, as well. The hem is a shirt-tail but only gently curved, so it’s easy to press it up and double-fold it for the hem. It’s odd to have to space your own buttons, but it worked out just fine.
It is definitely a loose A-line shirt, but I’ll wear it.
The one disappointing thing is that the pattern offers no option with sleeves.
I cut another in a Kaffe Fassett yarn-dyed stripe from my stash. I photographed it flat, rather than on Nellie, so you could see how wide it is in the hips:
I am pretty much a 14 by the Jalie measurements, so I cut the Y in this shirt.
I like this one, too, but if I cut more (next summer) I’ll take in that front side seam and go for a trimmer silhouette. This is fun and comfortable, a good hot weather shirt, but it does veer a little close to the maternity-top-look for me. I might cut one in rayon first, just to see how it drapes. Hmm.
What do you think? Do you have a favorite sleeveless shirt pattern?


 This is Jalie’s 3881 Rose sewing pattern. It’s a sleeveless shirt with a collar, back pleat and shirt tail hem. You can buy the pattern directly from Jalie
 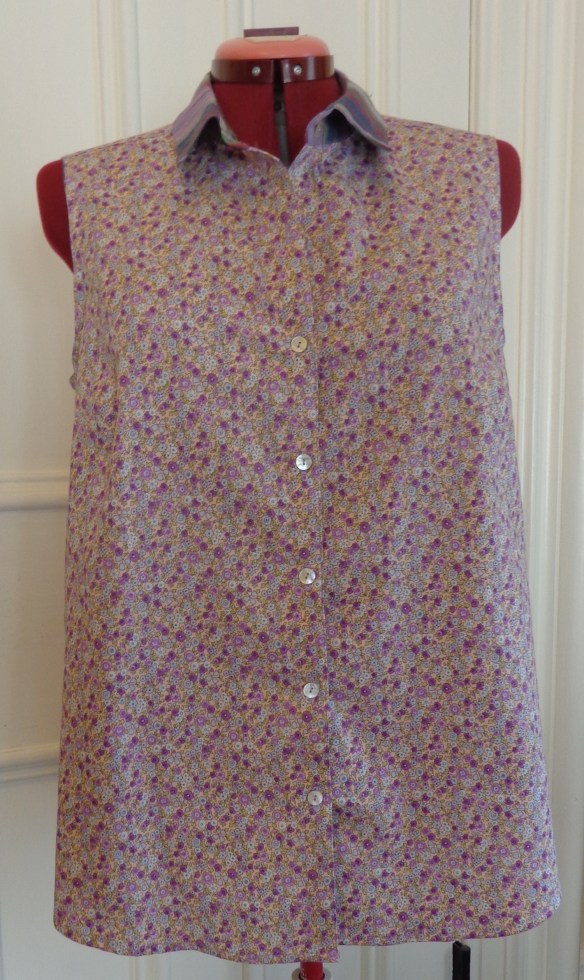 I do like it! The instructions for this shirt are great, very clear and quite clever in places. I don’t think I’ve ever had a two-piece collar go in so easily and come out so perfectly. The way they instruct you to put in the yoke is brilliant. The garment ends up being beautifully finished, too. The sleeves are finished with bias binding. I felled the side seams, as well. The hem is a shirt-tail but only gently curved, so it’s easy to press it up and double-fold it for the hem. It’s odd to have to space your own buttons, but it worked out just fine.
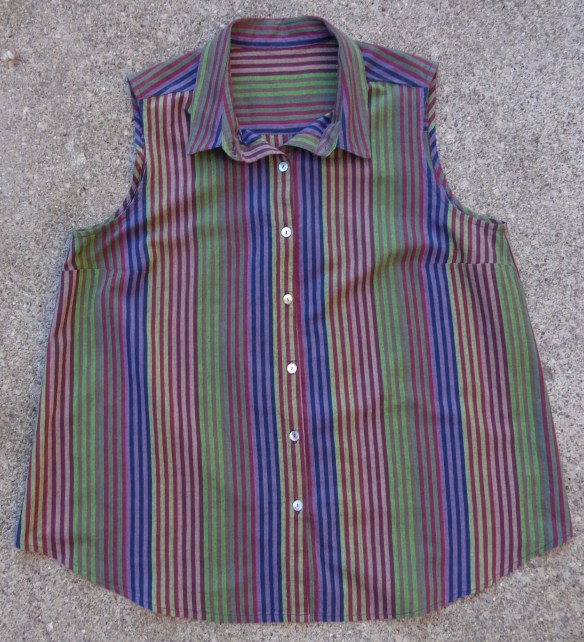 I am pretty much a 14 by the Jalie measurements, so I cut the Y in this shirt.