Top Down Raglan

I finally finished Mr. Math’s new sweater. This is a pullover, a top-down raglan with a crew neck – here’s a link for the free pattern. I used the same pattern for his Elrond Sweater, which he wears all the time.

These sweaters are kind of fun to knit because there’s not really a pattern to follow. You calculate the cast-on at the neck – based on your gauge and measurements desired for the finished sweater – then start knitting. You increase at the raglan seams every second row, and keep knitting around until it’s time to split the yoke into the arms and the body. You decide this point by trying the sweater on. Then you knit the body until the sweater is long enough, ditto on the sleeves, and you’re done. If you knit in stockinette, in the round, you just knit the whole way down. It’s not very challenging once you have it going, which makes it good television knitting.

Mr. Math wanted a basic sweater to wear around the house and he prefers wool. So, he chose a shade of Patons Classic Wool – his pick was Dark Grey Marl. Marl means that one ply of the yarn is one colour and one ply is another. This yarn has one charcoal ply and one off-white ply. Knitted up, the effect is more flicky than tweedy. I put some red stripes in PCW on the cuffs and neck.

And here it is.Top down raglan knitted in Patons Classic Wool by Deborah Cooke

The photo is mediocre, both because I’m a mediocre photographer and because marl yarn doesn’t photograph well. I only had a chance to take one shot – then the sweater was on him and he was heading out to get things done. I think this one is going to get some serious mileage!

Incredible Custom Fit Raglan in Big Wool

This is about a sweater I just finished. Despite the title of this post, I really love the sweater – what was breaking my heart was the yarn. Like all heartbreaks, this one is a bit of a saga. Here we go.

I very seldom buy the actual yarn specified for any given pattern. I tend to raid my stash first, then look for sales. So, as much as I love the Rowan patterns and books, I’ve knit very few items designed by Rowan in Rowan yarn. That changed last fall when I fell head over heels for a sweater called Voyager. It called for Rowan Big Wool, which is very thick yarn, much thicker than anything in my stash. I looked around but couldn’t find anything comparable. Fortunately, I discovered that my favourite colour – 28 Bohemian, which is a two-tone red – was discontinued. It was on sale at half price.

Even at half price, 14 balls was a hefty investment. I was a bit stressed about the cost of the sweater before I even received the yarn. But it arrived and I loved it and I cast on immediately. The pattern stitch on the sweater called for a purl 3 together, which was a bit of a challenge, but I persisted and knit it all up. Then I tried it on.

Oops. It looked TERRIBLE on me. I didn’t even sew in the ends – I frogged the sweater immediatel and returned the yarn to the stash.

But I still loved the yarn. And it had been comparatively expensive. I had to use it! I tried a number of other sweater patterns, but nothing worked out. I didn’t get gauge or I didn’t like the look of the stitch or whatever. Finally, I decided to just knit a top down raglan in it. This is a really easy pattern and always results in a sweater that fits. There’s a tiny bit of math to do for the neck, then you knit, and periodically try it on as you go. Easy! I knew I wanted a cardigan that was more like a jacket in length. I knew I wanted a big collar. I knew I liked how the yarn looked in seed stitch and wanted the hems done in that stitch. So, I did my bit of math, and started knitted.

The one thing about knitting with big wool on big needles (9mm!) is that sweaters get done fast.

Here’s the sweater that resulted:Raglan cardigan knit in Rowan Big Wool by Deborah Cooke

What I did for the collar was cast on a lot of stitches – I think it was 80. I knit the edge the same as I’d do the hem (should have done 7 rows instead of 5, but there you go) then worked for several inches. I then decreased down to the neckline, in exactly the same way as I’d increase for the raglans. The really cool thing is that the collar kind of curls up against my neck. I didn’t expect that but I like it a lot.

And here’s a detail of the back:Raglan cardigan knit in Rowan Big Wool by Deborah CookeI added a kind of a pleat at the centre back to add ease of movement. I also added a passamenterie frog back there, to echo the fasteners at the front – these are done in I-cord.

The one complication is the weight of this sweater. It used 12 100g balls of yarn. That means it weighs 1.2 kg or almost 3 pounds. (It is heavy. It was a huge mound on my lap when I was knitting the last rows!) So, I had concerns about the weight of the sweater stretching it down. I added I-cord inside the collar to ensure that the neck keeps its shape. To do this, I picked up all of the purl bumps on the row where the collar becomes the coat, then knit applied I-cord right across, sewing in the ends. I also used anchor buttons behind each of the buttons you can see on the outside. This ensures that the button never rips free of the knitting, or tears the fabric. Either of those things can happen with weight.

I could have made it longer – I have two balls of wool left, which would have given me another 7 or 8″ of length – but I thought I’d be less likely to wear a coat than a jacket. I think I’ll make an earflap hat with the rest of the wool. I need a red one.

What do you think of my heartbreaker? Do you love it as much as I do? Have you had a knitting project that came together when you thought it might not?

Easy Top Down Raglan Cardigan

I seem to be convinced that I need cardigans, because I cast them on all the time. And I LOVE self-striping yarns. They entertain me enormously. I saw some Noro Kureyon on sale and could not resist.

On Ravelry, in the listing for Noro Kureyon, it says that “Kureyon” is the way that Japanese speakers pronounce “Crayon”, so the yarn is named for its bright colour combinations. Noro, of course, is a Japanese manufacturer. This is such a good story that I hope it’s true.

Top down raglans are insanely easy to knit and to fit – you can just try on the sweater as you go and adjust the fit accordingly. And there’s no sewing at the end! No seams! It’s all one piece. You just have to sew in the ends.

I used Laura Chau’s (a.k.a. CosmicPluto Knits) free pattern for an Easy Top Down Raglan, partly because she had knit it with the same weight of yarn. I did use smaller needles, though – 4mm instead of her 5.5mm – because I wanted a denser fabric. The only difference that made (because you do try it on as you go) was that it took more increases to get to the underarms. Laura suggests 24 but I did 30. Instead of ribbing, I worked the edges in seed stitch. I left out the buttonholes for a cleaner front. I did some waist shaping, but mostly I wanted a big loose cardi in pretty colours. I also was (big surprise) pretty compulsive about keeping the self-striping in sequence, even when changing balls of yarn.

It’s had a good soak (and is much softer for it), then a block. Here’s the result:Top Down Raglan by Laura Chau knitted in Noro Kureyon by Deborah Cooke

You can see that the sleeves aren’t a perfect match. I had to change balls in the light green near the top of the sleeve on your right, and it looks like I didn’t break off enough green. See the dark green line in the middle? The dark green band should have started there, not three or four rows down. That’s what threw off the match, but by the time I saw it, I didn’t want to rip back. It did become more out-of-step as the sleeves became more narrow, but I’ll live with it.

A couple of notes:

• From the 12 balls of Noro Kureyon, I used parts of 11 balls in my matchy-matchy fussiness. There’s a little more than 150 g left, though – so if I hadn’t been fussy, but had just knit it as it came off the balls, I would have needed 9.

• I did change the method of increasing at the raglan seams. The pattern instructs you to knit to one stitch before each marker, then KFB, move marker, KFB and continue. I don’t like how knitting front and back into the same stitch looks. Because each stitch is made into two, a knit stitch and a purl stitch, it makes a purl stitch right where the marker is and again to the left of the stitch after the marker.

I prefer when there is a neat line down the length of the raglan. So, I kept the increases outside of the two stitches that bracket the marker, leaving those two stitches to make that line. To do that, I knit to one stitch before the marker, make 1, knit 1, move the marker, knit 1, make 1, and continue.

Here’s a picture of different styles of increases so you can see what I mean. KFB is near the bottom of the sample. I’m not sure which of the M increases is the one I use, as these are the poster’s assigned names – it’s either M1A or M1L/F (and the corresponding M1T and M1R/B). It’s amazing to see how many ways there are to make a new stitch, isn’t it?

Of course, I’ve finished this winter cardi exactly as summer starts. This is pretty funny. It’s done just in time to be stashed away – while all the cotton ones linger on the needles. OTOH, in September, I’ll have a new sweater to wear. Look at the yummy colours!

Top Down Raglan by Laura Chau knitted in Noro Kureyon by Deborah CookeHave you ever knit a top down raglan? What did you think of the method? And the result? Is your knitting “in season”? Or do you finish things at the wrong time to wear them, like me?

The Elrond Sweater

I finished Mr. C.’s Kauni fair isle sweater a while back. (You may remember me talking about the swatching and the pattern choice here.)

When it came off the needles, it looked like this:

elrond1.JPG

It sat for a bit while I worked up the nerve to throw the completed sweater into the washing machine. I had to do it, because I had knit the sweater 10% too big to allow for the shrinkage in washing. It didn’t fit him, so into the pillowcase it went, then into the machine. That was a stressful 45 minutes! But it came out beautifully soft and 10% smaller.

It had to sit a few days more before I was ready to sew in the zipper. I always fret about sewing zips in with the machine, but not enough to baste them by hand first. This one, as has recently been the case, went in perfectly the first time.

Since then, Mr. C. has had it on his back and I’ve been trying to get it from him to take a picture of it! Here it is, all done:

elrond2.JPG

Yet more proof that I’m not a photographer! Unfortunately, you can’t feel how much the wool softened in the washing machine. It’s incredible. The sweater is so soft now that you wouldn’t think it was the same yarn. It didn’t felt – it just fulled and shrank.

For this sweater, I used the Kauni Rainbow colourway for the bright bits, but not all of the colour repeat. The purple, turquoise and green bits didn’t contrast enough with the purple, navy and blue background, so I broke them out of each repeat. I had a whole pile of these pieces left, so I knit something else with them. I’ll show it to you tomorrow.

Kauni Fair Isle

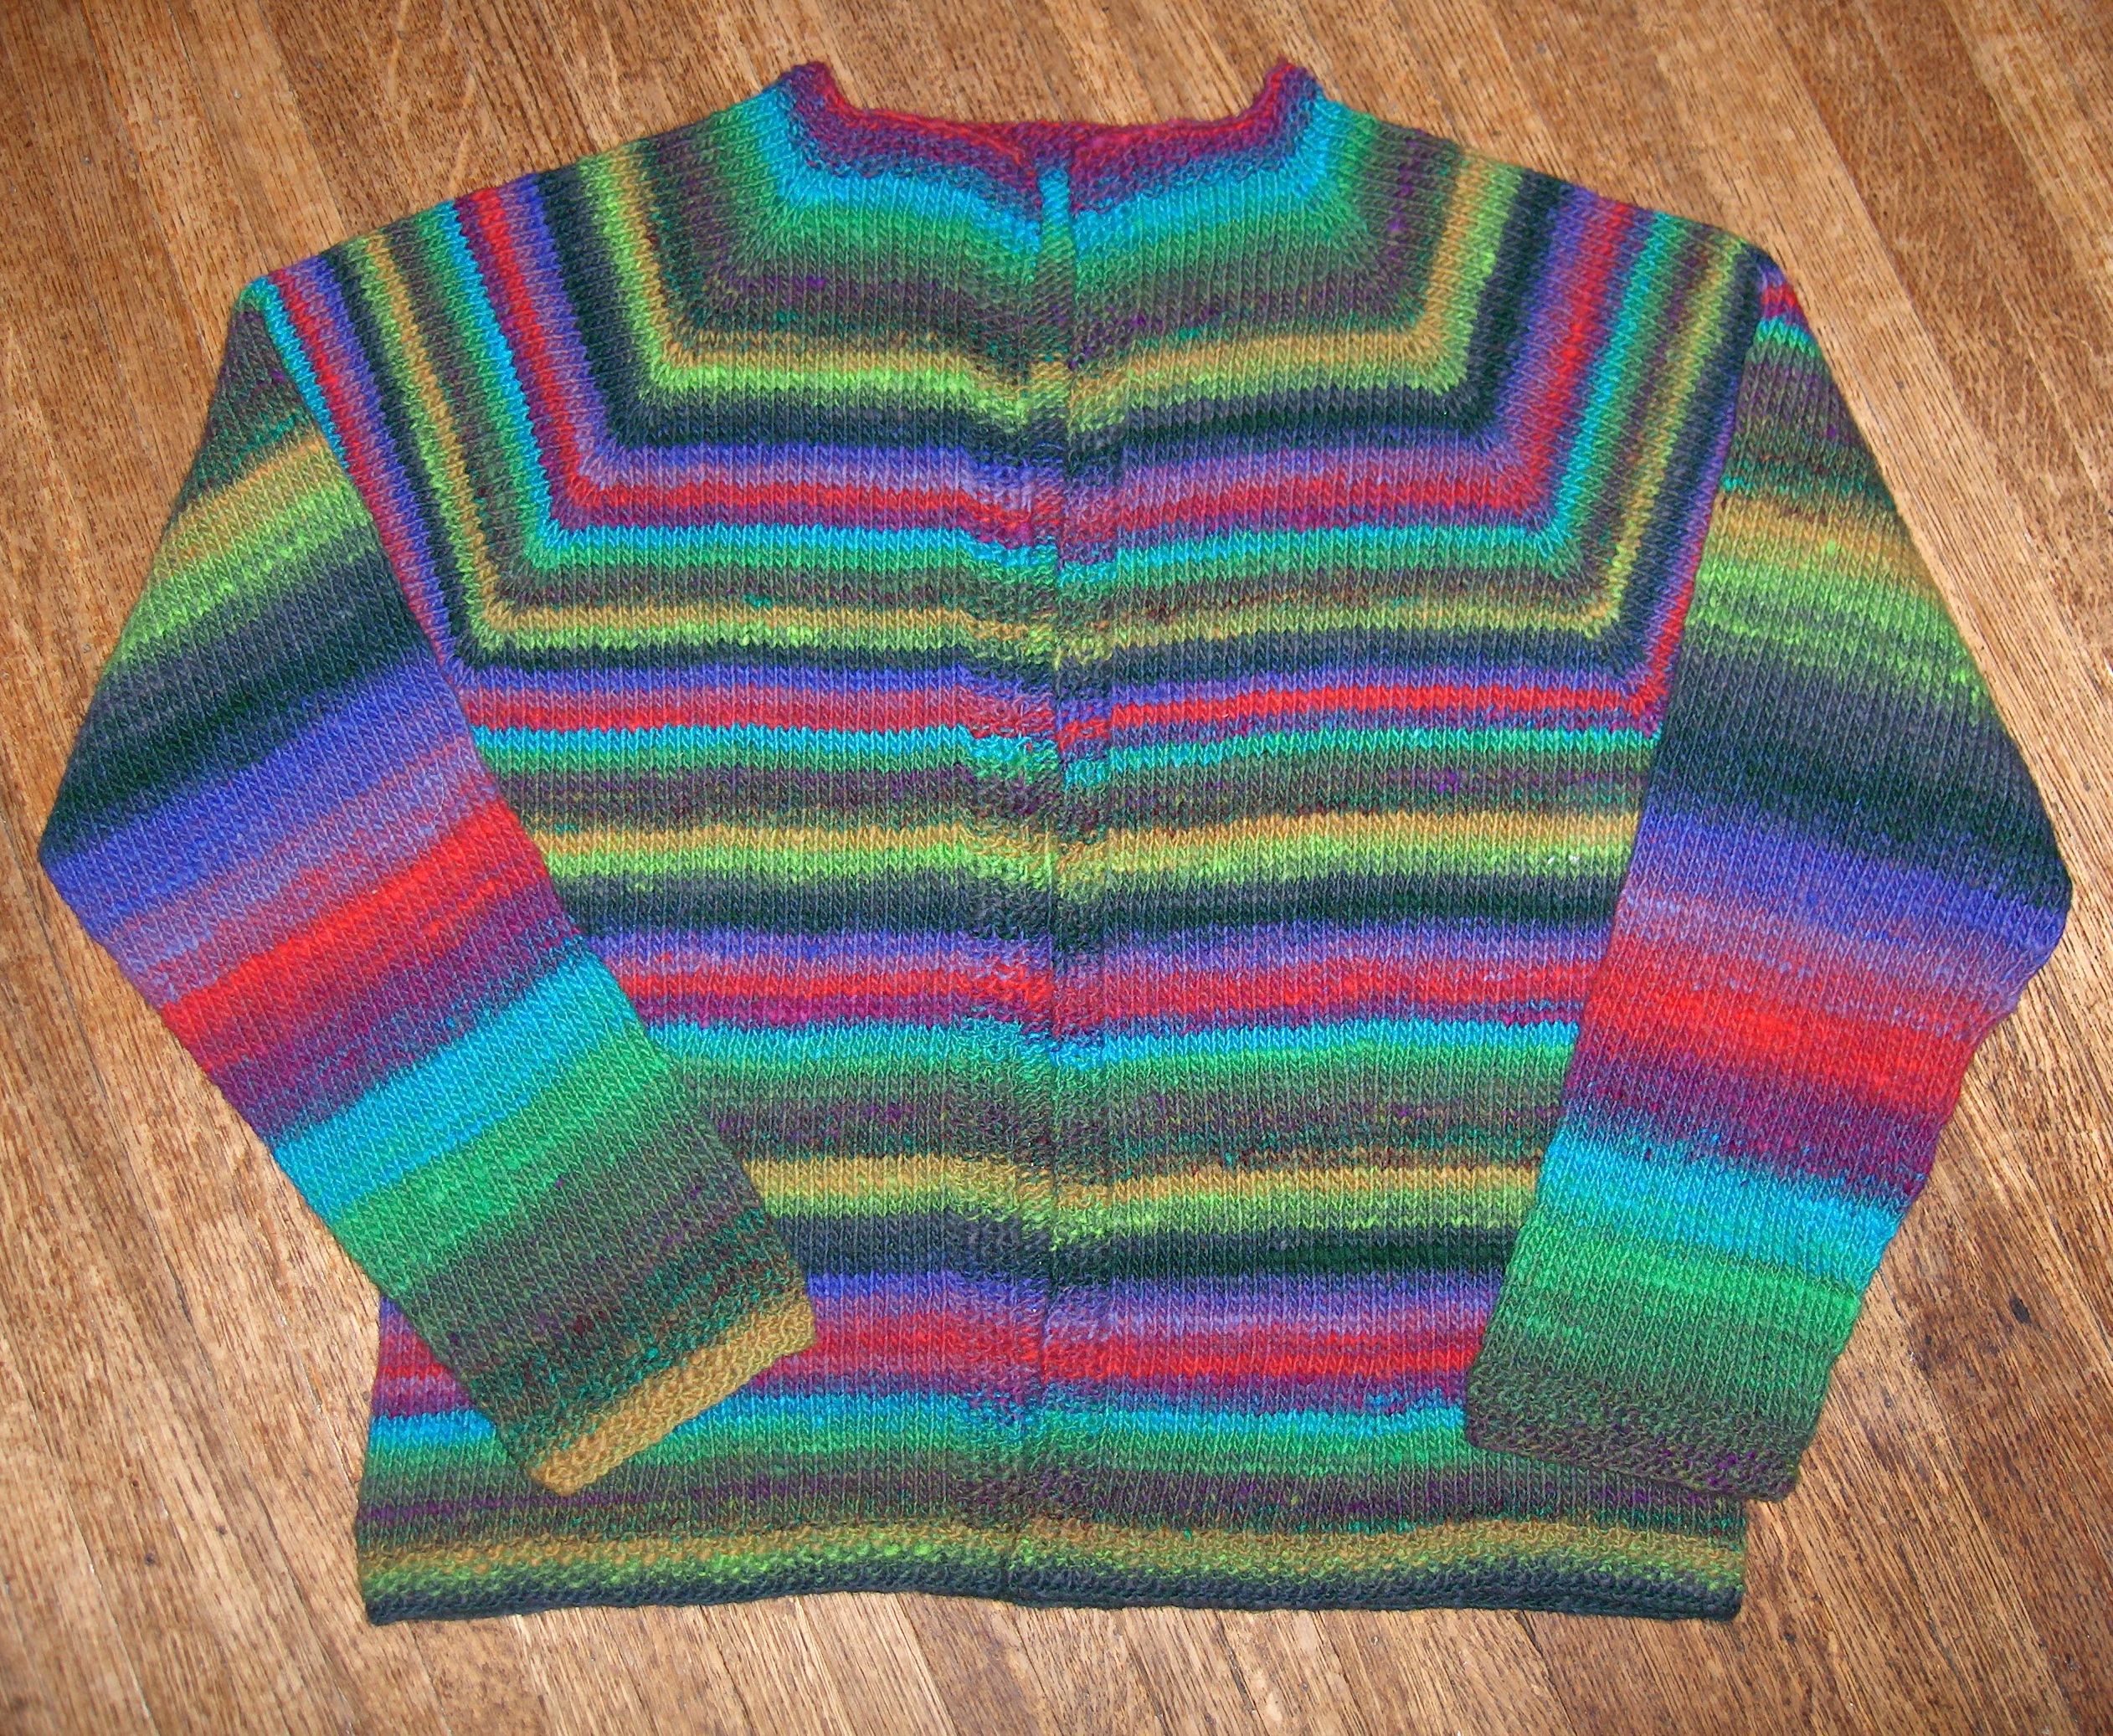
I’m fascinated with the wool with the long colour gradations called Kauni Effektgarn. (That’s a Ravelry link.) This is going to be a zip-front cardigan for Mr. C. – the plan is for it to replace one of his fleeces. It’ll be warmer, plus I think it’ll look better than recycled pop bottles ever could.

Not that I’m biased toward knitted sweaters!

I decided to knit a top-down raglan. This is because you do all the math at the beginning, then just knit. Also, the pieces match perfectly – a good thing with stripes like the Kauni makes – and the only seam you have to sew up is a little teeny one in each underarm. Finally, you can try it on as you go, and check the fit. This beats the heck out of frogging an entire sweater.

There are a lot of free top down raglans available in the wide world. Here’s one at Woolworks. Designer Stephanie Japel has created a lot of patterns for top down raglans – here’s her instructions on designing your own.

Once you’ve made the basic calculations, you can play.

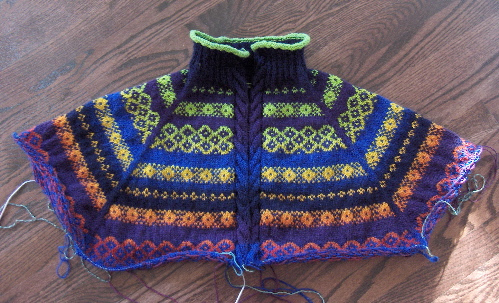
I had bought two colours of the Kauni – the slowly changing blue called EL and the rainbow gradation called EQ. My plan was to do “something fair isle”. Since it’s for Mr. C. and I knew he wouldn’t wear it if it was too vivid, the idea was for the jacket to be mostly blue with intermittent fair isle stripes in the two colourways.

A terrific resource for fair isle – including its history and a number of patterns – is Alice Starmore’s Book of Fair Isle Knitting. This book has been out of print for some years, and used hard cover copies were selling for incredible prices. The good news for all of us knitters is that the book is being reprinted in paper this year – you can preorder a copy at the online booksellers for $20 or so. Or you can look in your library for a copy.

I had Mr. C. choose three fair isle patterns that were variations on a theme – a “peerie” or narrow pattern, a wider pattern and a border. All of the ones he chose use the same motif – in this case, a diamond, although there are lovely patterns in stars, X’s and O’s, lots of choices. These were the ones he liked and it’s his sweater. Let’s call them 1, 2 and 3, 1 being the narrowest and 3 the widest. I’ve knit them 1 – 2 – 3 – 2 – 1 – 2 – 3 – 2 etc. with 6 rows of the blue between each one.

I just split the work for the underarms, so you can have a peek. Here we are.

Elrond Cardigan knit in Kauni Effektgarn by Deborah CookeKnitting this has been addictive. There’s just something about self-striping yarns that always has me knitting one more row “just to see”. I’m not a fast knitter, but I can be an obsessive one! One of the fun things about fair isle is that if you make a small mistake, it tends to get lost.

Mr. C. loves this sweater. He says it awakens his inner Celt – we all have one – but I think the way the colours shift and change on this sweater is even more magickal than that. I’m calling it the Elrond Sweater, just the thing for those chilly evenings at Rivendell.

A few details:

• Most of these raglan patterns suggest starting at the collar line, then going back, picking up stitches and adding the collar when the rest of the sweater is done. I knew the blue probably wouldn’t match if I did that, so I took a chance and started at the collar cast-on instead. I used the same number of stitches that I’d calculated to cast on at the neck, then because it looked SO BIG, I worked it in 2×2 ribbing. Voilà. The collar is done and it matches.

• I also ran a cable down either side of the front, the two cables mirroring each other to frame the zipper. I like the look of cables with fair isle – one designer who seems to put the two together a lot is Fiona Ellis. This particular cable is a 12 stitch band on each side, with 2 purl stitches on either side of the 8-stitch cable – purl stitches always make cables pop from the background of the sweater – and the cable twists every 8 rows.

• I’ll knit I-cord down the fronts as well, in contrast, to accent the opening even more, then will edge cuffs and hem the same way as the collar. I’d like them all to be the same green, so here’s hoping I have enough.

• It’s kind of fun how the gradation of the rainbow is working out – I like that it made one cycle from green to red from the neck to the underarms. The rainbow goes from red into purple, blue and turquoise, but I’ve broken that section of the colourway out of the yarn. There just won’t be enough contrast in the fair isle against the blue background. I’m heading back from red to green again.

The sleeves will change colour more slowly than the body, because there will be fewer stitches. I had debated the merit of breaking the yarn to make everything matchy-matchy, but have decided to just go with it. As long as the sleeves match each other, it’ll look good.

It’s going to shrink a little bit when I wash and block it, about 1/8″ for every inch, so the yarn will tighten up and the fair isle will snap even more. The wool also softens and fulls in the wash, making it look a bit fuzzier. I like how the swatch looks, so am aiming for the same finish.

So, what do you think?