Things have been quiet here this month, as I’ve been deciding how to go forward. At the end of last year, I discovered that several of my pictures of my dolls were being used on scam sites. I had thought that taking mediocre pictures would keep them from being stolen, but evidently that’s not so – now they look “authentic”. As an author, I have a whole lot of issues with the general dissolution of copyright and its protections, so hmm. As much as I love sharing my progress and results with others, I’m not interested in providing anything to aid scammers or pirates. This is the reason why I’ve never published any patterns or designs for dolls.
I did treat myself to some Japanese books this year and will share that with you today. Again, copyright is a concern – there are people on Etsy selling digital editions of many of these books, sometimes even with a translation by Google, but I doubt these are licensed digital or English editions. The beauty of Japanese craft books is that they’re so thoroughly illustrated that you can follow the directions even if you don’t read Japanese – plus buying the actual print book supports the creator and his/her copyright.
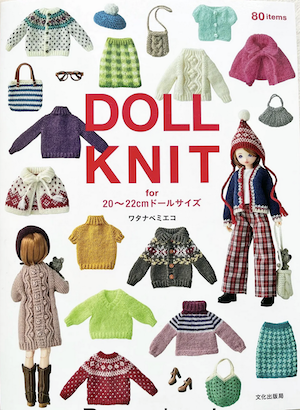
This first book is Doll Knit by Mieko Watanabe, for 20 – 22cm Obitsu dolls. You can find her on Instagram right here. The knits are detailed and very cute. The knits are all charted, so you don’t have to read Japanese to follow the instructions. They’re sized for the Obitsu dolls but fit the current MTM regular Barbie pretty well.
The big challenge is finding yarn substitutes. The designer has used yarns from a Japanese company called Puppy which aren’t available here. There is a Kidsilk Haze equivalent, so that’s easily replaced, but otherwise, not so much. I used Knit Picks Palette for the fair isle cloak and it’s slightly too heavy – I got gauge but the garment is thicker and stiffer than would be ideal.
The best match so far for the Puppy 3-ply is old 3-ply Kroy Socks, so I’m rummaging in my odds and ends for more of that. It does looks as if Holst Garn Supersoft would be a good substitute for the 3-ply, and it comes in shade packs, with five small balls in coordinated colours. I’ll make a road trip to a LYS that stocks this yarn to see it. The 2-ply Puppy is a lace weight, so I’ll try those patterns with some odds and ends in my stash. Maybe I’ll get lucky and find a lace pack of many little skeins in different colours.
I also want to get out my crochet needle and try at least one of those adorable hats.
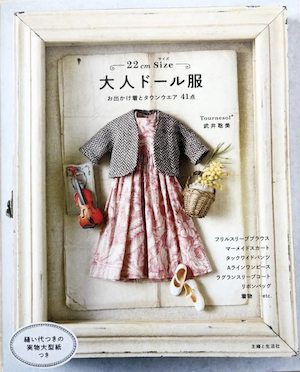
Next is a sewing book of doll clothes, also for 20 cm dolls including Blythe dolls. I think this is called Tournesol (which is French for sunflower). It’s by Satomi Takei, who can be found on IG right here. These have the usual aesthetic of Blythe doll patterns – lace and petticoats and tiny florals, straw bags and hats – although the fashions are shown on other dolls too. Again, the book is beautifully photographed.
I tried a few of the patterns and they more-or-less fit the MTM regular Barbies – the designs are more like little girl dresses and I’m not sure I like the look on my B girls. There is a pattern for a kimono, which is a tempting project.
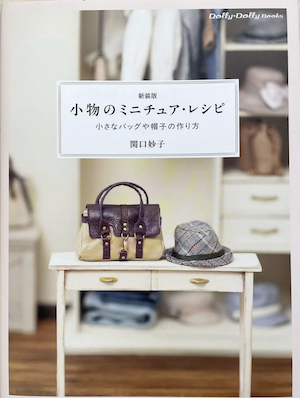
Finally, an accessories book from Dolly Dolly Books, although the other two books also have patterns for accessories.
That purse on the cover is what sold me. The instructions for that bag cover seven pages and I’m determined to make one. The author is Taeko Sekiguchi, who has designed a lot of beautifully detailed clothing for dolls. It’s very inspiring to see the work of people who stretch higher.
I bought the books from Pomadour on Etsy. This shop ships promptly from Japan and packs the books extremely well.
We’ve looked a few times at my DIY doll wardrobes – here and here – but this time, I made a carrying case for my dolls alone.
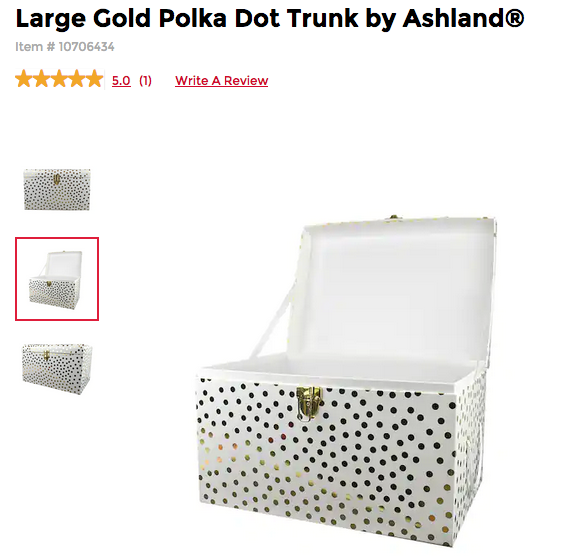
As usual, I used a trunk made by Ashland that I found at Michaels. I have four of this style, two large ones – like the one at right – which are wardrobes for Tyler and friends, then two smaller ones. To date, those had sweaters and coats for Tyler.
One of them has been liberated and become a carrying case for the Silkstone girls. I have some storage bins for the girls, but I’m an unboxer and when they’re on their backs, their hair gets messed up. I wanted them to be standing.
As usual, I removed one handle from the trunk. This time, that was easy as the handles are knotted cord. I pushed that second cord through the eyelets for the top one, to double up the handle. I also added felt feet to the bottom.
This time, I used foamboard for my siding pieces instead of the heavy bookbinder’s board I used for the first wardrobe. I cut them to fit, then papered them over. I put the “floor” in first – which covers the eyelets in the bottom from the removed handle – then the three “walls”. In each wall, I cut paired slits and pushed ribbon through them so that the dolls can be secured in place. The ribbon is taped on the back side so it won’t move.
Here’s a peek inside:
It’s kind of cozy for the girls, but that keeps them from falling over. This case holds 8 dolls – which means I have room to buy 3 more. (mwahaha) The extra ribbons are tied in place.
I feel like I should add a bar table in the middle with cocktails so they have something to do in there in the dark. Maybe a mirror ball or chandelier overhead…
I put the articulated girls on the door since they’re lighter.
Best to a Tea still needs to have her hair done. (No wonder she’s slumped against the wall. Bad hair days are depressing.) The little white wedge of foamboard needs to be covered to match the floor – I forgot that the girls needed to be elevated a bit to ensure that the door can be easily closed. I also ran out of the ribbon I used in the main case, so these girls get a coordinating one. They don’t seem to mind.
I’m kind of amazed that three of them are wearing dresses made from the same pattern – Trench Setting from Hankie Chic – which means I need to sew them some new things. At least they’ll be tidy and safe from dust while I do that.
Next up, the big girls get storage boxes…and the duplicate box of the very first carrying case I made is becoming a wardrobe, too. Instead of space for three girls on the inside of the lid/door, it’ll have lots of hooks for purses and hats. The girls will be organized!
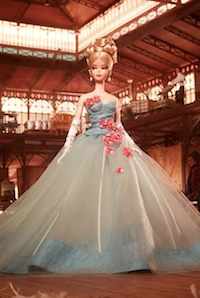
I’ve been sewing clothes for my dolls again recently – I’ll show you when something is done. There’s a lot of handwork on this particular couturier gown! – and went looking for a video I watched a long while ago. I found a trove of videos made by Mattel for Silkstone Barbies which show fantastic dioramas.
This one from 2012 is called Behind the Scenes of the Atelier. It features the five new dolls, but also a really terrific diorama. It’s like a visit to a Paris couturier in the 1950’s. This is a longer video with some behind-the-scenes commentary from the designer, Robert Best.
The 2015 video – again showcasing five new dolls – takes us to a runway show at a Paris couturier. There’s also a quick visit to the atelier again. I love the colour choices, how the backgrounds are all black and cream (hello, Coco Chanel) so that the dolls really contrast.
There are six dolls showcased in the 2013 video (there was a new Ken that year plus five Barbies) on a ship similar to the Titanic. This one has a fashion editor voiceover and is sepia-toned.
The 2011 video showcases five dolls, and the diorama setting is a train station – the train being the Trans Siberian Express. it reminds me of the opening scenes of the movie Murder on the Orient Express, the one with Michael York.
This video from 2014 spotlights one doll (Fiorella) in an Italian town. I like how it starts in black-and-white then changes to colour.
And this is the one I was looking for in the first place! It’s from 2016 and is the reason my girls now have a Vespa. (Who knew such a thing existed in 1/6 scale?) Again, there are five new dolls, photographed this time in a photographer’s loft – but check out the Paris streetscape! That’s a diorama. I would love the opportunity to explore it more closely.
I went hunting about information about the artist(s) who built the dioramas or any sites that show the dioramas in more detail. There is this video showing the artists building the Russian train diarama, which is huge!
I also discovered that the Silkstone Barbie Fashion Model Collection is coming back, according to Robert Best, which is awesome news. I can’t wait to see what he designs for the girls next.
There were four dolls in 2019, of which I bought only Best in Black, and three in 2020. I bought Best to a Tea. The Gala’s Best is usually listed as the last Silkstone Barbie, but she won’t be any longer. These two are also the only two articulated Silkstones in my collection – this body sculpt is thinner than the original Silkstone doll.
2019 Barbie Silkstone Best in Black
2020 Barbie Silkstone Best to a Tea
2020 Barbie Silkstone The Gala’s Best
Here’s a reference website showing an inventory of all Barbies. FYI, clicking on the images takes you to eBay instead of a larger version of the image. Here’s the Silkstone page.
I should have a finished ball gown to show you soon. 🙂
I have been AWOL lately and apologize for that. August was insanely busy with a Kickstarter campaign to fulfill and a book to finish and publish—plus the usual August garden and canning to be done. I did some crafting, but didn’t take pictures—until now.
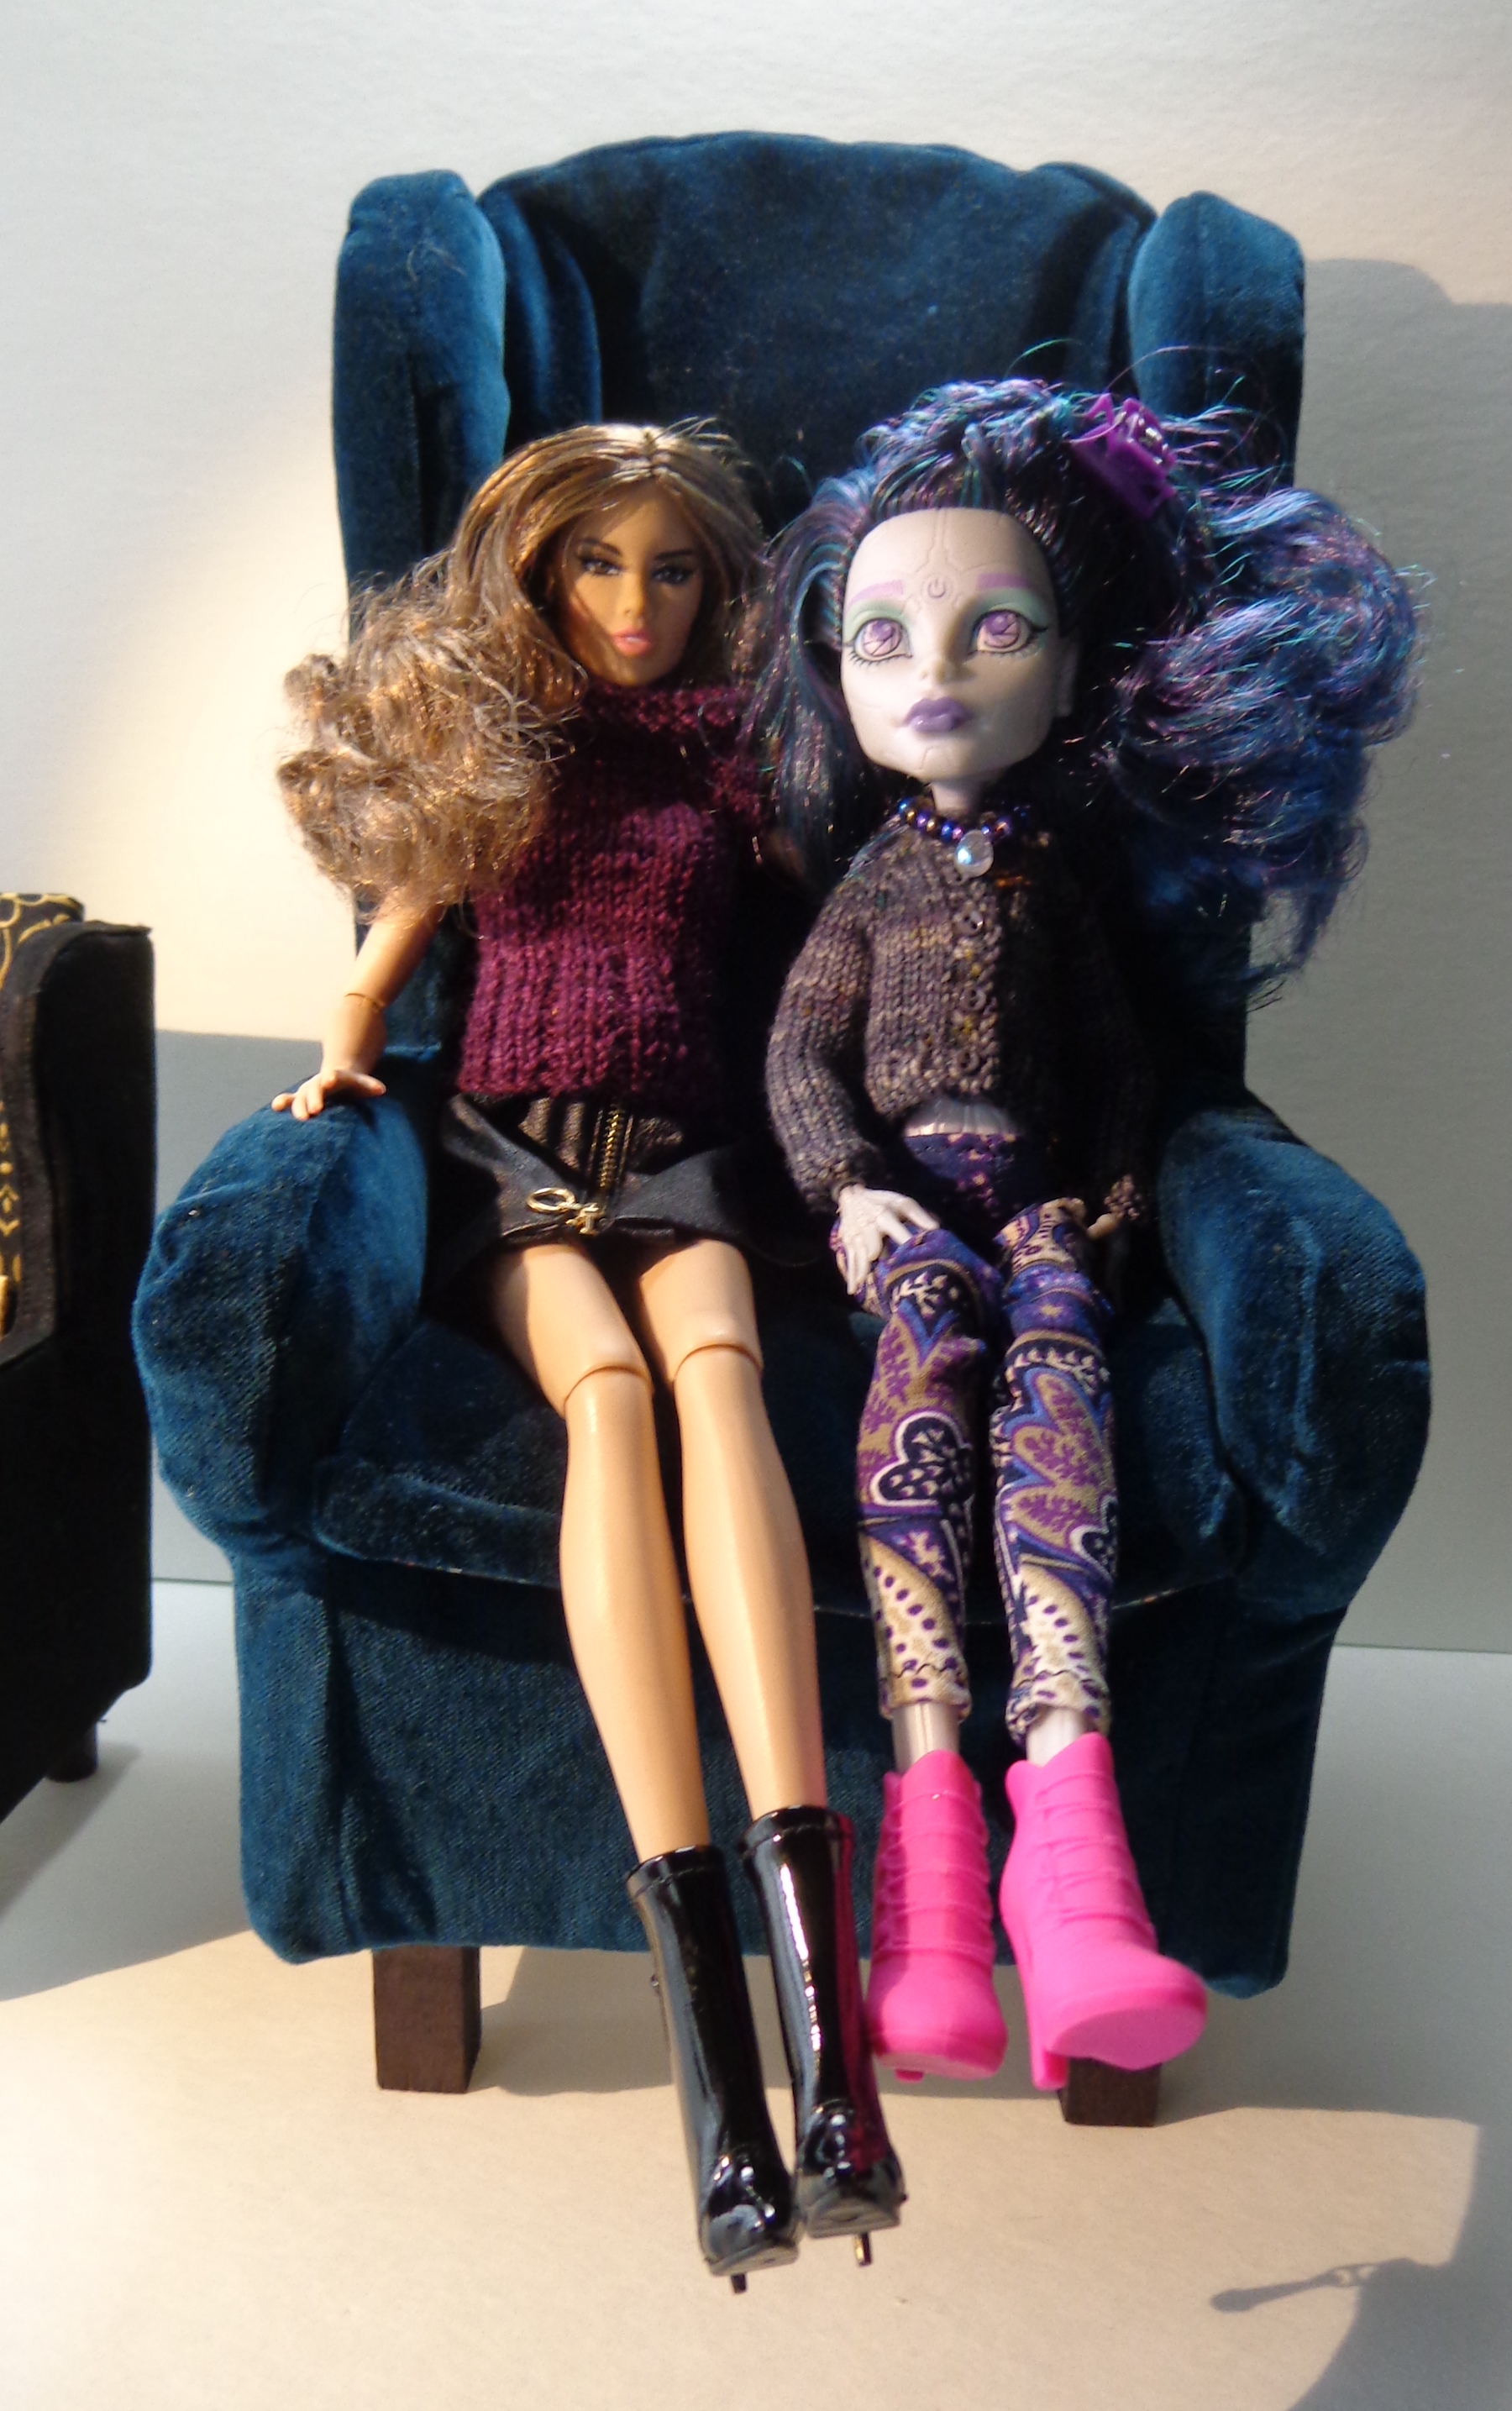
The girls scored some new chairs recently, and today’s the day to share.
I started with this tutorial and free pattern at Resin Rapture (who creates the most amazing dioramas. Go on and look. I’ll wait.) which is for a 1:6 scale chair. I downloaded the pattern and followed the instructions to make the chair and pad it. (It’s a lot harder than you’d think to cut foamboard so the edges are perfectly square.)
There are two options presented for upholstery, gluing the fabric on or making a slipcover. The pattern creator preferred a slipcover. I wasn’t so fussed about having a slipcover as the final finish, though. I don’t like them in real life , so didn’t want them for my dolls—and while it’s removable and washable, I think the chances of my washing a slipcover for a doll chair to be pretty low. (Non-existent, actually.) I watched the video from Bentley House Miniatures linked in the tutorial (it’s right here) for making and upholstering a 1:12 scale chair. The fabric is all glued onto the chair for the final finish.
It seems that when it comes to minis and making for dolls, there are people who glue and people who sew. I wanted the finish of the Bentley House mini, but I shared Resin Rapture’s concerns about glue and fabric. They don’t always play well together. So, I made my own combination—for this first one, I tried to ensure that all the glue was where it wouldn’t be visible.
I didn’t take in-progress pictures, so here’s the 1:6 finished chair.
I made my own pattern pieces for the chair covering – I liked how BHI worked from a rough shape and trimmed once they were in place, so I left a lot of excess to be trimmed later. I glued the front piece so that the glue was on the seat and under the front of the chair. Then I pressed down the two vertical edges on the back piece, and sewed it to the side pieces on the machine. After pressing the seams, I positioned it on the back of the chair, wrapped the fabric over top and bottom, and glued it in place on the inside back of the chair and under the bottom of the chair. I pulled the sides around and folded under the front edge beneath the arm rest (the straight vertical that meets the front) and put a teeny bit of glue on the seam allowance to secure that edge in place. I also turned the bottom edges under and glued them on the underside.
I trimmed the curved edges so that the seam allowance was about 3/4″, then clipped the curves and folded the fabric over the chair. The glue is only on the inside of the chair. I clamped some of these bits until they dried.
Here’s a Monster High doll in the chair with some mini-books. (That’s Elle Eedee, who arrived naked from the thrift store.)
I created a template for the inside of the sides, trimming it until it was the right height. The template is the size of the heavy fusible interfacing and the fusible webbing – for the fabric, I added 1/4″ all around. I fused the fabric (wrong side down) to the interfacing, then set the fusible webbing against the wrong side, turned in all the edges and pressed them in place. I had to be careful with this as there was fusible webbing exposed in the middle of each piece and you don’t want that stuff melted to your iron. I could have trimmed it so it was only on the edges and will do that next time. Then these two pieces were glued in place on the chair. Again, I used clamps until they were dry.
I modified the strips that run down each arm from the back of the chair, too. Once again, I used interfacing to make a finished strip of perfectly consistent width. I topstitched it on each side, turning under and topstitching one end. That one goes at the top. Then I glued it in place, counting on all those layers keeping the glue from seeping into view (and being pretty frugal with the glue, too.) I pushed pins into the foamboard down the length of these pieces – every 1/2″ or so, to hold each one in place – and left them until the glue was dry.
I made my two cushions – seat and back – but cutting them out of foamboard, then building them up with multiple layers of padding. I fussy-cut their upholstery from a contrasting fabric, glued it onto each cushion, then glued them in place. All the glue is between the cushion and the chair, where it will never be seen.
The legs are 1 cm dowels cut into 3 cm lengths, as specified in the original pattern, then “stained” with Sharpie marker. I did sand down the bottoms to give them a little shape. Because these legs are round instead of square, I added a bottom piece to the chair in foamboard to create more surface area for gluing the legs in place. (The pattern piece is the seat with the corners cut out of it.)
I added a little cushion, too. The Resin Rapture pattern also includes some book covers and a book template for the foamboard and I made these, but they’re not in the pic.
Here’s Jade Feelin’ Extra, enjoying some downtime in her new chair. (She’s my one and only Integrity Toys doll – I like her, but she’s very tall and skinny to me. She’s 12″ tall.) She’s nicked Elle’s books, which are these 1:12 scale fairy tale books (printable PDFs) from Etsy.
Next, modified the templates for my 1:4 girls and changed up my method.
I didn’t love the glue on the black chair since no matter how careful I was, I got some on the visible part of the fabric. (The solid black may have been a bad strategic choice.) It’s a water soluble glue, so I managed to get most of the offending bits off with a damp cloth. Still.
This time, I made the chair the same way and padded it the same way. I added some pieces inside the bottom of the chair to make a stop for the final piece that goes on the bottom. That also gives another edge for gluing it in place.
Then I made a slipcover our of teal velveteen, sewing it together on the machine but leaving the back piece unattached. That piece that runs down the top of the arms is tricky to fit in place, so I’m thinking about how it could be changed or simplified. I fitted it, adding more padding to the chair over the arms, then pinned it in place and sewed the back piece on by hand. (The foamboard is great this way as you can jab pins right into it to hold things in place.) The result is a lot like a slipcover, but more fitted and it’s never coming off. I then stretched the fabric tight over the bottom and glued it there, putting the glue on the inside bottom of the chair and using clamps to hold it until it dried. The legs are square this time, cut from a longer piece, sanded and stained with a Sharpie.
Here are the two chairs beside each other:
One mistake I made in my drafting of this variation of the pattern is that I didn’t trim enough from the width of the upholstery and cushions for the inside back and seat. They’re kind of fluffy and could have been trimmed down another 3/16″ or so.
This time, the cushions are actual fabric cushions, without any foamboard. Because velveteen doesn’t always love being against velveteen, I cut one side of each cushion from a cotton lawn with a teeny print that coordinates – turns out they’re reversible now, which is kind of neat. (And yes, there is a certain irony that I bought this lovely expensive lawn for a blouse for myself years ago, and the first cut out of it is for chair cushions for the girls. I need to start sewing for myself again!) And I made a little throw cushion of the velveteen. I’m thinking I might need to embeliish it.
The 1:6 girls wanted to try the big chair. (You can see that I could have padded the arms more.)
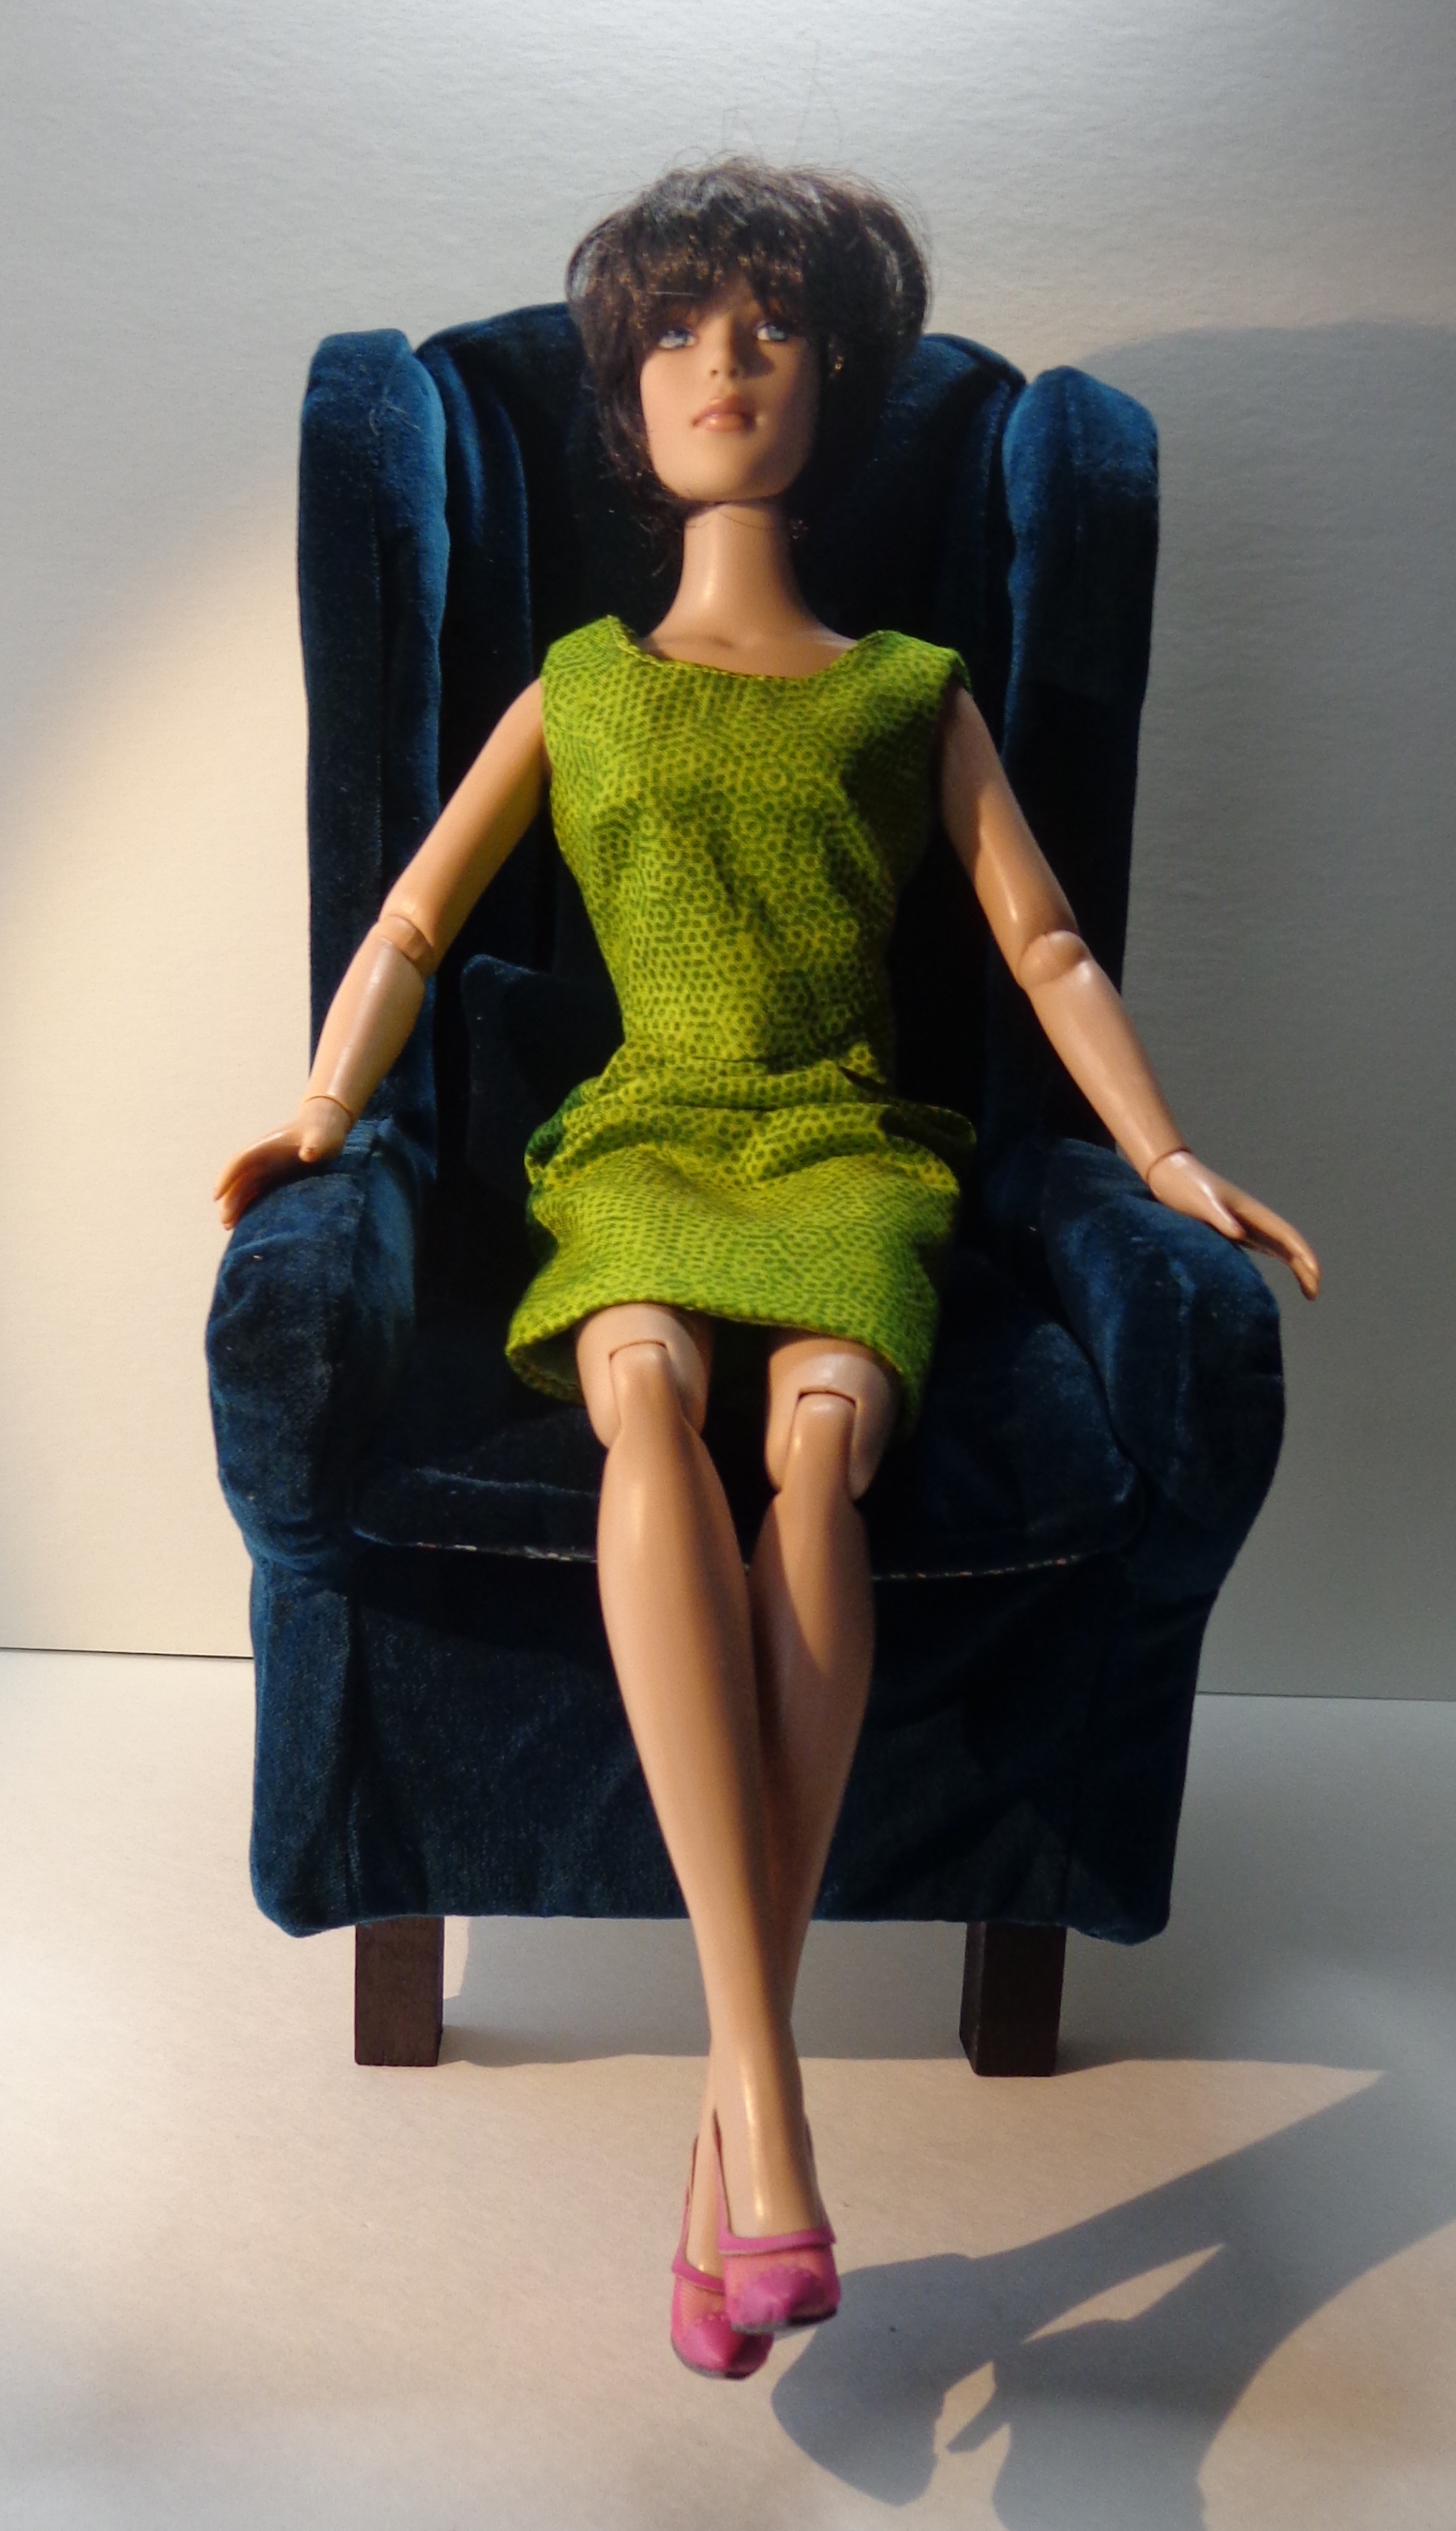
Here’s the completed chair, and here it is with Sydney, its rightful occupant in 1:4 scale.
I’m going to make another one upholstered in fake leather (because everyone loves a challenge, right?) but will make a few changes. I’ll cut the inside chair pieces narrower so they nestle in place better. I’ll also cut them of a plain cotton, maybe with fake leather pieces at top and bottom where that fabric might show. I’ll leave more fabric at the bottom of each piece for turning under, too. And I’m still thinking about how to modify that strip that goes down the arms. Hmm.
For now, though, the girls have somewhere to sit, although they’ll have to take turns.
I’ve also discovered that I really like making furniture for the girls out of foamboard.
I made a bookcase table (it doesn’t spin) and a bookcase, and have been making more books to fill it. Those books on the bookcase table and Sydney’s book are the ones from the Resin Rapture pattern, btw. I’m envisioning a library, so we’ll see how that goes.
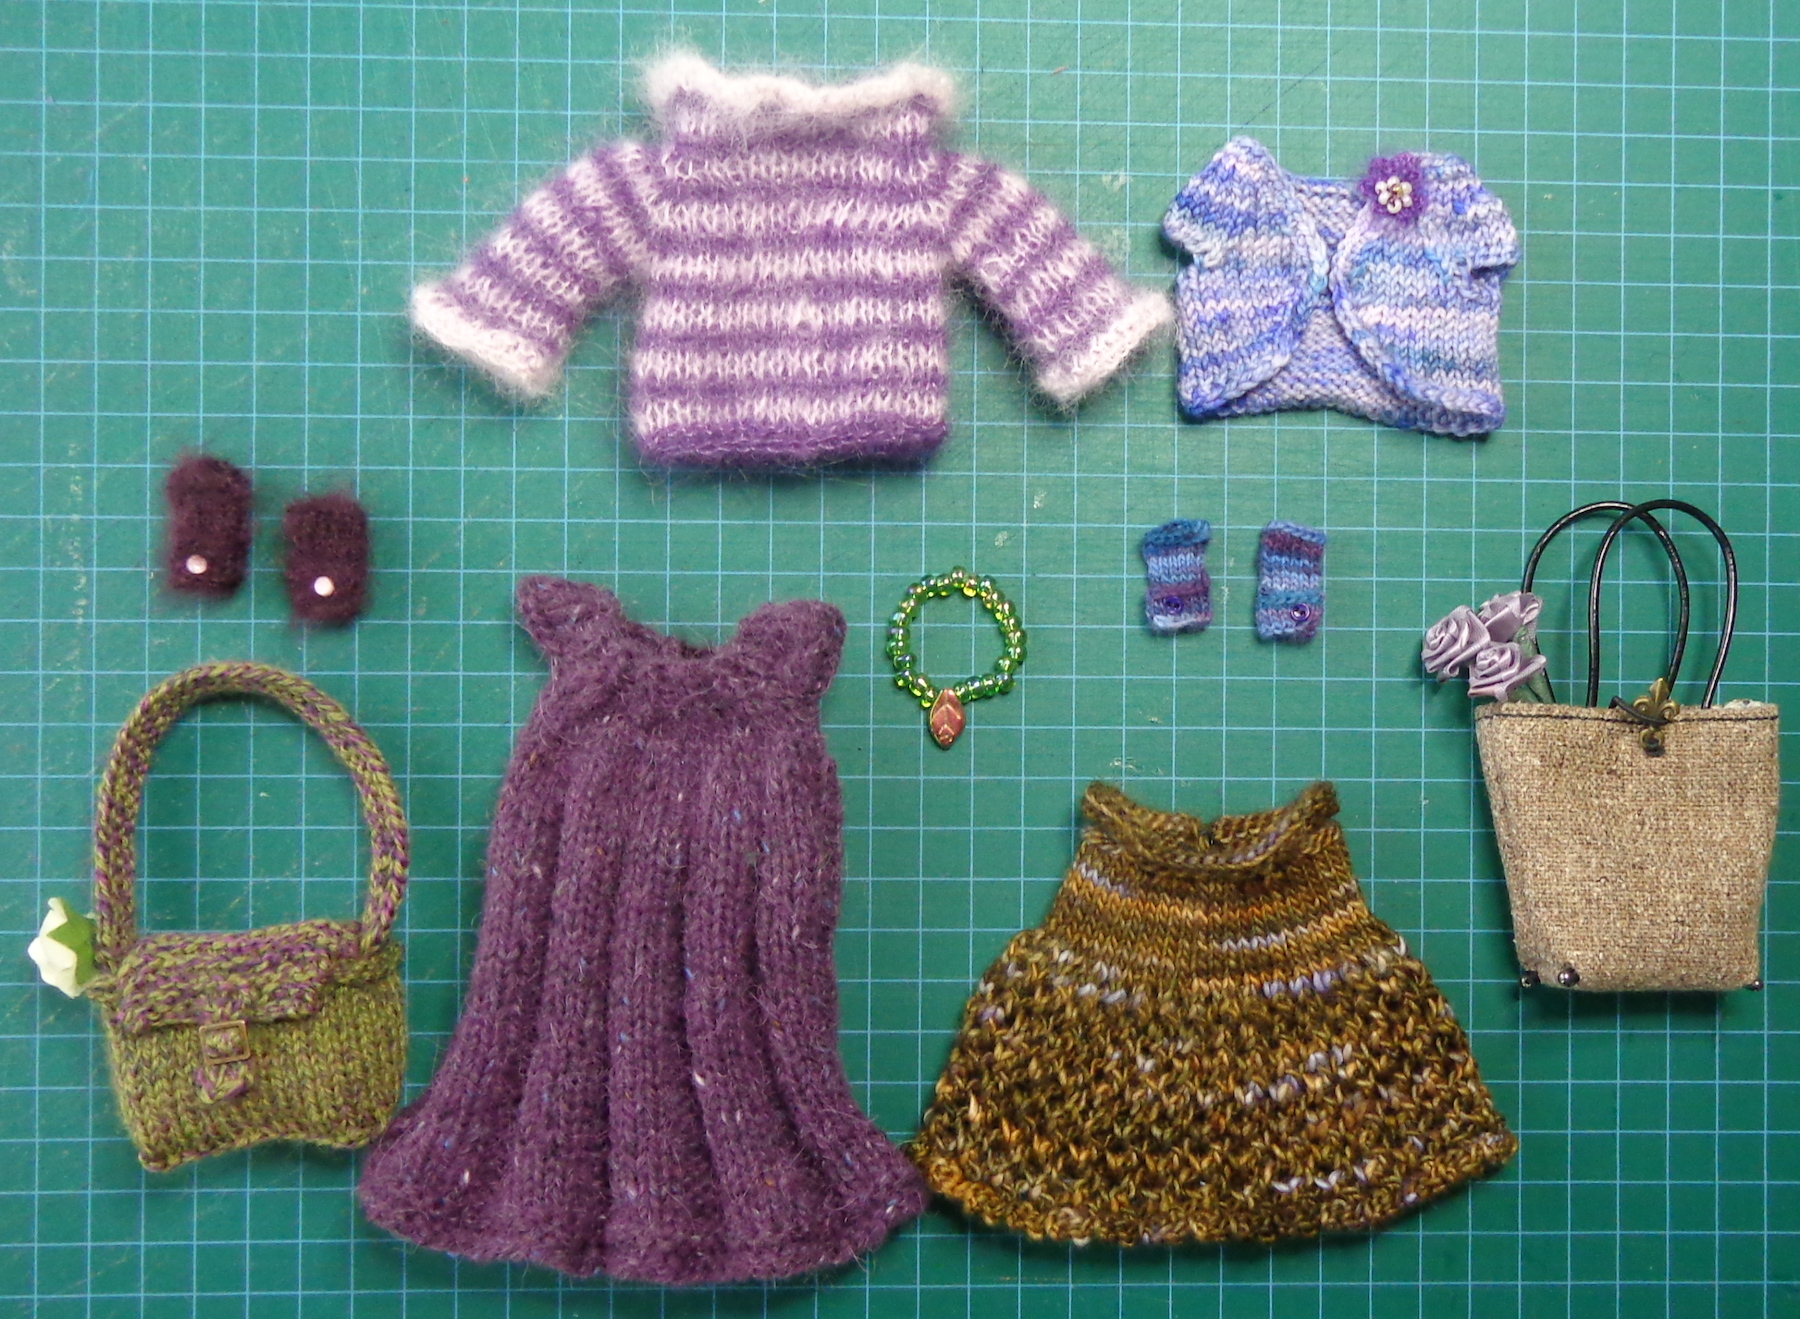
Here’s another project I was working on in December but couldn’t show you because it was a gift. My friend collects dolls (like me) and her favorite is her Blythe doll with purple hair. I don’t have a Blythe doll – I’m not even sure I’ve seen one in real life – so it always feels risky to make for her, but I do it anyway. 🙂 Here’s last year’s gift to my friend and her Blythe.
Many of these knitting patterns are from the same designer, whose work is just so clever and cute. Her name is Jane Pierrepont and she publishes her patterns as Polly. Here’s her Ravelry profile. It looks like her website is gone. 😦
The gold and brown dress is her Blythe Lacey Mini Dress which is a free pattern on Ravelry. I knit this one in MadTosh Merino Light in the colourway Vanilla Bean. The dress is knit flat and then seamed, and knit from the top down. I joined mine in the round when the lace skirt started. I also mucked up the lace pattern (It was written for knitting flat and I was knitting in the round) so substituted a traditional one, Vertical Lace Trellis instead. In hindsight, it wouldn’t be that big of a change.
R1 as instructed. R2: P1, *P2tog, YO and repeat from * to end. R3: Knit R4: Purl
Here’s the back of the dress. I put snaps to close the back, then added four teeny buttons to the right side which aren’t functional.
Maybe I’ll make another with the right lace stitch!
The bolero is another Polly pattern, Blythe Shrug, also a free Ravelry download. (and a pattern I previously modified to fit Barbie.) This one is knit in a bit of leftover Koigu KPPPM. I made a little corsage by crocheting a daisy of KSH and adding some beads to the centre of it. The bag is one of my own market bags, which work for all 1/6 dolls.
The purple sleeveless dress and striped fuzzy top are from the same Polly pattern, which is not free (but is totally worth buying.) It’s called Cozy Comforts and includes the Pleated Pinafore and the Mohair Sweater. I made the dress in Rowan Felted Tweed since it called for a DK weight. I think a slightly lighter DK would have worked a little better – this one is a bit stiff. The top is knit in two colours of Sugar Bush Drizzle – that’s a Ravelry link, since Drizzle has been discontinued. I made mine striped, using two colours. Sugar Bush Drizzle is similar to Rowan Kidsilk Haze, specified in the pattern. These pieces took 13g of Felted Tweed and 3g (total) of Drizzle.
Here are the backs so you can see the button closures. I used KSH for the loops on both, since it’s a strong thread – Felted Tweed isn’t very strong and I was afraid it would snap with use.
Next up, Blythe needed several coordinating accessories. The messenger bag is one I’ve knit before. The pattern was a free download at stickatillbarbie.se , a website of free knitting patterns for dolls which is no longer hosted. I think you can find the patterns archived on the Wayback Machine, but here’s the Ravelry link for this one. I used up some sock yarn for this bag and modified the flap a bit to add a buckle. Here’s my original knit of this pattern, which is knit following the directions. The pattern calls for a crocheted strap, but I knit mine instead: c/o 50 stitches. K2 rows, P 1row, K2 rows, cast off purlwise.
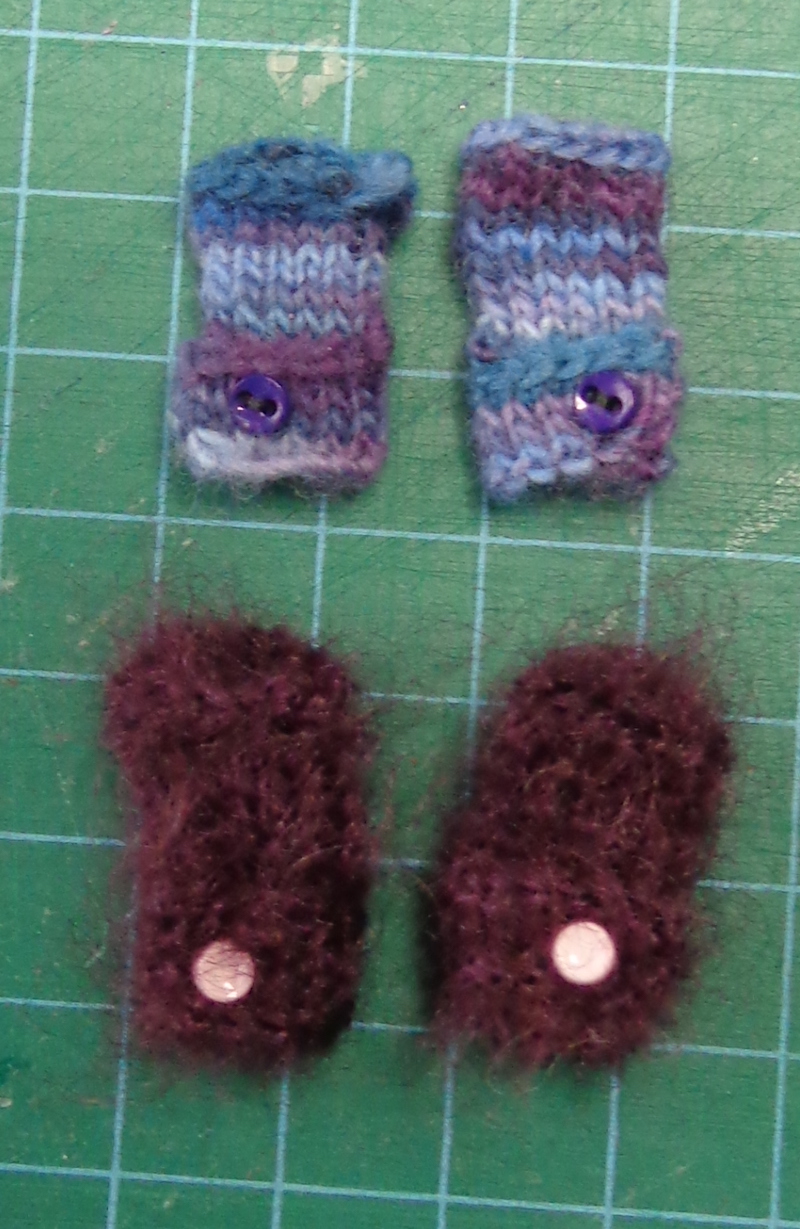
And finally, fingerless gloves with teeny tiny button bands. The pattern is a free Ravelry download, and requires small needles. I knit mine on 1.6mm DPNs in Rowan Kidsilk Haze in Blackcurrant, which meant I had to knit them using the magnifying glass on my desk.
I also thought the flap looked backwards on the original, so I moved the thumb hole. The instructions for the change are on my Ravelry project page. There actually are little button holes on the flaps so the buttons really work.
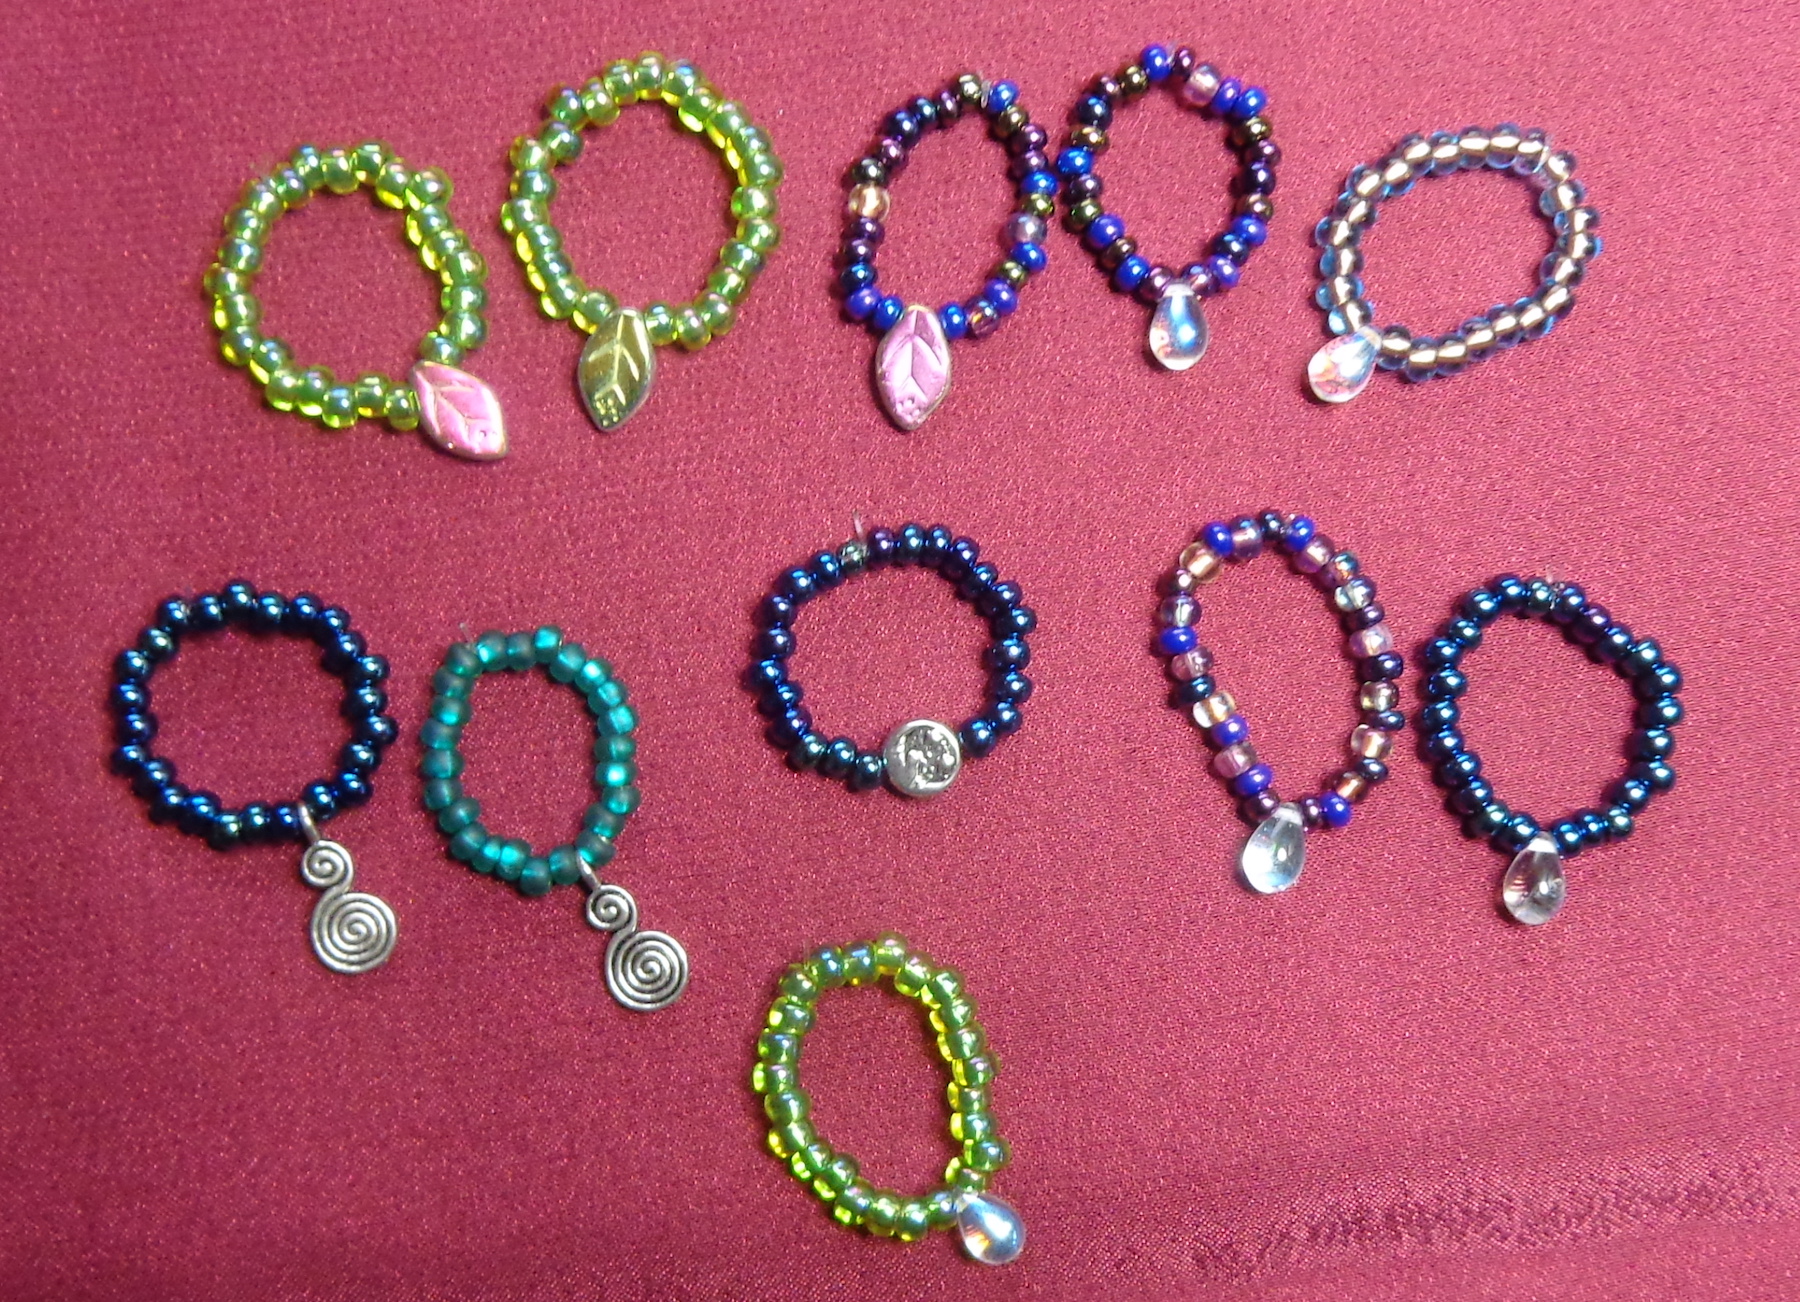
This started as a quest for a string of pearls, but kept on going. Be warned – making these is like eating potato chips. You can’t stop with just one.
I made these necklaces on .5mm jelly elastic – knotted and secured with glue – and either 6/0 beads or plastic “pearls”:
You need to use a glue that remains flexible to secure the knot in the jelly, then you can cut the ends shorter. I used E6000.
Then I started to think about focal pendants (as one does). These butterflies were charms from Michaels, which I matched with other 6/0 beads.
Next up, I had a look through the other charms in my stash and tried these:
There are smooth teardrops with an A/B coating, little leaves with A/B coating, spiral charms and the one in the middle has the moon on one side and the sun on the other. I also realized that the jelly is stretchier than I’d originally thought, so I made some shorter necklaces.
These ones have faceted glass teardrops that are 9mm long. These were the smallest I could find and come on a string of mixed coloured drops. (I did find some quartz ones that are 7mm long, but they’re a lot more expensive.) Some of these are strung with 6/0 beads while others are with faceted glass 2mm beads.
Of course, you can go on and on with the variations. I’m thinking of necklaces with two or even three strands. Mixing the beads. Alernating beads. Beads of graduated sizes. (etc. etc.) Do my girls need dozens of necklace choices? No, but…potato chips!
We’ll see these in action when the girls model their ballgowns…