As mentioned yesterday, I have a lot of unfinished projects on my sewing table, and many of them are for the girls. It seems that I fiddle endlessly with the cheap pattern downloads from Etsy – the ones that are scans of older commercial patterns – getting the printed size right, then messing with the fit. They really aren’t that good of a deal in the end, considering the time involved. The plan is to just stop with them.
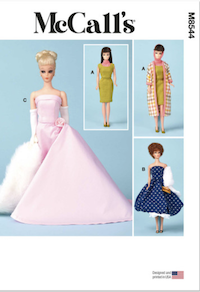
To that end, I found some new resources. First of all, the big four commercial pattern companies have introduced more patterns for 11/12″ dolls, and they’re selling digital downloads of them. This is a very cool development, since they always print out perfectly at 100%. Here’s a new one, McCalls 8544, which includes versions of three familiar vintage Barbie ensembles. The pink dress is Enchanted Evening, the checkered coat and dress is Poodle Parade, and the blue poof dress is Gay Parisienne.
McCalls 8544
Simplicity 9869
Simplicity 9869 is one of the patterns that features a decade of fashion. This one is for the 1970’s. I wish they’d make the others available, too, having spent a chunk of time in December fiddling with a scanned version of the 1960’s one. I’ll show you that next.
Here’s the page with the PDF patterns for doll clothes. It’s a mix of patterns for American Girl and Barbie, but there are more fashion doll patterns than has been the case for a while. There are often sales on this site, so keep a look-out. I got the digital downloads of the patterns I bought for just $3 each in December.
If you’re a fan of the vintage Barbie outfits and would like to reproduce them yourself, I found another site for you. This designer has patterns for many of the vintage outfits, available as PDF downloads. I haven’t tried any of them, but it looks like a great resource. His site is called Tailored Doll Patterns and there are patterns for Barbie and other dolls. Here’s his site.
I’m still searching for the perfect suit for the girls, so I’ve gone back to my Japanese pattern books by Katie Mitsubashi. I’m making a test version of one from this book now and will show it to you when it’s done.
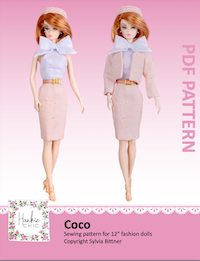
There’s something classic and feminine about a Chanel suit, so I’ve been seeking a good pattern to make them for the girls. Here’s one pattern I tried recently.
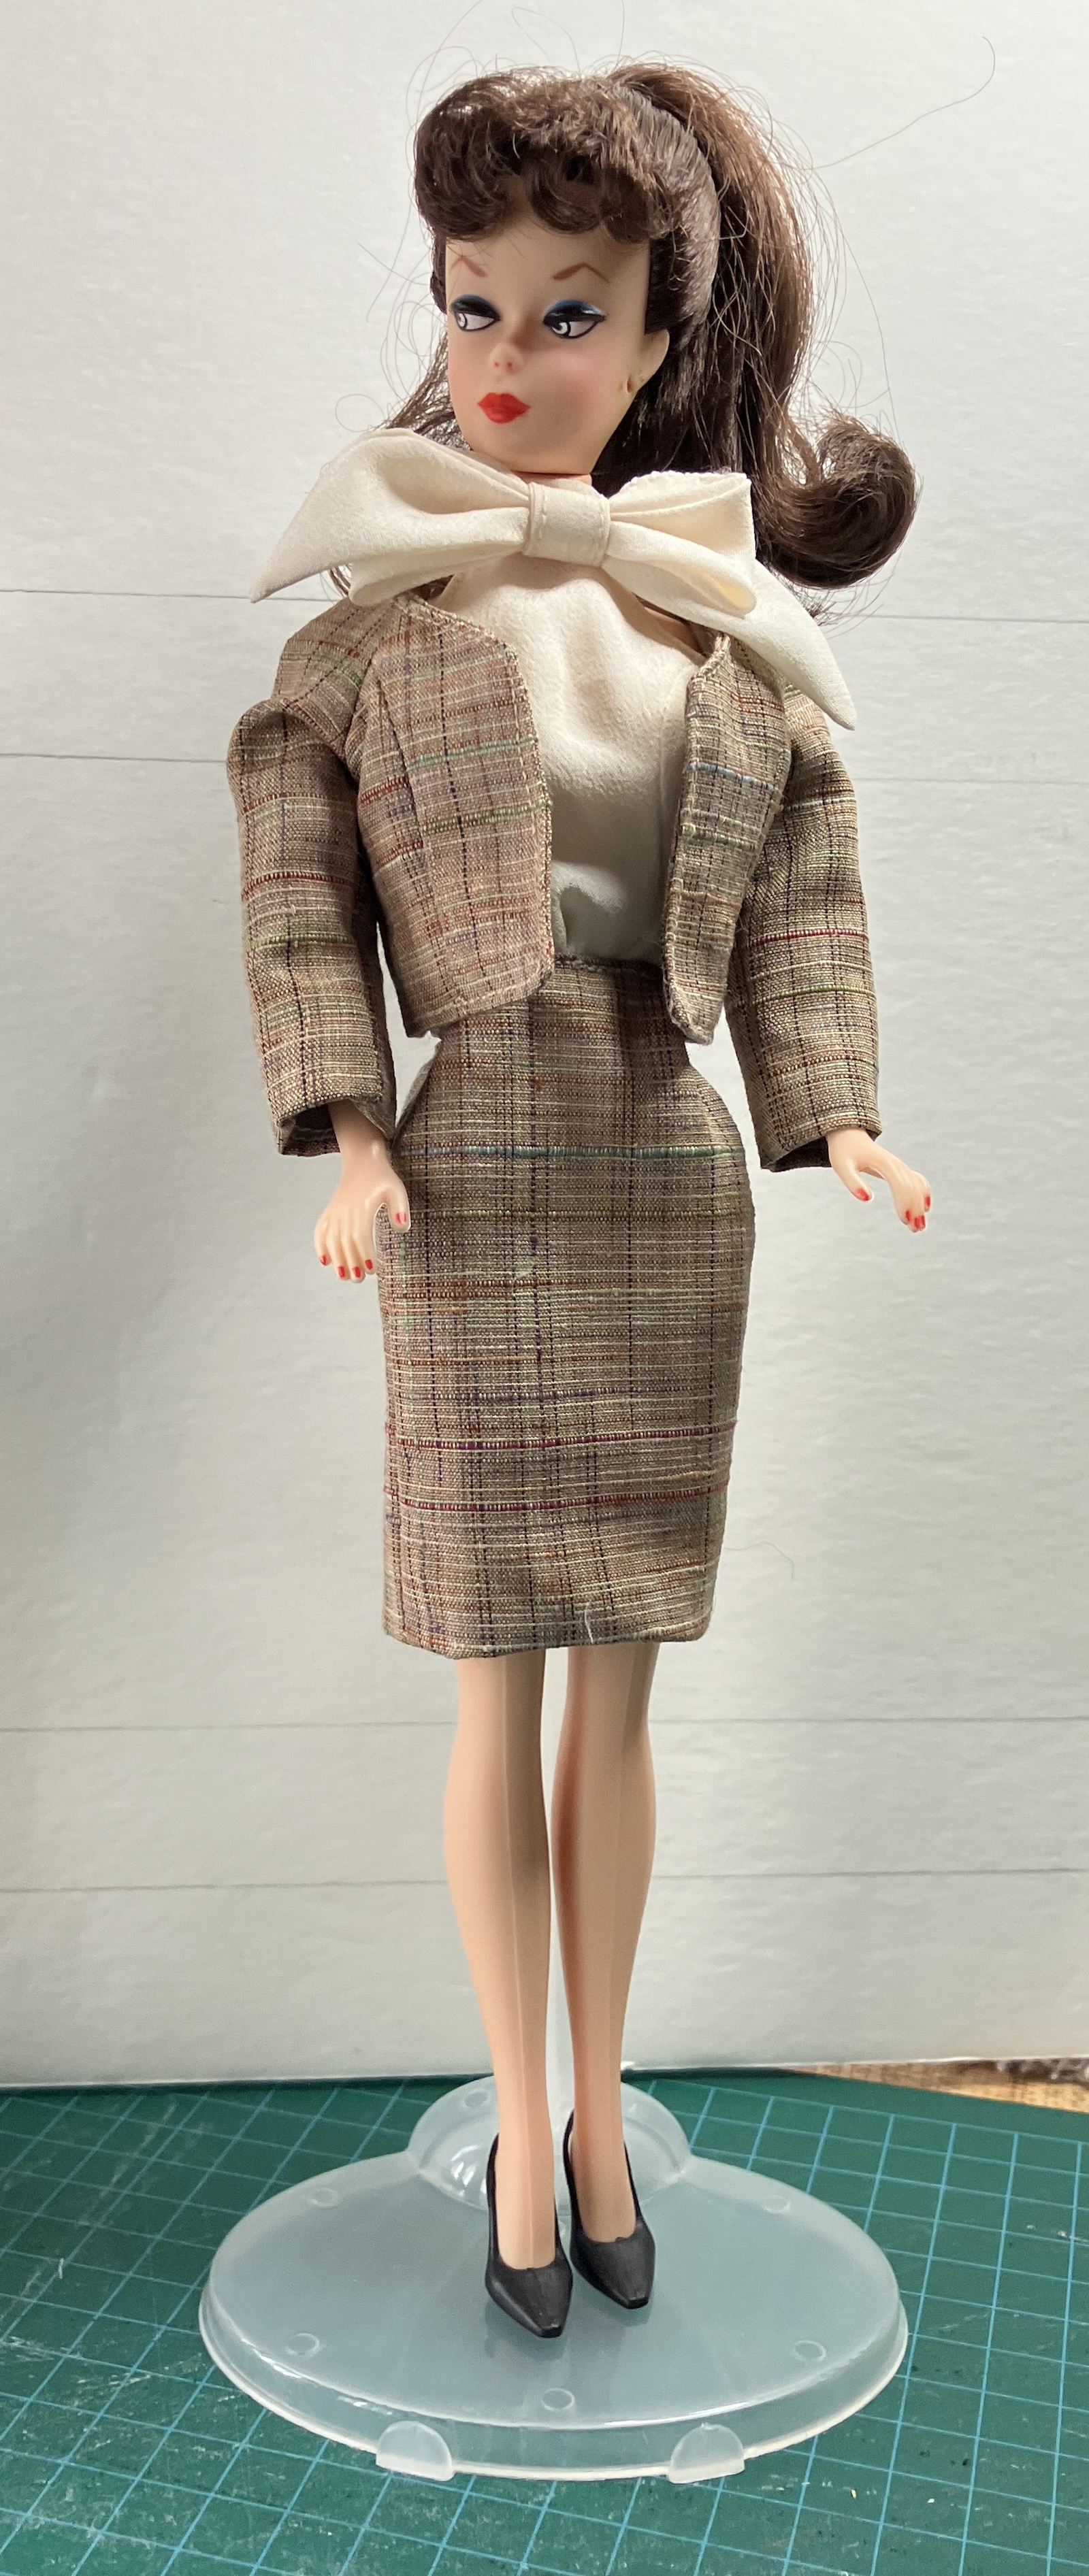
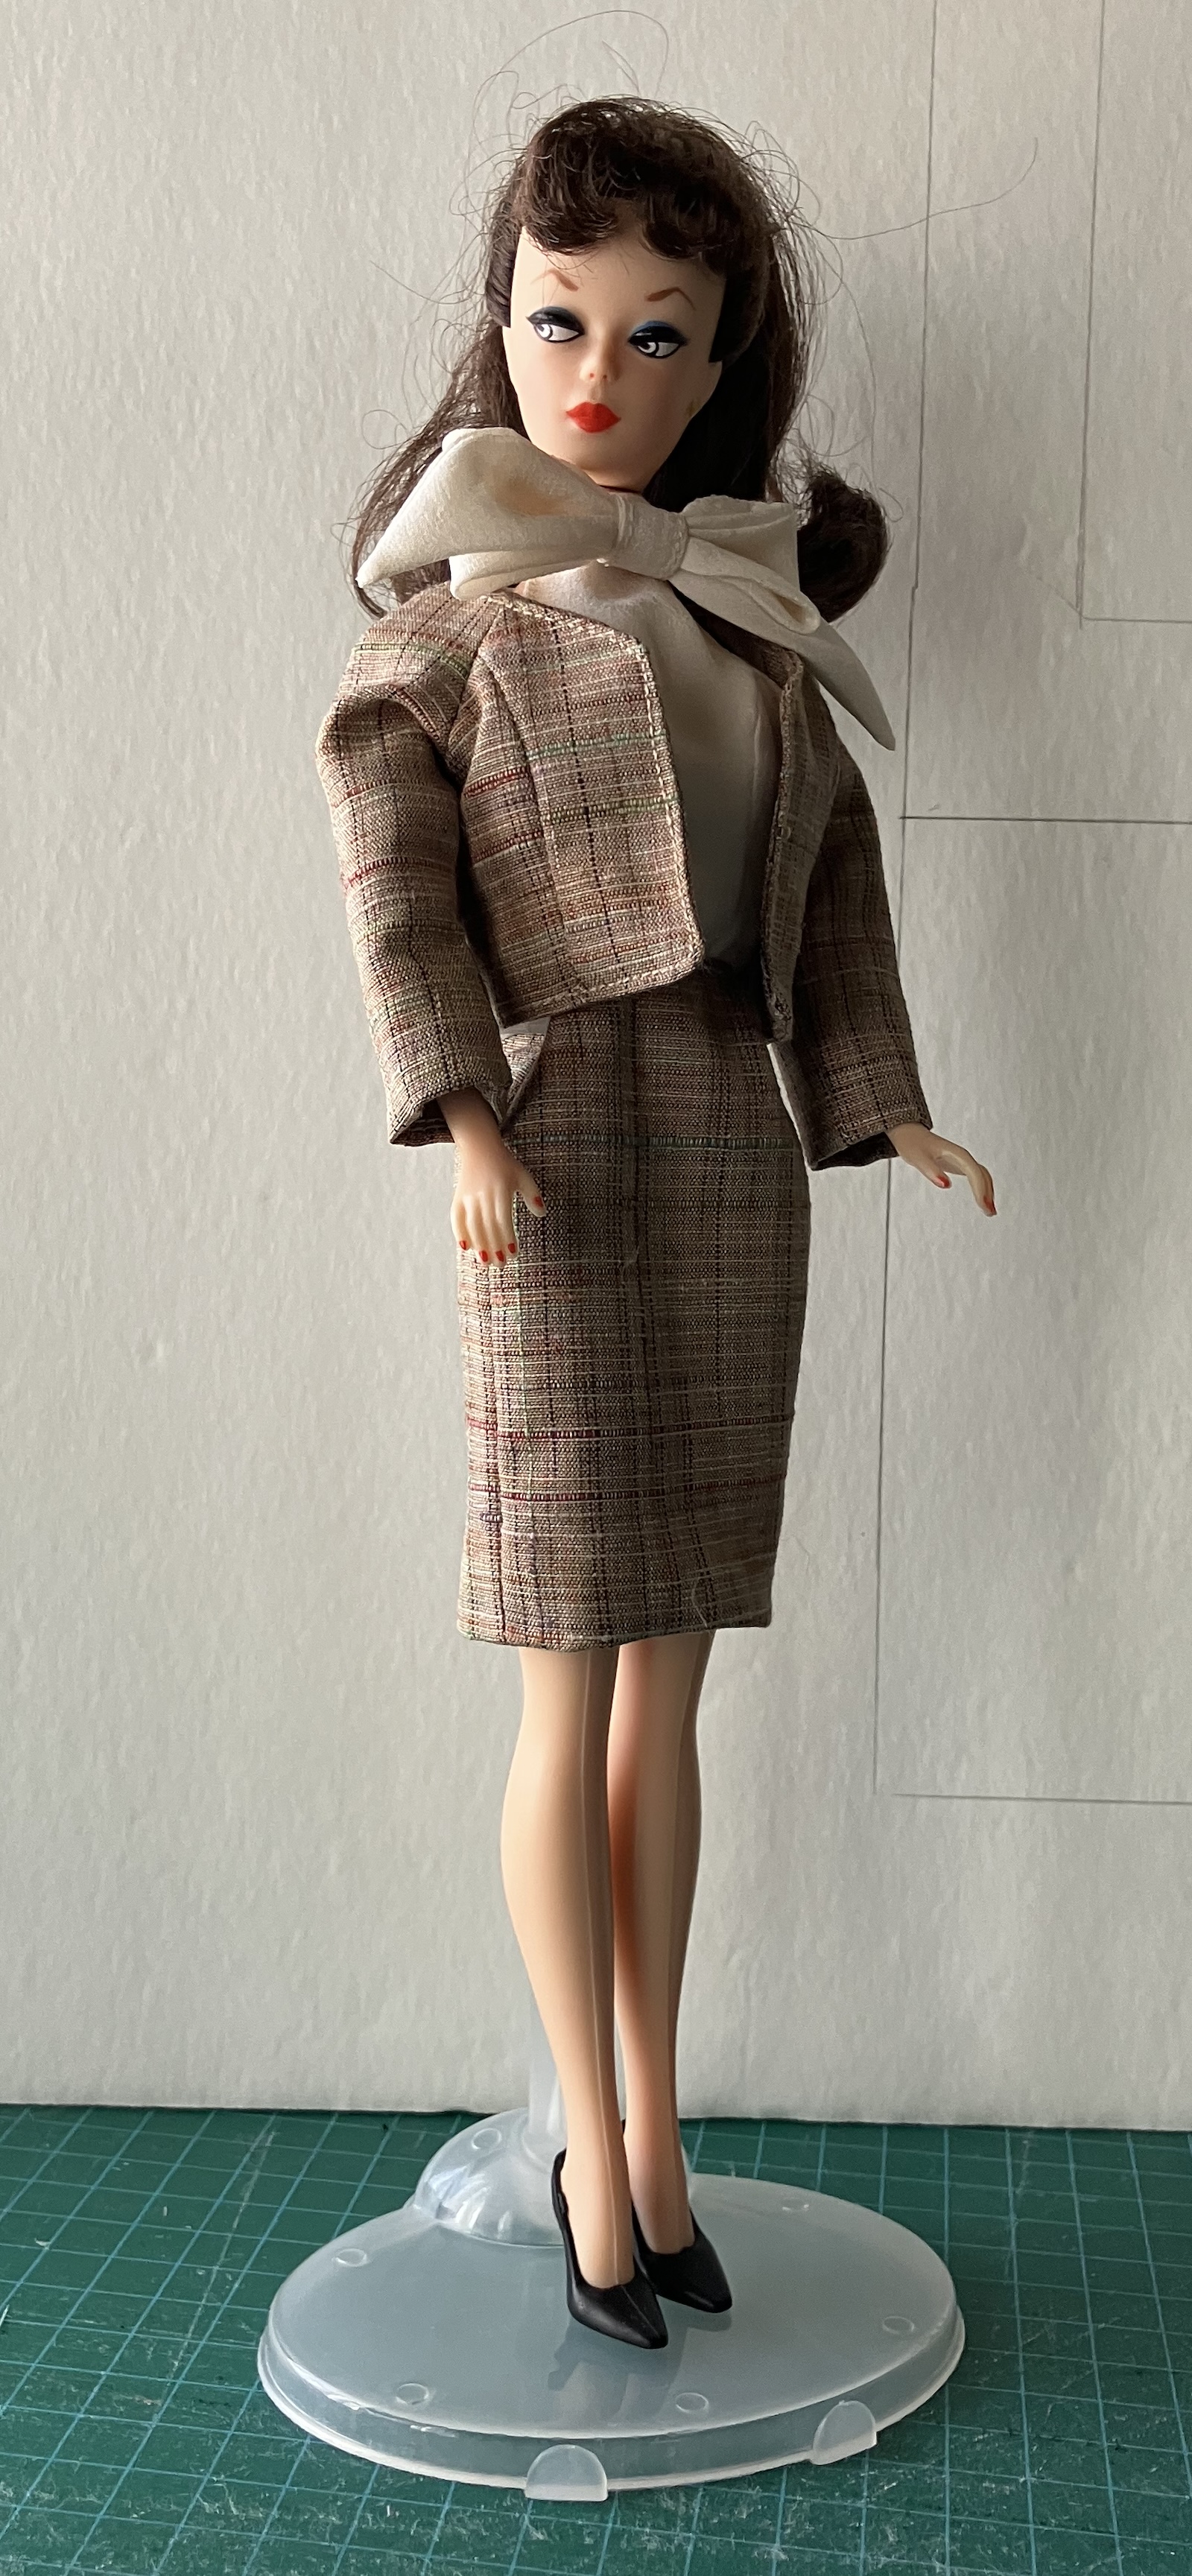
This one is Coco from HankieChic. This designer has moved from Etsy to another host since I last posted about one of her patterns: you can now find her patterns here.
I wasn’t sure about the big bow, but tried the pattern anyway. The top and skirt are actually a dress, and the top is a halter. It’s shown with an added belt. Both the dress and the jacket are lined.
I cut the suit from a yarn-dyed silk obi in taupe, and the blouse from a scrap of silk leftover from a blouse I made for myself ages ago. I cut the skirt and jacket lining from Bemberg rayon, and lined the halter top with the same silk fabric.
The jacket has raglan sleeves and a shoulder dart, then princess seams. The skirt has side seams and a center back opening.
There aren’t grainlines on the pattern pieces, which is characteristic of these HC patterns. I guessed, making the grainline vertical on all the pieces. I had some bias stretch on the front edges of the halter so if I made it again, I’d stabilize that edge by putting it on the grain.
Here’s the finished suit:
I think the neckline on the jacket is a bit wide on this one, and to me, the shoulders of the jacket are a bit big for B. There’s a gap between the neck of the halter and the jacket that could be addressed by adding maybe 1/8″ to the neckline all around. I might do the skirt differently too, with darts or pleats in the front and back. Also, I’ll probably lengthen the sleeves. I’m not much for a bracelet length sleeve on a jacket, though it’s common for dolls (probably because it’s easier to get a shorter wider sleeve over their hands.) So, modifications planned for this one. Overall, though, it’s quite cute – and I like the bow better than anticipated. 🙂
I also cut out a pillbox hat in the silk, using the pattern from that first suit, but haven’t sewn it together yet. They are fiddly to make.
I’m also in the midst of trying another suit pattern (the quest continues!) and will show it to you when it’s done.
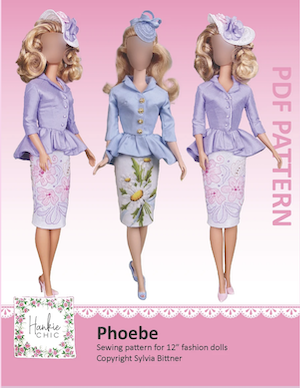
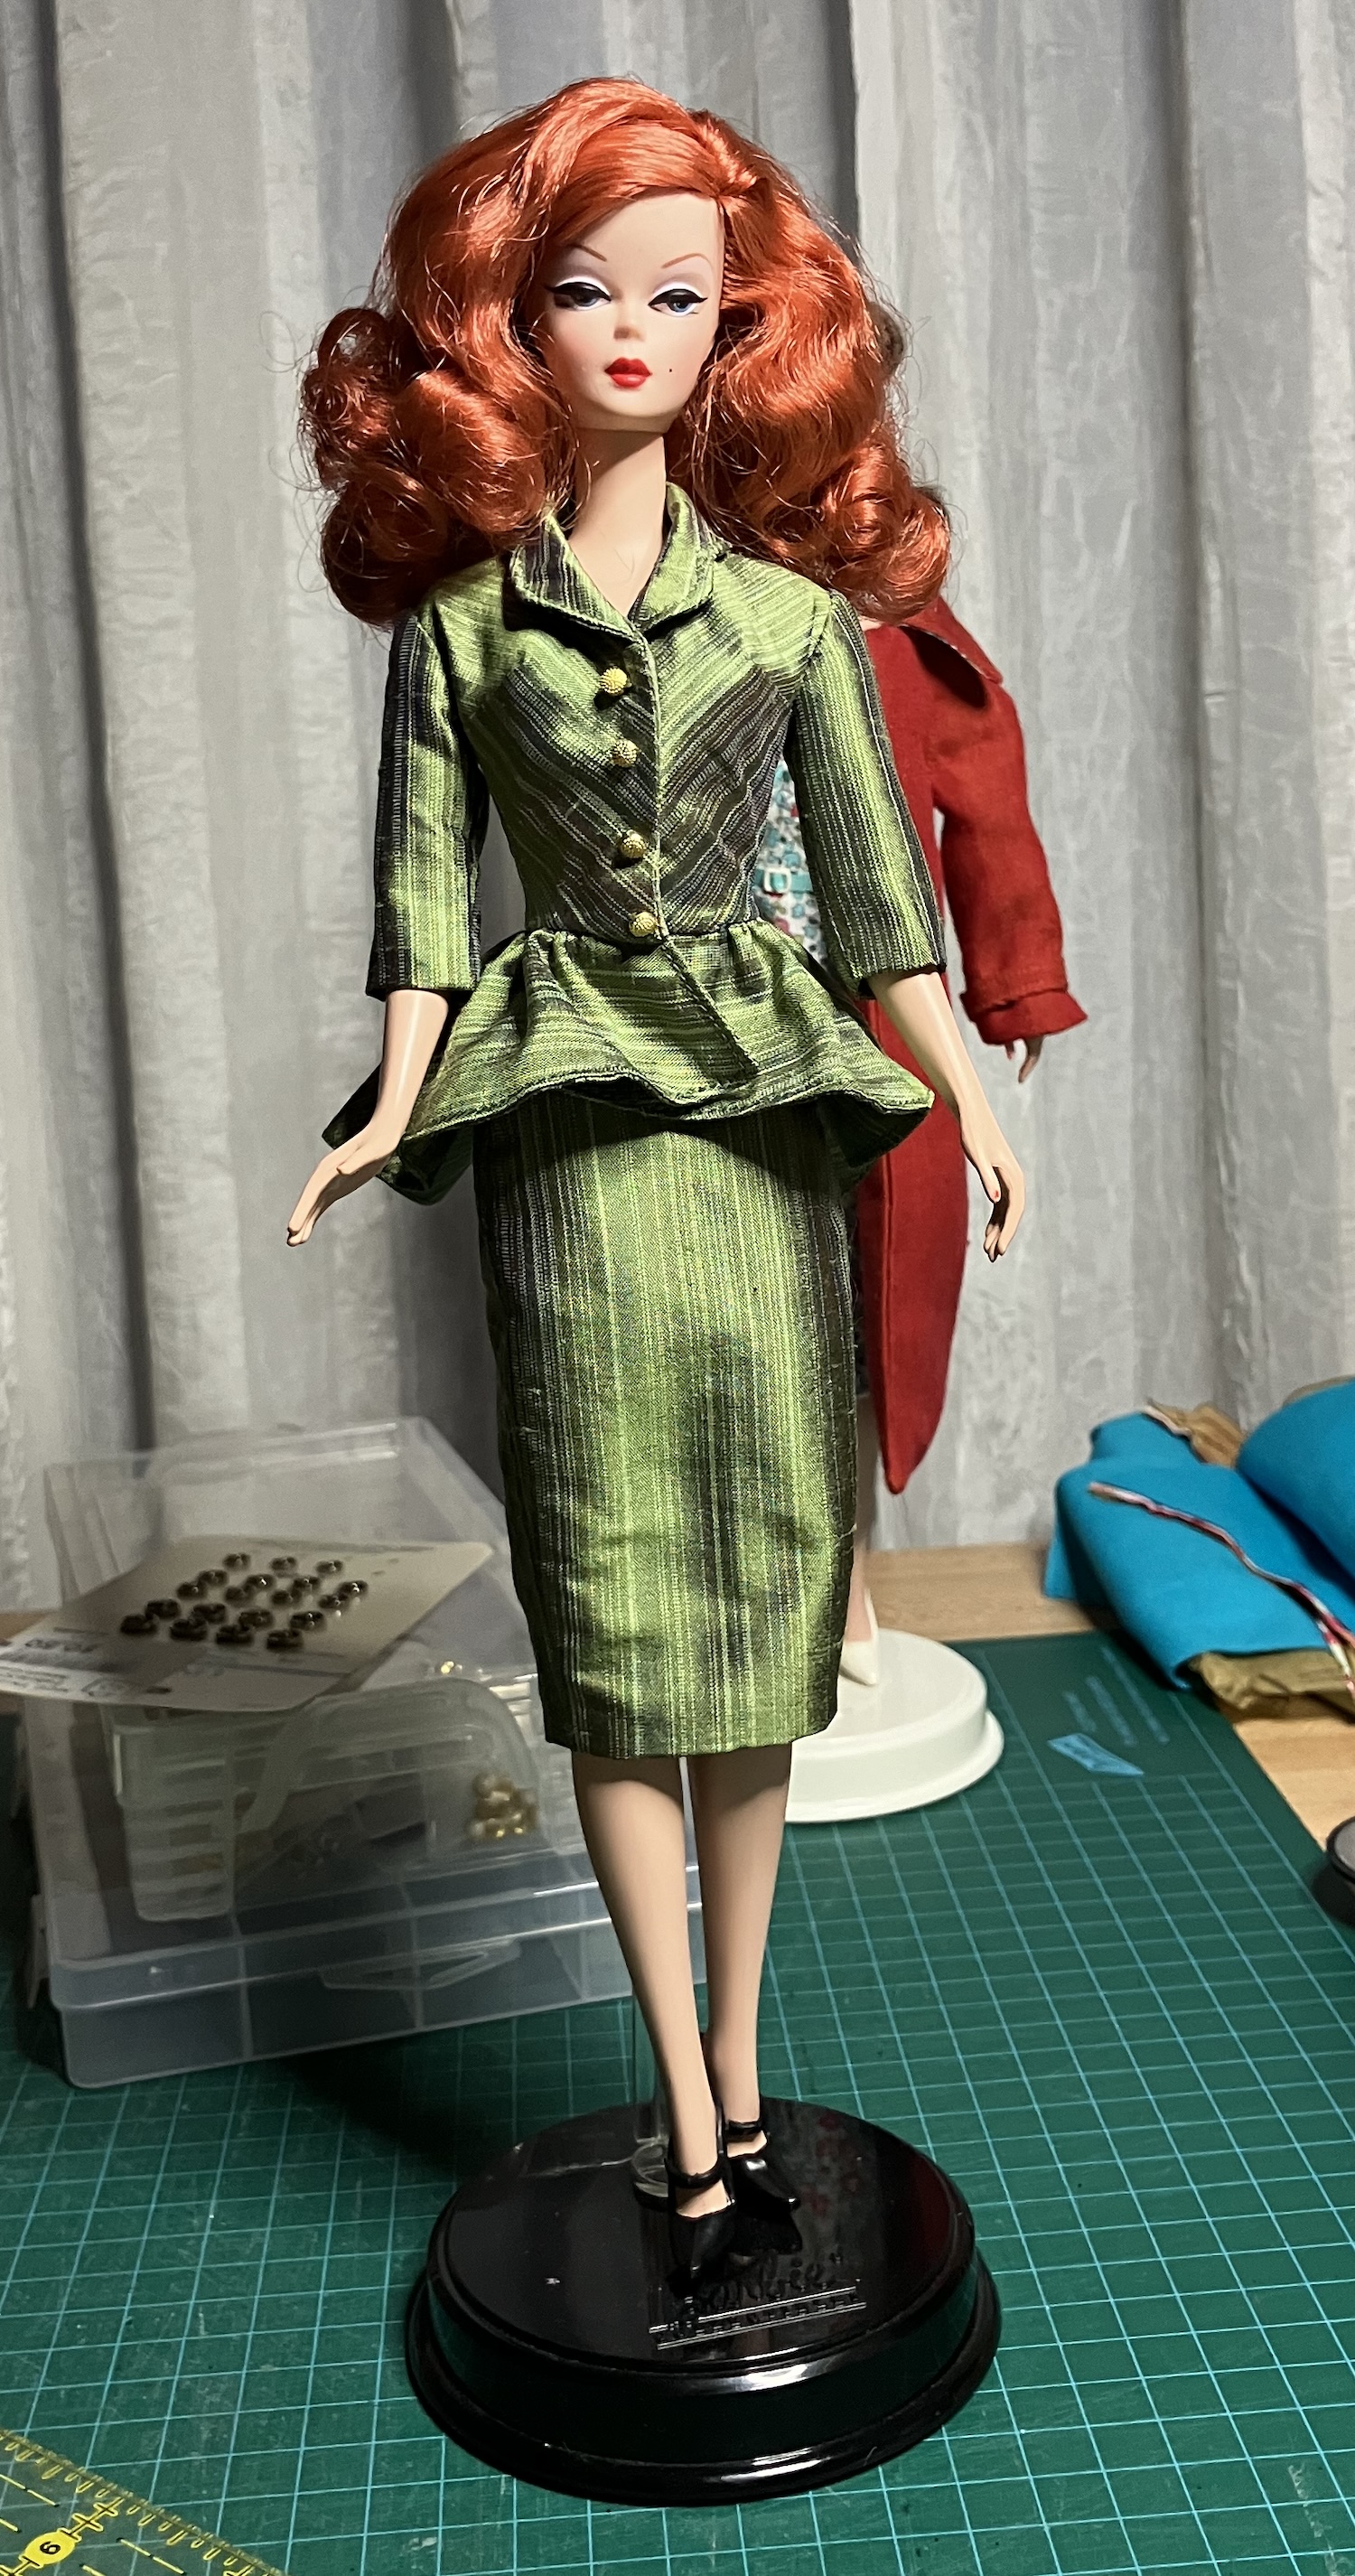
I’ve had a disappointing run of making this fall, with more failures than would be ideal, but here’s something that came out well. It’s a silk suit for the girls.
The pattern is Phoebe from Hankie Chic. You can buy the pattern right here. The pattern is for a two-piece suit, with a straight skirt and a fitted jacket with a peplum that opens at the front. The jacket has a small collar and 3/4 sleeves and is lined.
I cut mine of that striped silk in green. I thought the back was too wide – the instructions say to put the back edge of the pattern on a fold, but I subsequently seamed it. This made the back 1/2″ narrower. The jacket is a very precise fit for the Silkie girls (and will be looser on the articulated Silkies) but I’d need at least half of that seam allowance back for it to fit the vintage B girls better. Right now, it goes around the doll and the front edges match, but they don’t overlap.
Here’s the suit on Dusk to Dawn:
Those are little gold shank buttons from I Sew For Doll. I love this shade of green on her!
Because it’s a lengthwise stripe, the direction of the stripe changes in the garment. The bodice top is cut in one piece, without a shoulder seam, so ended up on the bias at the front. I like this construction a lot, as it’s less bulky. I cut the peplum lengthwise and crosswise, planning to use the one for the facing that I liked least. The grain on the center back ends up perpendicular to the front edges – I liked it best when that was lengthwise at the back (even though it means the peplum is crosswise at the front.)
The peplum is much longer in the back than I’d expected. It’s almost like a frock coat. It’s also a lot more full – it was tight to jam in all of those gathers and I’m not sure they’re all needed.
I topstitched the collar and the hem of the peplum. I also understitched the sleeve lining and the skirt lining, all at the hems, but that’s not visible. It stabilizes the hem, though.
There are no grainlines on the patterns from this company, so you have to guess how to lay out the pieces. I put the center back seam on the straight of the grain, which is why the fronts ended up on the bias. It might be interesting to try a variation with the center front on the straight of the grain, which would put the CB seam on the bias. I’ll also likely try one with a shorter peplum, perhaps one that is less full than this one.
I have ideas for many variations and experiments, but the suit came out well as it is and I’m very glad to have a small triumph!
This fall, Mattel introduced another Silkstone Barbie BFMC. She’s the second in the series of new dolls that launched with the Sapphire girl, who moved in here in the summer.
I had mixed feelings about her, even though she’s pretty. I don’t love the articulated body, I wasn’t sure I liked the pink velvet scrunchie bit and I wasn’t loving the price. (She was $175CAD plus shipping and now is $190CAD plus shipping.) Someone in a forum noted that they could buy a vintage Silkstone for the same price, and I had an AHA! moment.
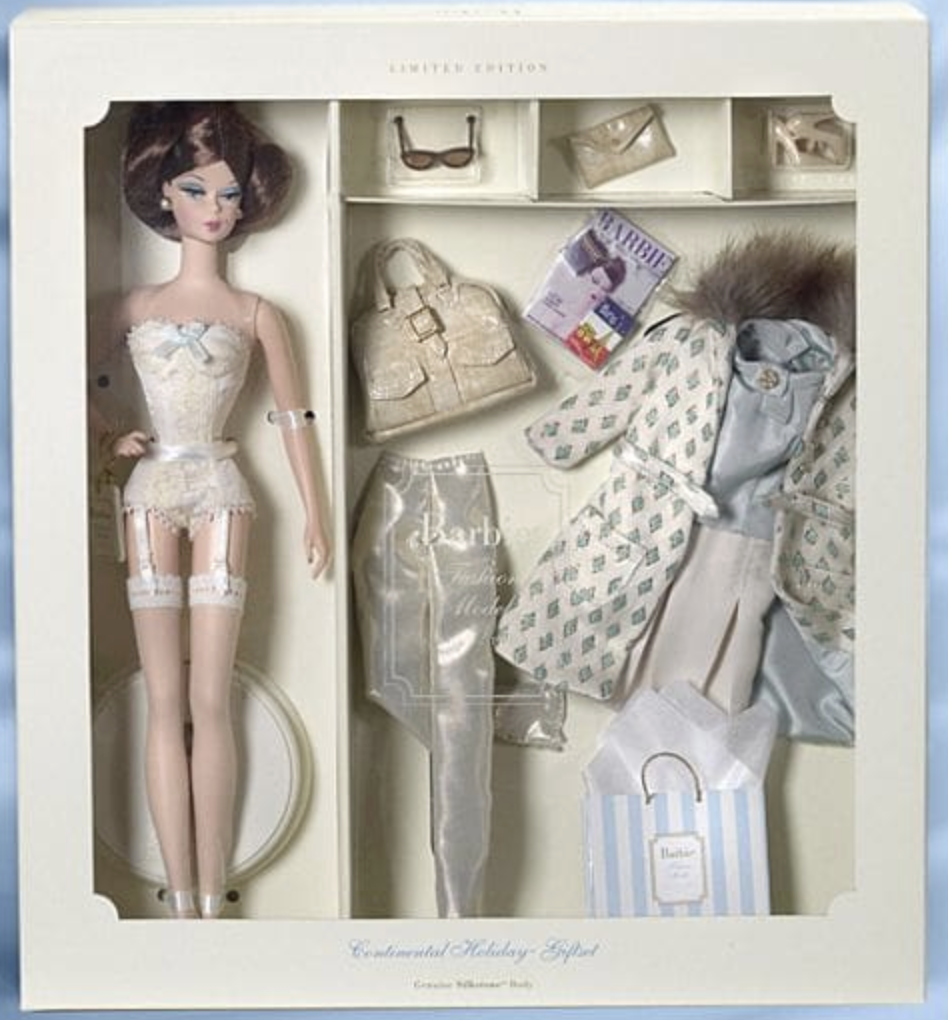
Silkstone Barbie Continental Holiday Gift Set from 2002 joined my collection. Here’s one of the promo shots of her from the original launch.
I like the gift sets because they come with more accessories and garments. Here’s how this one was packed:
She has lingerie and stockings, a second pair of shoes, the outfit in the first picture plus a pair of pants, the overnight bag and the clutch purse, plus sunglasses and other goodies. (A passport! How cute is that?!) Mine was NIB and I think she was glad to get out of the box after 22 years in there. We tried on her clothes, but it was hard to get her coat over that blouse with the wide collar.
Here she is, chez moi. She’s wearing the Trench Setting coat in shot linen and the dress that matches the lining in Tana Lawn.
I’m not sure what to make of her hair arrangement. It’s kind of a double ponytail. The two sides at the front are pulled back into a low ponytail, then there’s a higher ponytail and a bunch of loose hair in between. Here’s the back.
At least it isn’t stiff with glue or spray. I’ll leave it as is for now, but the elastics on her ponytails are over 20 years old and will degenerate soon. Then I’ll have to decide about her ‘do.
Behind her in these pix is my latest DIY carrier for the girls. This one has all of the girls’ original garments, accessories and shoes, sorted and labelled. Instead of putting braces for the dolls on the door, I covered the inside of the door with hooks (each made from a head pin with a bead) to hand and organize all the goodies. It’s lined with the same Italian paper as the first one. Putting this together and hanging everything up gave me enormous satisfaction. (There’s another clothing bar behind the front two for longer gowns, too.)
I also have been fiddling with that Advance pattern again, In Paris 4750. (You might remember that I made the Balenciaga ballgown with lace overlay.) I printed out the pieces for the Bar Suit (Christian Dior’s iconic New Look) but it ended up too big. I’ve reprinted it at 90% and the fit is better. Still fiddling with this one, but should be able to show a result to you soon. I made it of cotton this first time and will remake it in silk once I have the details right. It’s also made me realize that all of the girls have their hair down, and I need one with an updo to model the Dior suit.
That also meant I had a good look at this new girl’s clothes and bags, with a mind to copying them. I never like the fabrics chosen, and there are shortcuts that I might not emulate – the skirt, for example, isn’t lined – but there are other potential take-aways. At the very least, I may remake some of the original garments in fabrics that I like better. There’s always something with the girls!
Sorry to have been quiet lately. I’ve had some projects that didn’t come out as well as I’d hoped which – like books that need a tweak – are in the midst of revisions. I’ll show you them when I’ve fixed them up the way I like. I also was finishing up a book and publishing it.
I have finished the knitting on the black KSH cardigan of doom. (Phew!) I need a sunny day to seam the sleeves and set them in. My Ravelry project page says that one’s been on the needles for eight years – I hope that isn’t true, that I created the project before I cast on, but even so. I have projects that have been on the needles longer than that. Gah. I have a belated case of finish-itis now. I’ll show you that when it’s finally done.
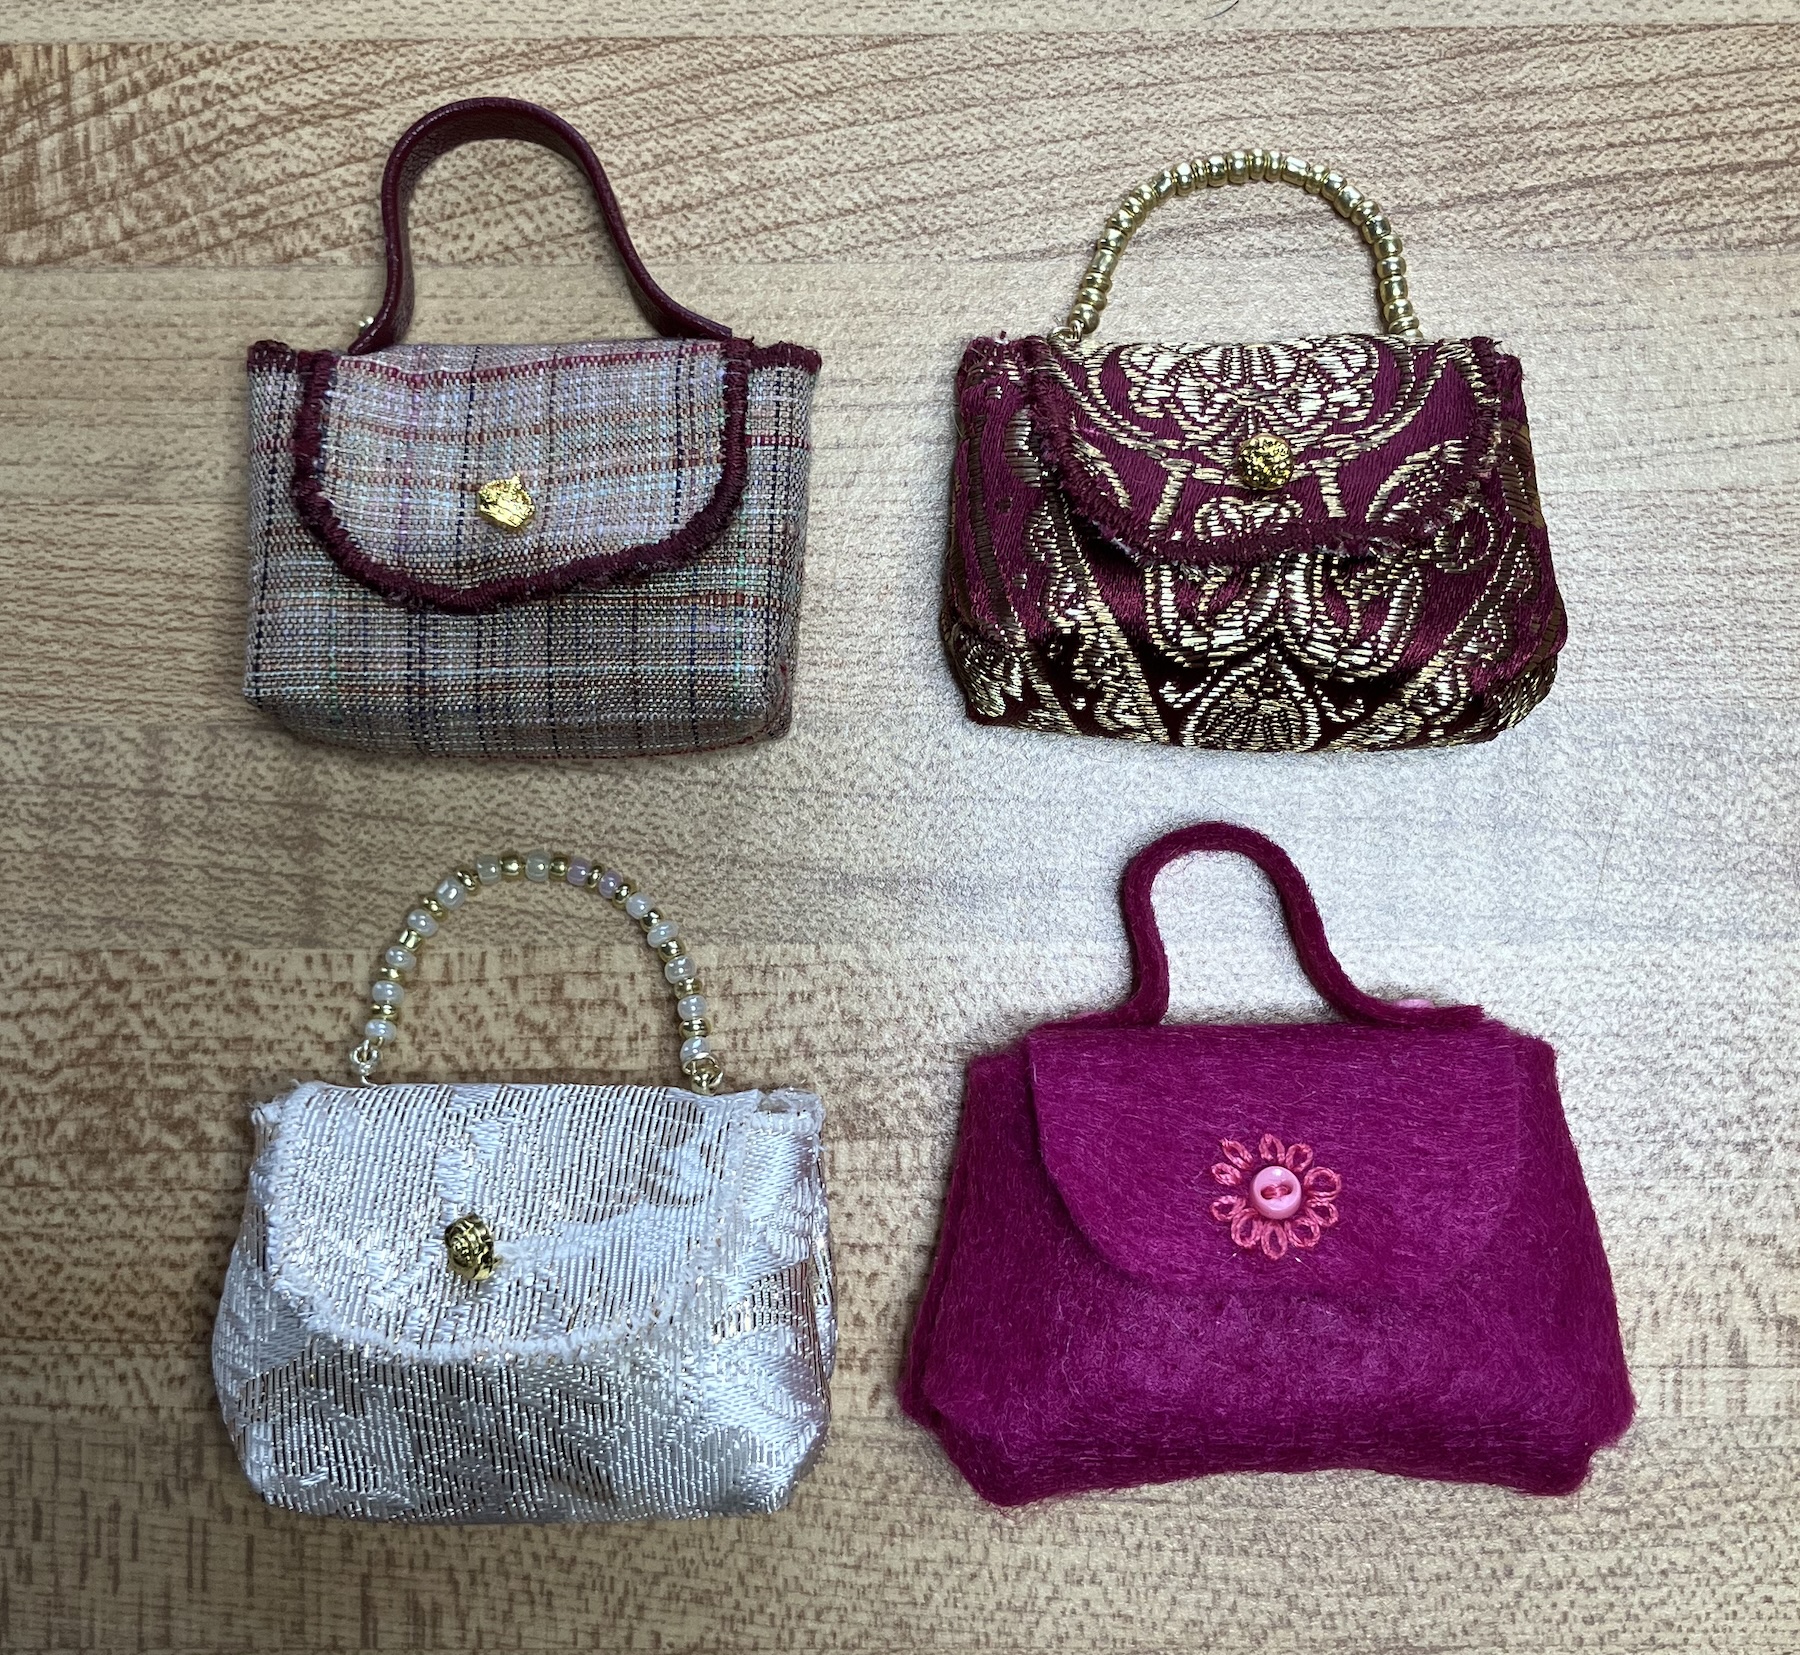
Today let’s talk about purses for 12″ fashion dolls. This is a silly little project that keeps going on and on. The thing with making for the girls is that I always see more variations. I could get stuck exploring the possibilities of one pattern for a very VERY long time, which is kind of what has happened here. I’ve made a lot (a LOT) of these little purses. They’re quick and easy, and they come out really well. It’s almost instant gratification, and I’ve needed a bit of that lately.
I found this image on PInterest when I was ogling gorgeous suits for Silkstone Barbies. (There is some fabulous stuff there and many very talented makers in the world.) It’s in Japanese and from a book for dolls called My Favorite Dolls. That’s pretty much all I know from that one page. You can see that there’s a purse and a pair of jackets illustrated. I’ve no idea where the jacket patterns are – maybe on the facing page? – but there’s the purse pattern right there. I grabbed a screen shot and printed it out. There’s also no scale, so I just guessed it was from a page roughly 8.5″ by 11″ and printed it to fit the page. My purse pattern came out about 4.25″ long and the scale is great for the girls.
And then the fun began.
The directions are in Japanese, but like so many Japanese patterns, it’s pretty easy to figure out what to do. Japanese patterns always include such lovely illustrations in the instructions.
Here are the first ones.
I used my go-to fake leathers first – the shiny black I use for almost everything and a matte burgundy. They’re the two in the top row. The burgundy one has a brass-like button with a butterfly on it. 🙂
For each purse, I folded the handle and glued it – nothing fancy here. I used a gluestick, then put a weight on it until it dried. I did learn over the first couple that it’s easier to do as much as you can while the purse is flat. So, I sew on the half of the snap under the flap and the decorative button over it, then put on the handle. I use a seed bead as a decorative accent on the handle, one that matches the accent button on the front. Then I fold up the purse and press the snap into the body of the purse to make an indent where the other side of the snap needs to be, and sew it on in place.
When seaming the sides, I do a few overcast stitches at the top. When turning the bag right side out, there’s a bit of stress on those two seams at the top, so a little extra reinforcement can’t hurt. When I get to the base, I just tack in the top of the flap from the base of the purse. Turn the purse, ease out the sideseams and fiddle that flap until it looks right. Presto, purse.
The next pair are made from the very cheapest fake leather. I bought a set of 12 squares of craft vinyl, each 5×5″ or so, two each of six colours, at the dollar store. Each purse takes less than half a square. These next two, in red and the caramel, are from that vinyl. The vinyl is stiff enough that the purse holds its shape well.
I even cut an extra strap for the caramel one and added a buckle to that one. The strap is the width to pass easily through the buckle. I cut it an inch too long then trimmed it once the bag was assembled. I glued it in place while working on it, but the glue didn’t hold. Good thing the snap halves are sewn through the beginning and the end of that strap, and will hold it in place forever.
The red one has a fleur-de-lis accent button and I thought it needed even more zing. I used a black Sharpie to outline the edge of the flap and I think it looks great.
Next up, some sample vinyl pieces found at the thrift store. The individual pieces in thiis bundle of different fake leathers is about 5 x 8″. Again, that’s more than enough for a purse. There’s even a piece of cork in there but it seemed too thick for this purse. (Will the girls have cork purses before I do? I’m thinking they will.) I used a dark brown from that bundle and a metallic gold, which got extra beads on the flap for embellishment. (It looks silvery here but is more golden IRL.)
The raw edge does show along the front flap, the top of the bag and at those bottom corners. If the fake leather has a light backing – the dark brown one, for example, has a white backing – I colour the edges with a Sharpie marker in a matching colour.
Then I looked at the fabric ones with the bead handles. I chose two brocades, one firmer than the other, and a bit of silk. (The silk is at the top left.) I interfaced all of them with fusible interfacing before cutting out the pattern, then finished the edges of the top and flap of the bag with a zigzag stitch in a coordinating colour of thread. I also used Fraycheck on the other edges to keep them from unravelling. I don’t love this stuff, since it’s essentially glue. It often marks the fabric and leaves it crunchy – that bit is less of an issue for a purse than for a garment, but still. It didn’t mark the white, but it did mark the other two, so I sewed that little base triangle on all three purses to keep the stain and/or edges from showing.
The silk one has a fake leather handle and a little crown button, which is adorable. Sharpies are your friend here, too – where the fabric showed through the thread on the edge of the flap, I just coloured it in with a matching marker.
It looks as though the pattern recommends the beads be on thread, but I wanted a stiffer handle than that. I fed them onto beading wire, then poked the ends of the wire through the fabric and twisted it on the inside so it won’t pull back through.
Finally, I was wishing I had some more fun colours of fake leather and wondered about felt. Why not? It doesn’t unravel. This is synthetic felt and I used three doll buttons in a contrasting colour. The “embroidery” was done with sewing thread held double – I did it after sewing on the button and snap. I think this one is really cute and I do have a lot of fun felt colours. There may be more of these.
You can see these purses are like potato chips. It’s impossible to stop with just one, or three…or ten.
Of course, I also drafted the pattern a bit bigger so I can make similar purses for the 16″ girls. Purses abound!
Next time, I’ll show you my new girl and get her to model one of the purses so you can see it in scale.
Two new dolls joined my collection last week, so we’ll meet one of them today.
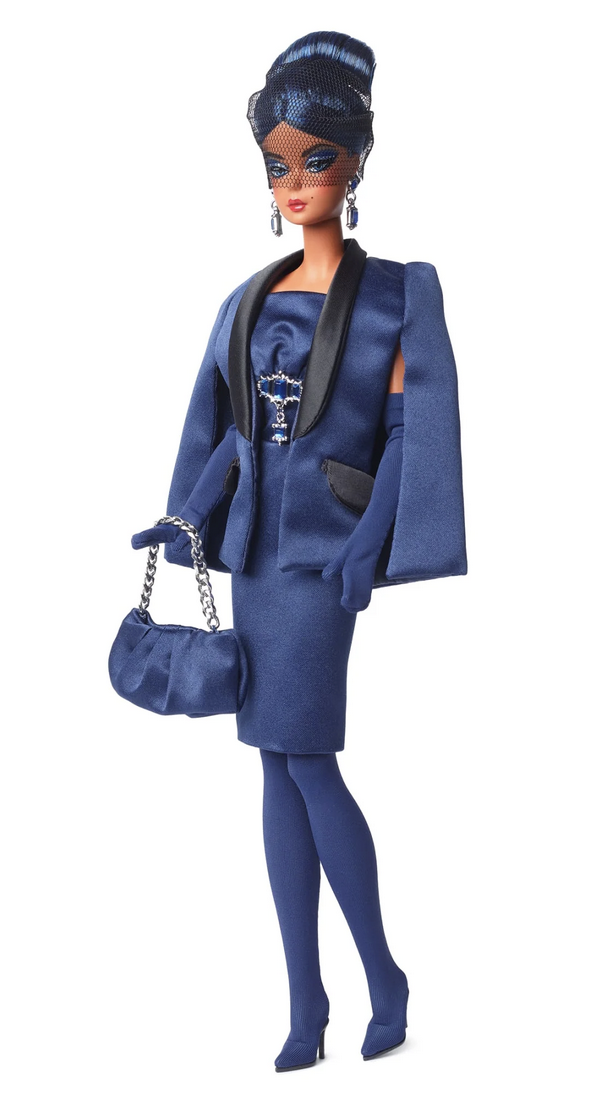
She’s the Sapphire Anniversary Silkstone Barbie. She’s still available on the Mattel website for members, right here. At right is one of the official pix of her and it’s linked back to their landing page.
I had mixed feelings about this doll. I prefer the older Silkstone bodies over the articulated dolls, but was attracted to the idea of getting a new doll. (That explains my other two articulated Silkstones, too!) In the end, though, I ordered her.
The finishing of the doll itself is disappointing but that was true of the other articulated girls, too. I suspected I wouldn’t like the jacket and I didn’t. 🙂
But I love her blue hair and sparkly eye make-up. The dress is darling, although it has a crunchy lining in the skirt. I may try to copy it in another fabric. This time, they put clear plastic disks between the earrings and the doll, presumably to keep her face from being scratched. (It’s the metal pin in the head that gives dolls green ear, so it won’t prevent that.)
Her stocking-boots are interesting – there are shoes secured in the bottoms. I saw a photo of her with the 60th anniversary pink Barbie which appears to have the same stocking-boots. (That’s an Amazon link.)
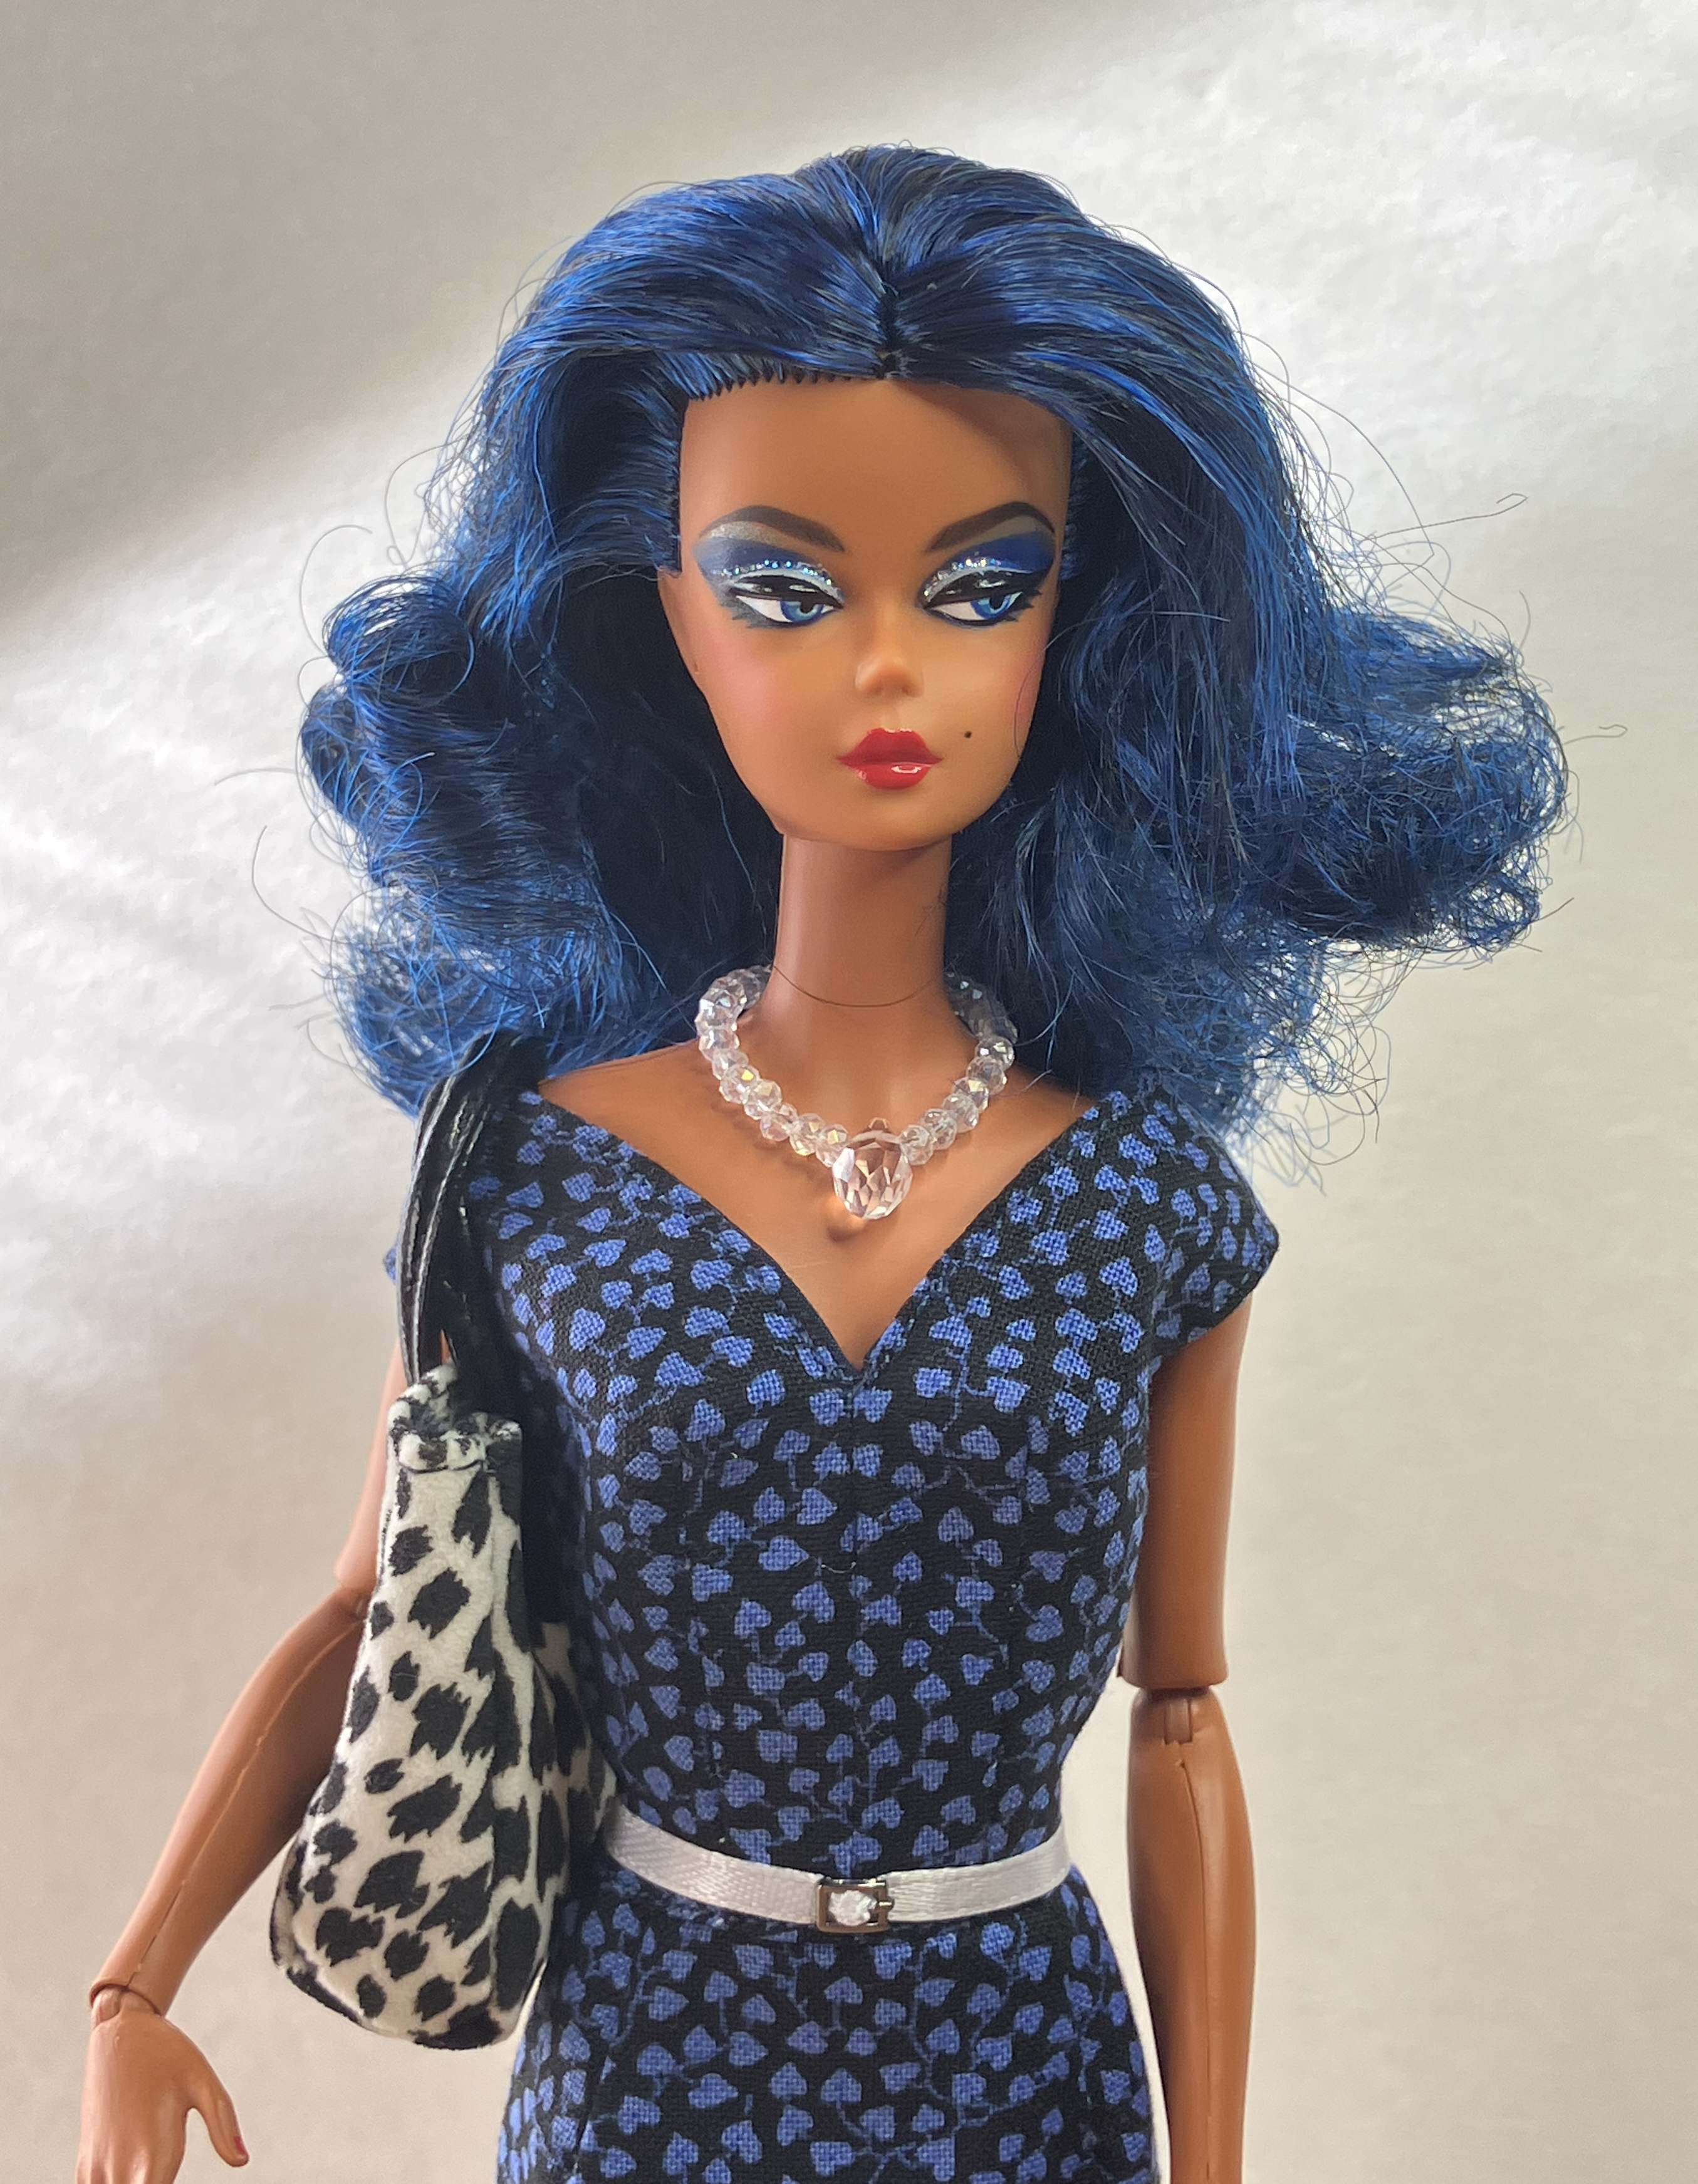
She came out of the box and waited just a day before I surrendered to temptation and took her hair down. I don’t know what they use to keep the hair in place, but it leaves the hair stiff and crunchy. (Maybe it’s just glue.) We had a good wash and comb, then another couple of washes. I didn’t boil-wash because I was hoping to just tame the curl not lose it completely.
And here we are:
Her lipstick is evenly applied – it’s just the angle of the morning sunlight that makes it look otherwise. I trimmed a few scaggy ends from her hair, but otherwise, it’s how it came down. She borrowed the purse from Dusk-to-Dawn and it’s possible she won’t give it back. The dress is the one from Trench Setting. I definitely need to make her some black and blue separates.
A day late on this post because I didn’t have pictures done. I took one inside but it was dingy – yesterday was sunny so I got a second one.
Malia is a pattern for 12″ fashion dolls from Hankie Chic. (That’s an Etsy link.) There are two skirt variations included for this dress – a fuller below-knee skirt and a straight full length skirt. The bodice has pleats over the shoulders, which form short sleeves. There’s a long-waisted bodice piece, too.
I made this from a cotton with a tiny print in navy. I ordered this fabric from Charlene Lu’s Etsy store, and she has it in several colours in 70 x 50cm squares. It’s really a very delicate print, a great scale for dolls.
This dress is lined with cotton voile and was machine sewn – except for the bodice lining, which I sewed by hand. The pleats that are formed over the shoulder open up when the dress is on the doll in a very attractive way.
Isn’t this a pretty dress?
Here’s the dress off the doll. (I’m not sure the details are more visible, though that was the idea.) It has a couple of snaps at the back waist.
I have another one cut out in cotton, also with the full skirt. I’ll have to try one with the long straight skirt, in a shiny fabric. The one on the pattern image looks like it might be made of that Chinese brocade, which is beautiful but also quite thick. I’ll probably try a crepe back satin first, even though it’s slippery stuff.
When things go awry in making for myself, I often make for my girls instead. This is a pattern available on Etsy from Elenpriv, who also makes and sells finished garments for fashion dolls. It’s a pdf download without instructions – which means I made a mistake or two. 🙂 I’m pleased with how it came out even so.
At right is the garment picture on the pattern download.
You can see more pictures in the Etsy listing, right here.
This is a double-breasted tailored and lined jacket, with matching slim pants. In the little video in the Etsy listing, you can see that she uses narrow Velcro closures on the jacket and pants. I don’t like getting velcro close to my girls, so I used plain old snaps.
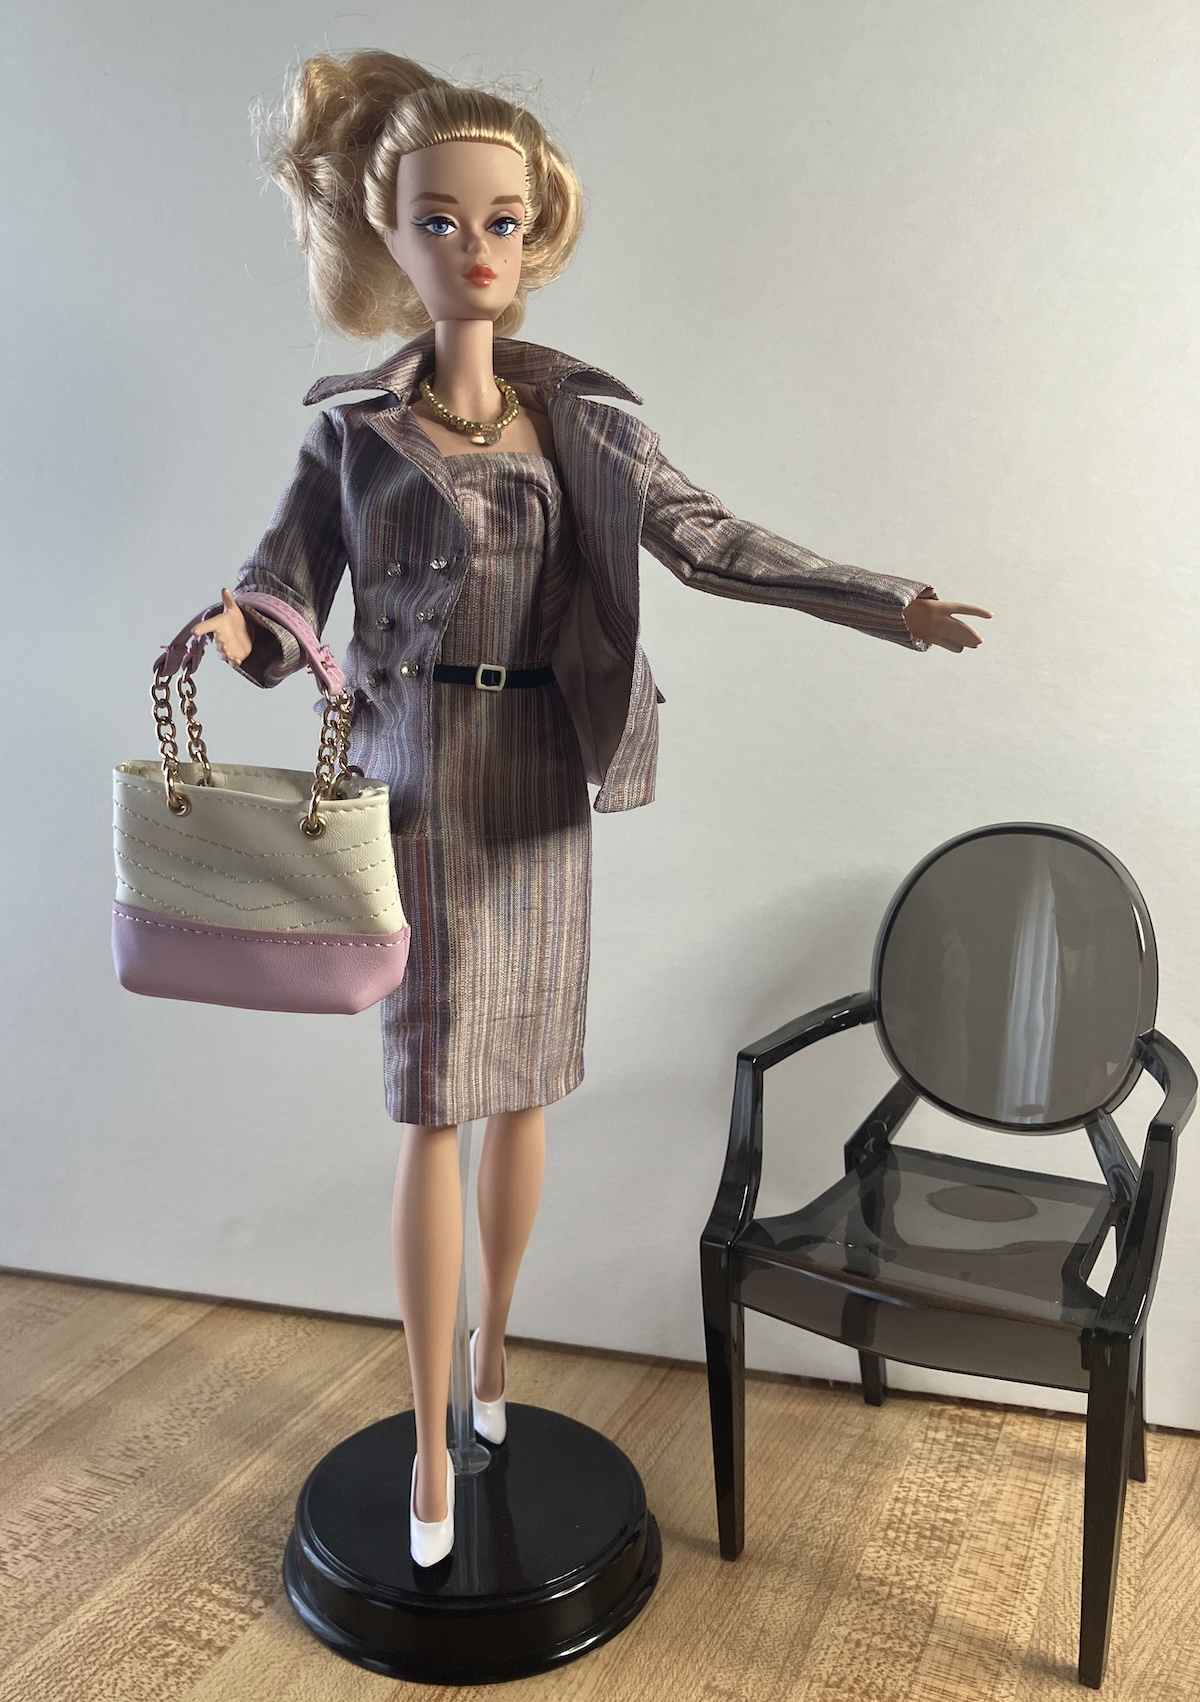
Here’s one of my Silkstone girls, modelling her new suit. This is Best in Black Silkstone Barbie, but she has a new do – all the girls have ponytails for the summer. The colour is a bit dingy because we’re having rain like it’s time to build an ark.
I cut the suit out of a yarn-dyed stripe silk, and lined it with Bemberg rayon. I used rhinestone buttons on this one. As you can see, I ended up with a notch collar instead of a shawl collar. Evidently, I should have seamed those edges together. Maybe next time.
I also added pleats to the front of the pants and darts to the back as they had no waist shaping. I’m not sure how the pants would have fit into the waistband otherwise.
Next, I made a lined sheath dress of the same fabric – ha! I drew my own pattern for this! – so B has some options. It even has a little ribbon belt and yes, it’s lined with the Bemberg rayon.
Here’s the suit flat. It’s much more of a pale mauve-pink than it appears here.
Best in Black is an articulated Silkstone, which means she has a thinner body sculpt. This suit fits the regular Silkstone girls, as well. The pants run a little short for Jade, who is a Fashion Royalty doll and has a different body sculpt. The main difference is that Jade is taller, so when I make her pants, I’ll cut them a little longer. Sleeves are perfect for Jade just as they are, probably because they’re a teensy bit long for B.
All in all, a good pattern and one I’ll make again.
Vogue Craft 7010 is another sewing pattern for dolls that is out-of-print but available as a downloadable PDF from vendors on Etsy. I’m not sure which vendor I bought this one from, but it’s one of the better downloads I’ve ever bought – there’s a measuring tape on each page of pattern pieces. It’s also kind of nice to have a pattern with cutting layouts, line drawings, grainlines and dots to match on the individual pieces. Yup, call me old-skool.
Although I bought it for view E, the first dress I made was view C. That’s the little teeny one in pink. It has a great yoke – but then a lot of the designs in this particular collection have some great seaming details.
It’s just so cute. Here are the girls in their new dresses and sunhats.
The pink one is a quilting cotton, lined with cotton voile. I made the hat with two layers (the pattern specifies one) because I wanted to finish the inner circle rather than just gluing it (as specified.) The inside layer is the same quilting fabric as the dress, while the other is a plain white linen. I put the two fabrics right side together, sewed the inside circle using the pattern piece as a template, trimmed the middle so there was a 1/8″ seam allowance, clipped the curves and turned it. I pressed it, then topstitched around the inner circle. The outer binding on the edge is a bias-cut strip of coordinating cotton voile in hot pink. I sewed it to the linen side, then turned and pressed it, hand-stitching it on the pink flamingo side.
I wasn’t crazy about the order of the seaming on the dress, so I cut another one of green quilting cotton with green cotton voile for lining. On the pink one, I followed the directions, sewing the dress and the lining fronts and backs, then the shoulder seams. I sewed them together at the neck, sleeve holes and hems, then sewed the side seams and the back seam. I ended up doing a lot of handstitching on the lining because it was very tight to manage on the machine.
For the green one, I sewed the side seams first. Fronts and backs, seamed at the shoulders, in both the lining and the dress, then sewed them together at neck and sleeve. Then I sewed the side seams, and the back. I sewed the hems, turned it through the open center-back skirt seam, then hand-stitched that closed. I’ll use this method in future.
Here are the backs and you can see the linen side of the sunhats, too.
This dress also has a placket at the back for the overlap, a very nice detail. I cut it of the lining for the green one to reduce the bulk, which worked out well for bulk – though it was tough to sew the snap to it.
The girls also have had their earrings removed. I knew the regular dolls could get green ear from the earrings – and had noticed a teensy mark on my repro ponytail girl – but saw a horrible pic of a Silkstone, never removed from box, with a bad case of green ear. It’s possible the vendor had never even opened the box. What a nasty surprise! So, all the girls had their earrings removed this past weekend. Only one pair was actually finished well enough to save – the others were already corroding and/or broke into bits while being removed. Why doesn’t Mattel include earrings in a little bag for the dolls, stapled to the inside of the box, like other vendors? Why don’t they stop making earrings of cheap metal that corrodes? These are the questions. In the meantime, take out your girls’ earrings.
Next up, the shirtdress from this pattern, while I hunt down something suitable for that leopard print evening coat. 🙂
I’ve been sewing for the B girls again and trying some different pattern companies. The vintage patterns are great for vintage B, but the Silkstone girls are skinnier – and the articulated Silkstone girls are even skinnier. (I’m starting to think of them as social media girls – they photograph really well and look great in clothes but in real life, they’re really thin.) But I wanted to try some patterns drafted specifically for the thinner dolls.
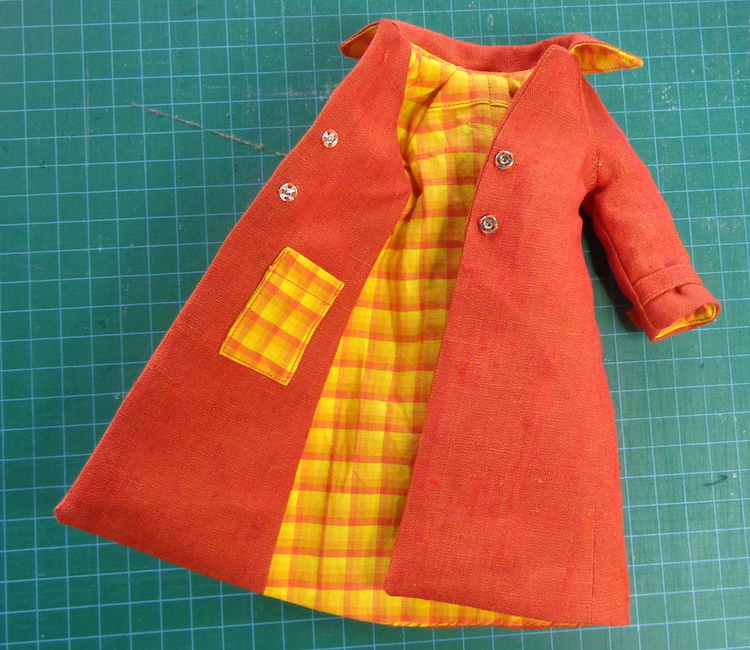
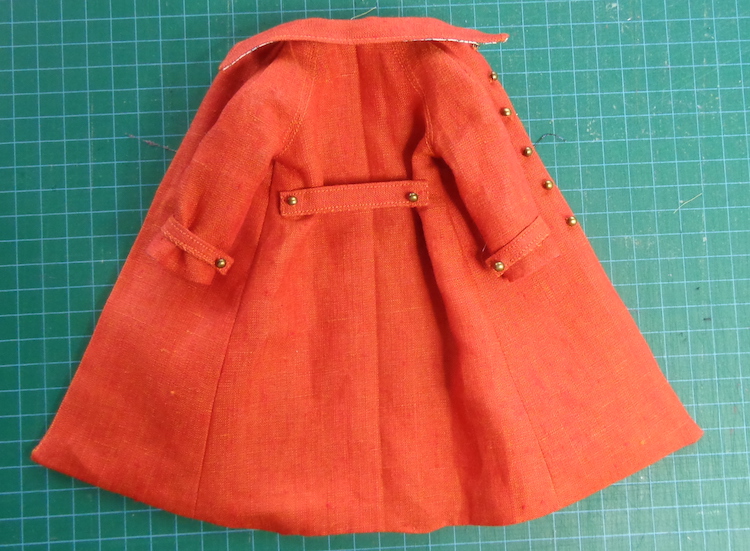
First up was Trench Setting from Hankie Chic patterns on Etsy. (This designer is not the same person who wrote the Hankie Couture books that I blogged about before.) This pattern for a coat and dress is designed for 11.5″ dolls. As has become my habit, I shop based on the doll used to model the garment – that’s an original Silkstone B, so I know it will fit that body. It’ll probably be a little loose on the articulated Silkstone and will be too small around (esp the dress) for vintage B. The sleeves of the coat might be too long for her, too.
For some reason, I cut two coats of an orange shot linen. I gave them different linings and buttons – plus an inside pocket—as a social media girl, Silkstone B needs somewhere to put her phone.
The one on the left is lined with Liberty Tana Lawn, and the one on the right with a cotton check that’s been in the stash forever. It was a strange little remnant but I liked it with the orange linen, even though I had to piece the back. (See that little seam across the shoulders?)
The Tana Lawn one has bronze dome buttons while the orange plaid version has shiny gold buttons.
The straps seemed a little out of proportion to me, so I halved the width of them for the sleeves and for the half belt at the back. The coat appears to be designed to be worn open, although I put snaps on one with the check lining to close the fronts. (The problem then is that when it’s open, you can see the metal snaps. Always a conundrum for the girls!)
Here’s B in both. (The pic is a little fuzzy so it’s small here. I really need to get my lighting sorted for doll pictures. The issue here is that there’s not enough of it.)
I sewed the coats almost entirely by machine and added some top-stitching, because that’s just how I roll.
I think the orange linen is a bit too thick of a fabric choice, so it looks more bulky than would be ideal. The linen also gives her a bit of a rumpled Columbo look – but Silkstone B prefers to look polished and sleek. I might make her another one. We’ll see. (I have another coat pattern to try first, a more fitted one that she might prefer.)
The doll modeling the combo here is Silkstone Barbie Dusk to Dawn.
The dress is a complete gem. Here’s my first one, made in Liberty Tana Lawn to match the lining on one of the coats. (I wish I had more of that yellow check, but I had to piece it to get the coat lining.) It’s lined with white cotton voile.
I love this one!
Again, I sewed it almost completely by machine – I hand-stitched the center back seam in the skirt lining and that was it. I also buried the back ends of the shoulder straps. The pattern instructs you to sew them inside the finished bodice back, but I wasn’t so fussed on that plan. I remembered this trick from a vintage pattern – I left a gap in the seam of each upper back, where the fabric is sewn to the lining. I put the dress on the doll to fit, slid the strap ends into the gap and pinned them in place. Then I caught them in the seam when I top-stitched the edges.
You can see that the left one could have been tucked in a teensy bit more on the edge closest to the center back.
The belt is a piece of 1/8″ gross-grain ribbon – in the most absolutely perfect colour! – with a teeny tiny buckle included as a gift in one of my orders from I Sew for Doll. She always tucks in a teeny ziplock with a sample of something. This one had four of these buckles. It’s a brilliant marketing strategy because I now know what size of buckle is perfect for this kind of belt for B and will order more in more colours. (Mr. Math likes the teensy ziplocks the buttons come in and has suggested I pack lunches for the girls, with teeny sandwiches in the teeny ziplocks. Maybe some teeny carrot and celery sticks. The problem with jokes like this is that they make me go “hmmmm” and think about modelling clay…)
I’ve cut out two more of the dress, one in a teal crepe-backed satin, and one in a navy cotton with a teeny tiny leaf print. Quilting cotton would be too heavy for this dress design, so I’m rummaging through my various cotton lawns and silks, too. I’ll be on the hunt for more Liberty Tana Lawn prints, too.
Then – because I am that person – I decided that B needed a little clothing rack. While the girls have their cases with clothing racks, B’s are getting full. I made this rack from foamboard with a dowel for the clothing bar.
It worked out pretty well, so I plan to make another in basa wood, maybe even with wheels…