Things have been really busy writing-and-publishing-wise, which means my knitting and sewing projects have been getting less action. When I need to think, I need a simple project (or two.) So I finished a pair of new socks for myself which is always a good thing.
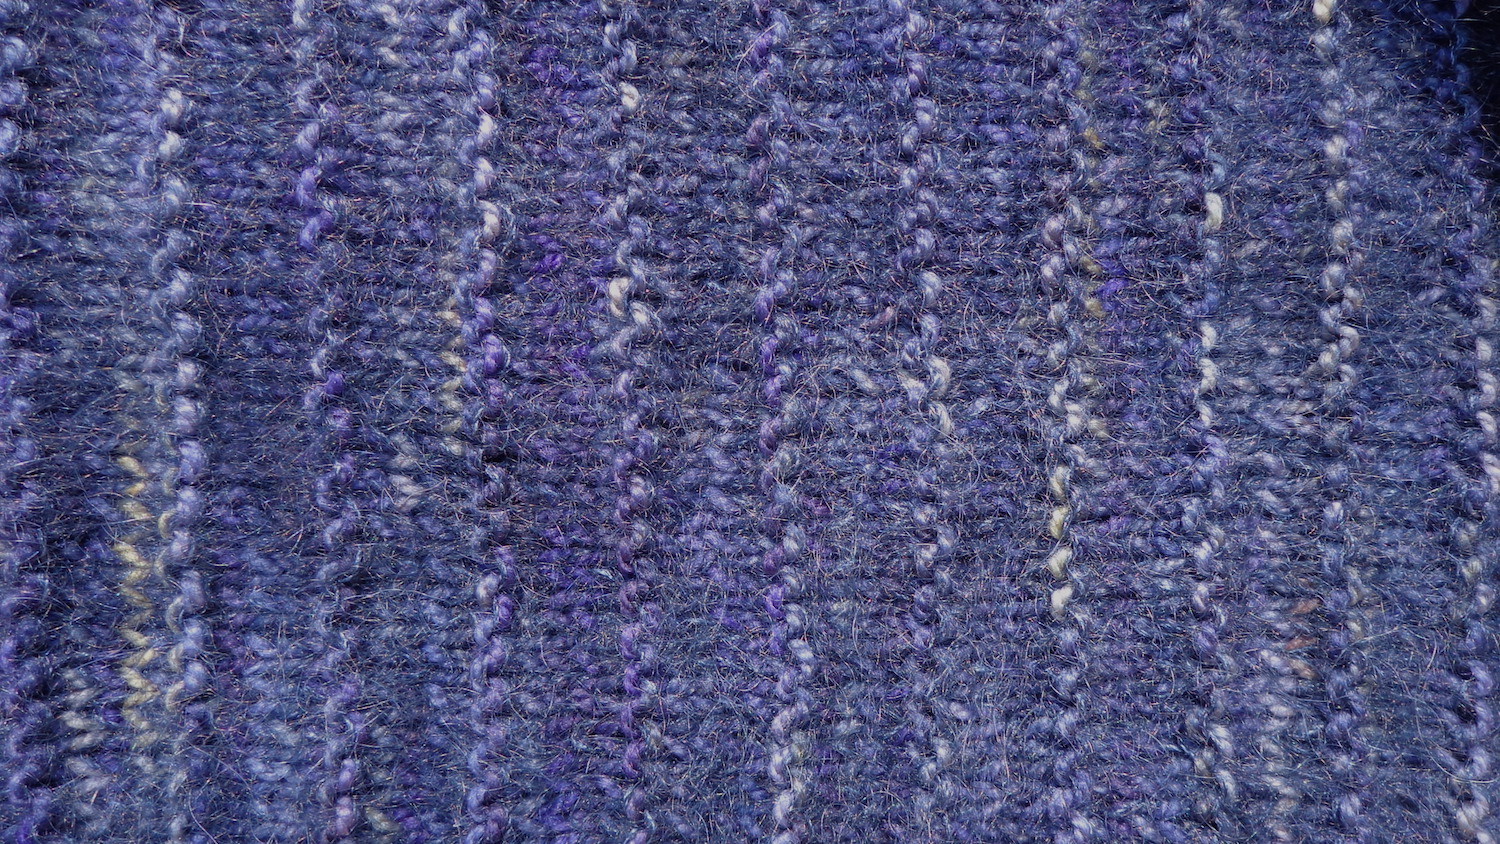
I managed to crop the toe of one of them in this picture, but the colour is pretty true. They’re knit of Fleece Artist Kiki in Twilight, a superwash and nylon blend that is put up in a big skein of 140g. (That’s a Ravelry link for the yarn.) This yarn is thick, so these socks are thick, and I used almost the whole skein.
This is just my usual sock pattern, the one I don’t have to think about too much, but this time, I added two six-stitch mirroring cables to the front.
After the 2/2 ribbing, I changed to 6/2 ribbing for the rest of the sock, turning cables on two adjacent knit bands. When I got to the heel, I positioned them at the center front. They go all the way down to the toe and make me happy.
It was the Halo that got me thinking about Fleece Artist yarn and missing (as usual) their Trail Socks yarn base. I no longer have a LYS with Fleece Artist yarn, which is sad, but Ravelry shows that Trail Socks isn’t discontinued. Good news. I haven’t seen it in so long that I assumed otherwise. (Let the hunt begin.) I found Kiki at Little Knits, because it’s discontinued. The colour saturation is great and the yarn is very squishy. I was surprised by the thickness, though. These are heavy socks.
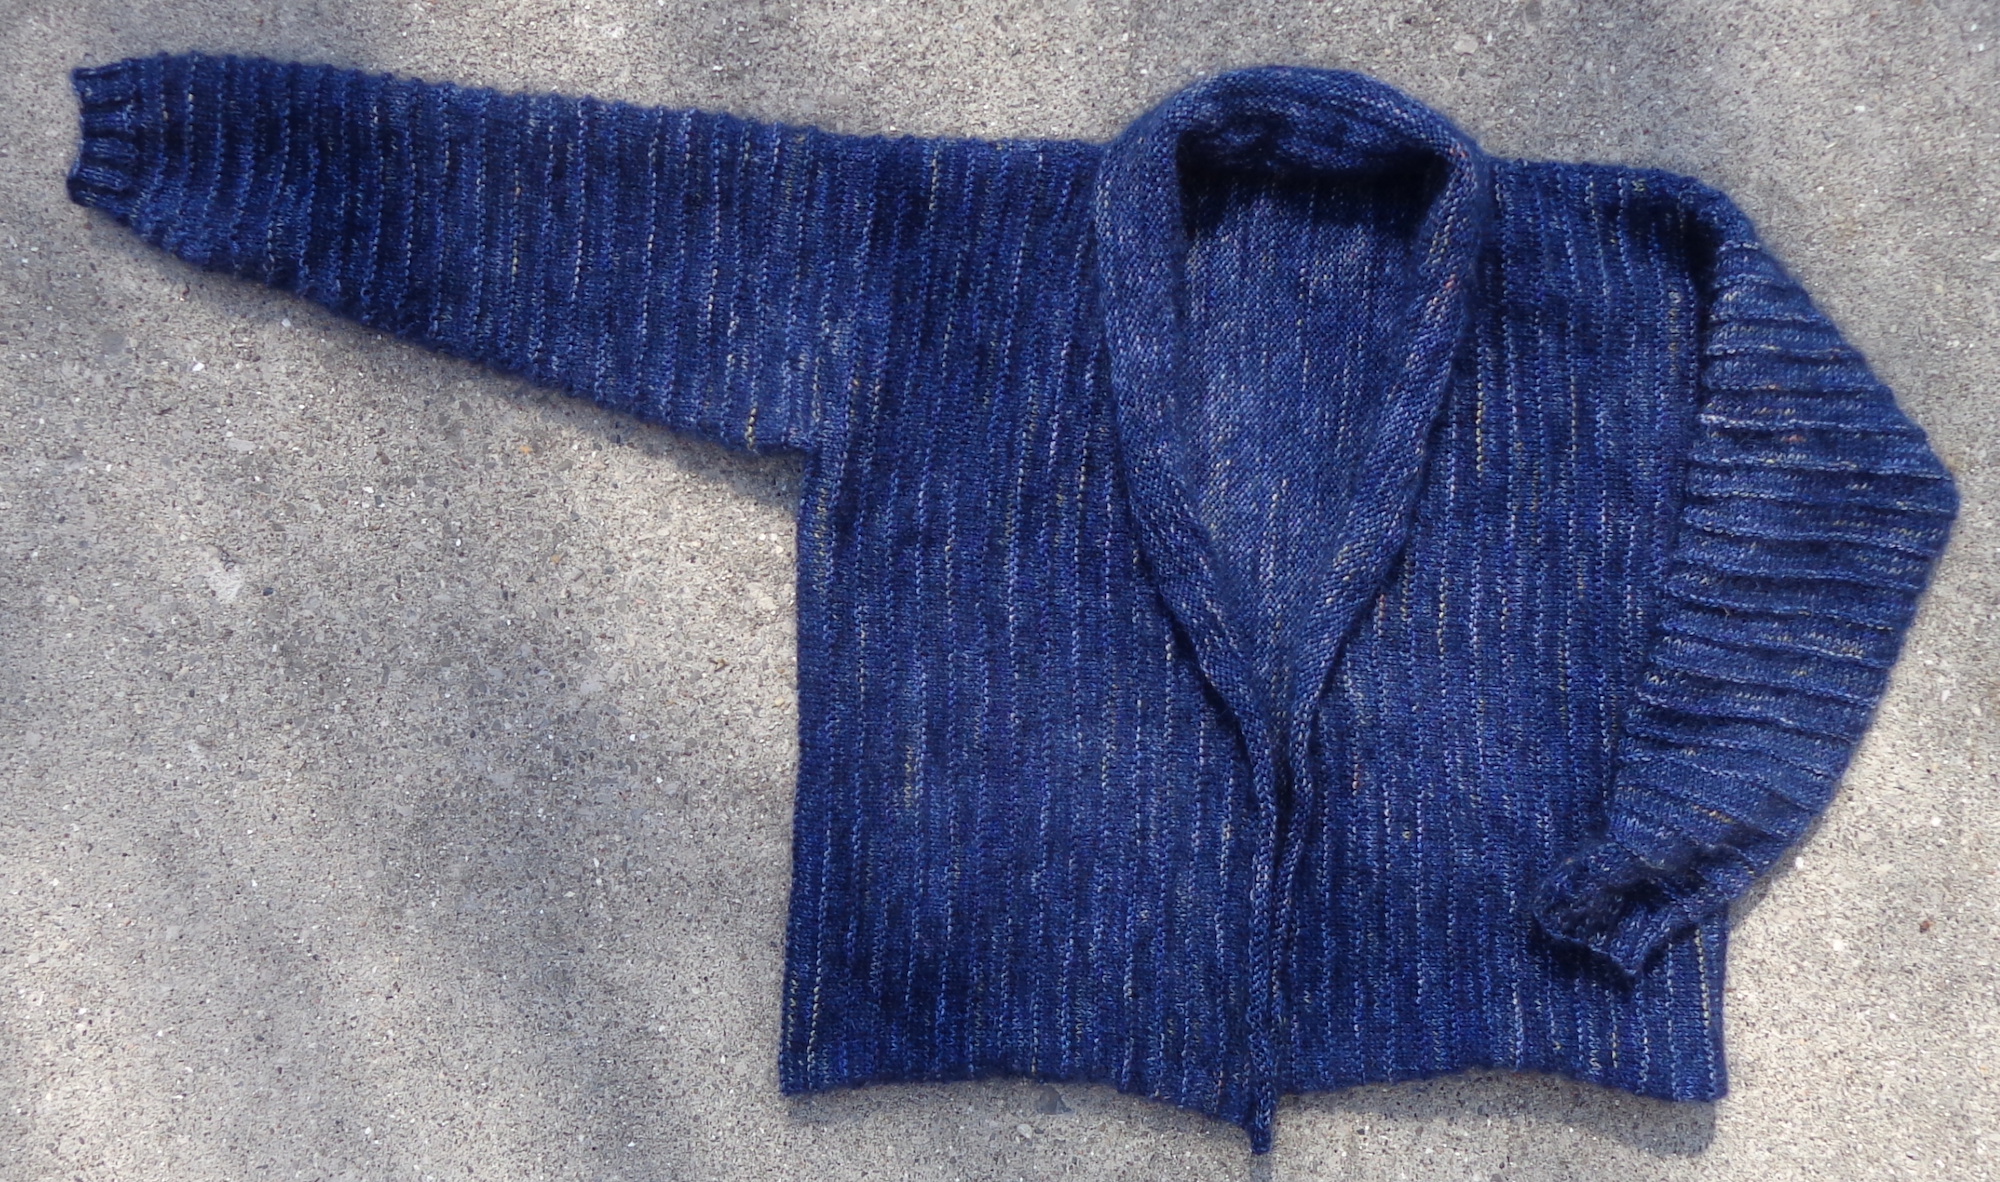
I started this project a year ago, in February 2022. (It was a free pattern then, but might not be so now.) I liked the design a lot but didn’t want to buy more yarn, so I shopped my stash. I came up with some Koigu KPPPM in a mixy blue and some Rowan Kidsilk Haze in Turkish Plum which matched. The resulting fabric is lovely and soft, with enough variation from the Koigu to make the colour interesting.
Mmm. Squishy goodness.
The construction is interesting. You can tell by the ridges that it’s a sideways knit. You cast on provisionally at what might be considered a sideseam, knit across the back, cast off stitches for the sleeve, then knit across one front. You put those stitches on a holder. You go back to the provisional cast-on to pick up enough stitches for the other front, then when it’s done, put them on a holder. You sew the shoulder seams, then start knitting those front stitches, up one side, pick up stitches across the back for the collar, then down the other front. This makes a self-rolling shawl collar after you knit five inches of it. Then you go back to each sleeve opening to pick up stitches and knit in the round, decreasing down to each cuff.
By the elbow of the second sleeve, I was sure that I would run out of yarn. I stopped knitting so I could look for something matchy-matchy at the Koigu tent sale in August. The best I could do was some solid-ish navy (it looks kettle-dyed) so I decided to use it on the cuffs and the front edge of the collar, if necessary. I frogged a lot of the collar to be sure I had enough Koigu for the second sleeve. By this time, I’d lost momentum and the project sat. As is so often the case, I picked it up finally and finished it in a couple of evenings.
And – ha! – I didn’t run out of yarn. I took the remaining Koigu and knit on the collar until it was gone.
Here’s Halo completed.
Morning sunlight through the tree branches makes for dappled light and shadow. 🙂
Mine came out a bit smaller than anticipated. I made the larger size, which meant it should have been 25″ long and 48″ wide. There’s no row gauge specified, probably because it’s stretchy, but the stitch gauge is 20 sts to 4″. Mine is right on, but my sweater is 22″ long and 42″ wide. So, if and when I make another of these cardigans, I’ll add 15 stitches to the length and 7 or 8 repeats to the width, probably 4 across the back and 4 on each front.
I’m thinking I might knit a second one of these rather than another Lunenberg-meets-Hebrides cardigan. I have more of the KPPPM in the teal colourway than I had of the navy, so that should work out well – plus I have KSH in Trance to knit with it. Or I might buy a Halo bundle from Fleece Artist and actually knit the sweater in the specified yarn. (Had to sit down for a minute there. Phew. What a concept.) We’ll see after I finish up a few projects still on the go.
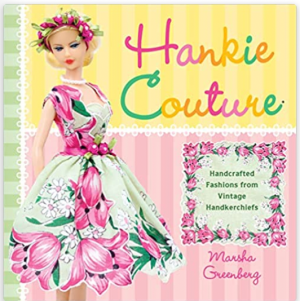
Hankie Couture is a book featuring dresses (and other outfits) made for Barbie (and other 11.5″ dolls) from vintage handkerchiefs. I’ve had this book for a few years now and finally found some hankies at the thrift store so I could experiment.
The image and the link above both go to the Amazon product page for the book. I have the paperback and (wow) it’s from 2011. I don’t think I’ve had it quite that long. Evidently there’s a new edition from 2019, too.
This book is very pretty, with LOTS of inspiration in the many many images of dolls styled with dresses etc. made from hankies. The disappointing thing is that it doesn’t have a ton of patterns, certainly not for all the outfits shown in the images. There are three bodices – a strapless bodice, a round-neck sleeveless bodice and a square-neck bodice with straps. All of these are attached to rectangular skirts. There’s a circle hat and a purse. All of these are pretty standard Barbie patterns – I have similar templates already in my stash. The one difference is that the strapless bodice pattern is way too big for Barbie. I used my repro vintage B as a model and usually modern patterns are too snug for her – she has the biggest bust of all Barbies – but I took half an inch out of the circumference of this pattern.
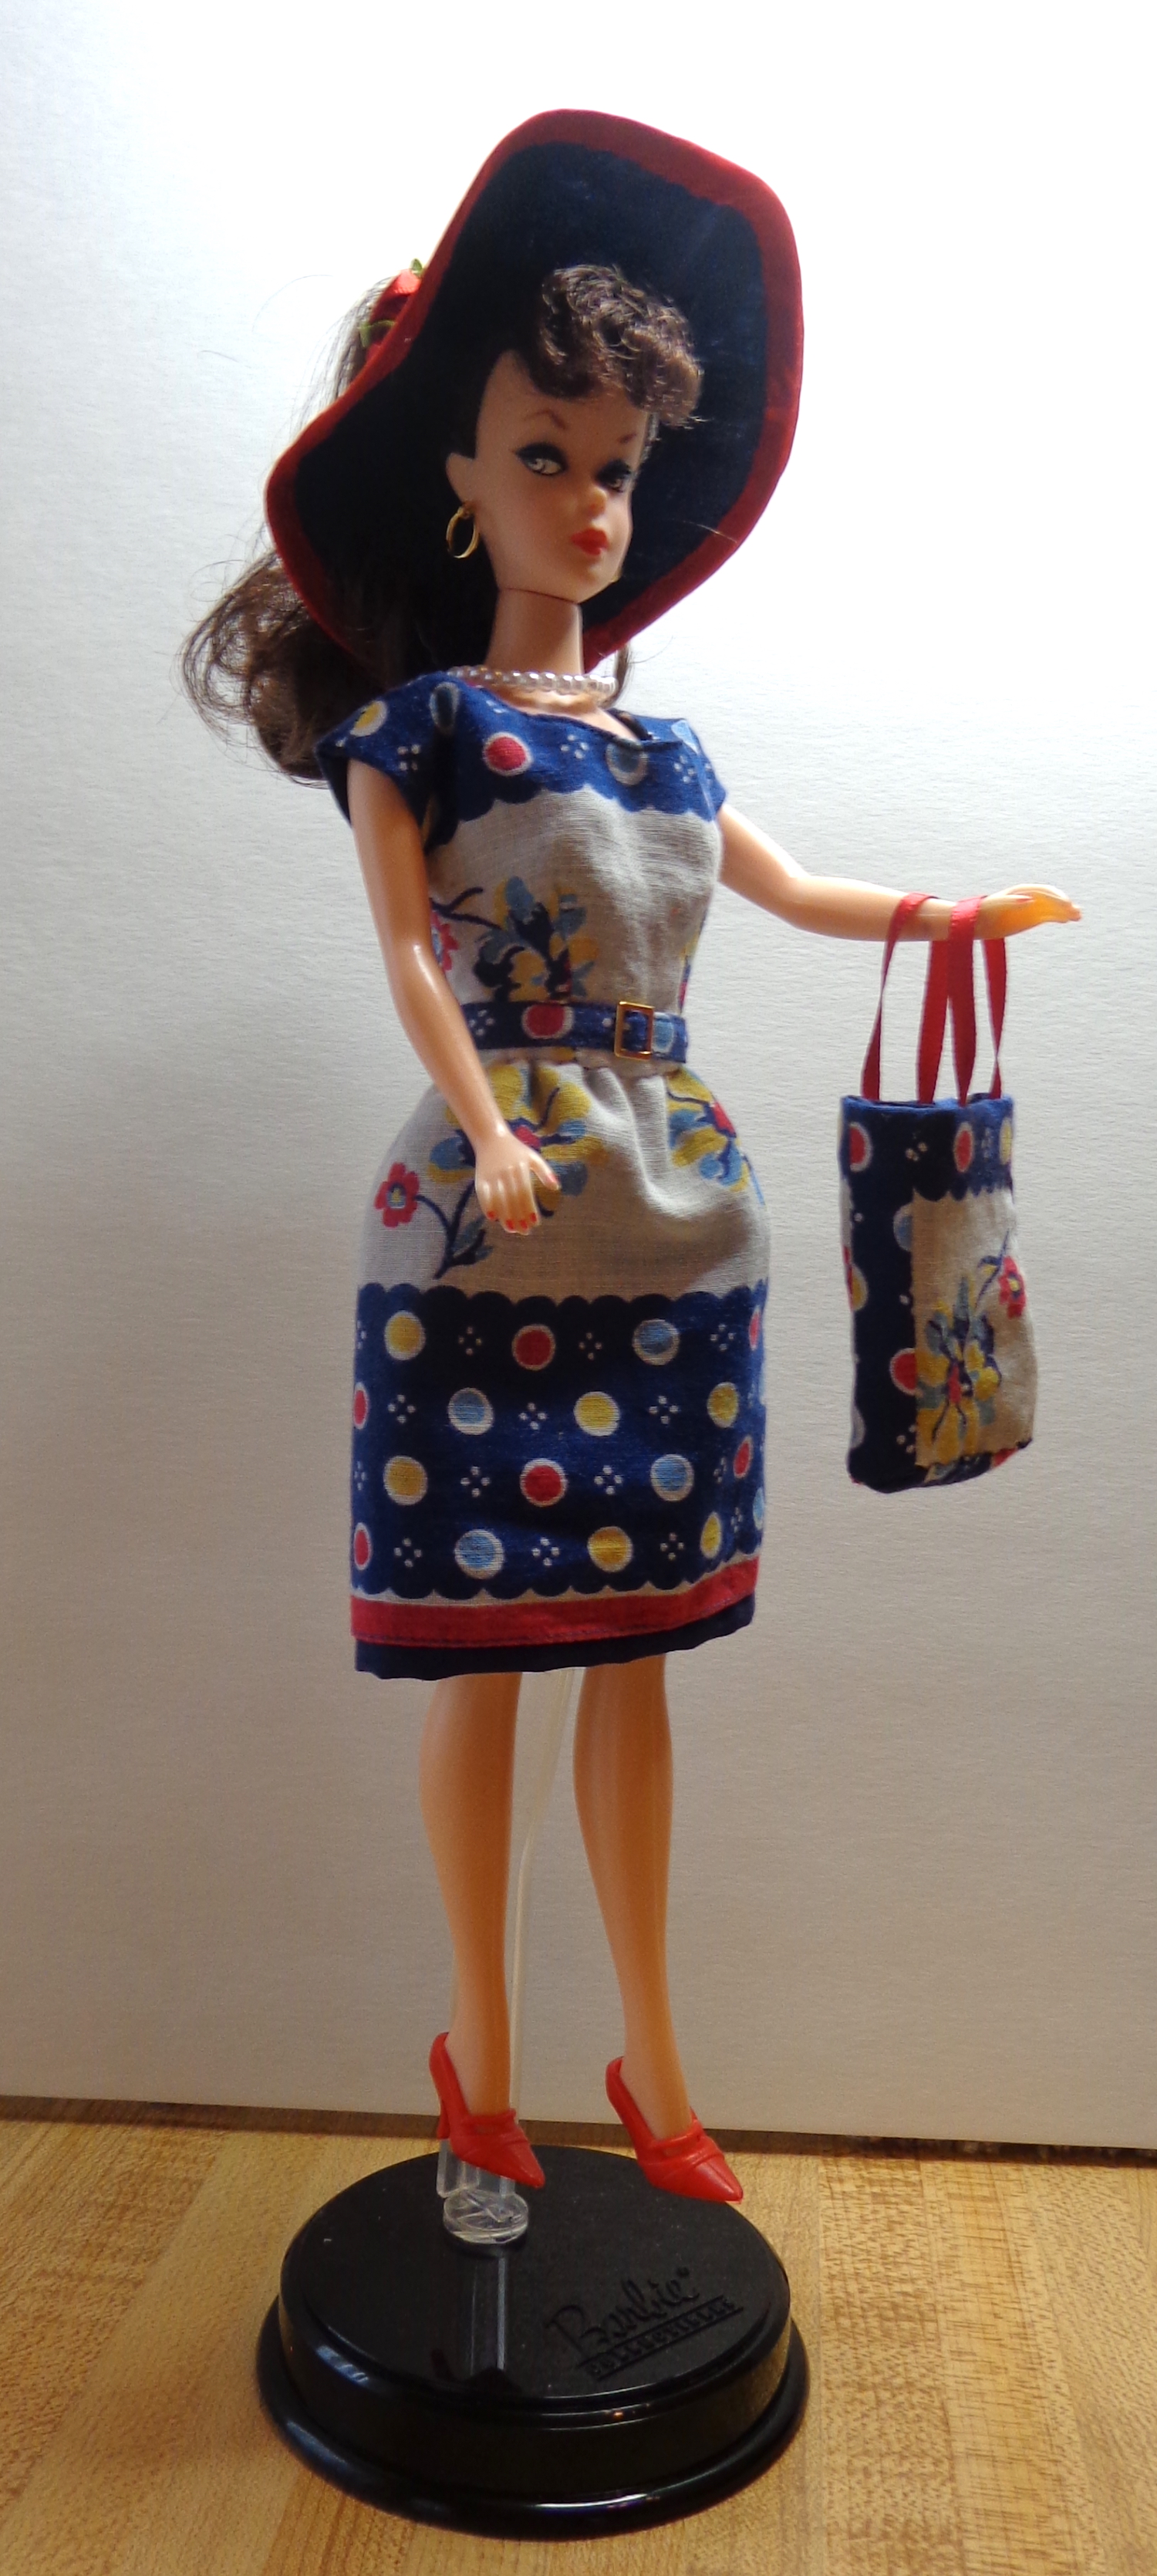
What did I make? Well, first I made the round neck dress from a hankie with a navy polka dot border.
Ha. This is fun. I photographed the outfits flat, the way Mattel used to sell outfits for B, then on the doll, too. Of course, I didn’t make the shoes but chose matchy ones from B’s shoe stash.
This hankie was a bit worn, so I used it first in case the dress didn’t come out well. I lined it with navy broadcloth, which makes it look a bit dull. It has a belt made of a narrow strip of the polka dots which is sewn on and has an in-scale buckle at the center front. I made a circle hat and a purse to go with it – the purse is lined and has ribbon handles – and think it came out pretty well.
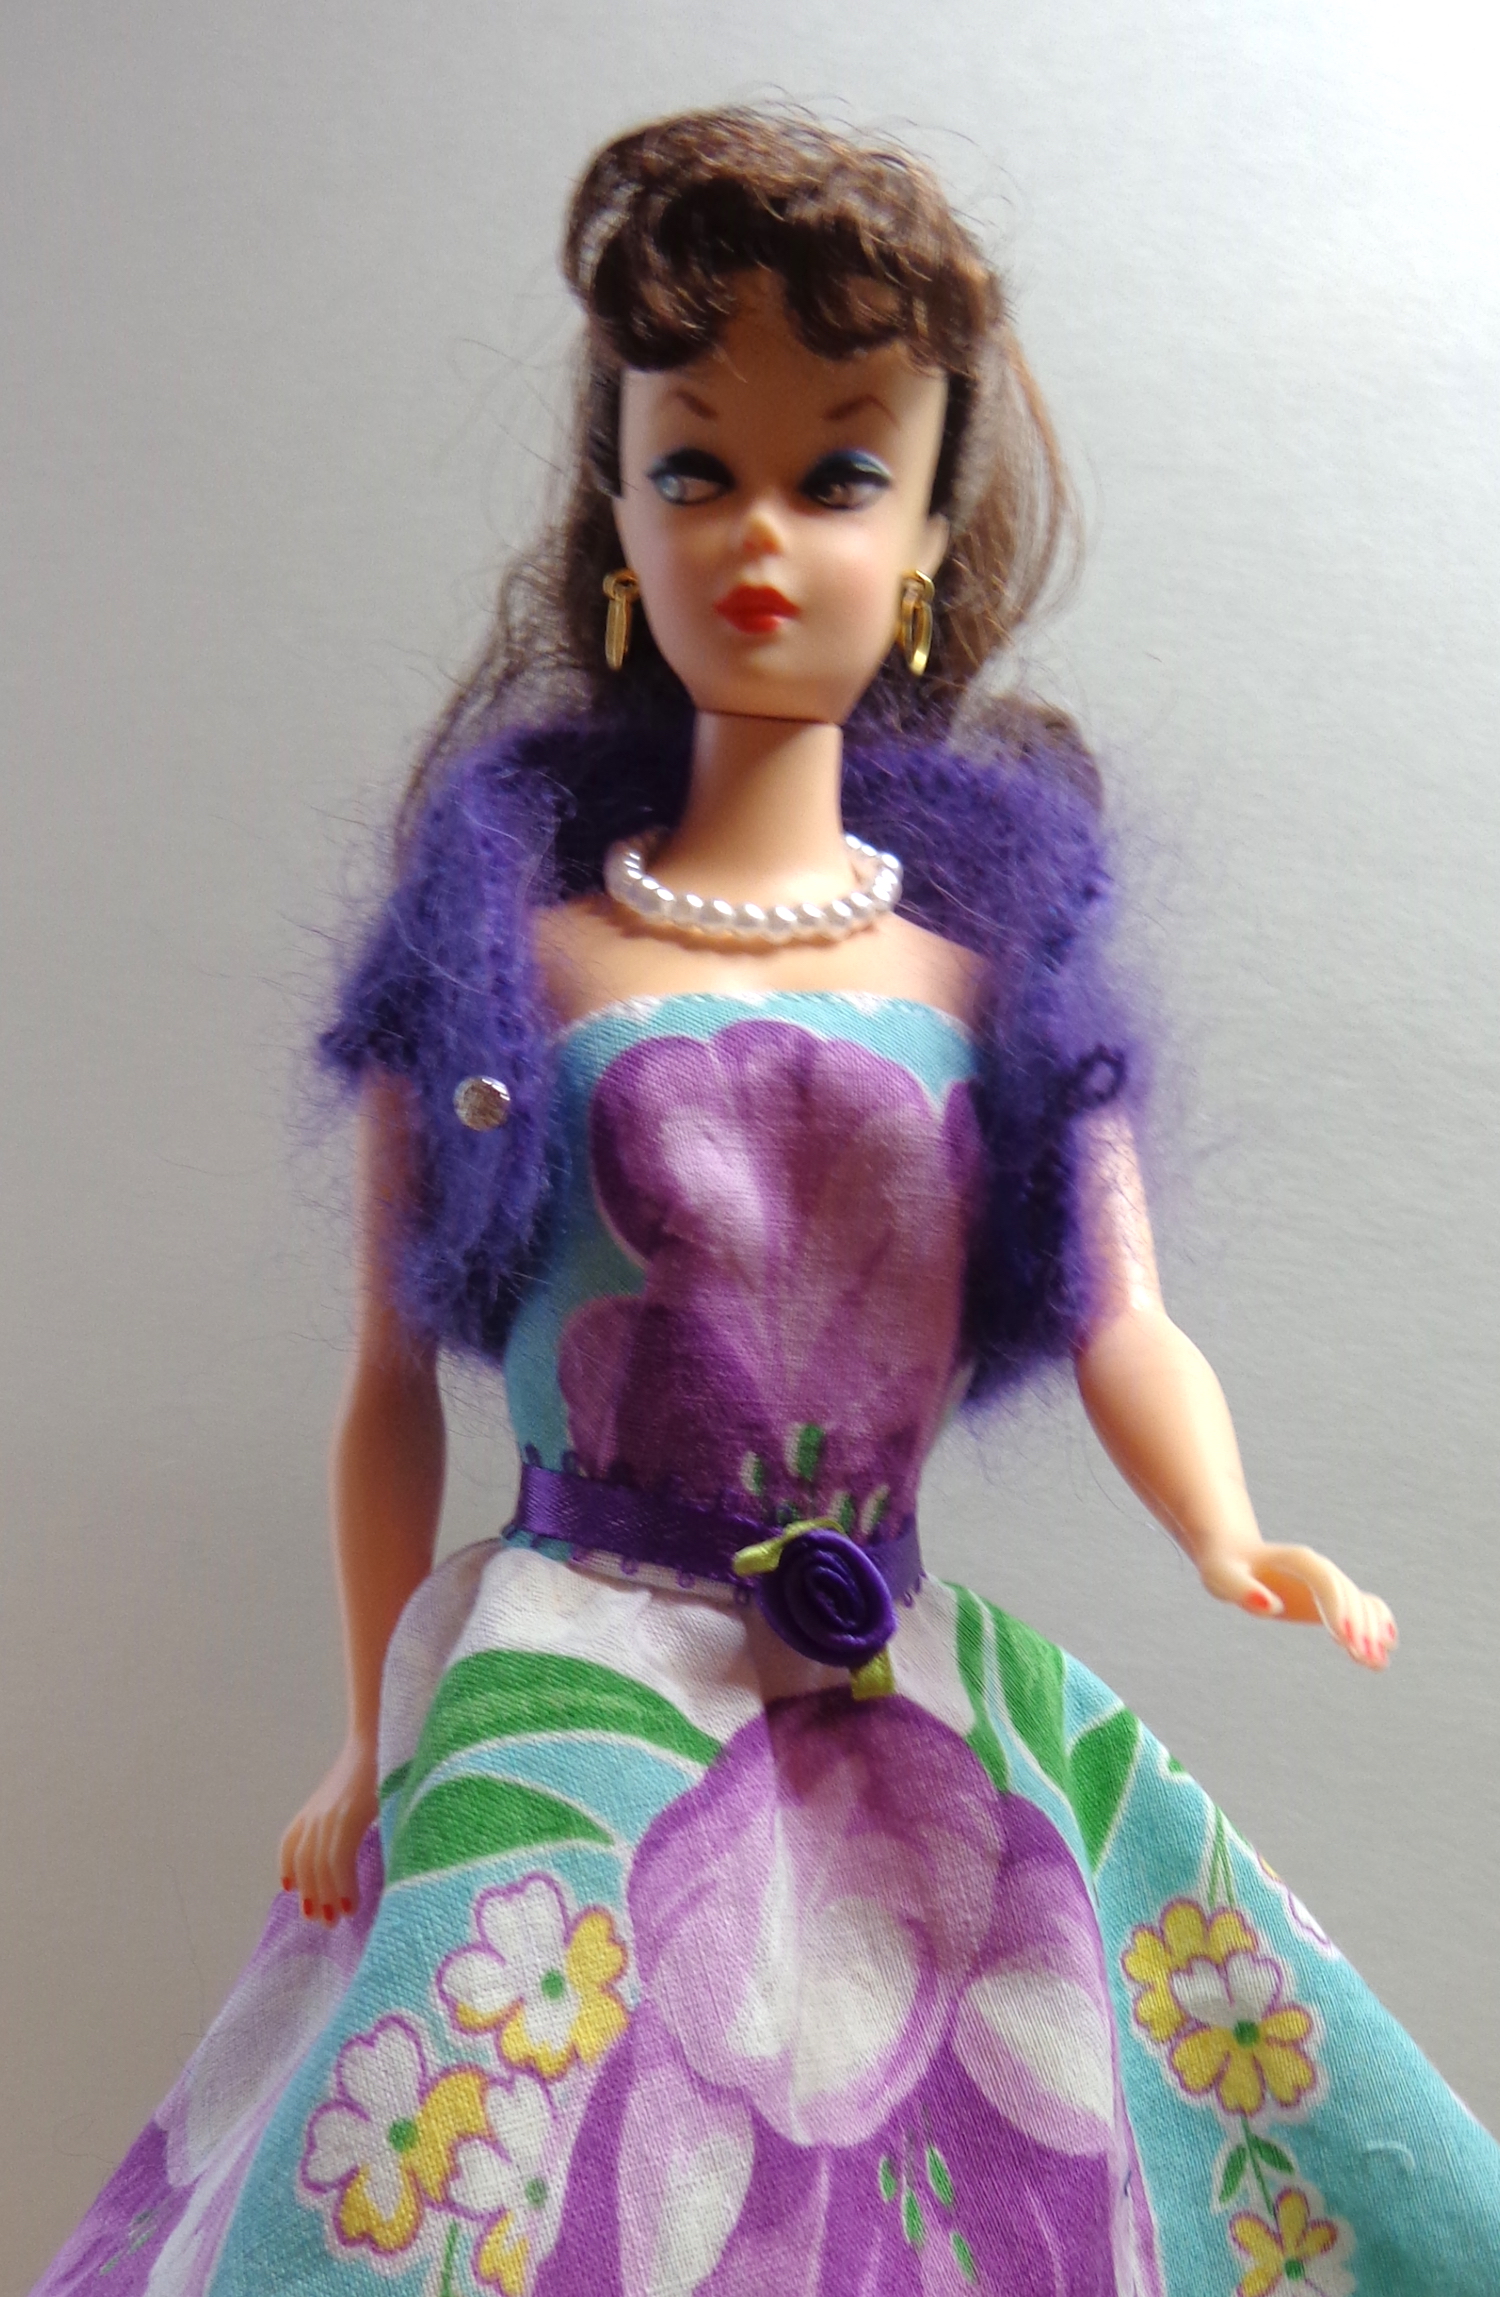
Then I made a strapless dress from a turquoise hankie with big purple tulips on it. The hankie had a circular design, so I cut it following the curve and made a half-circle skirt. The pattern almost matched at the center back seam! Unfortunately, the hem on the hankie was too close for me to keep the entire white scalloped border – later I realized I could have unpicked the original hem to get more seam allowance. Oh well. – but I sewed the hem with a scalloped hemming stitch which I like.
This was the bodice that was too big – I was sewing on the snaps after doing all the finishing when I realized as much (grrr) so picked it all back and fixed it, adding a petticoat to the skirt at the same time since I had the waist taken apart. The petticoat is the striped part of hankie that I used to line the bodice with a bit of lace sewn on the hem. I still think the bodice is too long for her in the front, but will use another pattern in future.
I wanted to add a little bolero jacket but couldn’t find a pattern. There were two corners with a floral motif from the hankie after cutting the circular skirt, so I trimmed them into a curve and sewed them together for a shawl collar. I made up the rest of the jacket pattern and it came out reasonably well, considering that I’ve never done that before. I’ll tweak it before I make another. It needs a little more ease through the shoulders. There was nothing left for a purse, since the hankie had some stains, but she looks happy enough.
She also reminded me that she could wear this dress with her Kidsilk Haze shrug, which is all true.
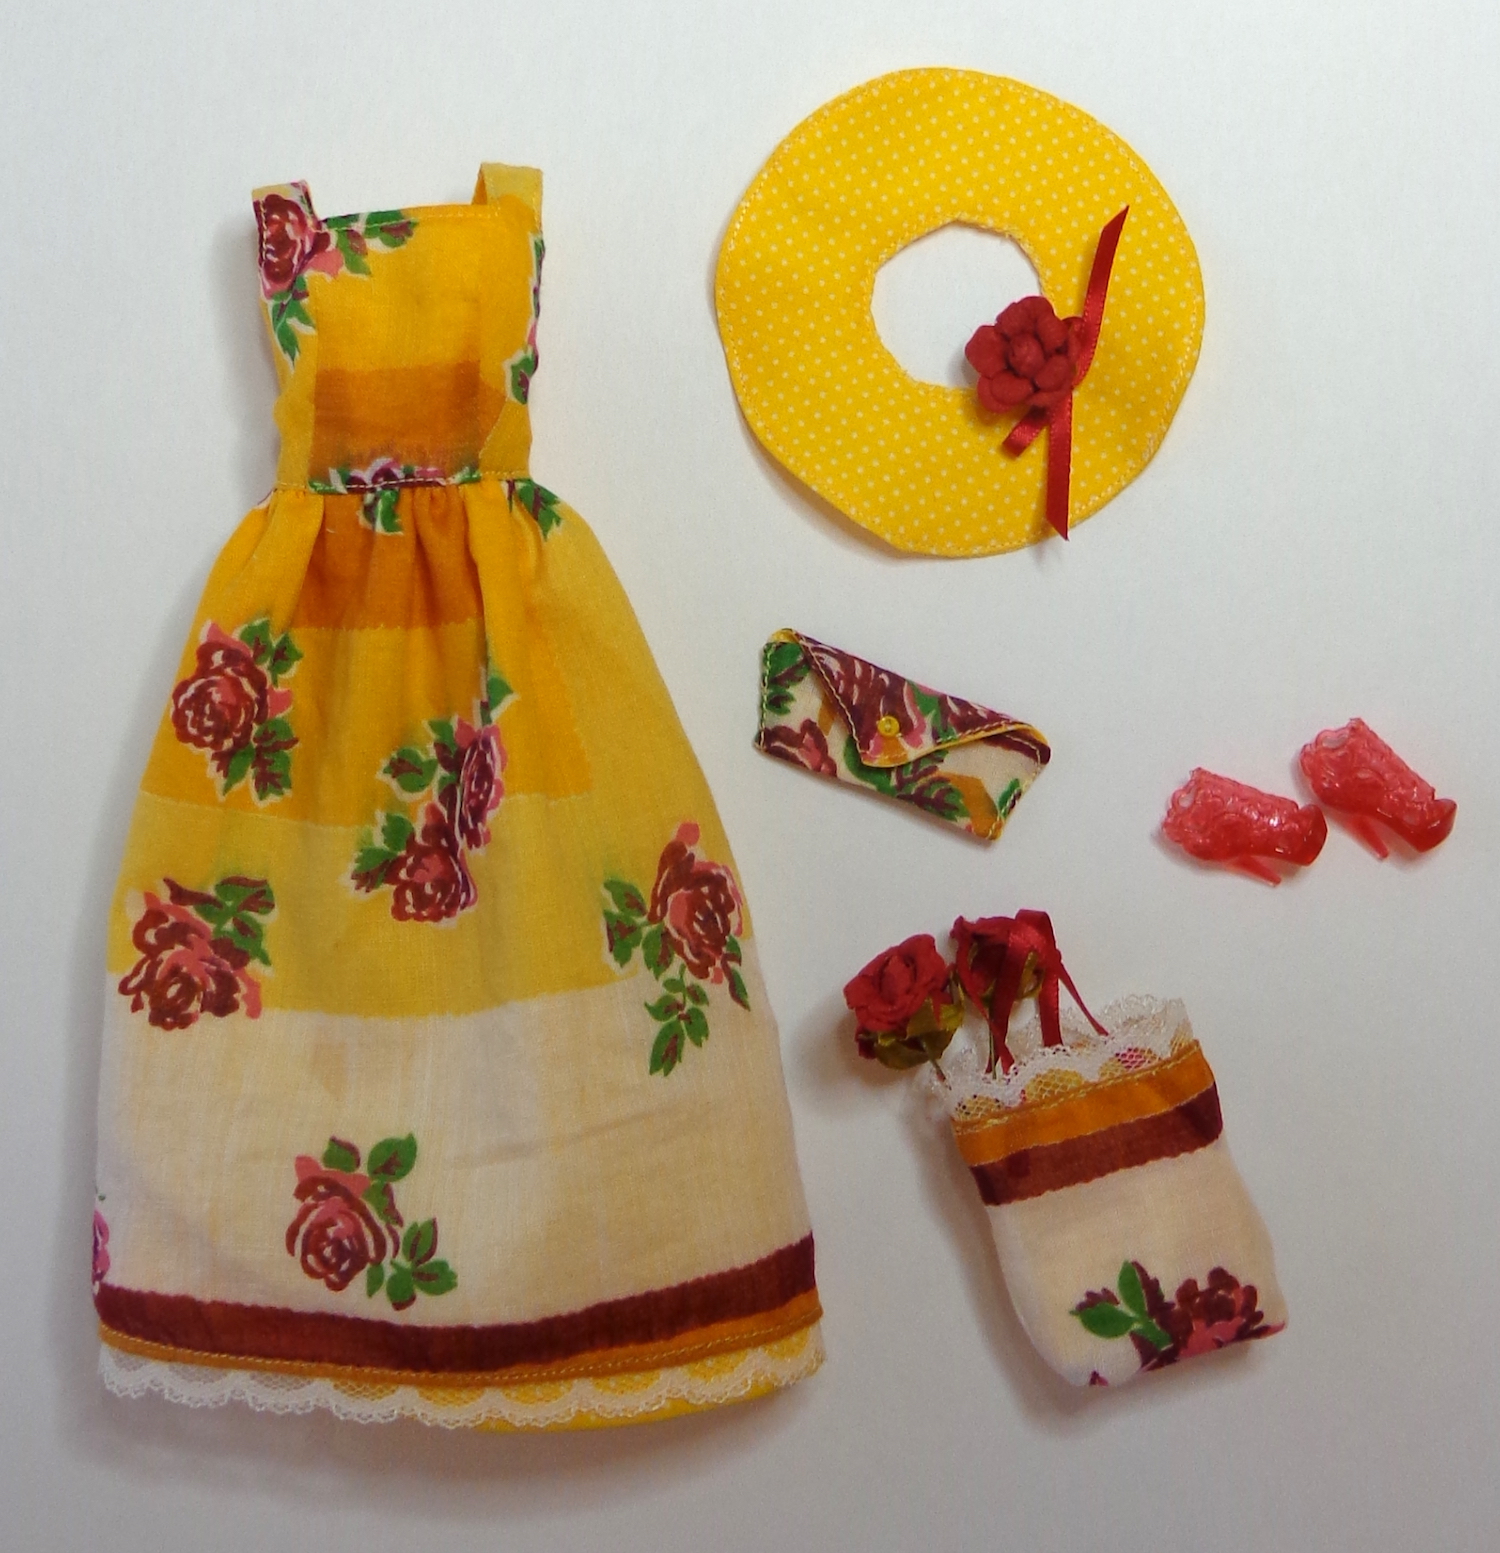
Next, I tried the third and final bodice pattern. It’s identical to one I have from another pattern for B, so I knew it would fit. This time, B got a hat, a clutch purse and a bigger tote bag.
I put lace on the hem of the skirt and the edge of the tote bag, and used that yellow polka dot cotton as contrast. This one came out particularly well, IMO, but the hankie was really pretty. Bonus that I had red flowers in my stash that perfectly matched the ones on the hankie!
I folded up a tissue to put in the tote bag, to give it a bit of ballast against the top-heavy flowers. Mr. Math peeked inside then said “ah! she’s been to the fabric store!” which made me laugh.
Here are the two hats, which I made slightly differently. The hat with an open top is kind of an established style for B, not just because some have a ponytail like mine. It’s hard to make a closed hat fit B’s head and not look ginormous, because usually B has a lot of hair.
The one on the left is more like the instructions in the book – except that the author recommends a zigzag edge around the inner circle which would leave a raw edge. I turned in the edges instead (fiddle fiddle) then top-stitched around it. For the navy hat, I made a hat band of contrasting fabric, then sewed the two brims together along the seam line. I hand-sewed one edge of hat band to the flat brims of the hat, using that stitching line as a guide, then clipped the curves and put all the seam allowances insde the hat band before sewing the other edge over it all. I’m much MUCH happier with this version, although it was finicky. I also bound the outer edge of the navy one with a contrasting self-cut piece of bias – sewn to the outside, pressed very narrow, and hand sewn on the inside – and I like that too. (Even though, yes, there are a couple of red stitches showing on the outside where I made the binding wider on the inside.) In either case, there was a bunch of hand sewing to assemble the hat.
All in all, this was an interesting adventure. They’re fiddly makes, because they have to be completely lined, but I had fun. Of course, I have another one cut out on my sewing table, but then I’ll head back to sewing for the bigger dolls (or maybe even myself!)
I haven’t been watching tv at night during the past month, which means I haven’t been knitting in the evenings. This has slowed my progress a lot, but I’m casting off a sweater this week that I’ll be able to show you next week. Another one coming off the needles!
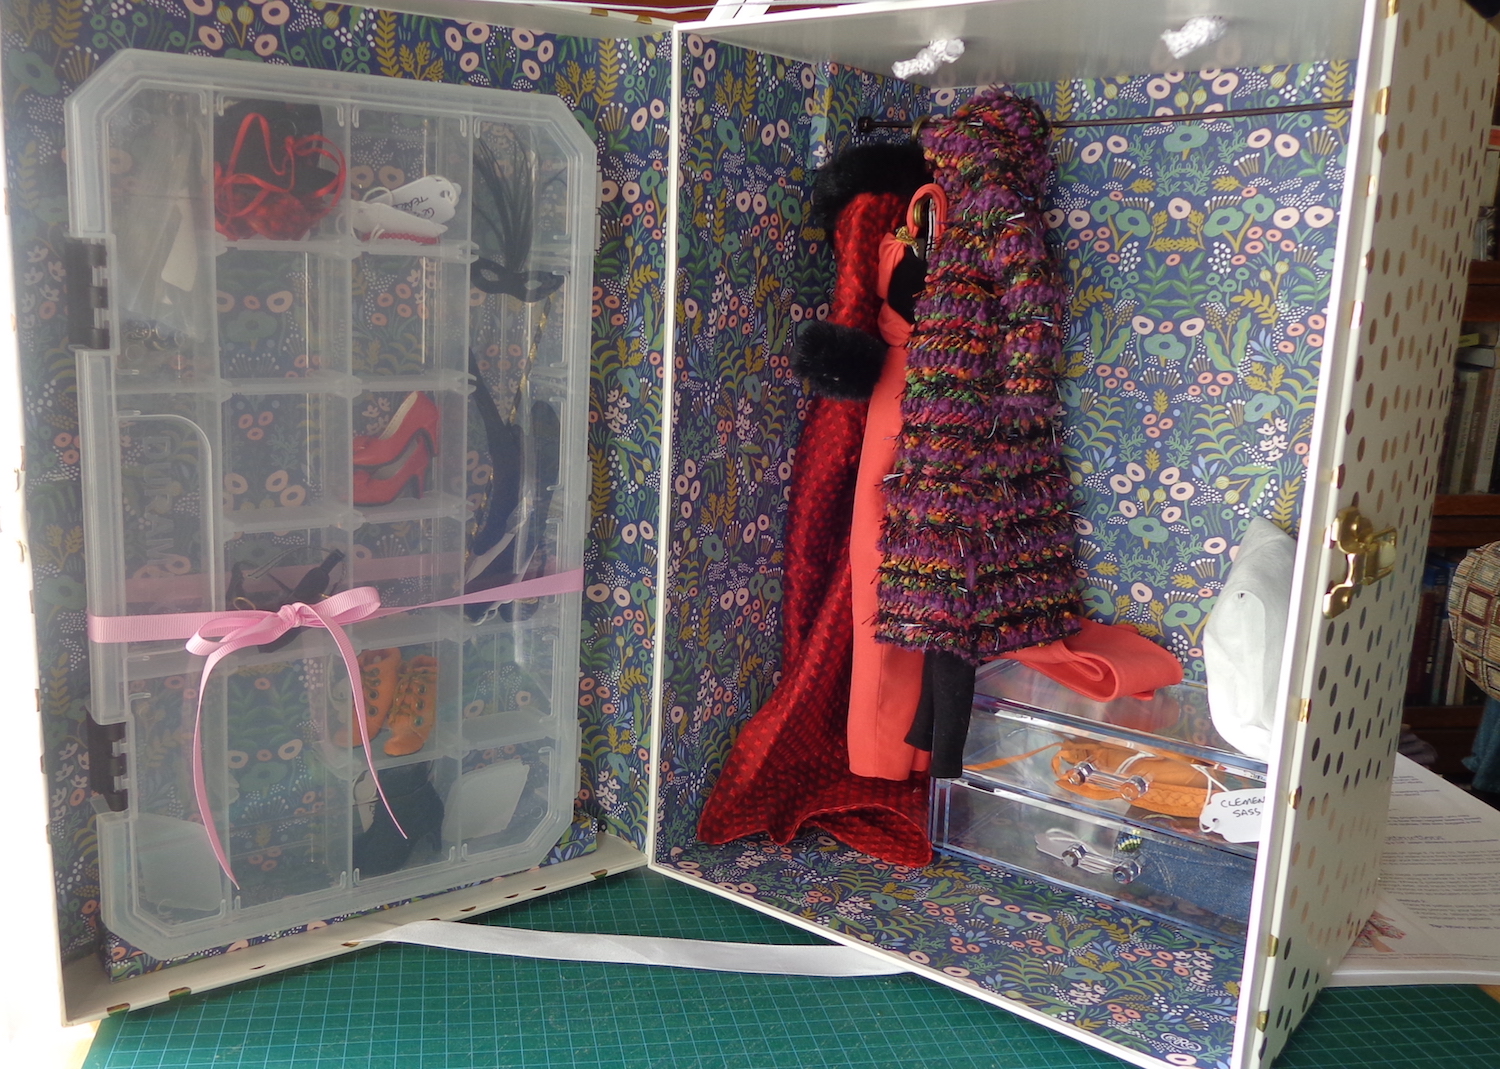
I have some new girls and have started to sew for them. They’re 16″ fashion dolls – I have three Tyler Wentworth dolls and two Alexandra Fairchild Ford dolls. (No doubt there will be more.) Here’s the first one who arrived – she’s Tyler Wentworth Opera Gala and she’s standing in front of the first of two wardrobes I’m building for the clothes of these girls:
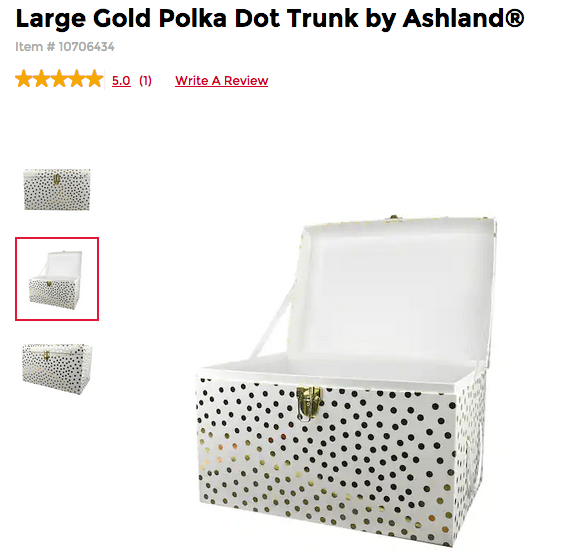
The wardrobe is a chest from Michaels, which is standing on one side. (It’s the Large Gold Polka Dot Trunk from Ashland. That’s a Michaels Canada link, which will probably go 404 once they’ve sold out of this box, so I’ve included a screen shot of it here.) It has rope handles that knot inside – easy-peasy, I untied one and threaded it through the top eyelets to double the handle there. The eyelets on the bottom are covered by the paper lining. I put felt feet on the bottom, too.
This one was much easier to change to a wardrobe than the one I used for Barbie – and even better, the exterior print is just dots, so it doesn’t look like I turned it sideways. (If you remember the wardrobe for Barbie, the Eiffel Tower on the lid ended up on its side, so I had to paper the front, too.) Inside is one of those cosmetic storage drawer units from the dollar store, which is perfect for purses and belts. In this pic, I haven’t hung the bars for the hangers yet.
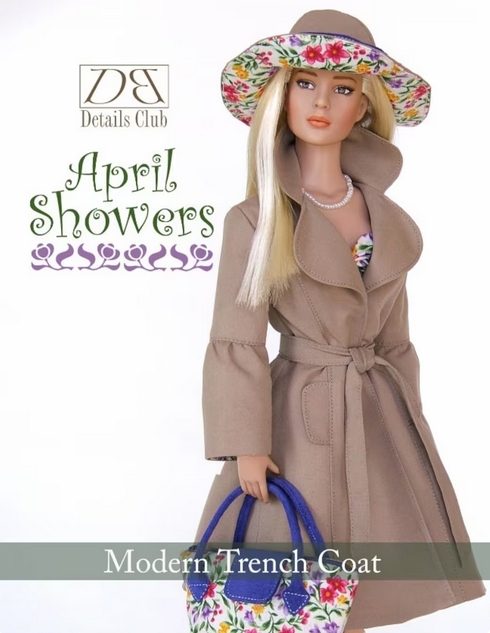
Here’s the pattern I’ve been sewing. It’s a DBDoll pattern called April Showers: Modern Trenchcoat, which has ruffled sleeves. That link is to Etsy, where I bought the pattern. (The hat, purse, and dress patterns are also available but are sold separately, which diminishes the chance of my buying them. I wish they offered a bundle of all four, but they don’t.)
It’s a very good pattern with lots of helpful suggestions for the construction. I learned some new tricks from it!
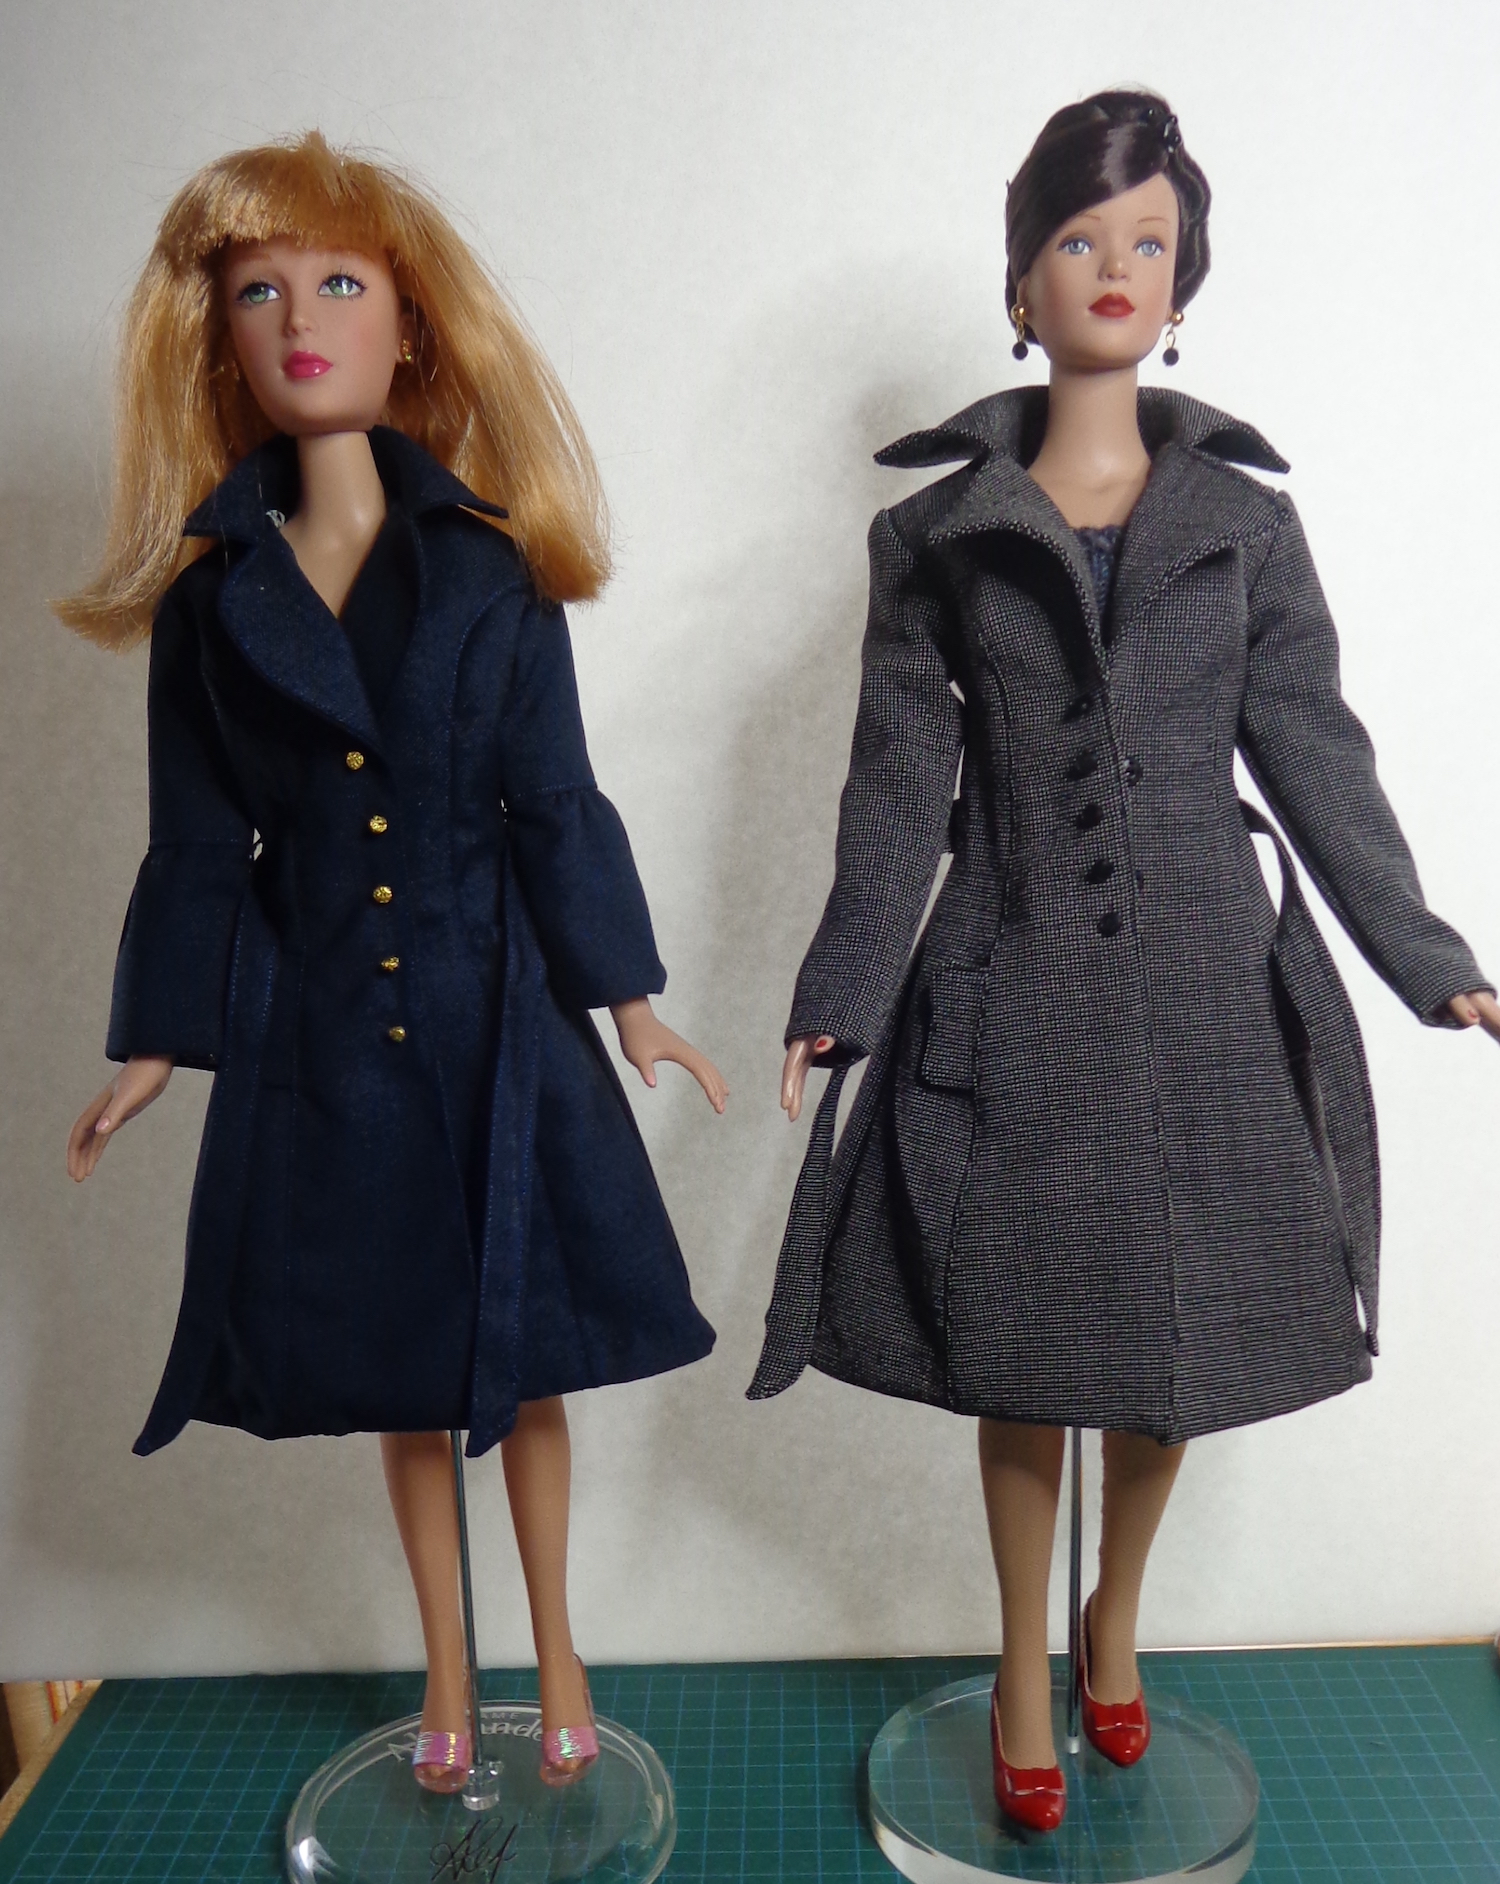
Below are my first two raincoats. The navy one on the left was made with the pattern as is. The interesting thing about 16″ dolls is that their proportions aren’t all the same (of course not!) and you can see that this coat is a bit short in the sleeves and the length for Tyler. It still needs the hem sewn in this picture, btw. (Yup, those are pins.) The fabric is a mystery-content that seems like outerwear in scale. It must have a lot of polyester because it was miserable to iron. The lining, which you can’t see, is a floral Liberty Tana Lawn.
I made some modifications for the coat on the right, cut of another mystery fabric which has a perfect pattern in scale. It’s black and white, literally one thread in each color alternating, and looks like a tiny check. It wonks out my eyes a bit to topstitch on this fabric, but it looks great in scale. (I made a suit for Barbie of it, too.) I made some modifications for this coat: I lengthened the coat by 1/2″ and moved the pocket flaps down 1/2″. I also made the lapels and collar pointed instead of rounded and changed out the ruffled sleeve for a plain one.
For that, I used the basic sleeve from Fashion Doll Clothing by Rosemarie Ionker. (That’s an Amazon link.) I traced the sleeve cap from the raincoat pattern, then used the basic sleeve from the book to draw the sleeve down to the cuff. This is a book I bought a few years ago, thinking it would have patterns for Barbie and other 11.5″ fashion dolls. Most of the patterns are actually for 16″ dolls, and the book was my first discovery of them. The patterns for smaller dolls are for Tonner dolls, like Tiny Kitty Collier, so the proportions are different than for Barbie etc. This sleeve turned out to be a teeny tiny bit too long on the raincoat, so I’ll trim it back for the next version.
This book also includes two different blocks for 16″ dolls. One fits the body sculpt of Alexandra Fairchild Ford and the other fits Tyler Wentworth. Comparing these shows that Tyler is almost 1/2″ longer in the torso, arms and legs than Alexandra Fairchild Ford. Their feet are also different sizes (AFF’s are smaller) so they can’t share shoes. Once again, people refer to 16″ dolls as if they’re all the same (like 11.5″ dolls) while in reality, there is a lot of variation.
As anticipated, the navy raincoat fits Alex perfectly. Here are the two finished raincoats, with Alexandra Fairchild Ford on the left and Tyler on the right. (AFF has a tendency to be tippy on her stand, which makes me wonder whether its proportions might be better for a doll with longer legs, like Tyler. It is her stand, though, with the AFF logo, so that’s odd.) I added thread loops for the belts at the side seams so they don’t go missing.
The raincoat has a pleat in the back and a lot of topstitching on the seams, which results in a very elegant coat. I’m not fussed about the hemming, but used fusible interfacing to stabilize the edge of the grey one and that came out better. I’ll play with some other finishes.
Because, of course, there will be more raincoats. I have a longer pink one with the rounded lapels and ruffled sleeves – so my blonde Tyler can have her own raincoat – and plan to make an even longer fake-leather one for my third Tyler doll, who is going to dress with a bit more verve. I’ll show you those when they’re done, and we’ll see what happens after that. It’s easy to look at my fabric stash and imagine even more combinations!
Here’s another picture of the wardrobe in progress. It’s good that I bought them BOGO as clearly Tyler and Alex need their own stashes of clothes and shoes. It’ll be good to keep them separated, though the girls will probably borrow each other’s purses.
I have to replace the hanger bar in this one – I used a bamboo skewer (painted with marker) just the way I did with the Barbie wardrobe, but it’s too flimsy. I’ll replace it with a wooden dowel. Tied inside the lid (or door) is an organizer from the dollar store which is perfect for shoes etc. The dividers can be removed when I need a larger space. I thought of gluing it in, but Mr. Math was skeptical that any glue would hold that hard plastic, especially with a lot of opening and closing. I glued in the ribbon instead, then covered a little block at the bottom in the interior wallpaper. That raises the organizer so the lid/door of the case closes more easily. This solution works very well.
A few weeks ago, I decided to take apart a sweater that I’ve never worn, one knitted some thirty years ago. The post about that was The Turquoise Pullover.
Here’s the first repurposing of the yarn.
I took all the bouclé and knit a scarf in garter stitch. This isn’t a fancy or complicated project, but the garter stitch—and the larger needles—really show off the yarn, I think. You can see all the colours at this looser gauge.
It’s about 10″ wide and 54″ long, and used every inch of the yarn – I just wove in the ends until they vanished and carried on. Where the yarn was thin, I doubled it up, which diminished the thick-and-thiness of it a bit. You can see that there’s inconsistency but this isn’t a reflection of the spinner’s skill – when I frogged this yarn, the loose single ply structure worked against me and this yarn pulled out to be thinner. I tried to be careful, but the yarn’s consistency still suffered. You can see that the boules were stretched out to the vanishing point in some places.
The uneven texture makes it look like a first project to me, which is kind of funny. Why? Because the needles were wooden ones, actually the ones my grandmother gave me when she taught me to knit. I was four. They’re bigger than 6.0mm and smaller than 6.5mm, so maybe someone made them for her. I like the patina on them and the memories they stir up.
Come to think of it, she taught me to knit with a pink yarn that was slightly thick and thin. I knit a scarf for one of my dolls that was about four inches wide, if memory serves, in garter stitch.
For this one, I cast on and cast off with the coordinating silk blend to make a neater edge, and did a couple of rows at each end in garter stitch with that yarn.
It’s a very thick and warm scarf, but not too long. Crossed in front, it covers my neck right up to my chin. It’ll be perfect under a coat next winter. I thought about a fringe or tassels in the contrasting yarn, but it’s all kinky from being frogged right now. I’ll see how much of it is left after I finish the cowl and may embellish this scarf then.
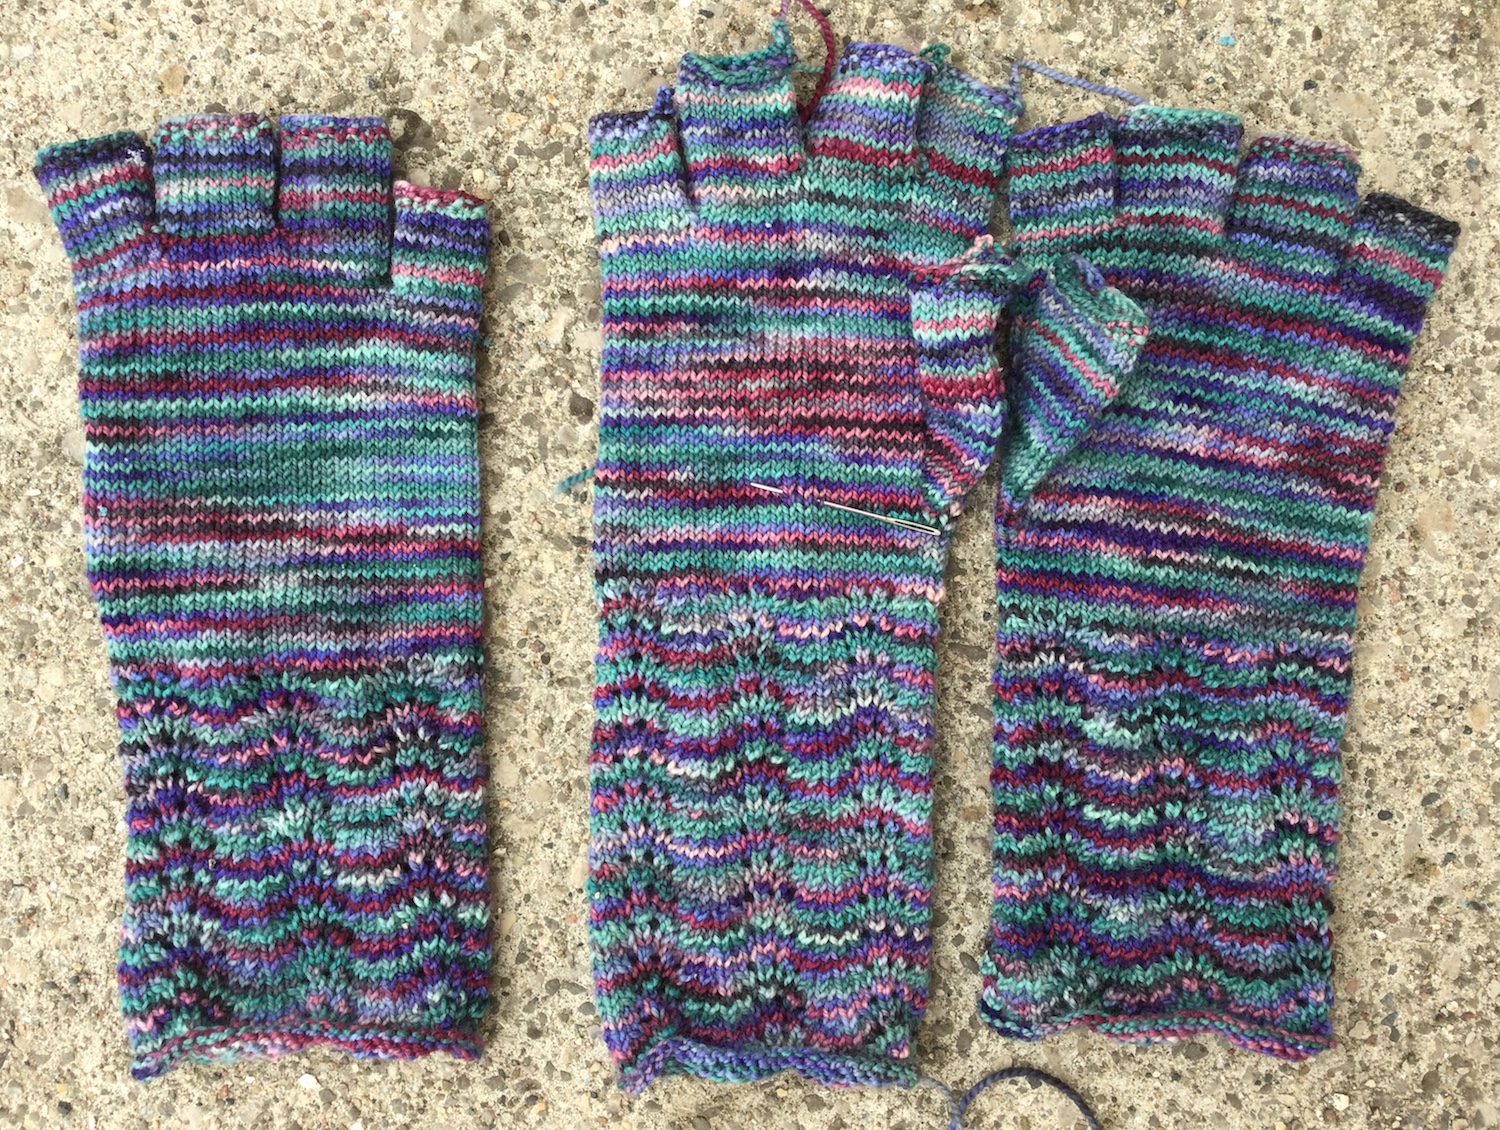
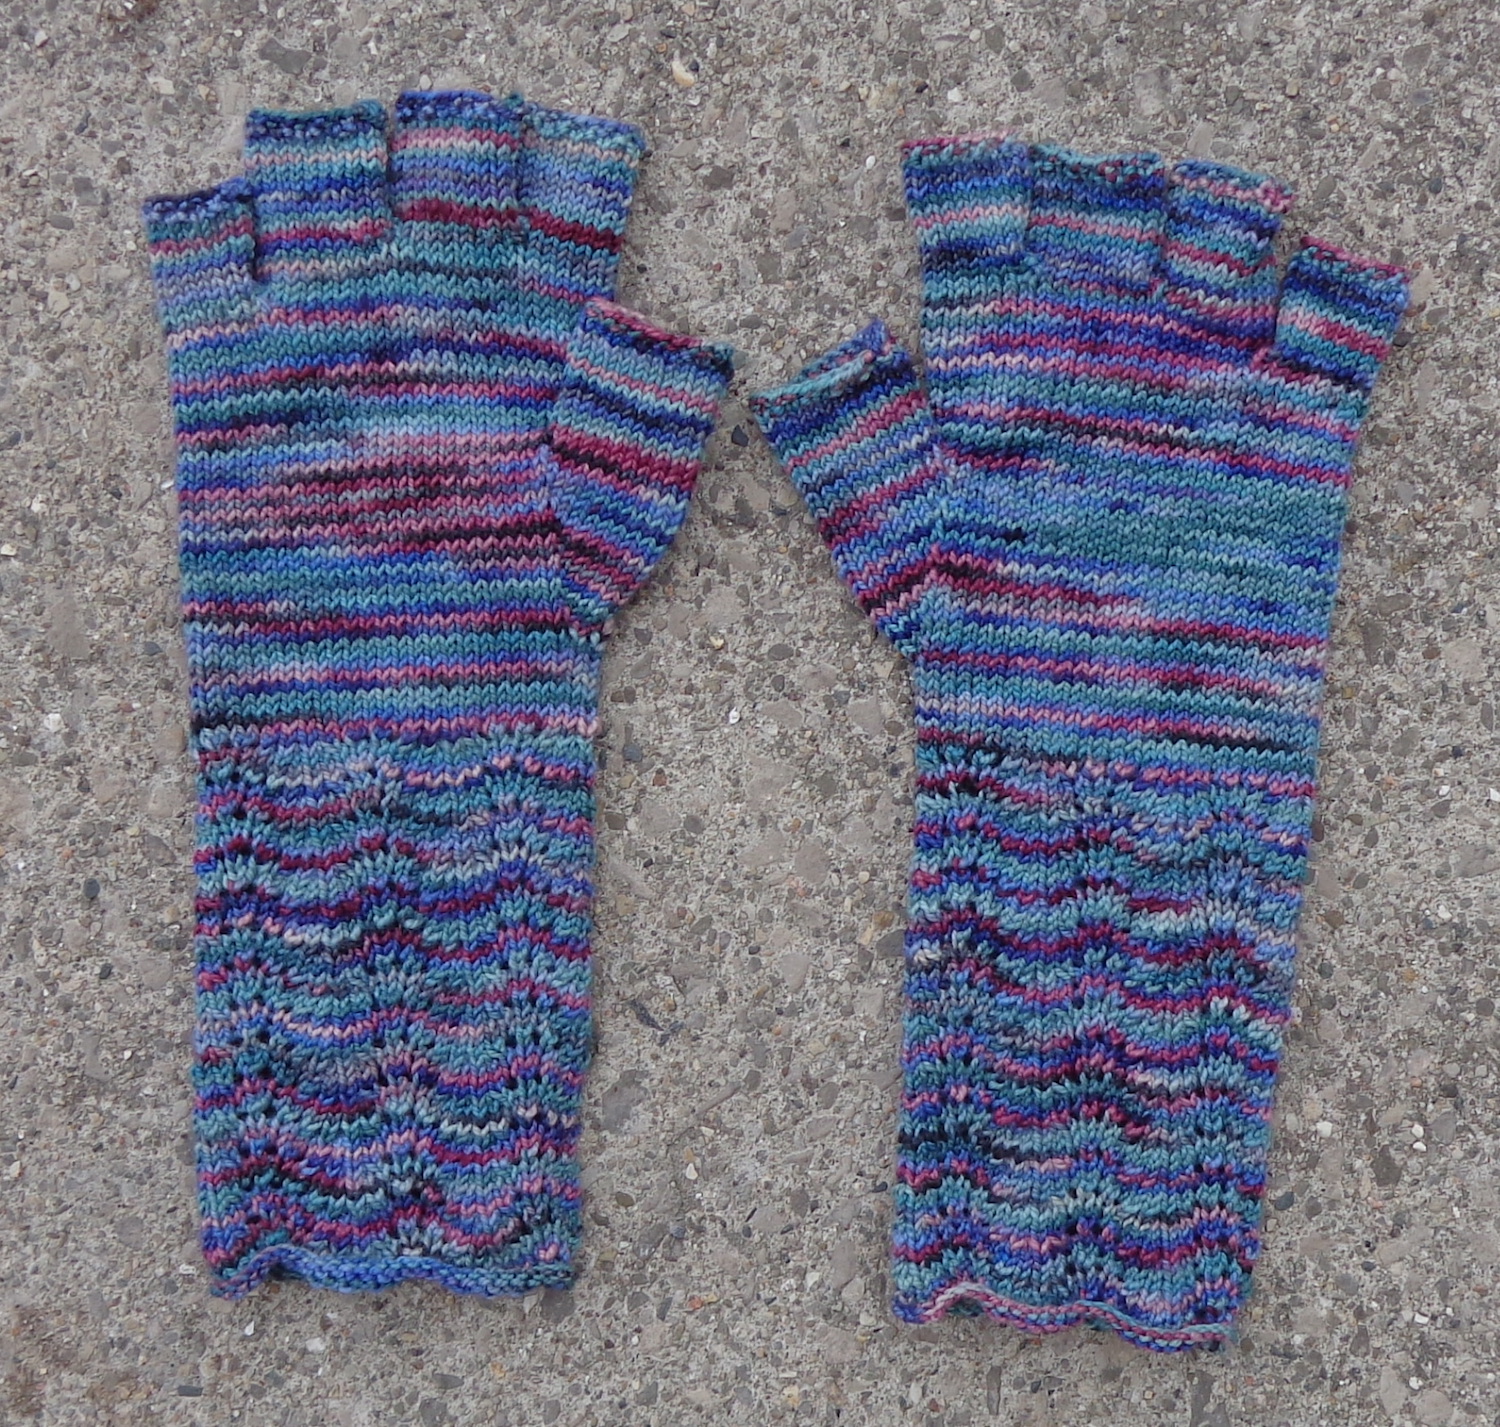
This is a pattern from Fleece Artist to make fingerless gloves called Fairy Fingers. Fairy fingers is also an old term for foxglove flowers. As seems to be happening a lot lately, I made my first pair from Koigu KPPPM. (They were done last week, but a gift, so I couldn’t show you before the recipient saw them!)
Here they are:
This is the colourway that made a swirl in my teal Navelli so was frogged and returned to the stash as a result. I wasn’t sure what it would do in these gloves and was pleasantly surprised by the result. The colourway is P528. Here’s the other side of them:
I did only 12 repeats of the pattern on the cuff instead of the 15 specified.
The pattern calls for 2.75mm needles but I thought the cuff looked too loose, so I went down to 2.5mm needles. I really like the fabric that resulted, but this might make the gloves too small for some people. They fit me perfectly 🙂 which is inevitable since they were a gift.
I did end up with a pair for myself, though. When I cast on the second glove from a different skein of Koigu, it didn’t look like it would match the first one. I knit one with 15 repeats in the cuff then and made a second pair, which I kept. You can see that glove in the middle here – doesn’t it look a bit lighter than the outside two?
Instead of using a second skein, I went back and cast on the second of the shorter gloves from the leftovers of the first skein, to make sure it matched. Koigu comes in skeins of 50g and the first short glove used 28g. For the second glove, I got all of it out of the remainder of the skein except the fingers – if there’s a colour difference, you can’t see it.
This pattern also launched me on a hunt for Fleece Artist yarn. I love their colourways. There’s some new Fleece Artist yarn on its way to me, which I’ll show you once it’s knitted up.
Just editing this to show the other pair, the longer ones that are for me.
I’m also noticing the pooling on the hand with this pair – the other pair has it, too, but I’m taking a better look now. 🙂 If I flip one over, you can see that it worked out the same way on both, just it ends upon on the back of one and the palm of the other.
I did do the fussy-knitting thing of casting on at the same point in the colour gradation – I usually do this with a self-striping yarn by choosing a point (like where the burgundy changes to the turquoise) and making my cast-on knot there for both mitts (or socks). That way, the striping will unfurl the same way on both. A second fussy-knitting fix would have been to knit an extra half row on the hand before starting the thumb gusset, moving it to the other side so that the two palms would be the same (and the two backs). They wouldn’t mirror but they’d match.
This is another one from the vaults, as they say. It began because I went to a spinners’ festival once upon a time at the Arboretum in Ann Arbor, Michigan. It must have been in the late 1980’s. I bought four yarns that day, just because they were beautiful, including two in bluey-greens. Then I didn’t know what to do with any of it.
The two blue-green yarns coordinated. One was a thick-and-thin mohair blend – I’ve since learned that I always like thick-and-thin yarns in the skein and never know what to do with them – and the other was a smooth silk blend, maybe aran weight. I had envisioned the two yarns together, even though their textures were really different, but couldn’t find a pattern. I also didn’t have that much of either of them.
When I found a commercial yarn that came in two shades that coordinated beautifully, this was the result:
The two handspun yarns are used for the top and the sleeves. I alternated them in 4-row stripes of moss stitch. Even the blue and green commercial yarns had blended colours, so they worked really well with the handspun ones.
The cream contrast is another commercial yarn with a long variegation. It feels as if it’s part cotton, maybe part acrylic, but the label is long gone. I loved the gradation in it.
I have a vague recollection that the intarsia pattern was from a book, but I don’t know which one now.
This sweater is a cropped length because that’s how much yarn I had. It’s incredibly warm so I never wore it much. In fact, I haven’t worn it even once in over 30 years, so something needs to be done. The yarn is too beautiful to sit in the cedar box.
I tried this sweater on again and rediscovered another issue. The top is very thick and bulky, and it’s wide in the shoulders. It’s not a flattering fit. Also the contrast line above the intarsia used to be below my bustline. Now it isn’t. Ha. So, that’s not a good look either. I decided to unravel it and save the intarsia part as a cowl.
Wow. Did I ever do a good job of seaming up this sweater! It was a challenge, but I’ve taken apart the body and have what will be the cowl back on my needles. (I’m guessing what size they were.) The plan is to knit a ribbed backing and join it to the cast-on hem, so only the part between the contrast ridges will be on the right side. I’ll show it to you when it’s completed.
I dove into the stash in search of more of the blue and green commercial yarn. No luck but I did find more of the creamy one *and* the label. (Ha.)
What about the thick-and-thin mohair and the silk blend? Stay tuned for its new incarnation. I have a plan…
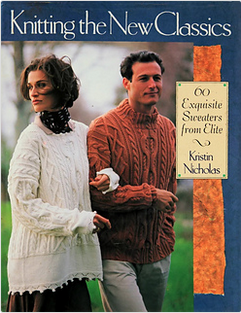
Now I’m digging out old sweaters that I’ve never blogged about. 🙂 Today I’m posting about my Scandinavian Family cardigan from Knitting the New Classics by Kristin Nicholas. (The title and the book cover are linked to the Ravelry page since this book is out of print. It was published in 1995.)
The Scandinavian Family sweater is stranded knitting, with contrast bands at the shoulders and hems. It’s a drop shoulder boxy design (more square pieces!) and I had some fun mixing up the colours.
One of the interesting changes in patterns is that many companies (like Rowan and Elite) once offered many size variations in each design, so you could make the same sweater pattern for every member of the family. (Rowan also used to offer sleeve and length variations.) Here’s the photo spread for this sweater from the book:
The picture is dark so it didn’t photograph that well, but they’re all wearing a version of the same sweater.
And here’s my version:
I split mine up the front to make a cardigan, which meant I added facings all around. I started with the mixy gold blend in the borders, which had been in my grandmother’s yarn stash, and chose colours to coordinate with it. I have no idea what the content of it is – it was a huge handwound ball when I got it. The green and white yarns used in the main body are from a farm/mill that used to be near Ottawa called Belle Vallée Wools. (They might still exist. I’m not sure.) I bought the green and white in Carleton Place on a road trip to Ottawa in the mid-90s. The yarn is a lot like Briggs & Little Regal. Many of the colours in the yoke are actually fingering weight and I held them double. Again, I bought yarns all over the place, but mostly on that road trip.
A detail pic. I love this fair isle pattern and all the colours in the green tweedy wool:
This is a really warm sweater, probably because it’s knit tightly. No worries about the wind with this one! The other thing about this kind of wool is that it doesn’t change much over time. It doesn’t pill or show wear the way that softer yarns do. This sweatter looks very similar to the day it came off the needles, thirty years ago, and not because I haven’t worn it.
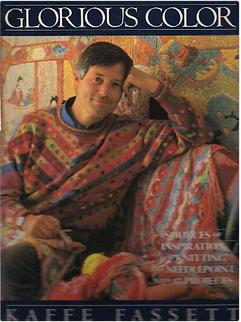
My chat this week in the comments on Audrey with rontuaru (about Alice Starmore and Kaffe Fassett patterns and knitting in days of yore) got me to thinking about The Beast again. I knit this Kaffe Fassett design – which is really called The Chinese Rose Coat – around 1990. It’s in the book Glorious Color, sort of. (That’s a Ravelry link. This is the 1988 edition, which is the one that I have. The book was reprinted in 1990 with a different cover.) What’s actually in Glorious Color are instructions for The Chinese Rose Jacket, then there’s a note that you could make it into a coat by using the chart for the jacket and the pattern for the Jug Coat.
These sweaters are all big squares, which is great for intarsia designs but not so great for a flattering fit. (If you look on Ravelry, you’ll see that the Jug Coat is one-size-fits-all and finishes out at 44″ across the bust, so there have been other changes in pattern design in forty years, too.) The coat is a big T – you cast on at the bottom back hemline and knit up, adding stitches for the sleeves (to make that T), then continue up to the top of the shoulders. Then you split the work in the middle, continuing down the fronts, decreasing to end the sleeves at the underarm and casting off at the front hem. You sew the side seams, pick up stitches at the hem to add ribbing, then add ribbing to the cuffs too. I remember what a huge pile I had in my lap at the end.
Here’s the spread from the book with the coat on the left and the jacket on the right.
Kaffe’s suggestion was that you should mix many yarns together for the coat, even twisting two lighter weight yarns together to get a thicker yarn. I did that. Mine is a big mixy-mixy of colours and textures, which is a lot of fun. There are even fringe yarns and sparkly yarns in there. I don’t remember what the fiber mix is, but it’s certainly not all wool or even natural fibres. I bought odd balls of yarn in yarn shops all over the place for this coat.
Here’s my coat:
I’m not tall enough to even get all of it in one picture!
I didn’t use one black yarn for the background but mixed a bunch of them, including a fur one and some grey ones. The one thing that bugs me is that the chenille yarn I used for the collar and cuffs seems to be aging badly – each time I pull out The Beast, there are more loose loopy bits there. I guess there’s some content with elastic that’s losing its boing (?)
I also wasn’t really good about checking gauge in those days. Most things I knit then were too big or too small. This coat was and is ginormous. It’s a bit shorter now because I took the ribbing and one repeat off the hem as soon as it was sewn together. I’m just not tall enough for how big it was. This also eliminated the ribbing at the hem, which isn’t a bad thing if you want to walk in the coat. I added facings down the front, knit my ribbed collar and cuffs in black chenille and ultimately added bias tap inside the collar (at the base of the ribbing) and from collar to cuff where the shoulder seam could have been to keep the monster from always getting bigger. Part of this is a gauge issue. Some of it is just weight. The original design was supposed to be worn open, more like a cape than a coat, but I added buttons and loops on the front. I also added pockets in the side seams, which are awesome.
It is a sweater to wear on a perfect fall day with just the right temperature and no wind. As a result, it mostly gets action when the mister is very sick, which doesn’t happen very often. He’s the one who called it The Beast and he’s convinced that it’s the warmest possible blanket when he’s not feeling well.
There was one fun incident with this sweater. It used to be possible to fly from Toronto to New York City for the day – there were a lot of flights and it’s not that far, so you could catch the 7AM flight, be in the city by 9:30, meet someone for coffee, someone else for lunch, someone else for a coffee and maybe even a fourth person for a drink, then head back to the airport to catch the 6PM or 7PM flight home. At LaGuardia, the Air Canada people always put you on the next possible flight, if you were interested. I used to go down to meet with my editors. In 1998, I was going to hire an agent and had narrowed it to two possibilities but wanted to meet them both to decide. I flew down for the day. I also had appointments with both of my editors that day, so it was busy. It was in the fall, a gorgeous sunny day, and I wore The Beast. I was so excited when two women stopped me on the street to talk about it because they recognized it as a Kaffe Fassett pattern. Obviously they were knitters, and we had a lovely chat on 7th Ave. (or maybe 5th) in the sunshine. Their enthusiasm made my day.
I also made the Chinese Rose Jacket for my SIL in the mid-90s. I was a lot more careful with gauge and much more disciplined with my yarn choices. I used one yarn for each colourway and the same black tweed for the whole jacket. I remember that it came out really well but I don’t have any pictures of it. (Maybe I’ve embellished the memory. LOL!) Next time I’m at her place, I’ll try to remember to take a pic of it.