Reverse-Bloom Flower Washcloth

I’m not much for knitting dishcloths, because I don’t use knitted dishcloths. I can’t imagine knitting something then plunging into the greasy muck of dirty pots and pans. I was intrigued, though, by this pattern for knitted facecloths. It’s in a book called WEEKEND KNITTING by Melanie Falick. I also like that they’re flowers:Reverse-Bloom Flower Washcloth by Cindy Taylor knit in mystery yarn by Deborah Cooke

The pattern calls for a cotton chenille, which sounds neat except I don’t have any and I’m not buying more. So, I stash-dove and found this yarn. I’m not even sure what it is. It looks like cotton but is a bit smoother, and I can smell the seracin of silk in it. So, it must be a blend – maybe of even more than cotton and silk. The colours are pretty, though, which is probably why I have it. Only one ball meant that there wasn’t enough for much – but there was enough for two flower power facecloths.

What do you think? Are you a dishcloth knitter? A facecloth knitter? Or a happy recipient of either?


Fitted Cardigan

This is a cardigan I’ve just finished of Noro Silk Garden. I’ve had this yarn for years and knit and frogged it so many times that Mr. C. is convinced it’s the best yarn investment I’ve ever made. Well, this time it’s staying knit! Here’s the cardi:Fitted Cardigan by Jane Ellison knit in Noro Silk Garden by Deborah CookeThe pattern is from a book called KNITTING NORO by Jane Ellison, which I like a lot. It has a lot of basic patterns in the main Noro yarns that I buy – Kureyon and Silk Garden. This is called a Fitted Cardigan, which it’s not – it should be called a Boxy Cardigan, but I like it anyway. I could have made it a little smaller, but it will have a visit to the dryer when it’s just about dry. The one in the book isn’t matched up so I took a deep breath and went with it.

It took a bit longer to finish than expected because the sleeves were too narrow for me. The only modification I made was to taper the sleeve from the wrist to the elbow, because I hate floppy cuffs. (The pattern has straight sleeves.) But even the upper part of the arm was a bit snug when I finished the sleeves. So, I frogged a few inches from the cuff and reknit the black garter stitch edging, then frogged down to the last increase and added a few more increases. They’re still slim, but they fit better.

What do you think? I love it!

DIY Gradient Cardigan – 1

This is a bizarre – and compulsive – project, but one that I haven’t been able to avoid since I first had the idea.

Once upon a time, I found a cardigan at a thrift sale. It was $1 and handknit from wool. I couldn’t leave it behind. (This is a problem I have at thrift sales.) A year later, I went to the same sale (it’s an annual one) and found another cardigan, handknit in wool for $1. I brought it home too. It was only once I got the second one home, that I saw how similar they were. I think they were knitted by the same person.

Here they are:vintage sweaters bought by Deborah CookeThey also were unusual colours. I wondered whether the Original Knitter had dyed the wool herself, maybe with Kool-Aid or food colouring. And this gave me the idea, the one I couldn’t forget.

I love self-striping yarn, like Kauni Effektgarn. The problem is getting it to match when you make a whole sweater. Sleeves are narrower than fronts and backs. When I knit the Elrond Sweater for Mr. C., I solved much of this by making it a top-down raglan – everything matched to the underarms. The fronts and back remained one piece, so they matched all the way to the hem. I had to fiddle around to make the sleeves match each other, and they don’t match the body of the sweater.

But what if you already had a raglan knit sweater, dyed it so that the pieces matched, frogged it, then knitted a sweater from that yarn again? You would need two sweaters if you were going to knit one fair isle one, and you’d be able to make it bigger, like a jacket. This is mildly insane (it might even be more than mildly so, but I do have a biased perspective) but I was intrigued by this idea.

And so, I did it.

First, I took the pink sweater apart. This was harder than I’d expected – the yarn kept breaking when I was trying to frog the ribbing at the neck. I realized then that the yarn was a single ply, which makes it prone to both felting and breaking. (That’s when I came up with the title for this post.) Ultimately, I just cut through most of the neck ribbing, then took the sweater apart from there. I soaked the pieces in a vinegar and water bath, then started to paint.

I used the acid dyes made by Jacquard, and steamed the pieces to set the colour. The sweater was pinkish, so I used Burgundy, Purple, a bit of Fire Red and some Sapphire Blue at the tops and hems. Note that there is less Sapphire Blue in the finished yarn, because there’s that bit of ribbing at the top that just got chucked. Here’s the result:My plan had been to make wide bands of colour that then blended into each other. What happened was that the colour struck very quickly, even when the dye was diluted, and it was hard to blend smoothly. This was likely because I put vinegar in the soaking bath – vinegar makes the dye adhere to the fabric/fibre. That’s why they’re called acid dyes – but I liked the effect anyhow. It turned out that the yarn had both fulled and softened in the dye process. It was really easy to frog the pieces and cake up the yarn. No splits or joins in the yarn, which leads me to believe that the Original Knitter had a cone of this stuff. Some nice construction details – she knew what she was on about.

Here’s one of the cakes, all ready to go. I labelled them so I wouldn’t get them mixed up.Next up – the green sweater. I left one front unfrogged from the pink one so I could make some attempt to line up the colours and ensure that there’s good contrast between the two shades. (And no surprise, I chose the front that has the knit-in buttonholes. Those don’t look like they’ll be fun to frog.) I’ll show you what happened with the green sweater next week.

So, what’s the craziest project you’ve ever undertaken?

Annis Shawl

A while ago, I was seduced by some Madeline Tosh Merino Fingering yarn, in the Vanilla Bean colourway. I hunted through my queue of patterns and cast on Annis, which is a free pattern from Knitty.

Here’s the result:Annis by Susanna IC knit in Madeline Tosh Merino Light by Deborah CookeAnnis is a curved shawlette, and the shape is intended to keep it on your shoulders.

Here’s a detail of the border – of course, I added some gold matte beads:Annis by Susanna IC knit in Madeline Tosh Merino Light by Deborah CookeI like this piece. It was a pretty quick knit, although it came out a bit smaller than expected. I must have 100m of the ball of yarn left over – if I made one of these again, I think I’d knit some more rows after the lace border and before the shaping. I did add six rows of garter stitch before casting off.

So – shawl or scarf? What do you think?

SuperSocke Wellness Socks

I finished these socks.socks knit in ONline Supersocke 6-ply / 6-fach by Deborah CookeThey’re knit of a self-striping yarn called Online SuperSocke Wellness II. The “wellness” bit is presumably because the yarn has jojoba and aloe vera added to it. (?) I’m not really sure how that doesn’t wash out, but it does make the yarn nice to knit with. It’s a pretty thick sock yarn, so these are warm socks. I just used my usual system for making socks, which is more of a method than a pattern.

One thing that surprised me was the way it striped. I’d thought from looking at the ball that the colour changes would be more gradual. But they look good and I had enough to make them match. There’s a good bit left, so I could have even made a pair for Mr. C. and had them match. This is good, as I have two more balls of this stuff in different colourways.

What do you think? Have you finished any projects lately?

Another Upcycled and Felted Bag

In the midst of all this blog tour frenzy and book promotion, let’s talk about something different.

Let’s talk about knitting.

In fact, let’s talk about recycling other people’s knitting. I stepped away from my computer and from my desk this weekend to create something. Here it is:Felted bag made from an upcycled sweater by Deborah Cooke

The bag is a gift – for someone who almost certainly doesn’t read my blog, so it’s safe to show it here. It’s made primarily from a Gap sweater, which was a crew neck pullover with raglan sleeves and lovely fair isle patterning. I got it at the thrift store for a buck, because someone had tossed it into the washing machine and started the felting process. It probably hadn’t fit the person after that. I brought it home and tossed it into the washing machine again to felt it even more. I really liked how colourful it was and knew it would make a great bag.

The bag itself is made of the body of the sweater – you can see the ribbing from the hem at the bottom of the bag. I often cut that off, but this sweater had shrunk a lot and I didn’t want to make the bag smaller than it could be. (It’s about 12″ deep finished and 13″ wide.)

As far as shaping goes, I used the body of the sweater up to the underarms. The flap is actually the front of the sweater. I cut the raglan seams open on either side of the front and kept all of the front, shaping it at the neck to have a nice curve for the flap. Then I cut straight across the back of the sweater at the underarms – the fair isle pattern made it easy to do that straight! – and removed the sleeves.

The sleeves will become another small purse. I’ve cut the pieces and all that will go in the trash from this sweater is the neck ribbing. 🙂

Then I dove into my fabric stash, which is quite considerable. I chose a colourful check for the contrast piping and cut it on the diagonal, making piping with cotton cording. The lining is the same cotton. The bag is lined with a drawstring top, contrast piping all around and nylon straps. I like the button a lot. I’m less happy about the straps but handles are always an issue for these bags. I have bought leather handles in the past, but they’re expensive and I haven’t seen any locally for a while. I used the handles and lock strap from Grayson E. on this bag, for example, but the set cost over $100. It was fine for a special project – I had actually knit this bag myself – but is not something I’ll do for every bag.The tapestry bag also has feet, which I didn’t put on this newest little purse.

As far as the purse goes, my only regret is that I didn’t put a zippered pocket inside – I usually put one in the lining but just forgot this time.

What do you think? Do you recycle anything to make it into something else?

Regia Socks

These are Mr. C’s new socks. Just plain socks, nothing fancy, but I like them and so does he.Socks in Schachenmayr Regia Design Line by Kaffe Fassett 4-fädig knit by Deborah CookeThe yarn is 4-ply Regia sock yarn, in one of Kaffe Fassett’s colourways. I thought this would stripe, but each colourway comes in two versions: “Landscape” stripes and “Mirage” does this flicky thing. This wool is a Mirage colourway.

What do you think?

Chevalier Socks

Things have been a bit wild around here lately, but I have been knitting. (It is a sanity preserver!) I think a couple of things might get frogged for gauge and fit issues – phooey – but these socks are getting done.

I love them. Fortunately, so does Mr. C. who will get to wear them.

The pattern is by Mari Muinonen and is called Chevalier (This is the Ravelry link, which might not be visible to the world at large.) The pattern is free for download on Ravelry and there’s a matching Chevalier pattern for mittens. Mari’s blog is called MadebyMyself, but a lot of the content is in Finnish.You can look at the pictures, though – she’s an incredibly talented designer. (She seduced me utterly with her pattern directions for these socks. It says “Pattern of the Chevalier Socks is written both english and finnish in the same file. Try to manage.”)

The yarn is Briggs & Little Tuffy, which Mr. C. loves for his house socks, and which is spun in New Brunswick. The colourway is Greystone. It’s actually kind of green.The bonus of using such thick yarn is that the socks knit up super-fast.

Here’s the first sock. Don’t you love it?Chevalier Socks by Mari Muinonen knit in Briggs and Little Tuffy by Deborah CookeA bit of a blurry shot because I had to do it without the flash to show the cables better. Also, the colour looks more blue here than it really is.

I made some modifications. I knit 24 rows of ribbing before starting the cable stuff, while the pattern specifies 10 rows. And I fiddled with the toe so that there’s a whole diamond ending there, instead of just cropping it off and doing a regular toe. Since these won’t be worn under boots, cabling on the top of the toe isn’t going to be an issue.

What do you think?

Incredible Custom Fit Raglan in Big Wool

This is about a sweater I just finished. Despite the title of this post, I really love the sweater – what was breaking my heart was the yarn. Like all heartbreaks, this one is a bit of a saga. Here we go.

I very seldom buy the actual yarn specified for any given pattern. I tend to raid my stash first, then look for sales. So, as much as I love the Rowan patterns and books, I’ve knit very few items designed by Rowan in Rowan yarn. That changed last fall when I fell head over heels for a sweater called Voyager. It called for Rowan Big Wool, which is very thick yarn, much thicker than anything in my stash. I looked around but couldn’t find anything comparable. Fortunately, I discovered that my favourite colour – 28 Bohemian, which is a two-tone red – was discontinued. It was on sale at half price.

Even at half price, 14 balls was a hefty investment. I was a bit stressed about the cost of the sweater before I even received the yarn. But it arrived and I loved it and I cast on immediately. The pattern stitch on the sweater called for a purl 3 together, which was a bit of a challenge, but I persisted and knit it all up. Then I tried it on.

Oops. It looked TERRIBLE on me. I didn’t even sew in the ends – I frogged the sweater immediatel and returned the yarn to the stash.

But I still loved the yarn. And it had been comparatively expensive. I had to use it! I tried a number of other sweater patterns, but nothing worked out. I didn’t get gauge or I didn’t like the look of the stitch or whatever. Finally, I decided to just knit a top down raglan in it. This is a really easy pattern and always results in a sweater that fits. There’s a tiny bit of math to do for the neck, then you knit, and periodically try it on as you go. Easy! I knew I wanted a cardigan that was more like a jacket in length. I knew I wanted a big collar. I knew I liked how the yarn looked in seed stitch and wanted the hems done in that stitch. So, I did my bit of math, and started knitted.

The one thing about knitting with big wool on big needles (9mm!) is that sweaters get done fast.

Here’s the sweater that resulted:Raglan cardigan knit in Rowan Big Wool by Deborah Cooke

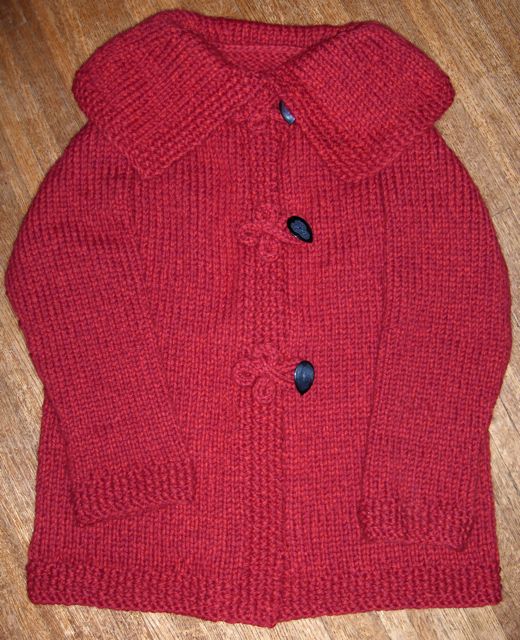
What I did for the collar was cast on a lot of stitches – I think it was 80. I knit the edge the same as I’d do the hem (should have done 7 rows instead of 5, but there you go) then worked for several inches. I then decreased down to the neckline, in exactly the same way as I’d increase for the raglans. The really cool thing is that the collar kind of curls up against my neck. I didn’t expect that but I like it a lot.

And here’s a detail of the back:Raglan cardigan knit in Rowan Big Wool by Deborah Cooke
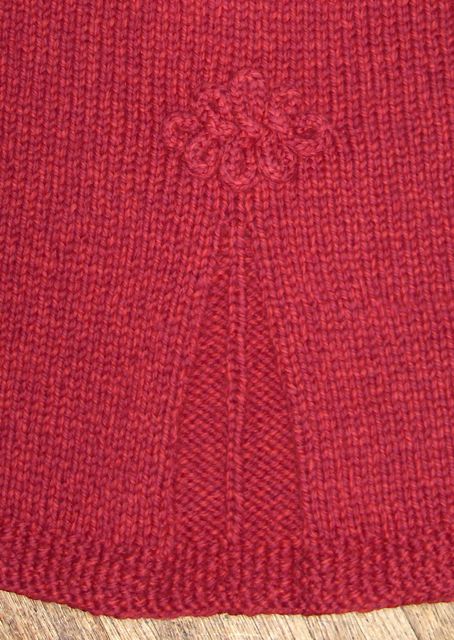
I added a kind of a pleat at the centre back to add ease of movement. I also added a passamenterie frog back there, to echo the fasteners at the front – these are done in I-cord.

The one complication is the weight of this sweater. It used 12 100g balls of yarn. That means it weighs 1.2 kg or almost 3 pounds. (It is heavy. It was a huge mound on my lap when I was knitting the last rows!) So, I had concerns about the weight of the sweater stretching it down. I added I-cord inside the collar to ensure that the neck keeps its shape. To do this, I picked up all of the purl bumps on the row where the collar becomes the coat, then knit applied I-cord right across, sewing in the ends. I also used anchor buttons behind each of the buttons you can see on the outside. This ensures that the button never rips free of the knitting, or tears the fabric. Either of those things can happen with weight.

I could have made it longer – I have two balls of wool left, which would have given me another 7 or 8″ of length – but I thought I’d be less likely to wear a coat than a jacket. I think I’ll make an earflap hat with the rest of the wool. I need a red one.

What do you think of my heartbreaker? Do you love it as much as I do? Have you had a knitting project that came together when you thought it might not?

Damask Bag in SWS – 4

Well, you probably remember me going on and on (and on) about this fair isle messenger bag. Happy to say that it is DONE and you won’t have to hear anymore about it after today. I finally finished the knitting after abandoning that double knitted strap that wasn’t going to get knitted in my lifetime.

The most recent post on the bag is HERE, and it has links to the earlier posts. Unfortunately, the nifty black I-cord I was showing you in that picture is no more. After finishing the strap, I decided that all of the I-cord had to be in the variegated violet — so I ripped out the black I-cord. I’m not a huge fan of knitting I-cord, so it nearly made me weep to tear out three feet of it. BUT it looks much better with the I-cord all the same colour.

Here it is, ready to be felted:Kauni Damask Understated Bag by Karen Stelzer knit in Patons SWS by Deborah Cooke

It’s about 24″ wide and 22″ deep in its unfelted state. My hope was for a bag more like 18″ wide and 13″ deep. I’ve felted a lot of SWS and that seemed about reasonable to expect in terms of shrinkage. I was a bit worried about it being so humungous – would this be the felting project that finally finished off my trusty (ferocious) top-loading washing machine?

Nope. But it didn’t felt the way I expected. Felting is, by nature, somewhat unpredictable, at least the way I do it. Putting the piece into a pillowcase then chucking it into the washing machine and coming back in half an hour leaves lots of opportunity for variation. I just don’t have it in me to stand guard over a felting piece though, pulling it out of the machine at regular intervals, much less to felt by hand in the tub with a plunger. I have made my peace with unpredictability.

Sometimes. On the first ride through the washer, the bag felted quite a bit. The flap and strap hardly felted at all. The design was starting to lose definition on the bag, but the bag was still pretty big. I had to leave it on the top of the washing machine and visit it regularly – poke it, prod it – to come up with a plan. Mostly I had to accept that I was past the point of no return – it was useless as it was; there was no going back; I might as well risk another run through the washer.

Before putting it back into the pillowcase, though, I tried to figure out how to make the strap and flap felt more than the bag on this run. The front of the bag had also felted more than the back on the first pass. So, I rolled up the bag and tied it into a big roll, with the back of it on the outside, much the way a butcher ties up a roast. It seemed that less exposure to hot water and less agitation could make the bag felt less. (Remember that I make stuff up for a living.) The flap and strap were free to move around inside the pillowcase. Back into the machine it went.

This worked pretty well. I made progress. But now, I have to get down to regional felting. Ugh. This is the handwork, in the sink, rubber gloves and hot water, just to get the flap and the strap to felt consistently with the rest. I have doubts. For the moment, I have to let it sit, maybe visit it, poke it and prod it once in a while. It’s still huge – about 18″ by 18″, but mostly I’m not loving it as much as I did (although this photo might change my mind.) Here it is:Kauni Damask Understated Bag by Karen Stelzer knit in Patons SWS by Deborah Cooke

What do you think?