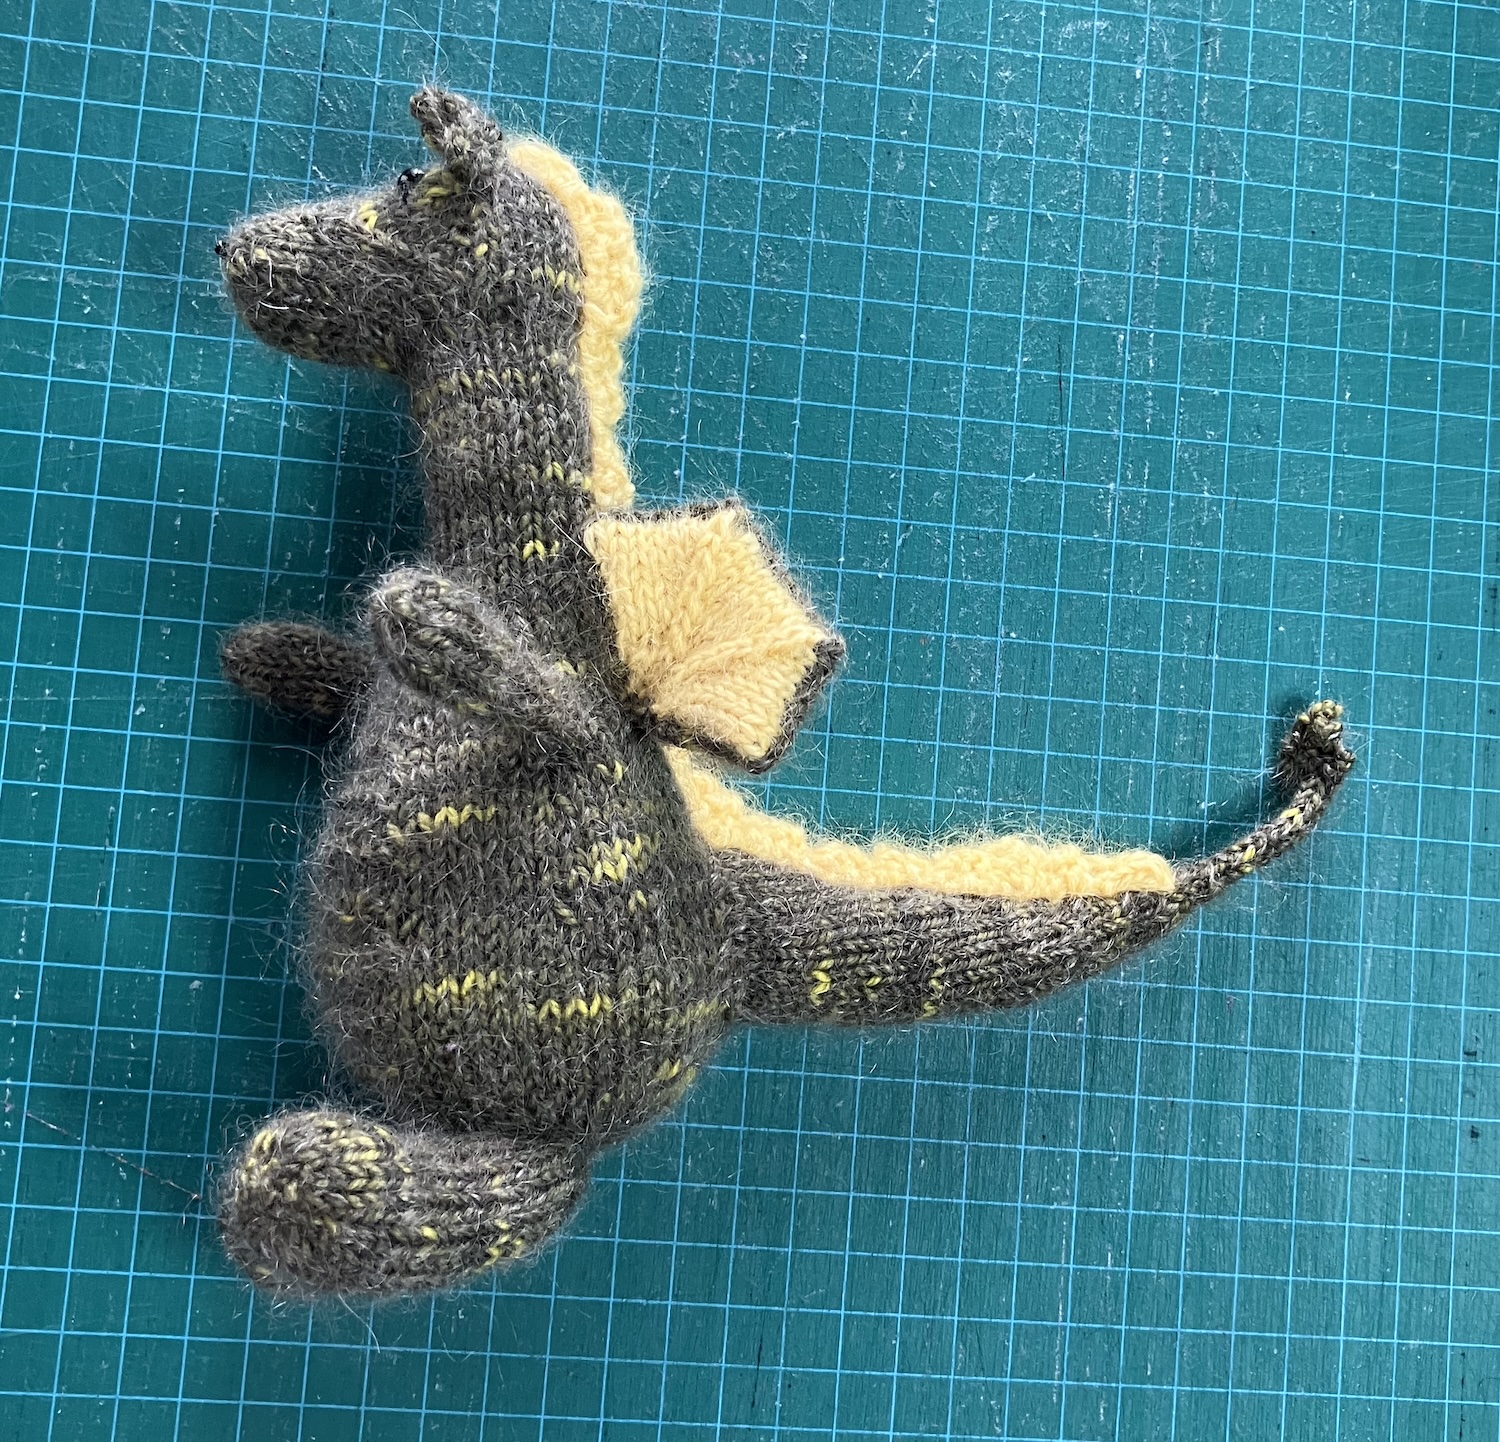
You might remember these two little dragons I knitted. The one on the left (Cedric) sits on the bookshelf in my office and the one on the right has gone on to live on a different bookshelf. I started to knit a few more.
The pattern is Tarragon, a free download. (That’s the Ravelry link.) There are a lot of projects on Ravelry with additions and changes to the pattern – I’ve added ears as in one of those projects. I knit mine with a strand of fingering weight or sock yarn – in this case, it’s Koigu KPPPM – held double with a strande of KSH or similar. This time, it’s Elann Silken Kydd.
Here’s the new dragon on the block:
This time, instead of knitting four wings and sewing them together in pairs, I knit the green wings, then picked up the stitches for the yellow “lining”. The wings are knit from the outer edge in, and this saved some sewing. I think outer edge looks neater too.
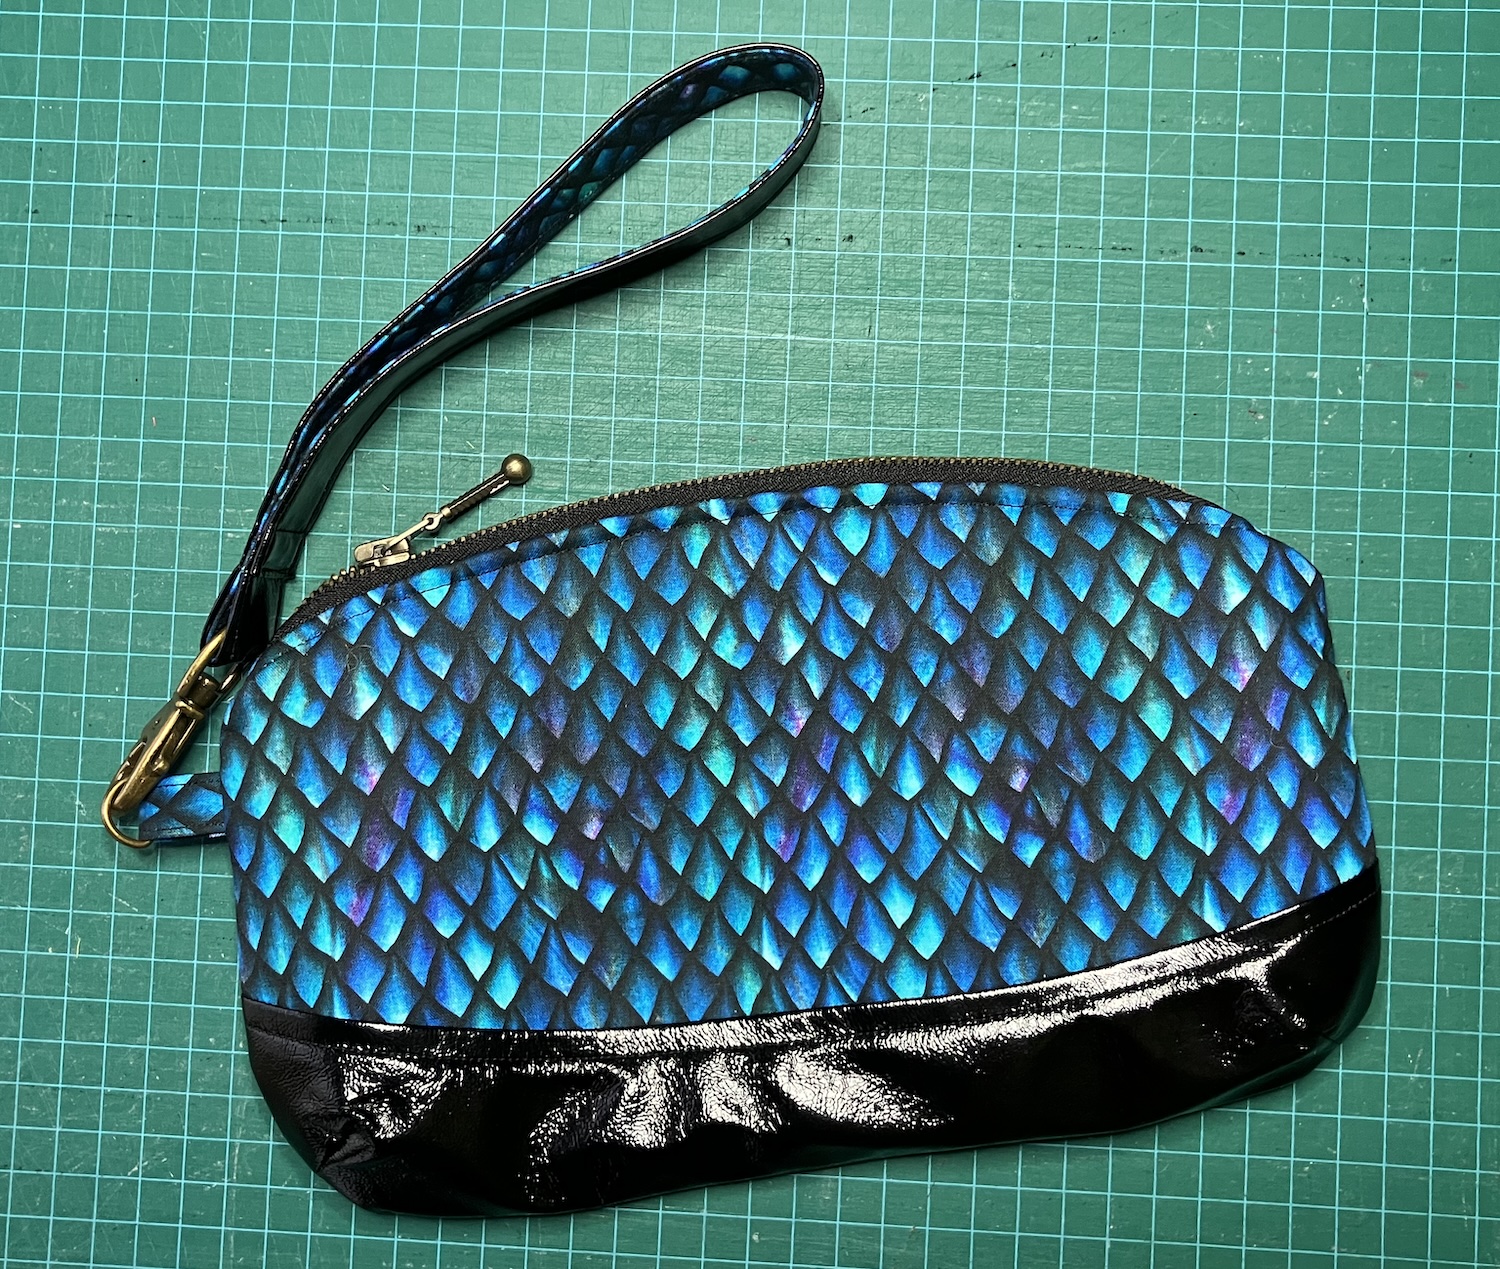
I’ve gotten back into making bags this fall and here’s a completed one to show you. I’ve been waiting for a sunny day to take some pictures, but it’s raining raining raining, so we get some pix taken on my sewing table instead. The blog has been too quiet and I’m done with waiting for sun.
You might remember my blue dragon quilt, which was a kit (and is now FINISHED! HA!). That’s it at right.
I had some leftover of the various fabrics and used them for this, along with a shiny black pleather. They really were bits and ends, so it ended up a bit patchworky but everything coordinates well.
This is the Clematis Wristlet, a free pattern from Blue Calla Patterns. This little bag has fusible fleece on the outside pieces, which gives it a bit of substance, and more interfacing besides. I didn’t have a 9″ brass zipper, so I cut down a 14″ one for this project.
On one side, I used the scales. I also had a strip of this print to use on the inside of the strap.
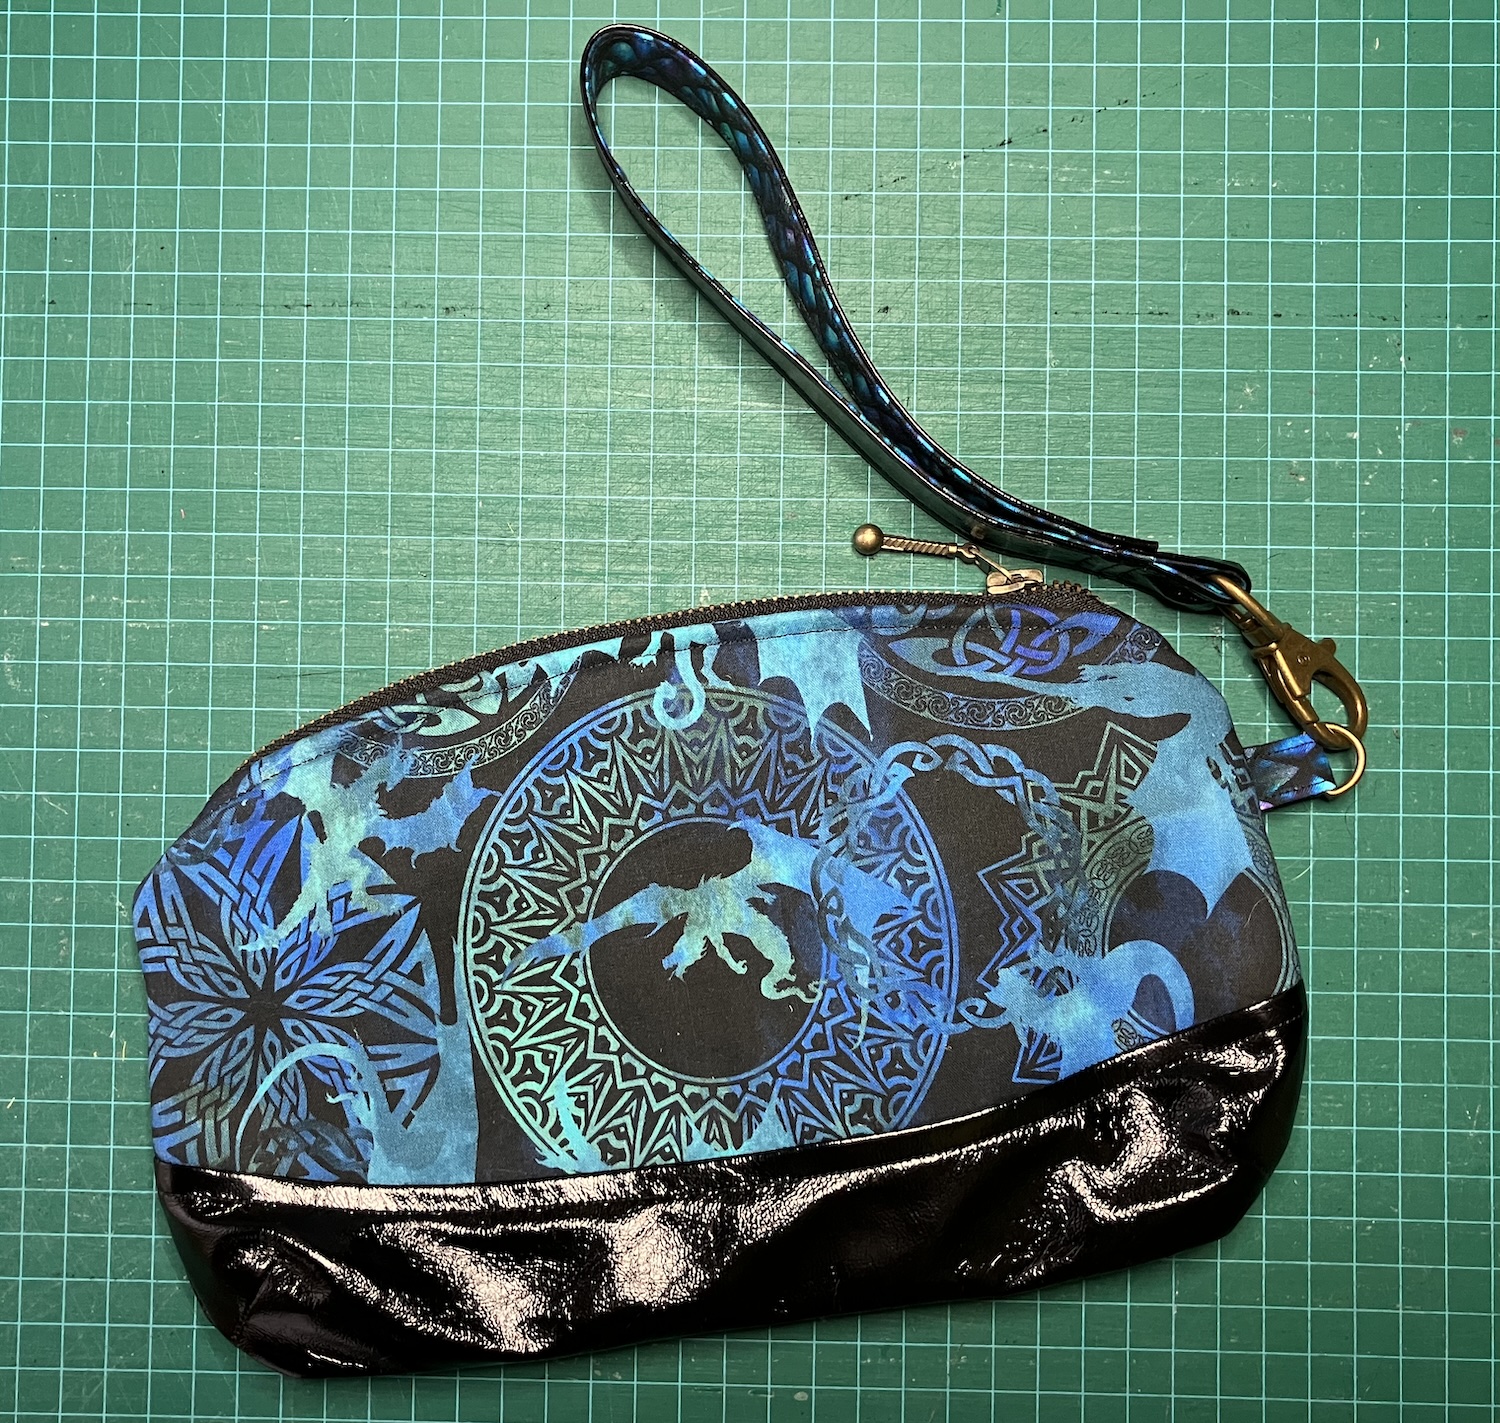
On the other side, I used the background with dragons and circles.
The lining is the Celtic/tattoo background fabric. (I see I picked up a thread on my cutting table and included it inadvertently in this shot.)
And the pocket inside is made of the dragons from the border print. There are only scraps now, so they’ve gone into my bag for real patchwork.
This pattern is a pretty easy make, and the finished bag is a useful size. I’m always looking for something flat to hold my cash at bookfairs and this might just do the trick.
I like the idea of the dragons watching over my hoard!
I showed you this scarf and mittens in progress last month in this post about Comfort Knitting. The project started with a bag of mill ends from Spinrite of Patons Rumor, a long discontinued yarn. Here it is on Ravelry. It’s a bulky weight yarn that’s mostly acrylic but also is 15% alpaca, which makes it very soft and a bit fuzzy.
This colourway, which is a light purple, is called Hibiscus Heather. This was the picture I showed you last month of the mittens and part of the scarf.
The mittens are from the Tin Can Knits’ World’s Simplest Mittens pattern. (That’s a Ravelry link.) If you don’t have a basic mitten pattern, this is a really good one – and it’s free! It includes instructions for four sizes of mitten, each in four different weights of yarn. I used the chunky instructions for an adult small.
The scarf is a design I made up as I worked. It ended up with nine diamonds – mostly because I mucked up the fifth one and made it a bit smaller by accident. It thus became a midpoint design element. 🙂
Here’s the completed scarf.
I think it could do with a blocking. The edges are very curly.
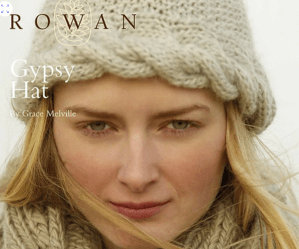
I have enough yarn left for a hat, but I tend to dislike knitted hats. I had a sift through my library on Ravelry (I love that search engine!) and found a possibility – it’s Gypsy from Rowan 48, a seed stitch hat with a cable trim. (That’s a Ravelry link.) I like the brim on this one. The pattern specifies Rowan Cocoon, which is similar in weight to Patons Rumor, so I’ll give it a try. It’s a hat, though, so I’ll probably have to knit, frog and reknit at least once.
Of course, now I’m flipping through Rowan 48 and being distracted by other designs. 🙂
As mentioned last week, I’ve been doing some comfort knitting. Besides making clothes for the girls, this usually means knitting socks and/or mittens. I also sorted some stash and rehomed a bunch of it, which meant I rediscovered some goodies, too.
The mittens are from one of these rediscoveries. They started with a bag of mill ends from Spinrite of Patons Rumor, a long discontinued yarn. Here it is on Ravelry. It’s a bulky weight yarn that’s mostly acrylic but also is 15% alpaca, which makes it very soft and a bit fuzzy.
This colourway, which is a light purple, is called Hibiscus Heather.
I first made a pair of mittens for myself, using the Tin Can Knits’ World’s Simplest Mittens pattern. (That’s a Ravelry link.) If you don’t have a basic mitten pattern, this is a really good one – and it’s free! It includes instructions for four sizes of mitten, each in four different weights of yarn. I used the chunky instructions for an adult small.
I also cast on a scarf for myself to match and am just making it up as I go. I’m really enjoying this knitting – it’s the combination of the yarn, which feels nice, and the Brittany birch needles, which I always love to use. This is about the midpoint. I’ll make nine diamonds, then taper down to the other point. Will it need a tassel on each end? Possibly…
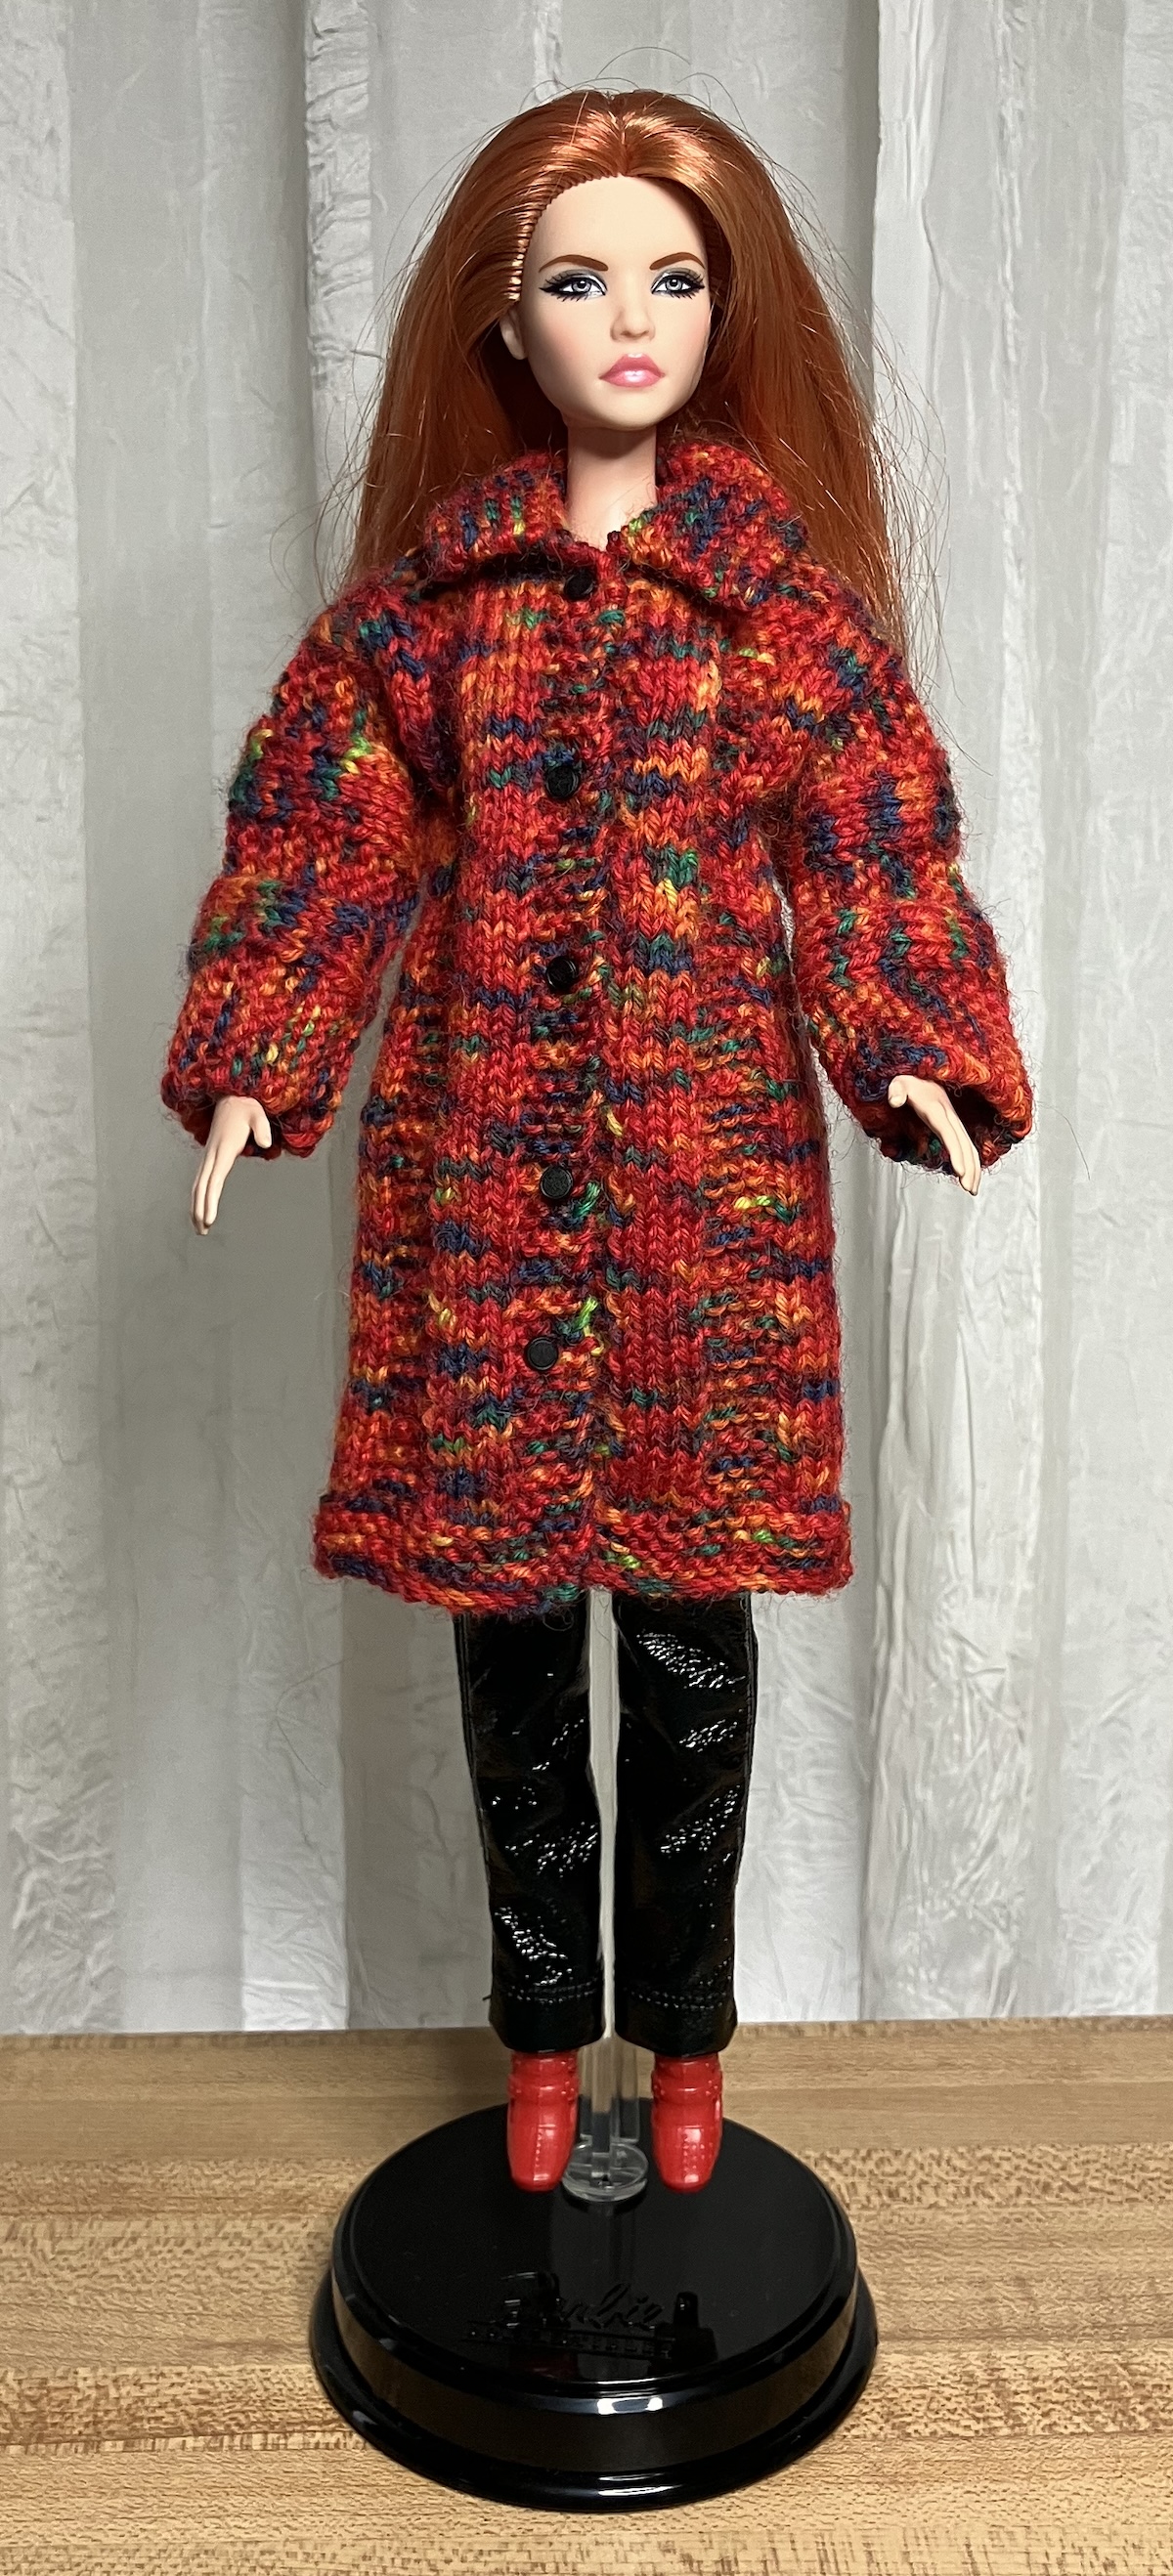
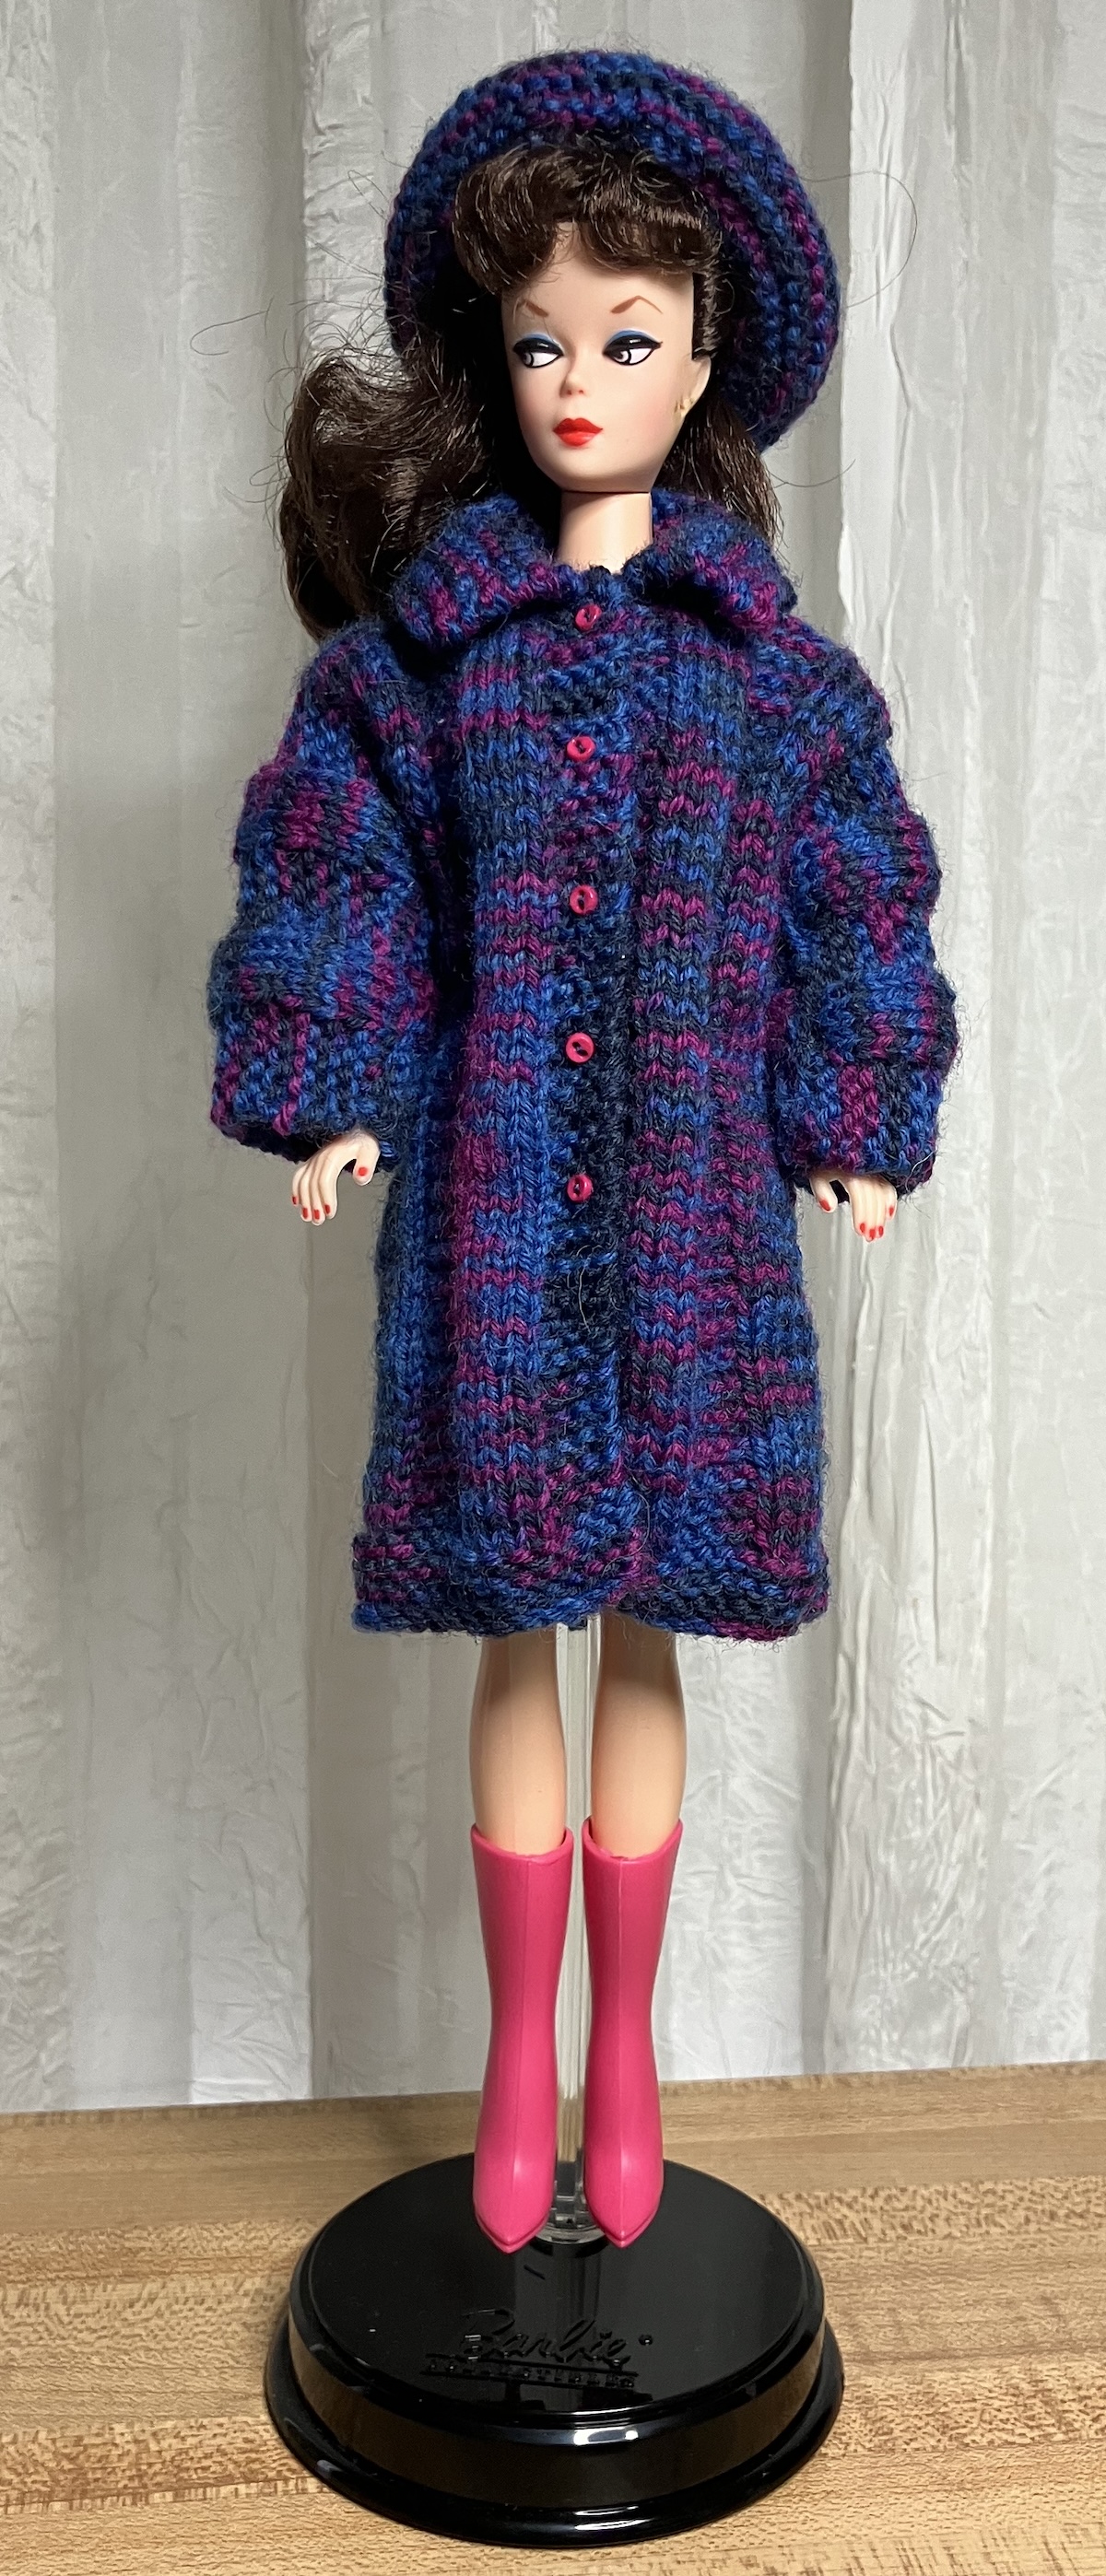
Things have been a little quiet here, mostly because of real life. When things get busy and even a little unpredictable, I always choose some comfort knitting. Lately that’s been knitting for the girls, as well as mittens and socks. Today, we’ll look at my latest completed project for the girls.
This is another free pattern from Sticka till Barbie, this time for a knitted coat. It’s amazing that I’m always learning more about fitting clothes for the girls – this time, I learned that vintage Barbies have shorter arms than modern Barbies. MTM and Silkstone (articulated and original) all have longer arms than vintage B.
I knitted the first coat following the instructions for #101 Yellow Coat. Here’s a Ravelry link for the pattern. The original website was taken down in 2022. The wayback machine’s backup of the original site has changed now – previously you could download individual patterns from there. There is also this other backup at the Internet Archive. Scroll down for the link to download a zip file of all the patterns. I’d do this soon, as it seems the content is vanishing. There are so many clever patterns in this collection.
Here’s my first coat in Patons Kroy sock yarn, on a MTM doll.
This coat is knit from the front hem up over the shoulder and down the back. You knit one front, then the other, then join them at the back collar line and knit down the back. The sleeves are added as you go – it’s shaped like a T, kind of like a kimono. Stitches are picked up at the neck for the collar.
This coat took 35g of Patons Kroy – I just barely made it with my partial ball of the red mix, so couldn’t make the hat shown with it in the pattern picture.
I cast on a second version and cast on two less stitches on each sleeve, to make shorter sleeves for vintage B. Here’s that one – this time, I had enough yarn for the hat, too.
The hat is cute and quick to make. I joined mine in the round so there wouldn’t be a seam, although the instructions are to knit it flat. The hat pattern is A-41.
I’m working on a modification of the coat, resizing it for the 16″ girls. I’m knitting it in a kettle-dyed Koigu that is quite pretty. It’s amazing how much more knitting that requires, but I’m headed down the back now and should have it done soon.
When you need a quick project, a doll garment can provide that almost-instant gratification – and a free pattern from Sticka-till-Barbie might be just the thing.
Here’s the Internet Archive backup of the Sticka till Barbie patterns. There is no longer the option of downloading individual patterns at the Wayback Machine, but the Internet Archive offers a zip file of the entire catalogue. I’d grab it now.
This is a straight dress knitted top down with ribbing at the waist. The original pattern is seamed down the back, but I joined the cast-on stitches in the round.
I think they allowed two stitches for the CB seam, as the first dress was a bit broad in the back for Barbie (who is bigger in the front than the back). I knit that first dress, then modified the pattern and knit the second. I liked it much better so I frogged the first and reknit it following the modified instructions.
This one fits vintage B best. The yarn is Koigu KPPPM and it used 10g on 2mm needles.
My modifications: Instead of casting on 52 and knitting flat, I cast on 50 and knit in the round.
Row 1 in the pattern says: K9, cast off 8, K7, k2tog, K2tog, K7, cast of 8, K9 (34 sts)
My revised Row 1 is: K7, cast off 8, K20, cast off 8, K7 (32 sts)
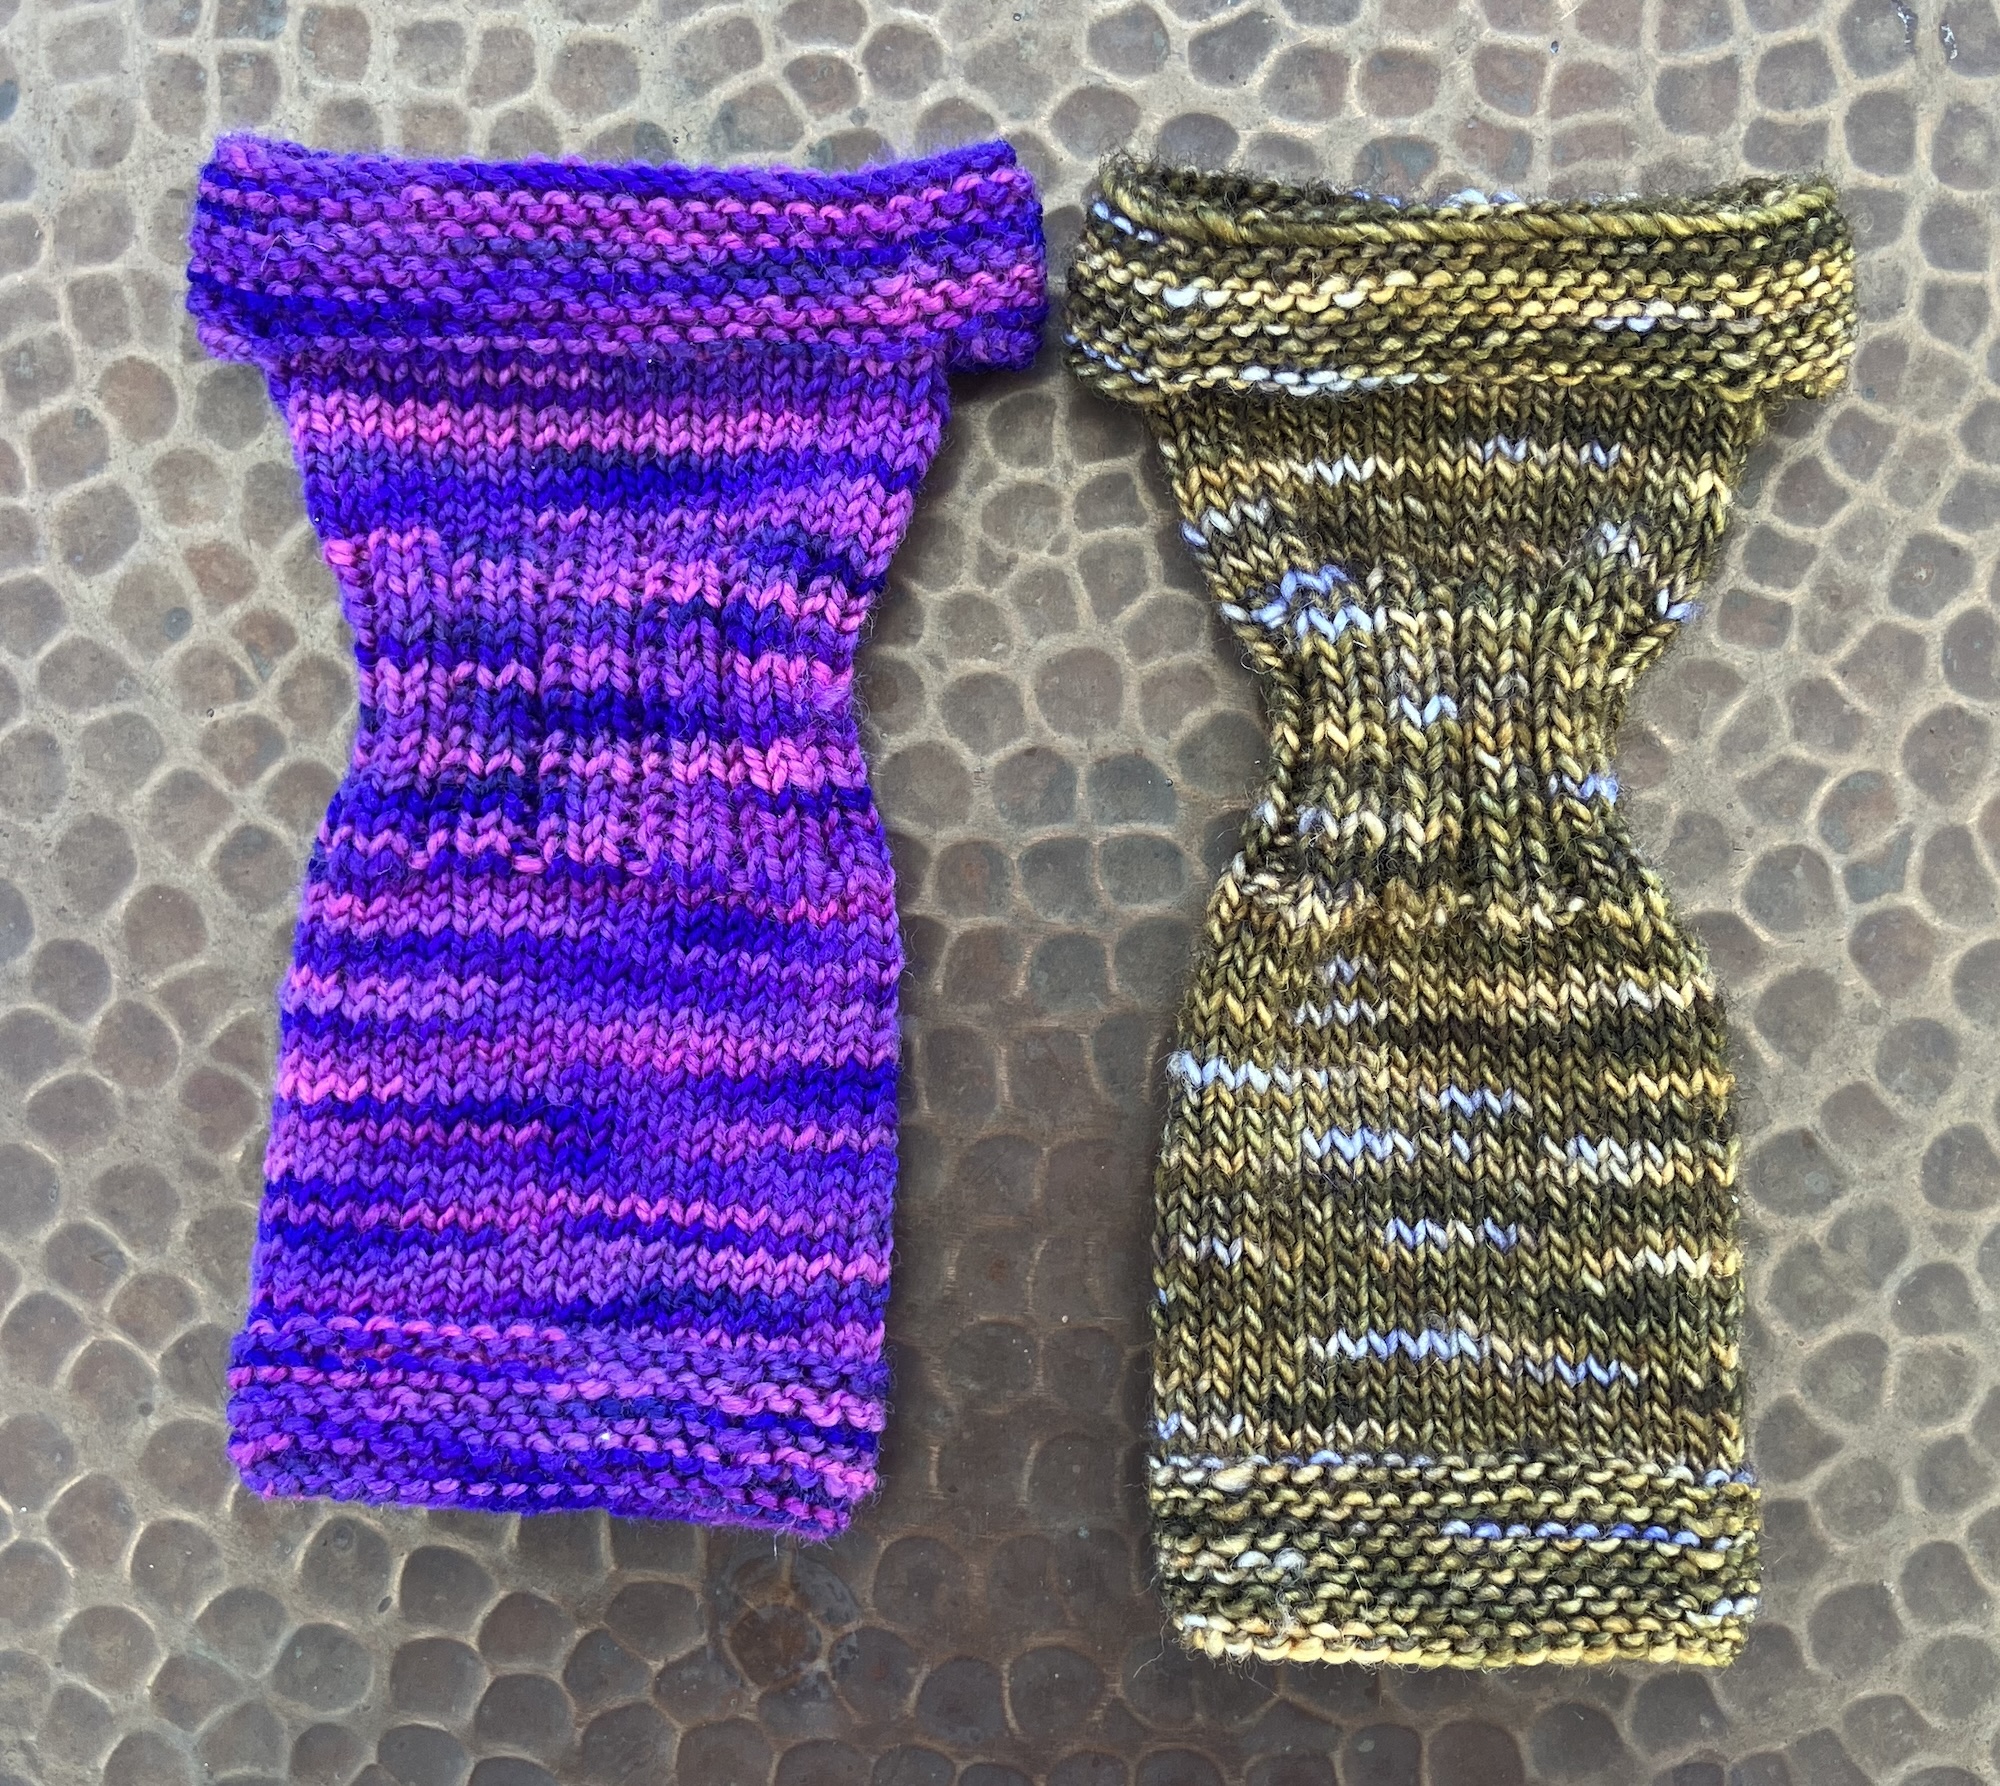
I tried the dress on my skinnier girl and it was too big, especially in the shoulders. I could have diminished the stitch counts again, but remembered the differing results I had with different yarns when knitting sweaters for the girls. Mad Tosh Merino Light is still a fingering yarn, but it’s much thinner than Koigu KPPPM – Koigu KPPPM has 160m per 50g, or 320 m per 100g, while MadTosh Merino Light has 384 m in 100g. It’s thinner.
I followed the same instructions and used the same needles, and look at the size difference:
Purple is Koigu KPPPM and the brown is MadTosh Merino Light. I may have added a row or two more to the length, but it’s amazing how much skinnier the second dress is. (It also took 10g of yarn.)
And here’s the brown dress on a MTM Barbie with the regular body sculpt:
She’s the 2025 Barbie Basics #2, and yes, her hair does have a bit of a violet cast to it. Here she is for sale at the big river. (Interesting that it notes this product is often returned. All of the boxes on my 2025 Barbie Basics dolls were damaged. The dolls were fine, but for those who keep their dolls boxed, that would be an unacceptable situation.)
You might remember the Blue Glitter Dress from Stickatillbarbie.se (pattern number 619) that I showed you in December.Here’s a Ravelry link, and here’s the link at the Wayback Machine for that page (patterns #601-650).
I made another one in plain black. This is an acrylic fingering yarn that’s labelled as baby yarn, that I bought at Walmart for a couple of bucks. I liked how soft it was, but (of course) that means it’s splitty, too.
Here’s the finished dress, which looks much better in plain black than in that glittery stuff:
I knit this one longer, so it would fit the Silkies, and that turned out to be a good thing. Even though the stitch counts and needles are the same on the bodice of both dresses, this one is much skinnier. Only the Silkie girls can wriggle into it. This time, the hem wants to roll, even though it’s in garter stitch. The acrylic yarn won’t take a block, so I sewed a line of beads into the garter stitches to weigh it down. That didn’t actually work – I had to fuss with the hem to get this picture and it flipped up again right afterward – so I’m thinking I might thread some wire into the hem to hold it in place.
Otherwise, I’m quite pleased with it, though – and I’m done with knitting ballgowns. They take forever!
This project has been on my needles longer than I expected. Usually, knitted garments for the girls are quick projects, but this time, the yarn was a challenge.
Here it is:
What the camera isn’t picking up is the glitter. This is a sparkly yarn with a bit of metallic thread included in it. It’s structured with a central cord that might be cotton, then the lumpy-bumpy-glittery color bit is wound around that in a spiral. When you knit, the spiralled thread slides up and down, which makes for some bigger bumps – and a bit of frustration. I don’t know what the yarn actually is as I found it without a label at the thrift store, but I’m sure it’s not intended to be knit on 2mm needles.
Finally, finally, I finished the dress. This is the Blue Glitter Dress from Stickatillbarbie.se. It’s pattern number 619 – here’s a Ravelry link, and here’s the link at the Wayback Machine for that page (patterns #601-650).
The glitter really doesn’t photograph at all. 😦 Too bad, because it’s very shiny, just the thing for a festive party. Without the sparkle showing, it just looks lumpy. (Although this makes me wonder if I should use the rest for a tweedy little suit. Hmm.)
I didn’t love this pattern as much as some of the others from this designer. It’s a top-down knit, starting with 60 stitches – which is a lot. I see on Rav that some knitters have taken that down to 50 stitches, and I would do the same if/when I knit it again. With this one (and part of that might be the yarn. It’s pretty crunchy) the shoulder band is way too big. I ran a few rows of stitches through it on the back side with buttonhole thread to tighten it up.
I did modify the pattern to knit it in the round. The body is knit fairly straight according to the directions, but I substituted my shaping from the dresses with the fur skirts.
I could not get the stitch counts to work out on the mermaid flare. Picking back this yarn a couple of times really wasn’t fun. 😦 The increases are done before and after a knit stitch, and those two M1’s so close together were a challenge in a yarn with no stretch. I’m not sure what I did wrong, but after picking it back twice, I rewrote the instrcutions for the flare increases. You can see in the picture that I divided the skirt into quadrants, offsetting the increases so they’re centered on the right front, the left front. It’s the same on the back. They’re still on either side of a knit stitch, with 3 rows worked plain in between each increase row. This way, my stitch counts worked out.
There’s four rows of garter at the hem before binding off, which echoes the six rows of garter at the shoulder band. I’m pleased with the dress now it’s done, but the next one will be in regular fingering weight yarn. I think it will be in that solid black baby yarn.
It’s possible that I’ll add another set of increases and made the skirt a half an inch longer. It really looks short on the Silkies. I’m also wondering about adding a tulle ruffle under that flare…
I seem to be finding a lot of ways to avoid setting in the sleeves of my black cardigan in Kidsilk Haze. That’s certainly not a job for the evening or even one particularly suited to the dark days we’ve been having. I need to turn on a bright light, buckle down and get it done.
But in the meantime, I’ve been knitting dresses for the girls. I saw a picture on social media of someone’s knitted dresses for fashion dolls. They were unspeakably cute with fluffy skirts, knit of novelty yarn. She said she was using a free pattern, so off I went to hunt down options. I chose #146 from Sticka till Barbie as my base pattern, then made a bunch of modifications. Mine needed to fit vintage Barbie with her curves and the existing pattern had pretty much a straight bodice. I added decreases and increases. I also modified the instructions to knit the dress in the round, and made the increases/decreases mirror each other because that makes me happy.
And here are the girls, posing in a diorama-in-progress that I’m making for the 16″ girls:
The diorama, of course, is another timesink, but a lot of fun. I like working in the foamboard – it’s easy to cut and light, and the gratification is almost instant.
The gift boxes are from an Etsy vendor who sells printables. It’s right here. They are a bit fiddly to assemble, which is why I’ve put together just two even though I bought this almost four years ago. So cute, though, and they fold up so precisely.
Here’s a better look at the dresses.
For these skirts, I used an eyelash yarn called Bernat Boa. (That’s a Ravelry link.) This yarn is discontinued, but I found my little stash at the thrift store. The bodices are knit of fingering yarns – the black is an acrylic baby yarn, the purple is leftover MadTosh. I made the skirt longer for the purple one (15 rows before decreasing instead of 12). The bodice looks longer on that one because the articulated Silkstone is thinner and taller than vintage B.
It’s interesting how the same yarn can feel different in different colours. That always mystifies me. The purple Boa doesn’t feel as silky as the black and red. I remember a lot of colours of this yarn, so will keep checking the thrift store for more. (I also have some variegated pink, but no fingering weight to match.)
I think the original pattern was knit of something more like a fringe yarn than this eyelash yarn, because the skirt isn’t as puffy in the pattern picture. I have some Lion Brand Fun Fur (also a thrift store find) so will try that out next.
That’s a link to the Lion Brand website – how lovely for a manufacturer keeps the link live after the yarn is discontinued! Here’s a Ravelry link so you can see what other knitters have made with it. I hopped into the advance search and sorted for doll clothes – sure enough, there are a few versions of this dress.
These are also like potato chips. It’s hard to knit just one. I need to find something to go with that pink, and try out the other yarn…
Sorry to have been quiet lately. I’ve had some projects that didn’t come out as well as I’d hoped which – like books that need a tweak – are in the midst of revisions. I’ll show you them when I’ve fixed them up the way I like. I also was finishing up a book and publishing it.
I have finished the knitting on the black KSH cardigan of doom. (Phew!) I need a sunny day to seam the sleeves and set them in. My Ravelry project page says that one’s been on the needles for eight years – I hope that isn’t true, that I created the project before I cast on, but even so. I have projects that have been on the needles longer than that. Gah. I have a belated case of finish-itis now. I’ll show you that when it’s finally done.
Today let’s talk about purses for 12″ fashion dolls. This is a silly little project that keeps going on and on. The thing with making for the girls is that I always see more variations. I could get stuck exploring the possibilities of one pattern for a very VERY long time, which is kind of what has happened here. I’ve made a lot (a LOT) of these little purses. They’re quick and easy, and they come out really well. It’s almost instant gratification, and I’ve needed a bit of that lately.
I found this image on PInterest when I was ogling gorgeous suits for Silkstone Barbies. (There is some fabulous stuff there and many very talented makers in the world.) It’s in Japanese and from a book for dolls called My Favorite Dolls. That’s pretty much all I know from that one page. You can see that there’s a purse and a pair of jackets illustrated. I’ve no idea where the jacket patterns are – maybe on the facing page? – but there’s the purse pattern right there. I grabbed a screen shot and printed it out. There’s also no scale, so I just guessed it was from a page roughly 8.5″ by 11″ and printed it to fit the page. My purse pattern came out about 4.25″ long and the scale is great for the girls.
And then the fun began.
The directions are in Japanese, but like so many Japanese patterns, it’s pretty easy to figure out what to do. Japanese patterns always include such lovely illustrations in the instructions.
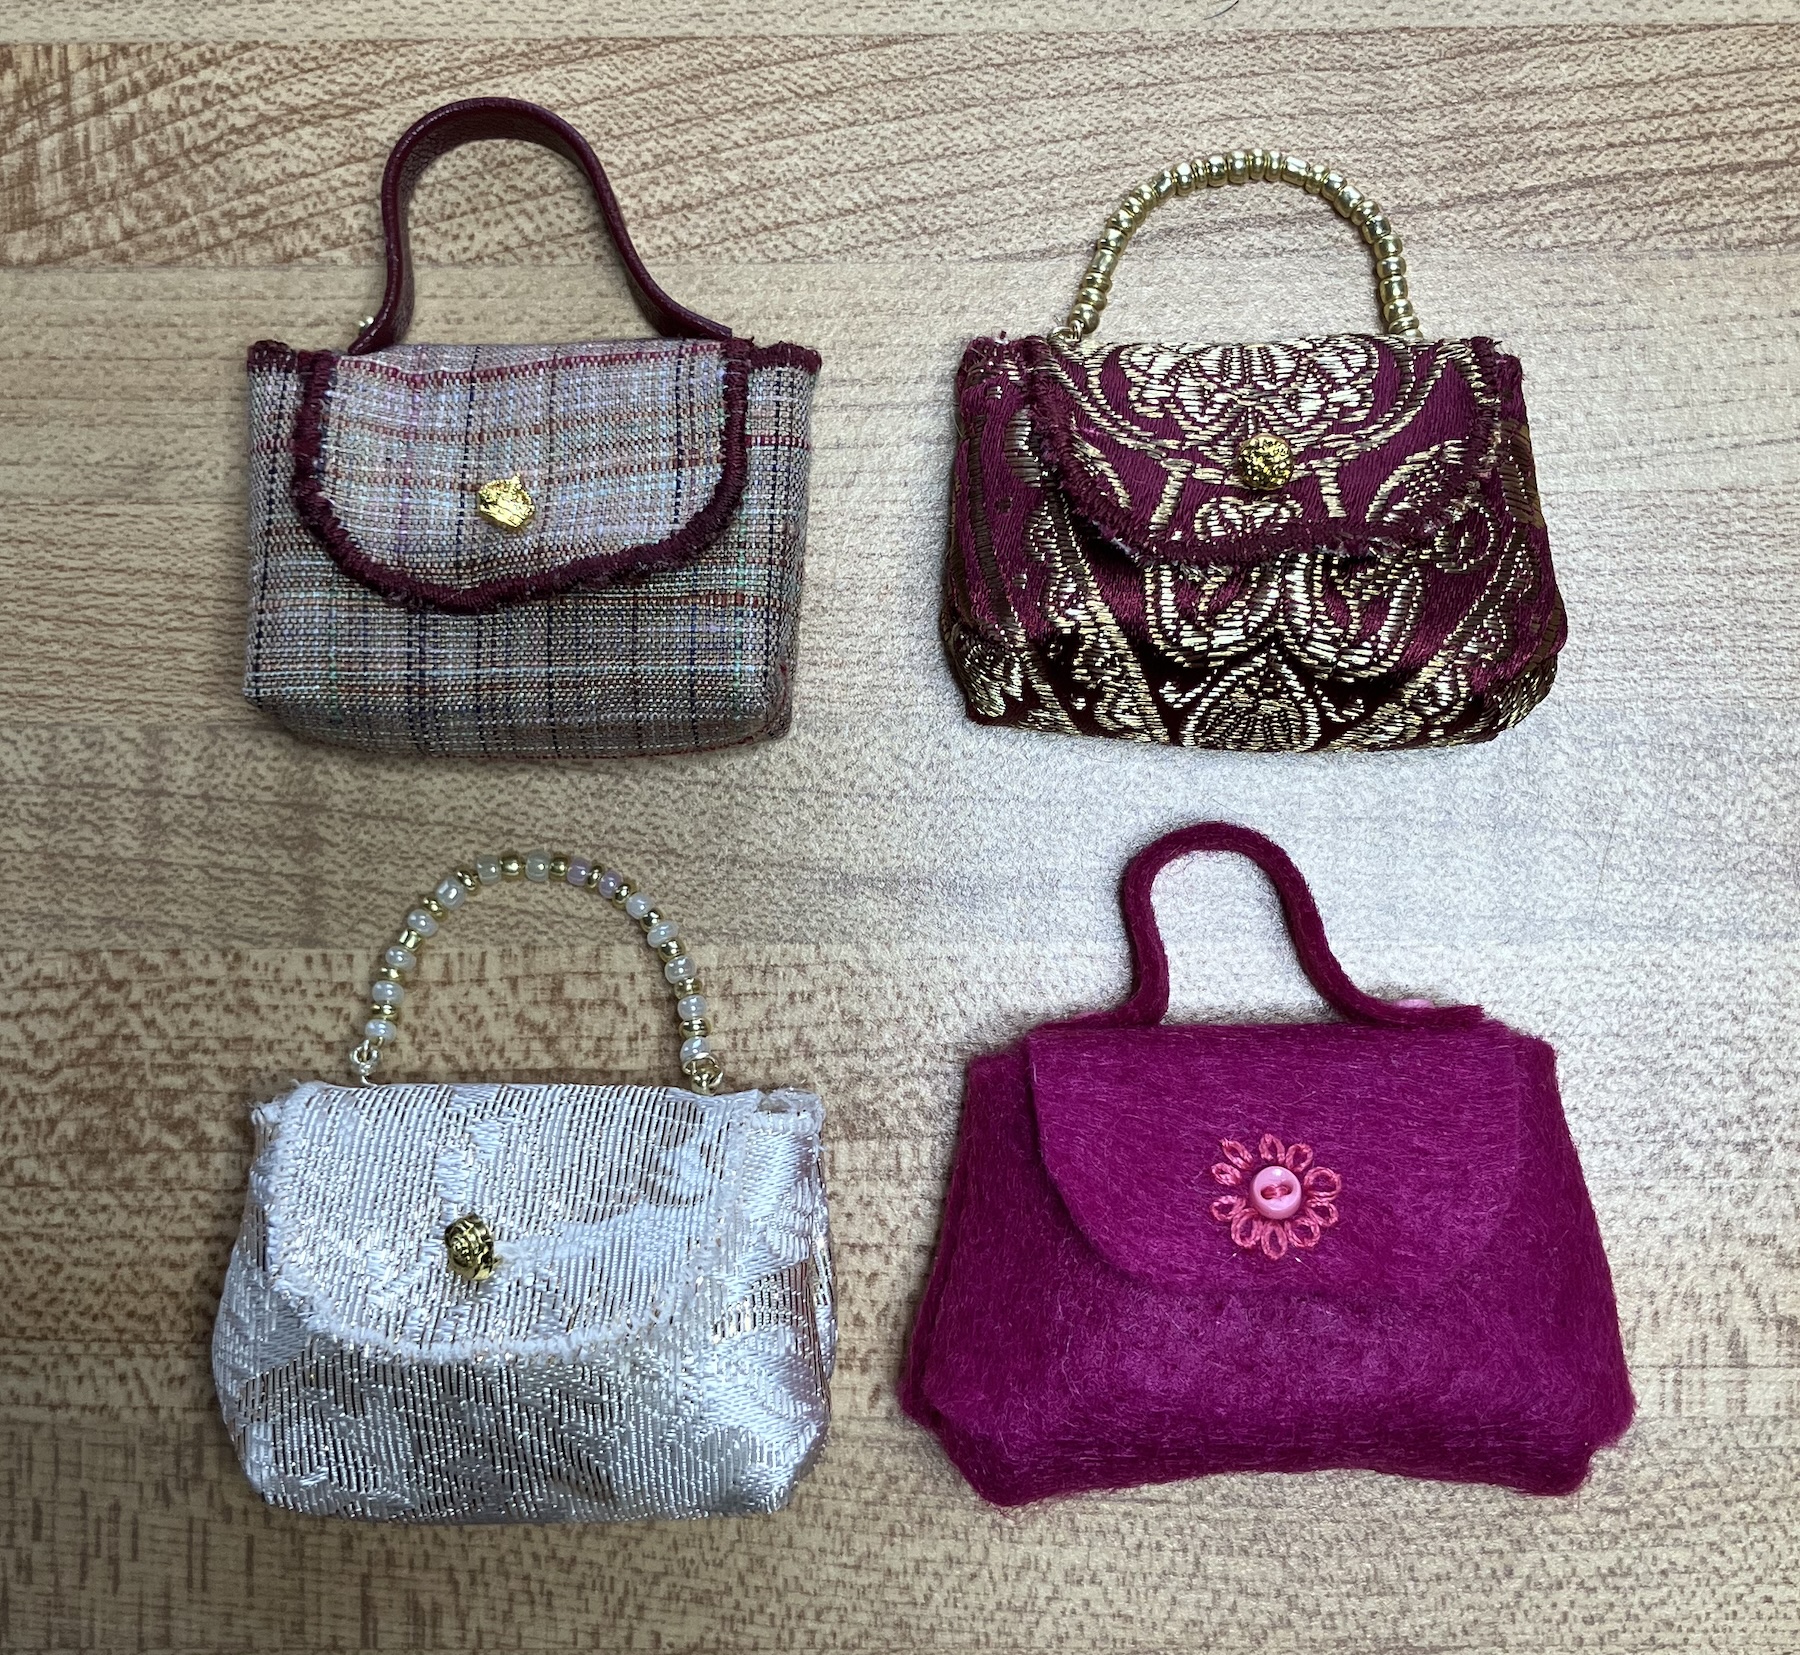
Here are the first ones.
I used my go-to fake leathers first – the shiny black I use for almost everything and a matte burgundy. They’re the two in the top row. The burgundy one has a brass-like button with a butterfly on it. 🙂
For each purse, I folded the handle and glued it – nothing fancy here. I used a gluestick, then put a weight on it until it dried. I did learn over the first couple that it’s easier to do as much as you can while the purse is flat. So, I sew on the half of the snap under the flap and the decorative button over it, then put on the handle. I use a seed bead as a decorative accent on the handle, one that matches the accent button on the front. Then I fold up the purse and press the snap into the body of the purse to make an indent where the other side of the snap needs to be, and sew it on in place.
When seaming the sides, I do a few overcast stitches at the top. When turning the bag right side out, there’s a bit of stress on those two seams at the top, so a little extra reinforcement can’t hurt. When I get to the base, I just tack in the top of the flap from the base of the purse. Turn the purse, ease out the sideseams and fiddle that flap until it looks right. Presto, purse.
The next pair are made from the very cheapest fake leather. I bought a set of 12 squares of craft vinyl, each 5×5″ or so, two each of six colours, at the dollar store. Each purse takes less than half a square. These next two, in red and the caramel, are from that vinyl. The vinyl is stiff enough that the purse holds its shape well.
I even cut an extra strap for the caramel one and added a buckle to that one. The strap is the width to pass easily through the buckle. I cut it an inch too long then trimmed it once the bag was assembled. I glued it in place while working on it, but the glue didn’t hold. Good thing the snap halves are sewn through the beginning and the end of that strap, and will hold it in place forever.
The red one has a fleur-de-lis accent button and I thought it needed even more zing. I used a black Sharpie to outline the edge of the flap and I think it looks great.
Next up, some sample vinyl pieces found at the thrift store. The individual pieces in thiis bundle of different fake leathers is about 5 x 8″. Again, that’s more than enough for a purse. There’s even a piece of cork in there but it seemed too thick for this purse. (Will the girls have cork purses before I do? I’m thinking they will.) I used a dark brown from that bundle and a metallic gold, which got extra beads on the flap for embellishment. (It looks silvery here but is more golden IRL.)
The raw edge does show along the front flap, the top of the bag and at those bottom corners. If the fake leather has a light backing – the dark brown one, for example, has a white backing – I colour the edges with a Sharpie marker in a matching colour.
Then I looked at the fabric ones with the bead handles. I chose two brocades, one firmer than the other, and a bit of silk. (The silk is at the top left.) I interfaced all of them with fusible interfacing before cutting out the pattern, then finished the edges of the top and flap of the bag with a zigzag stitch in a coordinating colour of thread. I also used Fraycheck on the other edges to keep them from unravelling. I don’t love this stuff, since it’s essentially glue. It often marks the fabric and leaves it crunchy – that bit is less of an issue for a purse than for a garment, but still. It didn’t mark the white, but it did mark the other two, so I sewed that little base triangle on all three purses to keep the stain and/or edges from showing.
The silk one has a fake leather handle and a little crown button, which is adorable. Sharpies are your friend here, too – where the fabric showed through the thread on the edge of the flap, I just coloured it in with a matching marker.
It looks as though the pattern recommends the beads be on thread, but I wanted a stiffer handle than that. I fed them onto beading wire, then poked the ends of the wire through the fabric and twisted it on the inside so it won’t pull back through.
Finally, I was wishing I had some more fun colours of fake leather and wondered about felt. Why not? It doesn’t unravel. This is synthetic felt and I used three doll buttons in a contrasting colour. The “embroidery” was done with sewing thread held double – I did it after sewing on the button and snap. I think this one is really cute and I do have a lot of fun felt colours. There may be more of these.
You can see these purses are like potato chips. It’s impossible to stop with just one, or three…or ten.
Of course, I also drafted the pattern a bit bigger so I can make similar purses for the 16″ girls. Purses abound!
Next time, I’ll show you my new girl and get her to model one of the purses so you can see it in scale.